Rear BMW 7 SERIES 2016 G11 Owner's Manual
[x] Cancel search | Manufacturer: BMW, Model Year: 2016, Model line: 7 SERIES, Model: BMW 7 SERIES 2016 G11Pages: 314, PDF Size: 7.9 MB
Page 229 of 314
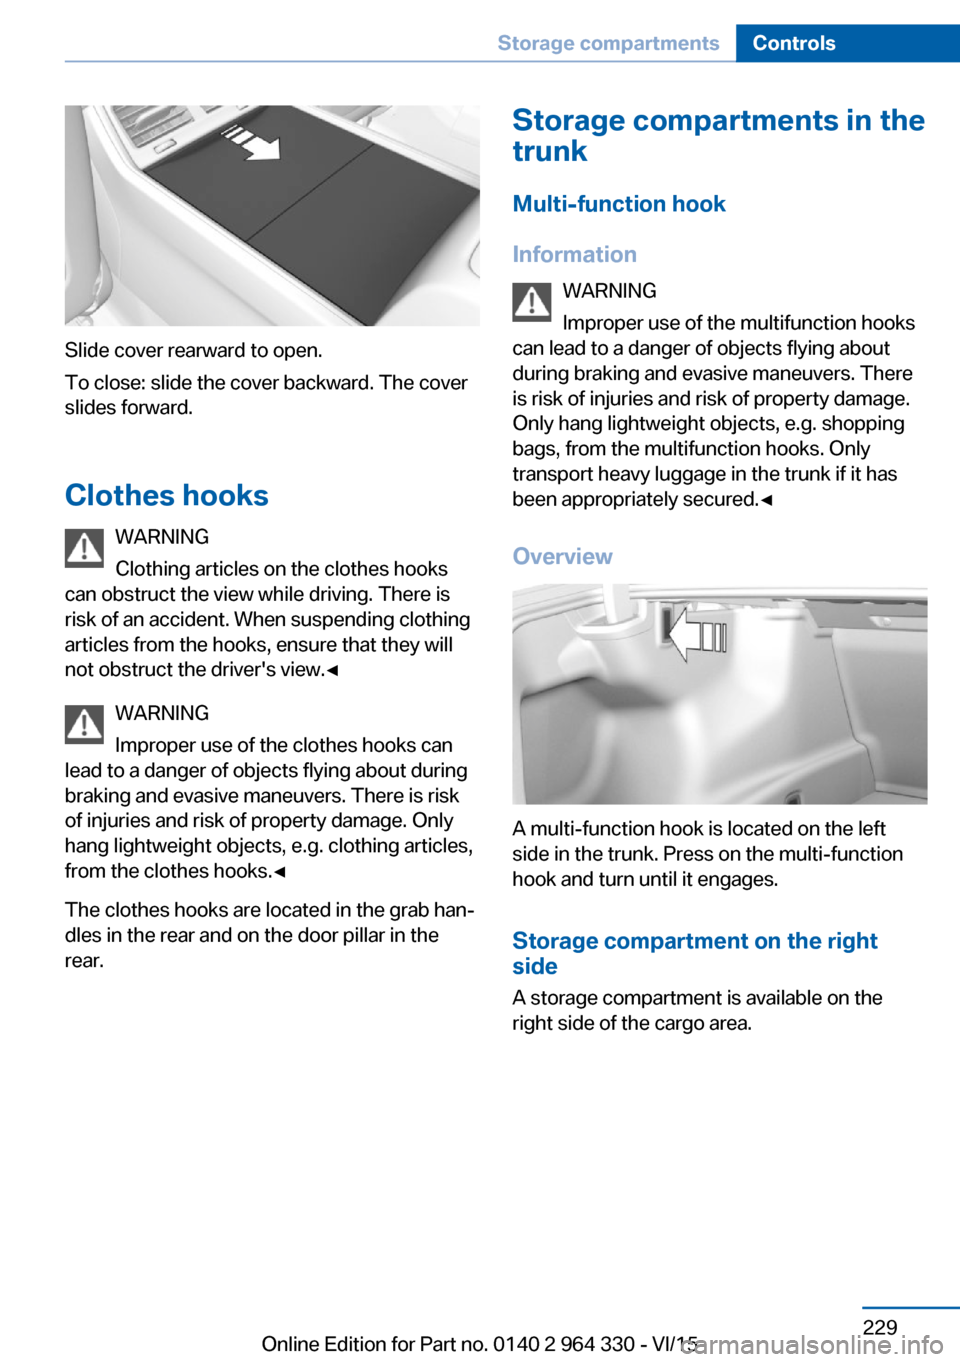
Slide cover rearward to open.
To close: slide the cover backward. The cover
slides forward.
Clothes hooks WARNING
Clothing articles on the clothes hooks
can obstruct the view while driving. There is
risk of an accident. When suspending clothing
articles from the hooks, ensure that they will
not obstruct the driver's view.◀
WARNING
Improper use of the clothes hooks can
lead to a danger of objects flying about during
braking and evasive maneuvers. There is risk
of injuries and risk of property damage. Only
hang lightweight objects, e.g. clothing articles,
from the clothes hooks.◀
The clothes hooks are located in the grab han‐
dles in the rear and on the door pillar in the
rear.
Storage compartments in the
trunk
Multi-function hook
Information WARNING
Improper use of the multifunction hooks
can lead to a danger of objects flying about
during braking and evasive maneuvers. There
is risk of injuries and risk of property damage.
Only hang lightweight objects, e.g. shopping
bags, from the multifunction hooks. Only
transport heavy luggage in the trunk if it has
been appropriately secured.◀
Overview
A multi-function hook is located on the left
side in the trunk. Press on the multi-function
hook and turn until it engages.
Storage compartment on the right
side
A storage compartment is available on the
right side of the cargo area.
Seite 229Storage compartmentsControls229
Online Edition for Part no. 0140 2 964 330 - VI/15
Page 238 of 314
Load
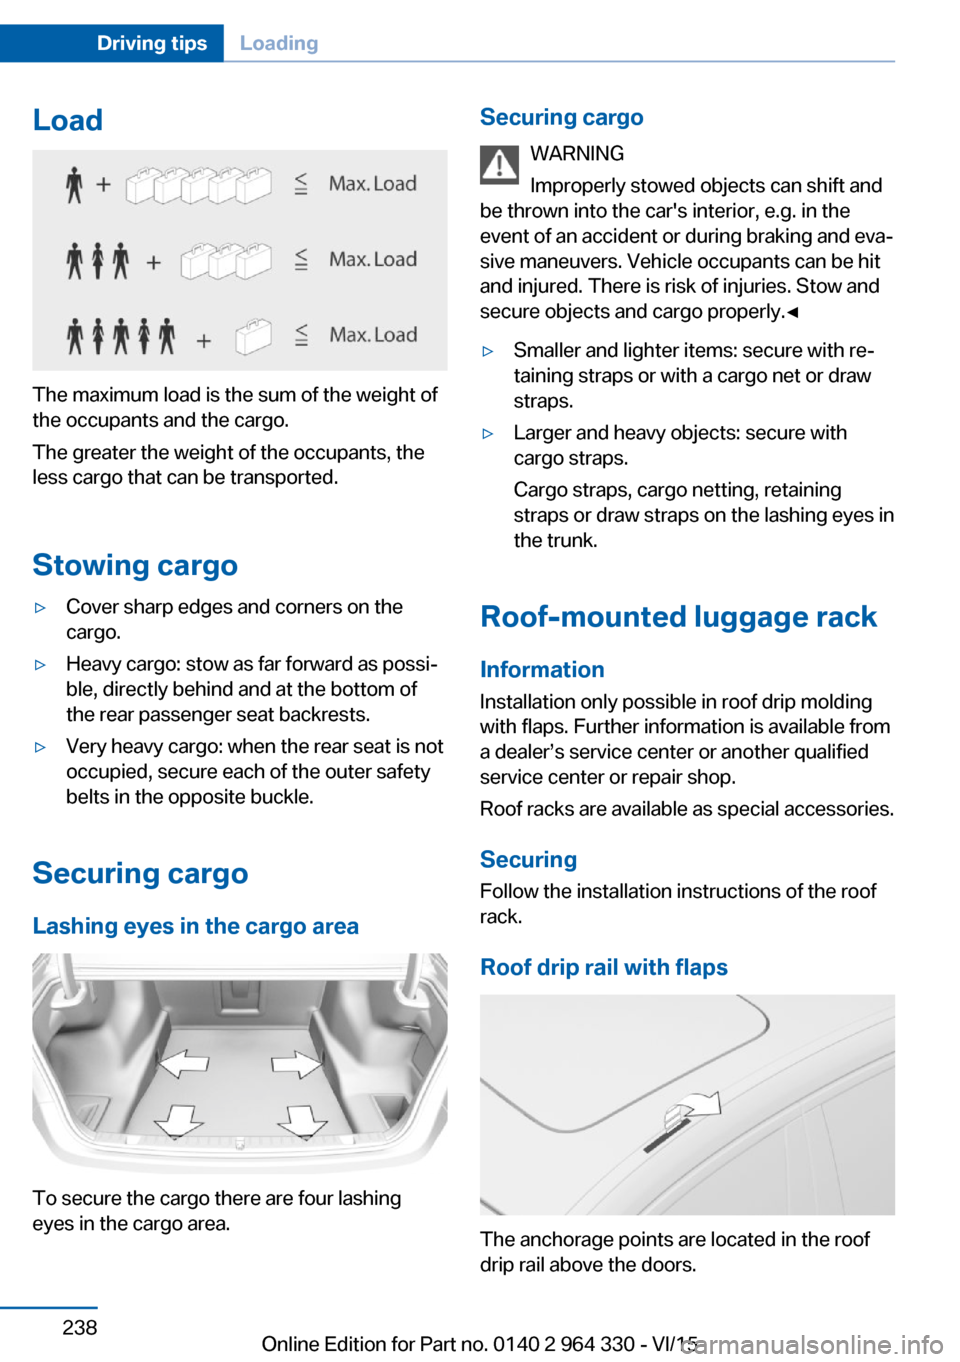
The maximum load is the sum of the weight of
the occupants and the cargo.
The greater the weight of the occupants, the
less cargo that can be transported.
Stowing cargo
▷Cover sharp edges and corners on the
cargo.▷Heavy cargo: stow as far forward as possi‐
ble, directly behind and at the bottom of
the rear passenger seat backrests.▷Very heavy cargo: when the rear seat is not
occupied, secure each of the outer safety
belts in the opposite buckle.
Securing cargo
Lashing eyes in the cargo area
To secure the cargo there are four lashing
eyes in the cargo area.
Securing cargo
WARNING
Improperly stowed objects can shift and
be thrown into the car's interior, e.g. in the
event of an accident or during braking and eva‐
sive maneuvers. Vehicle occupants can be hit
and injured. There is risk of injuries. Stow and
secure objects and cargo properly.◀▷Smaller and lighter items: secure with re‐
taining straps or with a cargo net or draw
straps.▷Larger and heavy objects: secure with
cargo straps.
Cargo straps, cargo netting, retaining
straps or draw straps on the lashing eyes in
the trunk.
Roof-mounted luggage rack
Information
Installation only possible in roof drip molding
with flaps. Further information is available from
a dealer’s service center or another qualified
service center or repair shop.
Roof racks are available as special accessories.
Securing
Follow the installation instructions of the roof
rack.
Roof drip rail with flaps
The anchorage points are located in the roof
drip rail above the doors.
Seite 238Driving tipsLoading238
Online Edition for Part no. 0140 2 964 330 - VI/15
Page 240 of 314
Saving fuelVehicle features and optionsThis chapter describes all standard, country-
specific and optional features offered with the
series. It also describes features that are not
necessarily available in your car, e. g., due to
the selected options or country versions. This
also applies to safety-related functions and
systems. The respectively applicable country
provisions must be observed when using the
respective features and systems.
General information Your vehicle contains advanced technology for
the reduction of fuel consumption and emis‐
sions.
Fuel consumption depends on a number of dif‐
ferent factors.
Carrying out certain measures, such as a mod‐
erate driving style and regular maintenance,
can influence fuel consumption and the envi‐
ronmental impact.
Remove unnecessary cargo
Additional weight increases fuel consumption.
Remove attached parts
following use
Remove auxiliary mirrors, roof or rear luggage
racks which are no longer required following use.
Attached parts on the vehicle impair the aero‐
dynamics and increase the fuel consumption.Close the windows and glass
sunroof
Driving with the glass sunroof and windows
open results in increased air resistance and
raises fuel consumption.
Tires General information
Tires can affect fuel consumption in various
ways, e.g., tire size may influence fuel con‐
sumption.
Check the tire inflation pressure
regularly
Check and, if needed, correct the tire inflation
pressure at least twice a month and before
starting on a long trip.
Low tire inflation pressure increases rolling re‐
sistance and thus raises fuel consumption and
tire wear.
Drive away without delay
Do not wait for the engine to warm-up while
the vehicle remains stationary. Start driving
right away, but at moderate engine speeds.
This is the quickest way of warming the cold
engine up to operating temperature.
Look well ahead when
driving
Avoid unnecessary acceleration and braking.
By maintaining a suitable distance to the vehi‐
cle driving ahead of you.
Driving smoothly and proactively reduces fuel
consumption.Seite 240Driving tipsSaving fuel240
Online Edition for Part no. 0140 2 964 330 - VI/15
Page 241 of 314
Avoid high engine speeds
As a rule: driving at low engine speeds lowers
fuel consumption and reduces wear.
If necessary, observe the gear shift indicator,
refer to page 120, of the vehicle.
Use coasting conditions When approaching a red light, take your foot
off the accelerator and let the vehicle coast to
a halt.
For going downhill take your foot off the accel‐
erator and let the vehicle roll.
The flow of fuel is interrupted while coasting.
Switch off the engine during longer stops
Switch off the engine during longer stops, e.g.,
at traffic lights, railroad crossings or in traffic
congestion.
Auto Start/Stop function The Auto Start/Stop function of your vehicle
automatically switches off the engine during a
stop.
If the engine is switched off and then restarted
rather than leaving the engine running con‐
stantly, fuel consumption and emissions are
reduced. Savings can begin within a few sec‐
onds of switching off the engine.
In addition, fuel consumption is also deter‐
mined by other factors, such as driving style,
road conditions, maintenance or environmental
factors.
Switch off any functions that
are not currently needed
Functions such as seat heating and the rear
window defroster require a lot of energy andreduce the range, especially in city and stop-
and-go traffic.
Switch off these functions if they are not
needed.
The ECO PRO driving program supports the
energy conserving use of comfort features.
These functions are automatically deactivated
partially or completely.
Have maintenance carried
out
Have vehicles maintained regularly to achieve
optimal vehicle efficiency and service life.
BMW recommends that maintenance work be
performed by a BMW dealer’s service center.
For information on the BMW Maintenance
System, refer to page 279.
ECO PRO
The concept
ECO PRO supports a driving style that saves
on fuel consumption. For this purpose, the en‐
gine control and comfort features, e. g. the cli‐
mate control output, are adjusted.
Under certain conditions the engine is auto‐
matically decoupled from the transmission in
the D selector lever position. The vehicle con‐
tinues traveling with the engine idling to re‐
duce fuel consumption. Selector lever position
D remains engaged.
In addition, context-sensitive instructions are
displayed to assist with an optimized fuel con‐
sumption driving style.
The achieved extended range is displayed in
the instrument cluster as bonus range.
Overview
The system includes the following
EfficientDynamics functions and displays:▷ECO PRO bonus range, refer to page 243.Seite 241Saving fuelDriving tips241
Online Edition for Part no. 0140 2 964 330 - VI/15
Page 250 of 314
RefuelingVehicle features and options
This chapter describes all standard, country-
specific and optional features offered with the
series. It also describes features that are not
necessarily available in your car, e. g., due to
the selected options or country versions. This
also applies to safety-related functions and
systems. The respectively applicable country
provisions must be observed when using the
respective features and systems.
Information CAUTION
With a range of less than 30 miles/50 km
it is possible that the engine will no longer have
sufficient fuel. Engine functions are no longer
ensured. There is risk of property damage. Re‐
fuel promptly.◀
Observe the fuel recommendation, refer to
page 252, prior to refueling.
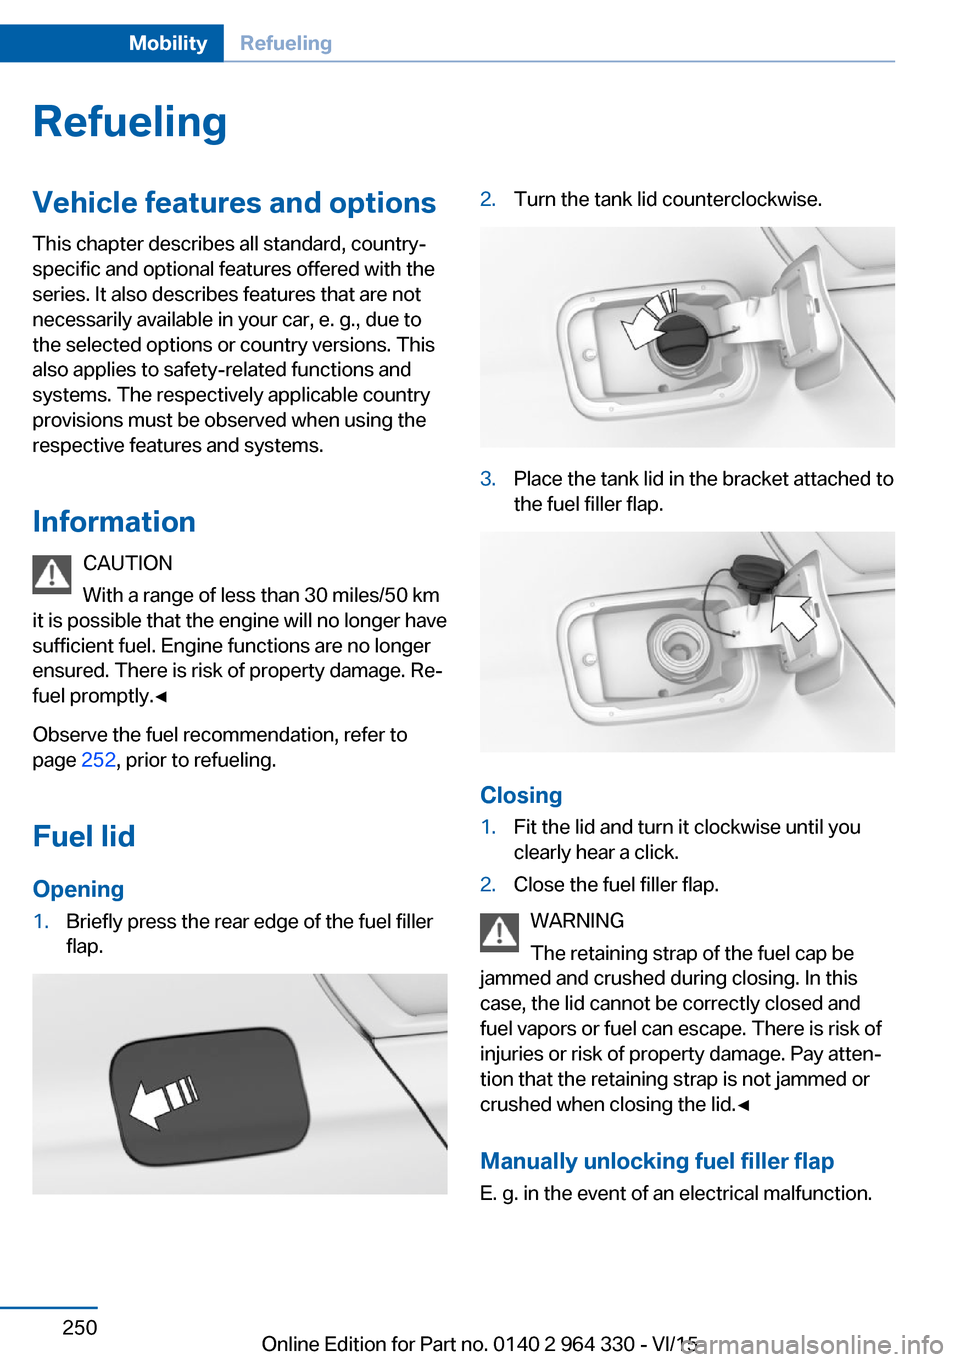
Fuel lid Opening1.Briefly press the rear edge of the fuel filler
flap.2.Turn the tank lid counterclockwise.3.Place the tank lid in the bracket attached to
the fuel filler flap.
Closing
1.Fit the lid and turn it clockwise until you
clearly hear a click.2.Close the fuel filler flap.
WARNING
The retaining strap of the fuel cap be
jammed and crushed during closing. In this
case, the lid cannot be correctly closed and
fuel vapors or fuel can escape. There is risk of
injuries or risk of property damage. Pay atten‐
tion that the retaining strap is not jammed or
crushed when closing the lid.◀
Manually unlocking fuel filler flapE. g. in the event of an electrical malfunction.
Seite 250MobilityRefueling250
Online Edition for Part no. 0140 2 964 330 - VI/15
Page 255 of 314
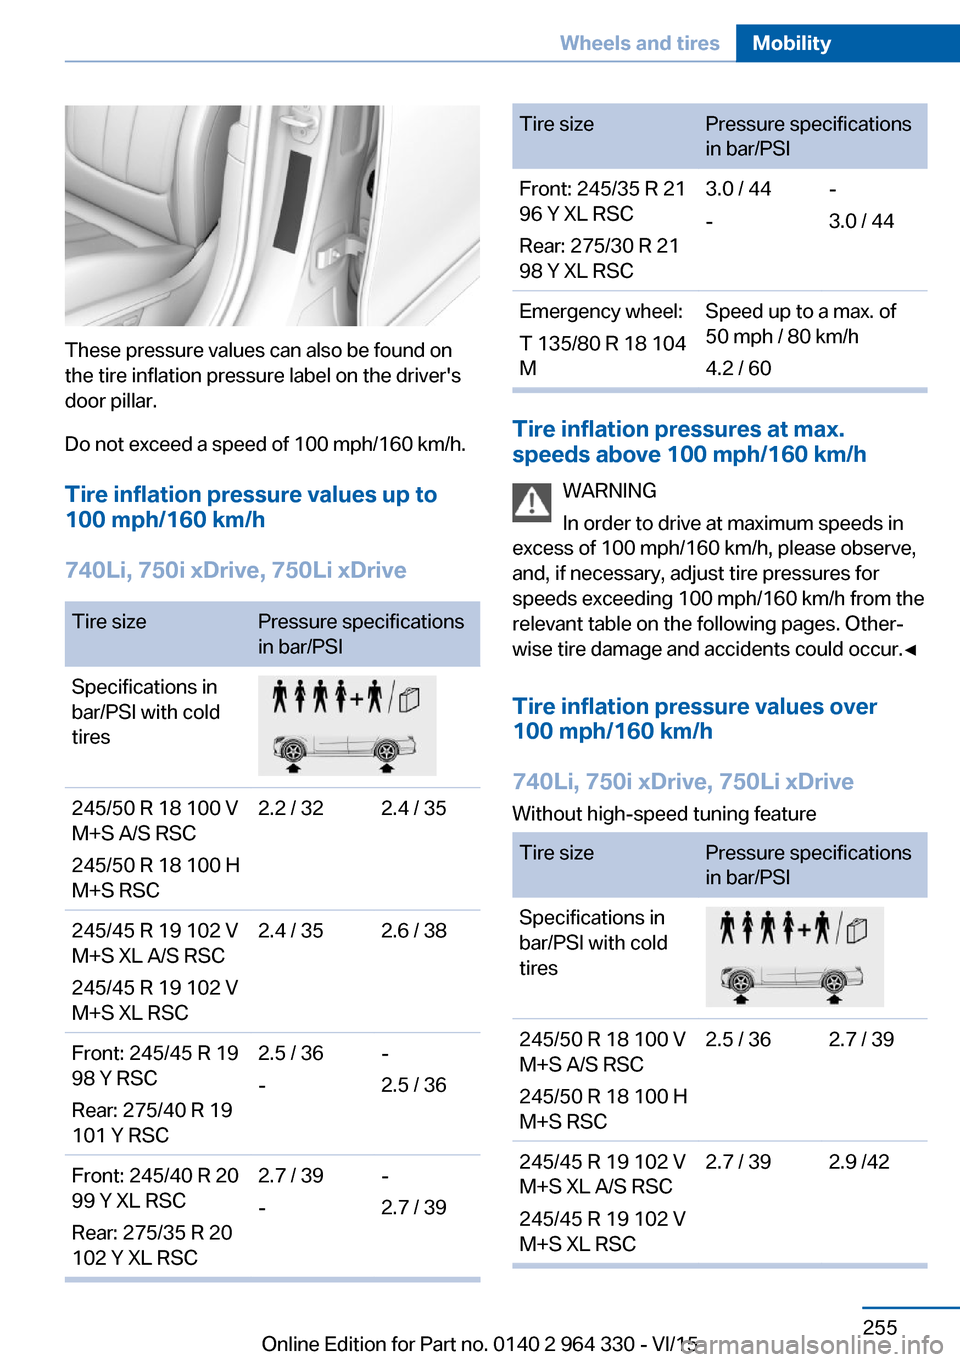
These pressure values can also be found on
the tire inflation pressure label on the driver's
door pillar.
Do not exceed a speed of 100 mph/160 km/h.
Tire inflation pressure values up to
100 mph/160 km/h
740Li, 750i xDrive, 750Li xDrive
Tire sizePressure specifications
in bar/PSISpecifications in
bar/PSI with cold
tires245/50 R 18 100 V
M+S A/S RSC
245/50 R 18 100 H
M+S RSC2.2 / 322.4 / 35245/45 R 19 102 V
M+S XL A/S RSC
245/45 R 19 102 V
M+S XL RSC2.4 / 352.6 / 38Front: 245/45 R 19
98 Y RSC
Rear: 275/40 R 19
101 Y RSC2.5 / 36
--
2.5 / 36Front: 245/40 R 20
99 Y XL RSC
Rear: 275/35 R 20
102 Y XL RSC2.7 / 39
--
2.7 / 39Tire sizePressure specifications
in bar/PSIFront: 245/35 R 21
96 Y XL RSC
Rear: 275/30 R 21
98 Y XL RSC3.0 / 44
--
3.0 / 44Emergency wheel:
T 135/80 R 18 104
MSpeed up to a max. of
50 mph / 80 km/h
4.2 / 60
Tire inflation pressures at max.
speeds above 100 mph/160 km/h
WARNING
In order to drive at maximum speeds in
excess of 100 mph/160 km/h, please observe,
and, if necessary, adjust tire pressures for
speeds exceeding 100 mph/160 km/h from the
relevant table on the following pages. Other‐
wise tire damage and accidents could occur.◀
Tire inflation pressure values over
100 mph/160 km/h
740Li, 750i xDrive, 750Li xDrive
Without high-speed tuning feature
Tire sizePressure specifications
in bar/PSISpecifications in
bar/PSI with cold
tires245/50 R 18 100 V
M+S A/S RSC
245/50 R 18 100 H
M+S RSC2.5 / 362.7 / 39245/45 R 19 102 V
M+S XL A/S RSC
245/45 R 19 102 V
M+S XL RSC2.7 / 392.9 /42Seite 255Wheels and tiresMobility255
Online Edition for Part no. 0140 2 964 330 - VI/15
Page 256 of 314
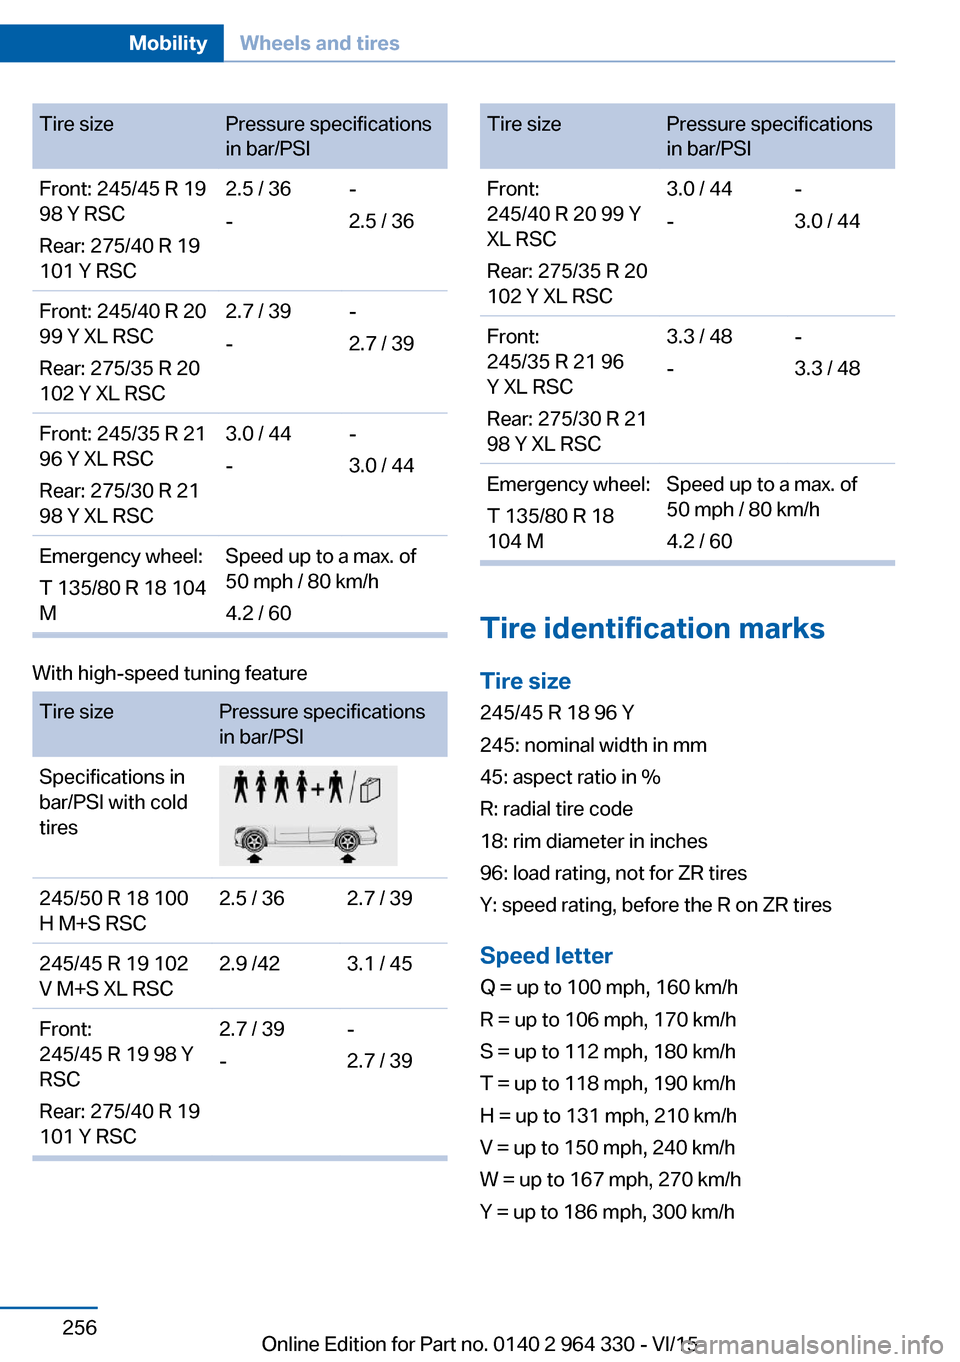
Tire sizePressure specifications
in bar/PSIFront: 245/45 R 19
98 Y RSC
Rear: 275/40 R 19
101 Y RSC2.5 / 36
--
2.5 / 36Front: 245/40 R 20
99 Y XL RSC
Rear: 275/35 R 20
102 Y XL RSC2.7 / 39
--
2.7 / 39Front: 245/35 R 21
96 Y XL RSC
Rear: 275/30 R 21
98 Y XL RSC3.0 / 44
--
3.0 / 44Emergency wheel:
T 135/80 R 18 104
MSpeed up to a max. of
50 mph / 80 km/h
4.2 / 60
With high-speed tuning feature
Tire sizePressure specifications
in bar/PSISpecifications in
bar/PSI with cold
tires245/50 R 18 100
H M+S RSC2.5 / 362.7 / 39245/45 R 19 102
V M+S XL RSC2.9 /423.1 / 45Front:
245/45 R 19 98 Y
RSC
Rear: 275/40 R 19
101 Y RSC2.7 / 39
--
2.7 / 39Tire sizePressure specifications
in bar/PSIFront:
245/40 R 20 99 Y
XL RSC
Rear: 275/35 R 20
102 Y XL RSC3.0 / 44
--
3.0 / 44Front:
245/35 R 21 96
Y XL RSC
Rear: 275/30 R 21
98 Y XL RSC3.3 / 48
--
3.3 / 48Emergency wheel:
T 135/80 R 18
104 MSpeed up to a max. of
50 mph / 80 km/h
4.2 / 60
Tire identification marks
Tire size 245/45 R 18 96 Y
245: nominal width in mm
45: aspect ratio in %
R: radial tire code
18: rim diameter in inches
96: load rating, not for ZR tires
Y: speed rating, before the R on ZR tires
Speed letter
Q = up to 100 mph, 160 km/h
R = up to 106 mph, 170 km/h
S = up to 112 mph, 180 km/h
T = up to 118 mph, 190 km/h
H = up to 131 mph, 210 km/h
V = up to 150 mph, 240 km/h
W = up to 167 mph, 270 km/h
Y = up to 186 mph, 300 km/h
Seite 256MobilityWheels and tires256
Online Edition for Part no. 0140 2 964 330 - VI/15
Page 260 of 314
Rotating wheels between axlesDifferent wear patterns can occur on the frontand rear axles depending on individual driving
conditions. The tires can be rotated between
the axles to achieve even wear. A dealer’s
service center or another qualified service cen‐
ter or repair shop will be glad to answer addi‐
tional questions at any time. After rotating,
check the tire pressure and correct if needed.
Rotating the tires is not permissible on vehi‐
cles with different tire sizes or rim sizes on the
front and rear axles.
Storage
Store wheels and tires in a cool, dry place with
as little exposure to light as possible.
Always protect tires against all contact with oil,
grease and fuels.
Do not exceed the maximum tire inflation pres‐
sure indicated on the side wall of the tire.
Run-flat tires
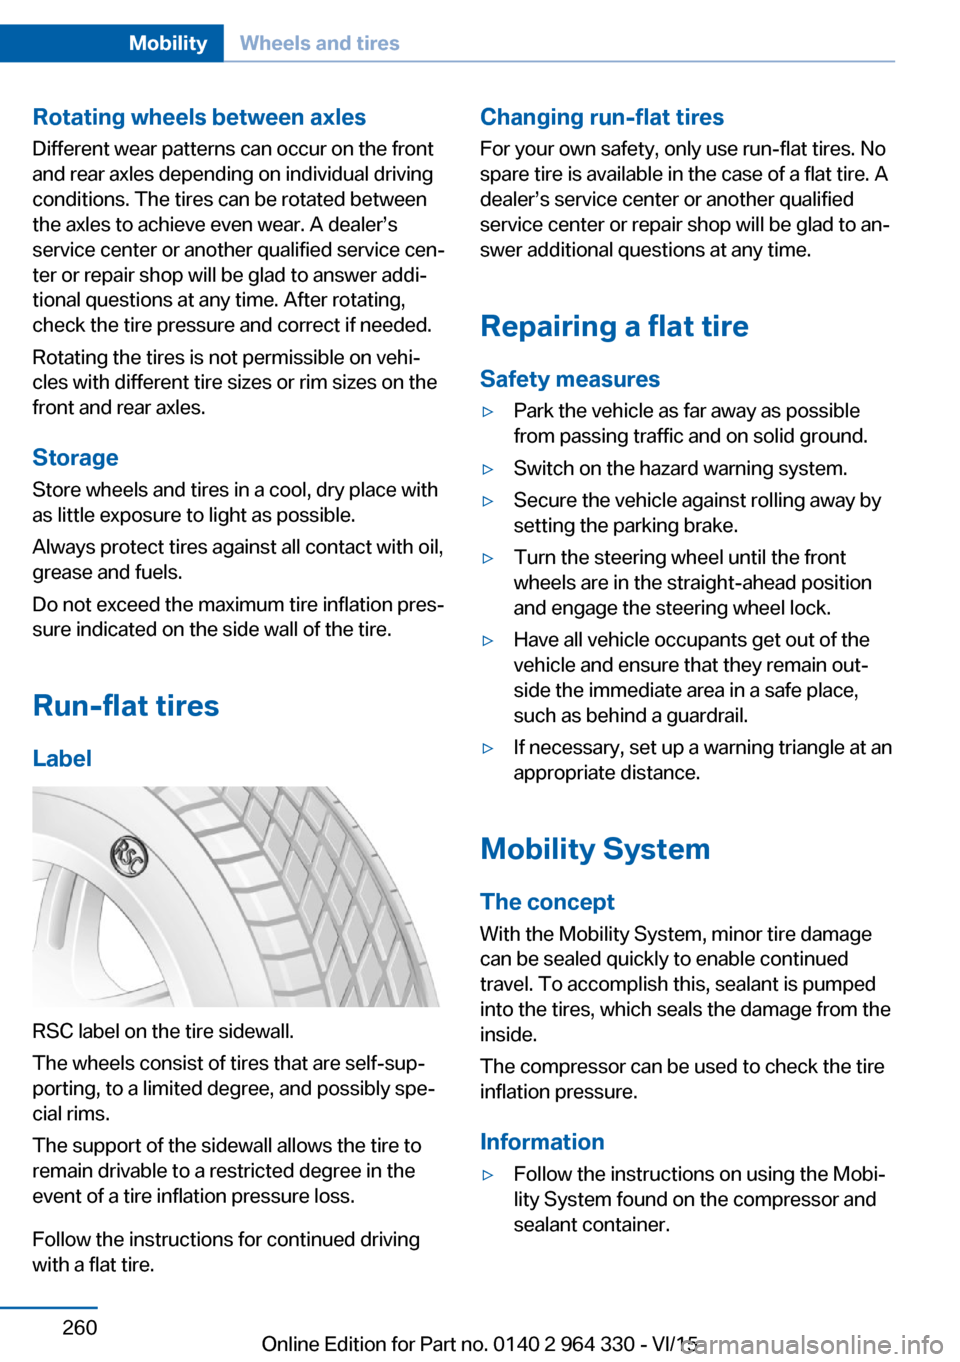
Label
RSC label on the tire sidewall.
The wheels consist of tires that are self-sup‐
porting, to a limited degree, and possibly spe‐
cial rims.
The support of the sidewall allows the tire to
remain drivable to a restricted degree in the
event of a tire inflation pressure loss.
Follow the instructions for continued driving
with a flat tire.
Changing run-flat tires
For your own safety, only use run-flat tires. No
spare tire is available in the case of a flat tire. A
dealer’s service center or another qualified
service center or repair shop will be glad to an‐
swer additional questions at any time.
Repairing a flat tire Safety measures▷Park the vehicle as far away as possible
from passing traffic and on solid ground.▷Switch on the hazard warning system.▷Secure the vehicle against rolling away by
setting the parking brake.▷Turn the steering wheel until the front
wheels are in the straight-ahead position
and engage the steering wheel lock.▷Have all vehicle occupants get out of the
vehicle and ensure that they remain out‐
side the immediate area in a safe place,
such as behind a guardrail.▷If necessary, set up a warning triangle at an
appropriate distance.
Mobility System
The concept
With the Mobility System, minor tire damage
can be sealed quickly to enable continued
travel. To accomplish this, sealant is pumped
into the tires, which seals the damage from the
inside.
The compressor can be used to check the tire
inflation pressure.
Information
▷Follow the instructions on using the Mobi‐
lity System found on the compressor and
sealant container.Seite 260MobilityWheels and tires260
Online Edition for Part no. 0140 2 964 330 - VI/15
Page 264 of 314
Snow chains
Fine-link snow chains The manufacturer of your vehicle recommends
use of fine-link snow chains. Certain types of
fine-link snow chains have been tested by the
manufacturer of the vehicle and recommended
as road-safe and suitable.
Information regarding suitable snow chains is
available from a dealer’s service center or an‐
other qualified service center or repair shop.
Use
Use only in pairs on the rear wheels, equipped
with the tires of the following size:▷245/50 R 18.▷245/45 R 19.
Follow the snow chain manufacturer's instruc‐
tions.
Make sure that the snow chains are always
sufficiently tight. Retighten as needed accord‐
ing to the chain manufacturer's instructions.
Do not initialize the Flat Tire Monitor after
mounting snow chains, as doing so may result
in incorrect readings.
Do not initialize the Tire Pressure Monitor after
mounting snow chains, as doing so may result
in incorrect readings.
When driving with snow chains, briefly activate
Dynamic Traction Control if needed.
Maximum speed with snow chains Do not exceed a speed of 30 mph/50 km/hwhen using snow chains.
Rear wheel steering during operation with snow chains
General information
In order to guarantee free running of the
wheels when operating with snow chains, the
rear wheel steering of the integral active steer‐
ing must be switched off when snow chains
are mounted. For this, it is possible to confirm
via iDrive that snow chains are mounted.
Information WARNING
When rear wheel steering is switched on
and snow chains are mounted, there can be
contact between snow chains and the chassis.
There is risk of accidents or risk of property
damage. With mounted snow chains, switch
off the rear wheel steering.◀
Switching off rear wheel steering With the setting that snow chains are
mounted, the rear wheel steering is switched
off.
About iDrive:1."My Vehicle"2."Vehicle settings"3."Tire chains"4."Tire chains installed"
Starting with the permissible maximum speed
with snow chains of 30 mph/50 km/h the rear
wheel steering will be switched on automati‐
cally.
Tire Pressure Monitor TPM
The concept
The system monitors tire inflation pressure in
the four mounted tires. The system warns you
if there is a loss of pressure in one or more
tires. For this purpose, sensors in the tire
valves measure the tire inflation pressure and
tire temperature.
Information
With use of the system observe further infor‐
mation found under Tire inflation pressure, re‐
fer to page 254.
Seite 264MobilityWheels and tires264
Online Edition for Part no. 0140 2 964 330 - VI/15
Page 283 of 314
▷Have all vehicle occupants get out of the
vehicle and ensure that they remain out‐
side the immediate area in a safe place,
such as behind a guardrail.▷If necessary, set up a warning triangle or
portable hazard warning lamp at an appro‐
priate distance.▷Perform wheel change only on a flat, solid
and slip-resistant surface. On soft or slip‐
pery ground, e.g., snow, ice, tiles, etc., the
vehicle or vehicle jack can slip away to the
side.▷Do not place wood blocks or similar items
under the vehicle jack; otherwise, it cannot
reach its carrying capacity because of the
restricted height.▷If the vehicle is raised, do not lie under the
vehicle and do not start the engine; other‐
wise, a fatal hazard exists.
Information
WARNING
The vehicle jack is optimized for lifting
the vehicle and for the jacking points on the
vehicle only. There is risk of injuries. Do not lift
any other vehicle or cargo using the vehicle
jack.◀
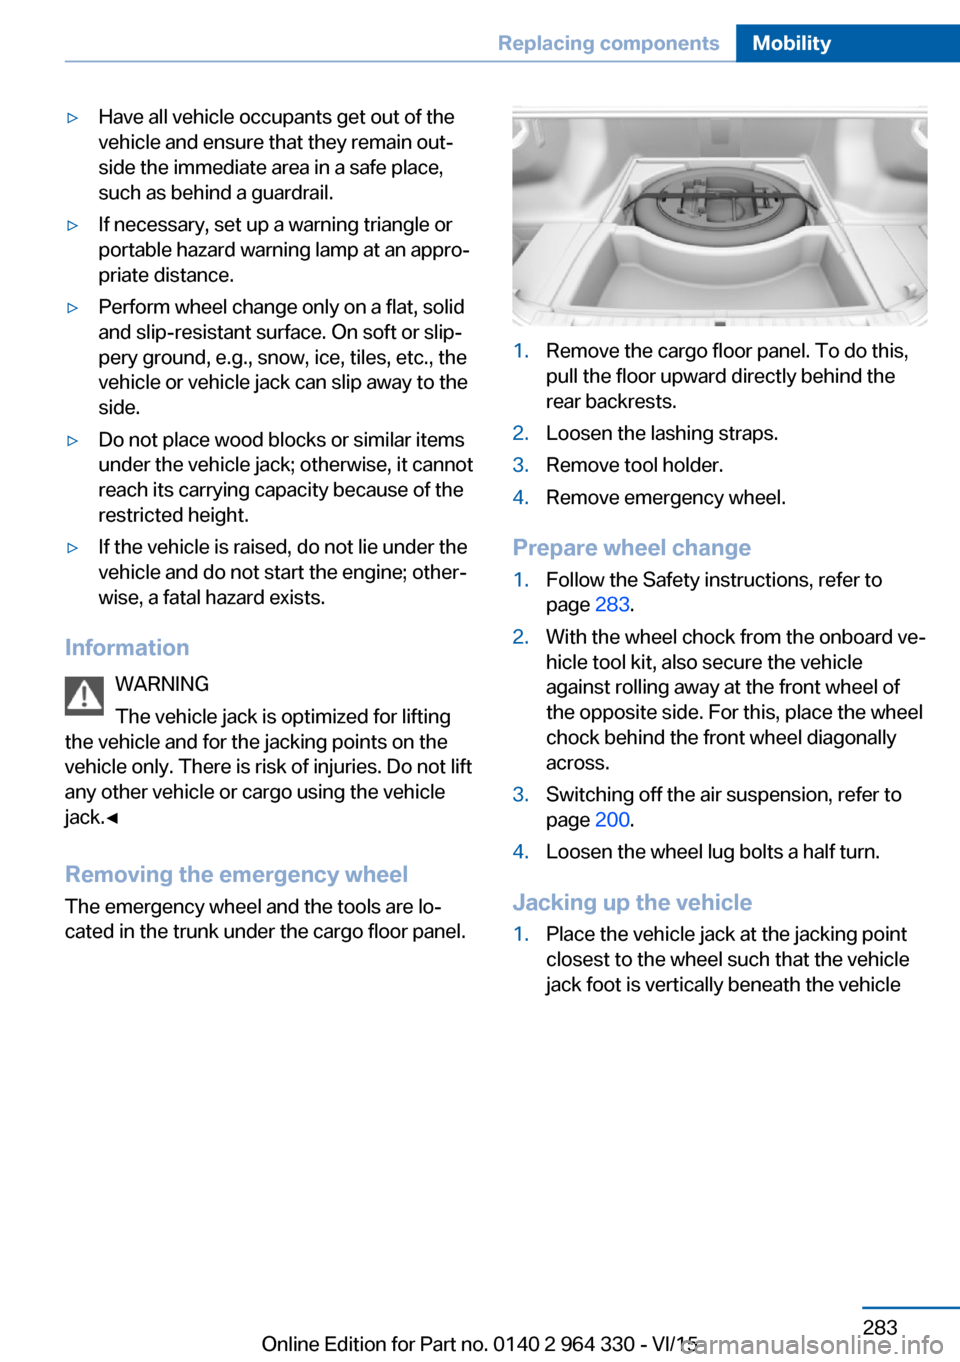
Removing the emergency wheel The emergency wheel and the tools are lo‐
cated in the trunk under the cargo floor panel.
1.Remove the cargo floor panel. To do this,
pull the floor upward directly behind the
rear backrests.2.Loosen the lashing straps.3.Remove tool holder.4.Remove emergency wheel.
Prepare wheel change
1.Follow the Safety instructions, refer to
page 283.2.With the wheel chock from the onboard ve‐
hicle tool kit, also secure the vehicle
against rolling away at the front wheel of
the opposite side. For this, place the wheel
chock behind the front wheel diagonally
across.3.Switching off the air suspension, refer to
page 200.4.Loosen the wheel lug bolts a half turn.
Jacking up the vehicle
1.Place the vehicle jack at the jacking point
closest to the wheel such that the vehicle
jack foot is vertically beneath the vehicleSeite 283Replacing componentsMobility283
Online Edition for Part no. 0140 2 964 330 - VI/15