Rear BMW 7 SERIES 2016 G11 Owner's Manual
[x] Cancel search | Manufacturer: BMW, Model Year: 2016, Model line: 7 SERIES, Model: BMW 7 SERIES 2016 G11Pages: 314, PDF Size: 7.9 MB
Page 14 of 314
CockpitVehicle features and options
This chapter describes all standard, country-
specific and optional features offered with the
series. It also describes features that are not
necessarily available in your car, e. g., due tothe selected options or country versions. This
also applies to safety-related functions and
systems. The respectively applicable country
provisions must be observed when using the
respective features and systems.
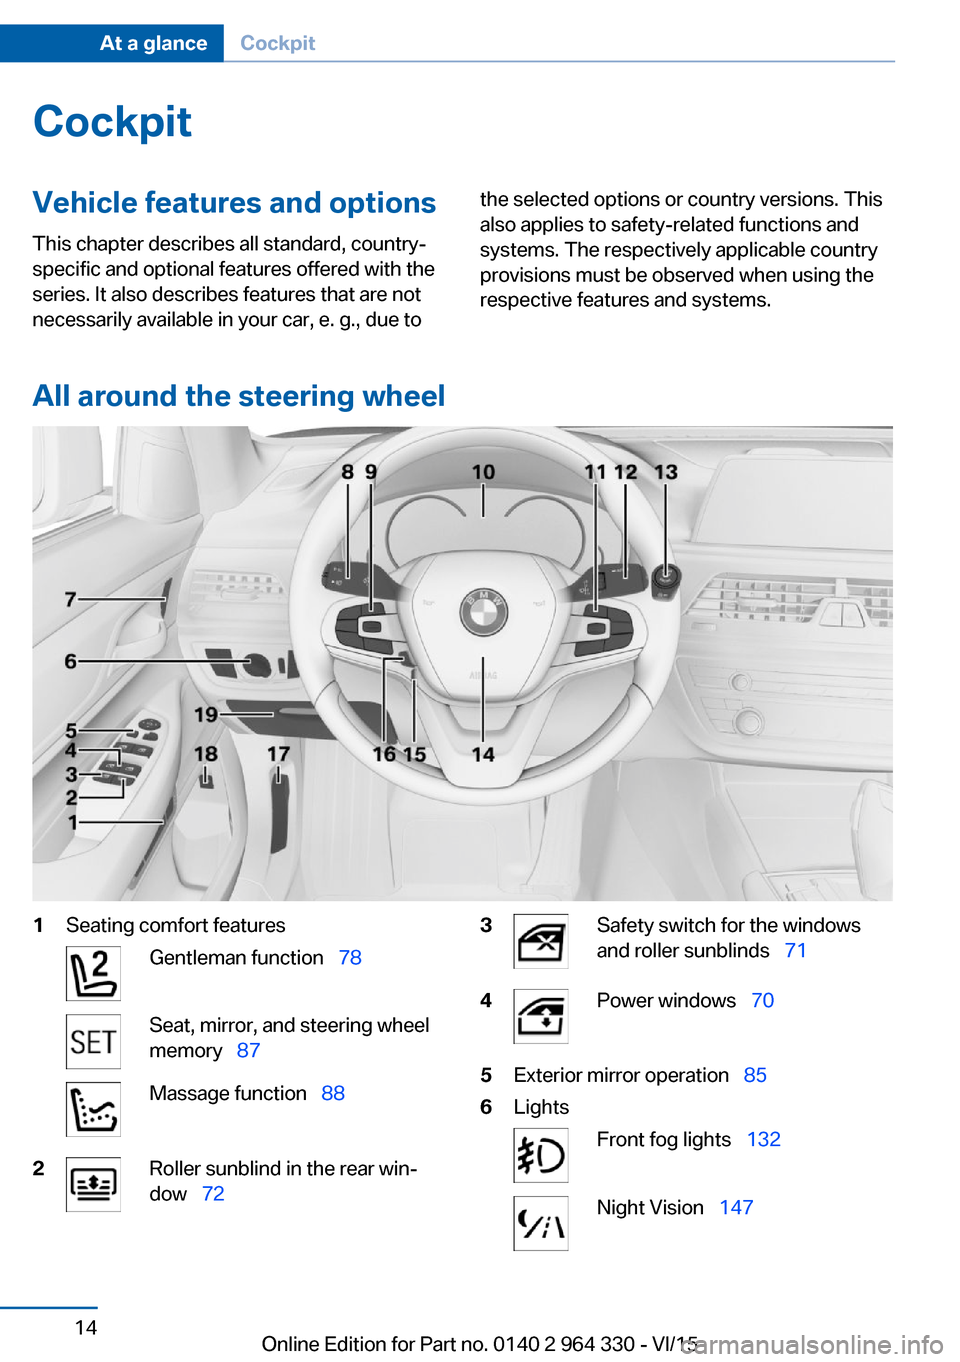
All around the steering wheel
1Seating comfort featuresGentleman function 78Seat, mirror, and steering wheel
memory 87Massage function 882Roller sunblind in the rear win‐
dow 723Safety switch for the windows
and roller sunblinds 714Power windows 705Exterior mirror operation 856LightsFront fog lights 132Night Vision 147Seite 14At a glanceCockpit14
Online Edition for Part no. 0140 2 964 330 - VI/15
Page 17 of 314
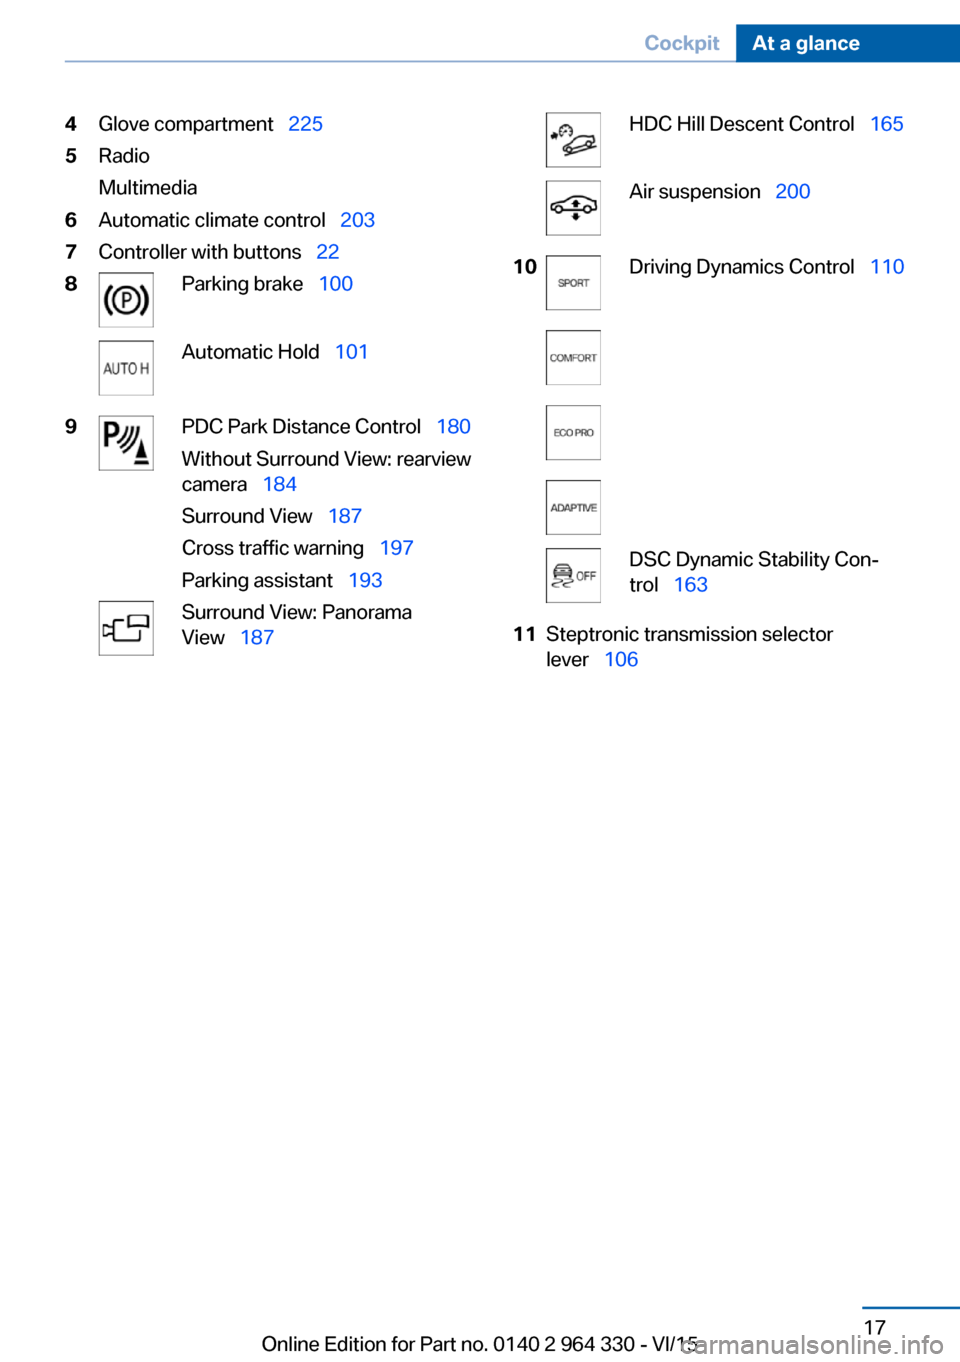
4Glove compartment 2255Radio
Multimedia6Automatic climate control 2037Controller with buttons 228Parking brake 100Automatic Hold 1019PDC Park Distance Control 180
Without Surround View: rearview
camera 184
Surround View 187
Cross traffic warning 197
Parking assistant 193Surround View: Panorama
View 187HDC Hill Descent Control 165Air suspension 20010Driving Dynamics Control 110DSC Dynamic Stability Con‐
trol 16311Steptronic transmission selector
lever 106Seite 17CockpitAt a glance17
Online Edition for Part no. 0140 2 964 330 - VI/15
Page 18 of 314
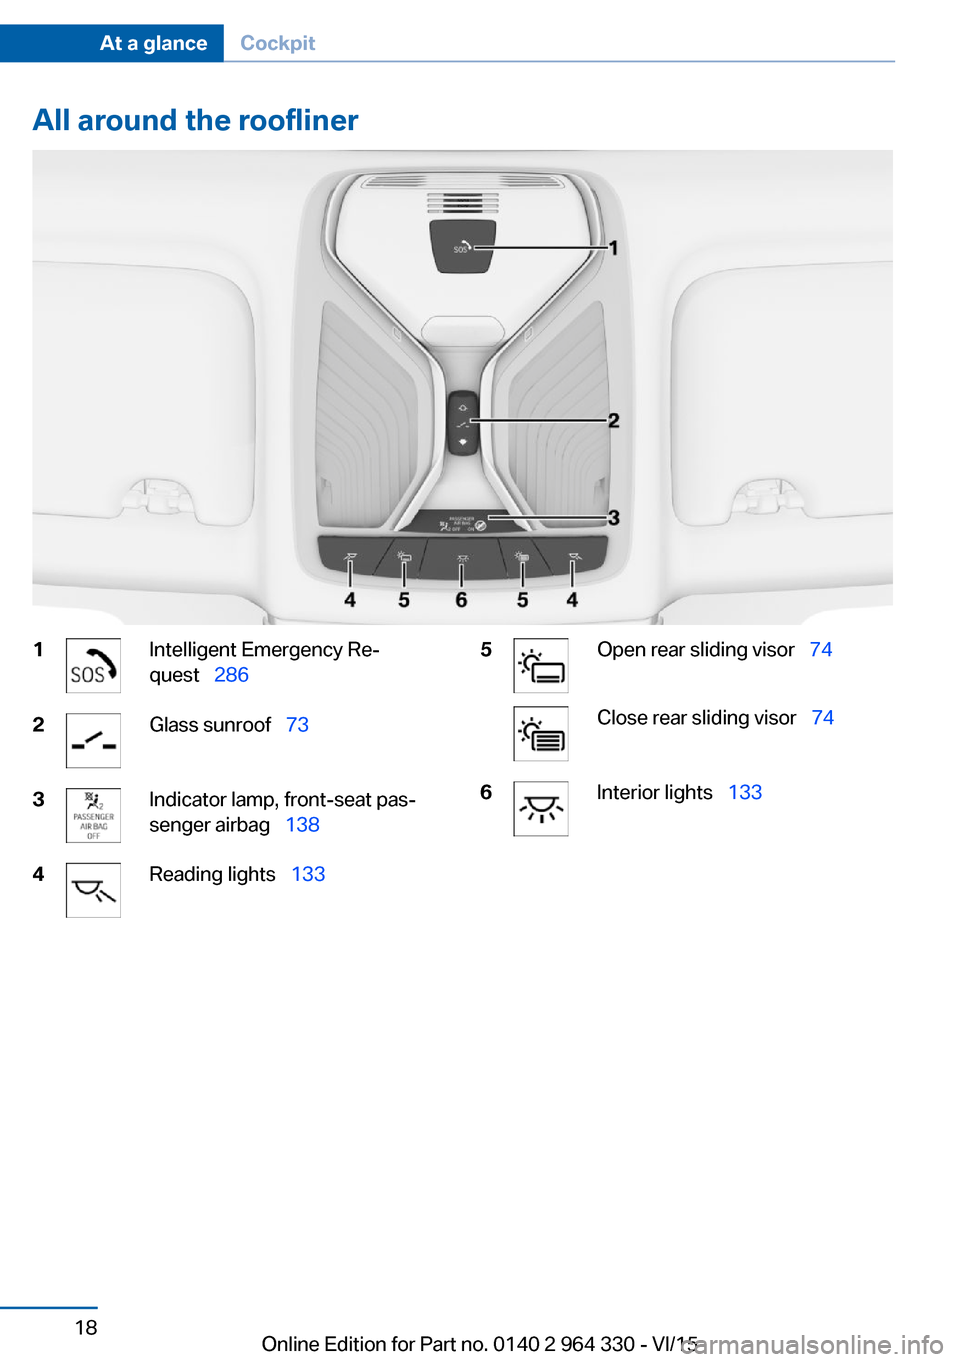
All around the roofliner1Intelligent Emergency Re‐
quest 2862Glass sunroof 733Indicator lamp, front-seat pas‐
senger airbag 1384Reading lights 1335Open rear sliding visor 74Close rear sliding visor 746Interior lights 133Seite 18At a glanceCockpit18
Online Edition for Part no. 0140 2 964 330 - VI/15
Page 28 of 314
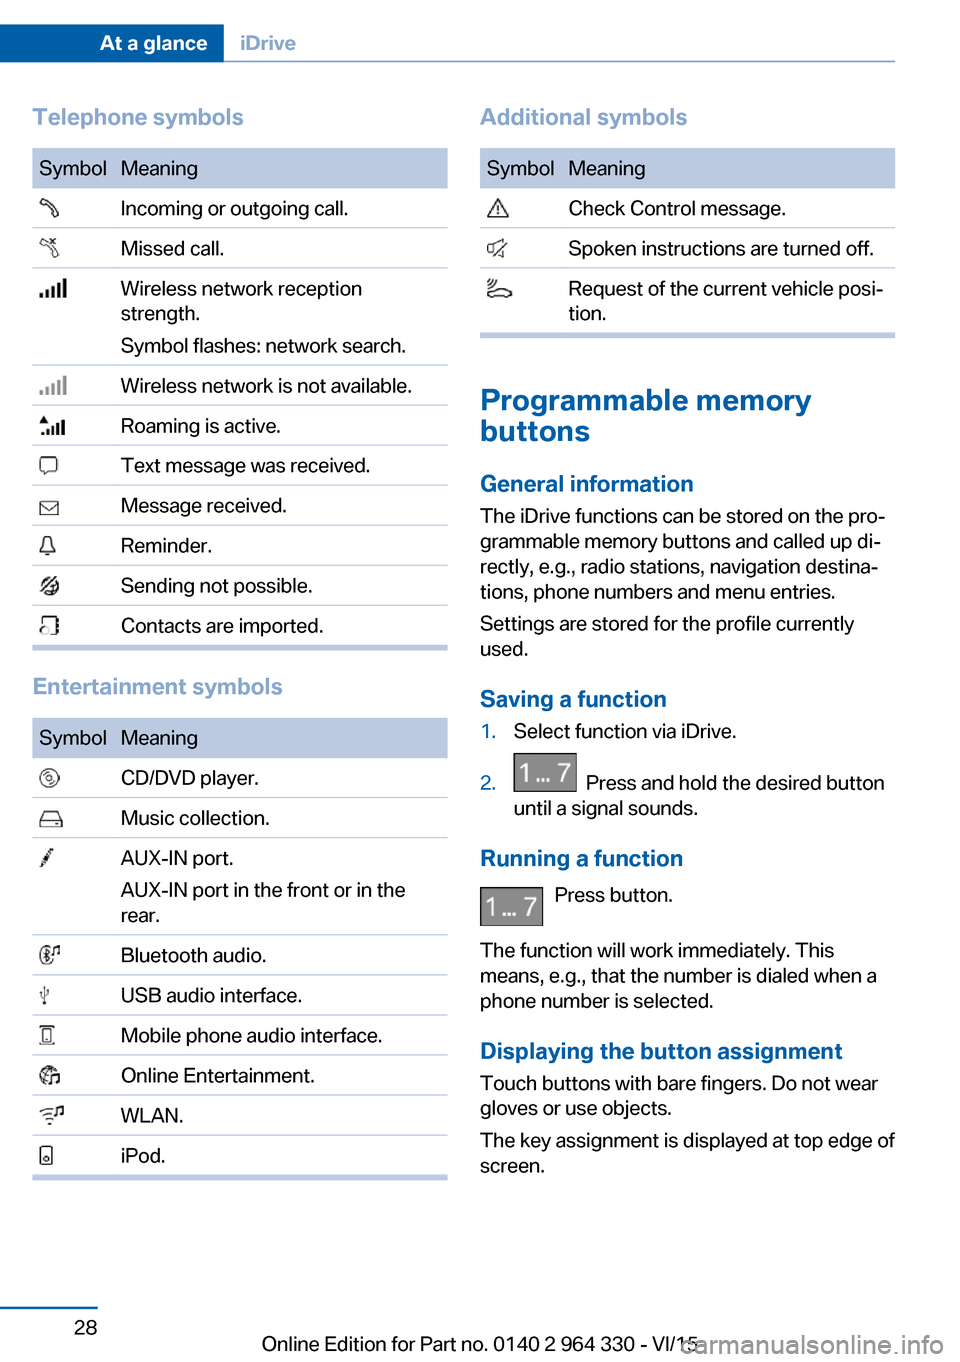
Telephone symbolsSymbolMeaning Incoming or outgoing call. Missed call. Wireless network reception
strength.
Symbol flashes: network search. Wireless network is not available. Roaming is active. Text message was received. Message received. Reminder. Sending not possible. Contacts are imported.
Entertainment symbols
SymbolMeaning CD/DVD player. Music collection. AUX-IN port.
AUX-IN port in the front or in the
rear. Bluetooth audio. USB audio interface. Mobile phone audio interface. Online Entertainment. WLAN. iPod.Additional symbolsSymbolMeaning Check Control message. Spoken instructions are turned off. Request of the current vehicle posi‐
tion.
Programmable memory
buttons
General information
The iDrive functions can be stored on the pro‐
grammable memory buttons and called up di‐
rectly, e.g., radio stations, navigation destina‐
tions, phone numbers and menu entries.
Settings are stored for the profile currently
used.
Saving a function
1.Select function via iDrive.2. Press and hold the desired button
until a signal sounds.
Running a function
Press button.
The function will work immediately. This
means, e.g., that the number is dialed when a
phone number is selected.
Displaying the button assignment Touch buttons with bare fingers. Do not wear
gloves or use objects.
The key assignment is displayed at top edge of
screen.
Seite 28At a glanceiDrive28
Online Edition for Part no. 0140 2 964 330 - VI/15
Page 31 of 314
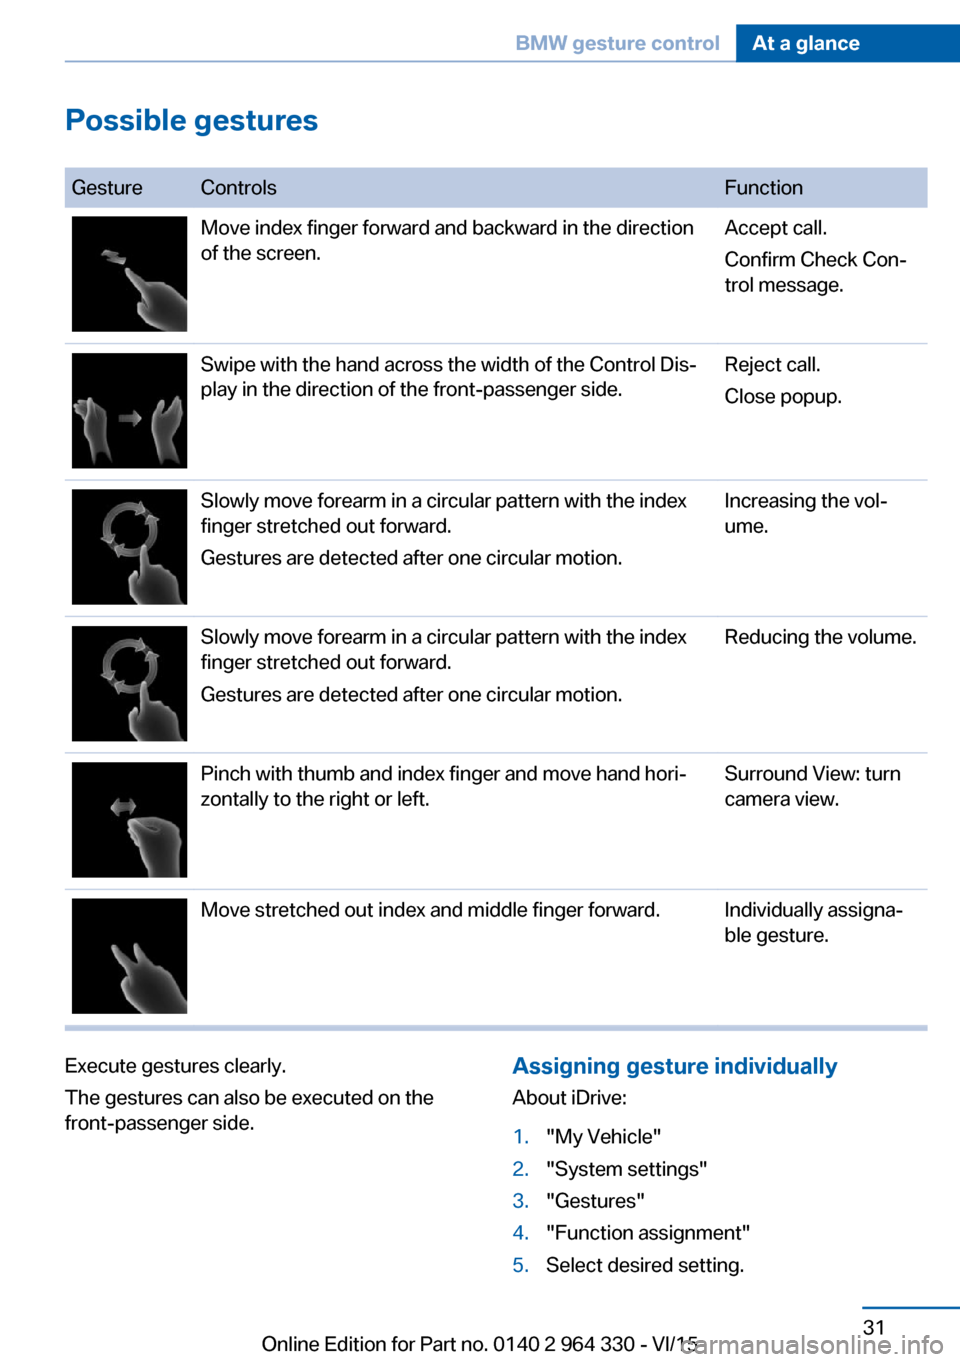
Possible gestures
GestureControlsFunctionMove index finger forward and backward in the direction
of the screen.Accept call.
Confirm Check Con‐
trol message.Swipe with the hand across the width of the Control Dis‐
play in the direction of the front-passenger side.Reject call.
Close popup.Slowly move forearm in a circular pattern with the index
finger stretched out forward.
Gestures are detected after one circular motion.Increasing the vol‐
ume.Slowly move forearm in a circular pattern with the index
finger stretched out forward.
Gestures are detected after one circular motion.Reducing the volume.Pinch with thumb and index finger and move hand hori‐
zontally to the right or left.Surround View: turn
camera view.Move stretched out index and middle finger forward.Individually assigna‐
ble gesture.Execute gestures clearly.
The gestures can also be executed on the
front-passenger side.Assigning gesture individually
About iDrive:1."My Vehicle"2."System settings"3."Gestures"4."Function assignment"5.Select desired setting.Seite 31BMW gesture controlAt a glance31
Online Edition for Part no. 0140 2 964 330 - VI/15
Page 36 of 314
BMW Touch CommandVehicle features and options
This chapter describes all standard, country-
specific and optional features offered with the
series. It also describes features that are not
necessarily available in your car, e. g., due to
the selected options or country versions. This
also applies to safety-related functions and
systems. The respectively applicable country
provisions must be observed when using the
respective features and systems.
BMW Touch Command The concept
Important functions of the vehicle can be used
via BMW Touch Command.▷Seat adjustments for front passenger seat
and seats in the rear.▷Climate control in the rear.▷Sun protection.▷Ambient light.▷Ambient light accent.▷Bowers & Wilkins loudspeaker lighting.▷Audio sources front.▷Rear entertainment.▷Some functions of the telephone in the
rear.
General information
Depending on the vehicle's equipment, BMW
Touch Command is located in the rear console
or in the center armrest in the rear.
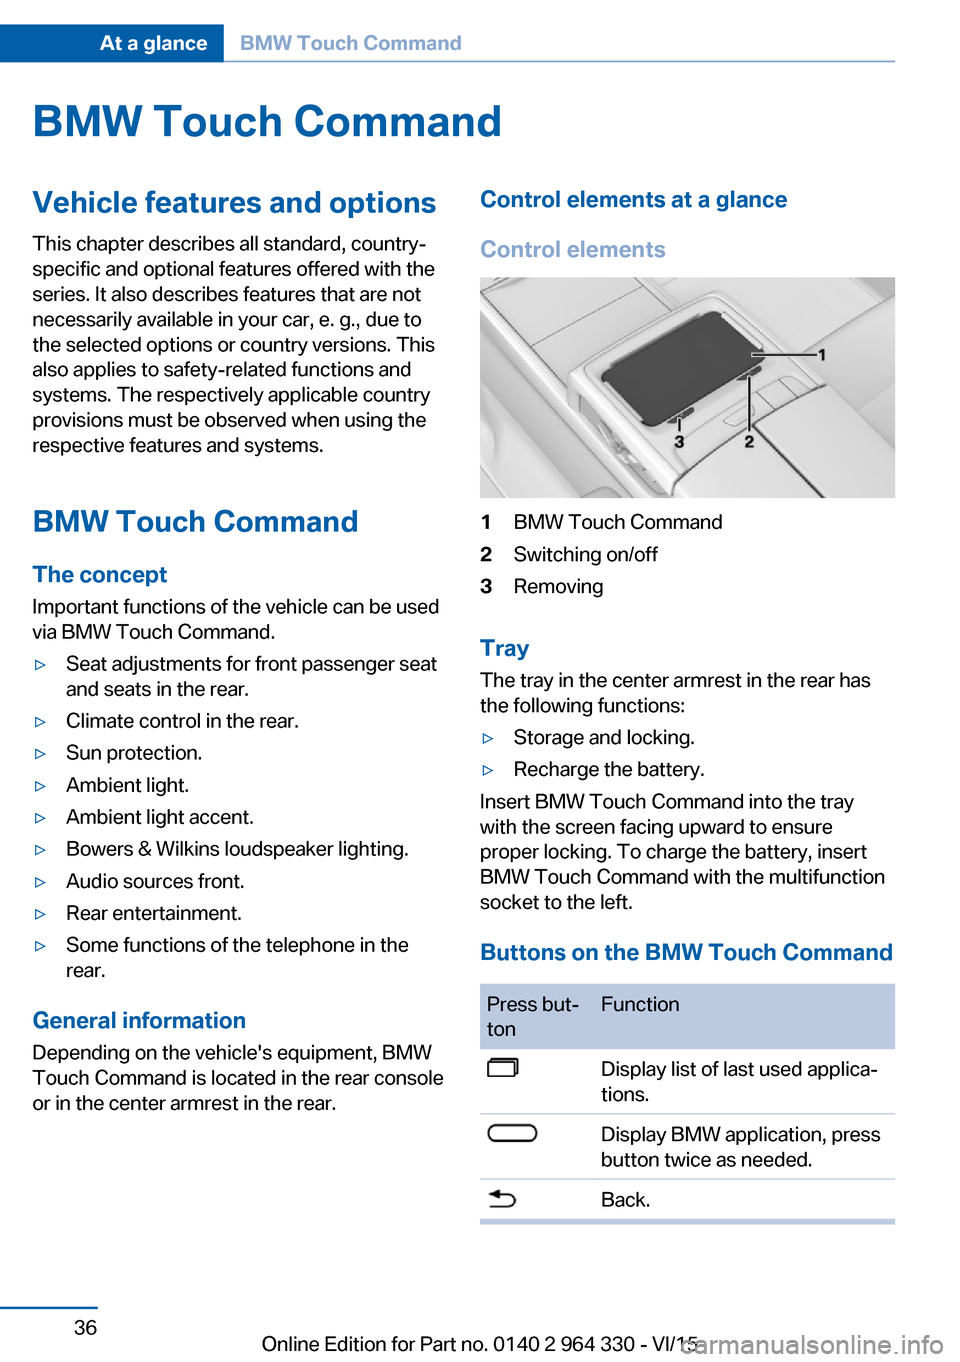
Control elements at a glance
Control elements1BMW Touch Command2Switching on/off3Removing
Tray
The tray in the center armrest in the rear has
the following functions:
▷Storage and locking.▷Recharge the battery.
Insert BMW Touch Command into the tray
with the screen facing upward to ensure
proper locking. To charge the battery, insert
BMW Touch Command with the multifunction
socket to the left.
Buttons on the BMW Touch Command
Press but‐
tonFunctionDisplay list of last used applica‐
tions.Display BMW application, press
button twice as needed.Back.Seite 36At a glanceBMW Touch Command36
Online Edition for Part no. 0140 2 964 330 - VI/15
Page 43 of 314
Activating/deactivating telephone
functions
To use all supported functions of the mobile
phone, the following functions must be acti‐
vated prior to pairing.
About iDrive:1."My Vehicle"2."System settings"3."Mobile devices"4."Settings"5.Select desired setting:▷"Office"
Activate functions to transmit short
messages, e-mails, calendars, tasks,
notes, and reminders to the vehicle.
Costs can be incurred by transmitting
all data to the vehicle.▷"Contact images"
Activate function to show the contact
pictures.6.Move the controller to the left.
Connecting the device via passkey
entry
Pair the vehicle entirely on the front or rear
Control Display.
About iDrive:
1."My Vehicle"2."System settings"3."Mobile devices"4."Connect new device"5.Select the functions for which the device is
to be used:▷ "Telephone"▷ "Bluetooth® audio"▷ "Apps"
The Bluetooth name of the vehicle is dis‐
played on the Control Display.
6.Search for Bluetooth devices in the sur‐
roundings of the device.
The Bluetooth name of the vehicle appears
on the device display. Select the Bluetooth
name of the vehicle.7.Enter and confirm the same passkey on
the device and via iDrive.
or
Compare the control number on the Con‐
trol Display with the control number on the
display of the device. Confirm the control
number on the device and on the Control
Display.8.The device is connected and displayed in
the device list.
There is a display of which features the
mobile phone supports, refer to page 42.
If pairing was unsuccessful: What to do if..., re‐
fer to page 47.
Connecting the device via near-field
communication, NFC
With near-field communication, NDC, data can
be transmitted over short distances using radio
technology.
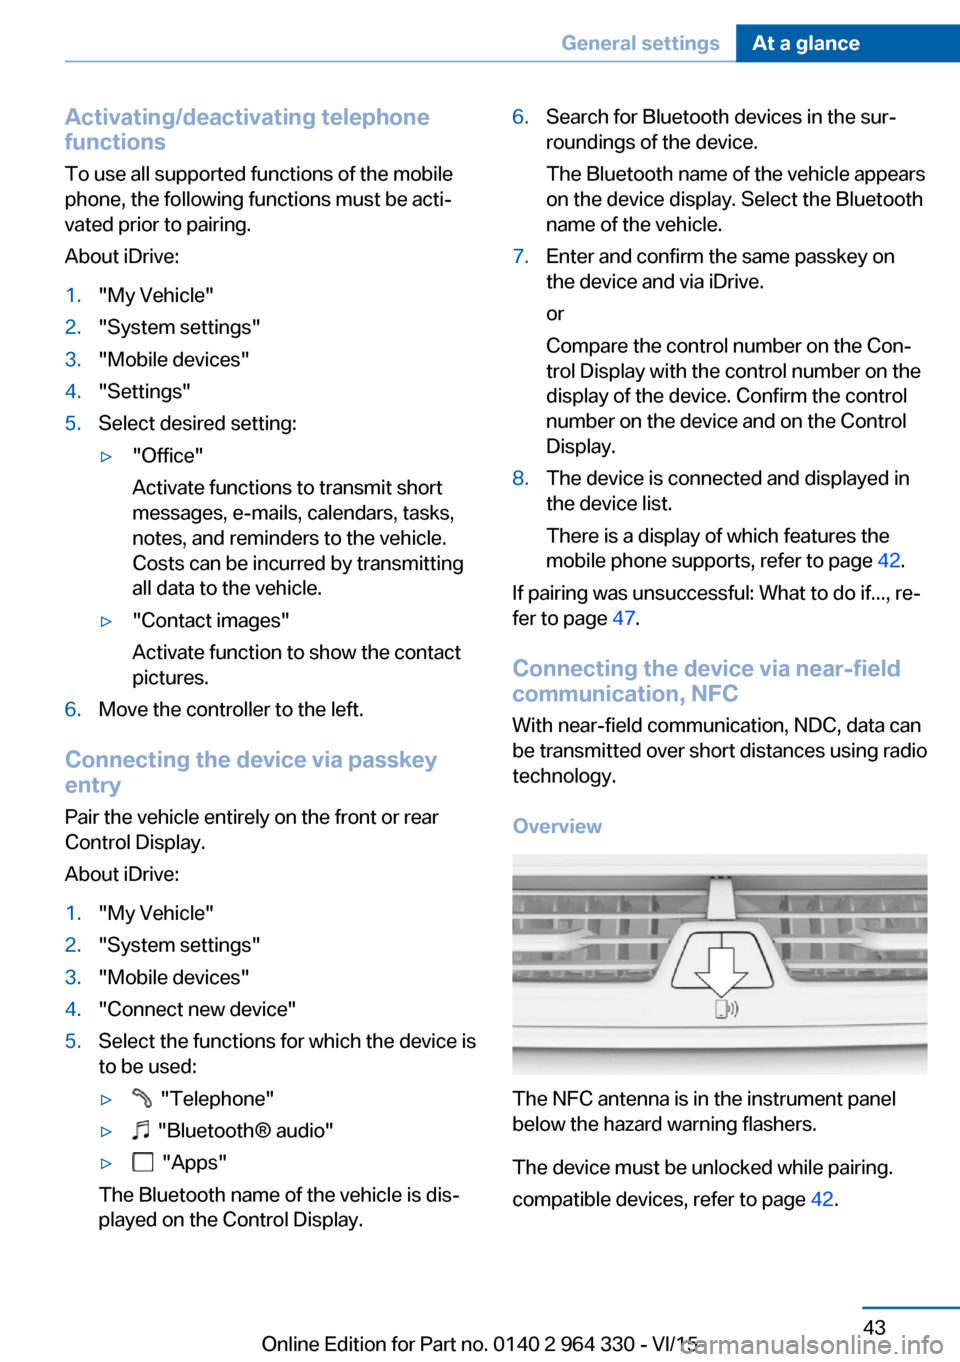
Overview
The NFC antenna is in the instrument panel
below the hazard warning flashers.
The device must be unlocked while pairing.
compatible devices, refer to page 42.
Seite 43General settingsAt a glance43
Online Edition for Part no. 0140 2 964 330 - VI/15
Page 44 of 314
Pairing is also possible while driving.1.Activate the NFC function on the device,
see the owner's manual of the device2.Hold the device close to the NFC antenna.3.Compare the control number on the Con‐
trol Display with the control number on the
display of the device. Confirm the control
number on the device and on the Control
Display.
or
Confirm the connection on the device.4.The device is connected and displayed in
the device list.
There is a display of which features the
mobile phone supports, refer to page 42.
Depending on which functions are already oc‐
cupied, the device is connected with the
phone, additional phone, or music function.
If pairing was unsuccessful: What to do if..., re‐
fer to page 47.
Pairing the snap-in adapter in the rear
with the vehicle
▷The Bluetooth passkey on the back of the
snap-in adapter is known.▷The snap-in adapter is installed in the cen‐
ter armrest.▷Operating readiness is switched on.▷The SIM card is inserted in the snap-in
adapter or the SIM Access Profile is active.
About iDrive:
1."My Vehicle"2."System settings"3."Mobile devices"4."Connect new device"5.Press the button on the snap-in
adapter for approx. 3 seconds, until the
signal tone sounds once.
The LED above the button flashes green.6.Enter the Bluetooth passkey for the snap-
in adapter at the Control Display.7. "Telephone"8.The device is connected and displayed in
the device list.
WLAN connection
Functional requirements
▷ConnectedDrive contract.▷Data contract with a service provider.▷WLAN-capable device.▷WLAN activated on the device.▷WLAN hotspot activated in the vehicle.▷Vehicle is stationary.▷Operating readiness switched on.
Activating WLAN hotspot
About iDrive:
1."My Vehicle"2."System settings"3."Mobile devices"4."Settings"5."Internet hotspot"
Connecting device with WLAN
hotspot
About iDrive:
1."My Vehicle"2."System settings"3."Mobile devices"4."Connect new device"5. "Internet hotspot"
Hotspot name and hotspot code are dis‐
played on the Control Display.6.Search for WLAN networks on the device.
Select network name on the device.7.Enter hotspot code on the device and con‐
nect.Seite 44At a glanceGeneral settings44
Online Edition for Part no. 0140 2 964 330 - VI/15
Page 45 of 314
The device connects to the hotspot via
WLAN.
With the first Internet usage via the WLAN hot‐
spot, data volume must be purchased from a
service provider.
All devices connected via the WLAN hotspot
use this data volume.
If necessary, data volume can be purchased
from the ConnectedDrive Store.
WiFi connection Pair the vehicle entirely on the front or rear
Control Display.
About iDrive:
1."My Vehicle"2."System settings"3."Mobile devices"4."Connect new device"5. "Miracast"
The WiFi name of the vehicle is displayed
on the Control Display.6.Search for WiFi devices in the surround‐
ings of the device.
The WiFi name of the vehicle appears on
the device display. Select the WiFi name of
the vehicle.7.Compare the control number on the Con‐
trol Display with the control number on the
display of the device. Confirm the control
number on the device and on the Control
Display.8.The device is connected and displayed in
the device list.
If pairing was unsuccessful: What to do if..., re‐
fer to page 47.
Additional functions
After initial pairing
▷The device is connected with the vehicle
within a short period of time if the engine isrunning or the operating readiness is
switched on.▷The data stored on the SIM card or in the
mobile phone are transferred to the vehicle
after recognition.▷For some devices, certain settings may be
necessary, e.g. authorization, see owner's
manual of the device.▷After one-time pairing, the devices are au‐
tomatically recognized and reconnected
when operating readiness is switched on.
Configuring the device
Functions can be activated or deactivated for
paired and connected devices.
About iDrive:
1."My Vehicle"2."System settings"3."Mobile devices"4.Select the desired device.5.Select desired setting.
If a function is assigned to a device, the func‐
tion will be deactivated where appropriate for a
device that is already connected and the de‐
vice will be disconnected.
Connecting a specific device About iDrive:
1."My Vehicle"2."System settings"3."Mobile devices"4.Select device.5."Connect device"
The functions that were assigned to the device
before unpairing are assigned to the device
when it is reconnected. If the device is already
connected, these functions are deactivated.
Disconnecting the device
The connection of the device to the vehicle is
disconnected.
Seite 45General settingsAt a glance45
Online Edition for Part no. 0140 2 964 330 - VI/15
Page 59 of 314
▷Instrument cluster.▷Programmable memory buttons.▷Volumes, tone.▷Control Display.▷Navigation.▷TV.▷Park Distance Control PDC.▷Rearview camera▷Side View.▷Head-up Display.▷Driving Dynamics Control.▷Seat position, exterior mirror position,
steering wheel position.▷Cruise control.▷Intelligent Safety.▷Night vision.
Profile management
Selecting a profile Regardless of the remote control in use a dif‐
ferent profile may be activated.
About iDrive:
1."My Vehicle"2."Driver profiles"3.Select profile.4."OK"▷All settings stored in the called-up profile
are automatically applied.▷The called-up profile is assigned to the re‐
mote control being used at the time.▷If the profile is already assigned to a differ‐
ent remote control, this profile will apply to
both remote controls. It cannot be differen‐
tiated anymore between the settings for
the two remote controls.Guest profile
The guest profile is for individual settings that
are stored in none of the three personal pro‐
files.
This can be useful for drivers who are using
the vehicle temporarily and do not have their
own profile.
About iDrive:1."My Vehicle"2."Driver profiles"3."Just drive off (guest)"4."OK"
The guest profile cannot be renamed. It is not
assigned to the current remote control.
Rename profile A personal name can be assigned to the activeprofile to avoid confusion between the profiles.
About iDrive:
1."My Vehicle"2."Driver profiles"
The profile marked with this symbol can
be renamed.
3.Select profile.4."Change driver profile name"5.Enter profile name.6. Select the symbol.
Resetting the profile
The settings of the active profile are reset to
their default values.
About iDrive:
1."My Vehicle"2."Driver profiles"
The profile marked with this symbol can
be reset.
3.Select profile.4."Reset driver profile"Seite 59Opening and closingControls59
Online Edition for Part no. 0140 2 964 330 - VI/15