manual BMW 740LI 2011 F02 Owner's Guide
[x] Cancel search | Manufacturer: BMW, Model Year: 2011, Model line: 740LI, Model: BMW 740LI 2011 F02Pages: 299, PDF Size: 8.49 MB
Page 129 of 299
▷
Lever for changing the air flow direction, ar‐
row 2.
Rear automatic climate
control*
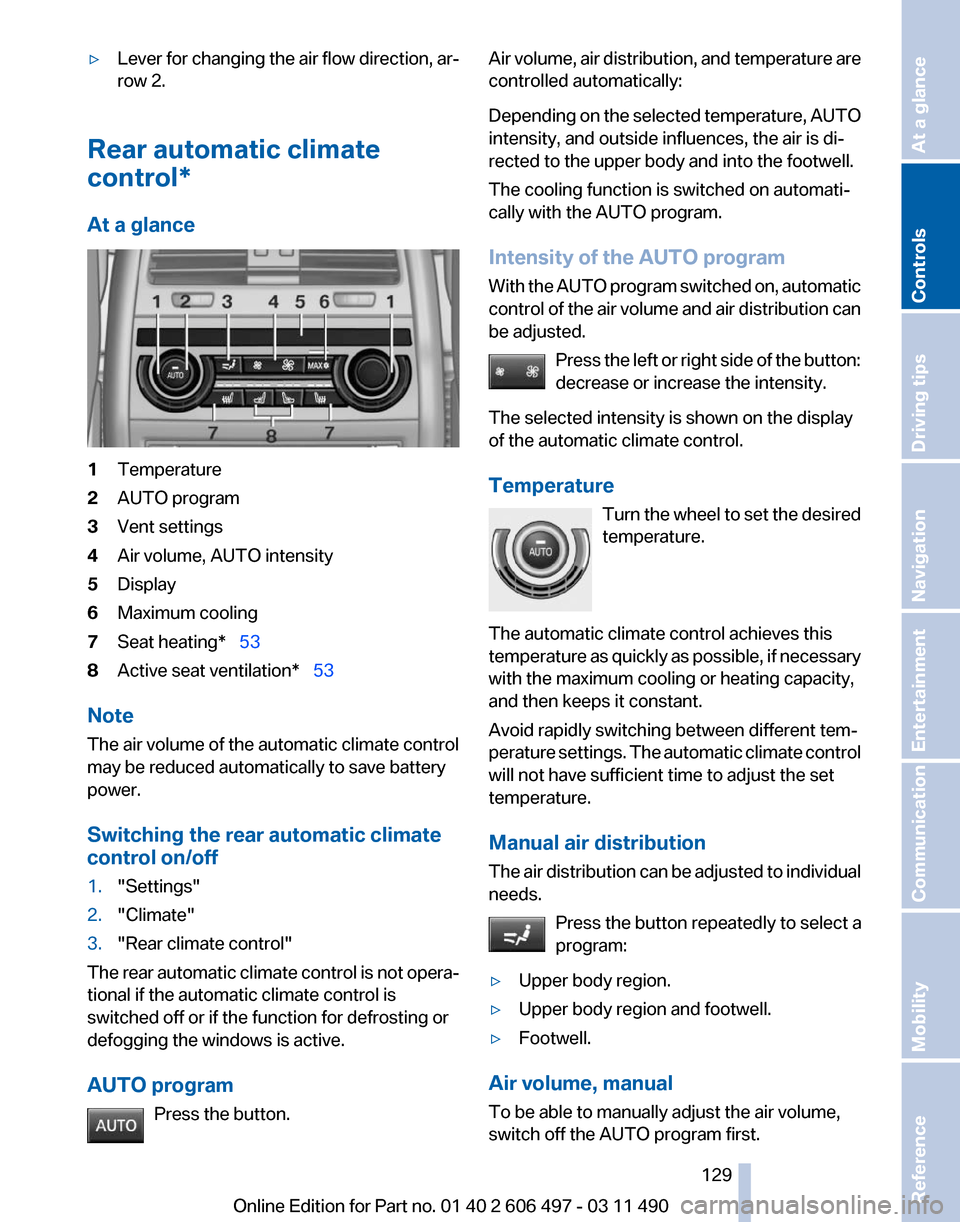
At a glance 1
Temperature
2 AUTO program
3 Vent settings
4 Air volume, AUTO intensity
5 Display
6 Maximum cooling
7 Seat heating* 53
8 Active seat ventilation* 53
Note
The air volume of the automatic climate control
may be reduced automatically to save battery
power.
Switching the rear automatic climate
control on/off
1. "Settings"
2. "Climate"
3. "Rear climate control"
The rear automatic climate control is not opera‐
tional if the automatic climate control is
switched off or if the function for defrosting or
defogging the windows is active.
AUTO program Press the button. Air volume, air distribution, and temperature are
controlled automatically:
Depending
on the selected temperature, AUTO
intensity, and outside influences, the air is di‐
rected to the upper body and into the footwell.
The cooling function is switched on automati‐
cally with the AUTO program.
Intensity of the AUTO program
With the AUTO program switched on, automatic
control of the air volume and air distribution can
be adjusted.
Press the left or right side of the button:
decrease or increase the intensity.
The selected intensity is shown on the display
of the automatic climate control.
Temperature Turn the wheel to set the desired
temperature.
The automatic climate control achieves this
temperature as quickly as possible, if necessary
with the maximum cooling or heating capacity,
and then keeps it constant.
Avoid rapidly switching between different tem‐
perature settings. The automatic climate control
will not have sufficient time to adjust the set
temperature.
Manual air distribution
The air distribution can be adjusted to individual
needs. Press the button repeatedly to select a
program:
▷ Upper body region.
▷ Upper body region and footwell.
▷ Footwell.
Air volume, manual
To be able to manually adjust the air volume,
switch off the AUTO program first. Seite 129
129Online Edition for Part no. 01 40 2 606 497 - 03 11 490
Reference Mobility Communication Entertainment Navigation Driving tips
Controls At a glance
Page 133 of 299
To do so:
▷
Read the instructions of the hand-held
transmitter.
▷ Press the memory button of the universal
remote control for an extended period.
If the LED flashes rapidly for a brief period and
then lights up continuously for approx. 2 sec‐
onds, the hand-held transmitter is equipped
with an alternating code system.
In this case, program the memory buttons as
described under Alternating-code hand-held
transmitters.
Alternating-code hand-held
transmitters
Please obtain information on synchronizing the
device
in the operating manual of the device be‐
ing set up.
Programming will be easier with the aid of a sec‐
ond person.
1. Park the vehicle within range of the remote-
controlled device.
2. Program the universal remote control as de‐
scribed above under Fixed-code hand-held
transmitters.
3. Press and hold the programmed button on
the
interior rearview mirror for approx. 5 sec‐
onds until the device to be adjusted is acti‐
vated.
If the device does not become activated,
press and hold the button and watch the
LED:
▷ If the LED lights up continuously, the
programming is completed. The device
should
become activated when the but‐
ton is pressed briefly.
▷ If the LED flashes for approx. 2 seconds
and then lights up continuously, con‐
tinue the programming procedure be‐
ginning with step 4.
4. Locate the button on the receiver of the de‐
vice to be set, e.g., on the drive. 5.
Press the button on the receiver of the de‐
vice
to be set. You have approx. 30 seconds
for the next step.
6. Press the programmed memory button of
the universal remote control three times.
The device can be operated when the engine is
running or the ignition is switched on.
Reassigning individual programs
1. Switch on the ignition.
2. Hold the hand-held transmitter a distance of
approx.
2 to 8 in/5 to 20 cm from the memory
buttons.
3. Press the memory button of the universal
remote control.
4. If the LED flashes slowly after approx.
20 seconds, press the transmit button on
the hand-held transmitter.
5. Release both buttons when the LED flashes
rapidly.
If
the LED does not flash rapidly after approx.
15 seconds, change the distance and repeat
the step.
Deleting all stored programs
Press the left and right memory buttons for ap‐
prox. 20 seconds until the LED flashes rapidly.
All stored programs are deleted.
The programs cannot be deleted individually.
Seite 133
133Online Edition for Part no. 01 40 2 606 497 - 03 11 490
Reference Mobility Communication Entertainment Navigation Driving tips
Controls At a glance
Page 141 of 299
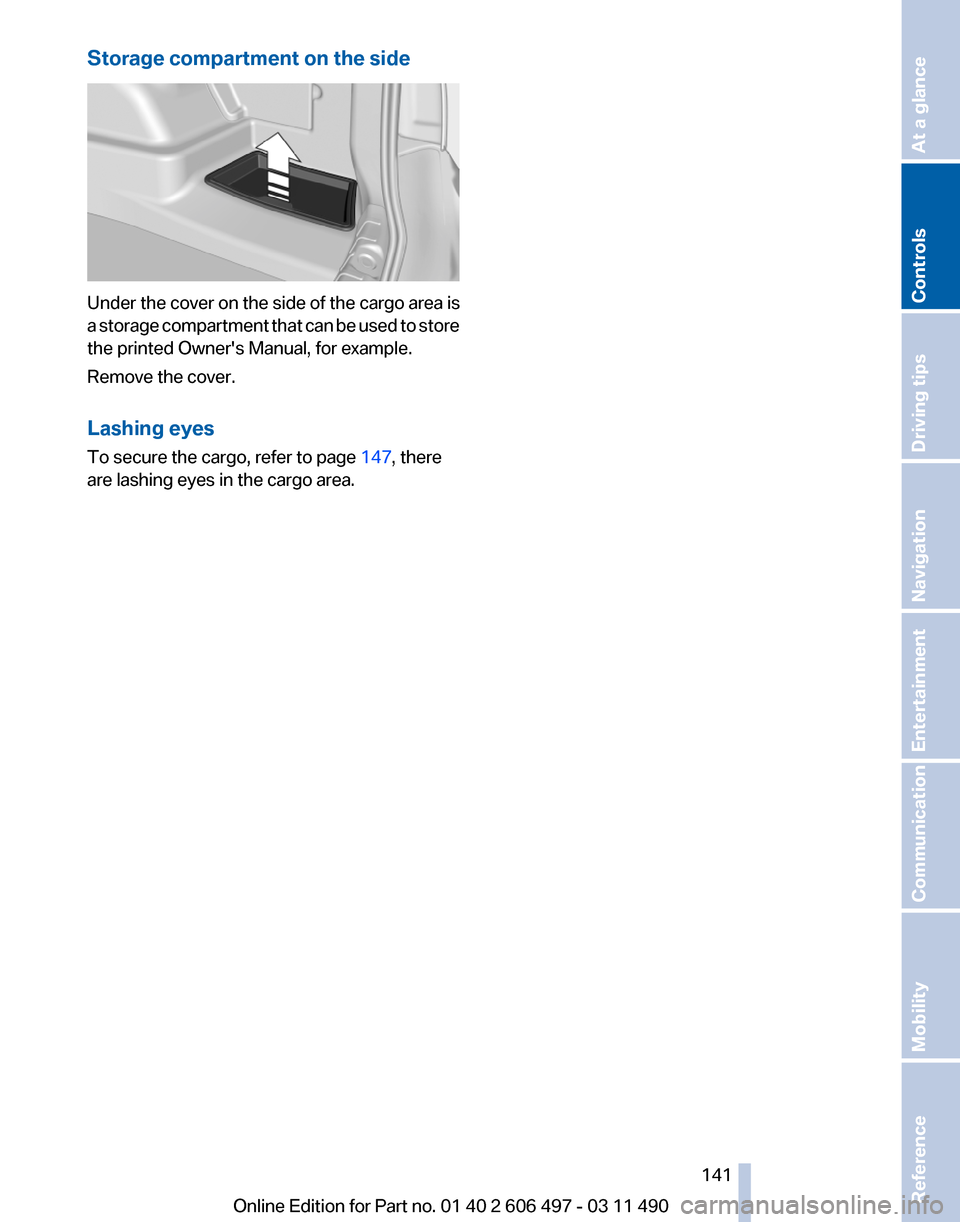
Storage compartment on the side
Under the cover on the side of the cargo area is
a
storage compartment that can be used to store
the printed Owner's Manual, for example.
Remove the cover.
Lashing eyes
To secure the cargo, refer to page 147, there
are lashing eyes in the cargo area.
Seite 141
141Online Edition for Part no. 01 40 2 606 497 - 03 11 490
Reference Mobility Communication Entertainment Navigation Driving tips
Controls At a glance
Page 146 of 299
Driving in wet conditions
When
roads are wet or there is heavy rain, briefly
exert gentle pressure on the brake pedal every
few miles.
Ensure that this action does not endanger other
road users.
The heat generated in this process helps dry the
brake discs and pads.
In this way braking efficiency will be available
when you need it.
Hills
Drive long or steep downhill gradients in the gear
in which the least braking is required. Otherwise,
the brake system may overheat, resulting in a
reduction in the brake system efficiency.
You can increase the engine's braking effect by
shifting down in the manual mode of the auto‐
matic transmission, refer to page 72.
Avoid load on the brakes
Avoid placing excessive load on the brake
system. Light but consistent brake pressure can
lead to high temperatures, brake wear and pos‐
sibly even brake failure.◀
Do not drive in neutral
Do not drive in neutral or with the engine
stopped, as doing so disables engine braking. In
addition, steering and brake assist is unavailable
with the engine stopped.◀
Brake disc corrosion
Corrosion on the brake discs and contamination
on the brake pads are furthered by:
▷ Low mileage.
▷ Extended periods when the vehicle is not
used at all.
▷ Infrequent use of the brakes.
Corrosion occurs when the minimum pressure
that must be exerted by the pads during brake
applications to clean the discs is not reached.
Should corrosion form on the brake discs, the
brakes will tend to respond with a pulsating ef‐
fect that generally cannot be corrected. Condensation under the parked vehicle
When
using the automatic climate control, con‐
densation water develops that exits underneath
the vehicle.
Therefore, traces of condensed water under the
vehicle are normal.
Loading
Overloading the vehicle
To avoid exceeding the approved carrying
capacity of the tires, never overload the vehicle.
Overloading can lead to overheating and in‐
creases the rate at which damage develops in‐
side the tires. This could result in a sudden loss
of tire inflation pressure.◀
No fluids in the trunk
Make sure that fluids do not leak into the
trunk; otherwise, the vehicle may be damaged.◀
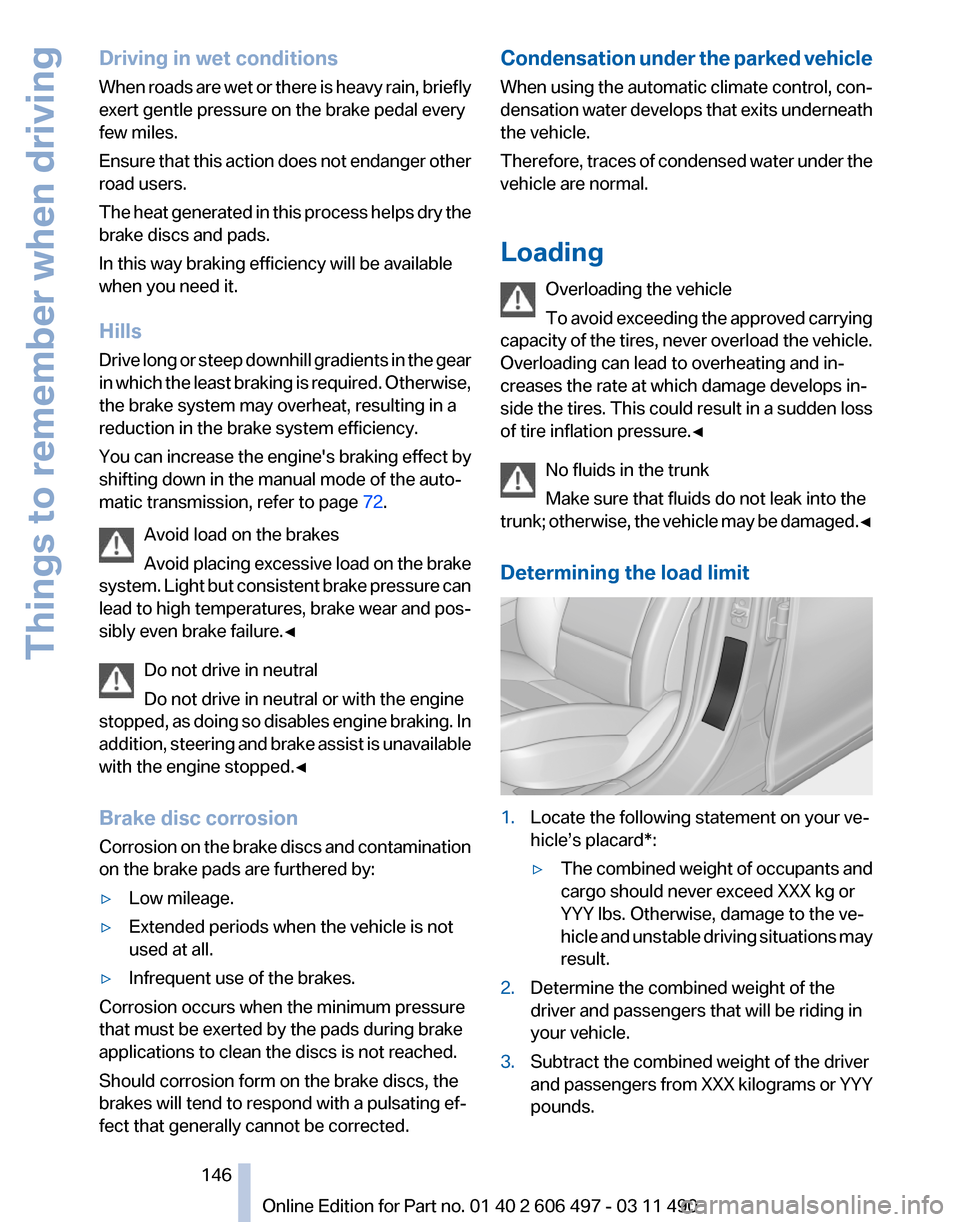
Determining the load limit 1.
Locate the following statement on your ve‐
hicle’s placard*:
▷The combined weight of occupants and
cargo should never exceed XXX kg or
YYY lbs. Otherwise, damage to the ve‐
hicle
and unstable driving situations may
result.
2. Determine the combined weight of the
driver and passengers that will be riding in
your vehicle.
3. Subtract the combined weight of the driver
and
passengers from XXX kilograms or YYY
pounds. Seite 146
146 Online Edition for Part no. 01 40 2 606 497 - 03 11 490
Things to remember when driving
Page 152 of 299
Navigation*
Navigation system
General information
The navigation system can determine the pre‐
cise position of the vehicle, with the aid of sat‐
ellites and vehicle sensors, and can reliably
guide you to every entered destination.
Navigation
data are stored in the vehicle and can
be updated.
Entries in stationary vehicle
Enter data only when the vehicle is sta‐
tionary, and always give priority to the applicable
traffic regulations in the event of any contradic‐
tion between traffic and road conditions and the
instructions issued by the navigation system.
Failure to take to this precaution can place you
in violation of the law and put vehicle occupants
and other road users in danger.◀
Destination input
Manual destination entry
General information
The system supports you in entering street
names and house numbers by automatically
completing the entry and providing entry com‐
parisons, refer to page 24.
Stored town/city and street names can be called
up quickly.
▷ If the existing entries should not be changed,
the entries for the state/province and town/
city can be skipped.
▷ Destination guidance is started to the town/
city center if no street is entered.
Entering a state/province
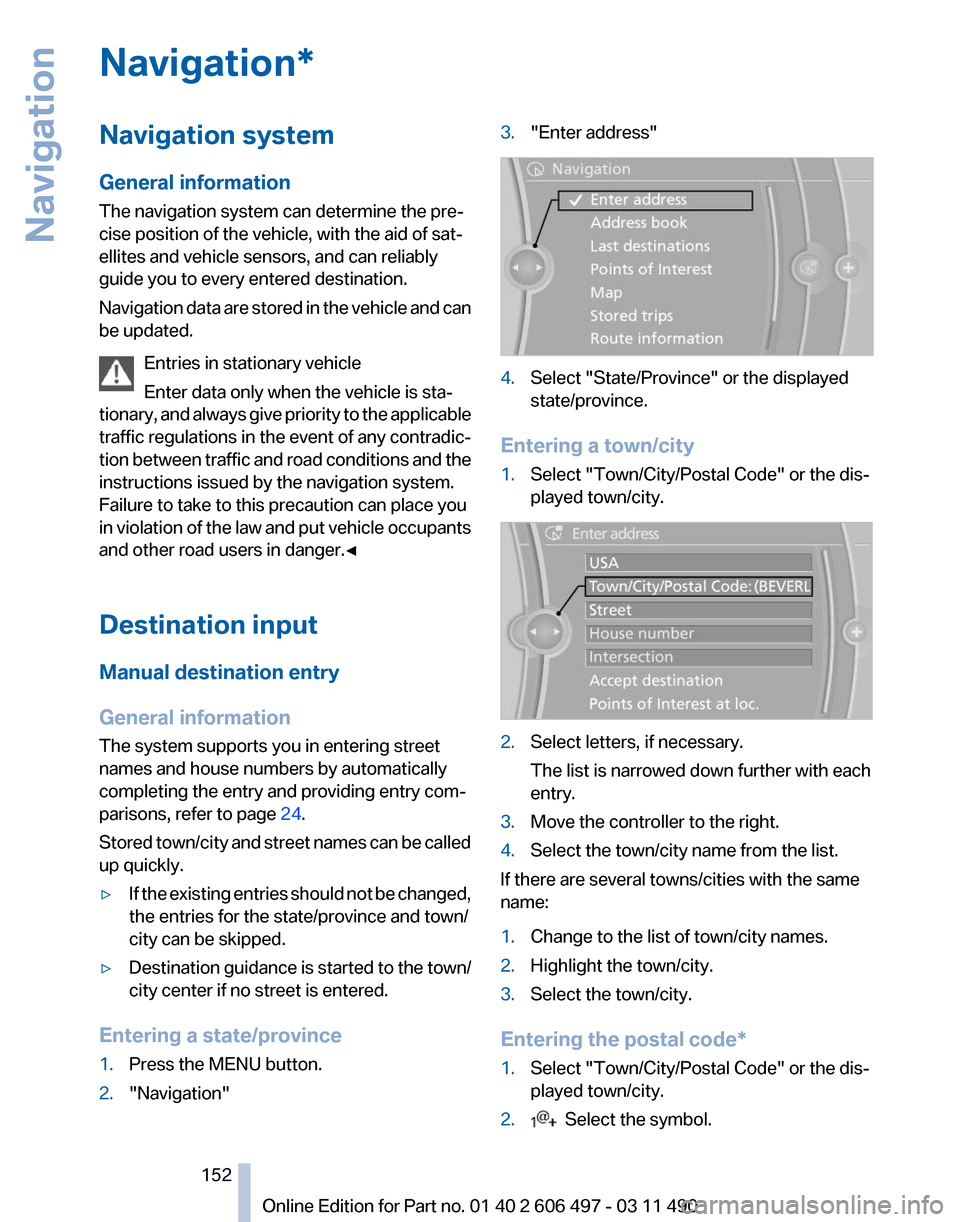
1. Press the MENU button.
2. "Navigation" 3.
"Enter address" 4.
Select "State/Province" or the displayed
state/province.
Entering a town/city
1. Select "Town/City/Postal Code" or the dis‐
played town/city. 2.
Select letters, if necessary.
The list is narrowed down further with each
entry.
3. Move the controller to the right.
4. Select the town/city name from the list.
If there are several towns/cities with the same
name:
1. Change to the list of town/city names.
2. Highlight the town/city.
3. Select the town/city.
Entering the postal code*
1. Select "Town/City/Postal Code" or the dis‐
played town/city.
2. Select the symbol.
Seite 152
152 Online Edition for Part no. 01 40 2 606 497 - 03 11 490
Navigation
Page 172 of 299
Radio
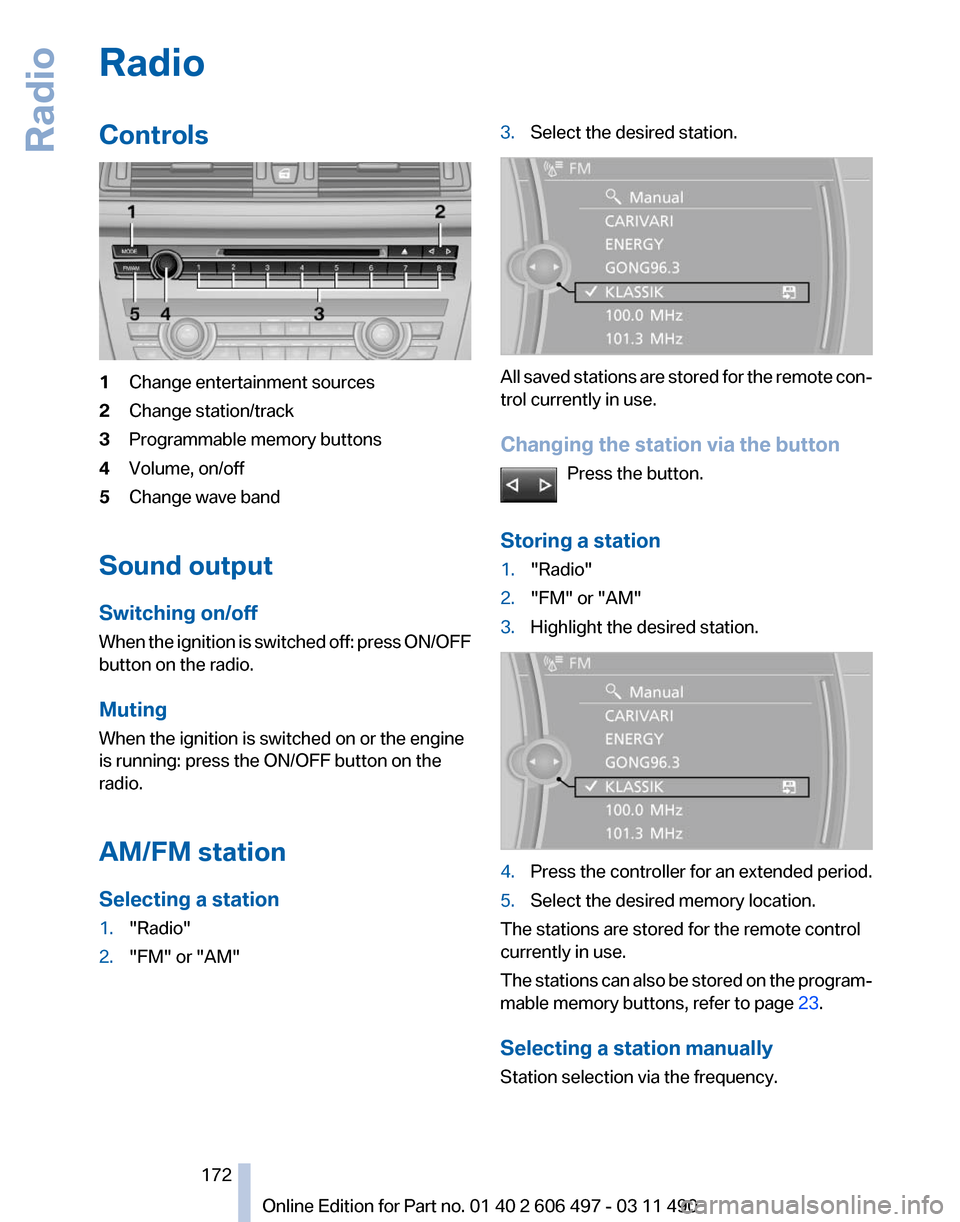
Controls
1
Change entertainment sources
2 Change station/track
3 Programmable memory buttons
4 Volume, on/off
5 Change wave band
Sound output
Switching on/off
When
the ignition is switched off: press ON/OFF
button on the radio.
Muting
When the ignition is switched on or the engine
is running: press the ON/OFF button on the
radio.
AM/FM station
Selecting a station
1. "Radio"
2. "FM" or "AM" 3.
Select the desired station. All saved stations are stored for the remote con‐
trol currently in use.
Changing the station via the button
Press the button.
Storing a station
1. "Radio"
2. "FM" or "AM"
3. Highlight the desired station. 4.
Press the controller for an extended period.
5. Select the desired memory location.
The stations are stored for the remote control
currently in use.
The
stations can also be stored on the program‐
mable memory buttons, refer to page 23.
Selecting a station manually
Station selection via the frequency. Seite 172
172 Online Edition for Part no. 01 40 2 606 497 - 03 11 490
Radio
Page 173 of 299
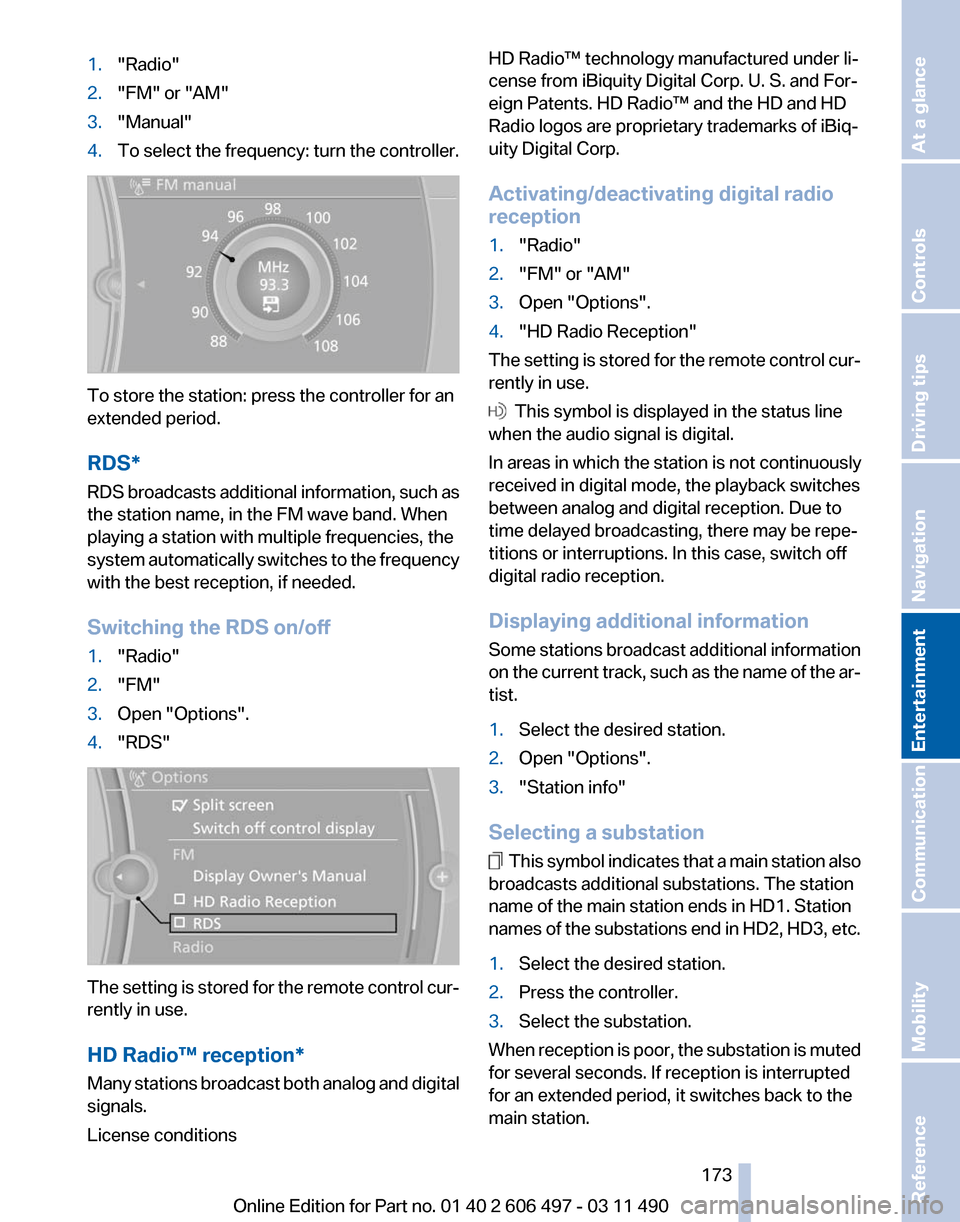
1.
"Radio"
2. "FM" or "AM"
3. "Manual"
4. To select the frequency: turn the controller. To store the station: press the controller for an
extended period.
RDS*
RDS
broadcasts additional information, such as
the station name, in the FM wave band. When
playing a station with multiple frequencies, the
system automatically switches to the frequency
with the best reception, if needed.
Switching the RDS on/off
1. "Radio"
2. "FM"
3. Open "Options".
4. "RDS" The setting is stored for the remote control cur‐
rently in use.
HD Radio™ reception
*
Many stations broadcast both analog and digital
signals.
License conditions HD Radio™ technology manufactured under li‐
cense from iBiquity Digital Corp. U. S. and For‐
eign Patents. HD Radio™ and the HD and HD
Radio logos are proprietary trademarks of iBiq‐
uity Digital Corp.
Activating/deactivating digital radio
reception
1.
"Radio"
2. "FM" or "AM"
3. Open "Options".
4. "HD Radio Reception"
The setting is stored for the remote control cur‐
rently in use. This symbol is displayed in the status line
when the audio signal is digital.
In areas in which the station is not continuously
received in digital mode, the playback switches
between analog and digital reception. Due to
time delayed broadcasting, there may be repe‐
titions or interruptions. In this case, switch off
digital radio reception.
Displaying additional information
Some
stations broadcast additional information
on the current track, such as the name of the ar‐
tist.
1. Select the desired station.
2. Open "Options".
3. "Station info"
Selecting a substation This symbol indicates that a main station also
broadcasts additional substations. The station
name of the main station ends in HD1. Station
names
of the substations end in HD2, HD3, etc.
1. Select the desired station.
2. Press the controller.
3. Select the substation.
When reception is poor, the substation is muted
for several seconds. If reception is interrupted
for an extended period, it switches back to the
main station.
Seite 173
173Online Edition for Part no. 01 40 2 606 497 - 03 11 490
Reference Mobility Communication
Entertainment Navigation Driving tips Controls At a glance
Page 201 of 299
▷
DVD changer*.
▷ Rear CD/DVD player.
▷ External device in rear.
If a video image is being played back in the rear,
the rear CD/DVD player cannot be selected in
the front.
Operation
is the same as for the front video play‐
back, refer to page 181.
Radio
When the same radio source is selected in the
front and rear (e.g., FM/AM), the same radio sta‐
tion is played.
Operation is the same as for the front radio, refer
to page 172.
CD/multimedia
CD/DVD
When the same audio source (front CD/DVD
player, rear CD/DVD player, DVD changer) is se‐
lected in the front and rear, the same material is
played.
Operation is the same as for the front CD/DVD,
refer to page 179.
Notes on CDs/DVDs, refer to page 185.
Music collection*
Music can only be stored and data can only be
exported and imported via the front CD/DVD
player or the USB interface in the glove com‐
partment.
When music collections are selected in the front
and rear, they are played back separately.
Operation is the same as for the front music col‐
lection, refer to page 186.
Tone
Only treble and bass can be set in the rear. The
settings are made separately for the left and
right headphones.
Operation is the same as for the front tone, refer
to page 170. Adjusting
The following settings are available:
▷
"Rear displays"
▷ "Language/Units": language can be set
globally for all screens.
▷ "Tone"
Options menu
The split screen is not available and there is no
Integrated Owner's Manual.
Operation
is the same as for the front menu op‐
tions, refer to page 21.
Enabling
Enabling operation in the rear
Only possible via the iDrive in the front.
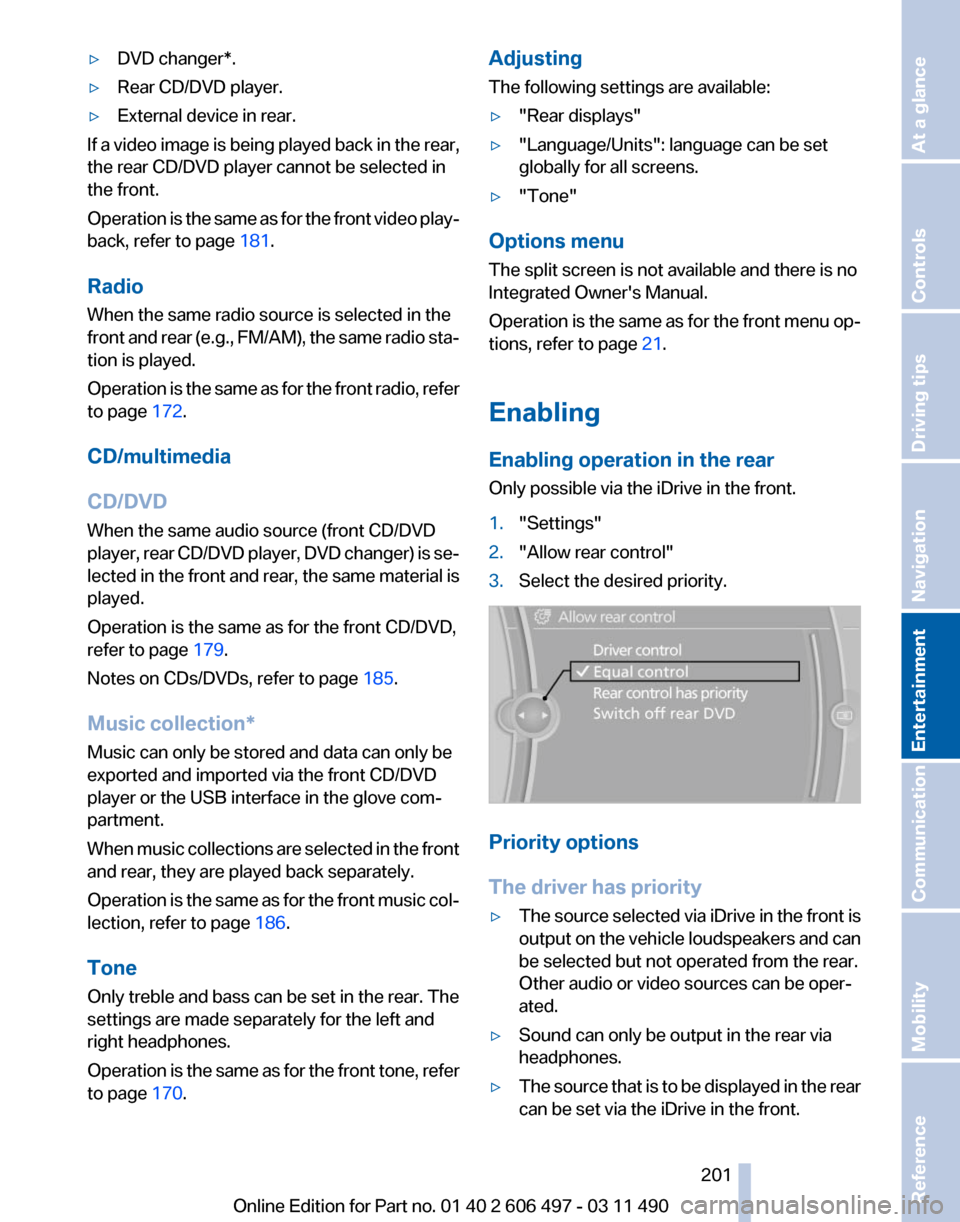
1. "Settings"
2. "Allow rear control"
3. Select the desired priority. Priority options
The driver has priority
▷
The source selected via iDrive in the front is
output
on the vehicle loudspeakers and can
be selected but not operated from the rear.
Other audio or video sources can be oper‐
ated.
▷ Sound can only be output in the rear via
headphones.
▷ The source that is to be displayed in the rear
can be set via the iDrive in the front.
Seite 201
201Online Edition for Part no. 01 40 2 606 497 - 03 11 490
Reference Mobility Communication
Entertainment Navigation Driving tips Controls At a glance
Page 203 of 299
Due to the large number of different audio and
video devices available on the market, it cannot
be ensured that every audio and video device
will be displayed correctly on the screen.
Connecting an external device
1.
Fold down the cover in front of the cinch
sockets on the CD/DVD player.
2. Connect the external device to the RCA
sockets.
▷Video: yellow socket.
▷ Audio: white and red socket.
Starting playback
1. "CD/Multimedia"
2. "External devices"
3. Select the or symbol.
Volume
The volume of the sound output is dependent
on the audio device. If this volume differs mark‐
edly
from the volume of the other audio sources,
it is advisable to adjust the volumes.
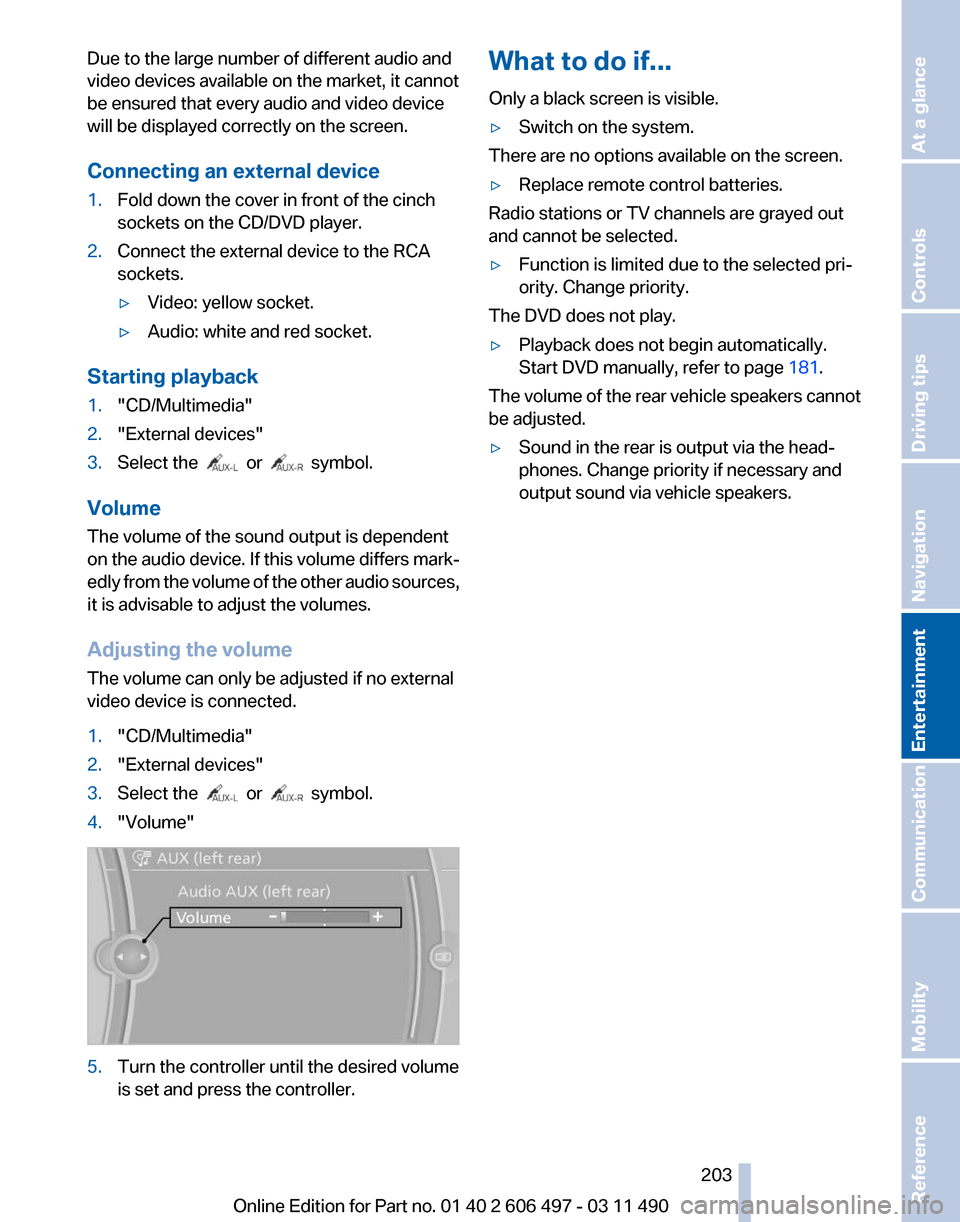
Adjusting the volume
The volume can only be adjusted if no external
video device is connected.
1. "CD/Multimedia"
2. "External devices"
3. Select the or symbol.
4. "Volume" 5.
Turn the controller until the desired volume
is set and press the controller. What to do if...
Only a black screen is visible.
▷
Switch on the system.
There are no options available on the screen.
▷ Replace remote control batteries.
Radio stations or TV channels are grayed out
and cannot be selected.
▷ Function is limited due to the selected pri‐
ority. Change priority.
The DVD does not play.
▷ Playback does not begin automatically.
Start DVD manually, refer to page 181.
The volume of the rear vehicle speakers cannot
be adjusted.
▷ Sound in the rear is output via the head‐
phones. Change priority if necessary and
output sound via vehicle speakers.
Seite 203
203Online Edition for Part no. 01 40 2 606 497 - 03 11 490
Reference Mobility Communication
Entertainment Navigation Driving tips Controls At a glance
Page 206 of 299
Suggesting a destination
A destination or trip can be sent to the front as
a suggestion. The suggestion can be adopted,
stored, or declined in the front. This function is
not available with the following setting:
"Driver
control".
1. Enter the destination.
2. "Suggest destination"
Contacts
Operation is the same as for the front contacts.
BMW Assist
Operation is the same as for BMW Assist in the
front, refer to page 234.
Adjusting
The following settings are available:
▷ "Rear display"
▷ "Language/Units": language can be set
globally for all screens.
▷ "Tone"
▷ "Climate"
Vehicle information
Computer content can be displayed. Operation
is only possible in the front.
Options menu
The split screen is not available and there is no
Integrated Owner's Manual.
Operation
is the same as for the front menu op‐
tions, refer to page 21.
Enabling
Enabling operation in the rear
Only possible via the iDrive in the front.
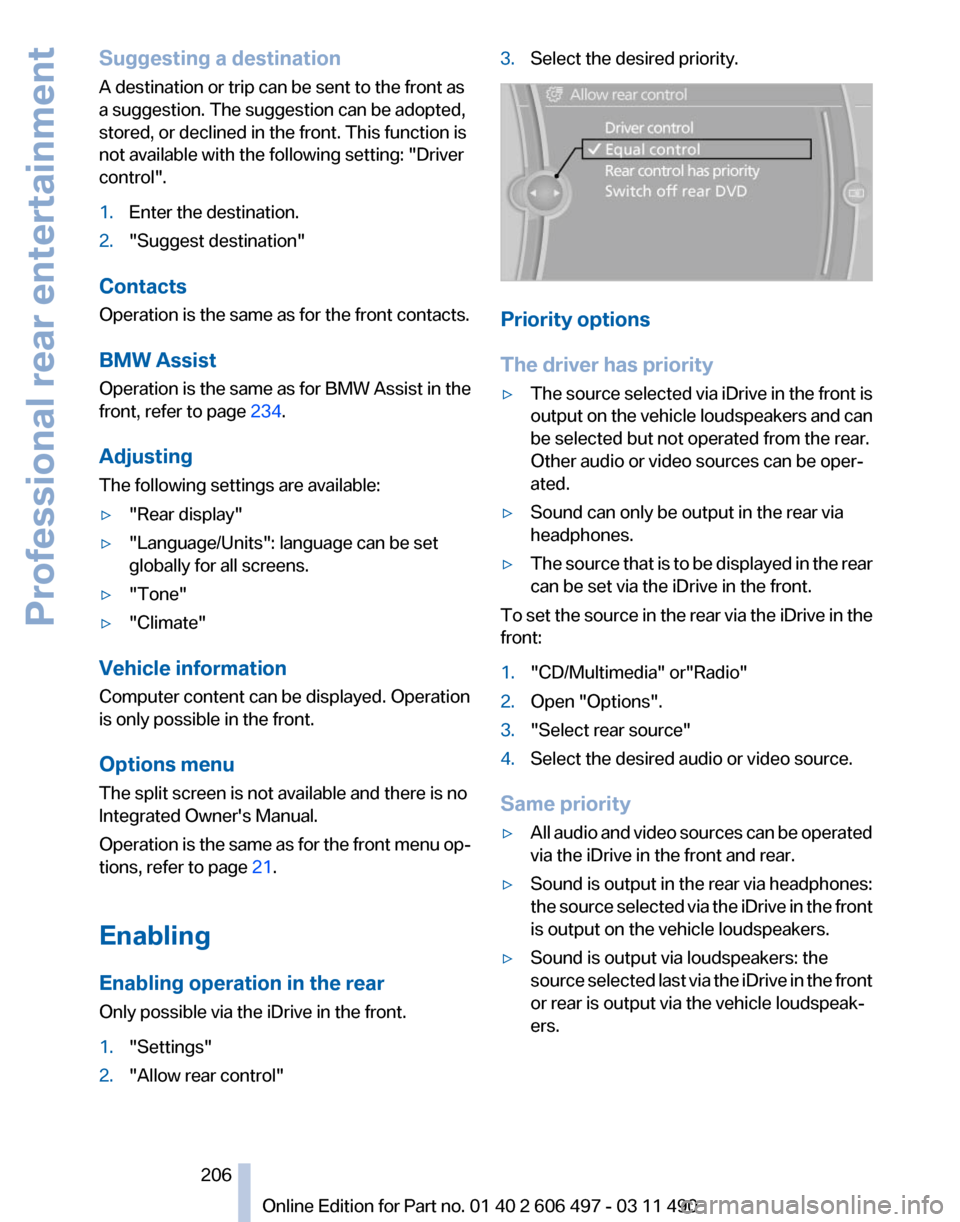
1. "Settings"
2. "Allow rear control" 3.
Select the desired priority. Priority options
The driver has priority
▷
The source selected via iDrive in the front is
output
on the vehicle loudspeakers and can
be selected but not operated from the rear.
Other audio or video sources can be oper‐
ated.
▷ Sound can only be output in the rear via
headphones.
▷ The source that is to be displayed in the rear
can be set via the iDrive in the front.
To set the source in the rear via the iDrive in the
front:
1. "CD/Multimedia" or"Radio"
2. Open "Options".
3. "Select rear source"
4. Select the desired audio or video source.
Same priority
▷ All audio and video sources can be operated
via the iDrive in the front and rear.
▷ Sound is output in the rear via headphones:
the
source selected via the iDrive in the front
is output on the vehicle loudspeakers.
▷ Sound is output via loudspeakers: the
source
selected last via the iDrive in the front
or rear is output via the vehicle loudspeak‐
ers.
Seite 206
206 Online Edition for Part no. 01 40 2 606 497 - 03 11 490
Professional rear entertainment