BMW 745LI SEDAN 2002 Owners Manual
Manufacturer: BMW, Model Year: 2002, Model line: 745LI SEDAN, Model: BMW 745LI SEDAN 2002Pages: 208, PDF Size: 6.33 MB
Page 111 of 208
Practical interior accessories
110 lock and close the doors; this precaution
prevents children from using the sun blinds
and injuring themselves, etc.<
To automatically extend and retract
the sun blinds You can extend and retract the sun blinds
together by briefly pressing button 3. Rear cooler
*
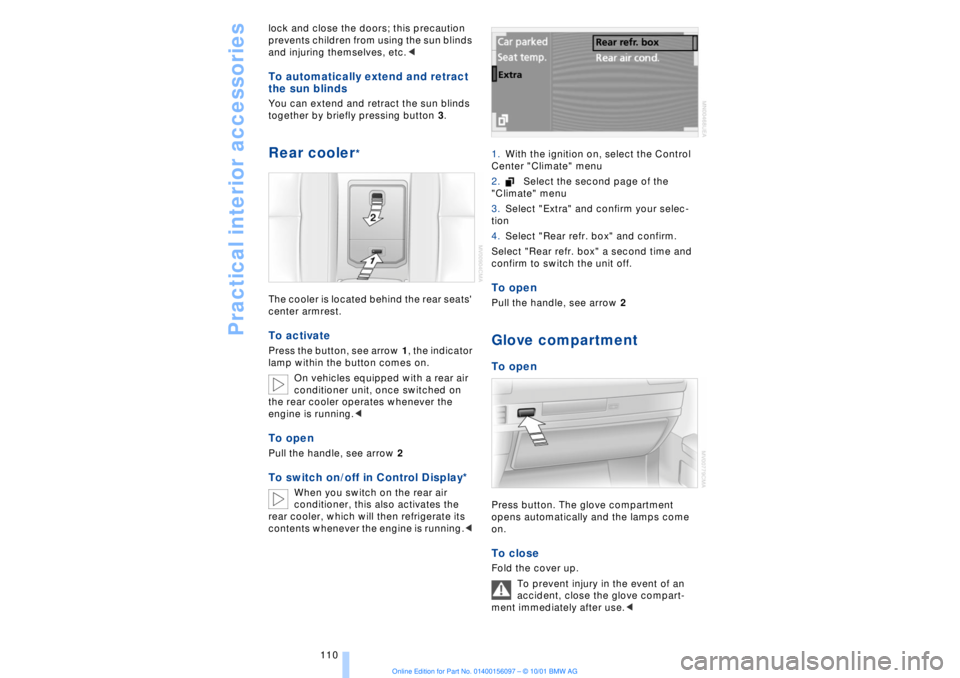
The cooler is located behind the rear seats'
center armrest. To activate Press the button, see arrow 1, the indicator
lamp within the button comes on.
On vehicles equipped with a rear air
conditioner unit, once switched on
the rear cooler operates whenever the
engine is running.< To openPull the handle, see arrow 2To switch on/off in Control Display*
When you switch on the rear air
conditioner, this also activates the
rear cooler, which will then refrigerate its
contents whenever the engine is running.< 1.With the ignition on, select the Control
Center "Climate" menu
2.Select the second page of the
"Climate" menu
3.Select "Extra" and confirm your selec-
tion
4.Select "Rear refr. box" and confirm.
Select "Rear refr. box" a second time and
confirm to switch the unit off.
To openPull the handle, see arrow 2Glove compartment To openPress button. The glove compartment
opens automatically and the lamps come
on. To close Fold the cover up.
To prevent injury in the event of an
accident, close the glove compart-
ment immediately after use.<
Page 112 of 208
At a glanceControlsDriving tipsCommunicationsNavigationEntertainmentMobilityReference
111
Rechargeable flashlight The flashlight is located on the left-hand
side of the glove compartment.
It features integral overload protection, so
it can be left in its holder continuously.
Be sure that the flashlight is switched
off when it is inserted into its holder.
Failure to comply with this precaution
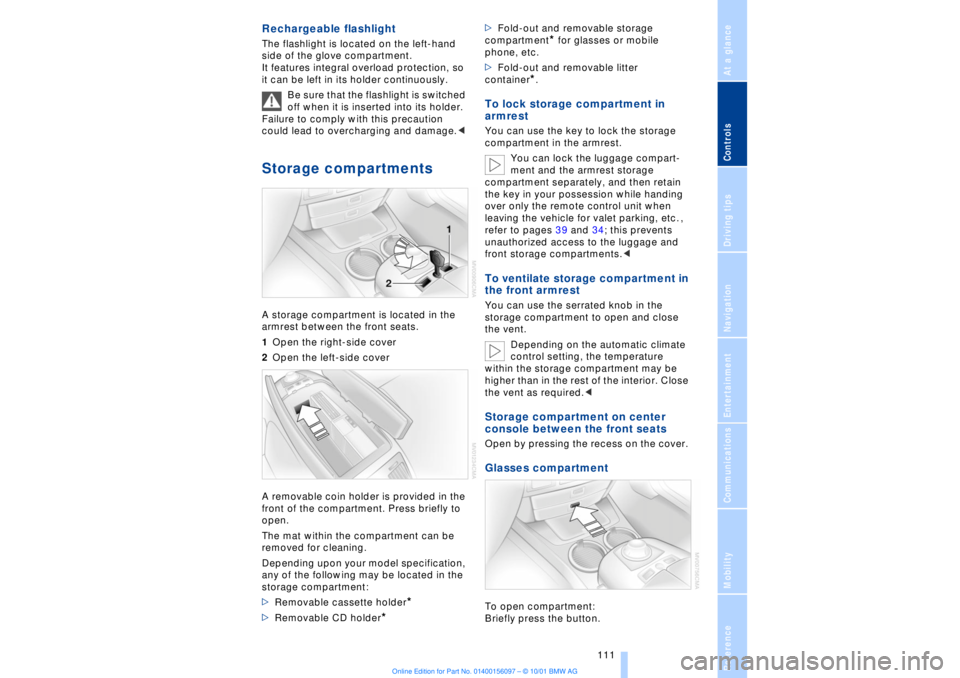
could lead to overcharging and damage.< Storage compartments A storage compartment is located in the
armrest between the front seats.
1Open the right-side cover
2Open the left-side cover
A removable coin holder is provided in the
front of the compartment. Press briefly to
open.
The mat within the compartment can be
removed for cleaning.
Depending upon your model specification,
any of the following may be located in the
storage compartment:
>Removable cassette holder
*
>Removable CD holder
* >Fold-out and removable storage
compartment
* for glasses or mobile
phone, etc.
>Fold-out and removable litter
container
*.
To lock storage compartment in
armrest You can use the key to lock the storage
compartment in the armrest.
You can lock the luggage compart-
ment and the armrest storage
compartment separately, and then retain
the key in your possession while handing
over only the remote control unit when
leaving the vehicle for valet parking, etc. ,
refer to pages 39 and 34; this prevents
unauthorized access to the luggage and
front storage compartments.< To ventilate storage compartment in
the front armrest You can use the serrated knob in the
storage compartment to open and close
the vent.
Depending on the automatic climate
control setting, the temperature
within the storage compartment may be
higher than in the rest of the interior. Close
the vent as required.< Storage compartment on center
console between the front seats Open by pressing the recess on the cover. Glasses compartment To open compartment:
Briefly press the button.
Page 113 of 208
Practical interior accessories
112 You can remove the insert tray for cleaning.
Storage compartment in center
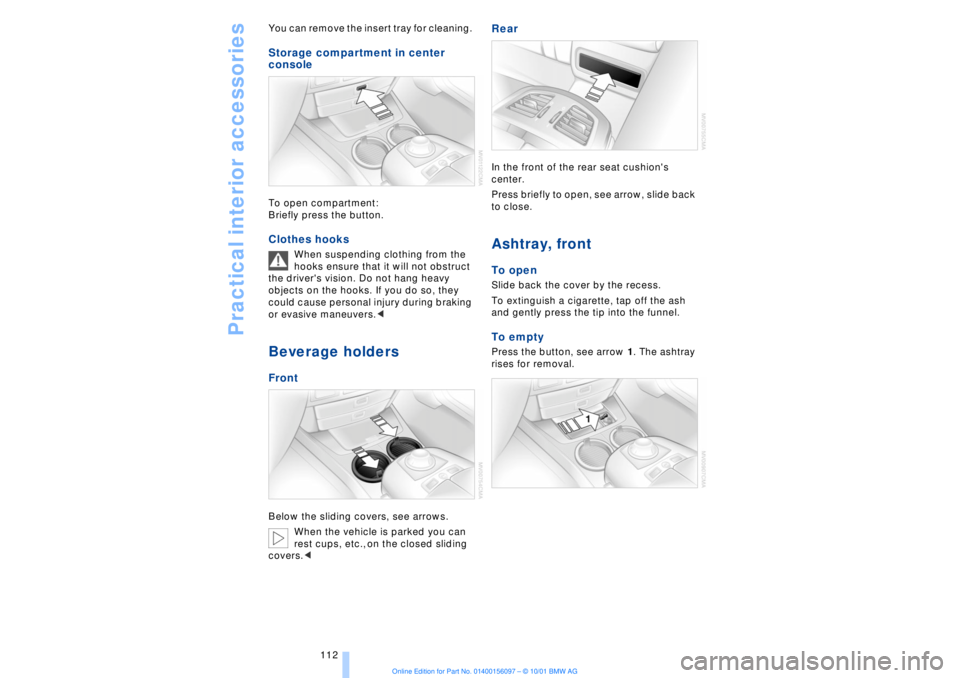
console To open compartment:
Briefly press the button. Clothes hooks
When suspending clothing from the
hooks ensure that it will not obstruct
the driver's vision. Do not hang heavy
objects on the hooks. If you do so, they
could cause personal injury during braking
or evasive maneuvers.<
Beverage holders Front Below the sliding covers, see arrows.
When the vehicle is parked you can
rest cups, etc., on the closed sliding
covers.<
Rear In the front of the rear seat cushion's
center.
Press briefly to open, see arrow, slide back
to close. Ashtray, front To open Slide back the cover by the recess.
To extinguish a cigarette, tap off the ash
and gently press the tip into the funnel. To empty Press the button, see arrow 1. The ashtray
rises for removal.
Page 114 of 208
At a glanceControlsDriving tipsCommunicationsNavigationEntertainmentMobilityReference
113
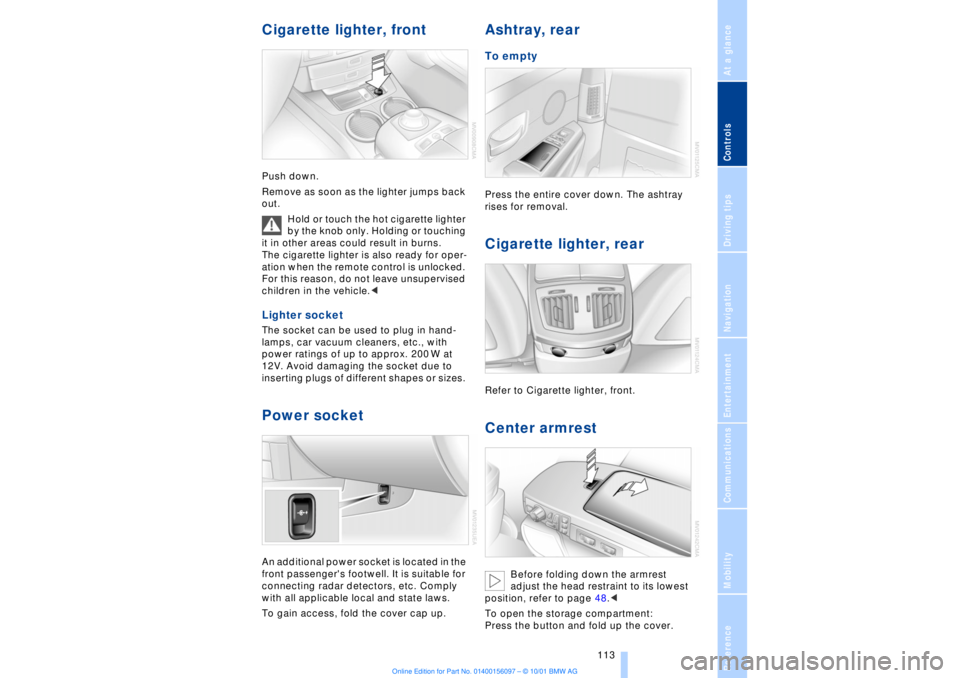
Cigarette lighter, frontPush down.
Remove as soon as the lighter jumps back
out.
Hold or touch the hot cigarette lighter
by the knob only. Holding or touching
it in other areas could result in burns.
The cigarette lighter is also ready for oper-
ation when the remote control is unlocked.
For this reason, do not leave unsupervised
children in the vehicle.< Lighter socket The socket can be used to plug in hand-
lamps, car vacuum cleaners, etc., with
power ratings of up to approx. 200 W at
12V. Avoid damaging the socket due to
inserting plugs of different shapes or sizes. Power socket An additional power socket is located in the
front passenger's footwell. It is suitable for
connecting radar detectors, etc. Comply
with all applicable local and state laws.
To gain access, fold the cover cap up.
Ashtray, rear To empty Press the entire cover down. The ashtray
rises for removal. Cigarette lighter, rear Refer to Cigarette lighter, front. Center armrest
Before folding down the armrest
adjust the head restraint to its lowest
position, refer to page 48.<
To open the storage compartment:
Press the button and fold up the cover.
Page 115 of 208
Practical interior accessories
114
Ski bag*
Designed for safe, convenient transport of
up to 4 pairs of standard skis or up to 2
snowboards.
The ski bag itself plus the additional
capacity provided by the luggage compart-
ment make it possible to transport skis with
a length of up to 6.9 ft (2.1 0 m). When skis
of 6.9 ft (2.1 0 m) in length are loaded the
ski bag will tend to contract, reducing its
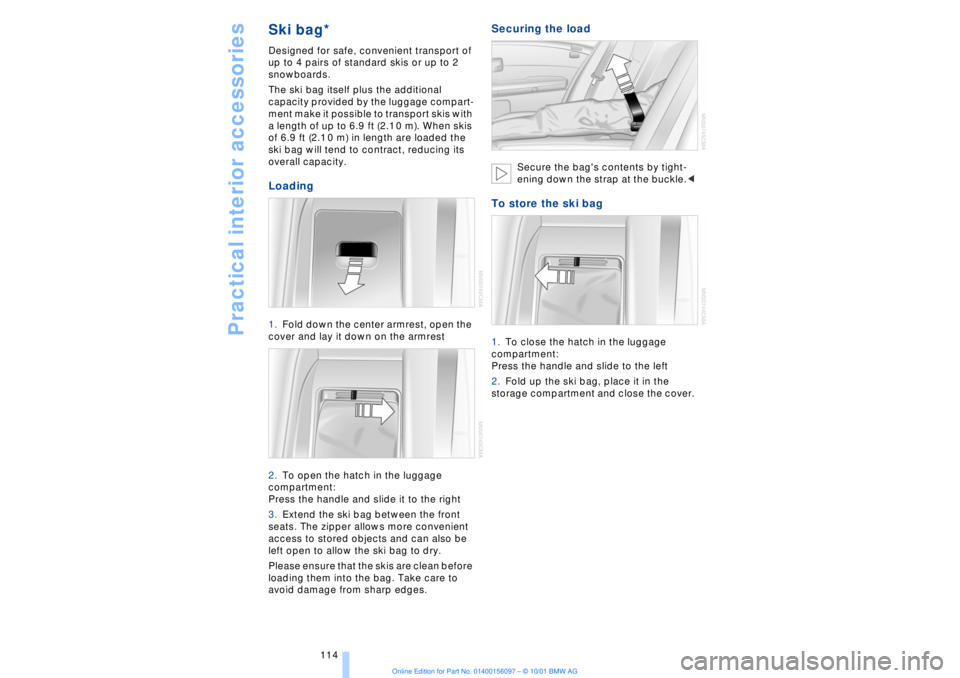
overall capacity. Loading 1.Fold down the center armrest, open the
cover and lay it down on the armrest
2.To open the hatch in the luggage
compartment:
Press the handle and slide it to the right
3.Extend the ski bag between the front
seats. The zipper allows more convenient
access to stored objects and can also be
left open to allow the ski bag to dry.
Please ensure that the skis are clean before
loading them into the bag. Take care to
avoid damage from sharp edges.
Securing the load
Secure the bag's contents by tight-
ening down the strap at the buckle.<
To store the ski bag 1.To close the hatch in the luggage
compartment:
Press the handle and slide to the left
2.Fold up the ski bag, place it in the
storage compartment and close the cover.
Page 116 of 208

At a glanceControlsDriving tipsCommunicationsNavigationEntertainmentMobilityReference
115
Page 117 of 208
Page 118 of 208
Driving tips
This section is designed to provide you
with extra support by supplying
information useful in dealing with
specific driving and operating conditions.
Page 119 of 208
Things to remember when driving
118
Things to remember when drivingBreak-in procedures To ensure that your vehicle continues to
furnish optimal economy of operation
throughout an extended service life, we
request that you devote careful attention to
the following section. Engine and differential The first 1,200 miles (2,000 km):
During this initial period you should attempt
to avoid constant, steady-state operation
and vary both vehicle and engine speeds
as often as possible. Until the break-in
period has been completed you should
also refrain from exceeding the following:
>4500 rpm and 105 mph (170 km/h)
Always obey all official speed limits.
Avoid full-throttle operation and use of the
transmission's kickdown mode during
these initial miles.
After the first 1,200 miles (2,000 km) you
can gradually increase both engine and
vehicle speeds to their respective maxima.
You should also comply with these break-in
procedures if the engine or differential is
replaced at a later point. Tires Due to technical factors associated with
their manufacture, tires do not achieve their
full traction potential until after an initial
break-in period. We thus urge you to drive
with extra care during the first 200 miles
(300 kilometers). Brake system Brakes require an initial break-in period of
approx. 300 miles (500 km) to achieve
optimal contact and wear patterns
between brake pads and rotors.
General driving notes High temperatures
Extreme temperatures occur at the
catalytic converter on this and every
catalyst-equipped vehicle. Do not remove
the heat shields installed adjacent to
various sections of the exhaust system,
and never apply undercoating to them.
When driving, standing at idle and while
parking take care to avoid possible contact
between the hot exhaust system and any
highly flammable materials such as hay,
leaves, grass, etc. Such contact could lead
to a fire, and with it the risk of serious prop-
erty damage as well as personal injury.<
Parking the vehicle Condensation forms in the air conditioner
system during operation, and then exits
under the vehicle. Traces of condensed
water under the vehicle are thus normal.Aquaplaning
When driving on wet or slushy roads,
reduce road speed. If you do not, a
wedge of water can form between tires and
road surface. This phenomenon is referred
to aquaplaning, and is characterized by a
partial or complete loss of contact between
tires and road surface, ultimately under-
mining your ability to steer and brake the
vehicle.<
Water-covered streets
Do not drive through water on the
road if it is deeper than 1 foot (30 cm),
and then only at walking speed at the most.
Otherwise, the vehicle's engine, the elec-
trical systems and the transmission may be
damaged.<
Page 120 of 208
At a glanceControlsDriving tipsCommunicationsNavigationEntertainmentMobilityReference
119
Brake system Braking with ABS The best way to achieve optimal response
from the ABS is to apply maximum pres-
sure to the brake pedal during emergencyÐ
panic stops. Since the vehicle maintains
steering responsiveness, you can never-
theless avoid possible obstacles with a
minimum of steering effort.
Pulsation at the brake pedal combines with
sounds from the hydraulic circuits to indi-
cate to the driver that ABS is in its active
mode.
Do not drive with your foot resting on
the brake pedal. Even light but
consistent pedal pressure can lead to high
temperatures, brake wear and possibly
even brake failure.< Disc brakes
Driving in wet conditions While driving in wet conditions and in
heavy rain, it is a good idea to apply light
pressure to the brake pedal every few
miles. Monitor traffic conditions to ensure
that this maneuver does not endanger
other road users. The heat generated in this
process helps dry the pads and rotors to
ensure that full braking efficiency will then
be available when you need it. Hills You can retain full and unimpaired braking
efficiency by downshifting to a gear in
which only minimal brake applications are
needed when descending long or steep
downhill stretches.
You can further enhance the engine's
braking effect by selecting a lower gear in
the automatic transmission's manual
mode, downshifting as far as first gear on
extremely steep stretches, refer to
page 68. This strategy helps you avoid
placing excessive loads on the brake
system.
Corrosion When the vehicle is driven only occasion-
ally, during extended periods when the
vehicle is not used at all, and in operating
conditions where brake applications are
less frequent, there is an increased
tendency for corrosion to form on rotors,
while contaminants accumulate on the
brake pads. This occurs because the
minimal pressure which must be exerted by
the pads during brake applications to clean
the rotors is not reached.
Should corrosion form on the brake rotors,
the brakes will tend to respond with a
pulsating effect that even extended appli-
cation will fail to cure.
Never allow the vehicle to coast with
the transmission in neutral Ð or with
the engine switched off; there is no engine
braking when the transmission is in neutral,
and no power-assist for brakes and
steering when the engine is not running.
Never allow floor mats, carpets or any other
objects to protrude into the area around the
accelerator and brake pedals and obstruct
their movement.< Brake pads
If the brake pad wear indicator lamp
appears in the Check Control,
accompanied by a text: please take
careful note of the additional information in
the Control Display panel.
Warning lamp for Canadian models.
The brake pads have reached their
minimum pad thickness. Have them
replaced at your BMW center as soon as
possible.
For your own safety: use only brake
pads that BMW has released for your
particular vehicle model. Because BMW
cannot assess the suitability of other brake
pads for use on your vehicle, we are unable
to assume continued responsibility for the
vehicle's operating safety if non-approved
pads are installed.<