display BMW 745LI SEDAN 2002 Owner's Guide
[x] Cancel search | Manufacturer: BMW, Model Year: 2002, Model line: 745LI SEDAN, Model: BMW 745LI SEDAN 2002Pages: 208, PDF Size: 6.33 MB
Page 71 of 208
Driving
70 To obtain maximum acceleration (for
passing maneuvers, etc.) during
operation in the manual mode, use the
kickdown or downshift manually.<
Malfunctions A status message will appear in the Check
Control panel to alert you to any malfunc-
tions in the transmission-control system.
Please note any supplementary information
that appears in the Control Display. The
directional arrows also start to flash in the
Info Display.
While it will remain still possible to move
the selector lever to any desired position,
the transmission will revert to operation in
its default mode with only a limited number
of forward gears.
Some types of malfunction will make it
impossible to engage all gears.
The engine may respond with reduced
output when accelerating from a standing
start.
If this happens, avoid extreme engine loads
and consult the nearest BMW center.
If no status messages appear in the
Info Display you should accelerate
carefully to confirm that you are driving in
the desired direction.
Never work in the engine compartment
with any of the forward or reverse gears
engaged, as the vehicle could start to
move. Engage the parking brake, refer to
page 62.< Manual release of transmission
lockout You can respond to any interruptions in the
supply of electrical power, for instance, if
the battery is discharged or disconnected,
by releasing the transmission lockout
manually.
To prevent the drive wheels from
locking up and sliding, the transmis-
sion lockout must always be released
manually before the vehicle is towed.<
Press the brake pedal before
releasing the transmission lockout manually. If the brakes are not applied, the
vehicle could start to roll if parked on a
steep slope.
The transmission lockout should only be
released for towing. Remember to engage
the transmission lockout when you repark
the vehicle after moving it.
Should it also be necessary to release the
parking brake manually (owing to a
discharged battery, etc.), always adhere to
the following sequence:
1.Start by manually releasing the parking
brake, refer to page 65
2.Then proceed to manually release the
transmission lockout.<
Jump-starting and towing, refer to
pages 187 and 188.
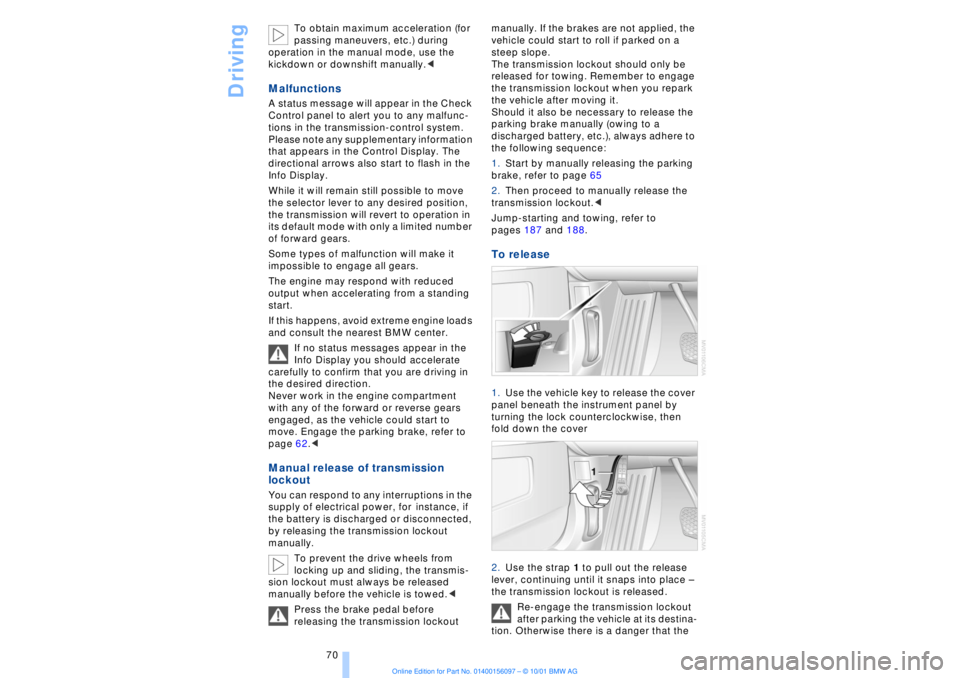
To release 1.Use the vehicle key to release the cover
panel beneath the instrument panel by
turning the lock counterclockwise, then
fold down the cover
2.Use the strap 1 to pull out the release
lever, continuing until it snaps into place Ð
the transmission lockout is released.
Re-engage the transmission lockout
after parking the vehicle at its destina-
tion. Otherwise there is a danger that the
Page 72 of 208
At a glanceControlsDriving tipsCommunicationsNavigationEntertainmentMobilityReference
71
vehicle could start to roll if parked on a
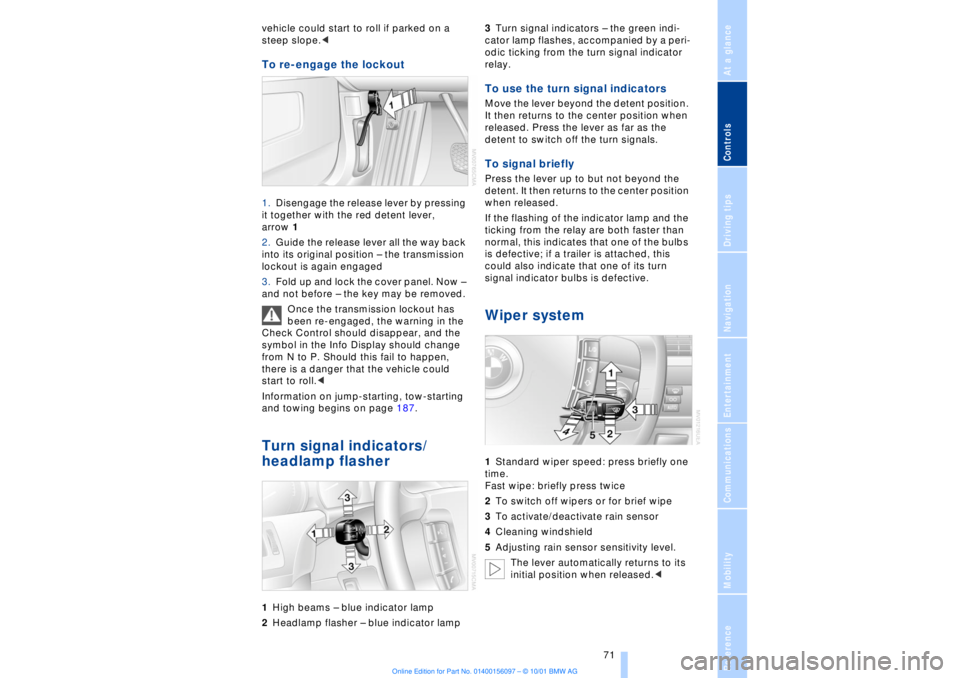
steep slope.< To re-engage the lockout 1.Disengage the release lever by pressing
it together with the red detent lever,
arrow 1
2.Guide the release lever all the way back
into its original position Ð the transmission
lockout is again engaged
3.Fold up and lock the cover panel. Now Ð
and not before Ð the key may be removed.
Once the transmission lockout has
been re-engaged, the warning in the
Check Control should disappear, and the
symbol in the Info Display should change
from N to P. Should this fail to happen,
there is a danger that the vehicle could
start to roll.<
Information on jump-starting, tow-starting
and towing begins on page 187. Turn signal indicators/
headlamp flasher1High beams Ð blue indicator lamp
2Headlamp flasher Ð blue indicator lamp 3Turn signal indicators Ð the green indi-
cator lamp flashes, accompanied by a peri-
odic ticking from the turn signal indicator
relay.
To use the turn signal indicatorsMove the lever beyond the detent position.
It then returns to the center position when
released. Press the lever as far as the
detent to switch off the turn signals. To signal brieflyPress the lever up to but not beyond the
detent. It then returns to the center position
when released.
If the flashing of the indicator lamp and the
ticking from the relay are both faster than
normal, this indicates that one of the bulbs
is defective; if a trailer is attached, this
could also indicate that one of its turn
signal indicator bulbs is defective. Wiper system1Standard wiper speed: press briefly one
time.
Fast wipe: briefly press twice
2To switch off wipers or for brief wipe
3To activate/deactivate rain sensor
4Cleaning windshield
5Adjusting rain sensor sensitivity level.
The lever automatically returns to its
initial position when released.<
Page 75 of 208
Driving
74 3Briefly tap lever up or down:
>To interrupt the cruise control
3Maintain pressure on lever for approx.
3 seconds:
>To cancel display of multilevel preset
mode in speedometer.
Press 1 or pull 2 the lever beyond the
detent to reactivate the display for the
multilevel preset mode.<
4Press button briefly:
>Select stored speed
4Maintain pressure on button for approx.
3 seconds:
>To store and delete speed settings, refer
to page 75.
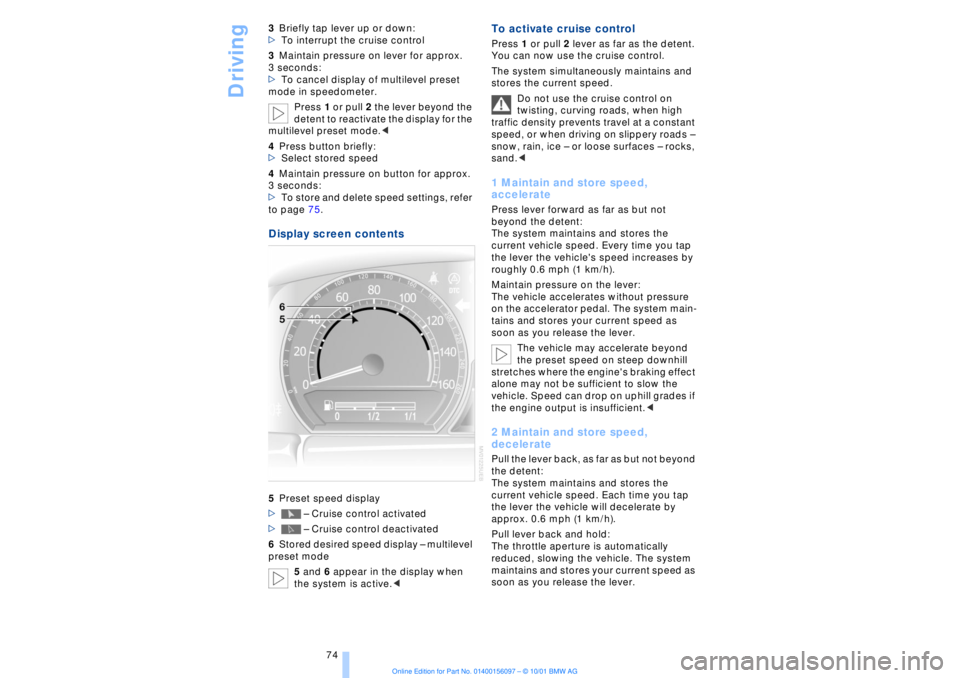
Display screen contents 5Preset speed display
> Ð Cruise control activated
> Ð Cruise control deactivated
6Stored desired speed display Ð multilevel
preset mode
5 and 6 appear in the display when
the system is active.<
To activate cruise control Press 1 or pull 2 lever as far as the detent.
You can now use the cruise control.
The system simultaneously maintains and
stores the current speed.
Do not use the cruise control on
twisting, curving roads, when high
traffic density prevents travel at a constant
speed, or when driving on slippery roads Ð
snow, rain, ice Ð or loose surfaces Ð rocks,
sand.< 1 Maintain and store speed,
accelerate Press lever forward as far as but not
beyond the detent:
The system maintains and stores the
current vehicle speed. Every time you tap
the lever the vehicle's speed increases by
roughly 0.6 mph (1 km/h).
Maintain pressure on the lever:
The vehicle accelerates without pressure
on the accelerator pedal. The system main-
tains and stores your current speed as
soon as you release the lever.
The vehicle may accelerate beyond
the preset speed on steep downhill
stretches where the engine's braking effect
alone may not be sufficient to slow the
vehicle. Speed can drop on uphill grades if
the engine output is insufficient.< 2 Maintain and store speed,
deceleratePull the lever back, as far as but not beyond
the detent:
The system maintains and stores the
current vehicle speed. Each time you tap
the lever the vehicle will decelerate by
approx. 0.6 mph (1 km/h).
Pull lever back and hold:
The throttle aperture is automatically
reduced, slowing the vehicle. The system
maintains and stores your current speed as
soon as you release the lever.
Page 76 of 208
At a glanceControlsDriving tipsCommunicationsNavigationEntertainmentMobilityReference
75
3 Interrupt cruise control Briefly press the lever up or down while the
cruise control is active. The status
message 5 in the Info Display is no longer
highlighted. You can use the cruise control
again as required.
In addition, cruise control is interrupted
automatically
>When you apply pressure to the brake
pedal
>when you select the automatic transmis-
sion's neutral range N
>when the DSC (Dynamic Stability
Control) system is in active operation. 4 To recall stored speed Briefly press button 4: The vehicle acceler-
ates to and maintains the last speed stored. To deactivate the cruise control The stored speed is deleted from the
system memory when you switch off the
ignition. To activate multilevel preset mode Push 1 or pull 2 the lever beyond the
detent.
The system maintains and stores the
current speed, which is also displayed as a
preset speed 5 and as the desired speed 6.
If no levels are programmed, with the
graduated function in operation you
can push or pull the lever past the detent to
increase or decrease the vehicle's speed in
increments of 6.2 mph (10 km/h).<1 Change preset level Press 1 or pull 2 the lever beyond the
detent: The preset speed progresses to the
next desired speed. The lowest desired
speed that it is possible to select is roughly
18 mph (30 km/h).3 Interrupt cruise control With the cruise control active, briefly tap
the lever up or down.
To deactivate the multilevel preset
modeThe multilevel preset mode is deactivated
when you switch off the ignition. Multilevel preset mode Ð Storing
speeds
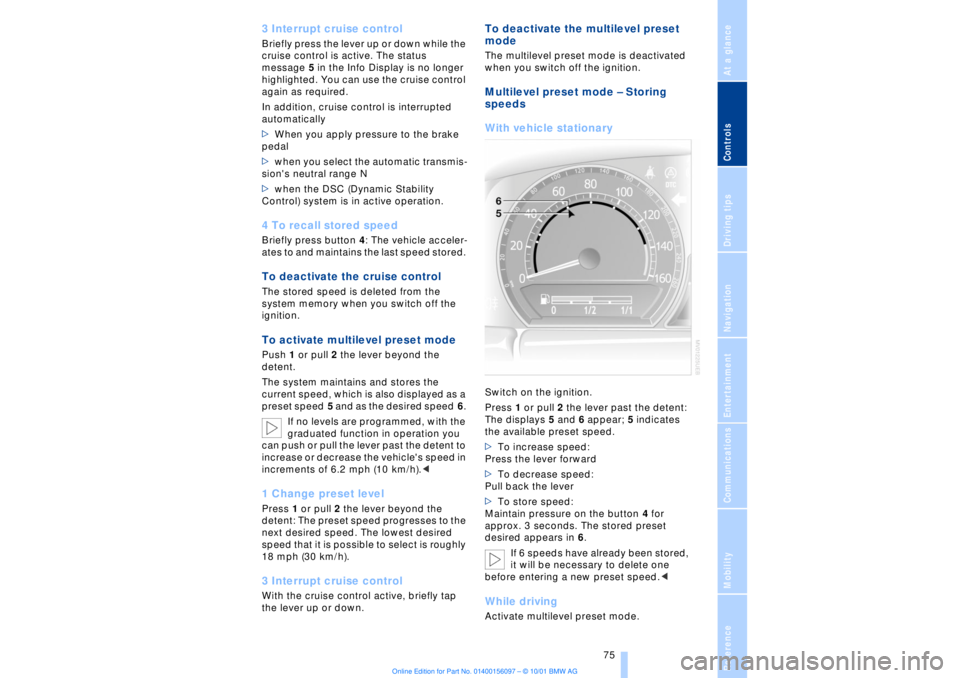
With vehicle stationary Switch on the ignition.
Press 1 or pull 2 the lever past the detent:
The displays 5 and 6 appear; 5 indicates
the available preset speed.
>To increase speed:
Press the lever forward
>To decrease speed:
Pull back the lever
>To store speed:
Maintain pressure on the button 4 for
approx. 3 seconds. The stored preset
desired appears in 6.
If 6 speeds have already been stored,
it will be necessary to delete one
before entering a new preset speed.
Page 77 of 208
Driving
76 Maintain pressure on button 4 for approx.
3 seconds. The system adopts and
displays your current speed as a preset
speed.
If all of the graduations flash at once
this indicates that 6 speeds have
already been stored. You must then delete
at least one.<
To delete preset speeds Select the desired preset speed 5.
Maintain pressure on button 4 for approx.
3 seconds. The desired preset speed is
deleted.
Page 78 of 208
At a glanceControlsDriving tipsCommunicationsNavigationEntertainmentMobilityReference
77
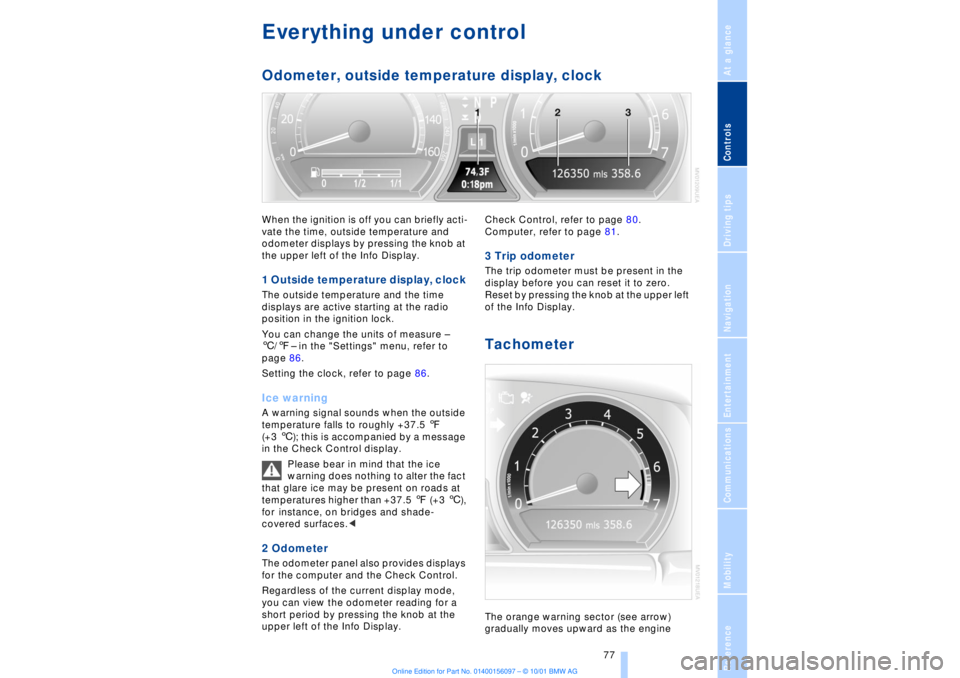
Everything under control Odometer, outside temperature display, clockWhen the ignition is off you can briefly acti-
vate the time, outside temperature and
odometer displays by pressing the knob at
the upper left of the Info Display. 1 Outside temperature display, clock The outside temperature and the time
displays are active starting at the radio
position in the ignition lock.
You can change the units of measure Ð
6/7Ð in the "Settings" menu, refer to
page 86.
Setting the clock, refer to page 86.Ice warning A warning signal sounds when the outside
temperature falls to roughly +37.5 7
(+3 6); this is accompanied by a message
in the Check Control display.
Please bear in mind that the ice
warning does nothing to alter the fact
that glare ice may be present on roads at
temperatures higher than +37.5 7 (+3 6),
for instance, on bridges and shade-
covered surfaces.< 2 Odometer The odometer panel also provides displays
for the computer and the Check Control.
Regardless of the current display mode,
you can view the odometer reading for a
short period by pressing the knob at the
upper left of the Info Display. Check Control, refer to page 80.
Computer, refer to page 81.
3 Trip odometer The trip odometer must be present in the
display before you can reset it to zero.
Reset by pressing the knob at the upper left
of the Info Display. Tachometer The orange warning sector (see arrow)
gradually moves upward as the engine
Page 79 of 208
Everything under control
78 warms to its normal operating temperature.
The segments disappear in sequence as
the engine warms to its normal operating
temperature.
Avoid allowing the engine speed to rise as
far as the orange warning sector whenever
possible.
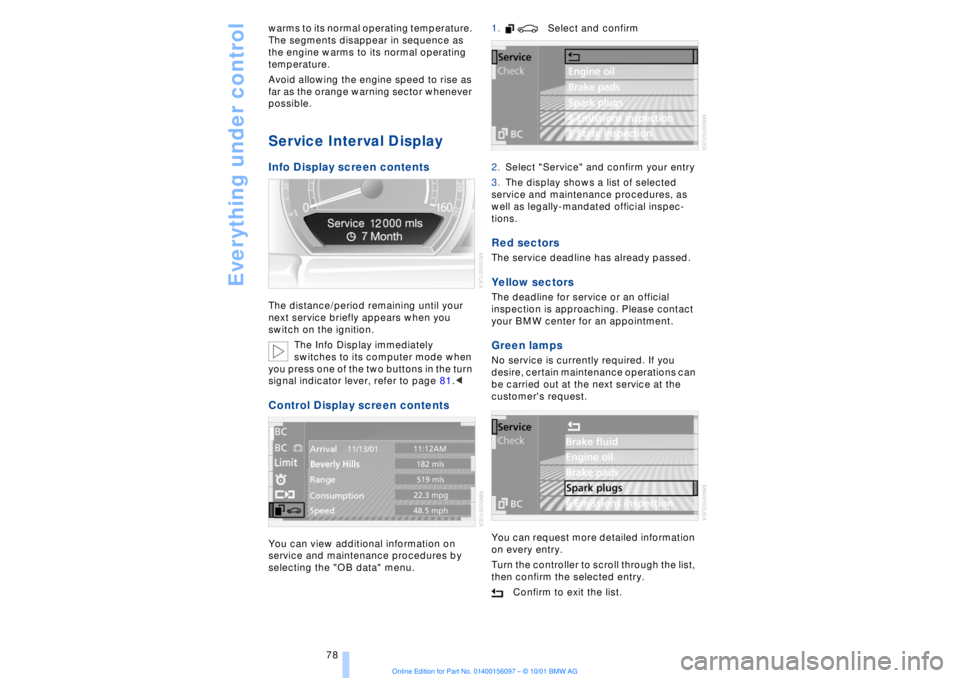
Service Interval Display Info Display screen contents The distance/period remaining until your
next service briefly appears when you
switch on the ignition.
The Info Display immediately
switches to its computer mode when
you press one of the two buttons in the turn
signal indicator lever, refer to page 81.< Control Display screen contents You can view additional information on
service and maintenance procedures by
selecting the "OB data" menu. 1. Select and confirm
2.Select "Service" and confirm your entry
3.The display shows a list of selected
service and maintenance procedures, as
well as legally-mandated official inspec-
tions.
Red sectors The service deadline has already passed. Yellow sectors The deadline for service or an official
inspection is approaching. Please contact
your BMW center for an appointment. Green lamps No service is currently required. If you
desire, certain maintenance operations can
be carried out at the next service at the
customer's request.
You can request more detailed information
on every entry.
Turn the controller to scroll through the list,
then confirm the selected entry.
Confirm to exit the list.
Page 80 of 208
At a glanceControlsDriving tipsCommunicationsNavigationEntertainmentMobilityReference
79
The display will automatically go out after a
short period; you can also cancel the
display manually using the symbol.
The Service Interval Display does not
continue counting down to the next
service during periods when the vehicle is
stored with the battery disconnected or the
battery switch OFF.
Please remember that brake fluid should
be changed every two years at the latest,
even if the display does not yet indicate
that service is required, for additional infor-
mation refer to page 178.
This same precaution applies to all of the
other service and maintenance operations
scheduled according to periodic inter-
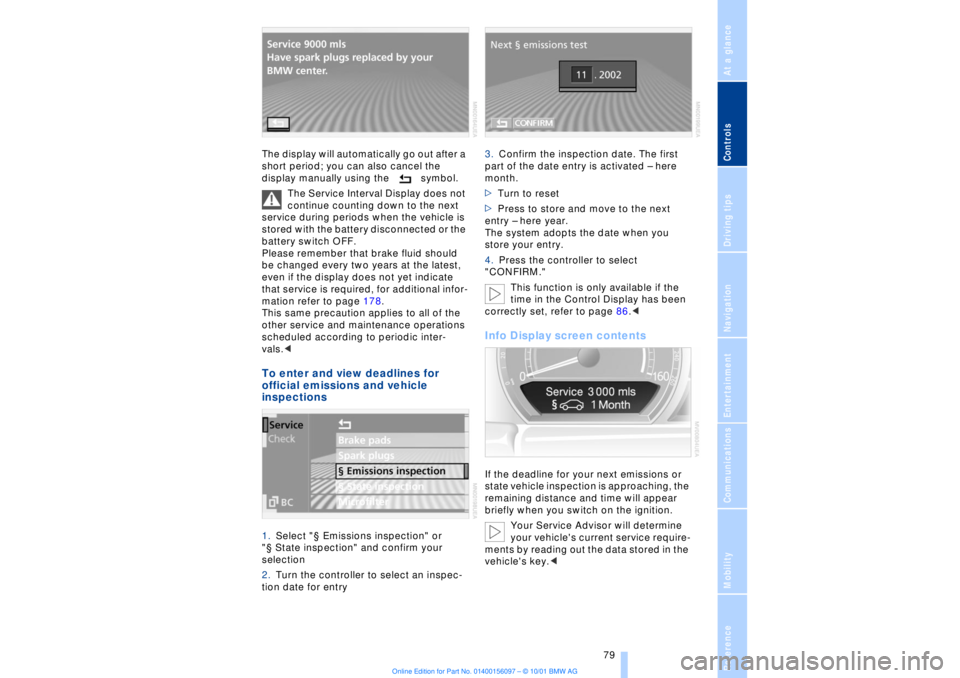
vals.< To enter and view deadlines for
official emissions and vehicle
inspections 1.Select "¤ Emissions inspection" or
"¤ State inspection" and confirm your
selection
2.Turn the controller to select an inspec-
tion date for entry 3.Confirm the inspection date. The first
part of the date entry is activated Ð here
month.
>Turn to reset
>Press to store and move to the next
entry Ð here year.
The system adopts the date when you
store your entry.
4.Press the controller to select
"CONFIRM."
This function is only available if the
time in the Control Display has been
correctly set, refer to page 86.<
Info Display screen contents If the deadline for your next emissions or
state vehicle inspection is approaching, the
remaining distance and time will appear
briefly when you switch on the ignition.
Your Service Advisor will determine
your vehicle's current service require-
ments by reading out the data stored in the
vehicle's key.<
Page 81 of 208
Everything under control
80
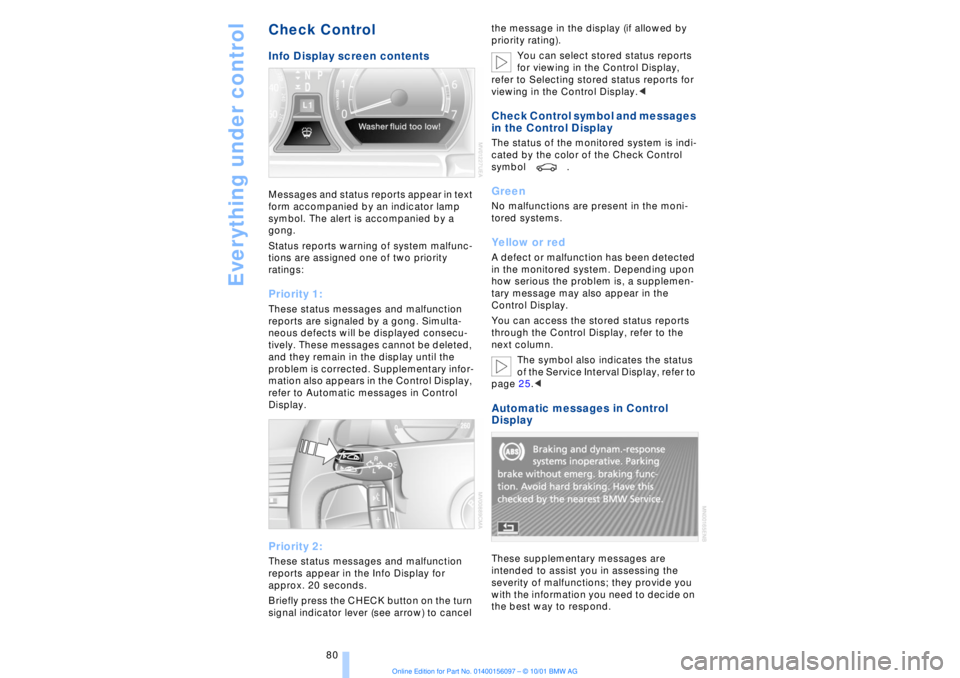
Check Control Info Display screen contents Messages and status reports appear in text
form accompanied by an indicator lamp
symbol. The alert is accompanied by a
gong.
Status reports warning of system malfunc-
tions are assigned one of two priority
ratings: Priority 1: These status messages and malfunction
reports are signaled by a gong. Simulta-
neous defects will be displayed consecu-
tively. These messages cannot be deleted,
and they remain in the display until the
problem is corrected. Supplementary infor-
mation also appears in the Control Display,
refer to Automatic messages in Control
Display. Priority 2: These status messages and malfunction
reports appear in the Info Display for
approx. 20 seconds.
Briefly press the CHECK button on the turn
signal indicator lever (see arrow) to cancel the message in the display (if allowed by
priority rating).
You can select stored status reports
for viewing in the Control Display,
refer to Selecting stored status reports for
viewing in the Control Display.<
Check Control symbol and messages
in the Control Display The status of the monitored system is indi-
cated by the color of the Check Control
symbol . Green No malfunctions are present in the moni-
tored systems. Yellow or red A defect or malfunction has been detected
in the monitored system. Depending upon
how serious the problem is, a supplemen-
tary message may also appear in the
Control Display.
You can access the stored status reports
through the Control Display, refer to the
next column.
The symbol also indicates the status
of the Service Interval Display, refer to
page 25.< Automatic messages in Control
Display These supplementary messages are
intended to assist you in assessing the
severity of malfunctions; they provide you
with the information you need to decide on
the best way to respond.
Page 82 of 208
At a glanceControlsDriving tipsCommunicationsNavigationEntertainmentMobilityReference
81
Select and confirm to cancel the
display.
Selecting stored status reports for
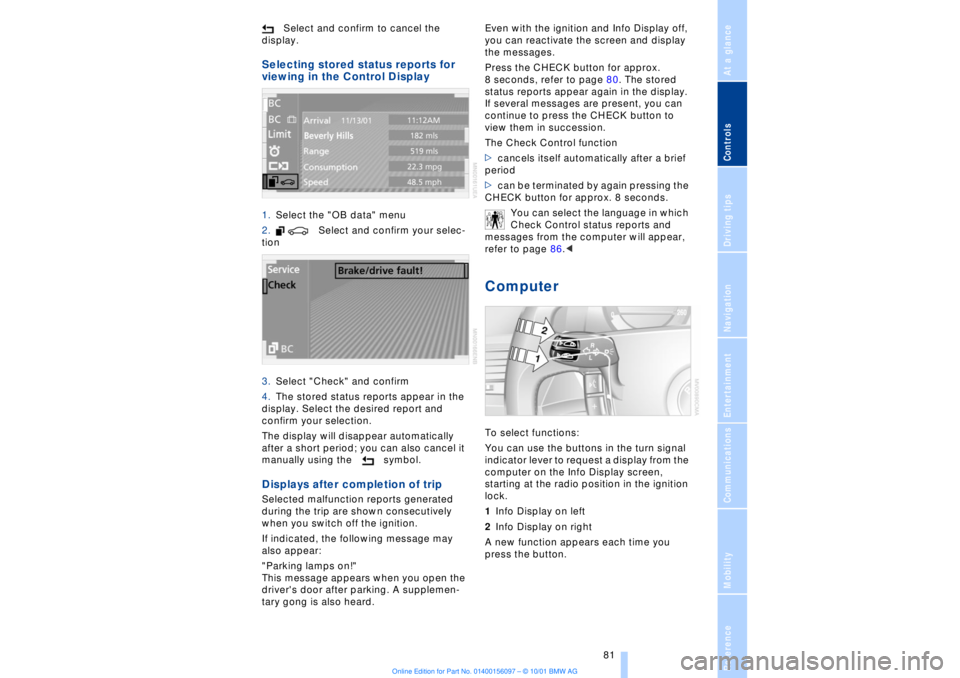
viewing in the Control Display 1.Select the "OB data" menu
2. Select and confirm your selec-
tion
3.Select "Check" and confirm
4.The stored status reports appear in the
display. Select the desired report and
confirm your selection.
The display will disappear automatically
after a short period; you can also cancel it
manually using the symbol. Displays after completion of trip Selected malfunction reports generated
during the trip are shown consecutively
when you switch off the ignition.
If indicated, the following message may
also appear:
"Parking lamps on!"
This message appears when you open the
driver's door after parking. A supplemen-
tary gong is also heard. Even with the ignition and Info Display off,
you can reactivate the screen and display
the messages.
Press the CHECK button for approx.
8 seconds, refer to page 80. The stored
status reports appear again in the display.
If several messages are present, you can
continue to press the CHECK button to
view them in succession.
The Check Control function
>cancels itself automatically after a brief
period
>can be terminated by again pressing the
CHECK button for approx. 8 seconds.
You can select the language in which
Check Control status reports and
messages from the computer will appear,
refer to page 86.<
Computer To select functions:
You can use the buttons in the turn signal
indicator lever to request a display from the
computer on the Info Display screen,
starting at the radio position in the ignition
lock.
1Info Display on left
2Info Display on right
A new function appears each time you
press the button.