navigation system BMW 760Li 2004 E66 Owner's Guide
[x] Cancel search | Manufacturer: BMW, Model Year: 2004, Model line: 760Li, Model: BMW 760Li 2004 E66Pages: 232, PDF Size: 5.27 MB
Page 77 of 232
Controls
75Reference
At a glance
Driving tips
Communications
Navigation
Entertainment
Mobility
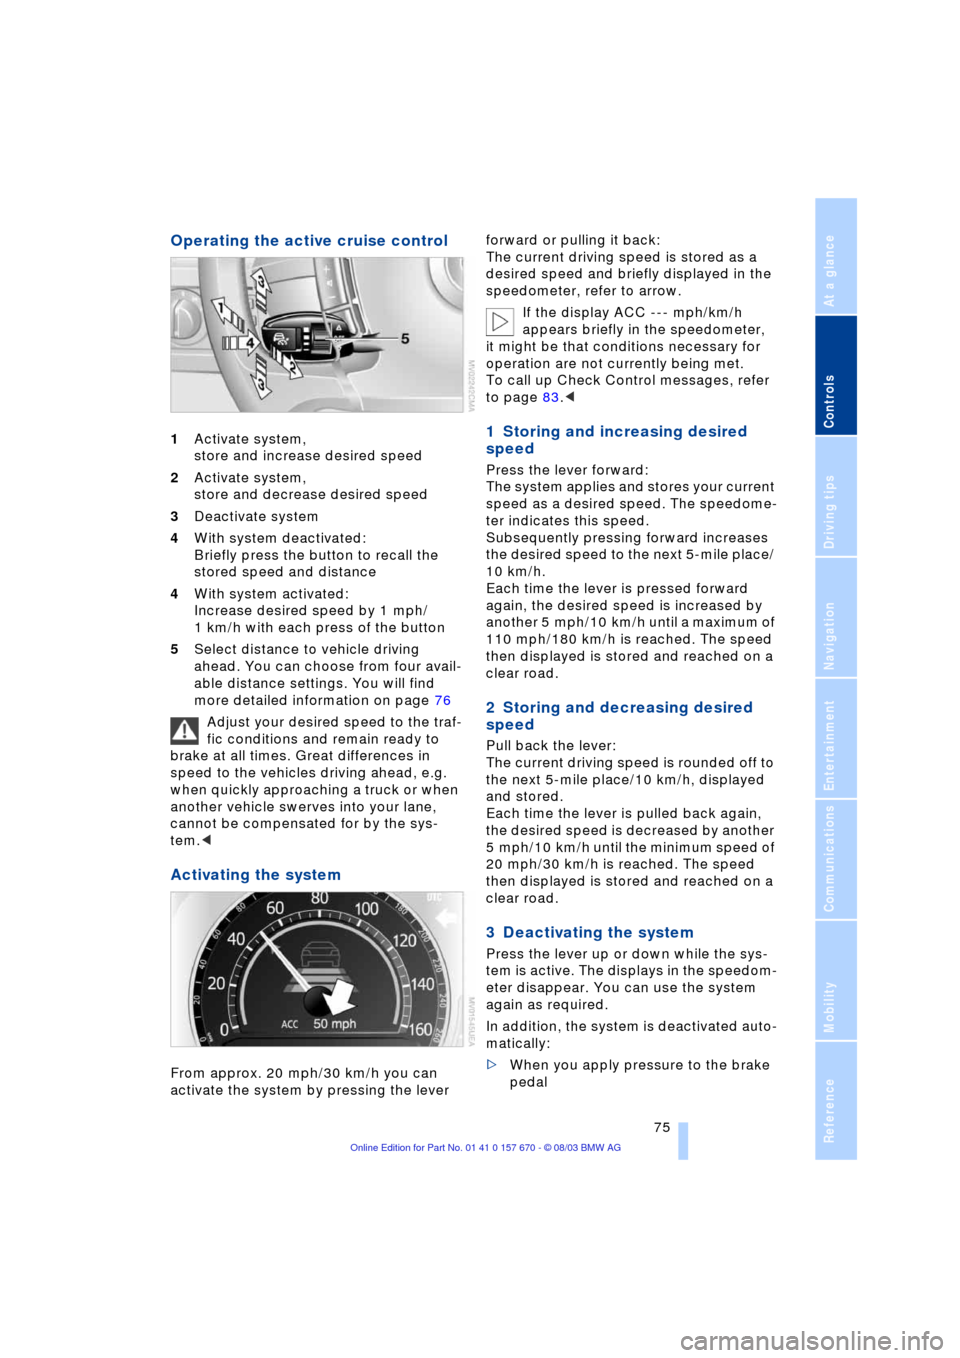
Operating the active cruise control
1Activate system,
store and increase desired speed
2Activate system,
store and decrease desired speed
3Deactivate system
4With system deactivated:
Briefly press the button to recall the
stored speed and distance
4With system activated:
Increase desired speed by 1 mph/
1 km/h with each press of the button
5Select distance to vehicle driving
ahead. You can choose from four avail-
able distance settings. You will find
more detailed information on page 76
Adjust your desired speed to the traf-
fic conditions and remain ready to
brake at all times. Great differences in
speed to the vehicles driving ahead, e.g.
when quickly approaching a truck or when
another vehicle swerves into your lane,
cannot be compensated for by the sys-
tem.<
Activating the system
From approx. 20 mph/30 km/h you can
activate the system by pressing the lever forward or pulling it back:
The current driving speed is stored as a
desired speed and briefly displayed in the
speedometer, refer to arrow.
If the display ACC --- mph/km/h
appears briefly in the speedometer,
it might be that conditions necessary for
operation are not currently being met.
To call up Check Control messages, refer
to page 83.<
1 Storing and increasing desired
speed
Press the lever forward:
The system applies and stores your current
speed as a desired speed. The speedome-
ter indicates this speed.
Subsequently pressing forward increases
the desired speed to the next 5-mile place/
10 km/h.
Each time the lever is pressed forward
again, the desired speed is increased by
another 5 mph/10 km/h until a maximum of
110 mph/180 km/h is reached. The speed
then displayed is stored and reached on a
clear road.
2 Storing and decreasing desired
speed
Pull back the lever:
The current driving speed is rounded off to
the next 5-mile place/10 km/h, displayed
and stored.
Each time the lever is pulled back again,
the desired speed is decreased by another
5 mph/10 km/h until the minimum speed of
20 mph/30 km/h is reached. The speed
then displayed is stored and reached on a
clear road.
3 Deactivating the system
Press the lever up or down while the sys-
tem is active. The displays in the speedom-
eter disappear. You can use the system
again as required.
In addition, the system is deactivated auto-
matically:
>When you apply pressure to the brake
pedal
Page 78 of 232
Driving
76 >When you select the automatic trans-
mission's neutral range N
>When you deactivate the DSC Dynamic
Stability Control
>When you actuate the parking brake
during driving
>When the system reduces the speed to
below 20 mph/30 km/h due to a traffic
situation.
The system deactivates automatically
when the speed is set to below
20 mph/30 km/h. A gong sounds and a
message appears in the Check Control.
The active intervention of the driver is
required, otherwise there is an accident
danger.<
Background lighting
You can switch off the background lighting
of the speedometer and tachometer
>when you have deactivated the system
>when the prewarning field in the
tachometer has gone out, refer to
page 80
>when the destination guidance system
of the navigation system is deactivated.
Press the lever up or down for approx.
1 second.
4 Resuming stored desired speed
and distance setting
Press button 4:
The displays appear in the speedometer.
The system is reactivated and uses the last
stored desired speed and distance setting.
4 Fine adjustment of desired speed
In the activated state, the desired speed
increases by 1 mph/1 km/h each time
button 4 is pressed briefly.
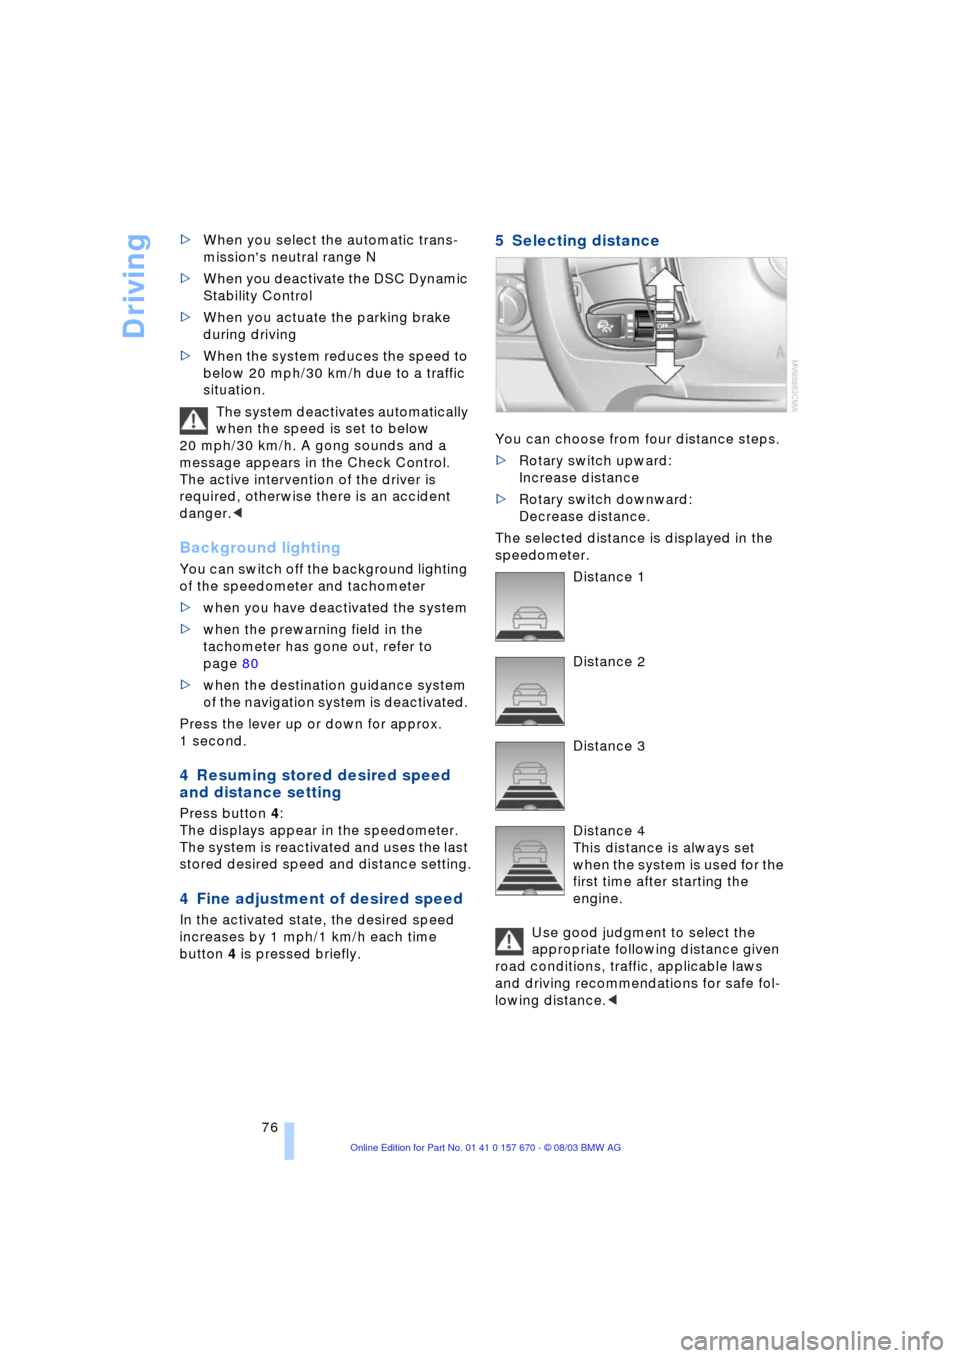
5 Selecting distance
You can choose from four distance steps.
>Rotary switch upward:
Increase distance
>Rotary switch downward:
Decrease distance.
The selected distance is displayed in the
speedometer.
Distance 1
Distance 2
Distance 3
Distance 4
This distance is always set
when the system is used for the
first time after starting the
engine.
Use good judgment to select the
appropriate following distance given
road conditions, traffic, applicable laws
and driving recommendations for safe fol-
lowing distance.<
Page 79 of 232
Controls
77Reference
At a glance
Driving tips
Communications
Navigation
Entertainment
Mobility
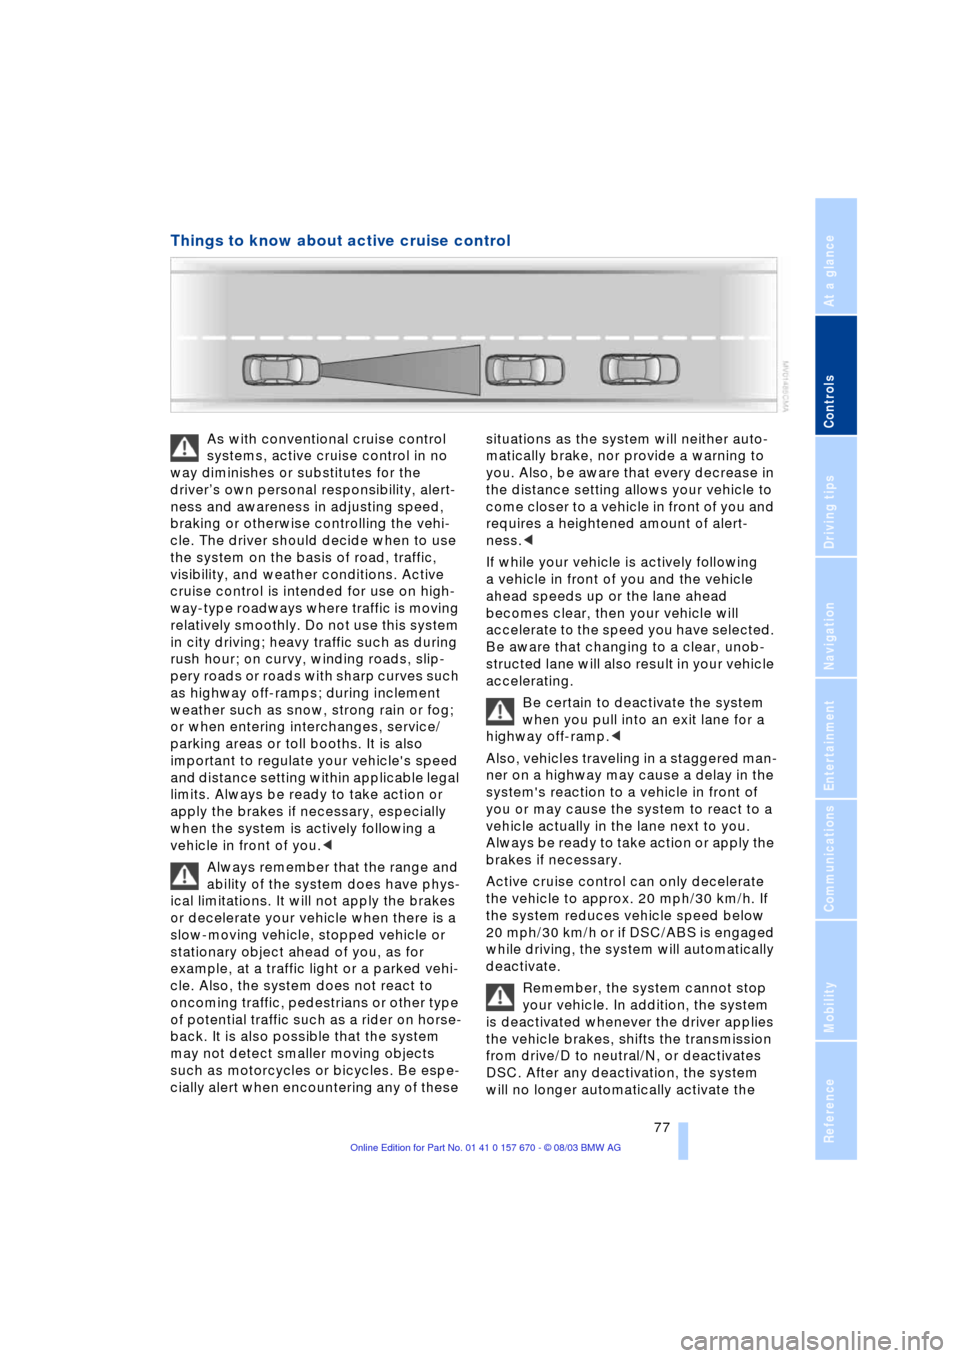
Things to know about active cruise control
As with conventional cruise control
systems, active cruise control in no
way diminishes or substitutes for the
driverÕs own personal responsibility, alert-
ness and awareness in adjusting speed,
braking or otherwise controlling the vehi-
cle. The driver should decide when to use
the system on the basis of road, traffic,
visibility, and weather conditions. Active
cruise control is intended for use on high-
way-type roadways where traffic is moving
relatively smoothly. Do not use this system
in city driving; heavy traffic such as during
rush hour; on curvy, winding roads, slip-
pery roads or roads with sharp curves such
as highway off-ramps; during inclement
weather such as snow, strong rain or fog;
or when entering interchanges, service/
parking areas or toll booths. It is also
important to regulate your vehicle's speed
and distance setting within applicable legal
limits. Always be ready to take action or
apply the brakes if necessary, especially
when the system is actively following a
vehicle in front of you.<
Always remember that the range and
ability of the system does have phys-
ical limitations. It will not apply the brakes
or decelerate your vehicle when there is a
slow-moving vehicle, stopped vehicle or
stationary object ahead of you, as for
example, at a traffic light or a parked vehi-
cle. Also, the system does not react to
oncoming traffic, pedestrians or other type
of potential traffic such as a rider on horse-
back. It is also possible that the system
may not detect smaller moving objects
such as motorcycles or bicycles. Be espe-
cially alert when encountering any of these situations as the system will neither auto-
matically brake, nor provide a warning to
you. Also, be aware that every decrease in
the distance setting allows your vehicle to
come closer to a vehicle in front of you and
requires a heightened amount of alert-
ness.<
If while your vehicle is actively following
a vehicle in front of you and the vehicle
ahead speeds up or the lane ahead
becomes clear, then your vehicle will
accelerate to the speed you have selected.
Be aware that changing to a clear, unob-
structed lane will also result in your vehicle
accelerating.
Be certain to deactivate the system
when you pull into an exit lane for a
highway off-ramp.<
Also, vehicles traveling in a staggered man-
ner on a highway may cause a delay in the
system's reaction to a vehicle in front of
you or may cause the system to react to a
vehicle actually in the lane next to you.
Always be ready to take action or apply the
brakes if necessary.
Active cruise control can only decelerate
the vehicle to approx. 20 mph/30 km/h. If
the system reduces vehicle speed below
20 mph/30 km/h or if DSC/ABS is engaged
while driving, the system will automatically
deactivate.
Remember, the system cannot stop
your vehicle. In addition, the system
is deactivated whenever the driver applies
the vehicle brakes, shifts the transmission
from drive/D to neutral/N, or deactivates
DSC. After any deactivation, the system
will no longer automatically activate the
Page 81 of 232
Controls
79Reference
At a glance
Driving tips
Communications
Navigation
Entertainment
Mobility
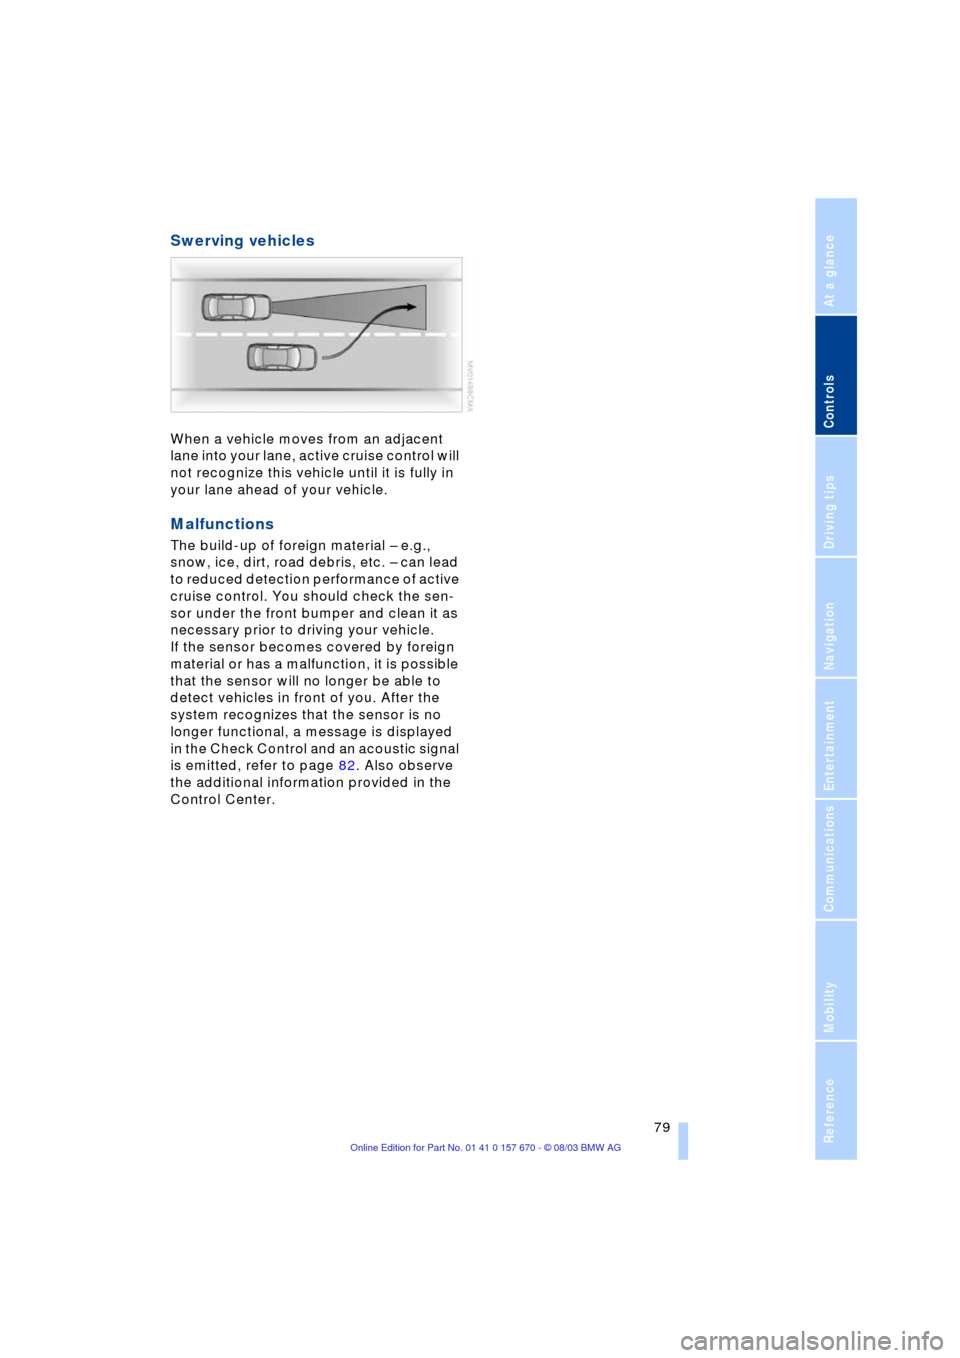
Swerving vehicles
When a vehicle moves from an adjacent
lane into your lane, active cruise control will
not recognize this vehicle until it is fully in
your lane ahead of your vehicle.
Malfunctions
The build-up of foreign material Ð e.g.,
snow, ice, dirt, road debris, etc. Ð can lead
to reduced detection performance of active
cruise control. You should check the sen-
sor under the front bumper and clean it as
necessary prior to driving your vehicle.
If the sensor becomes covered by foreign
material or has a malfunction, it is possible
that the sensor will no longer be able to
detect vehicles in front of you. After the
system recognizes that the sensor is no
longer functional, a message is displayed
in the Check Control and an acoustic signal
is emitted, refer to page 82. Also observe
the additional information provided in the
Control Center.
Page 85 of 232
Controls
83Reference
At a glance
Driving tips
Communications
Navigation
Entertainment
Mobility
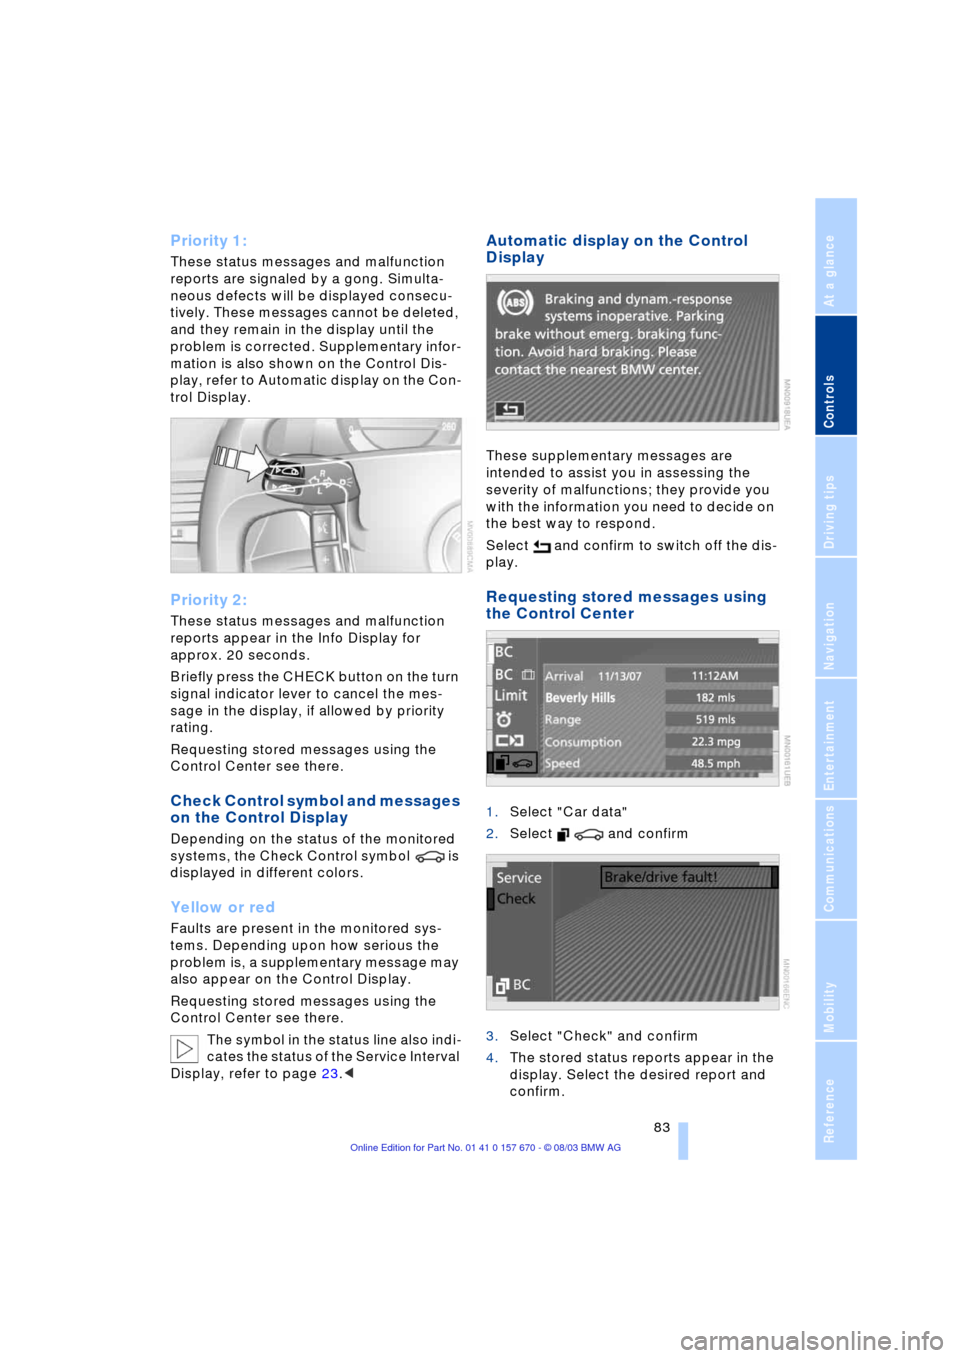
Priority 1:
These status messages and malfunction
reports are signaled by a gong. Simulta-
neous defects will be displayed consecu-
tively. These messages cannot be deleted,
and they remain in the display until the
problem is corrected. Supplementary infor-
mation is also shown on the Control Dis-
play, refer to Automatic display on the Con-
trol Display.
Priority 2:
These status messages and malfunction
reports appear in the Info Display for
approx. 20 seconds.
Briefly press the CHECK button on the turn
signal indicator lever to cancel the mes-
sage in the display, if allowed by priority
rating.
Requesting stored messages using the
Control Center see there.
Check Control symbol and messages
on the Control Display
Depending on the status of the monitored
systems, the Check Control symbol is
displayed in different colors.
Yellow or red
Faults are present in the monitored sys-
tems. Depending upon how serious the
problem is, a supplementary message may
also appear on the Control Display.
Requesting stored messages using the
Control Center see there.
The symbol in the status line also indi-
cates the status of the Service Interval
Display, refer to page 23.<
Automatic display on the Control
Display
These supplementary messages are
intended to assist you in assessing the
severity of malfunctions; they provide you
with the information you need to decide on
the best way to respond.
Select and confirm to switch off the dis-
play.
Requesting stored messages using
the Control Center
1.Select "Car data"
2.Select and confirm
3.Select "Check" and confirm
4.The stored status reports appear in the
display. Select the desired report and
confirm.
Page 87 of 232
Controls
85Reference
At a glance
Driving tips
Communications
Navigation
Entertainment
Mobility
Briefly press the button again to view the
last display.<
Fuel gauge
The fuel gauge display appears automati-
cally once the fuel level falls into the
reserve range. At the same time, the words
"Fuel reserve" appear. The tank still con-
tains approx. 2.6 gallons/10 liters of fuel.
It will not be possible to cancel the
computer display once the fuel level
drops into the reserve range. However, you
can still request a display of the travel
range. Computer, refer to page 84.<
Tank capacity: approx. 23.2 gallons/
88 liters. You can find information on refu-
eling on page 186.
If the tilt of the vehicle varies, when you are
driving in mountainous areas, for example,
the indicator may fluctuate slightly.
Refuel well before the tank is empty,
as otherwise engine functions will not
be ensured and damage can occur if you
drive down to the last drop.<
Cruising range
Displays the estimated cruising range
available with the remaining fuel. The sys-
tem calculates the cruising range based on
operating conditions and the amount of fuel
remaining in the tank. The basis for the cal-
culations is the average fuel consumption
over the preceding 20 miles/30 km.
Always refuel as soon as possible
once your range falls to below
30 miles/50 kilometers, as otherwise
engine functions are not ensured and dam-
age can occur.<
Refueling is only registered by the com-
puter for fuel amounts above approx.
1.3 gallons/5 liters.
Remaining distance
When you enter a destination in the naviga-
tion system or manually enter a distance in
the computer prior to departure, the sys-
tem can also display the distance remain-ing to your destination, refer to page 132
or 86.
The system automatically applies the dis-
tance to your destination using the route
recommended by the navigation system.
When you enter a destination in the
navigation system, any manual
entries will be overwritten no later than
once 1,640 ft/500 meters of the calculated
distance have elapsed.<
Energy Control/
Current fuel consumption
Shows the current fuel consumption. This
allows you to see whether your current
driving style is conducive to fuel economy
with minimum exhaust emissions.
Average fuel consumption
The average fuel consumption is calculated
for the time during which the engine is run-
ning.
You can use the Control Display to view
your fuel consumption rate over two differ-
ent distances, refer to Computer or Trip
computer.
Average speed
Periods with the vehicle parked and the
engine off are not included in the calcula-
tions of average speed.
Time of arrival
A display of your estimated time of arrival is
available whenever you enter a destination
in the navigation system, refer to page 132,
or enter the distance manually in the com-
puter, refer to page 86, prior to departure.
A requirement is that you have cor-
rectly set the time in the Control Cen-
ter, refer to page 88.<
Displays in the Control Display
You can activate the computer function at
any time by selecting it from the "Car data"
menu.
You have two possibilities to display infor-
mation of the computer:
Page 88 of 232
Everything under control
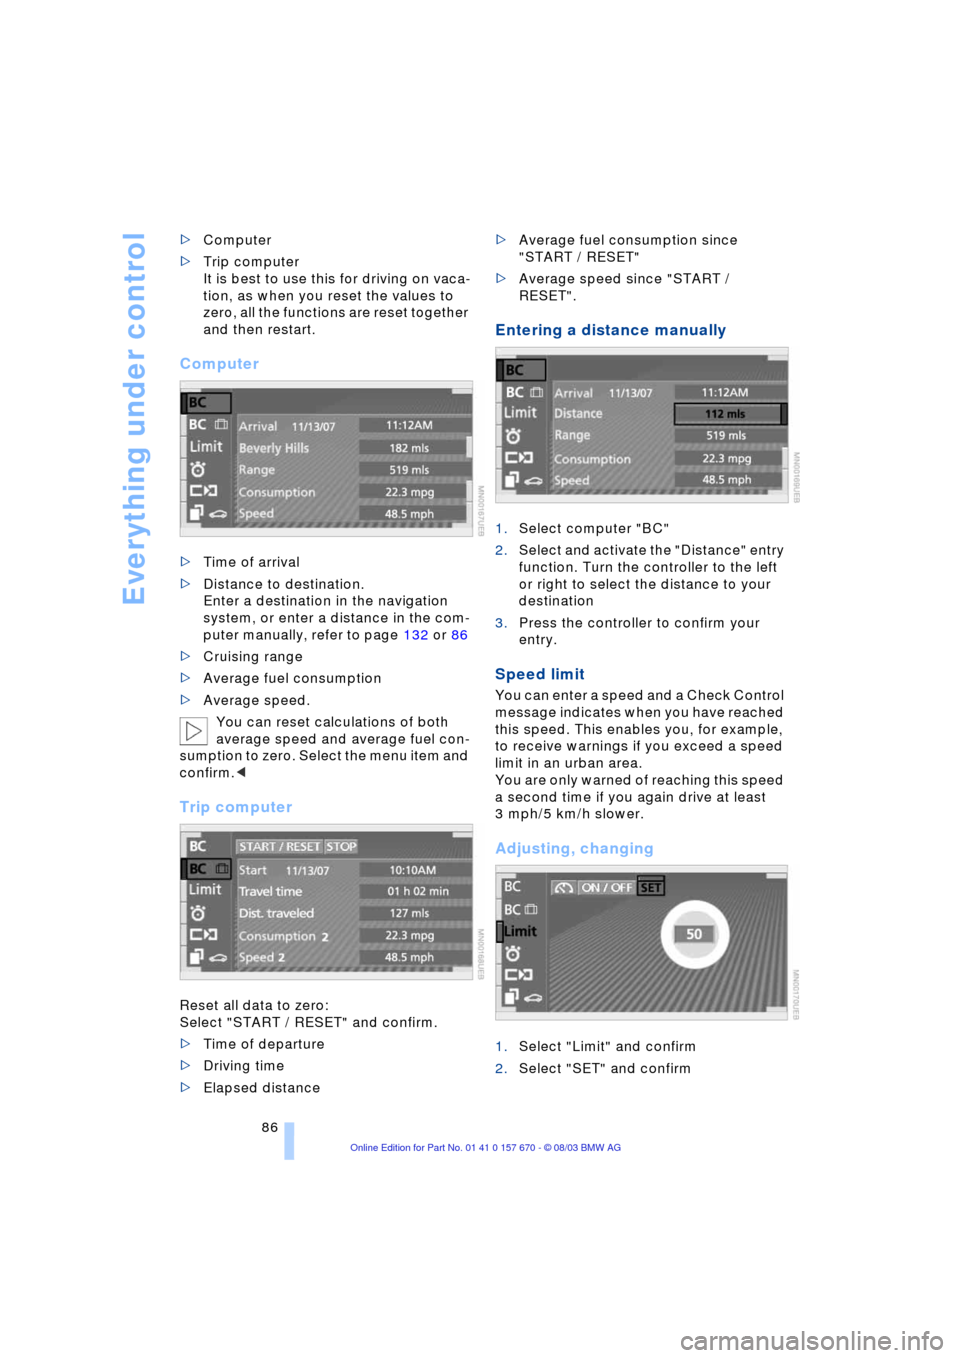
86 >Computer
>Trip computer
It is best to use this for driving on vaca-
tion, as when you reset the values to
zero, all the functions are reset together
and then restart.
Computer
>Time of arrival
>Distance to destination.
Enter a destination in the navigation
system, or enter a distance in the com-
puter manually, refer to page 132 or 86
>Cruising range
>Average fuel consumption
>Average speed.
You can reset calculations of both
average speed and average fuel con-
sumption to zero. Select the menu item and
confirm.<
Trip computer
Reset all data to zero:
Select "START / RESET" and confirm.
>Time of departure
>Driving time
>Elapsed distance >Average fuel consumption since
"START / RESET"
>Average speed since "START /
RESET".
Entering a distance manually
1.Select computer "BC"
2.Select and activate the "Distance" entry
function. Turn the controller to the left
or right to select the distance to your
destination
3.Press the controller to confirm your
entry.
Speed limit
You can enter a speed and a Check Control
message indicates when you have reached
this speed. This enables you, for example,
to receive warnings if you exceed a speed
limit in an urban area.
You are only warned of reaching this speed
a second time if you again drive at least
3 mph/5 km/h slower.
Adjusting, changing
1.Select "Limit" and confirm
2.Select "SET" and confirm
Page 89 of 232
Controls
87Reference
At a glance
Driving tips
Communications
Navigation
Entertainment
Mobility
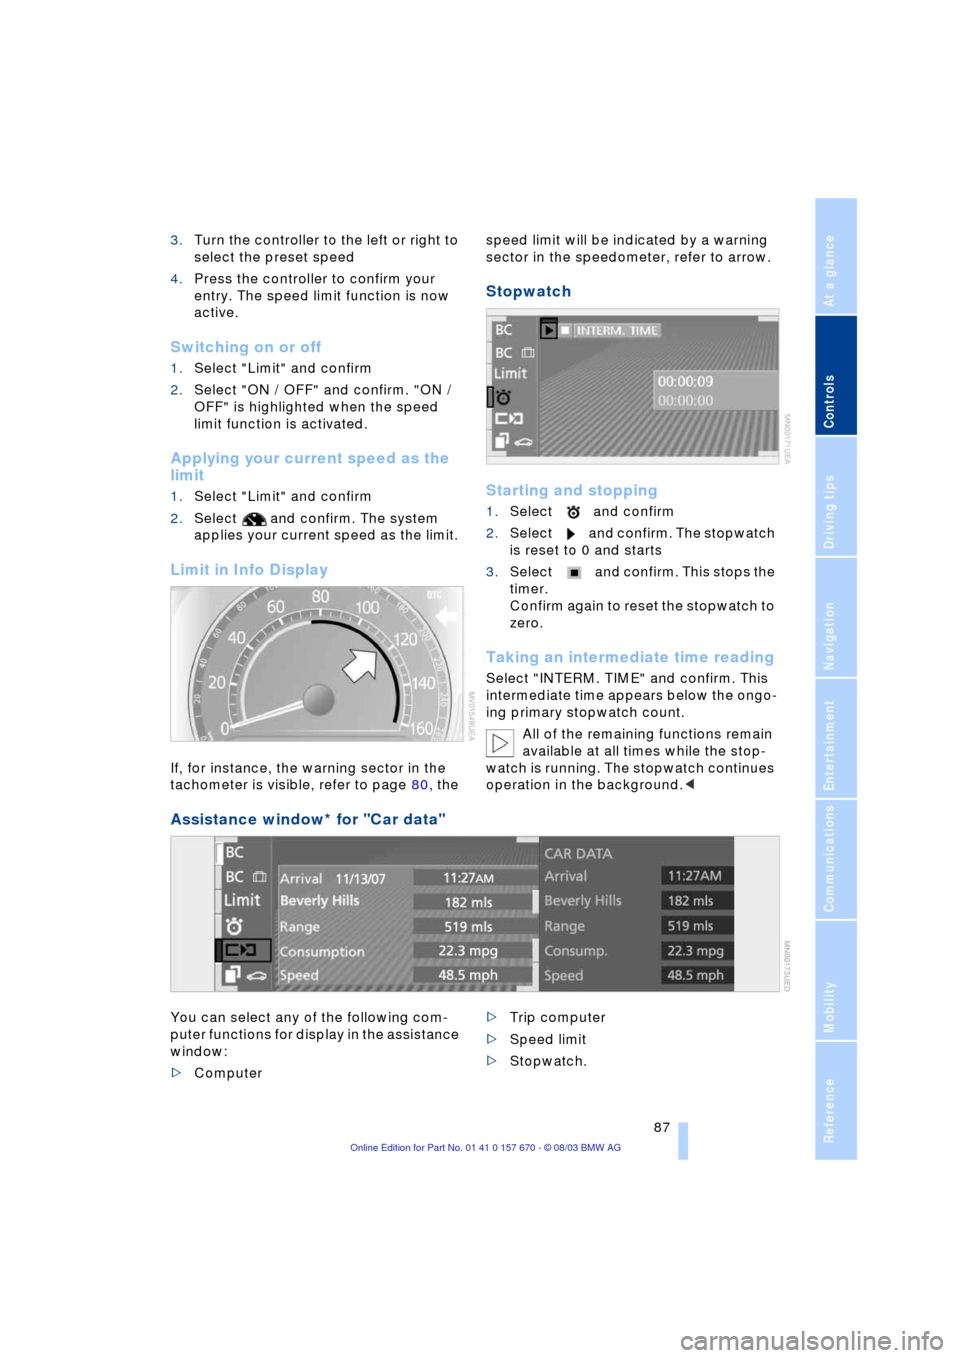
3.Turn the controller to the left or right to
select the preset speed
4.Press the controller to confirm your
entry. The speed limit function is now
active.
Switching on or off
1.Select "Limit" and confirm
2.Select "ON / OFF" and confirm. "ON /
OFF" is highlighted when the speed
limit function is activated.
Applying your current speed as the
limit
1.Select "Limit" and confirm
2.Select and confirm. The system
applies your current speed as the limit.
Limit in Info Display
If, for instance, the warning sector in the
tachometer is visible, refer to page 80, the speed limit will be indicated by a warning
sector in the speedometer, refer to arrow.
Stopwatch
Starting and stopping
1.Select and confirm
2.Select and confirm. The stopwatch
is reset to 0 and starts
3.Select and confirm. This stops the
timer.
Confirm again to reset the stopwatch to
zero.
Taking an intermediate time reading
Select "INTERM. TIME" and confirm. This
intermediate time appears below the ongo-
ing primary stopwatch count.
All of the remaining functions remain
available at all times while the stop-
watch is running. The stopwatch continues
operation in the background.<
Assistance window* for "Car data"
You can select any of the following com-
puter functions for display in the assistance
window:
>Computer >Trip computer
>Speed limit
>Stopwatch.
Page 90 of 232
Everything under control
88
Applying display
1.Select the desired function and confirm
Ð here computer "BC"
2.Select and confirm. The func-
tion appears in the assistance window.
The symbol is highlighted
if the function displayed in the
assistance window is selected on the
Control Display.<
You can also choose to view brief help
texts explaining selected menu items, refer
to page 22, or the travel route on vehicles
equipped with a GPS navigation system,
refer to page 131.
Changing settings
Units of measure and display format
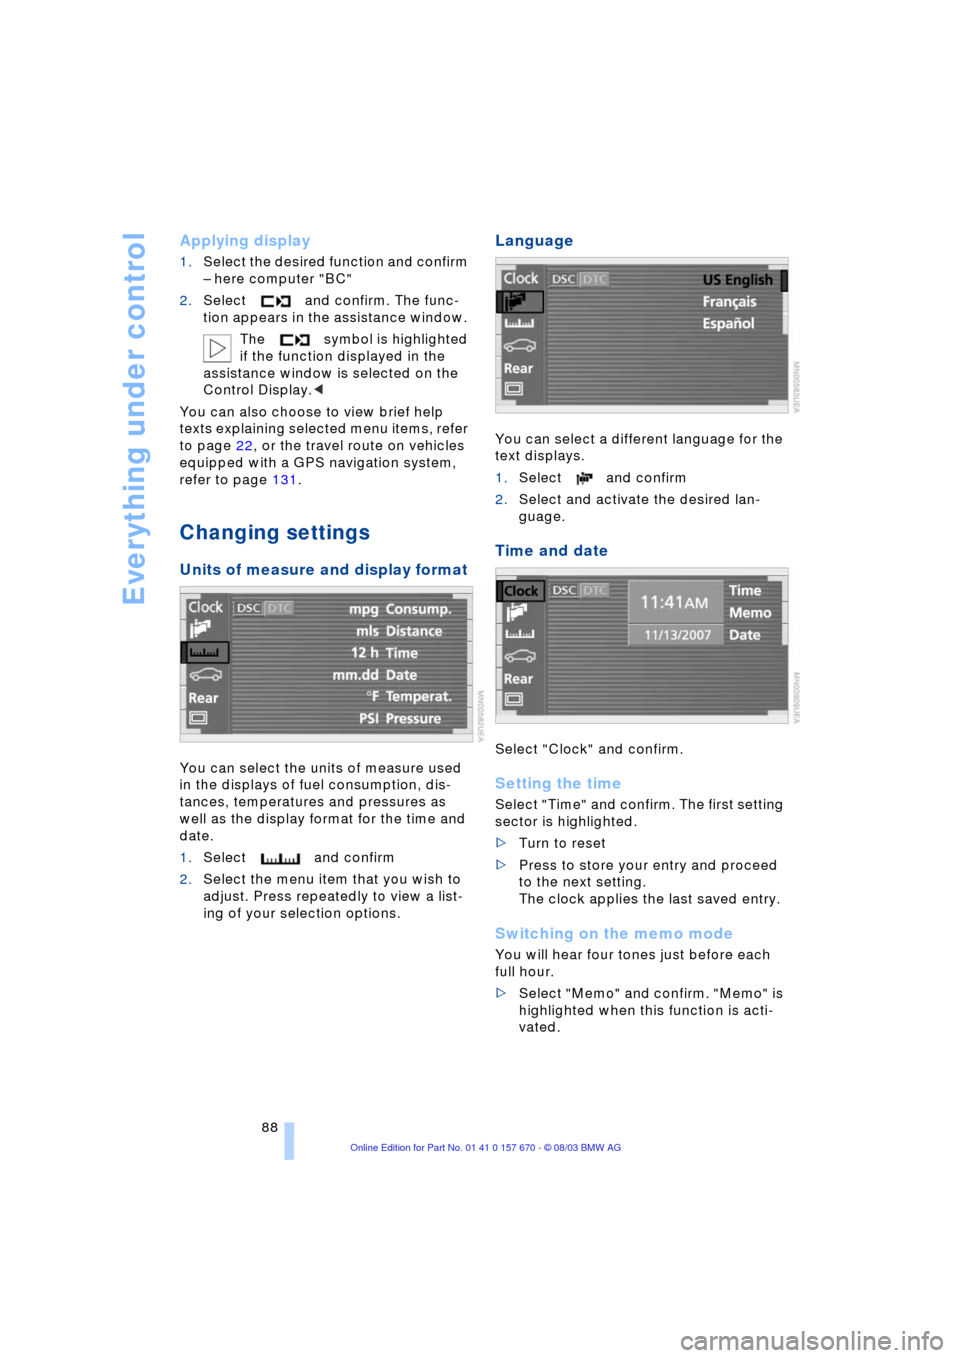
You can select the units of measure used
in the displays of fuel consumption, dis-
tances, temperatures and pressures as
well as the display format for the time and
date.
1.Select and confirm
2.Select the menu item that you wish to
adjust. Press repeatedly to view a list-
ing of your selection options.
Language
You can select a different language for the
text displays.
1.Select and confirm
2.Select and activate the desired lan-
guage.
Time and date
Select "Clock" and confirm.
Setting the time
Select "Time" and confirm. The first setting
sector is highlighted.
>Turn to reset
>Press to store your entry and proceed
to the next setting.
The clock applies the last saved entry.
Switching on the memo mode
You will hear four tones just before each
full hour.
>Select "Memo" and confirm. "Memo" is
highlighted when this function is acti-
vated.
Page 91 of 232
Controls
89Reference
At a glance
Driving tips
Communications
Navigation
Entertainment
Mobility
Setting the date
Select "Date" and confirm. The first section
of the date display is highlighted Ð here
day.
>Turn to reset
>Press to store and highlight the next
entry Ð here month and year.
Your date is applied by the system the
last time you store your entry.
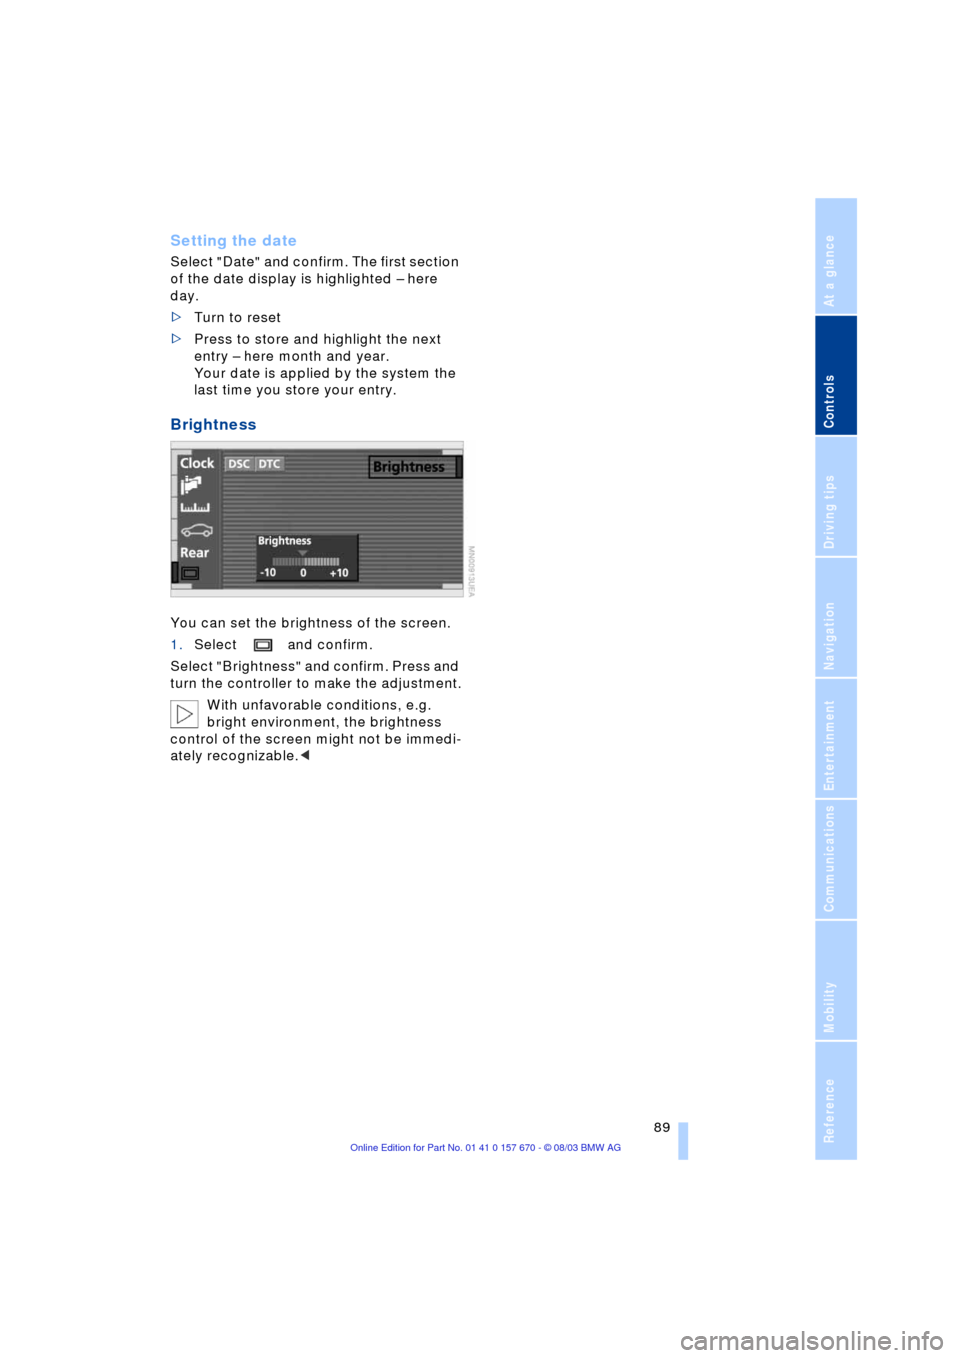
Brightness
You can set the brightness of the screen.
1.Select and confirm.
Select "Brightness" and confirm. Press and
turn the controller to make the adjustment.
With unfavorable conditions, e.g.
bright environment, the brightness
control of the screen might not be immedi-
ately recognizable.<