BMW 760LI SEDAN 2003 Owners Manual
Manufacturer: BMW, Model Year: 2003, Model line: 760LI SEDAN, Model: BMW 760LI SEDAN 2003Pages: 229, PDF Size: 4.35 MB
Page 201 of 229
Overview
Controls
Driving tips
Communications
Navigation
Entertainment
Mobility
Reference
199
Procedure
1.Read carefully and comply with the
safety precautions on page 198
2.Secure the vehicle to prevent it from
rolling:
Place the wheel chock against the rear
surface of the front tire on the side
opposite the side being raised. If the
vehicle is parked on a downward slope,
place the wheel chock securely in front
of the tire. If the wheel must be changed
on a surface with a more severe slope,
take additional precautions to secure
the vehicle from rolling
3.Loosen the lug bolts 1/2 a turn
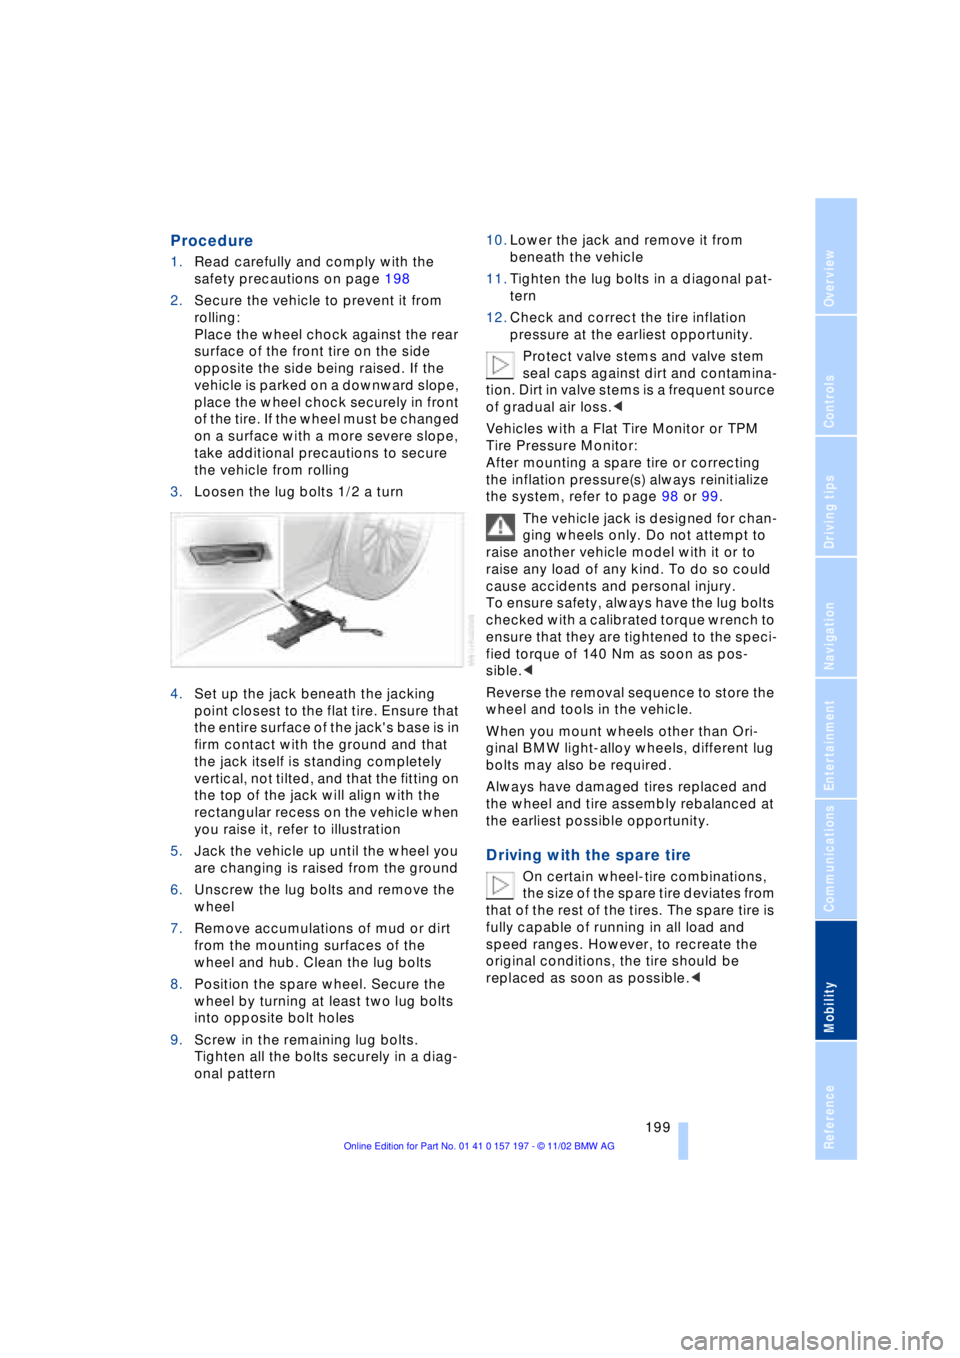
4.Set up the jack beneath the jacking
point closest to the flat tire. Ensure that
the entire surface of the jack's base is in
firm contact with the ground and that
the jack itself is standing completely
vertical, not tilted, and that the fitting on
the top of the jack will align with the
rectangular recess on the vehicle when
you raise it, refer to illustration
5.Jack the vehicle up until the wheel you
are changing is raised from the ground
6.Unscrew the lug bolts and remove the
wheel
7.Remove accumulations of mud or dirt
from the mounting surfaces of the
wheel and hub. Clean the lug bolts
8.Position the spare wheel. Secure the
wheel by turning at least two lug bolts
into opposite bolt holes
9.Screw in the remaining lug bolts.
Tighten all the bolts securely in a diag-
onal pattern 10.Lower the jack and remove it from
beneath the vehicle
11.Tighten the lug bolts in a diagonal pat-
tern
12.Check and correct the tire inflation
pressure at the earliest opportunity.
Protect valve stems and valve stem
seal caps against dirt and contamina-
tion. Dirt in valve stems is a frequent source
of gradual air loss.<
Vehicles with a Flat Tire Monitor or TPM
Tire Pressure Monitor:
After mounting a spare tire or correcting
the inflation pressure(s) always reinitialize
the system, refer to page 98 or 99.
The vehicle jack is designed for chan-
ging wheels only. Do not attempt to
raise another vehicle model with it or to
raise any load of any kind. To do so could
cause accidents and personal injury.
To ensure safety, always have the lug bolts
checked with a calibrated torque wrench to
ensure that they are tightened to the speci-
fied torque of 140 Nm as soon as pos-
sible.<
Reverse the removal sequence to store the
wheel and tools in the vehicle.
When you mount wheels other than Ori-
ginal BMW light-alloy wheels, different lug
bolts may also be required.
Always have damaged tires replaced and
the wheel and tire assembly rebalanced at
the earliest possible opportunity.
Driving with the spare tire
On certain wheel-tire combinations,
the size of the spare tire deviates from
that of the rest of the tires. The spare tire is
fully capable of running in all load and
speed ranges. However, to recreate the
original conditions, the tire should be
replaced as soon as possible.<
Page 202 of 229
Replacing components
200
Run-flat tires*
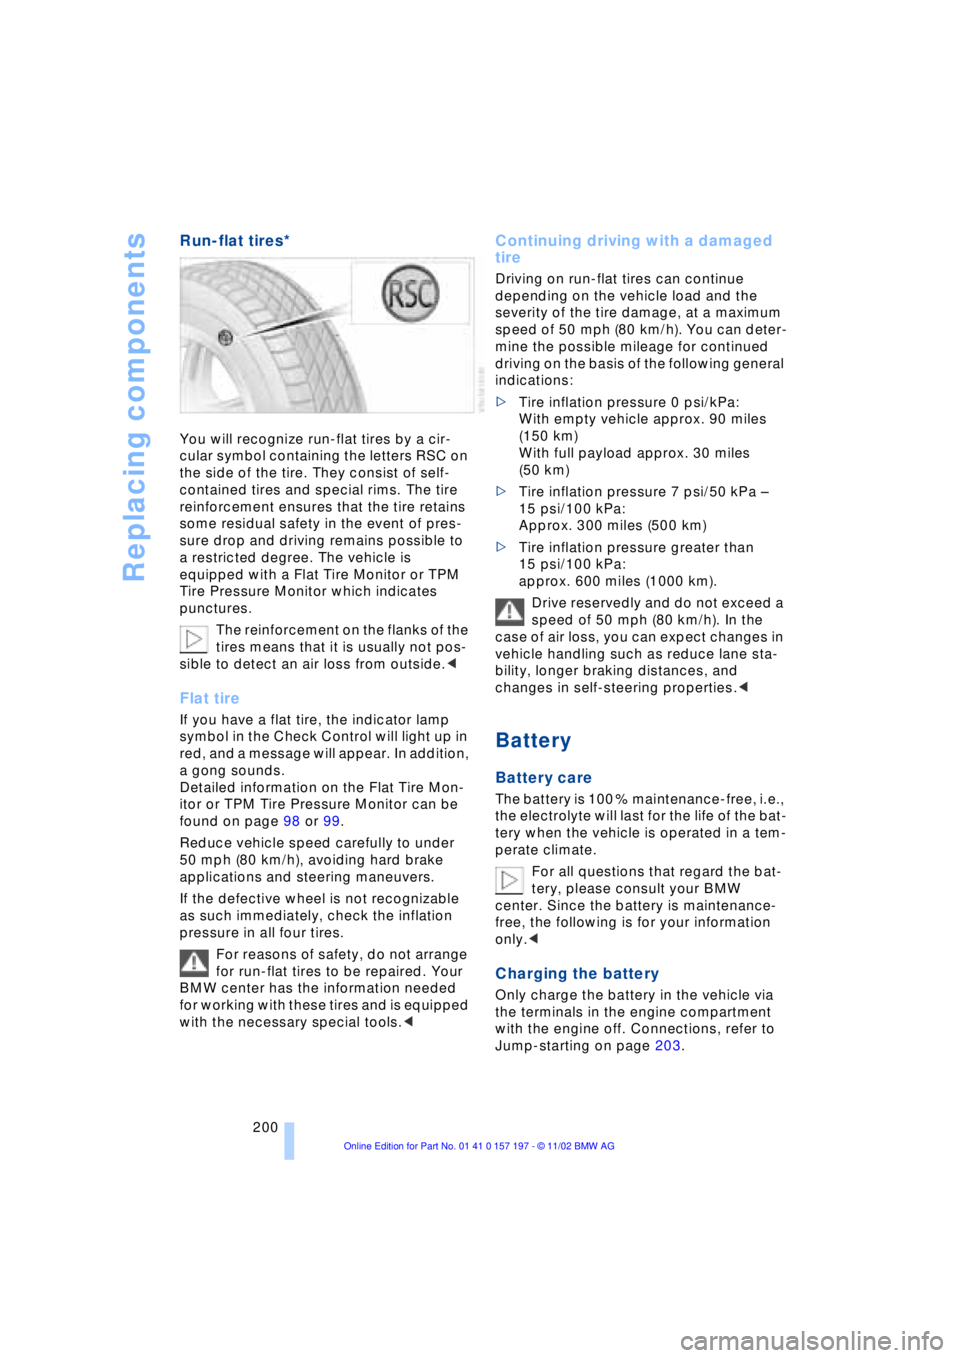
You will recognize run-flat tires by a cir-
cular symbol containing the letters RSC on
the side of the tire. They consist of self-
contained tires and special rims. The tire
reinforcement ensures that the tire retains
some residual safety in the event of pres-
sure drop and driving remains possible to
a restricted degree. The vehicle is
equipped with a Flat Tire Monitor or TPM
Tire Pressure Monitor which indicates
punctures.
The reinforcement on the flanks of the
tires means that it is usually not pos-
sible to detect an air loss from outside.<
Flat tire
If you have a flat tire, the indicator lamp
symbol in the Check Control will light up in
red, and a message will appear. In addition,
a gong sounds.
Detailed information on the Flat Tire Mon-
itor or TPM Tire Pressure Monitor can be
found on page 98 or 99.
Reduce vehicle speed carefully to under
50 mph (80 km/h), avoiding hard brake
applications and steering maneuvers.
If the defective wheel is not recognizable
as such immediately, check the inflation
pressure in all four tires.
For reasons of safety, do not arrange
for run-flat tires to be repaired. Your
BMW center has the information needed
for working with these tires and is equipped
with the necessary special tools.<
Continuing driving with a damaged
tire
Driving on run-flat tires can continue
depending on the vehicle load and the
severity of the tire damage, at a maximum
speed of 50 mph (80 km/h). You can deter-
mine the possible mileage for continued
driving on the basis of the following general
indications:
>Tire inflation pressure 0 psi/kPa:
With empty vehicle approx. 90 miles
(150 km)
With full payload approx. 30 miles
(50 km)
>Tire inflation pressure 7 psi/50 kPa Ð
15 psi/100 kPa:
Approx. 300 miles (500 km)
>Tire inflation pressure greater than
15 psi/100 kPa:
approx. 600 miles (1000 km).
Drive reservedly and do not exceed a
speed of 50 mph (80 km/h). In the
case of air loss, you can expect changes in
vehicle handling such as reduce lane sta-
bility, longer braking distances, and
changes in self-steering properties.<
Battery
Battery care
The battery is 100 % maintenance-free, i.e.,
the electrolyte will last for the life of the bat-
tery when the vehicle is operated in a tem-
perate climate.
For all questions that regard the bat-
tery, please consult your BMW
center. Since the battery is maintenance-
free, the following is for your information
only.<
Charging the battery
Only charge the battery in the vehicle via
the terminals in the engine compartment
with the engine off. Connections, refer to
Jump-starting on page 203.
Page 203 of 229
Overview
Controls
Driving tips
Communications
Navigation
Entertainment
Mobility
Reference
201
To avoid short circuits, as well as pos-
sible fires and personal injury, always
disconnect the cable from the battery's
negative terminal before working on the
vehicle's electrical system.<
Battery switch
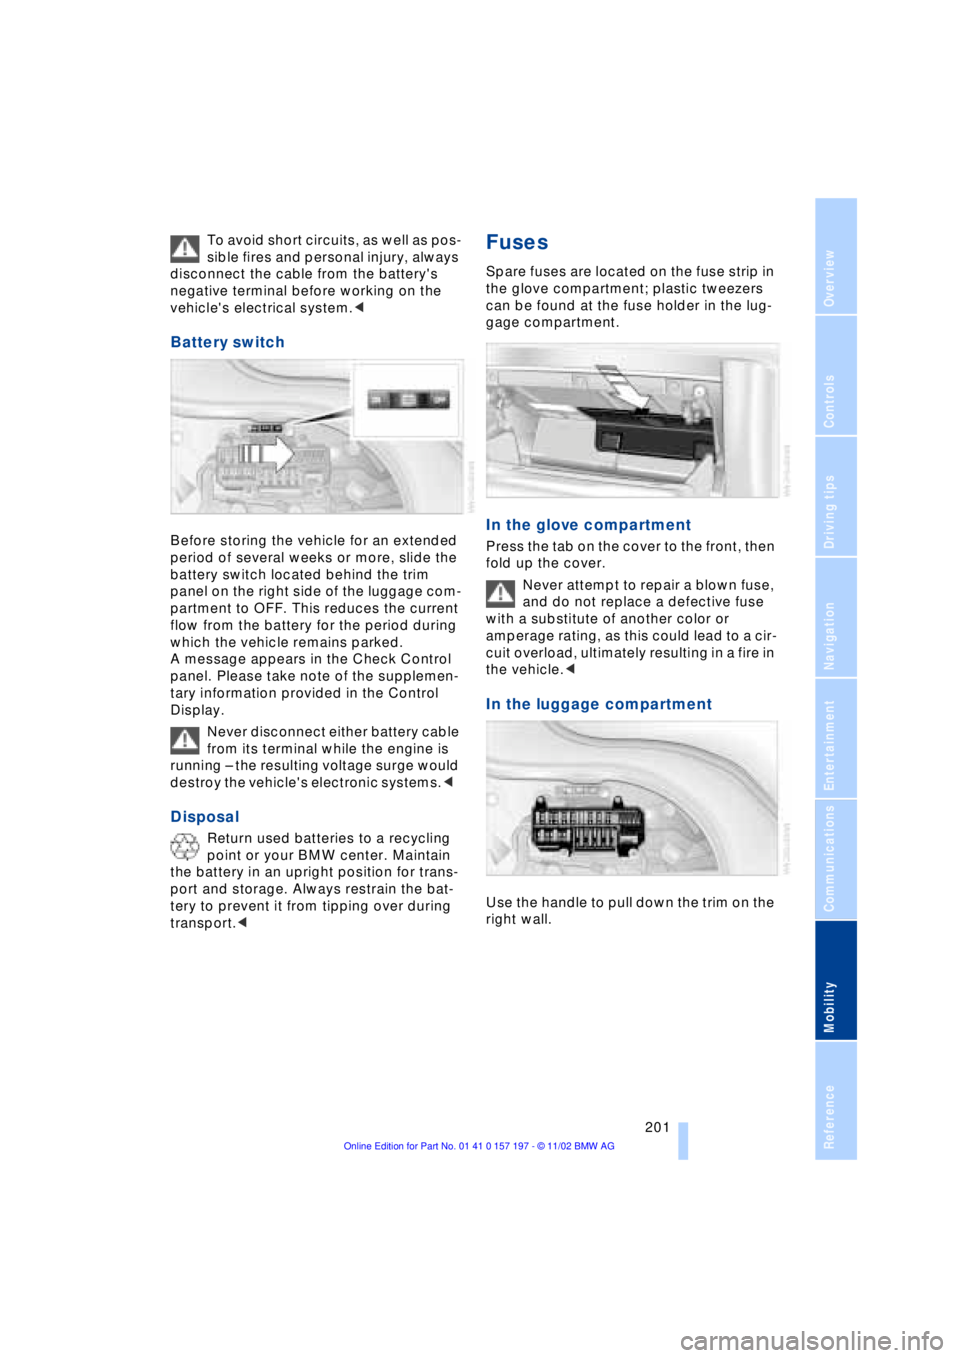
Before storing the vehicle for an extended
period of several weeks or more, slide the
battery switch located behind the trim
panel on the right side of the luggage com-
partment to OFF. This reduces the current
flow from the battery for the period during
which the vehicle remains parked.
A message appears in the Check Control
panel. Please take note of the supplemen-
tary information provided in the Control
Display.
Never disconnect either battery cable
from its terminal while the engine is
running Ð the resulting voltage surge would
destroy the vehicle's electronic systems.<
Disposal
Return used batteries to a recycling
point or your BMW center. Maintain
the battery in an upright position for trans-
port and storage. Always restrain the bat-
tery to prevent it from tipping over during
transport.<
Fuses
Spare fuses are located on the fuse strip in
the glove compartment; plastic tweezers
can be found at the fuse holder in the lug-
gage compartment.
In the glove compartment
Press the tab on the cover to the front, then
fold up the cover.
Never attempt to repair a blown fuse,
and do not replace a defective fuse
with a substitute of another color or
amperage rating, as this could lead to a cir-
cuit overload, ultimately resulting in a fire in
the vehicle.<
In the luggage compartment
Use the handle to pull down the trim on the
right wall.
Page 204 of 229
Giving and receiving assistance
202
Giving and receiving assistance
Warning triangle*
The warning triangle is conveniently stored
in the onboard tool kit mounted on the
inside of the luggage compartment lid.
Comply with legal requirements
requiring you to carry a hazard war-
ning triangle in the vehicle.<
First-aid kit*
You will also find the first-aid kit in the
onboard tool kit's container.
Some of the articles contained in the
first-aid kit have a limited service life.
For this reason, check the expiration dates
of each of the items regularly, and replace
any whose expiration dates have passed.
You can find replacements in any phar-
macy.
Always comply with laws requiring a first-
aid kit to be carried in the vehicle.<
Jump-starting
When your battery is discharged you can
use two jumper cables to start your vehicle
with power from the battery in a second
vehicle. You can also use the same method
to help start another vehicle. Use only
jumper cables with fully-insulated clamp
handles.
To avoid the risk of potentially fatal
injury, always avoid all contact with electrical components while the engine is
running. Carefully adhere to the following
sequence, both to prevent damage to one
or both vehicles, and to guard against pos-
sible personal injury.<
Preparing
1.Check whether the battery of the sup-
port vehicle has 12 Volts and approxi-
mately the same capacity (Ah). This
information can be found on the battery
2.Switch off the engine of the support
vehicle
3.Switch off any electrical systems and
components in both vehicles.
Ensure that no contact exists bet-
ween the bodywork on the two
vehicles Ð danger of short circuits.<
Connect the jumper cables
To avoid personal injury from sparks,
always observe this sequence when
connecting jumper cables.<
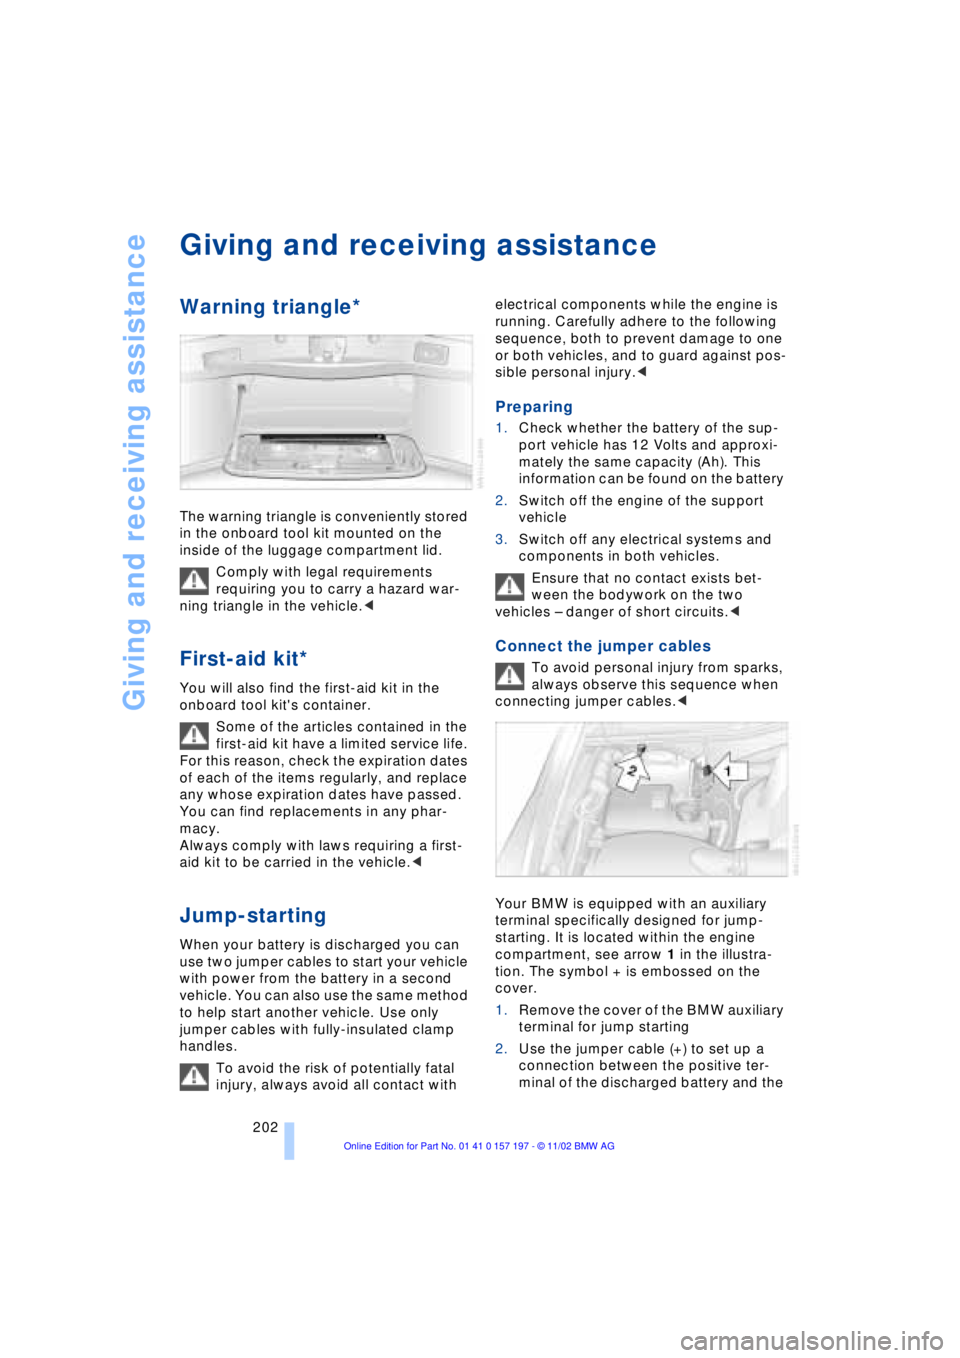
Your BMW is equipped with an auxiliary
terminal specifically designed for jump-
starting. It is located within the engine
compartment, see arrow 1 in the illustra-
tion. The symbol + is embossed on the
cover.
1.Remove the cover of the BMW auxiliary
terminal for jump starting
2.Use the jumper cable (+) to set up a
connection between the positive ter-
minal of the discharged battery and the
Page 205 of 229
At a glance
Controls
Driving tips
Communications
Navigation
Entertainment
Mobility
Reference
203
positive terminal of the support battery.
To do so:
Connect one terminal clamp to the pos-
itive terminal of the battery or to an aux-
iliary terminal for jump starting on the
support vehicle. Connect the second
terminal clamp on the positive terminal
of the battery or an auxiliary terminal for
jump starting of the vehicle to be
started.
On your BMW, there is a special nut as
body ground on the suspension strut
dome, see arrow 2 in the illustration
3.Use the second jumper cable to set up
the connection between the negative
terminals of both vehicles.
To do so:
Connect a terminal clamp to the nega-
tive terminal of the battery and/or to an
engine or body ground of the support
vehicle.Connect the second terminal
clamp to the negative terminal of the
battery or to an engine or body ground
of the vehicle to be started.
Starting the engine
1.Start the engine on the support vehicle
and allow it to run for several minutes at
a fast idle
2.Start the engine on the other vehicle in
the usual way.
If the first start attempt is not suc-
cessful, wait a few minutes before ano-
ther attempt in order to allow the
discharged battery to recharge
3.Allow the engines to run for several
minutes
4.Disconnect the jumper cables by
reversing the connection sequence.
If required, have the battery inspected and
recharged at your BMW center.
Never use spray fluids to start the
engine.<
Towing
Even if the transmission is in perfect
working order, remember to disen-gage the transmission lockout manually
before towing the vehicle. Failure to
observe this precaution could result in
automatic activation of the transmission
lockout while the vehicle is being towed.<
Releasing transmission lockout manually,
refer to page 70.
Tow fitting
The threaded tow fitting is stored in the tool
kit mounted on the inside of the luggage
compartment lid, refer to page 195, and
should always remain in the vehicle. This
fitting, which fits the tow sockets on both
the front and the rear of the vehicle, is
intended exclusively for use in towing the
vehicle on paved roads.
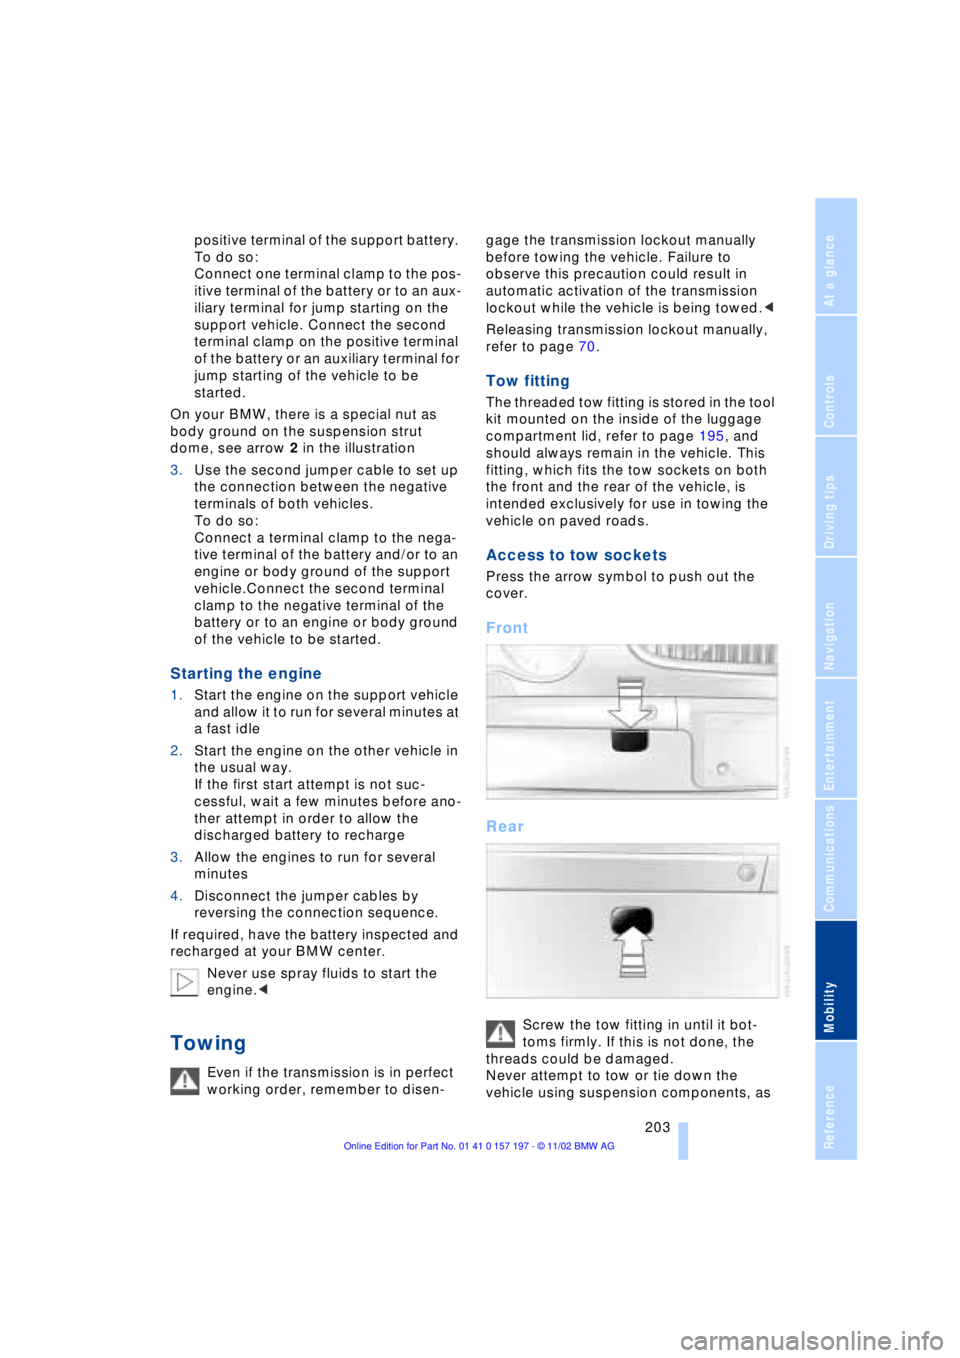
Access to tow sockets
Press the arrow symbol to push out the
cover.
Front
Rear
Screw the tow fitting in until it bot-
toms firmly. If this is not done, the
threads could be damaged.
Never attempt to tow or tie down the
vehicle using suspension components, as
Page 206 of 229
Giving and receiving assistance
204 this could lead to damage that might ulti-
mately result in an accident.<
To avoid jerking and the associated
stresses on vehicle components when
towing, always use either a tow bar or a
nylon rope.
Keep the vehicles in line, taking care
to avoid towing at an offset angle, and
make certain that the tow rope connecting
the two vehicles is tight before starting
off.<
Tow bars
The tow fittings used should be on the
same side on both vehicles.
Should it prove impossible to avoid moun-
ting the tow bar at an offset angle, please
observe the following:
>Clearance and maneuvering capability
will be strictly limited in corners
>When mounted at an angle, the tow bar
will exert lateral forces, tending to push
the vehicle sideways.
Never use a vehicle to tow another
vehicle that is heavier than itself, as
this could lead to a loss of control.<
Towing
Do not tow the vehicle by the rear
axle; because the steering detent is
not operational, the wheels could turn to an
extreme angle during towing.<
1.Turn on the ignition to allow operation
of the brake lamps, turn signal indica-
tors, horn, parking brake and winds-
hield wipers
2.Turn on the hazard warning flashers
where allowed by law
3.Release the transmission lockout man-
ually, refer to page 70
4.Towing speed:
maximum of 45 mph (70 km/h)
5.Towing distance:
maximum of 90 miles (150 km).
If the electrical system in the towed vehicle
has failed, use an alternate means to iden-
tify the vehicle as being towed such as a sign or warning triangle placed in the rear
window.
The steering and brakes are without
power assistance when the engine is
off. This means that higher levels of effort
will be required to operate the steering and
brakes.<
Tow-starting
It is not possible to start the engine by tow-
starting the vehicle.
Jump-starting, refer to page 203.
Have the source of the starting difficulties
diagnosed and repaired at your BMW
center.
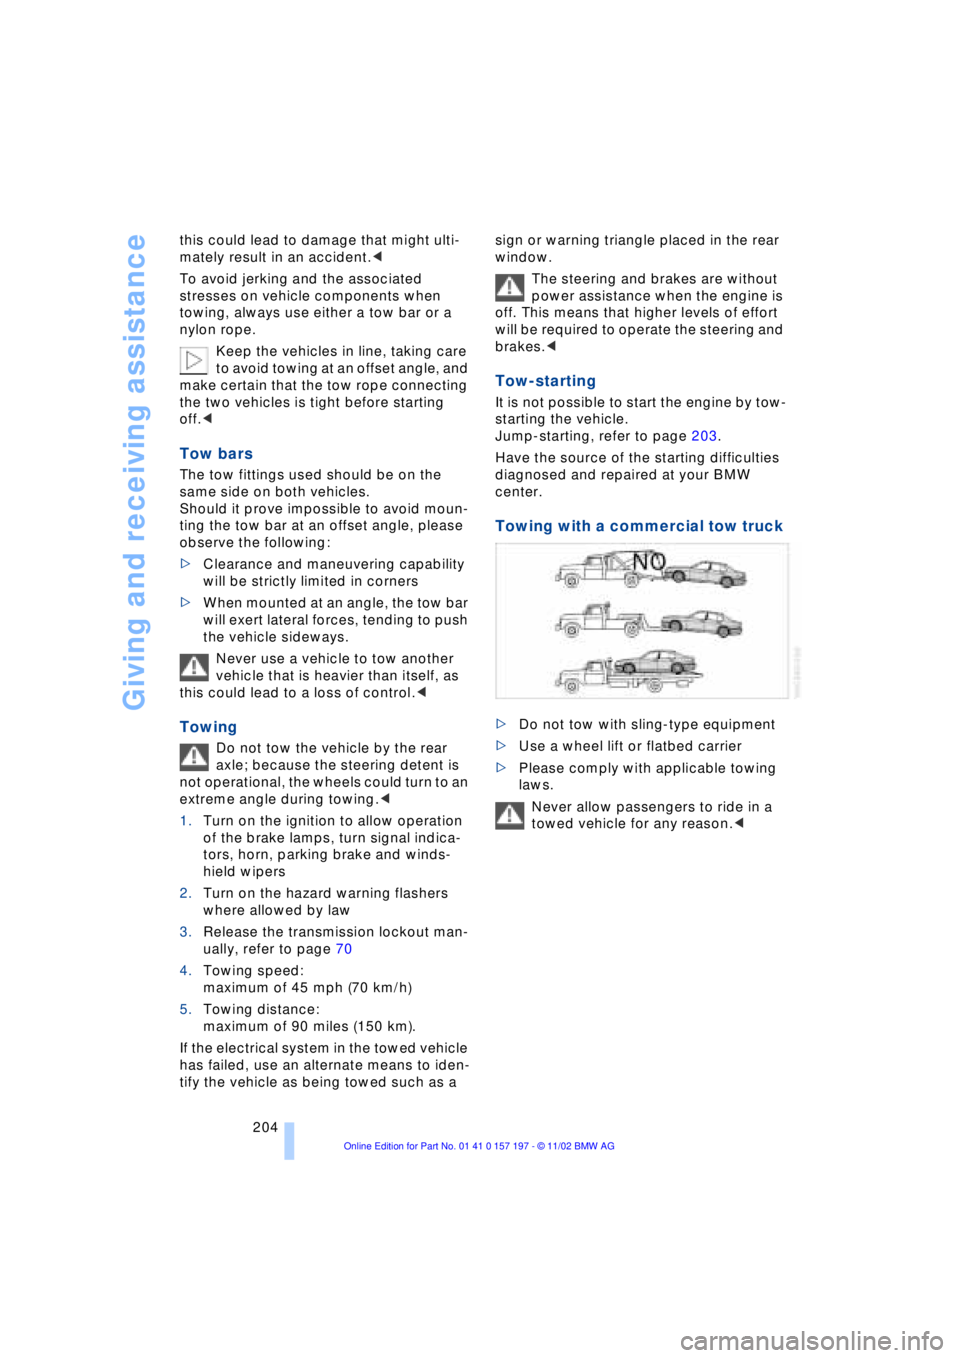
Towing with a commercial tow truck
>Do not tow with sling-type equipment
>Use a wheel lift or flatbed carrier
>Please comply with applicable towing
laws.
Never allow passengers to ride in a
towed vehicle for any reason.<
Page 207 of 229

At a glance
Controls
Driving tips
Communications
Navigation
Entertainment
Mobility
Reference
205
Page 208 of 229
Page 209 of 229
Reference
This is where to look to find
information on any desired topic as
quickly as possible.
This chapter includes the section
with technical information as well
as the manual's index.
Page 210 of 229
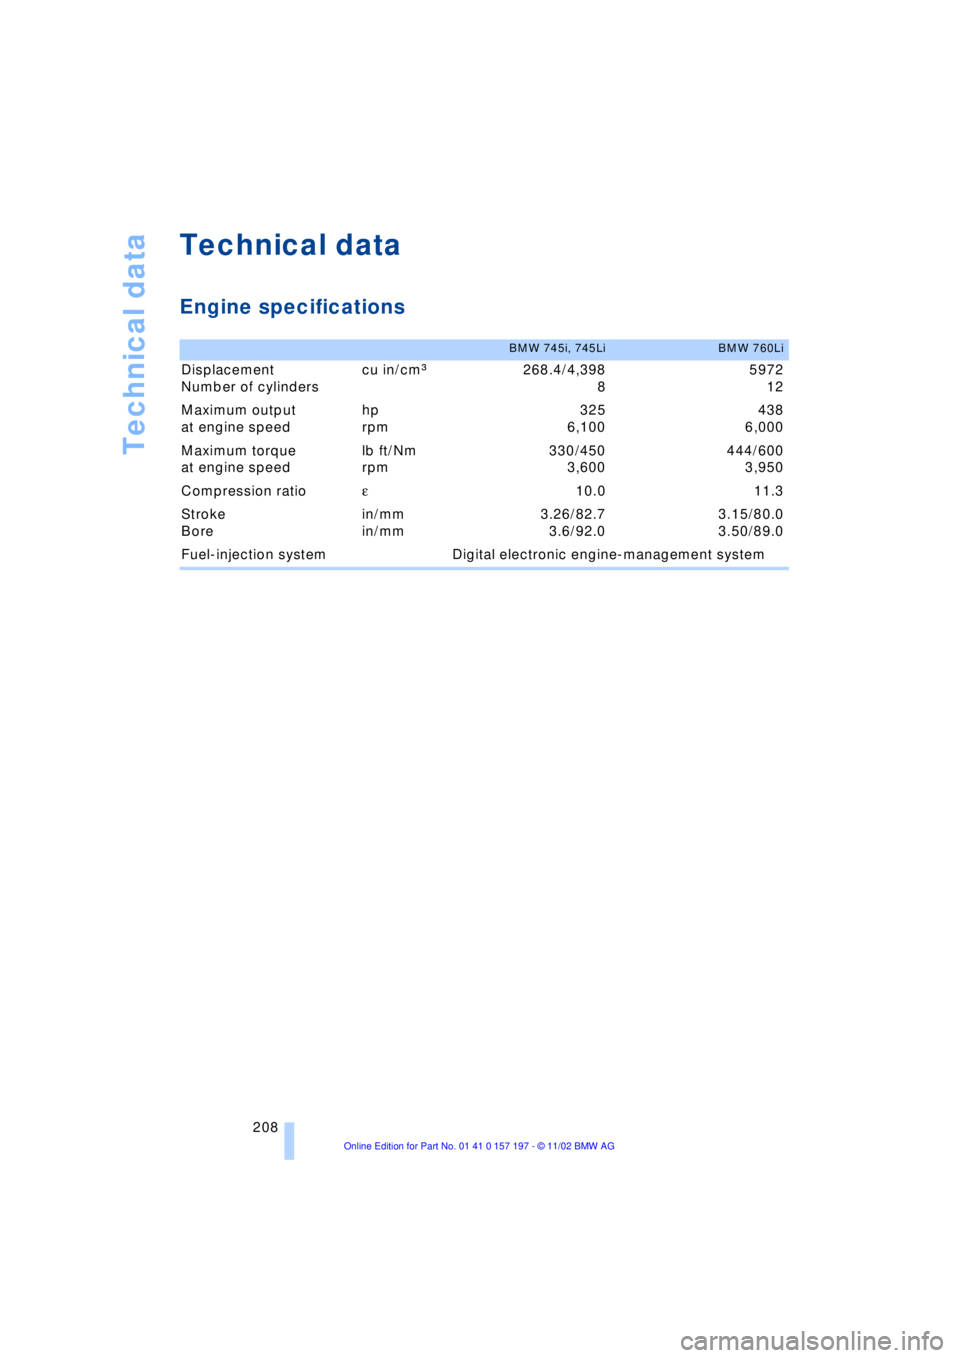
Technical data
208
Technical data
Engine specifications
BMW 745i, 745LiBMW 760Li
Displacement
Number of cylinders cu in/cmm268.4/4,398
85972
12
Maximum output
at engine speed hp
rpm 325
6,100438
6,000
Maximum torque
at engine speed lb ft/Nm
rpm 330/450
3,600444/600
3,950
Compression ratio e 10.0 11.3
Stroke
Bore in/mm
in/mm 3.26/82.7
3.6/92.03.15/80.0
3.50/89.0
Fuel-injection system Digital electronic engine-management system