remove seats BMW 760LI SEDAN 2003 Owners Manual
[x] Cancel search | Manufacturer: BMW, Model Year: 2003, Model line: 760LI SEDAN, Model: BMW 760LI SEDAN 2003Pages: 229, PDF Size: 4.35 MB
Page 19 of 229
At a glance
Controls
Driving tips
Communications
Navigation
Entertainment
Mobility
Reference
17
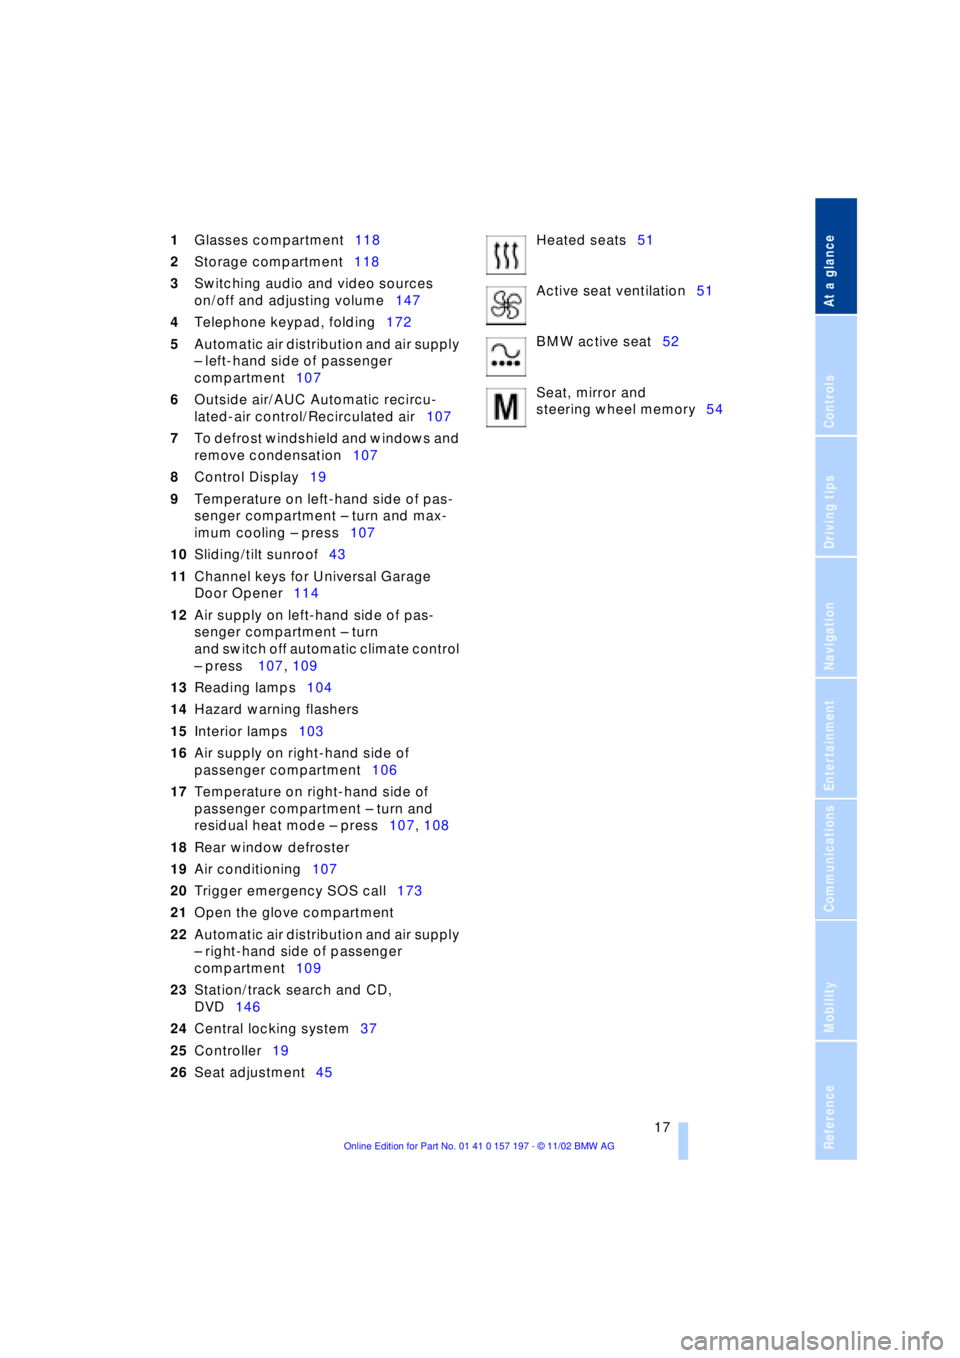
1Glasses compartment118
2Storage compartment118
3Switching audio and video sources
on/off and adjusting volume147
4Telephone keypad, folding172
5Automatic air distribution and air supply
Ð left-hand side of passenger
compartment107
6Outside air/AUC Automatic recircu-
lated-air control/Recirculated air107
7To defrost windshield and windows and
remove condensation107
8Control Display19
9Temperature on left-hand side of pas-
senger compartment Ð turn and max-
imum cooling Ð press107
10Sliding/tilt sunroof43
11Channel keys for Universal Garage
Door Opener114
12Air supply on left-hand side of pas-
senger compartment Ð turn
and switch off automatic climate control
Ð press 107, 109
13Reading lamps104
14Hazard warning flashers
15Interior lamps103
16Air supply on right-hand side of
passenger compartment106
17Temperature on right-hand side of
passenger compartment Ð turn and
residual heat mode Ð press107, 108
18Rear window defroster
19Air conditioning107
20Trigger emergency SOS call173
21Open the glove compartment
22Automatic air distribution and air supply
Ð right-hand side of passenger
compartment109
23Station/track search and CD,
DVD146
24Central locking system37
25Controller19
26Seat adjustment45Heated seats51
Active seat ventilation51
BMW active seat52
Seat, mirror and
steering wheel memory54
Page 60 of 229
Adjustments
58 Adjust the tether strap according to the
child-restraint manufacturer's instructions.
Before installing any child-restraint
system or child seat, please read the
following:
Never install a rearward-facing child-
restraint system in the front passenger seat
of this vehicle.
Your vehicle is equipped with an airbag
supplemental restraint system for the front
passenger. Because the backrest on any
rearward-facing child-restraint system Ð of
the kind designed for infants under 1 year
and 20 Ibs. (9 kg) Ð would be within the
airbag's deployment range, you should
never mount such a system in the front
passenger seat, since the impact of the
airbag against the child restraint's backrest
could lead to serious or fatal injuries.
If it is necessary for a child Ð not an infant Ð
to ride in the front seat, certain precautions
should be taken. First, move the passenger
seat as far away from the instrument panel
as possible. This important precaution is
intended to maximize the distance
between the airbag and the child. Older
children should be tightly secured with a
safety belt, after they have outgrown a
booster seat that is appropriate for their
age, height and weight. Younger children
should be secured in an appropriate for-
ward-facing child-restraint system that has
first been properly secured with a safety
belt. Never install a rearward-facing child-
restraint system in the front passenger
seat.
We strongly urge you to carefully read and
comply with the instructions for installation
and use provided by the child-restraint's
manufacturer whenever you use such a
system.
Be sure that all occupants Ð of all ages Ð
remain properly and securely restrained at
all times. If your vehicle is equipped with
electric power seats at the rear, these will
need to be returned to their standard
adjustment setting position before a child-
restraint system is used, refer to page 47.
Always press the safety switch for the
power windows before transporting chil-
dren in the rear seats, refer to page 43. This switch also disables the power rear seat
adjustment. Incorrect or unsupervised
adjustment of the electric power seats
could lead to injuries or damage to the
child-restraint system(s) installed in the
rear.<
All rear seating positions in your vehicle
meet the recommendations of SAE J1819,
an industry-recommended practice for
securing child-restraint systems in motor
vehicles.
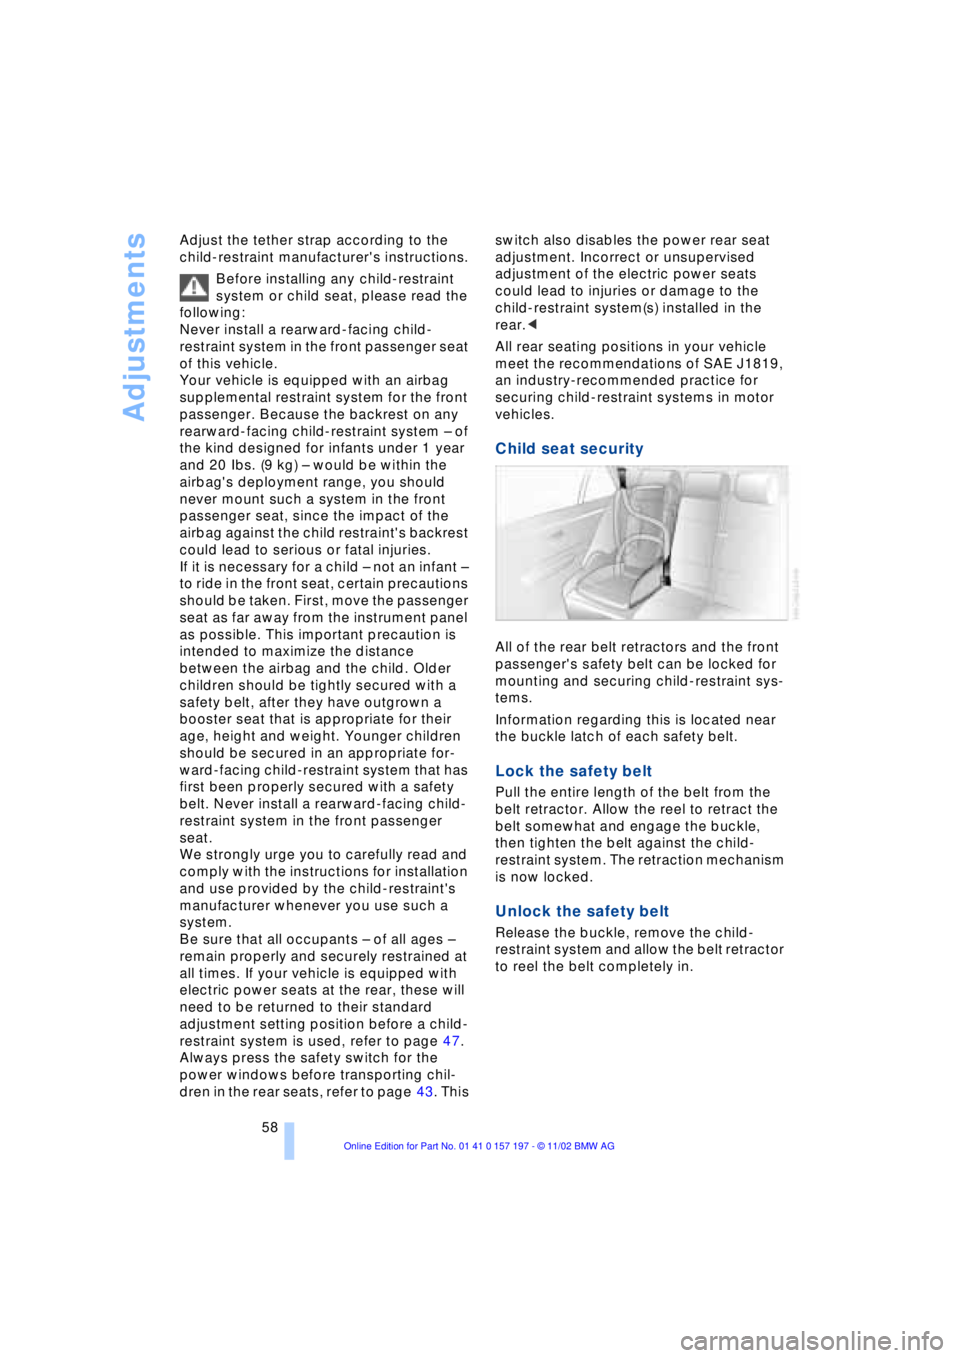
Child seat security
All of the rear belt retractors and the front
passenger's safety belt can be locked for
mounting and securing child-restraint sys-
tems.
Information regarding this is located near
the buckle latch of each safety belt.
Lock the safety belt
Pull the entire length of the belt from the
belt retractor. Allow the reel to retract the
belt somewhat and engage the buckle,
then tighten the belt against the child-
restraint system. The retraction mechanism
is now locked.
Unlock the safety belt
Release the buckle, remove the child-
restraint system and allow the belt retractor
to reel the belt completely in.
Page 61 of 229
At a glance
Controls
Driving tips
Communications
Navigation
Entertainment
Mobility
Reference
59
LATCH* child-restraint
system
LATCH: Lower Anchor and Tethers for
CHildren.
If the vehicle is equipped with electric
power seats, these must be returned
to their standard adjustment setting before
a LATCH child-restraint system can be
used, refer to page 47.<
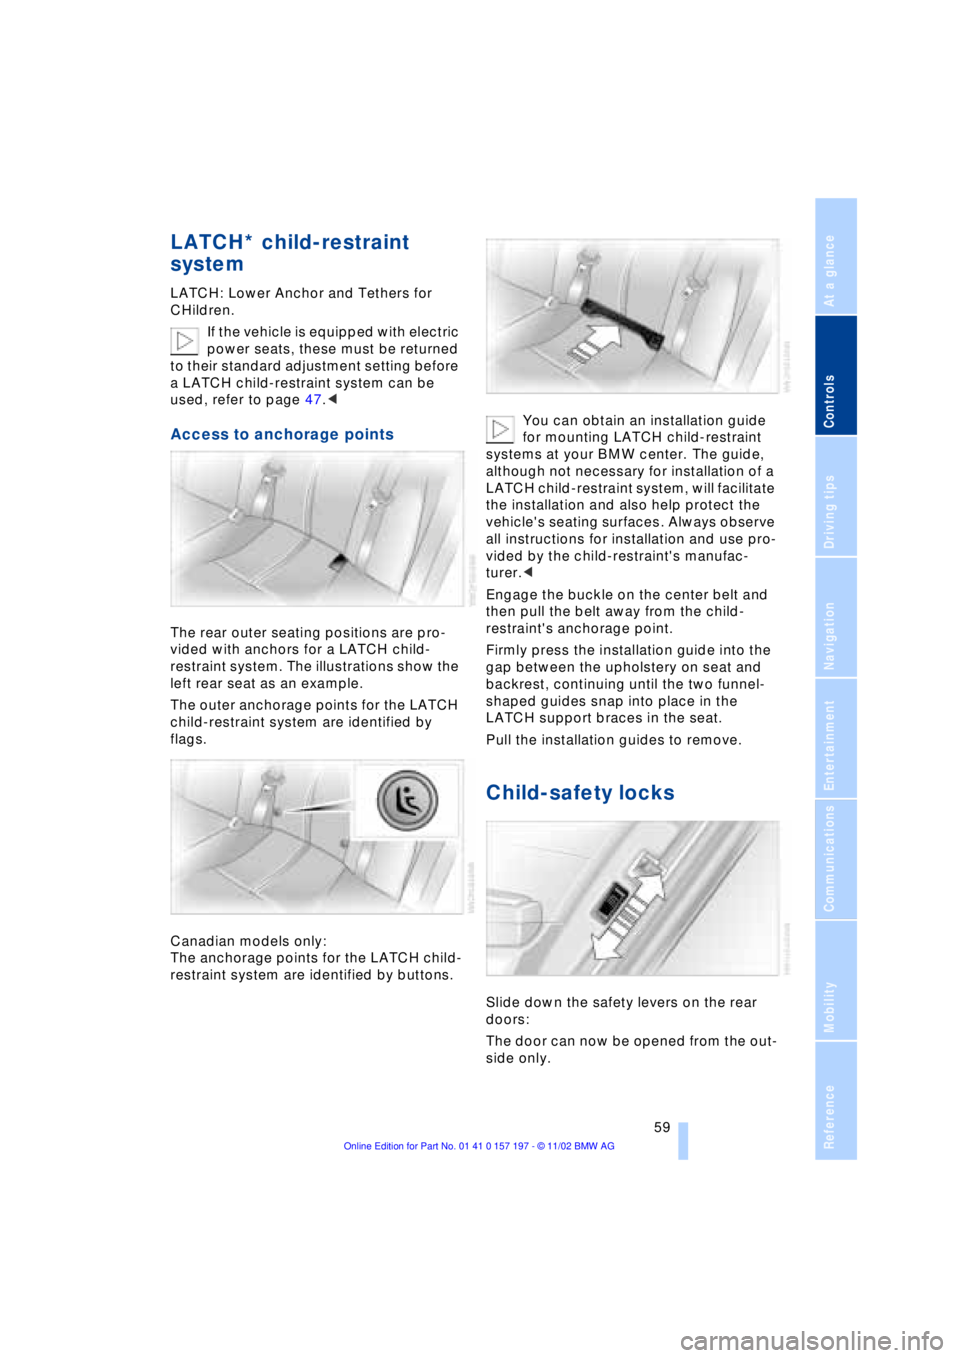
Access to anchorage points
The rear outer seating positions are pro-
vided with anchors for a LATCH child-
restraint system. The illustrations show the
left rear seat as an example.
The outer anchorage points for the LATCH
child-restraint system are identified by
flags.
Canadian models only:
The anchorage points for the LATCH child-
restraint system are identified by buttons.You can obtain an installation guide
for mounting LATCH child-restraint
systems at your BMW center. The guide,
although not necessary for installation of a
LATCH child-restraint system, will facilitate
the installation and also help protect the
vehicle's seating surfaces. Always observe
all instructions for installation and use pro-
vided by the child-restraint's manufac-
turer.<
Engage the buckle on the center belt and
then pull the belt away from the child-
restraint's anchorage point.
Firmly press the installation guide into the
gap between the upholstery on seat and
backrest, continuing until the two funnel-
shaped guides snap into place in the
LATCH support braces in the seat.
Pull the installation guides to remove.
Child-safety locks
Slide down the safety levers on the rear
doors:
The door can now be opened from the out-
side only.
Page 118 of 229
Practical interior accessories
116 3Rear window blind
4Switching to the other side
The side window blind can not be
extended unless the side window is
closed. If the window is open, the blind will
rise slightly prior to immediately retracting
to its original position.<
Briefly press the safety switch in the
driver's door, refer to page 43. The
indicator lamp must light up. This precau-
tion prevents children from operating the
sun blinds using the rear switches, etc.
Before using always ensure that the sun
blind's travel path is clear and unob-
structed.
When leaving the vehicle, always remove
the remote control unit from the ignition
lock and close the doors; this precaution
prevents children from using the sun blinds
and injuring themselves, etc.<
Automatically extending and
retracting the sun blinds
You can extend and retract the sun blinds
together by pressing and holding button 3
or the button in the driver's door.
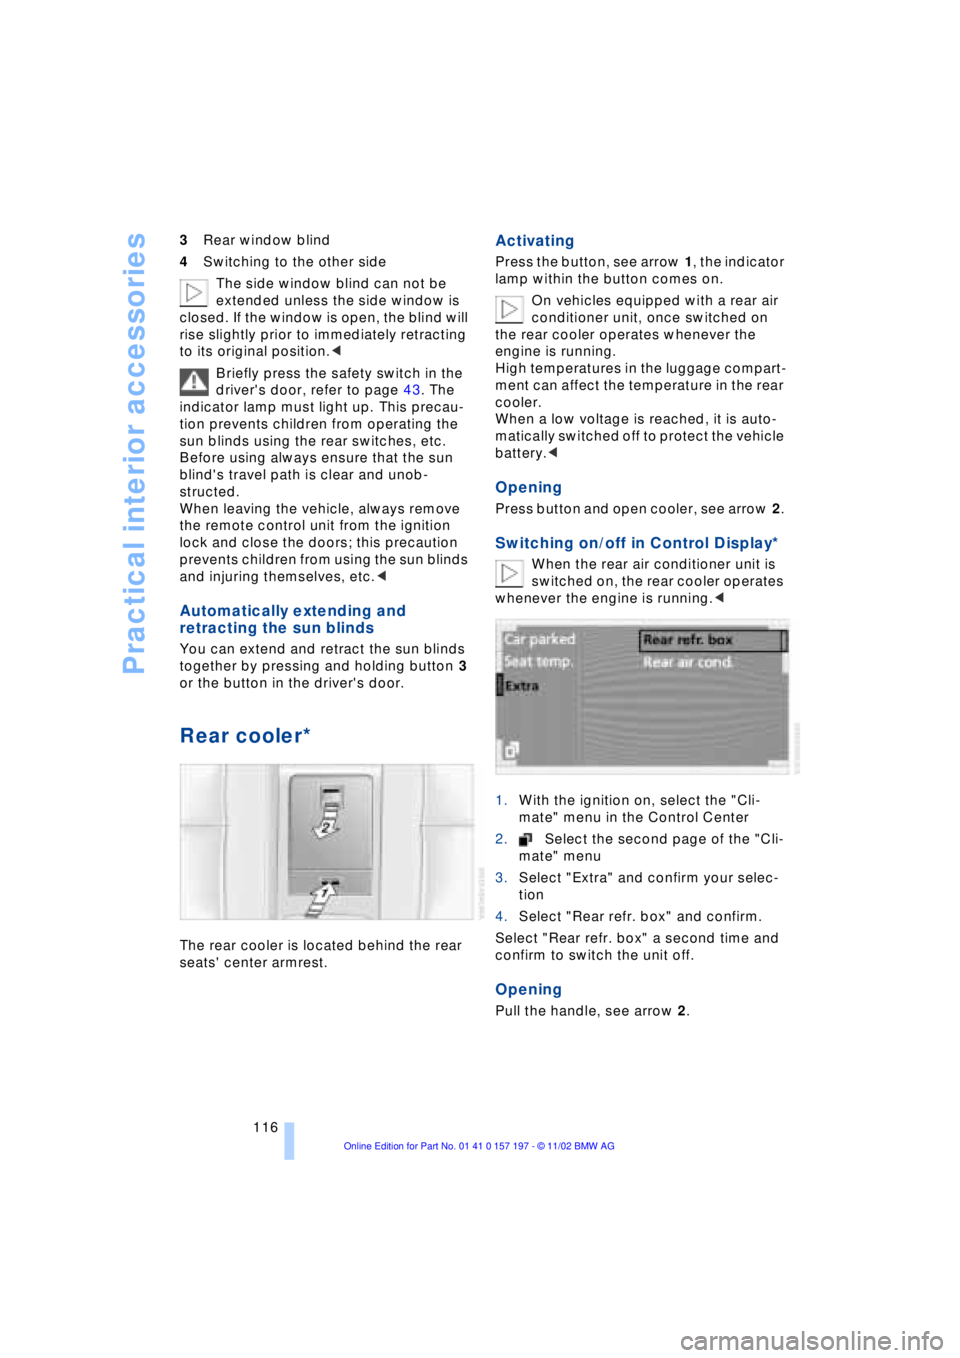
Rear cooler*
The rear cooler is located behind the rear
seats' center armrest.
Activating
Press the button, see arrow 1, the indicator
lamp within the button comes on.
On vehicles equipped with a rear air
conditioner unit, once switched on
the rear cooler operates whenever the
engine is running.
High temperatures in the luggage compart-
ment can affect the temperature in the rear
cooler.
When a low voltage is reached, it is auto-
matically switched off to protect the vehicle
battery.<
Opening
Press button and open cooler, see arrow 2.
Switching on/off in Control Display*
When the rear air conditioner unit is
switched on, the rear cooler operates
whenever the engine is running.<
1.With the ignition on, select the "Cli-
mate" menu in the Control Center
2.Select the second page of the "Cli-
mate" menu
3.Select "Extra" and confirm your selec-
tion
4.Select "Rear refr. box" and confirm.
Select "Rear refr. box" a second time and
confirm to switch the unit off.
Opening
Pull the handle, see arrow 2.
Page 119 of 229
At a glance
Controls
Driving tips
Communications
Navigation
Entertainment
Mobility
Reference
117
Glove compartment
Opening
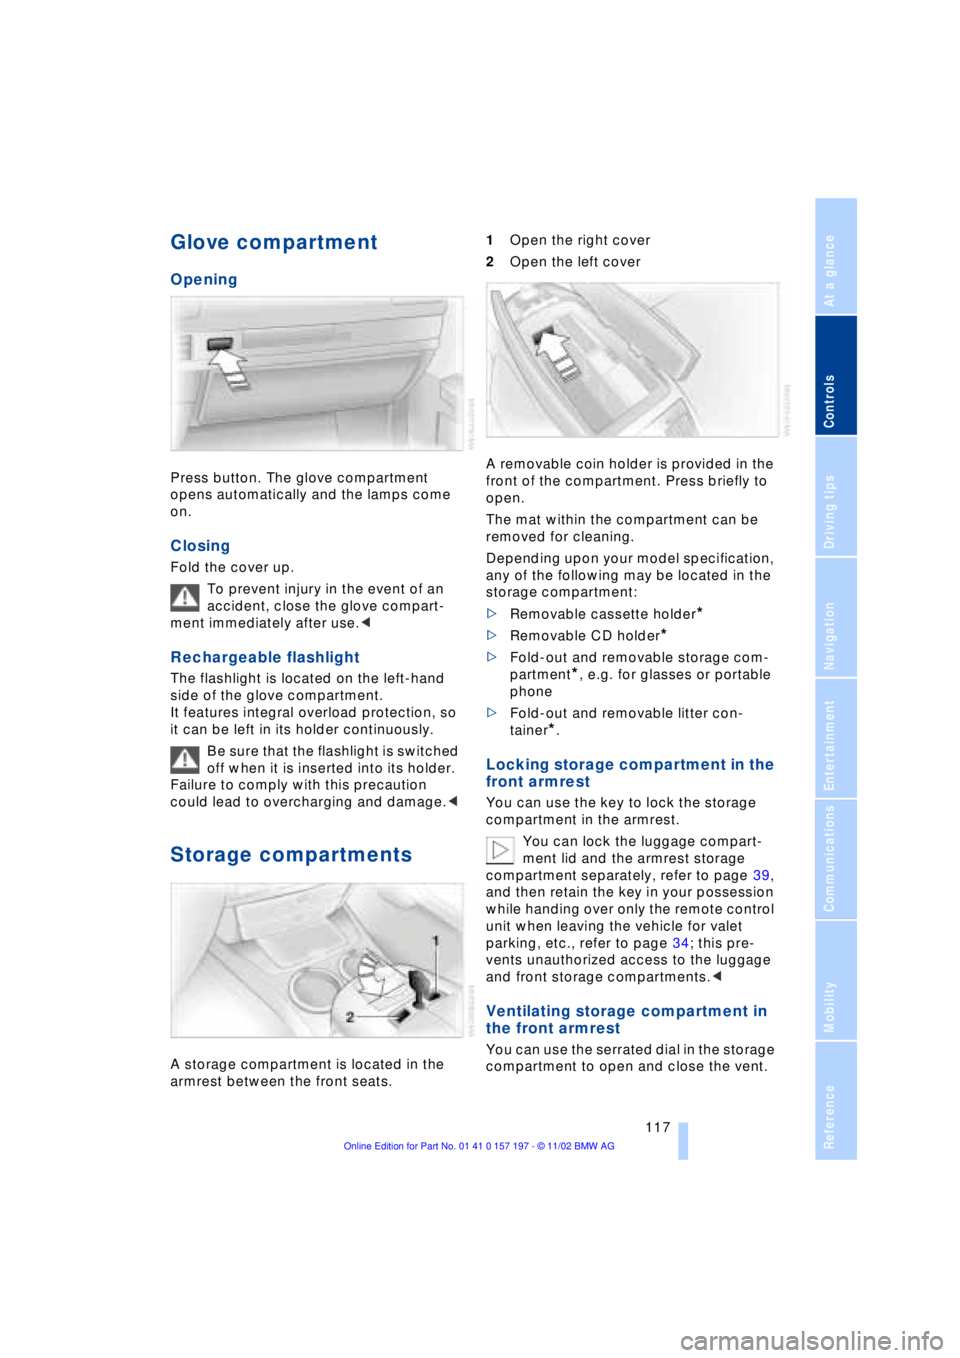
Press button. The glove compartment
opens automatically and the lamps come
on.
Closing
Fold the cover up.
To prevent injury in the event of an
accident, close the glove compart-
ment immediately after use.<
Rechargeable flashlight
The flashlight is located on the left-hand
side of the glove compartment.
It features integral overload protection, so
it can be left in its holder continuously.
Be sure that the flashlight is switched
off when it is inserted into its holder.
Failure to comply with this precaution
could lead to overcharging and damage.<
Storage compartments
A storage compartment is located in the
armrest between the front seats. 1Open the right cover
2Open the left cover
A removable coin holder is provided in the
front of the compartment. Press briefly to
open.
The mat within the compartment can be
removed for cleaning.
Depending upon your model specification,
any of the following may be located in the
storage compartment:
>Removable cassette holder
*
>Removable CD holder
*
>Fold-out and removable storage com-
partment
*, e.g. for glasses or portable
phone
>Fold-out and removable litter con-
tainer
*.
Locking storage compartment in the
front armrest
You can use the key to lock the storage
compartment in the armrest.
You can lock the luggage compart-
ment lid and the armrest storage
compartment separately, refer to page 39,
and then retain the key in your possession
while handing over only the remote control
unit when leaving the vehicle for valet
parking, etc., refer to page 34; this pre-
vents unauthorized access to the luggage
and front storage compartments.<
Ventilating storage compartment in
the front armrest
You can use the serrated dial in the storage
compartment to open and close the vent.
Page 120 of 229
Practical interior accessories
118 Depending on the automatic climate
control setting, the temperature
within the storage compartment may be
higher than in the rest of the interior. Close
the vent as required.<
Storage compartment on center
console between the front seats
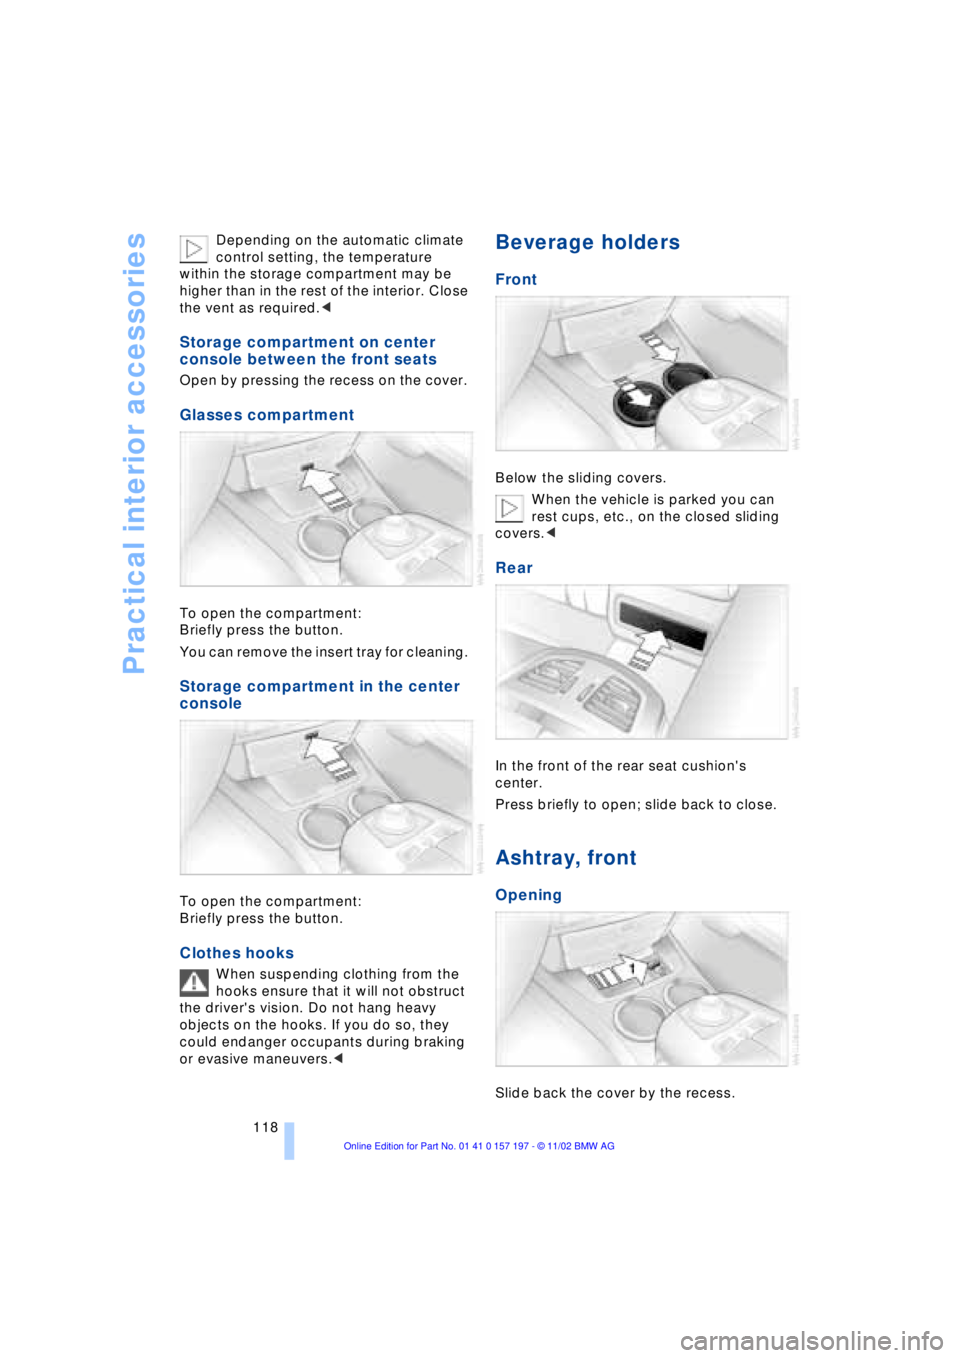
Open by pressing the recess on the cover.
Glasses compartment
To open the compartment:
Briefly press the button.
You can remove the insert tray for cleaning.
Storage compartment in the center
console
To open the compartment:
Briefly press the button.
Clothes hooks
When suspending clothing from the
hooks ensure that it will not obstruct
the driver's vision. Do not hang heavy
objects on the hooks. If you do so, they
could endanger occupants during braking
or evasive maneuvers.<
Beverage holders
Front
Below the sliding covers.
When the vehicle is parked you can
rest cups, etc., on the closed sliding
covers.<
Rear
In the front of the rear seat cushion's
center.
Press briefly to open; slide back to close.
Ashtray, front
Opening
Slide back the cover by the recess.
Page 122 of 229
Practical interior accessories
120
Center armrest
Before folding down the armrest
adjust the head restraint to its lowest
position, refer to page 49.<
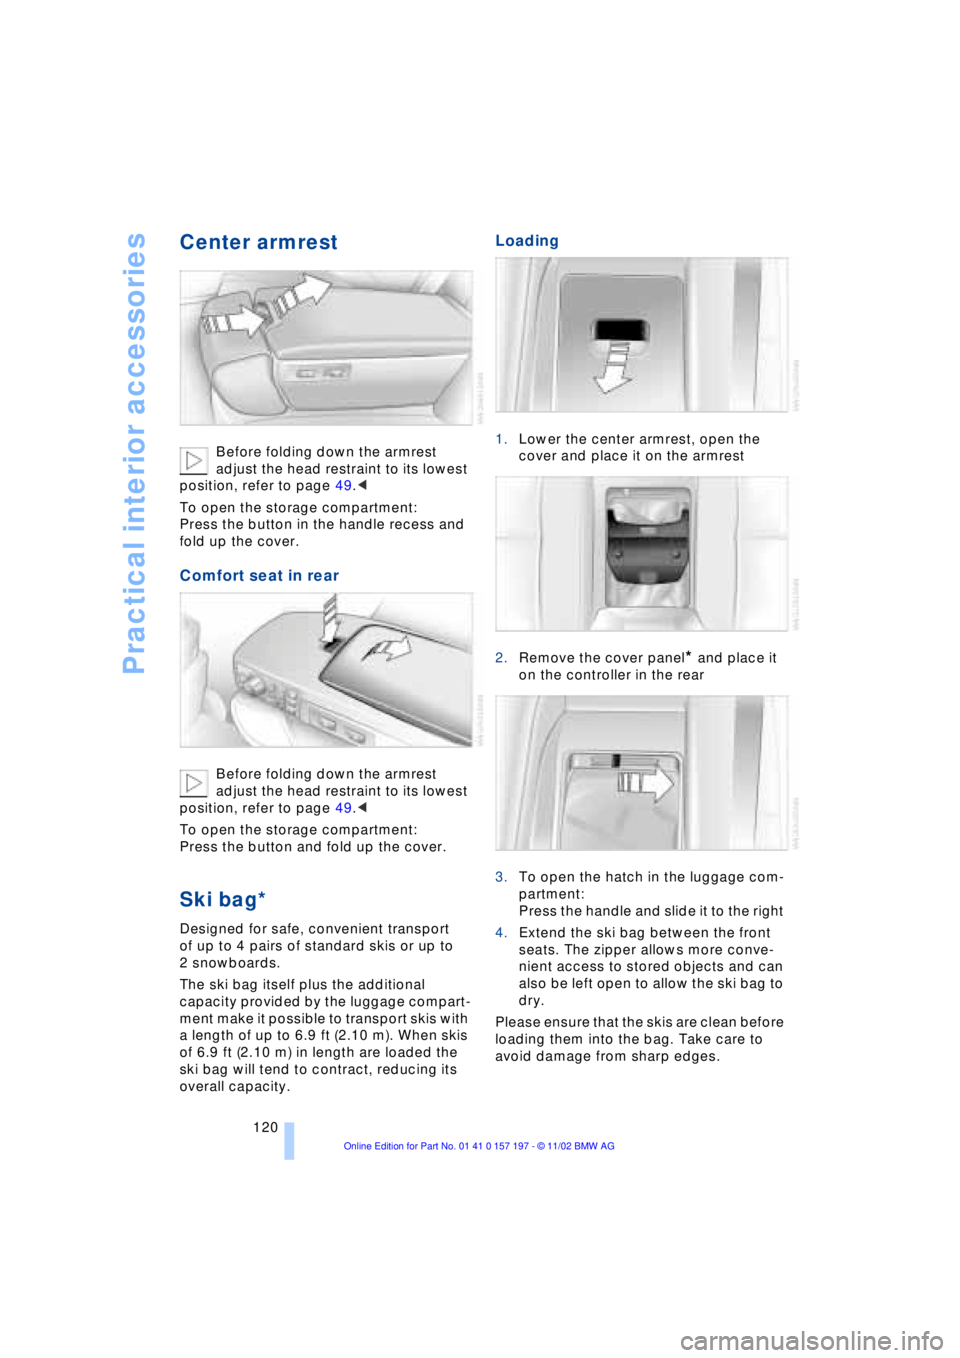
To open the storage compartment:
Press the button in the handle recess and
fold up the cover.
Comfort seat in rear
Before folding down the armrest
adjust the head restraint to its lowest
position, refer to page 49.<
To open the storage compartment:
Press the button and fold up the cover.
Ski bag*
Designed for safe, convenient transport
of up to 4 pairs of standard skis or up to
2 snowboards.
The ski bag itself plus the additional
capacity provided by the luggage compart-
ment make it possible to transport skis with
a length of up to 6.9 ft (2.10 m). When skis
of 6.9 ft (2.10 m) in length are loaded the
ski bag will tend to contract, reducing its
overall capacity.
Loading
1.Lower the center armrest, open the
cover and place it on the armrest
2.Remove the cover panel
* and place it
on the controller in the rear
3.To open the hatch in the luggage com-
partment:
Press the handle and slide it to the right
4.Extend the ski bag between the front
seats. The zipper allows more conve-
nient access to stored objects and can
also be left open to allow the ski bag to
dry.
Please ensure that the skis are clean before
loading them into the bag. Take care to
avoid damage from sharp edges.