instrument panel BMW ACTIVEHYBRID X6 2010 Owners Manual
[x] Cancel search | Manufacturer: BMW, Model Year: 2010, Model line: ACTIVEHYBRID X6, Model: BMW ACTIVEHYBRID X6 2010Pages: 54, PDF Size: 3.16 MB
Page 10 of 54
Cockpit
8
Cockpit
Instrument panel
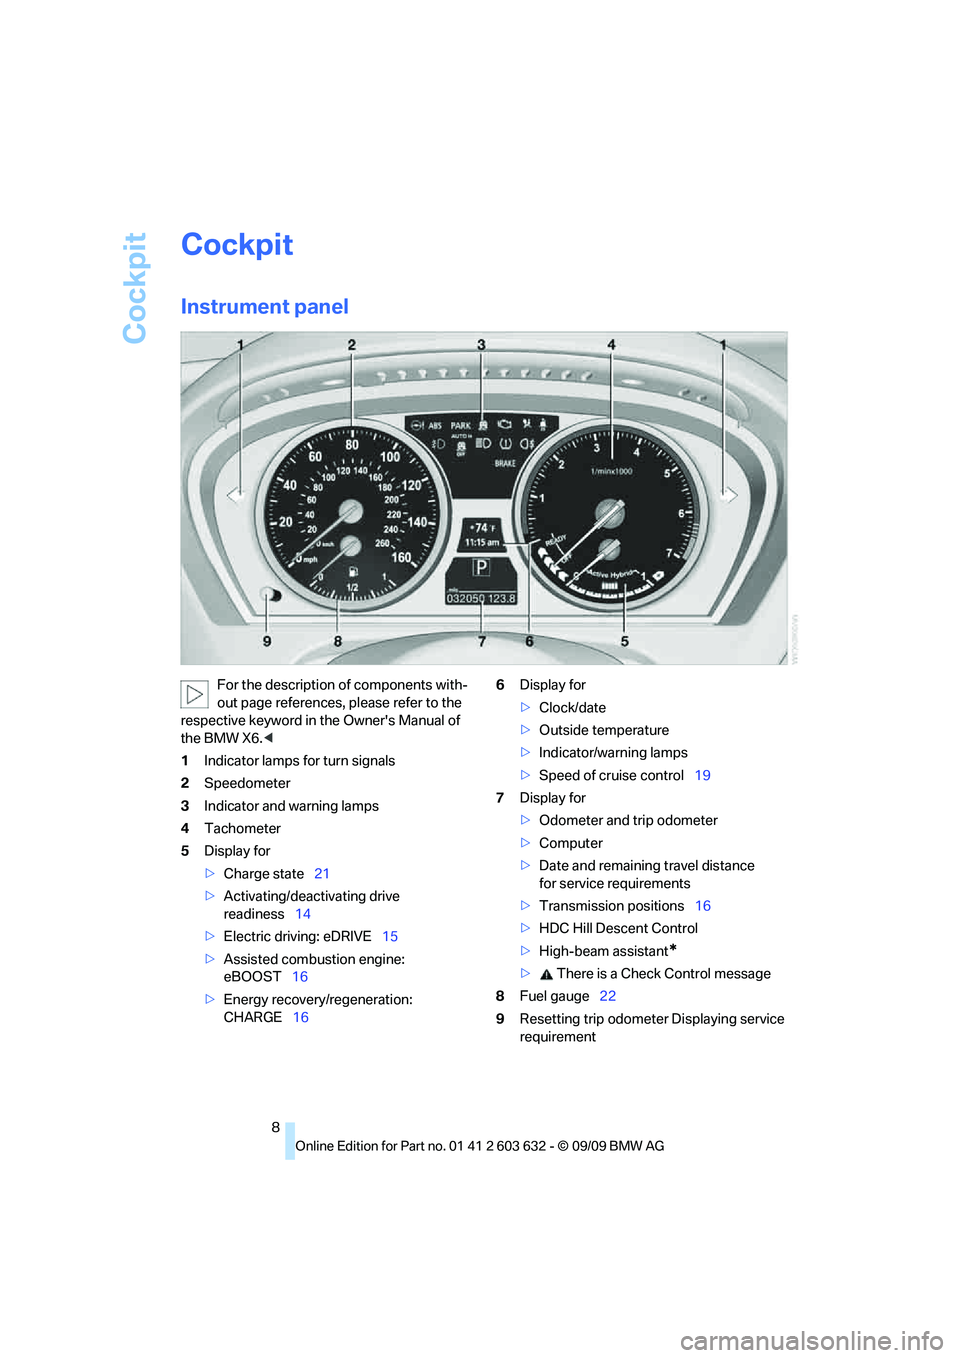
For the description of components with-
out page references, please refer to the
respective keyword in the Owner's Manual of
the BMW X6.<
1Indicator lamps for turn signals
2Speedometer
3Indicator and warning lamps
4Tachometer
5Display for
>Charge state21
>Activating/deactivating drive
readiness14
>Electric driving: eDRIVE15
>Assisted combustion engine:
eBOOST16
>Energy recovery/regeneration:
CHARGE166Display for
>Clock/date
>Outside temperature
>Indicator/warning lamps
>Speed of cruise control19
7Display for
>Odometer and trip odometer
>Computer
>Date and remaining travel distance
for service requirements
>Transmission positions16
>HDC Hill Descent Control
>High-beam assistant
*
> There is a Check Control message
8Fuel gauge22
9Resetting trip odometer Displaying service
requirement
Page 15 of 54
Reference
At a glance
Controls
Driving tips
Mobility
13
Functions of the hybrid system
The hybrid system of your BMW ActiveHybrid
X6 offers the following functions.
Electric driving: eDRIVE
Under certain conditions, refer to page15, the
vehicle is powered exclusively by its electric
motors.
Driving with combustion engine: DRIVE
The combustion engine supplies the drive out-
put for moving the vehicle. The high-voltage
battery is charged at the same time.
The hybrid system always starts the combus-
tion engine automatically, refer to page16.
Assisted combustion engine: eBOOST
The combustion engine supplies the main drive
output for moving the vehicle.
In this mode, the electric motors assist the
combustion engine with additional power as
needed.
Energy recovery: CHARGE
When reducing vehicle speed, the kinetic
energy can be converted into electrical energy,
refer to page16.
Start/Stop button, ready
modes
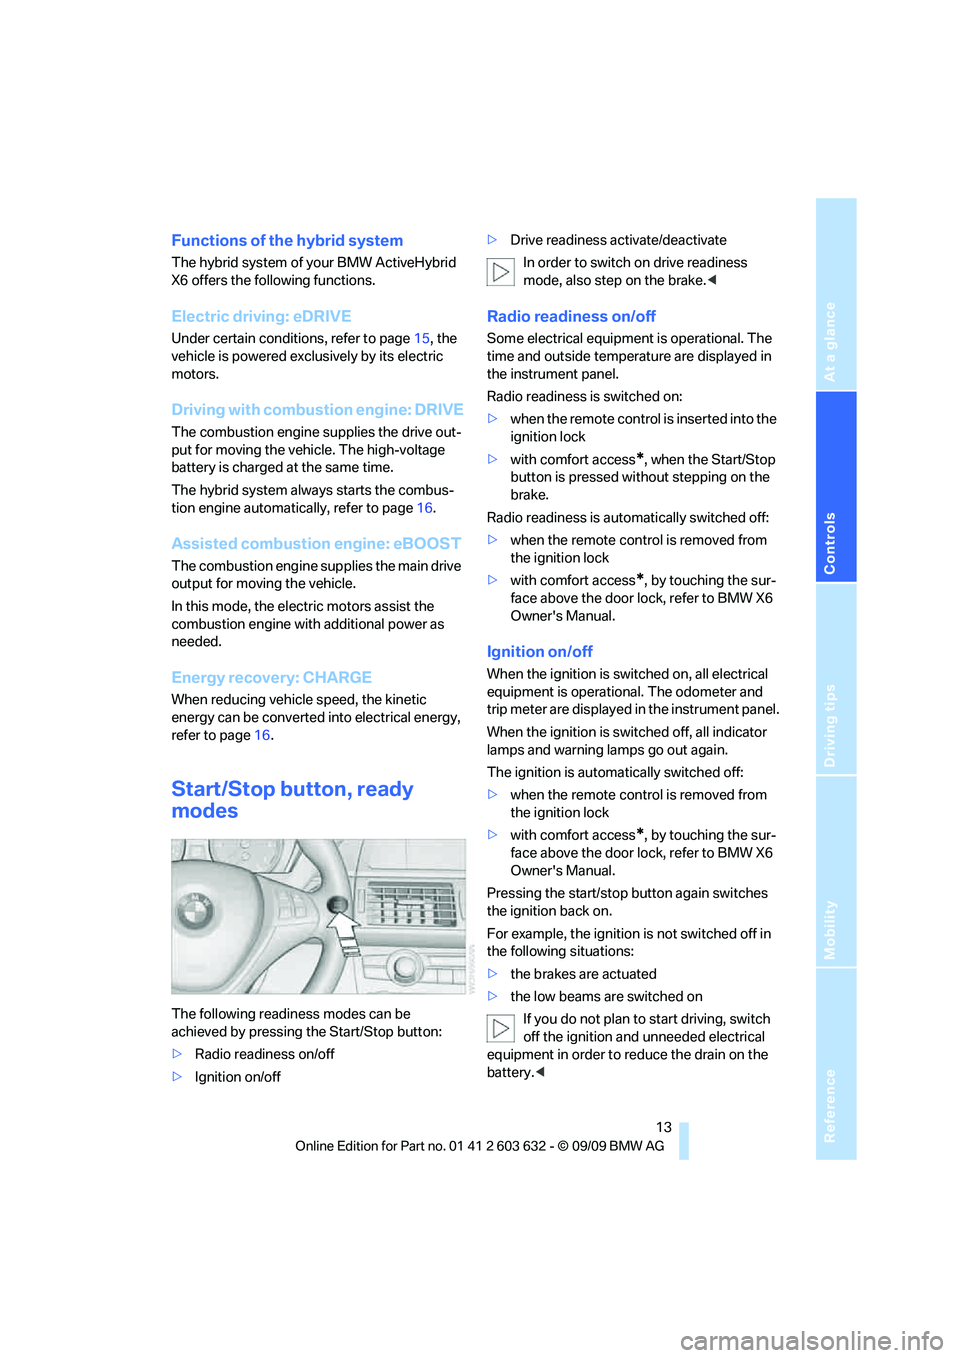
The following readiness modes can be
achieved by pressing the Start/Stop button:
>Radio readiness on/off
>Ignition on/off>Drive readiness activate/deactivate
In order to switch on drive readiness
mode, also step on the brake.<
Radio readiness on/off
Some electrical equipment is operational. The
time and outside temperature are displayed in
the instrument panel.
Radio readiness is switched on:
>when the remote control is inserted into the
ignition lock
>with comfort access
*, when the Start/Stop
button is pressed without stepping on the
brake.
Radio readiness is automatically switched off:
>when the remote control is removed from
the ignition lock
>with comfort access
*, by touching the sur-
face above the door lock, refer to BMW X6
Owner's Manual.
Ignition on/off
When the ignition is switched on, all electrical
equipment is operational. The odometer and
trip meter are displayed in the instrument panel.
When the ignition is switched off, all indicator
lamps and warning lamps go out again.
The ignition is automatically switched off:
>when the remote control is removed from
the ignition lock
>with comfort access
*, by touching the sur-
face above the door lock, refer to BMW X6
Owner's Manual.
Pressing the start/stop button again switches
the ignition back on.
For example, the ignition is not switched off in
the following situations:
>the brakes are actuated
>the low beams are switched on
If you do not plan to start driving, switch
off the ignition and unneeded electrical
equipment in order to reduce the drain on the
battery.<
Page 17 of 54
Reference
At a glance
Controls
Driving tips
Mobility
15
Do not run the combustion engine in
enclosed spaces; otherwise, the inhala-
tion of toxic exhaust gases can cause loss of
consciousness and death. The exhaust gases
contain carbon monoxide, an odorless and col-
orless, but highly toxic gas.
Never leave the vehicle unattended with the
combustion engine running; such a vehicle rep-
resents a potential safety hazard.<
Deactivating drive readiness
When drive readiness is switched off, the
tachometer pointer is in the OFF position.
When leaving the vehicle, always take
along the remote control.
Set the parking brake firmly when parking; oth-
erwise, the vehicle could roll.<
After the vehicle is switched off, audible operat-
ing sounds may issue from the hybrid system,
e.g. the cooling of the high-voltage battery.
Procedure
1.Select transmission position P with the
vehicle stationary.
2.Press the Start/Stop button.
3.Set the parking brake.
4.Remove the remote control from the igni-
tion lock.
Before removing the remote control, first
press it in as far as possible to release the
locking device.
Before driving into a car wash
The vehicle can roll if you proceed according to
the following steps:
1.With comfort access
*: insert the remote
control into the ignition lock.
2.Depress brake pedal.
3.Select transmission position N.
4.Release the parking brake or deactivate
Automatic Hold.
5.Press the Start/Stop button to deactivate
drive readiness.
Transmission position P will be selected:
>automatically after approx. 30 minutes>if you remove the remote control from the
ignition lock
Starting to drive
1.Activate drive readiness.
2.Select transmission position D, M/S, or R.
3.Release the parking brake.
4.Start to drive.
Driving
Electric driving: eDRIVE
Requirements
Electric driving is possible under the following
conditions:
>driving speed:
a maximum of approx. 37 mph/60 km/h
>charge state display of the high-voltage
battery: at least 15%
>transmission in position D or R, refer to
page17
>drive system at operating temperature
>accelerator pedal not pressed down too far
>driver's door closed
Possible driving speed
The possible speed that can be reached in elec-
tric driving depends on the charge state of the
high-voltage battery.
>charge state display 15% to 40%:
maximum driving speed is approx. 25 mph/
40 km/h
>charge state display 40% to 100%:
maximum driving speed is approx. 40 mph/
65 km/h
When accelerating past a speed of 25 mph/
40 km/h, the combustion engine is started
briefly in order to assure smooth acceleration.
Indicators of electric driving in the instrument
panel, refer to page22.
Page 18 of 54

Driving
16
Possible range
The vehicle can travel approx. 1.5 miles/2.5 km
under electric power.
Driving with combustion engine: DRIVE
The combustion engine supplies the drive out-
put for moving the vehicle. The high-voltage
battery is charged at the same time.
Automatic starting while driving
Under the following circumstances, the com-
bustion engine is started automatically while
driving:
>transmission position M/S selected
>driving speed greater than 40 mph/65 km/h
>low charge state or fully charged high-volt-
age battery, e.g. when driving downhill
>to protect the high-voltage system from
overheating, e.g. when driving downhill
>high output request, e.g. by accelerator
pedal position.
Automatic switching off while driving
When decelerating under the conditions for
electric driving, refer to page15, the combus-
tion engine is switched off.
Assisted combustion engine
The combustion engine supplies the main drive
output for moving the vehicle.
The electric motors assist by providing addi-
tional drive output as needed.
eBOOST
When accelerating quickly, e.g. when passing
another vehicle, power from the two electric
motors simultaneously is requested in addition
to that of the combustion engine. To trigger
this, step down hard on the accelerator pedal.
Display in the instrument panel, refer to
page22.
Energy recovery: CHARGE
The hybrid system makes it possible to convert
kinetic energy into electrical current, e.g. during braking. This energy recovery is used to charge
the high-voltage battery. The battery supplies
this stored energy back to the electric motors
as needed.
To recover the braking energy, the following
conditions must be met:
>The vehicle is in motion.
>The selector lever is in the position D, R, or
M/S.
>The high-voltage battery is not completely
charged.
Display of energy recovery in the instrument
panel, refer to page22
Two-Mode Active
Transmission with Steptronic
The Das Two-Mode Active Transmission is an
automatic transmission in which the gears can
be shifted in a fully automatic fashion or can be
shifted manually on demand. The manual shift-
ing is performed using the selector lever or the
shifting paddles of the Steptronic, refer to
page18.
Automatic shifting may be perceptible
when decelerating at a low speed.<
Transmission positions
P R N D M/S + –
Hold the brake pedal down until starting
to drive; otherwise, the vehicle can begin
to roll.<
Displays in instrument panel
P R N D, S1 through S7, M1 through M7
Page 20 of 54
Driving
18
D Drive, automatic position
Position for normal vehicle operation. All for-
ward gears are shifted automatically. Depend-
ing on operating conditions, the vehicle is
driven electrically or with the combustion
engine.
The fuel consumption is the lowest in transmis-
sion position D.
Kick-down
The kick-down mode provides maximum accel-
eration.
Press the accelerator pedal beyond the
increased resistance at full throttle.
Due to the high power requested, the combus-
tion engine is started and is assisted by the
electric motors as needed.
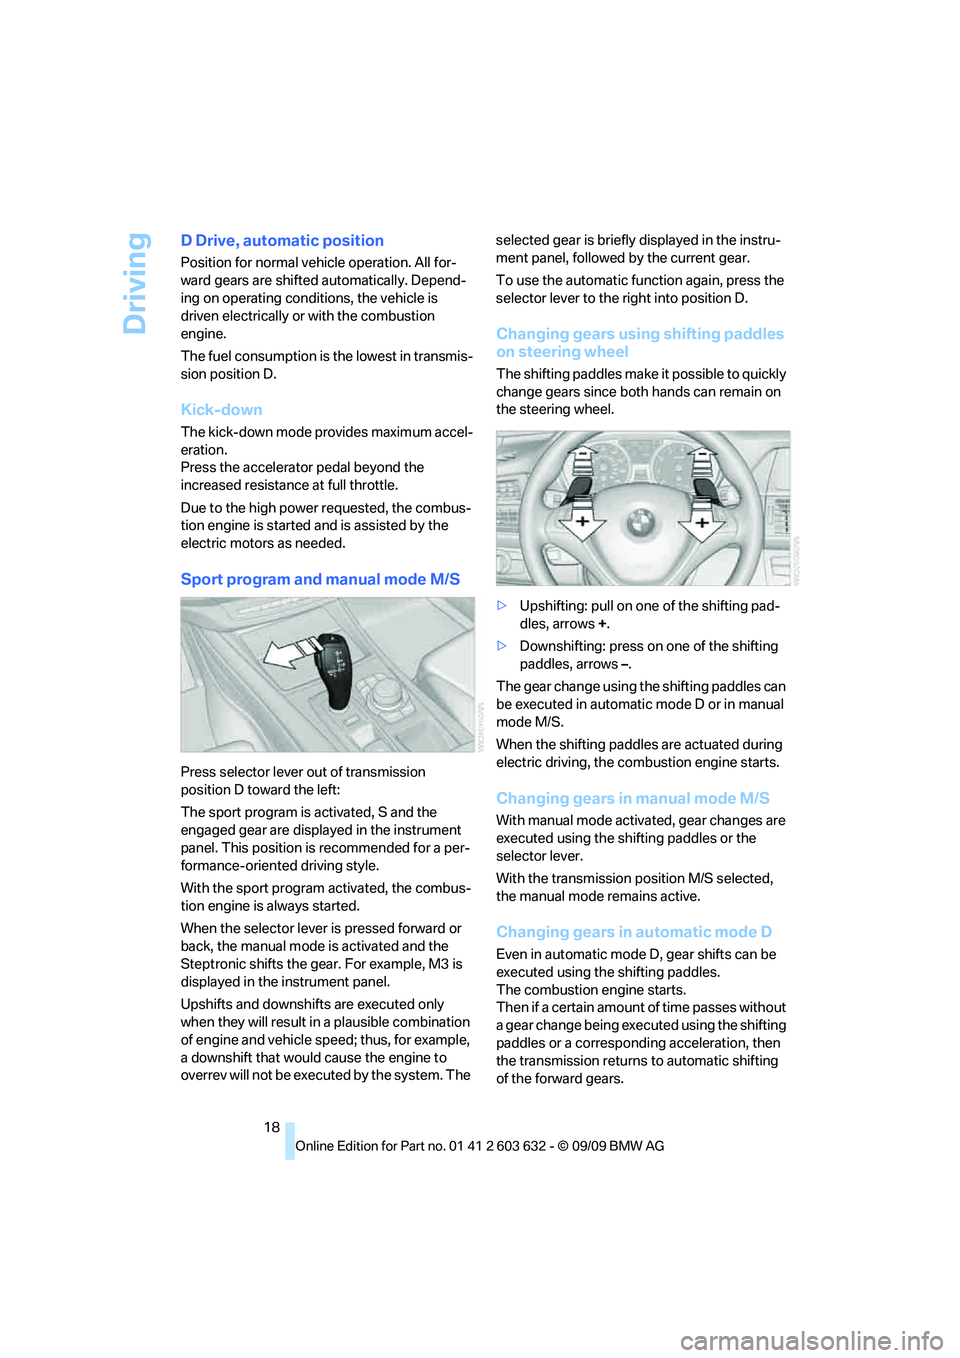
Sport program and manual mode M/S
Press selector lever out of transmission
position D toward the left:
The sport program is activated, S and the
engaged gear are displayed in the instrument
panel. This position is recommended for a per-
formance-oriented driving style.
With the sport program activated, the combus-
tion engine is always started.
When the selector lever is pressed forward or
back, the manual mode is activated and the
Steptronic shifts the gear. For example, M3 is
displayed in the instrument panel.
Upshifts and downshifts are executed only
when they will result in a plausible combination
of engine and vehicle speed; thus, for example,
a downshift that would cause the engine to
overrev will not be executed by the system. The selected gear is briefly displayed in the instru-
ment panel, followed by the current gear.
To use the automatic function again, press the
selector lever to the right into position D.
Changing gears using shifting paddles
on steering wheel
The shifting paddles make it possible to quickly
change gears since both hands can remain on
the steering wheel.
>Upshifting: pull on one of the shifting pad-
dles, arrows +.
>Downshifting: press on one of the shifting
paddles, arrows –.
The gear change using the shifting paddles can
be executed in automatic mode D or in manual
mode M/S.
When the shifting paddles are actuated during
electric driving, the combustion engine starts.
Changing gears in manual mode M/S
With manual mode activated, gear changes are
executed using the shifting paddles or the
selector lever.
With the transmission position M/S selected,
the manual mode remains active.
Changing gears in automatic mode D
Even in automatic mode D, gear shifts can be
executed using the shifting paddles.
The combustion engine starts.
Then if a certa in amount of time pas ses witho ut
a gear change being executed using the shifting
paddles or a corresponding acceleration, then
the transmission returns to automatic shifting
of the forward gears.
Page 21 of 54
Reference
At a glance
Controls
Driving tips
Mobility
19
Cruise control
The concept
The cruise control is available for use at speeds
of approx. 20 mph/30 km/h. The vehicle stores
and maintains the speed that you set using the
lever mounted on the steering column.
The cruise control can also be activated
during electric driving, eDRIVE. The
cruise control provides a particularly sensitive
adjustment of the electric drive output.<
Do not use the cruise control under driv-
ing conditions that do not permit a con-
stant speed, e.g. when driving on winding
roads, in heavy traffic or in poor road conditions
such as snow, rain, ice, and loose road surface.
Otherwise you could lose control of the vehicle
and cause an accident.<
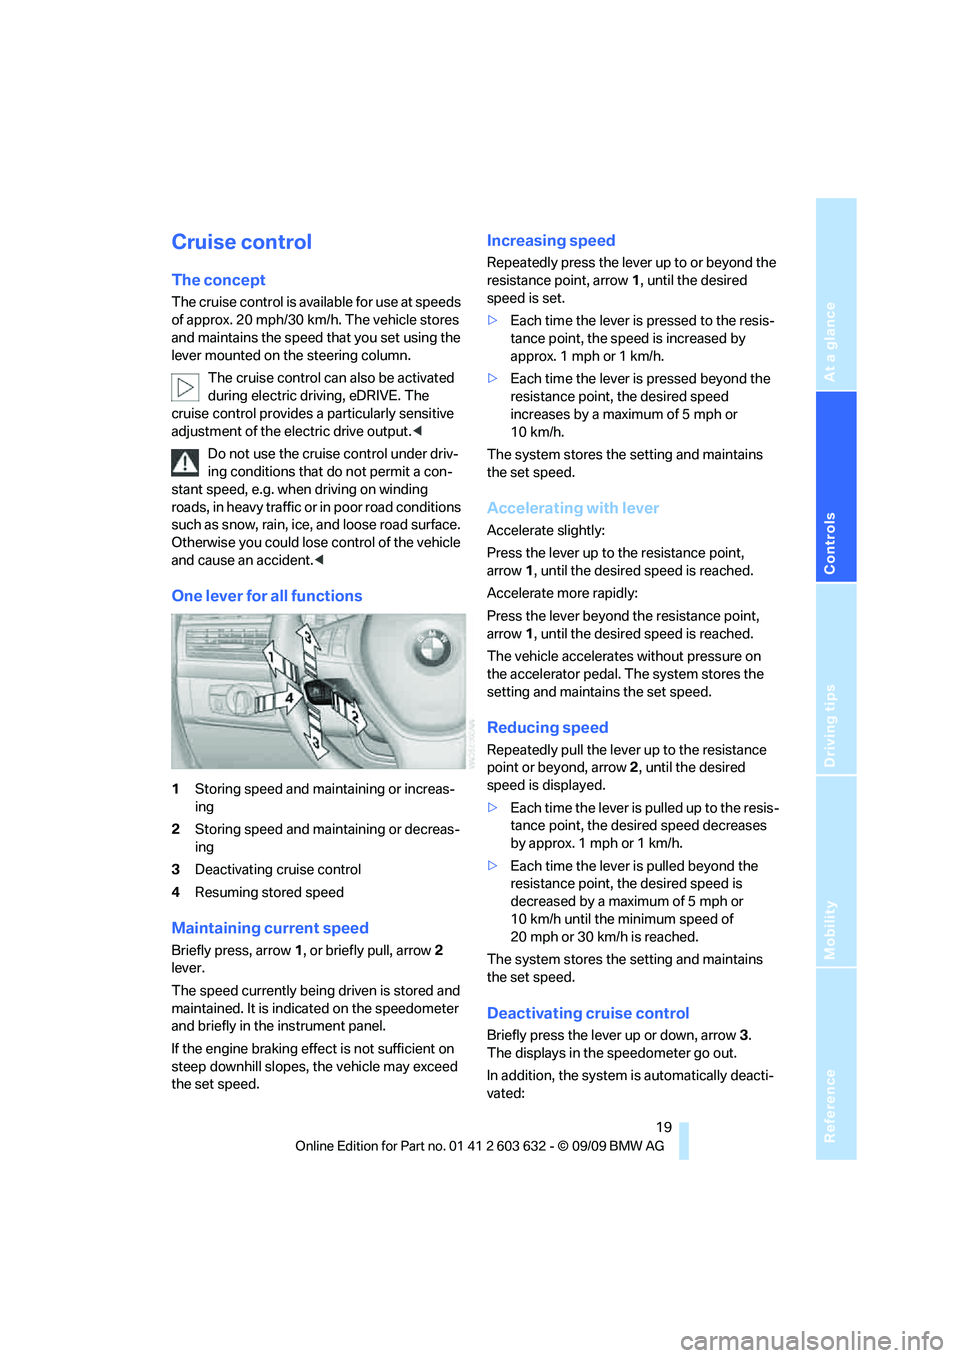
One lever for all functions
1Storing speed and maintaining or increas-
ing
2Storing speed and maintaining or decreas-
ing
3Deactivating cruise control
4Resuming stored speed
Maintaining current speed
Briefly press, arrow1, or briefly pull, arrow2
lever.
The speed currently being driven is stored and
maintained. It is indicated on the speedometer
and briefly in the instrument panel.
If the engine braking effect is not sufficient on
steep downhill slopes, the vehicle may exceed
the set speed.
Increasing speed
Repeatedly press the lever up to or beyond the
resistance point, arrow1, until the desired
speed is set.
>Each time the lever is pressed to the resis-
tance point, the speed is increased by
approx. 1 mph or 1 km/h.
>Each time the lever is pressed beyond the
resistance point, the desired speed
increases by a maximum of 5 mph or
10 km/h.
The system stores the setting and maintains
the set speed.
Accelerating with lever
Accelerate slightly:
Press the lever up to the resistance point,
arrow1, until the desired speed is reached.
Accelerate more rapidly:
Press the lever beyond the resistance point,
arrow1, until the desired speed is reached.
The vehicle accelerates without pressure on
the accelerator pedal. The system stores the
setting and maintains the set speed.
Reducing speed
Repeatedly pull the lever up to the resistance
point or beyond, arrow2, until the desired
speed is displayed.
>Each time the lever is pulled up to the resis-
tance point, the desired speed decreases
by approx. 1 mph or 1 km/h.
>Each time the lever is pulled beyond the
resistance point, the desired speed is
decreased by a maximum of 5 mph or
10 km/h until the minimum speed of
20 mph or 30 km/h is reached.
The system stores the setting and maintains
the set speed.
Deactivating cruise control
Briefly press the lever up or down, arrow3.
The displays in the speedometer go out.
In addition, the system is automatically deacti-
vated:
Page 22 of 54
Driving
20 >when braking
>when transmission position N is engaged
>when DTC is activated or DSC is deacti-
vated
>when HDC is activated
>when the parking brake is set
>when driving stability control systems inter-
vene
Accelerating does not deactivate the cruise
control. After releasing the accelerator pedal,
the stored speed is reached and maintained
again.
Warning lamp
The warning lamp lights up if the
cruise control has been deactivated
automatically, e.g. by a control inter-
vention of the DSC. A message appears on the
Control Display.
Resuming stored speed
Briefly press the button, arrow4. The stored
speed is resumed and maintained.
With the ignition switched off, the stored speed
value is deleted and cannot be resumed again.
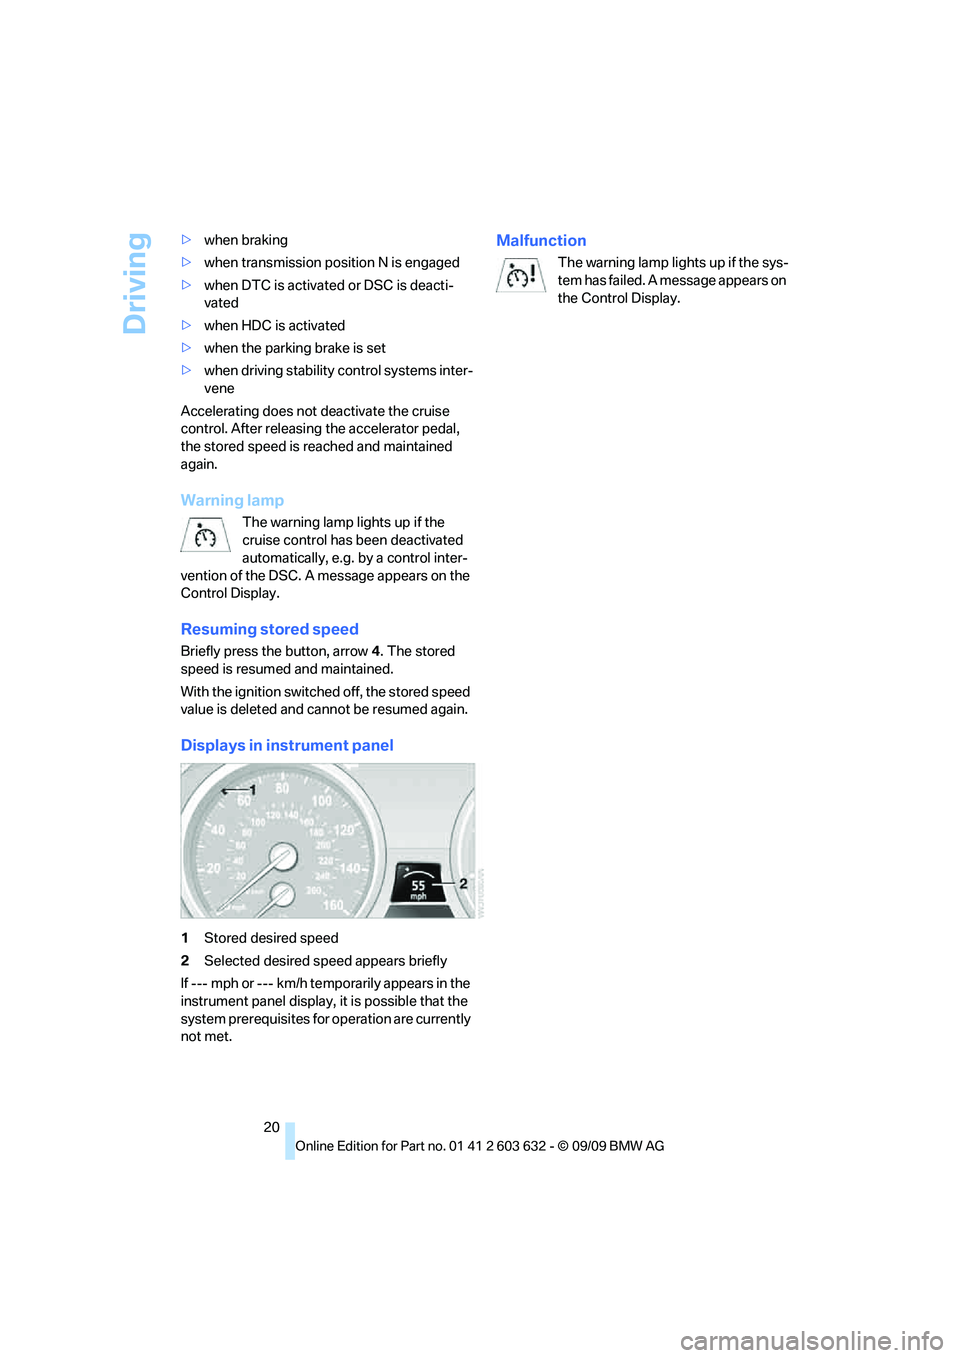
Displays in instrument panel
1Stored desired speed
2Selected desired speed appears briefly
If --- mph or --- km/h temporarily appears in the
instrument panel display, it is possible that the
system prerequisites for operation are currently
not met.
Malfunction
The warning lamp lights up if the sys-
tem has failed. A message appears on
the Control Display.
Page 29 of 54
Reference
At a glance
Controls
Driving tips
Mobility
27
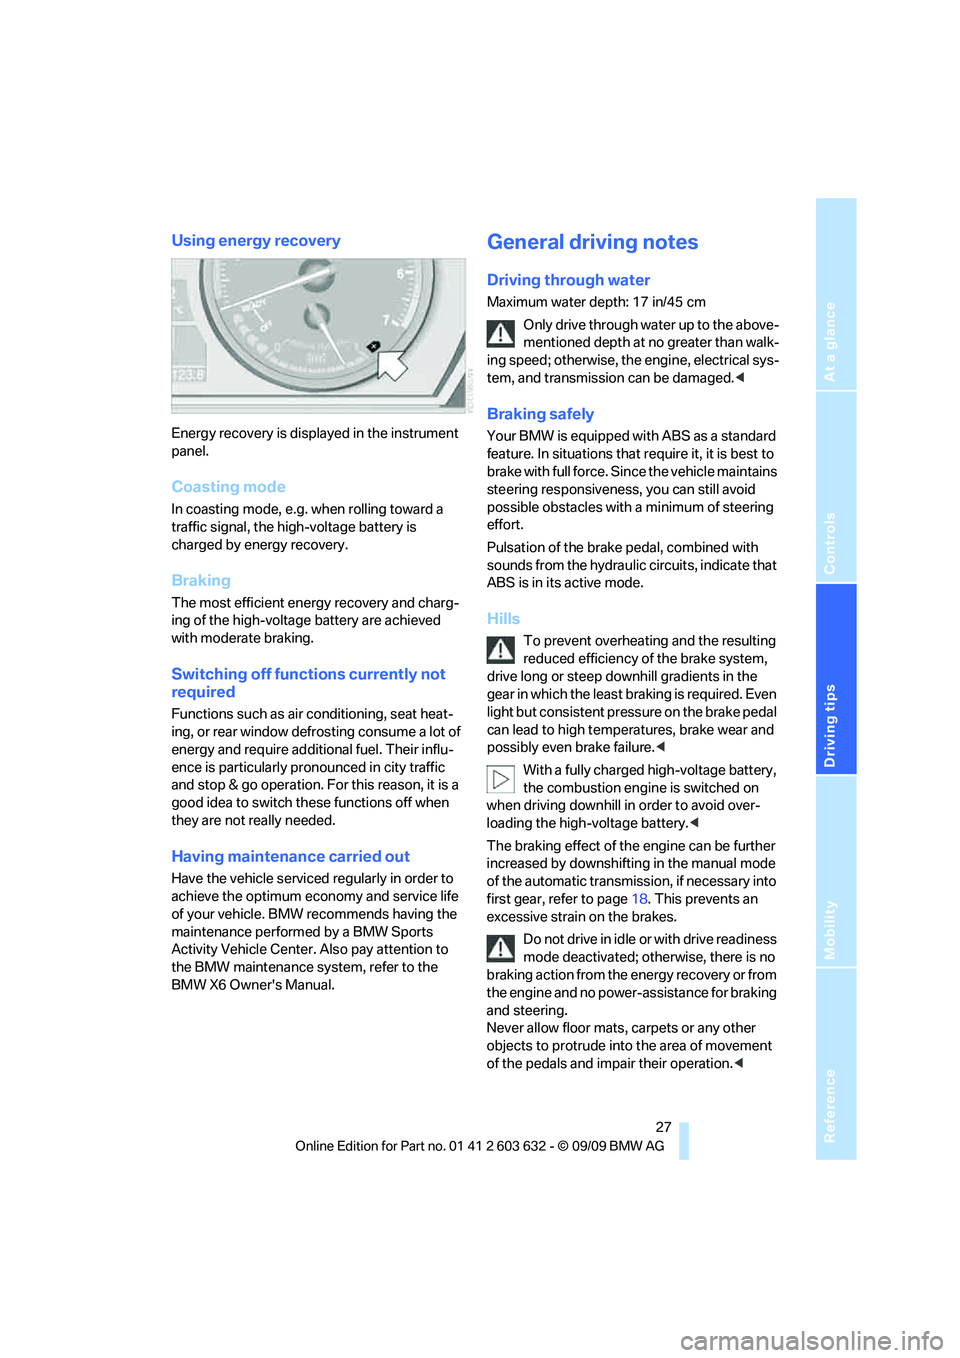
Using energy recovery
Energy recovery is displayed in the instrument
panel.
Coasting mode
In coasting mode, e.g. when rolling toward a
traffic signal, the high-voltage battery is
charged by energy recovery.
Braking
The most efficient energy recovery and charg-
ing of the high-voltage battery are achieved
with moderate braking.
Switching off functions currently not
required
Functions such as air conditioning, seat heat-
ing, or rear window defrosting consume a lot of
energy and require additional fuel. Their influ-
ence is particularly pronounced in city traffic
and stop & go operation. For this reason, it is a
good idea to switch these functions off when
they are not really needed.
Having maintenance carried out
Have the vehicle serviced regularly in order to
achieve the optimum economy and service life
of your vehicle. BMW recommends having the
maintenance performed by a BMW Sports
Activity Vehicle Center. Also pay attention to
the BMW maintenance system, refer to the
BMW X6 Owner's Manual.
General driving notes
Driving through water
Maximum water depth: 17 in/45 cm
Only drive through water up to the above-
mentioned depth at no greater than walk-
ing speed; otherwise, the engine, electrical sys-
tem, and transmission can be damaged.<
Braking safely
Your BMW is equipped with ABS as a standard
feature. In situations that require it, it is best to
brake with full force. Since the vehicle maintains
steering responsiveness, you can still avoid
possible obstacles with a minimum of steering
effort.
Pulsation of the brake pedal, combined with
sounds from the hydraulic circuits, indicate that
ABS is in its active mode.
Hills
To prevent overheating and the resulting
reduced efficiency of the brake system,
drive long or steep downhill gradients in the
gear in which the least braking is required. Even
light but consistent pressure on the brake pedal
can lead to high temperatures, brake wear and
possibly even brake failure.<
With a fully charged high-voltage battery,
the combustion engine is switched on
when driving downhill in order to avoid over-
loading the high-voltage battery.<
The braking effect of the engine can be further
increased by downshifting in the manual mode
of the automatic transmission, if necessary into
first gear, refer to page18. This prevents an
excessive strain on the brakes.
Do not drive in idle or with drive readiness
mode deactivated; otherwise, there is no
braking action from the energy recovery or from
the engine and no power-assistance for braking
and steering.
Never allow floor mats, carpets or any other
objects to protrude into the area of movement
of the pedals and impair their operation.<
Page 50 of 54
Everything from A to Z
48
Everything from A to Z
Index
A
Accident, what to do after40
After an accident40
AKI, refer to Fuel
specifications33
Alterations, technical, refer to
For your own safety5
Approved axle weights, refer
to Weights46
Approved gross vehicle
weight, refer to Weights46
Axle weights, refer to
Weights46
B
Battery
– 12 V battery36
– charging36
– high-voltage battery36
Battery disposal
– vehicle battery36
BMW homepage4
BMW website4
Brake rotors28
Brakes
– breaking-in26
– refer to Braking safely27
Brake system
– breaking-in26
– disk brakes28
Braking safely27
Breaking-in rear axle
differential26
Break-in period26
Button for starting engine13
C
Capacities46
Capacity of cargo bay46Cargo bay
– capacity46
Car wash
– before driving in15
Changes, technical, refer to
For your own safety5
CHARGE, Energy recovery16
Charge state display21
Charging high-voltage
battery37
Checking the air pressure,
refer to Tire inflation
pressure34
Climate23
Closing fuel filler cap32
Cockpit8
Components, high-voltage
system12
Consumption display
– charge state display21
Copyright2
Cruise control19
Cylinders, refer to Drive
system44
D
Data
– capacities46
– dimensions45
– engine44
– high-voltage system44
– hybrid system44
– technical data44
– weights46
Dimensions45
Displacement, refer to Drive
system44
Displays, refer to Instrument
panel8
Disposal
– vehicle battery36DRIVE, Driving with
combustion engine16
Drive readiness14
Driving through water27
Driving tips, refer to General
driving notes26
E
eBOOST16
eDRIVE, Electric driving15
Electrical malfunction
– fuel filler door32
Electric drive readiness14
Electric driving, eDRIVE15
Emergency operation, refer to
Manually operating fuel filler
door32
Energy recovery, CHARGE16
Engine
– breaking-in26
– data44
– speed44
– starting14
Engine compartment35
Engine output, refer to Drive
system44
Engine speed44
Eye for tow-starting and
towing, refer to Tow
fitting39
F
Footbrake, refer to Braking
safely27
For your own safety5
Page 51 of 54
Reference
At a glance
Controls
Driving tips
Mobility
49
Fuel33
– capacity46
– display22
– high-quality brands33
– quality33
– saving26
– specifications33
Fuel clock, refer to Fuel
gauge22
Fuel display, refer to Fuel
gauge22
Fuel filler door32
– closing32
– releasing manually32
G
Gasoline, refer to Required
fuel33
Gasoline display, refer to Fuel
gauge22
General driving notes26,27
Getting towed38
Gross vehicle weight, refer to
Weights46
H
Height, refer to
Dimensions45
High-voltage battery36
High-voltage system
– components12
High water, refer to Driving
through water27
Hills27
Homepage4
Hybrid system
– air-conditioning
functions23
– components12
– contact with water40
– deactivation40
– display21
– functions13
– safety39
Hybrid system safety39
I
Ignition13
– switched on13
Ignition key position 1, refer to
Radio readiness13
Ignition key position 2, refer to
Ignition on13
Imprint2
Inflation pressure, refer to Tire
inflation pressure34
Instrument cluster, refer to
Instrument panel8
Instrument panel8
J
Jumpering, refer to Jump
starting37
Jump starting37
K
Knock control33
L
Length, refer to
Dimensions45
Luggage compartment
capacity, refer to Cargo bay
capacity46
M
Malfunction
– fuel filler door32
Manual operation
– fuel filler door32
N
Noises, refer to Cooling of the
high-voltage system23
Nylon rope, refer to Tow-
starting and towing38
O
Octane ratings, refer to Fuel
specifications33
P
Power, refer to Drive
system44
Pressure, tires34
Pressure compensation,
refueling32
R
Radio position, refer to Radio
readiness13
Radio readiness13
– switched on13
Refueling32
– preparation32
– pressure compensation32
Regeneration, refer to Energy
recovery16
Reserve warning, refer to Fuel
gauge22
Roof load capacity46
Rope, refer to Tow-starting
and towing38
S
Safety5
Screw thread for tow fitting39
Silent start14
Speedometer8
Sport program, manual mode
M/S18
Start/Stop button13
Starting, refer to Starting
engine14
Starting assistance, refer to
Jump starting37
Starting difficulties, jump
starting37
Status of this Owner's Manual
at time of printing5
Summer tires, refer to Wheels
and tires34