high BMW ACTIVEHYBRID3 2013 Workshop Manual
[x] Cancel search | Manufacturer: BMW, Model Year: 2013, Model line: ACTIVEHYBRID3, Model: BMW ACTIVEHYBRID3 2013Pages: 220, PDF Size: 5.09 MB
Page 172 of 220
Tire age
DOT … 3510: the tire was manufactured in the
35th week in 2010.
Recommendation
Regardless of wear, replace tires at least every
6 years.
Uniform Tire Quality Grading
Quality grades can be found where applicable
on the tire sidewall between tread shoulder and
maximum section width.
For example: Treadwear 200; Traction AA;
Temperature A
DOT Quality Grades
Treadwear
Traction AA A B C
Temperature A B C
All passenger car tires must conform to Federal
Safety Requirements in addition to these
grades.
Treadwear
The treadwear grade is a comparative rating
based on the wear rate of the tire when tested
under controlled conditions on a specified gov‐
ernment test course. For example, a tire graded
150 would wear one and one-half, 1 g, times as
well on the government course as a tire graded
100. The relative performance of tires depends
upon the actual conditions of their use, however,
and may depart significantly from the norm due
to variations in driving habits, service practices
and differences in road characteristics and cli‐
mate.
Traction
The traction grades, from highest to lowest, are
AA, A, B, and C.
Those grades represent the tire's ability to stop
on wet pavement as measured under controlled
conditions on specified government test surfa‐ces of asphalt and concrete. A tire marked C may
have poor traction performance.
The traction grade assigned to this tire is based
on straight-ahead braking traction tests, and
does not include acceleration, cornering, hydro‐
planing, or peak traction characteristics.
Temperature
The temperature grades are A, the highest, B,
and C, representing the tire's resistance to the
generation of heat and its ability to dissipate
heat when tested under controlled conditions
on a specified indoor laboratory test wheel. Sus‐
tained high temperature can cause the material
of the tire to degenerate and reduce tire life, and
excessive temperature can lead to sudden tire
failure. The grade C corresponds to a level of
performance which all passenger car tires must
meet under the Federal Motor Vehicle Safety
Standard No. 109. Grades Band A represent
higher levels of performance on the laboratory
test wheel than the minimum required by law.
Temperature grade for this tire
The temperature grade for this tire is es‐
tablished for a tire that is properly inflated and
not overloaded. Excessive speed, underinfla‐
tion, or excessive loading, either separately or in
combination, can cause heat buildup and pos‐
sible tire failure.
If necessary, have the vehicle towed.◀
RSC – Run-flat tires
Run-flat tires, refer to page 175, are labeled with
a circular symbol containing the letters RSC
marked on the sidewall.
M+S
Winter and all-season tires with better cold
weather performance than summer tires.Seite 172MobilityWheels and tires172
Online Edition for Part no. 01 40 2 917 825 - II/13
Page 174 of 220
Wheel and tire combination
Information on the correct wheel-tire combina‐
tion and rim versions for your vehicle can be ob‐
tained from your service center.
Incorrect wheel and tire combinations impair the
function of a variety of systems such as ABS or
DSC.
To maintain good handling and vehicle re‐
sponse, use only tires with a single tread con‐
figuration from a single manufacturer.
Following tire damage, have the original wheel
and tire combination remounted on the vehicle
as soon as possible.
Approved wheels and tires
The manufacturer of your vehicle recom‐
mends that you use only wheels and tires that
have been approved for your particular vehicle
model.
For example, despite having the same official
size ratings, variations can lead to body contact
and with it, the risk of severe accidents.
The manufacturer of your vehicle cannot evalu‐
ate non-approved wheels and tires to determine
if they are suited for use, and therefore cannot
ensure the operating safety of the vehicle if they
are mounted.◀
Recommended tire brands
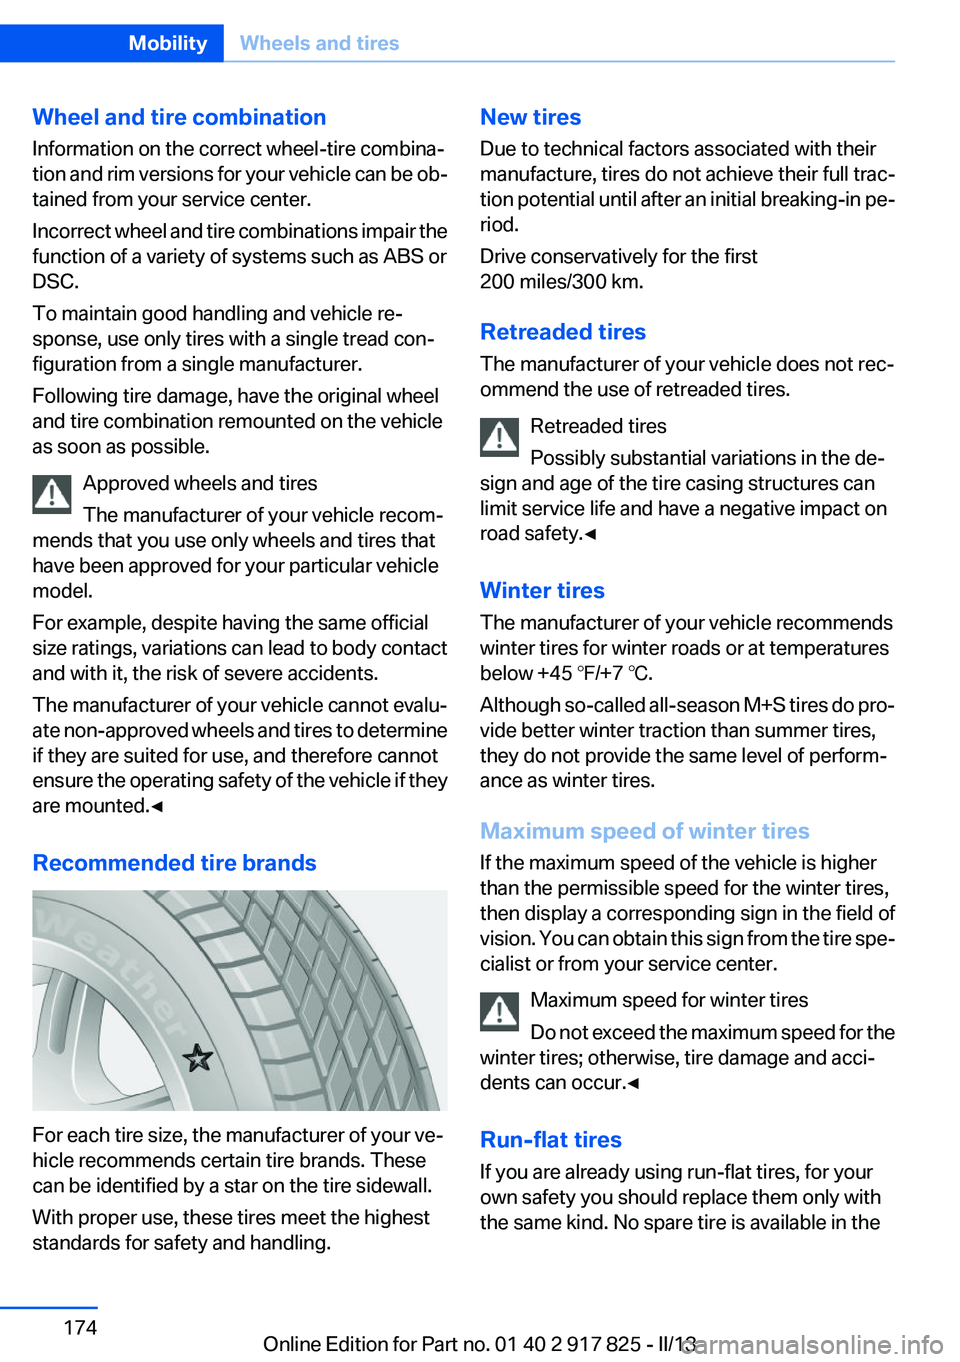
For each tire size, the manufacturer of your ve‐
hicle recommends certain tire brands. These
can be identified by a star on the tire sidewall.
With proper use, these tires meet the highest
standards for safety and handling.
New tires
Due to technical factors associated with their
manufacture, tires do not achieve their full trac‐
tion potential until after an initial breaking-in pe‐
riod.
Drive conservatively for the first
200 miles/300 km.
Retreaded tires
The manufacturer of your vehicle does not rec‐
ommend the use of retreaded tires.
Retreaded tires
Possibly substantial variations in the de‐
sign and age of the tire casing structures can
limit service life and have a negative impact on
road safety.◀
Winter tires
The manufacturer of your vehicle recommends
winter tires for winter roads or at temperatures
below +45 ℉/+7 ℃.
Although so-called all-season M+S tires do pro‐
vide better winter traction than summer tires,
they do not provide the same level of perform‐
ance as winter tires.
Maximum speed of winter tires
If the maximum speed of the vehicle is higher
than the permissible speed for the winter tires,
then display a corresponding sign in the field of
vision. You can obtain this sign from the tire spe‐
cialist or from your service center.
Maximum speed for winter tires
Do not exceed the maximum speed for the
winter tires; otherwise, tire damage and acci‐
dents can occur.◀
Run-flat tires
If you are already using run-flat tires, for your
own safety you should replace them only with
the same kind. No spare tire is available in theSeite 174MobilityWheels and tires174
Online Edition for Part no. 01 40 2 917 825 - II/13
Page 179 of 220
3. "Measure engine oil level"4."Start measurement"
The oil level is checked and displayed via a scale.
Duration: approx. 1 minute.
Adding engine oil
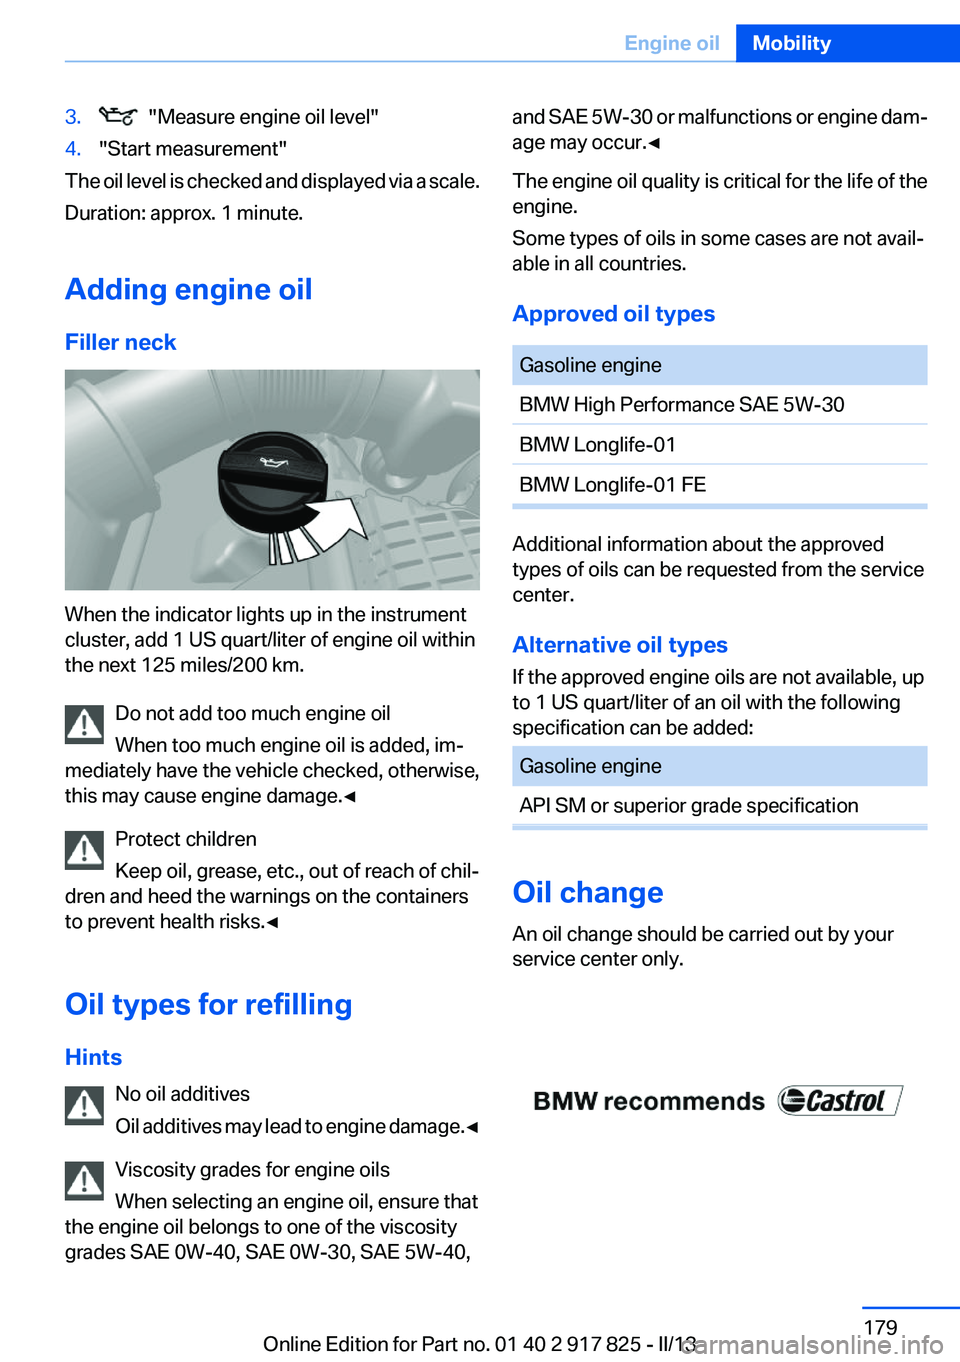
Filler neck
When the indicator lights up in the instrument
cluster, add 1 US quart/liter of engine oil within
the next 125 miles/200 km.
Do not add too much engine oil
When too much engine oil is added, im‐
mediately have the vehicle checked, otherwise,
this may cause engine damage.◀
Protect children
Keep oil, grease, etc., out of reach of chil‐
dren and heed the warnings on the containers
to prevent health risks.◀
Oil types for refilling
Hints No oil additives
Oil additives may lead to engine damage. ◀
Viscosity grades for engine oils
When selecting an engine oil, ensure that
the engine oil belongs to one of the viscosity
grades SAE 0W-40, SAE 0W-30, SAE 5W-40,
and SAE 5W-30 or malfunctions or engine dam‐
age may occur.◀
The engine oil quality is critical for the life of the
engine.
Some types of oils in some cases are not avail‐
able in all countries.
Approved oil typesGasoline engineBMW High Performance SAE 5W-30BMW Longlife-01BMW Longlife-01 FE
Additional information about the approved
types of oils can be requested from the service
center.
Alternative oil types
If the approved engine oils are not available, up
to 1 US quart/liter of an oil with the following
specification can be added:
Gasoline engineAPI SM or superior grade specification
Oil change
An oil change should be carried out by your
service center only.
Seite 179Engine oilMobility179
Online Edition for Part no. 01 40 2 917 825 - II/13
Page 184 of 220
Working on the lighting system
When working on the lighting system, you
should always switch off the lights affected to
prevent short circuits.
To avoid possible injury or equipment damage
when replacing bulbs, observe any instructions
provided by the bulb manufacturer.◀
Do not perform work/bulb replacement on
xenon headlamps
Have any work on the xenon lighting system, in‐
cluding bulb replacement, performed only by a
service center. Due to the high voltage present
in the system, there is the danger of fatal injuries
if work is carried out improperly.◀
Do not touch the bulbs
Do not touch the glass of new bulbs with
your bare hands, as even minute amounts of
contamination will burn into the bulb's surface
and reduce its service life.
Use a clean tissue, cloth or something similar, or
hold the bulb by its base.◀
Light-emitting diodes (LEDs)
Light-emitting diodes installed behind a cover
serve as the light source for controls, display el‐
ements and other equipment.
These light-emitting diodes, which are related
to conventional lasers, are officially designated
as Class 1 light-emitting diodes.
Do not remove the covers
Do not remove the covers, and never stare
into the unfiltered light for several hours; other‐
wise, irritation of the retina could result.◀
Headlamp glass
Condensation can form on the inside of the ex‐
ternal lamps in cool or humid weather. When
driving with the light switched on, the conden‐
sation evaporates after a short time. The head‐
lamp glasses do not need to be changed.If the headlamps do not dim despite driving with
the light switched on, increasing humidity forms,
e. g. water droplets in the light, have the service
center check this.
Front lamps, bulb replacement
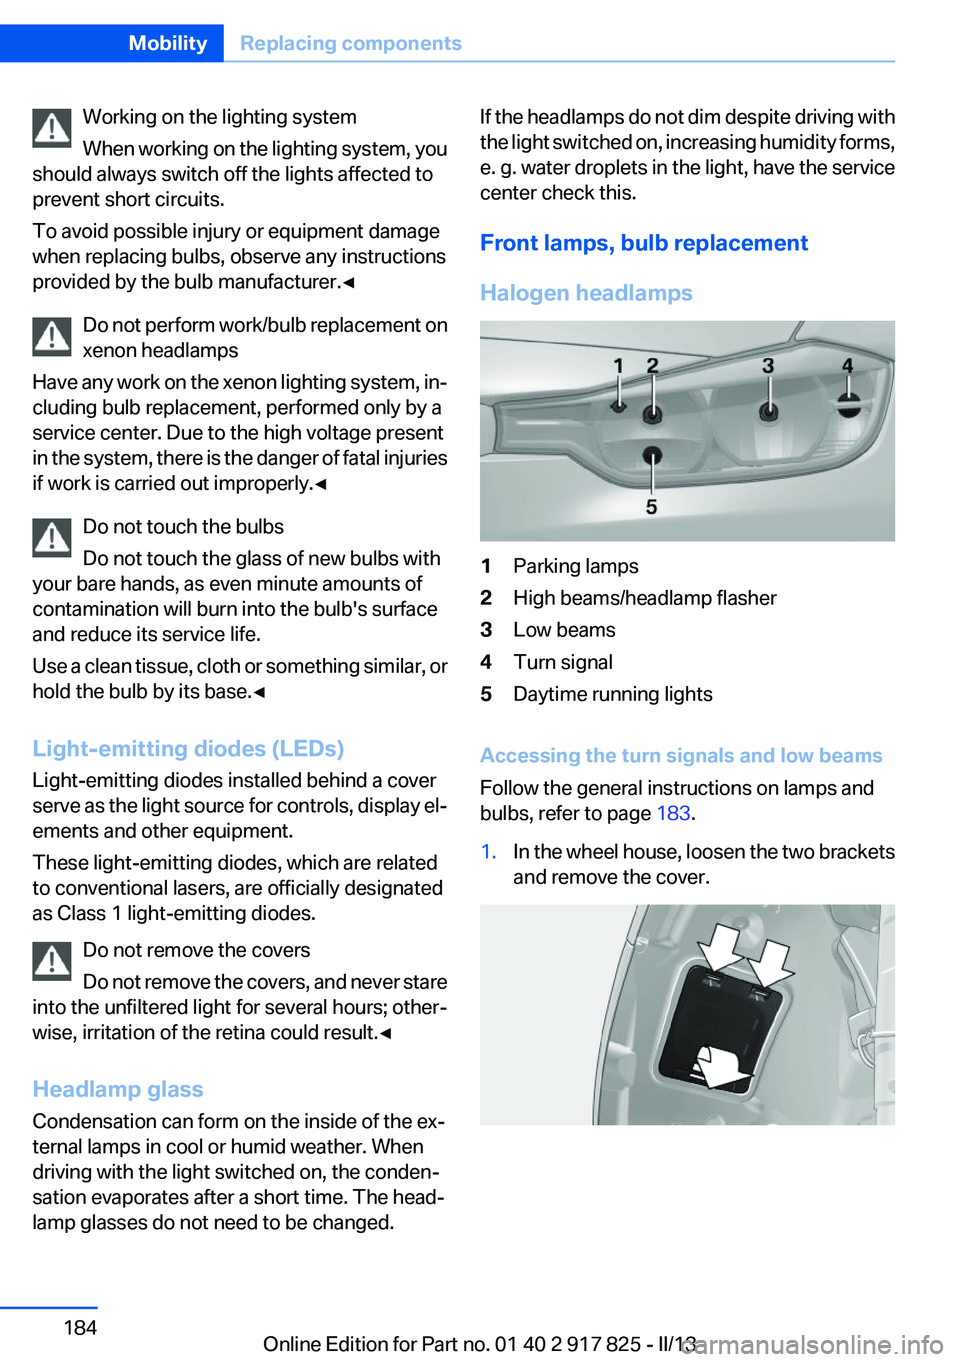
Halogen headlamps1Parking lamps2High beams/headlamp flasher3Low beams4Turn signal5Daytime running lights
Accessing the turn signals and low beams
Follow the general instructions on lamps and
bulbs, refer to page 183.
1.In the wheel house, loosen the two brackets
and remove the cover.Seite 184MobilityReplacing components184
Online Edition for Part no. 01 40 2 917 825 - II/13
Page 186 of 220
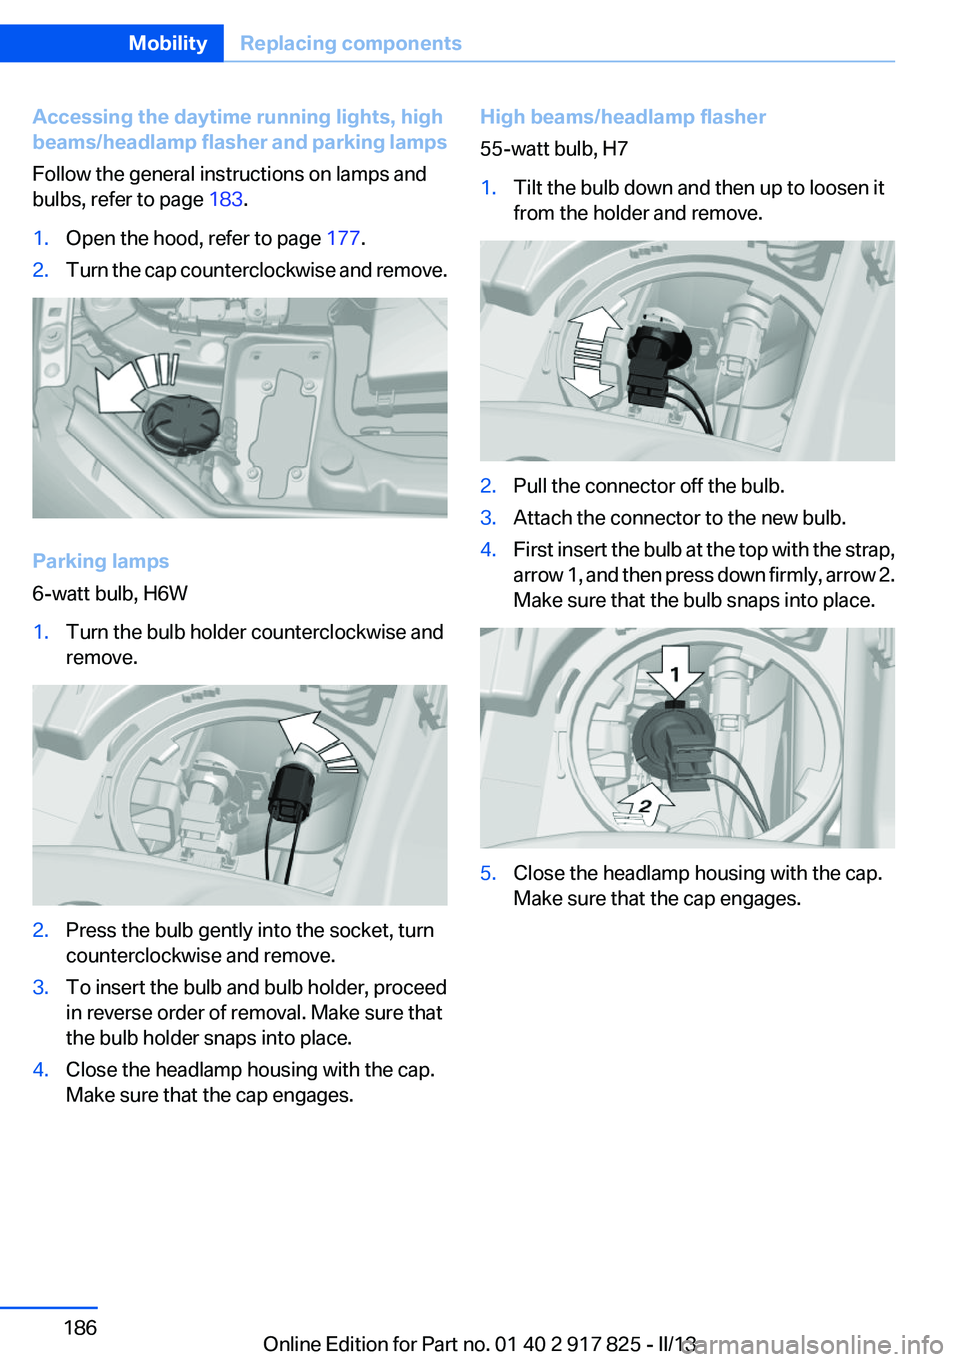
Accessing the daytime running lights, high
beams/headlamp flasher and parking lamps
Follow the general instructions on lamps and
bulbs, refer to page 183.1.Open the hood, refer to page 177.2.Turn the cap counterclockwise and remove.
Parking lamps
6-watt bulb, H6W
1.Turn the bulb holder counterclockwise and
remove.2.Press the bulb gently into the socket, turn
counterclockwise and remove.3.To insert the bulb and bulb holder, proceed
in reverse order of removal. Make sure that
the bulb holder snaps into place.4.Close the headlamp housing with the cap.
Make sure that the cap engages.High beams/headlamp flasher
55-watt bulb, H71.Tilt the bulb down and then up to loosen it
from the holder and remove.2.Pull the connector off the bulb.3.Attach the connector to the new bulb.4.First insert the bulb at the top with the strap,
arrow 1, and then press down firmly, arrow 2.
Make sure that the bulb snaps into place.5.Close the headlamp housing with the cap.
Make sure that the cap engages.Seite 186MobilityReplacing components186
Online Edition for Part no. 01 40 2 917 825 - II/13
Page 187 of 220
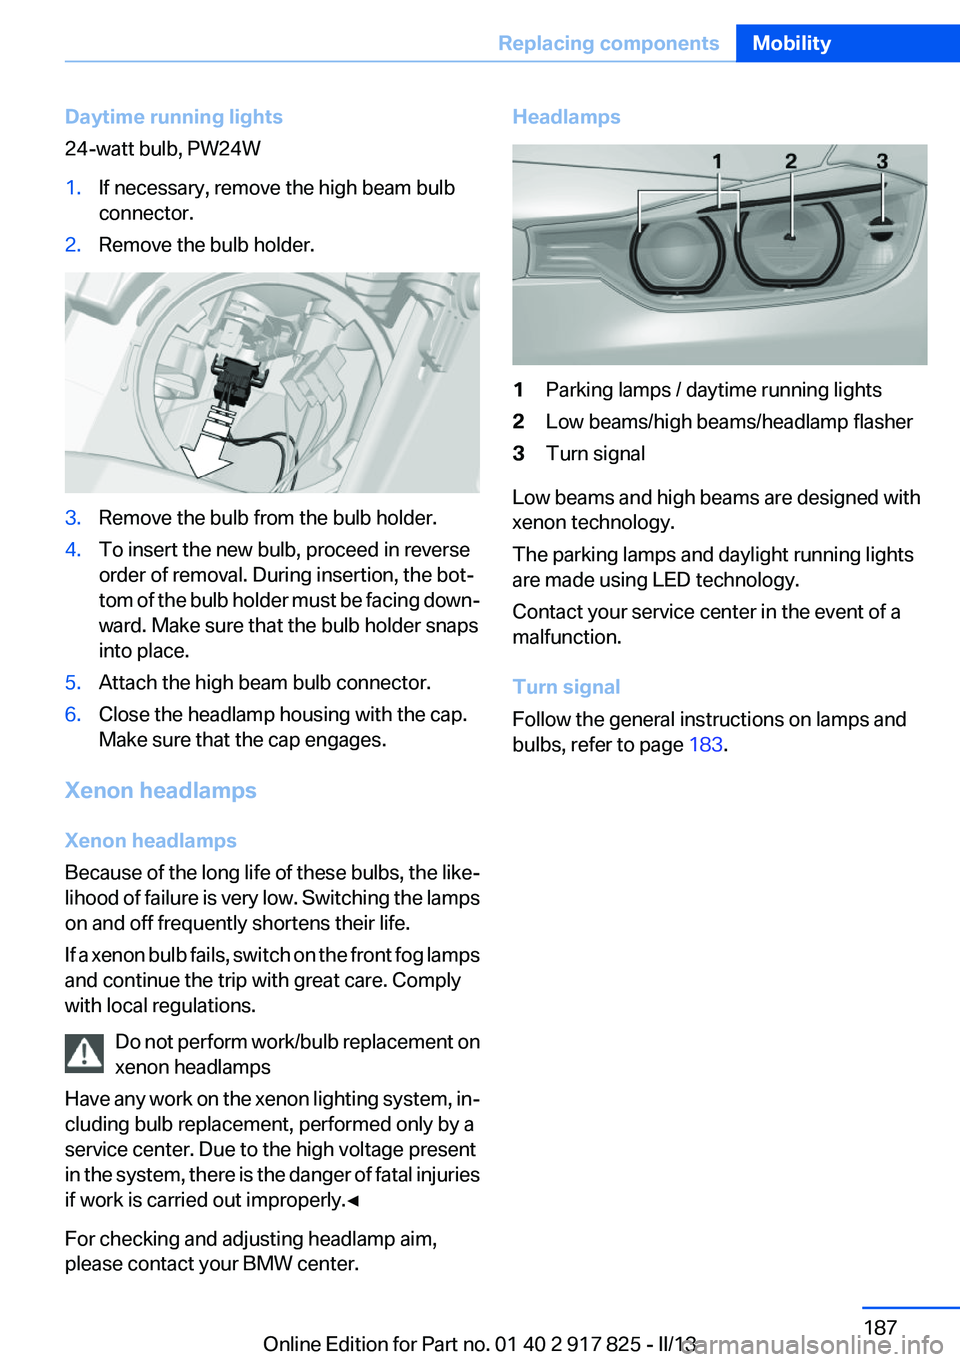
Daytime running lights
24-watt bulb, PW24W1.If necessary, remove the high beam bulb
connector.2.Remove the bulb holder.3.Remove the bulb from the bulb holder.4.To insert the new bulb, proceed in reverse
order of removal. During insertion, the bot‐
tom of the bulb holder must be facing down‐
ward. Make sure that the bulb holder snaps
into place.5.Attach the high beam bulb connector.6.Close the headlamp housing with the cap.
Make sure that the cap engages.
Xenon headlamps
Xenon headlamps
Because of the long life of these bulbs, the like‐
lihood of failure is very low. Switching the lamps
on and off frequently shortens their life.
If a xenon bulb fails, switch on the front fog lamps
and continue the trip with great care. Comply
with local regulations.
Do not perform work/bulb replacement on
xenon headlamps
Have any work on the xenon lighting system, in‐
cluding bulb replacement, performed only by a
service center. Due to the high voltage present
in the system, there is the danger of fatal injuries
if work is carried out improperly.◀
For checking and adjusting headlamp aim,
please contact your BMW center.
Headlamps1Parking lamps / daytime running lights2Low beams/high beams/headlamp flasher3Turn signal
Low beams and high beams are designed with
xenon technology.
The parking lamps and daylight running lights
are made using LED technology.
Contact your service center in the event of a
malfunction.
Turn signal
Follow the general instructions on lamps and
bulbs, refer to page 183.
Seite 187Replacing componentsMobility187
Online Edition for Part no. 01 40 2 917 825 - II/13
Page 191 of 220
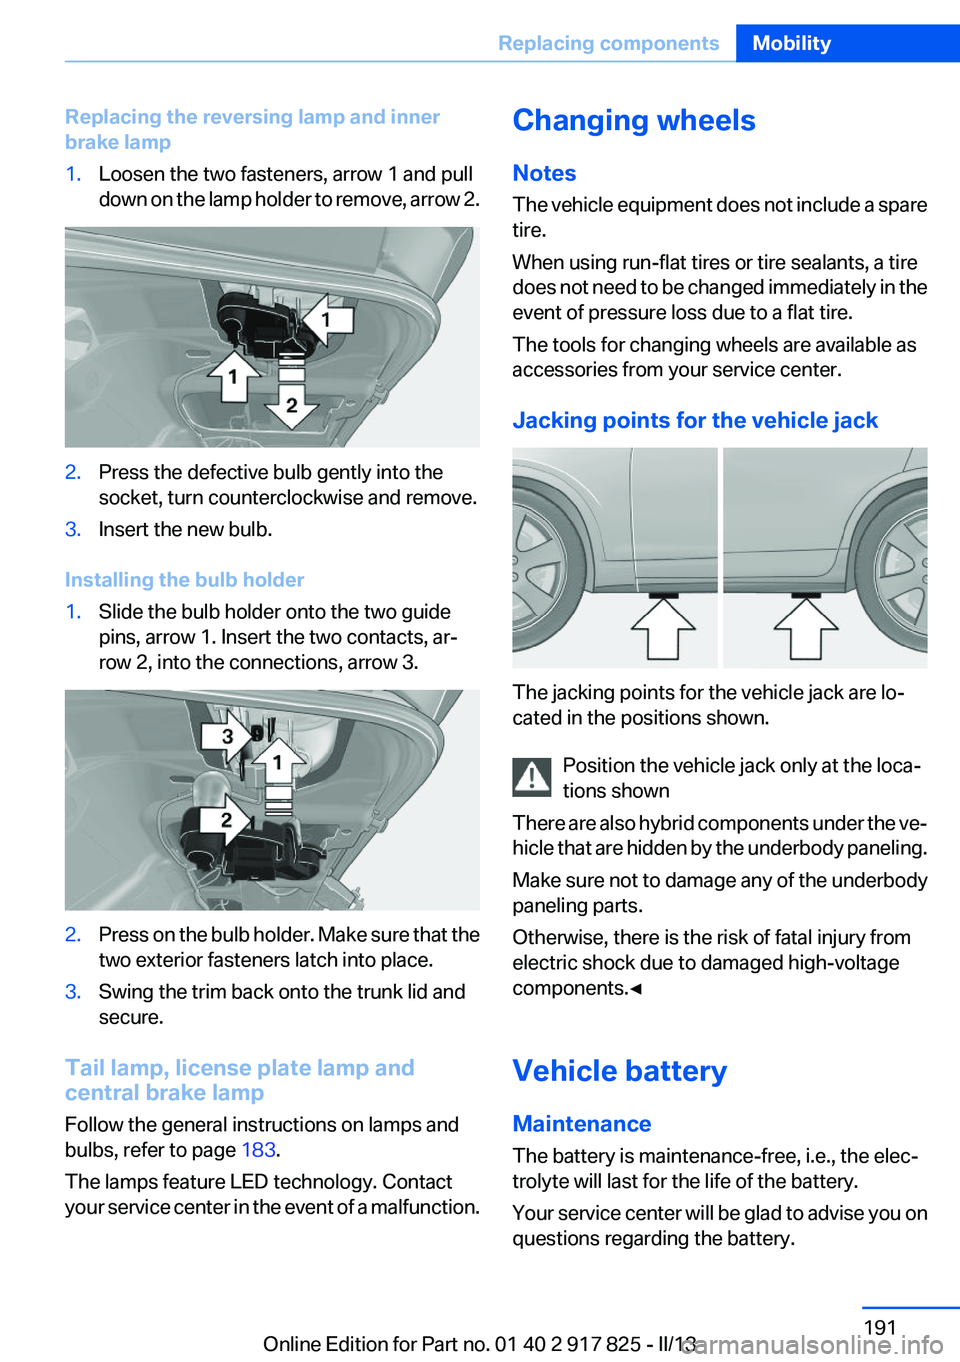
Replacing the reversing lamp and inner
brake lamp1.Loosen the two fasteners, arrow 1 and pull
down on the lamp holder to remove, arrow 2.2.Press the defective bulb gently into the
socket, turn counterclockwise and remove.3.Insert the new bulb.
Installing the bulb holder
1.Slide the bulb holder onto the two guide
pins, arrow 1. Insert the two contacts, ar‐
row 2, into the connections, arrow 3.2.Press on the bulb holder. Make sure that the
two exterior fasteners latch into place.3.Swing the trim back onto the trunk lid and
secure.
Tail lamp, license plate lamp and
central brake lamp
Follow the general instructions on lamps and
bulbs, refer to page 183.
The lamps feature LED technology. Contact
your service center in the event of a malfunction.
Changing wheels
Notes
The vehicle equipment does not include a spare
tire.
When using run-flat tires or tire sealants, a tire
does not need to be changed immediately in the
event of pressure loss due to a flat tire.
The tools for changing wheels are available as
accessories from your service center.
Jacking points for the vehicle jack
The jacking points for the vehicle jack are lo‐
cated in the positions shown.
Position the vehicle jack only at the loca‐
tions shown
There are also hybrid components under the ve‐
hicle that are hidden by the underbody paneling.
Make sure not to damage any of the underbody
paneling parts.
Otherwise, there is the risk of fatal injury from
electric shock due to damaged high-voltage
components.◀
Vehicle battery
Maintenance
The battery is maintenance-free, i.e., the elec‐
trolyte will last for the life of the battery.
Your service center will be glad to advise you on
questions regarding the battery.
Seite 191Replacing componentsMobility191
Online Edition for Part no. 01 40 2 917 825 - II/13
Page 199 of 220
with appropriately trained personnel. Other‐
wise, there is the risk of fatal injury from electric
shock due to the hybrid system's high voltage. ◀
Hybrid system: contact with water
The hybrid system is typically safe even in the
following example situations:▷Water in the footwell, for instance after a
rainstorm when the glass sunroof is open.▷Vehicle is in the water, such as in the event
of high water levels.▷Liquid escapes in the trunk.
In these cases there is no risk of injury from elec‐
tric shock. Other damage to the vehicle is pos‐
sible.
Hybrid system: automatic deactivation
If an accident occurs, the hybrid system is
switched off automatically to prevent risk of dan‐
ger to occupants and other road users.
Read the information on What to do after an ac‐
cident, refer to page 199.
What to do after an accident
General information After an accident
After an accident, do not touch any high-
voltage components such as orange colored
high-voltage cables or parts that are in contact
with exposed high-voltage cables. Otherwise,
there is the risk of fatal injury from electric shock
due to the hybrid system's high voltage.◀
Escaping fluids
Do not touch any fluids escaping from the
high-voltage battery, or the skin can sustain
chemical burns.◀
If you are involved in an accident with your ve‐
hicle, compliance with the following additional
safety precautions is required with regard to the
hybrid system.
▷Secure the crash site.▷Immediately notify rescue forces, police, or
firefighters of the fact that your vehicle is
equipped with a hybrid system.▷Engage transmission position P, apply the
parking brake, and switch off the ignition.▷Lock the vehicle after exiting.▷Do not inhale any gases escaping from the
high-voltage battery; if necessary, maintain
a safe distance from the vehicle.Seite 199Breakdown assistanceMobility199
Online Edition for Part no. 01 40 2 917 825 - II/13
Page 200 of 220
CareVehicle equipment
All standard, country-specific and optional
equipment that is offered in the model series is
described in this chapter. Therefore, equipment
is also described that is not available in a vehicle,
e. g., because of the selected optional equip‐
ment or country variant. This also applies for
safety-related functions and systems.
Car washes
Hints Steam jets or high-pressure washers
When using steam jets or high-pressure
washers, hold them a sufficient distance away
and use a maximum temperature of
140 ℉/60 ℃.
Ensure that a distance of at least 31.5 in‐
ches/80 cm from the glass sunroof is maintained
at all times. Holding them too close or using ex‐
cessively high pressures or temperatures can
cause damage or preliminary damage that may
then lead to long-term damage.
Follow the user's manual for the high-pressure
washer.◀
Cleaning sensors/cameras with high-
pressure washers
When using high-pressure washers, do not
spray the exterior sensors and cameras, e.g.,
Park Distance Control, for extended periods of
time and only from a distance of at least
12 in/30 cm.◀
Regularly remove foreign items such as leaves
in the area below the windshield when the hood
is raised.
Wash your vehicle frequently, particularly in win‐
ter.Intense soiling and road salt can damage the ve‐
hicle.
Automatic car washes
Hints
Note the following:▷Give preference to cloth car washes or those
that use soft brushes in order to avoid paint
damage.▷Make sure that the wheels and tires are not
damaged by the transport mechanisms.▷Fold in the exterior mirrors; otherwise, they
may be damaged, depending on the width of
the vehicle.▷Deactivate the rain sensor, refer to page 69,
to avoid unintentional wiper activation.▷In some cases, an unintentional alarm can be
triggered by the interior motion sensor of the
alarm system. Follow the instructions on
avoiding an unintentional alarm, refer to
page 45.
Guide rails in car washes
Avoid car washes with guide rails higher
than 4 in/10 cm; otherwise, the vehicle body
could be damaged.◀
Before driving into a car wash
In order to ensure that the vehicle can roll in a car
wash, take the following steps:
Automatic transmission:
1.Release the parking brake, refer to page 67.2.Drive into the car wash.3.Depress the brake pedal as needed.4.Engage transmission position N.5.Switch the engine off. In this way, the igni‐
tion remains switched on, and a Check-Con‐
trol message is displayed.Seite 200MobilityCare200
Online Edition for Part no. 01 40 2 917 825 - II/13
Page 203 of 220
If the floor carpets are very dirty, clean with a
microfiber cloth and water or a textile cleaner. To
prevent matting of the carpet, rub back and forth
in the direction of travel only.
Sensors/cameras
To clean sensors and cameras, use a cloth mois‐
tened with a small amount of glass cleaner.
Displays/screens
Clean the displays with an antistatic microfiber
cloth.
Cleaning displays
Do not use chemical or household cleans‐
ers.
Keep all fluids and moisture away from the unit.
Otherwise, they could affect or damage surfa‐
ces or electrical components.
Avoid pressing too hard when cleaning and do
not use abrasive materials; otherwise, damage
can result.◀
Long-term vehicle storage
For idle phases that last several weeks, park the
vehicle with a fully charged battery if possible.
Your service center can advise you on what to
consider when storing the vehicle for longer
than six weeks.
Do not allow the vehicle to sit idle for ex‐
tended periods with a low charging state
Before storing the vehicle for an extended pe‐
riod, check the battery charge indicator to en‐
sure that the high-voltage battery is fully
charged. If necessary, charge the high-voltage
battery by driving the vehicle. Check the charge
level regularly, and if necessary recharge the
high-voltage battery by driving the vehicle. Al‐
lowing the high-voltage battery charge to drop
too low will damage the battery.◀Note
Follow the instructions for discharging the high-
voltage battery, refer to page 153.Seite 203CareMobility203
Online Edition for Part no. 01 40 2 917 825 - II/13