BMW I3 2014 I01 Manual Online
Manufacturer: BMW, Model Year: 2014, Model line: I3, Model: BMW I3 2014 I01Pages: 230, PDF Size: 29.93 MB
Page 81 of 230
After a power failure
Putting the parking brake into
operation1.Switch on the ignition.2. Press the reel while stepping on the
brake pedal or selector lever position P is
set.
It may take several seconds for the brake to be
put into operation. Any sounds associated with
this are normal.
The indicator lamp in the instrument
cluster goes out as soon as the parking
brake is ready for operation.
Hold function The concept
The system holds the vehicle automatically
when gear is engaged. This prevents rolling
against the direction of travel.
In selector lever position D, the vehicle cannot
roll backwards. In selector lever position R, it
cannot roll forward. The brake pedal does not
have to be pressed.
Hints
To reduce energy consumption when the hold
function is activated, activate the parking brake
or engage lever in position P P when the vehi‐
cle is stopped for long periods of time.
The hold function can be by the vehicle's load
and the road incline. If needed a Check Control
message will appear and position P will be se‐
lected automatically.
Turn signal, high beams,
headlight flasher
Turn signal
Hints Do not adjust the exterior mirrors
Do not adjust the exterior mirror while
driving and when blinker/hazards are on, or
else the additional blinker lights in the exterior
mirror are out of position and can't be seen.◀
Using turn signals
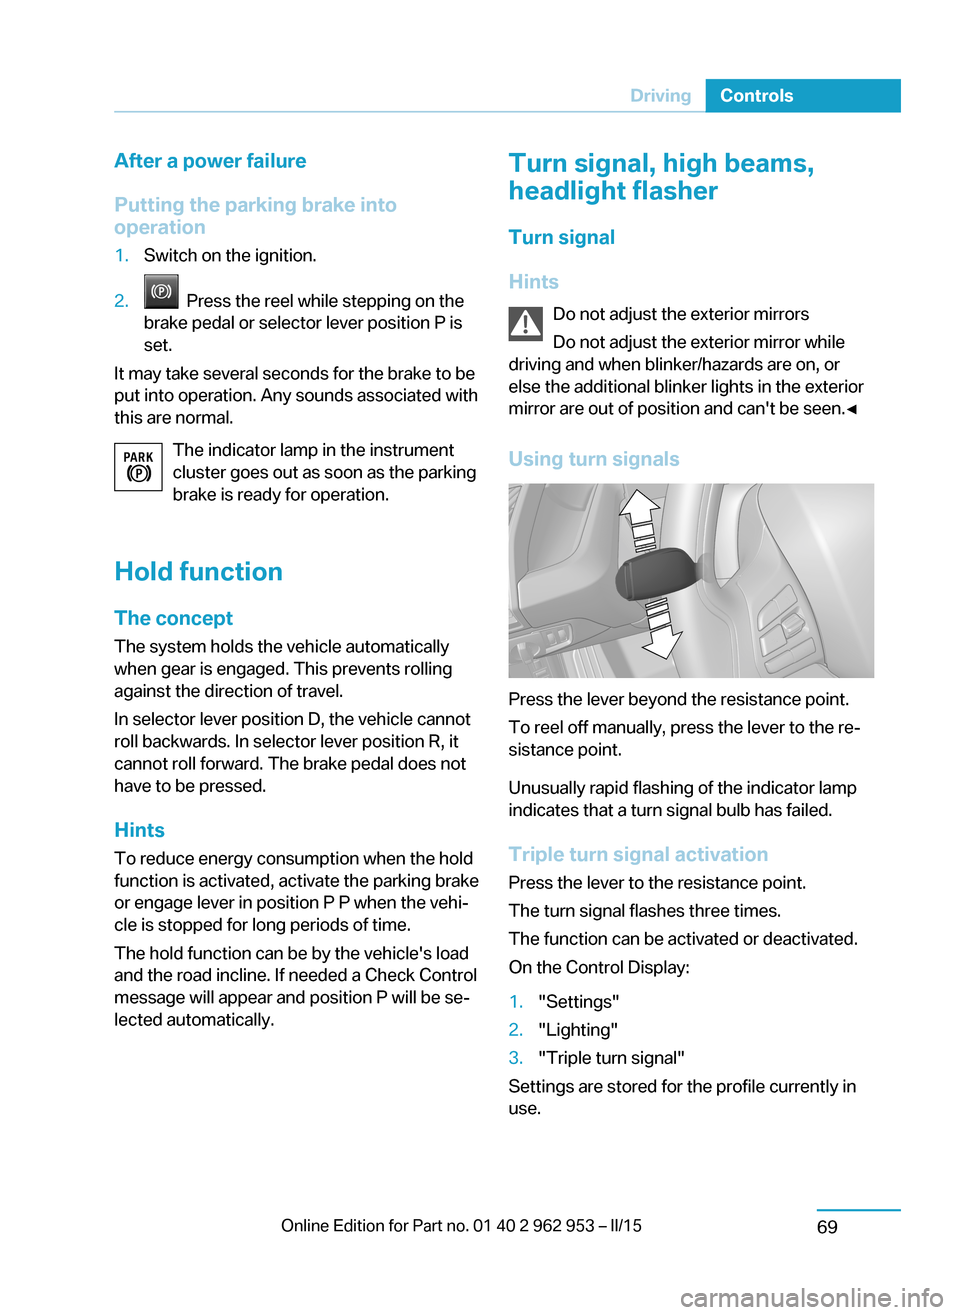
Press the lever beyond the resistance point.
To reel off manually, press the lever to the re‐
sistance point.
Unusually rapid flashing of the indicator lamp
indicates that a turn signal bulb has failed.
Triple turn signal activation Press the lever to the resistance point.
The turn signal flashes three times.
The function can be activated or deactivated.
On the Control Display:
1."Settings"2."Lighting"3."Triple turn signal"
Settings are stored for the profile currently in
use.
Seite 67DrivingControls69
Page 82 of 230
Signaling briefly
Press the lever to the resistance point and hold
it there for as long as you want the turn signal
to flash.
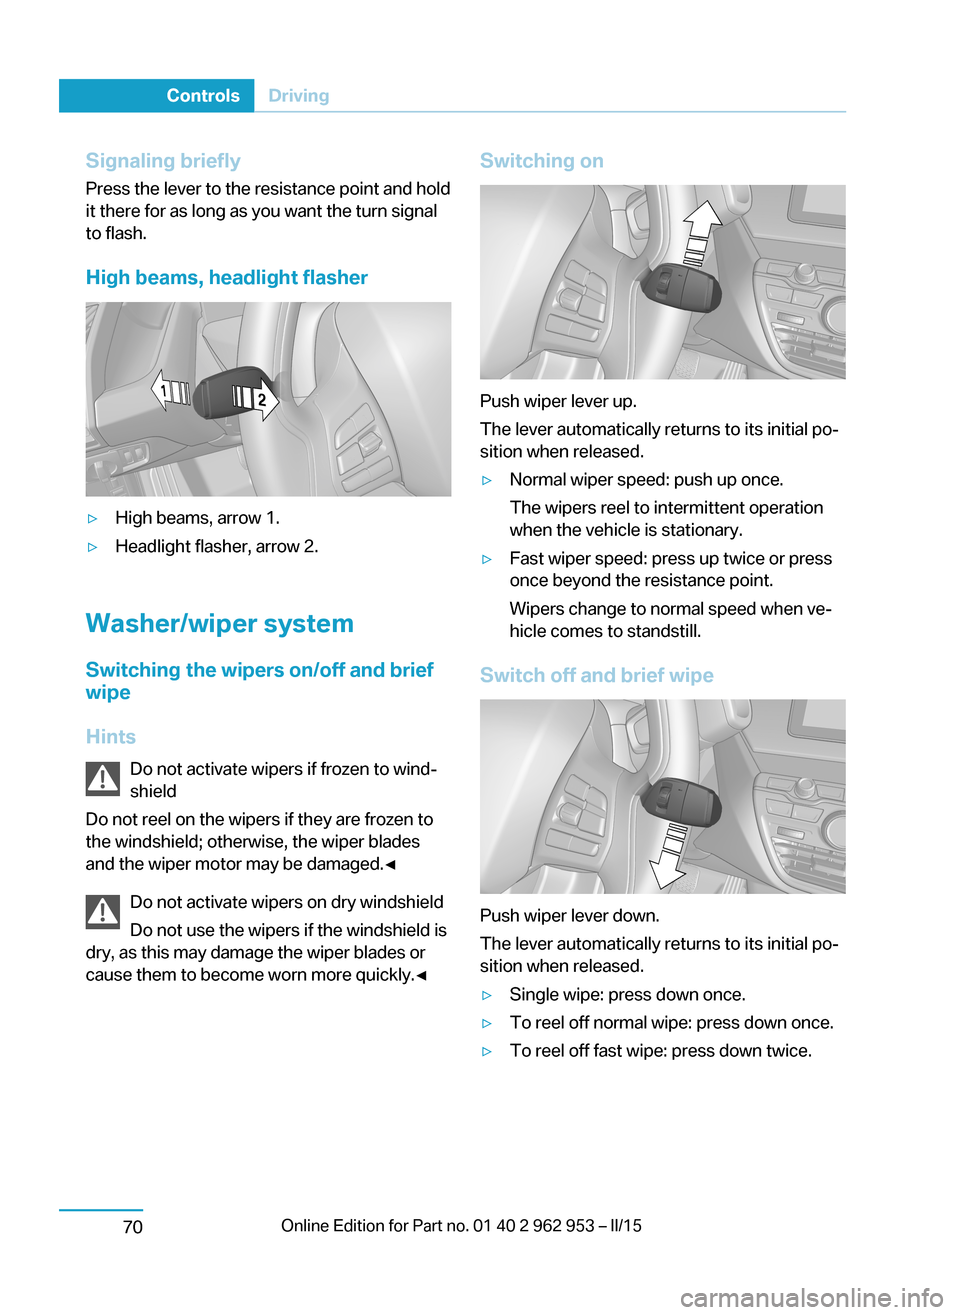
High beams, headlight flasher▷High beams, arrow 1.▷Headlight flasher, arrow 2.
Washer/wiper system Switching the wipers on/off and brief
wipe
Hints Do not activate wipers if frozen to wind‐
shield
Do not reel on the wipers if they are frozen to
the windshield; otherwise, the wiper blades
and the wiper motor may be damaged.◀
Do not activate wipers on dry windshield
Do not use the wipers if the windshield is
dry, as this may damage the wiper blades or
cause them to become worn more quickly.◀
Switching on
Push wiper lever up.
The lever automatically returns to its initial po‐
sition when released.
▷Normal wiper speed: push up once.
The wipers reel to intermittent operation
when the vehicle is stationary.▷Fast wiper speed: press up twice or press
once beyond the resistance point.
Wipers change to normal speed when ve‐
hicle comes to standstill.
Switch off and brief wipe
Push wiper lever down.
The lever automatically returns to its initial po‐
sition when released.
▷Single wipe: press down once.▷To reel off normal wipe: press down once.▷To reel off fast wipe: press down twice.Seite 68ControlsDriving70
Page 83 of 230
Intermittent operation or rain sensorThe concept Without the rain sensor, the frequency of the
wiper operation is preset.
The rain sensor automatically controls the time
between wipes depending on the intensity of the rainfall. The sensor is located on the wind‐
shield, directly behind the interior rearview mir‐
ror.
Activating/deactivating
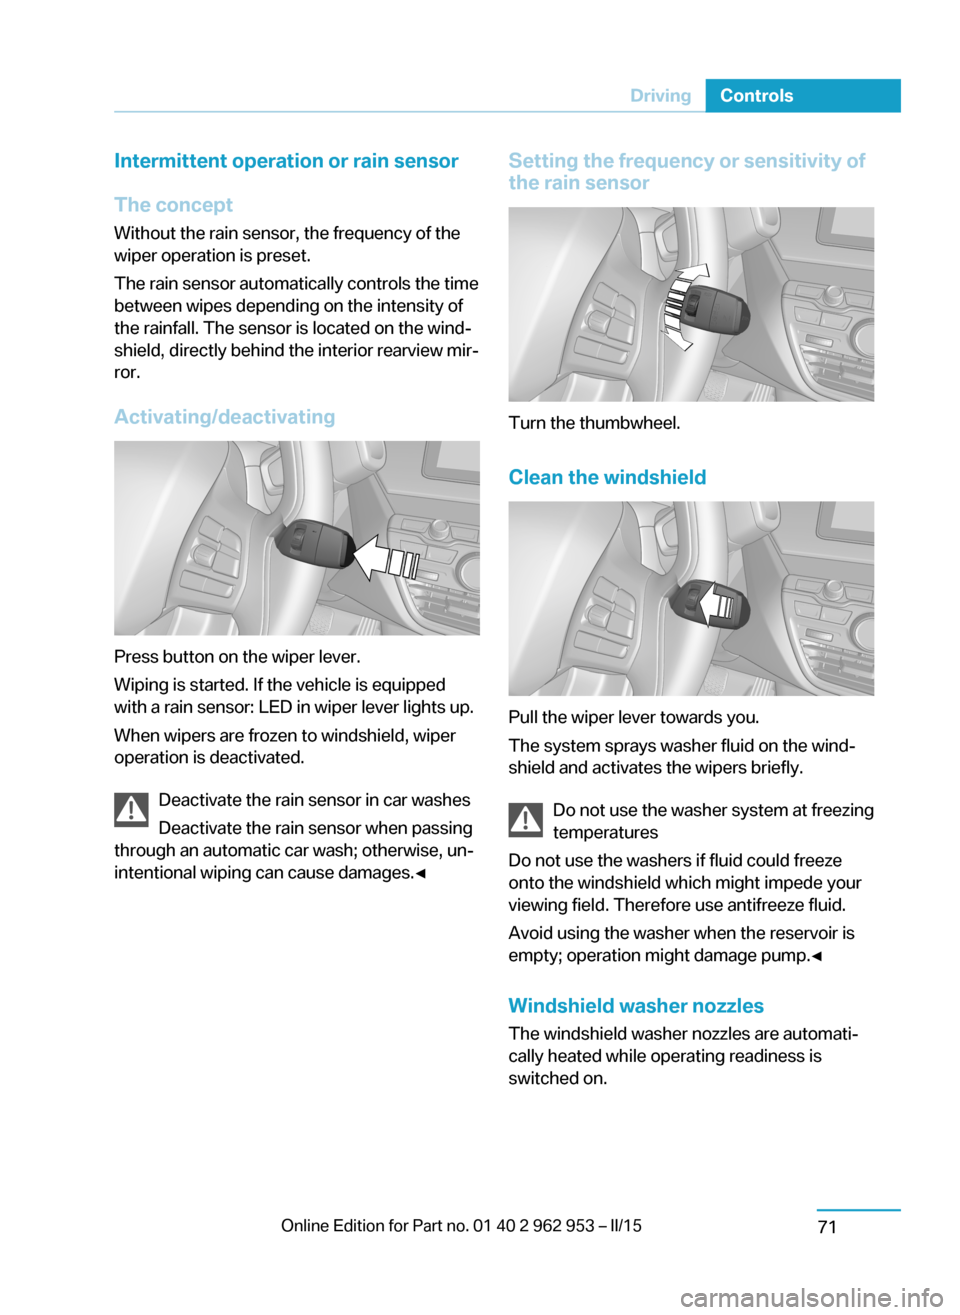
Press button on the wiper lever.
Wiping is started. If the vehicle is equipped
with a rain sensor: LED in wiper lever lights up.
When wipers are frozen to windshield, wiper
operation is deactivated.
Deactivate the rain sensor in car washes
Deactivate the rain sensor when passing
through an automatic car wash; otherwise, un‐
intentional wiping can cause damages.◀
Setting the frequency or sensitivity of
the rain sensor
Turn the thumbwheel.
Clean the windshield
Pull the wiper lever towards you.
The system sprays washer fluid on the wind‐
shield and activates the wipers briefly.
Do not use the washer system at freezing
temperatures
Do not use the washers if fluid could freeze
onto the windshield which might impede your
viewing field. Therefore use antifreeze fluid.
Avoid using the washer when the reservoir is
empty; operation might damage pump.◀
Windshield washer nozzles The windshield washer nozzles are automati‐
cally heated while operating readiness is
switched on.
Seite 69DrivingControls71
Page 84 of 230
Rear window wiper
Switching on the rear window wiper
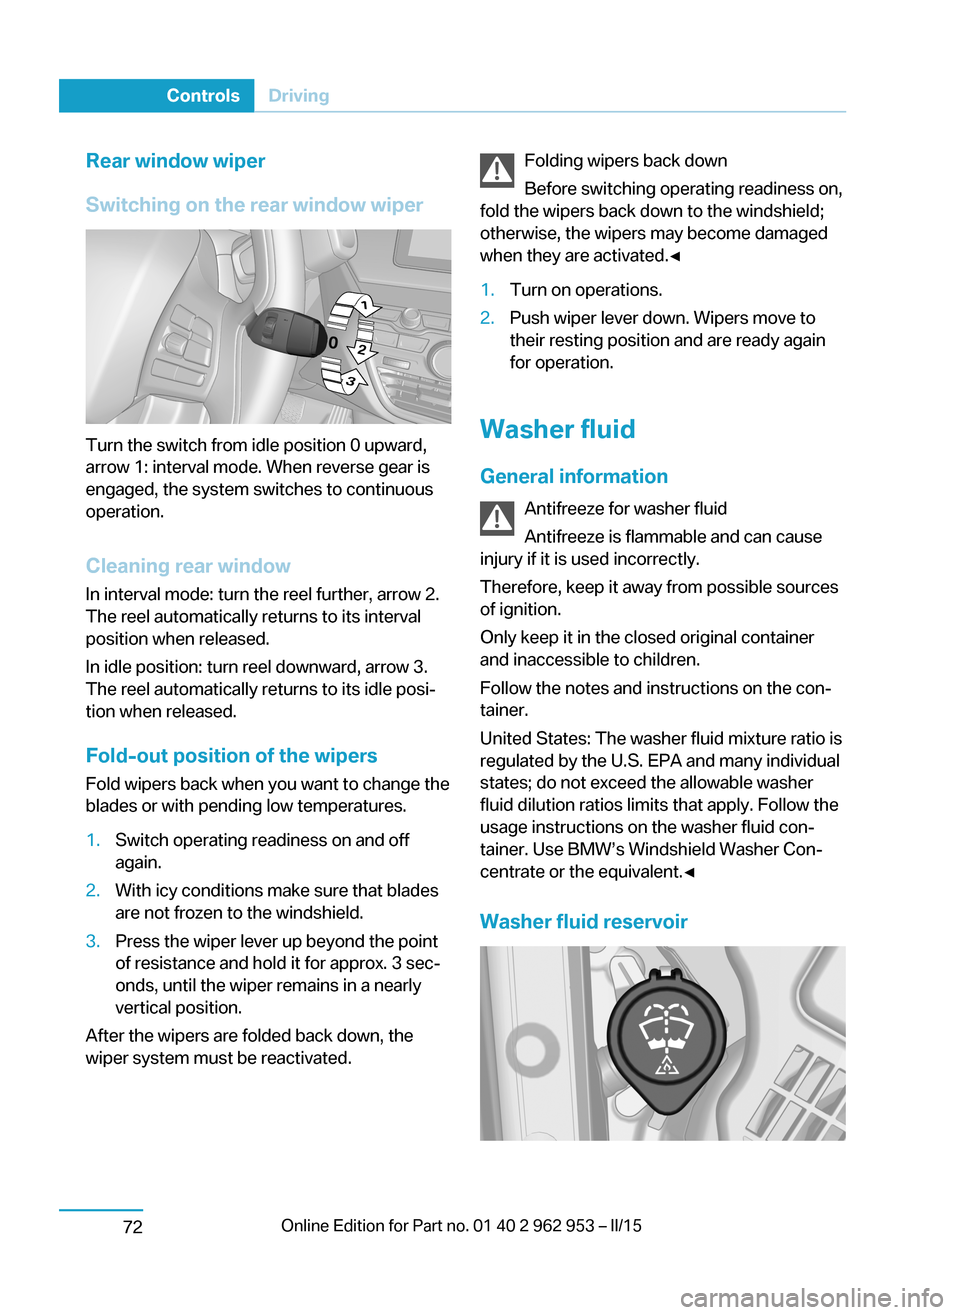
Turn the switch from idle position 0 upward,
arrow 1: interval mode. When reverse gear is
engaged, the system switches to continuous
operation.
Cleaning rear window
In interval mode: turn the reel further, arrow 2.
The reel automatically returns to its interval
position when released.
In idle position: turn reel downward, arrow 3.
The reel automatically returns to its idle posi‐
tion when released.
Fold-out position of the wipers Fold wipers back when you want to change the
blades or with pending low temperatures.
1.Switch operating readiness on and off
again.2.With icy conditions make sure that blades
are not frozen to the windshield.3.Press the wiper lever up beyond the point
of resistance and hold it for approx. 3 sec‐
onds, until the wiper remains in a nearly
vertical position.
After the wipers are folded back down, the
wiper system must be reactivated.
Folding wipers back down
Before switching operating readiness on,
fold the wipers back down to the windshield;
otherwise, the wipers may become damaged
when they are activated.◀1.Turn on operations.2.Push wiper lever down. Wipers move to
their resting position and are ready again
for operation.
Washer fluid
General information Antifreeze for washer fluid
Antifreeze is flammable and can cause
injury if it is used incorrectly.
Therefore, keep it away from possible sources
of ignition.
Only keep it in the closed original container
and inaccessible to children.
Follow the notes and instructions on the con‐
tainer.
United States: The washer fluid mixture ratio is
regulated by the U.S. EPA and many individual
states; do not exceed the allowable washer
fluid dilution ratios limits that apply. Follow the
usage instructions on the washer fluid con‐
tainer. Use BMW’s Windshield Washer Con‐
centrate or the equivalent.◀
Washer fluid reservoir
Seite 70ControlsDriving72
Page 85 of 230
All washer nozzles are supplied from one res‐
ervoir.
Fill with a mixture of windshield washer con‐
centrate and tap water and – if required – with a
washer antifreeze, according to the manufac‐
turer's recommendations.
Mix the washer fluid before adding to find the
right mixture.
Do not add windshield washer concentrate and
antifreeze undiluted and do not fill with pure
water; this could damage the wiper system.
Do not mix window washer concentrates of dif‐
ferent manufacturers because they can clog
the windshield washer nozzles.
Recommended minimum fill quantity:
0.2 US gal/1 liter.Seite 71DrivingControls73
Page 86 of 230
DisplaysVehicle features and optionsThis chapter describes all standard, country-
specific and optional features offered with the
series. It also describes features that are notnecessarily available in your car, e. g., due to
the selected options or country versions. This
also applies to safety-related functions and
systems.
Instrument cluster
The concept
The instrument cluster is a variable display.
Some of the displays in the instrument clustermay differ from the way they are shown in this
Owner's Handbook.
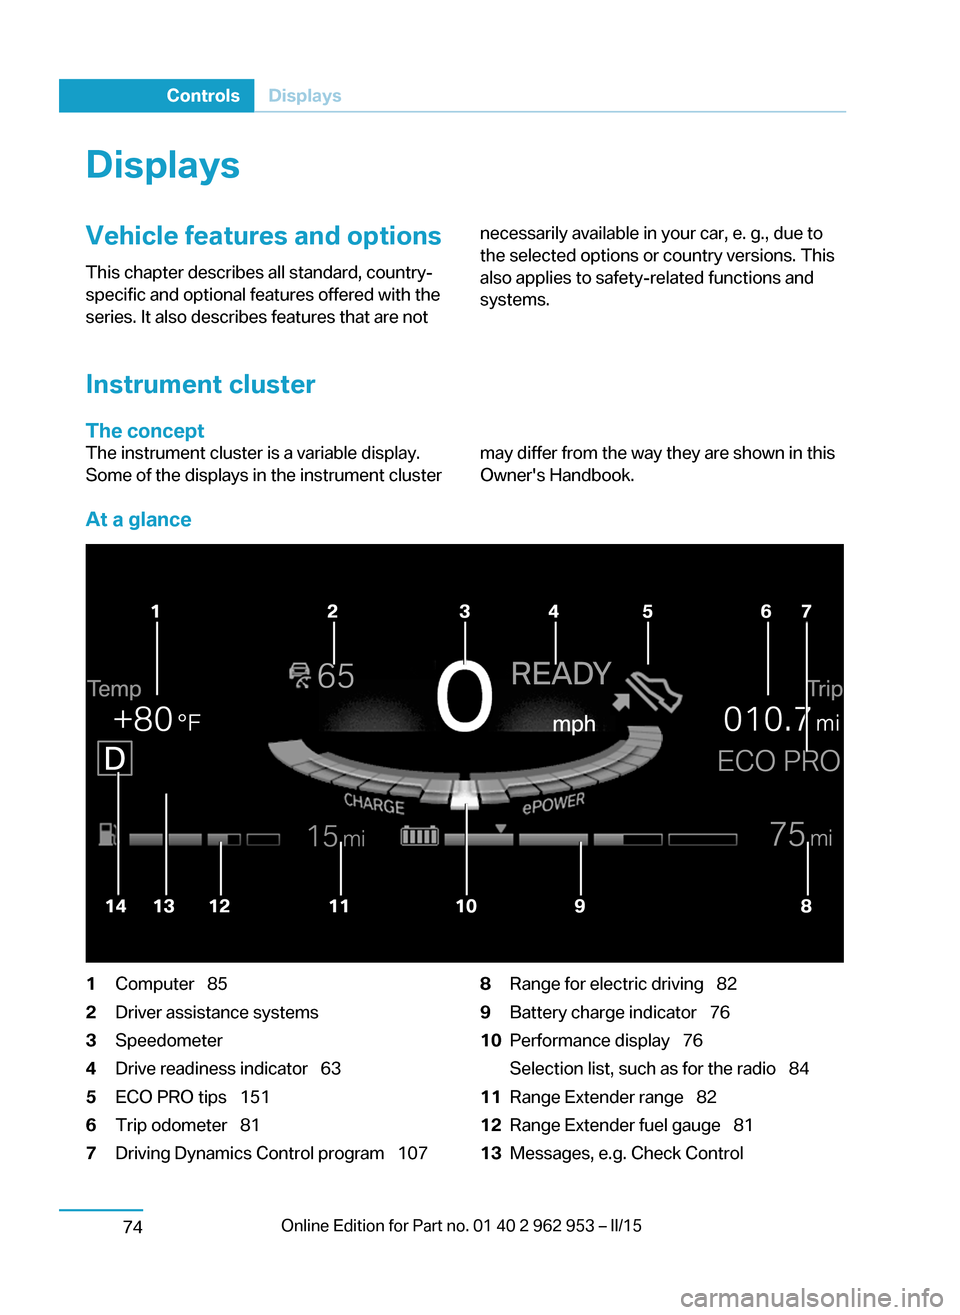
At a glance
1Computer 852Driver assistance systems3Speedometer4Drive readiness indicator 635ECO PRO tips 1516Trip odometer 817Driving Dynamics Control program 1078Range for electric driving 829Battery charge indicator 7610Performance display 76
Selection list, such as for the radio 8411Range Extender range 8212Range Extender fuel gauge 8113Messages, e.g. Check ControlSeite 72ControlsDisplays74
Page 87 of 230
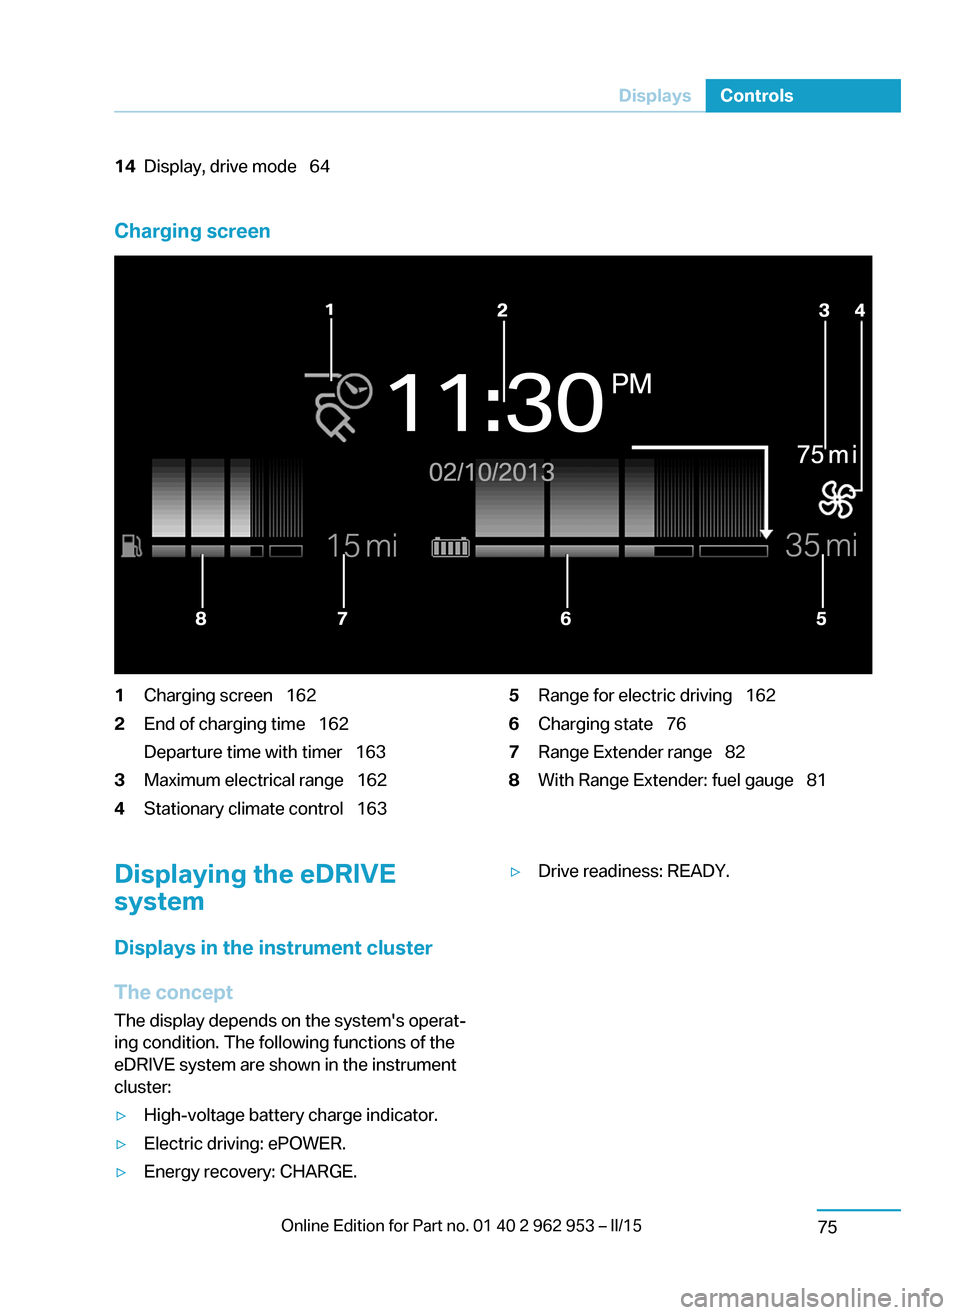
14Display, drive mode 64
Charging screen
1Charging screen 1622End of charging time 162
Departure time with timer 1633Maximum electrical range 1624Stationary climate control 1635Range for electric driving 1626Charging state 767Range Extender range 828With Range Extender: fuel gauge 81Displaying the eDRIVE
system
Displays in the instrument cluster
The concept The display depends on the system's operat‐
ing condition. The following functions of the
eDRIVE system are shown in the instrument
cluster:▷High-voltage battery charge indicator.▷Electric driving: ePOWER.▷Energy recovery: CHARGE.▷Drive readiness: READY.Seite 73DisplaysControls75
Page 88 of 230
High-voltage battery charge indicator
High voltage
Even if no bars are displayed in the bat‐
tery symbol, the high-voltage system is still
under high voltage.◀
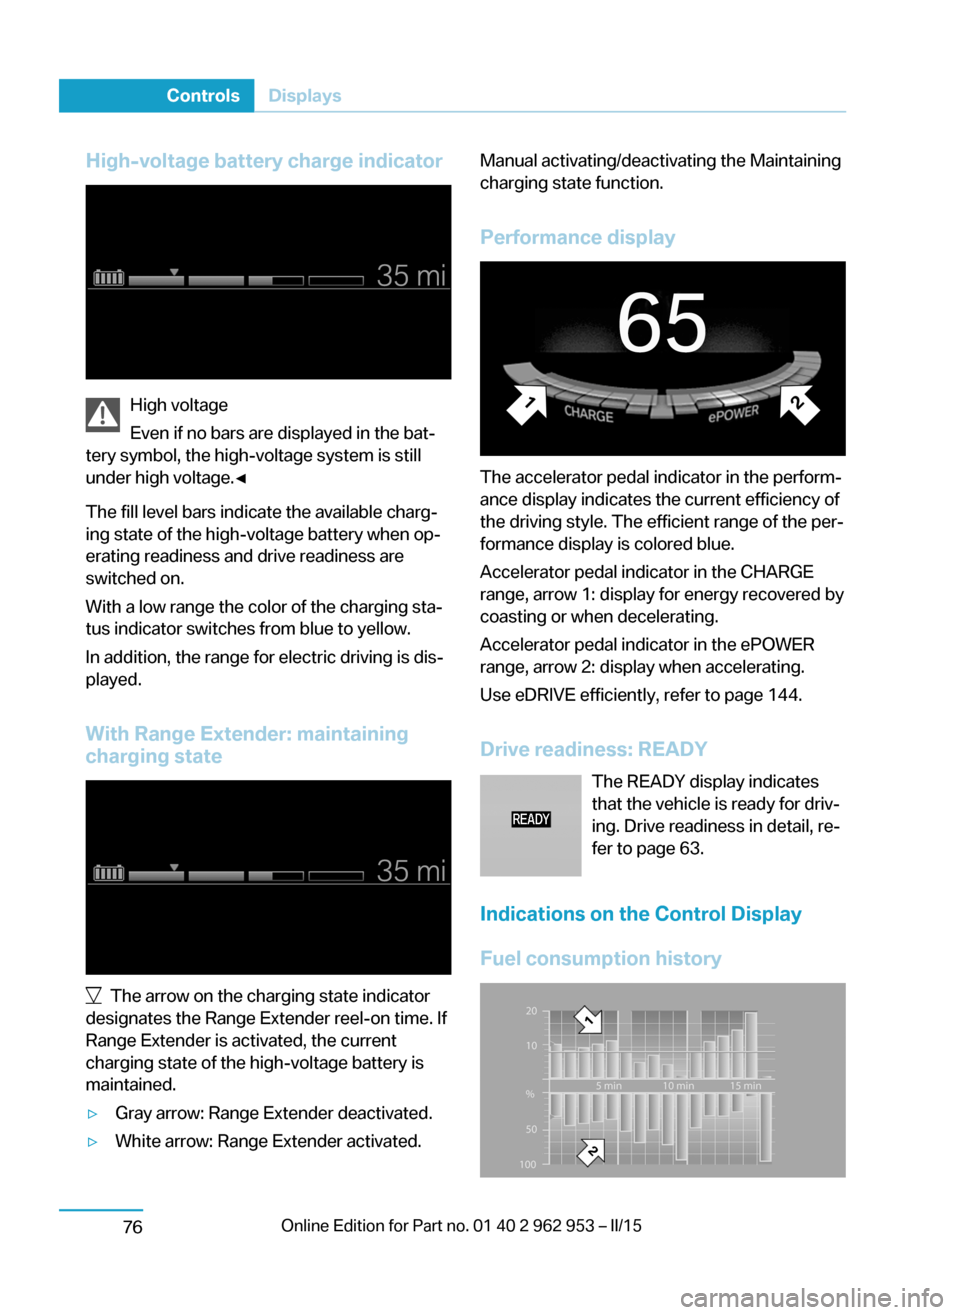
The fill level bars indicate the available charg‐
ing state of the high-voltage battery when op‐
erating readiness and drive readiness are
switched on.
With a low range the color of the charging sta‐
tus indicator switches from blue to yellow.
In addition, the range for electric driving is dis‐
played.
With Range Extender: maintaining charging state
The arrow on the charging state indicator
designates the Range Extender reel-on time. If
Range Extender is activated, the current
charging state of the high-voltage battery is
maintained.
▷Gray arrow: Range Extender deactivated.▷White arrow: Range Extender activated.Manual activating/deactivating the Maintaining
charging state function.
Performance display
The accelerator pedal indicator in the perform‐
ance display indicates the current efficiency of
the driving style. The efficient range of the per‐
formance display is colored blue.
Accelerator pedal indicator in the CHARGE
range, arrow 1: display for energy recovered by
coasting or when decelerating.
Accelerator pedal indicator in the ePOWER
range, arrow 2: display when accelerating.
Use eDRIVE efficiently, refer to page 144.
Drive readiness: READY The READY display indicates
that the vehicle is ready for driv‐
ing. Drive readiness in detail, re‐
fer to page 63.
Indications on the Control Display
Fuel consumption history
Seite 74ControlsDisplays76
Page 89 of 230
The top bars indicate the average energy con‐
sumed while driving time, arrow 1. The lower
bars indicate the average energy recovered
while driving time, arrow 2.
One bar indicates one minute.
The eDRIVE system's average fuel consump‐
tion is indicated by a line above the bar display
and as a value on the right next to the graph.
Displaying fuel consumption history1."Vehicle info"2."eDRIVE"3. "CHARGE"
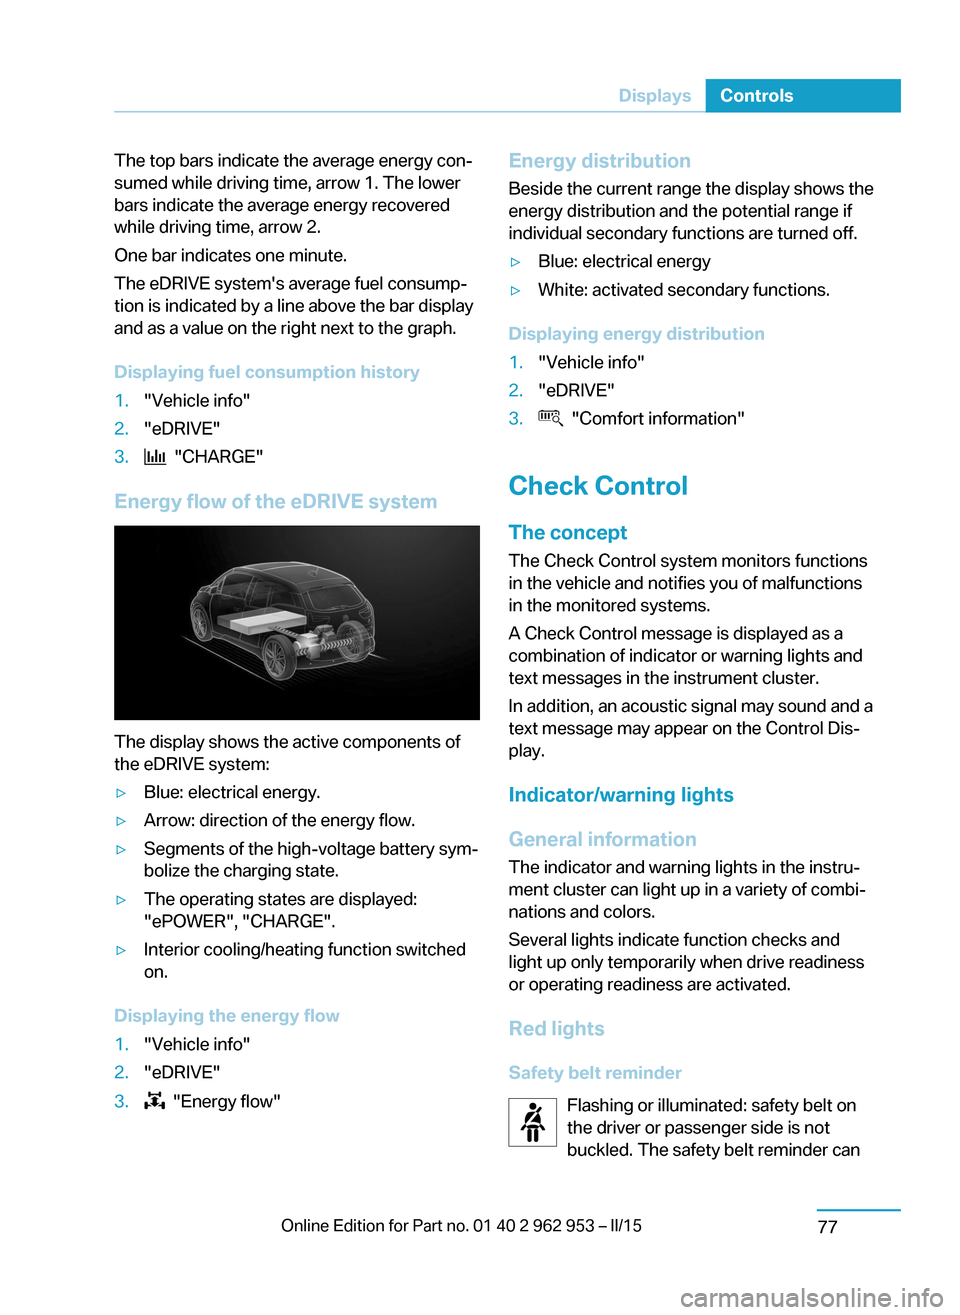
Energy flow of the eDRIVE system
The display shows the active components of
the eDRIVE system:
▷Blue: electrical energy.▷Arrow: direction of the energy flow.▷Segments of the high-voltage battery sym‐
bolize the charging state.▷The operating states are displayed:
"ePOWER", "CHARGE".▷Interior cooling/heating function switched
on.
Displaying the energy flow
1."Vehicle info"2."eDRIVE"3. "Energy flow"Energy distribution
Beside the current range the display shows the
energy distribution and the potential range if
individual secondary functions are turned off.▷Blue: electrical energy▷White: activated secondary functions.
Displaying energy distribution
1."Vehicle info"2."eDRIVE"3. "Comfort information"
Check Control
The concept The Check Control system monitors functions
in the vehicle and notifies you of malfunctions
in the monitored systems.
A Check Control message is displayed as a
combination of indicator or warning lights and
text messages in the instrument cluster.
In addition, an acoustic signal may sound and atext message may appear on the Control Dis‐
play.
Indicator/warning lights
General information
The indicator and warning lights in the instru‐
ment cluster can light up in a variety of combi‐
nations and colors.
Several lights indicate function checks and
light up only temporarily when drive readiness
or operating readiness are activated.
Red lights Safety belt reminder Flashing or illuminated: safety belt on
the driver or passenger side is not
buckled. The safety belt reminder can
Seite 75DisplaysControls77
Page 90 of 230
also be activated if objects are placed on the
front passenger seat.
Make sure that the safety belts are positioned
correctly.
Airbag system Airbag system and belt tensioner are
defective.
Have the vehicle checked by the serv‐
ice center immediately.
Parking brake The parking brake is set.
For additional information, refer to Release
parking brake, refer to page 68.
Brake system Continue to drive moderately.
Have the vehicle checked by the serv‐
ice center immediately.
Front-end collision warning Illuminated: advance warning is issued,
e.g., when there is the impending dan‐
ger of a collision or the distance to the
vehicle ahead is too small.
Increase distance.
Flashing: acute warning of the imminent dan‐
ger of a collision when the vehicle approaches
another vehicle at a relatively high differential
speed.
Intervention by braking or make an evasive ma‐
neuver.Pedestrian warning
If a collision with a person detected in
this way is imminent, the symbol lights
up and a signal sounds.
Orange lights
Active Cruise Control The number bars shows the selected
distance from the vehicle driving
ahead.
For additional information, refer to Active
Cruise Control with Stop & Go function, ACC,
refer to page 109.
Vehicle detection, Active Cruise Control Illuminated: vehicle driving ahead de‐
tected.
Flashing: the conditions are not ade‐
quate for operating the system.
The system was deactivated but applies the
brakes until you actively resume control by
pressing on the brake pedal or accelerator
pedal.
Yellow lights
Antilock Brake System ABS It reduces the braking distance to a
minimum during emergency stops.
Illuminated: avoid abrupt braking if pos‐
sible. Braking force boost in some
cases defective. Stop carefully. Take
into account longer brake travel. Have this
checked by the service center immediately.
DSC Dynamic Stability Control Flashing: DSC controls the drive and
braking forces. The vehicle is stabi‐
lized. Reduce speed and adapt driving
profile to the driving circumstances.Seite 76ControlsDisplays78