BMW M ROADSTER COUPE 2001 Owners Manual
Manufacturer: BMW, Model Year: 2001, Model line: M ROADSTER COUPE, Model: BMW M ROADSTER COUPE 2001Pages: 171, PDF Size: 1.98 MB
Page 131 of 171
131n
IndexDataTechnologyRepairsCar careControlsOverview
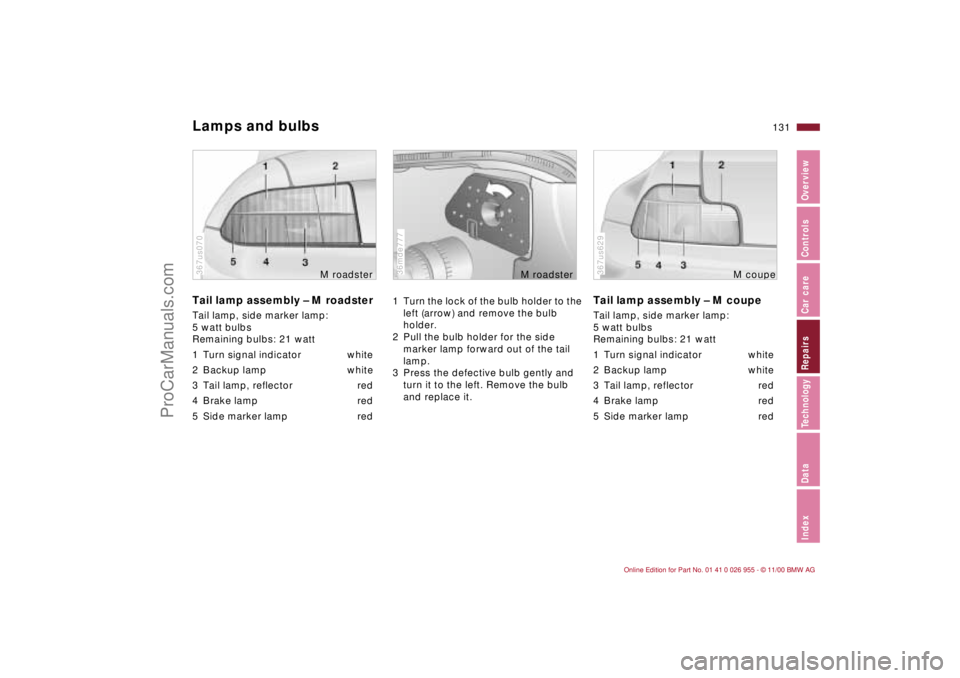
Lamps and bulbsTail lamp assembly – M roadsterTail lamp, side marker lamp:
5 watt bulbs
Remaining bulbs: 21 watt
1 Turn signal indicator white
2 Backup lamp white
3 Tail lamp, reflector red
4 Brake lamp red
5 Side marker lamp red367us070
M roadster
1 Turn the lock of the bulb holder to the
left (arrow) and remove the bulb
holder.
2 Pull the bulb holder for the side
marker lamp forward out of the tail
lamp.
3 Press the defective bulb gently and
turn it to the left. Remove the bulb
and replace it.36mde777
M roadster
Tail lamp assembly – M coupeTail lamp, side marker lamp:
5 watt bulbs
Remaining bulbs: 21 watt
1 Turn signal indicator white
2 Backup lamp white
3 Tail lamp, reflector red
4 Brake lamp red
5 Side marker lamp red367us629
M coupe
ProCarManuals.com
Page 132 of 171
132n
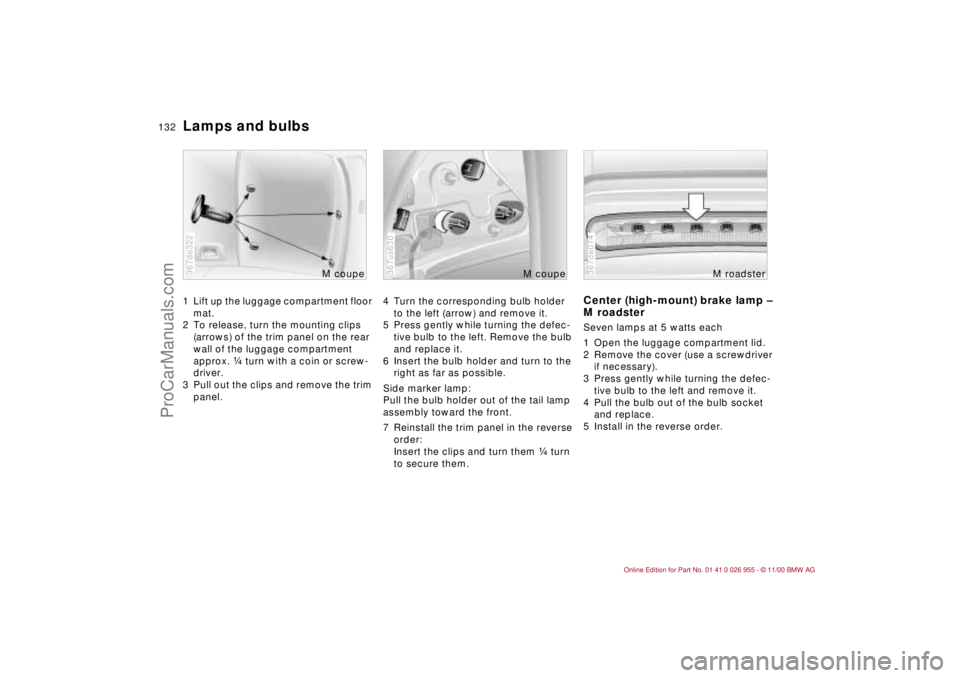
Lamps and bulbs1 Lift up the luggage compartment floor
mat.
2 To release, turn the mounting clips
(arrows) of the trim panel on the rear
wall of the luggage compartment
approx. f turn with a coin or screw-
driver.
3 Pull out the clips and remove the trim
panel.367de322
M coupe
4 Turn the corresponding bulb holder
to the left (arrow) and remove it.
5 Press gently while turning the defec-
tive bulb to the left. Remove the bulb
and replace it.
6 Insert the bulb holder and turn to the
right as far as possible.
Side marker lamp:
Pull the bulb holder out of the tail lamp
assembly toward the front.
7 Reinstall the trim panel in the reverse
order:
Insert the clips and turn them f turn
to secure them.367us630
M coupe
Center (high-mount) brake lamp –
M roadsterSeven lamps at 5 watts each
1 Open the luggage compartment lid.
2 Remove the cover (use a screwdriver
if necessary).
3 Press gently while turning the defec-
tive bulb to the left and remove it.
4 Pull the bulb out of the bulb socket
and replace.
5 Install in the reverse order.367de074
M roadster
ProCarManuals.com
Page 133 of 171
133n
IndexDataTechnologyRepairsCar careControlsOverview
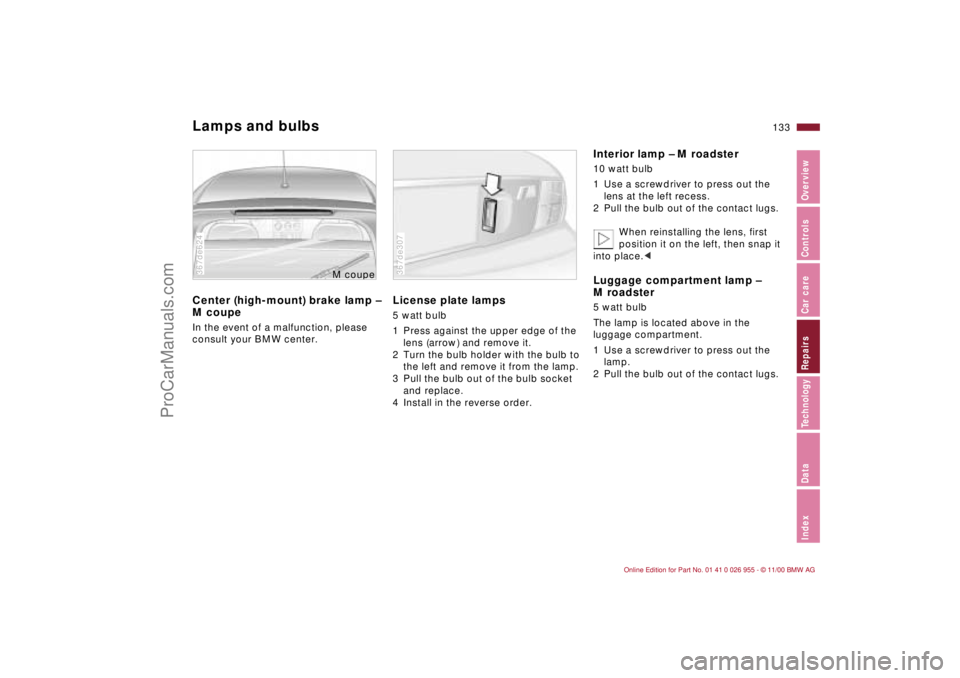
Lamps and bulbsCenter (high-mount) brake lamp –
M coupeIn the event of a malfunction, please
consult your BMW center.367de624
M cou
pe
License plate lamps5 watt bulb
1 Press against the upper edge of the
lens (arrow) and remove it.
2 Turn the bulb holder with the bulb to
the left and remove it from the lamp.
3 Pull the bulb out of the bulb socket
and replace.
4 Install in the reverse order.367de307
Interior lamp – M roadster10 watt bulb
1 Use a screwdriver to press out the
lens at the left recess.
2 Pull the bulb out of the contact lugs.
When reinstalling the lens, first
position it on the left, then snap it
into place.< Luggage compartment lamp –
M roadster5 watt bulb
The lamp is located above in the
luggage compartment.
1 Use a screwdriver to press out the
lamp.
2 Pull the bulb out of the contact lugs.
ProCarManuals.com
Page 134 of 171
134n
Lamps and bulbs Master key with battery-powered lampInterior lamps – M coupeFront:
15 watt bulb
1 Use a screwdriver to press out the
lamp at the left recess.
2 Press back the plastic tab on the
reflector, open the reflector and
replace the bulb.
Rear:
10 watt bulb
1 Use a screwdriver to press out the
lamp at the side recess.
2 Press back the plastic tab on the
reflector, open the reflector and
replace the bulb.Reading lamps – M coupe10 watt bulbs
1 Use a screwdriver to press out the
lamp at the left recess.
2 Press gently while turning the defec-
tive bulb to the left. Remove the bulb
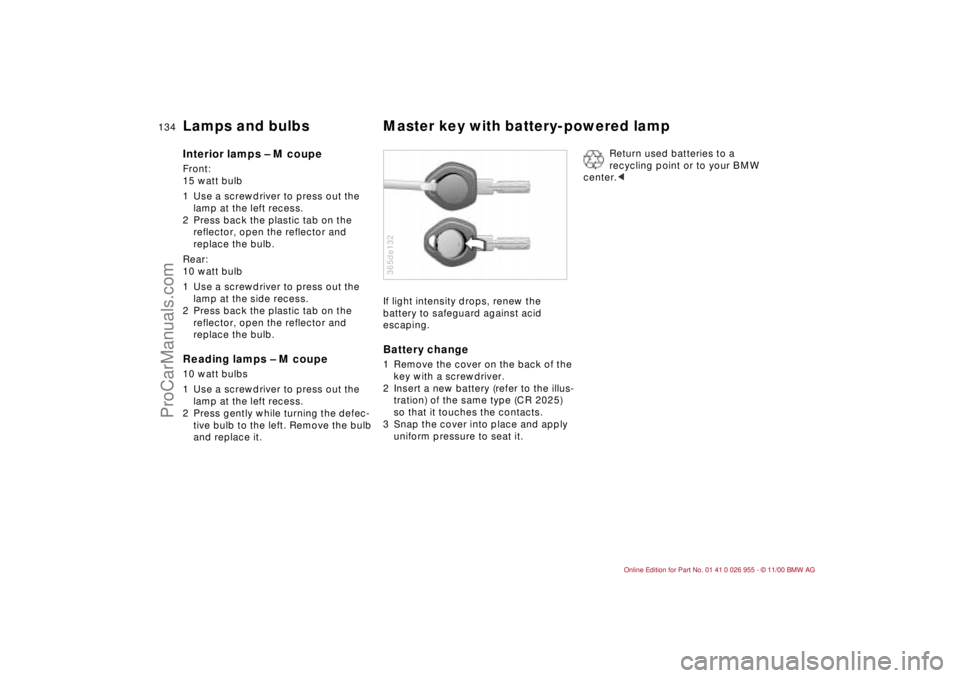
and replace it.If light intensity drops, renew the
battery to safeguard against acid
escaping.
Battery change1 Remove the cover on the back of the
key with a screwdriver.
2 Insert a new battery (refer to the illus-
tration) of the same type (CR 2025)
so that it touches the contacts.
3 Snap the cover into place and apply
uniform pressure to seat it.365de132
Return used batteries to a
recycling point or to your BMW
center.<
ProCarManuals.com
Page 135 of 171

135n
IndexDataTechnologyRepairsCar careControlsOverview
Changing a wheel Repairing a flat tireThe M roadster and M coupe are deliv-
ered from the factory without a jack and
lug wrench.
Please have your BMW center switch
the tires on your vehicle from summer
to winter tires, or the reverse.
To repair a flat tire, refer to the following
pages.Safety measures in the event of a
flat tire:
Stop the vehicle as far as possible from
the flow of traffic. Turn on the hazard
warning flashers.
Turn the steering wheel to the straight-
ahead position and engage the steering
lock, engage the parking brake and
shift into 1st or reverse gear.
All passengers should be outside the
vehicle and well away from your imme-
diate working area (for instance, behind
the guardrail).
If a warning triangle or portable hazard
warning lamp is available, set it up on
the roadside at an appropriate distance
from the rear of the vehicle. Comply
with all safety guidelines and regula-
tions.<
M Mobility SystemYou will find an M Mobility system in the
M roadster and M coupe, for repairing
flat tires. With the aid of this system,
you can apply a liquid sealant to the
inside of the tire, thereby sealing off the
damaged area, and then continue
driving.
The M Mobility system makes trans-
porting a spare wheel superfluous,
thereby reducing the amount of weight
you have to carry around.
ProCarManuals.com
Page 136 of 171
136n
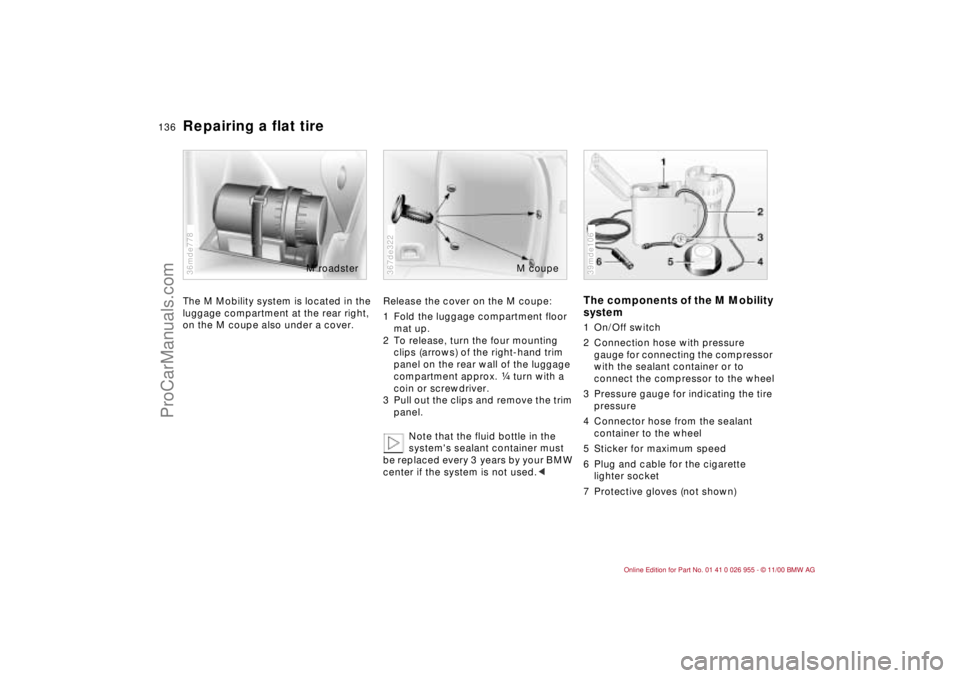
Repairing a flat tireThe M Mobility system is located in the
luggage compartment at the rear right,
on the M coupe also under a cover.36mde778
M roadster
Release the cover on the M coupe:
1 Fold the luggage compartment floor
mat up.
2 To release, turn the four mounting
clips (arrows) of the right-hand trim
panel on the rear wall of the luggage
compartment approx. f turn with a
coin or screwdriver.
3 Pull out the clips and remove the trim
panel.
Note that the fluid bottle in the
system's sealant container must
be replaced every 3 years by your BMW
center if the system is not used.<367de322
M coupe
The components of the M Mobility
system1 On/Off switch
2 Connection hose with pressure
gauge for connecting the compressor
with the sealant container or to
connect the compressor to the wheel
3 Pressure gauge for indicating the tire
pressure
4 Connector hose from the sealant
container to the wheel
5 Sticker for maximum speed
6 Plug and cable for the cigarette
lighter socket
7 Protective gloves (not shown)39mde106
ProCarManuals.com
Page 137 of 171
137n
IndexDataTechnologyRepairsCar careControlsOverview
Repairing a flat tireUsing the M Mobility system Release the securing device of the
M Mobility system and remove the
system from the luggage compartment.
If possible, leave the foreign
object in the tire.<
Do not exceed the maximum
speed limits described below,
otherwise accidents could result.
Before you use the M Mobility system,
read the warnings and danger notices
on the device carefully.<
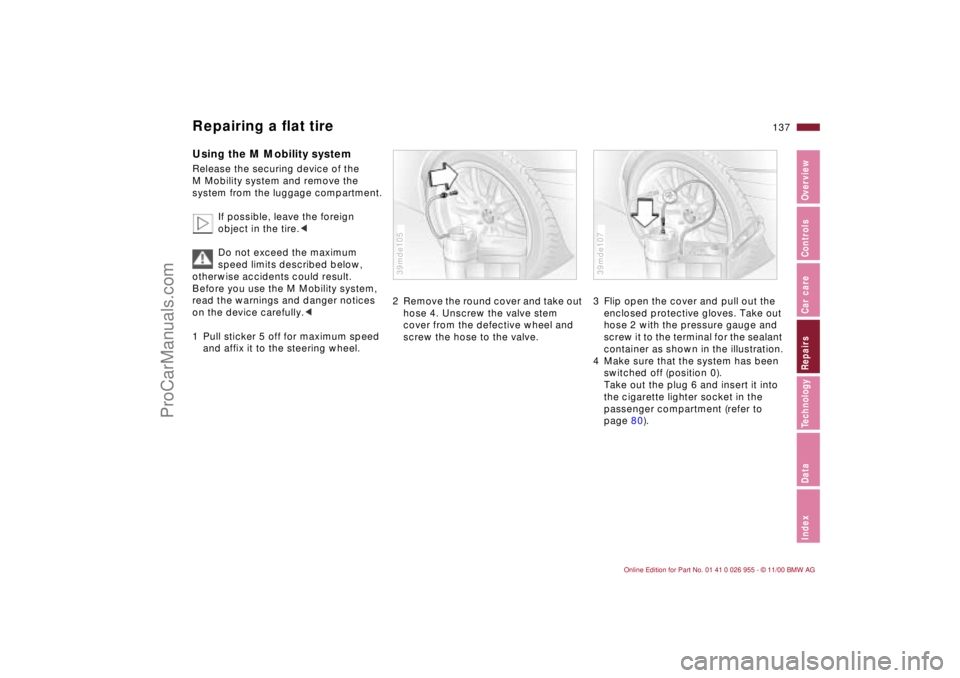
1 Pull sticker 5 off for maximum speed
and affix it to the steering wheel.
2 Remove the round cover and take out
hose 4. Unscrew the valve stem
cover from the defective wheel and
screw the hose to the valve.39mde105
3 Flip open the cover and pull out the
enclosed protective gloves. Take out
hose 2 with the pressure gauge and
screw it to the terminal for the sealant
container as shown in the illustration.
4 Make sure that the system has been
switched off (position 0).
Take out the plug 6 and insert it into
the cigarette lighter socket in the
passenger compartment (refer to
page 80).39mde107
ProCarManuals.com
Page 138 of 171
138n
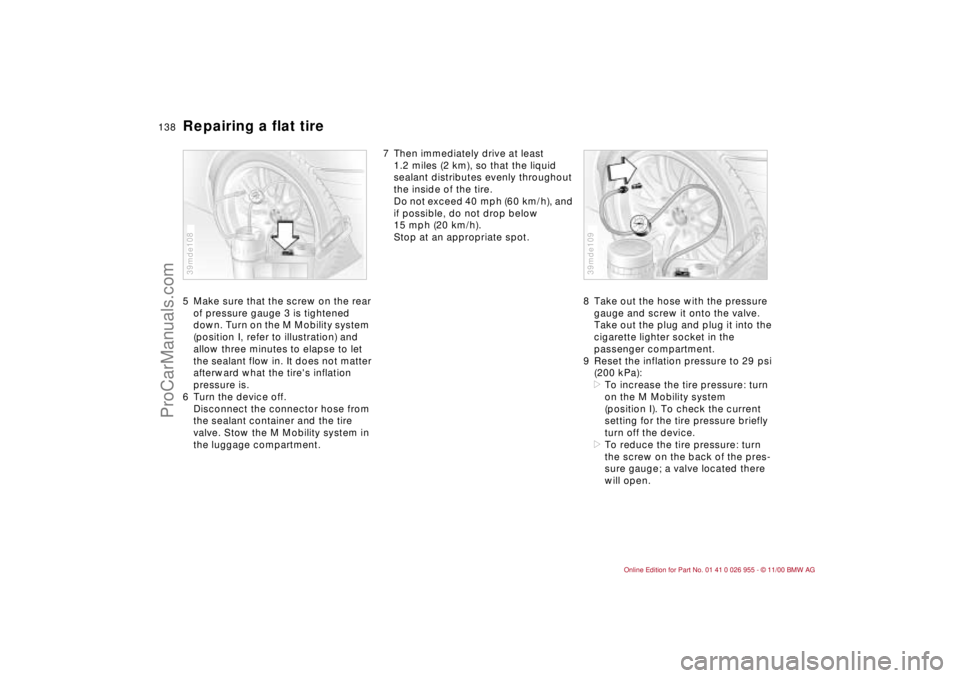
Repairing a flat tire5 Make sure that the screw on the rear
of pressure gauge 3 is tightened
down. Turn on the M Mobility system
(position I, refer to illustration) and
allow three minutes to elapse to let
the sealant flow in. It does not matter
afterward what the tire's inflation
pressure is.
6 Turn the device off.
Disconnect the connector hose from
the sealant container and the tire
valve. Stow the M Mobility system in
the luggage compartment.39mde108
7 Then immediately drive at least
1.2 miles (2 km), so that the liquid
sealant distributes evenly throughout
the inside of the tire.
Do not exceed 40 mph (60 km/h), and
if possible, do not drop below
15 mph (20 km/h).
Stop at an appropriate spot.
8 Take out the hose with the pressure
gauge and screw it onto the valve.
Take out the plug and plug it into the
cigarette lighter socket in the
passenger compartment.
9 Reset the inflation pressure to 29 psi
(200 kPa):
>To increase the tire pressure: turn
on the M Mobility system
(position I). To check the current
setting for the tire pressure briefly
turn off the device.
>To reduce the tire pressure: turn
the screw on the back of the pres-
sure gauge; a valve located there
will open.
39mde109
ProCarManuals.com
Page 139 of 171

139n
IndexDataTechnologyRepairsCar careControlsOverview
Repairing a flat tire
If the inflation pressure won't hold,
carry out step 10 anyway and then
repeat steps 7 through 10 again.
The use of the M Mobility system may
be ineffective if the damaged area in
the tire is larger than approx.
0.15 in (4 mm). Please consult the
nearest BMW center if the tire cannot
be temporarily repaired with the
M Mobility system.<
10 Unscrew the hose from the valve
and stow the M Mobility system in
the luggage compartment.
After the flat tire has been fixed and you
start driving again, do not exceed a
maximum speed of 50 mph (80 km/h).
You will find corresponding instructions
for using the M Mobility system on the
device.
Replace the defective tire as soon as
possible and have the new wheel
balanced. Re-initialize the Tire Pressure
Warning (RDW) system, refer to
page 67 for further information. Have
the M Mobility system refilled. Contact
your BMW center for this.
ProCarManuals.com
Page 140 of 171
140n
Battery
Battery posts, terminals and
related accessories contain lead
and lead compounds. Wash hands after
handling.<
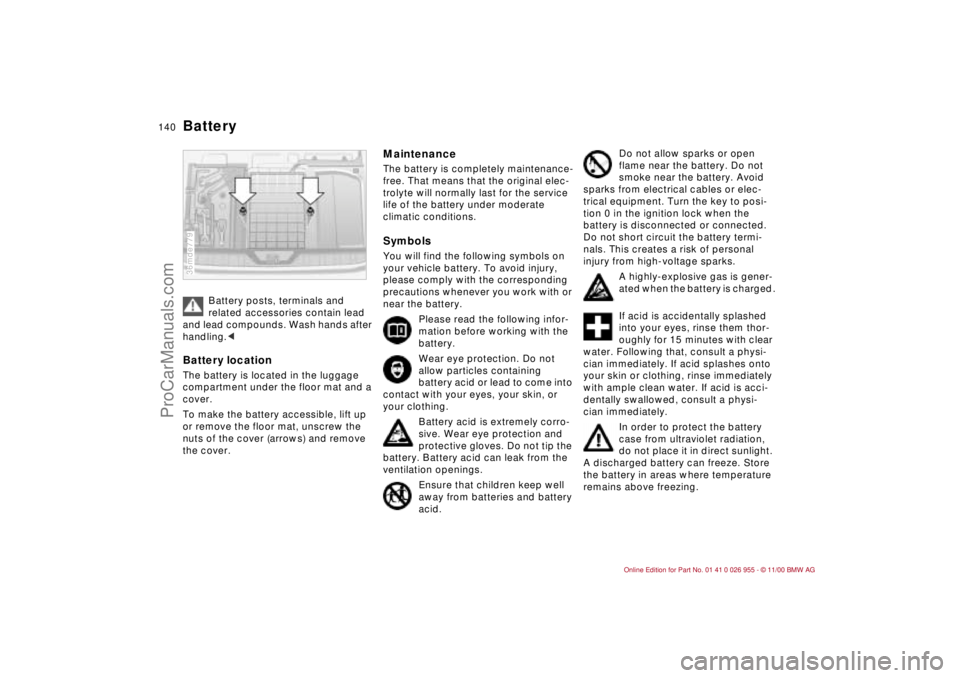
Battery locationThe battery is located in the luggage
compartment under the floor mat and a
cover.
To make the battery accessible, lift up
or remove the floor mat, unscrew the
nuts of the cover (arrows) and remove
the cover.36mde779
Z3 d Z3
MaintenanceThe battery is completely maintenance-
free. That means that the original elec-
trolyte will normally last for the service
life of the battery under moderate
climatic conditions.SymbolsYou will find the following symbols on
your vehicle battery. To avoid injury,
please comply with the corresponding
precautions whenever you work with or
near the battery.
Please read the following infor-
mation before working with the
battery.
Wear eye protection. Do not
allow particles containing
battery acid or lead to come into
contact with your eyes, your skin, or
your clothing.
Battery acid is extremely corro-
sive. Wear eye protection and
protective gloves. Do not tip the
battery. Battery acid can leak from the
ventilation openings.
Ensure that children keep well
away from batteries and battery
acid.
Do not allow sparks or open
flame near the battery. Do not
smoke near the battery. Avoid
sparks from electrical cables or elec-
trical equipment. Turn the key to posi-
tion 0 in the ignition lock when the
battery is disconnected or connected.
Do not short circuit the battery termi-
nals. This creates a risk of personal
injury from high-voltage sparks.
A highly-explosive gas is gener-
ated when the battery is charged.
If acid is accidentally splashed
into your eyes, rinse them thor-
oughly for 15 minutes with clear
water. Following that, consult a physi-
cian immediately. If acid splashes onto
your skin or clothing, rinse immediately
with ample clean water. If acid is acci-
dentally swallowed, consult a physi-
cian immediately.
In order to protect the battery
case from ultraviolet radiation,
do not place it in direct sunlight.
A discharged battery can freeze. Store
the battery in areas where temperature
remains above freezing.
ProCarManuals.com