light BMW M3 1992 E36 Repair Manual
[x] Cancel search | Manufacturer: BMW, Model Year: 1992, Model line: M3, Model: BMW M3 1992 E36Pages: 759
Page 169 of 759
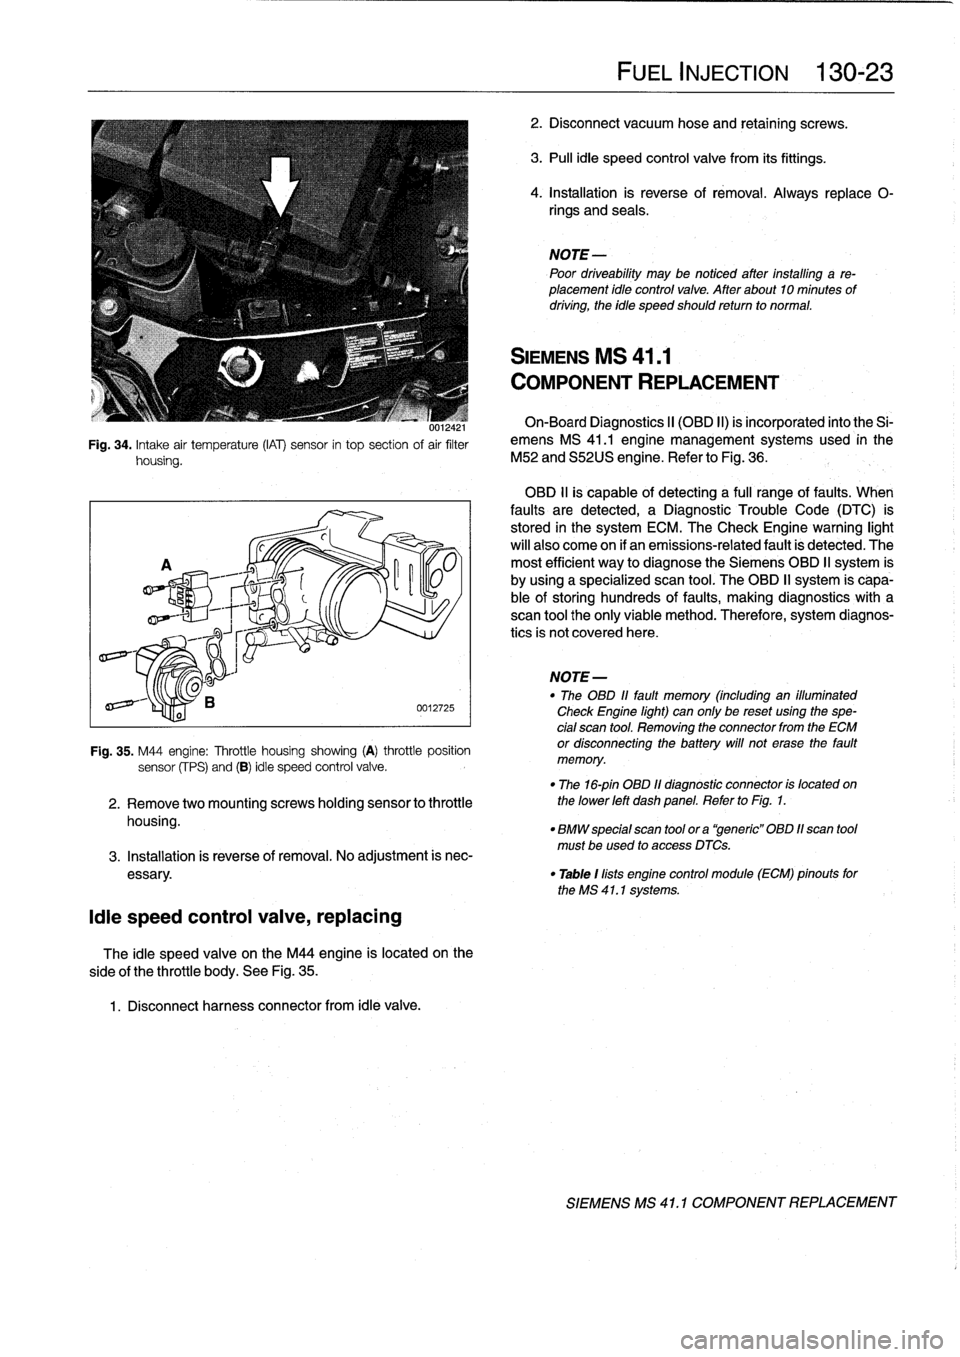
001ía4
i
Fig
.
34
.
Intake
air
temperature
(IAT)
sensor
in
top
section
of
air
filter
housing
.
¡die
speed
control
valve,
replacing
side
of
the
throttle
body
.
See
Fig
.
35
.
1
.
Disconnect
harness
connector
from
¡die
valve
.
0012725
Fig
.
35
.
M44
engine
:
Throttle
housing
showing
(A)
throttle
position
sensor
(fPS)
and
(B)
¡die
speed
control
valve
.
2
.
Remove
twomountingscrews
holding
sensor
to
throttle
housing
.
The
¡die
speed
valve
on
the
M44
engine
is
located
on
the
FUEL
INJECTION
130-23
2
.
Disconnect
vacuum
hose
and
retaining
screws
.
3
.
Pull
¡die
speed
control
valve
from
its
fittings
.
4
.
Installation
is
reverse
of
rémoval
.
Always
replace
0-
rings
and
seals
.
NOTE
Poor
driveability
may
be
notíced
after
installing
a
re-
placement
¡dio
control
valve
.
After
about10
minutes
of
driving,
the
idie
speed
should
retum
to
normal
.
SIEMENS
MS
41
.1
COMPONENT
REPLACEMENT
On-Board
Diagnostics
II
(OBD
II)
is
incorporated
into
the
Si-
emens
MS
41
.1
engine
management
systems
used
in
the
M52
and
S52US
engine
.
Refer
to
Fig
.
36
.
OBD
11
is
capable
of
detecting
a
fui¡
range
offaults
.
When
faults
are
detected,
a
Diagnostic
Trouble
Code
(DTC)
is
stored
in
the
system
ECM
.
The
Check
Engine
warning
light
will
also
come
on
if
an
emissions-related
fault
is
detected
.
The
most
efficient
way
to
diagnose
the
Siemens
OBD
II
system
is
by
using
a
specialized
scan
tool
.
The
OBD
II
system
is
capa-
ble
of
storing
hundreds
of
faults,
making
diagnostics
with
a
scan
tool
the
only
viable
method
.
Therefore,
system
diagnos-
tics
is
not
covered
here
.
NOTE
-
"
The
OBD
11
fault
memory
(including
an
illuminated
Check
Engine
light)
can
only
be
reset
using
the
spe-
cial
scan
tool
.
Removing
the
connector
from
the
ECM
or
disconnecting
the
battery
will
not
erase
the
fault
memory
.
"
The
16-pin
OBD
11
diagnostic
connector
is
located
on
the
lower
left
dash
panel
.
Refer
to
Fig
.
1
.
"
BMW
special
scan
tool
ora
"generic"
OBD
11scan
tool
must
be
used
to
access
DTCs
.
3
.
Installation
is
reverse
of
removal
.
No
adjustment
is
nec
essary
.
"
Table
1
lists
engine
control
module
(ECM)
pinouts
forthe
MS
41
.1
systems
.
SIEMENS
MS
41
.
1
COMPONENT
REPLACEMENT
Page 185 of 759
160
Fuel
Tank
and
Fuel
Pump
GENERAL
.
.
.
.
.
.
...........
.
....
.
.
.
.
.
.
160-1
Operating
fuel
pump
for
tests
.
.
.
.
.
.
.......
.160-6
Fuel
Pump
Electrical
Tests
.
.
.
.
.
.
.
...
.
.
.
.
.
160-7
FUEL
TANK
AND
LINES
..
.
.
.
..........
160-2
Fuel
pump
electrical
circuit,
testing.
...
.
.
.
.
.
160-7
Fuel
tank,
draining
..
.
.
.
.
.
.
.
.
.
..........
160-2
Fuel
pump
power
consumption,
testing
.
.
.
.
.
.
160-7
Fuel
tank,
removing
and
installing
.........
160-3
Fuel
Delivery
Tests
....
.
.
.
...
.
.....
.
.
.
..
160-8
Fuel
Tank
Evaporative
Control
System
.....
160-4
Relieving
fuel
pressure
and
connecting
fuel
pressure
gauge
..
.
...........
.
.
.
..
160-8
FUEL
LEVEL
SENDERS
.
.
.
.
.
.......
.
.
.
160-4
System
pressure,
testing
.................
160-9
Fuel
level
senders,
testing
.
.
.
.
.
.......
.
.
.
160-5
Fuel
delivery
volume,
testing
.............
160-10
Fuel
leve¡
sender
and
fuel
pump
(right
side),
emoving
and
installing
.
.
.
.
.
.
160-5
TABLES
Fuel
leve¡
sender
(left
side),
a
.
FuelLeve¡
Sender
Resistances
...........
.
.
..
.160-5
removing
and
installing
.........
.
.
.
.
.
.
.
160-6
b
.
Fuel
Pump
Current
...
.................
..
...
160-8
c
.
Fuel
Pressure
Specifications
..............
.
..
160-10
FUEL
PUMP
.
.
.
................
.
.
.
.
.
.
.
160-6
d
.
Fuel
Pump
Delivery
Specifications
.........
.
..
160-10
Fuel
Pump
Fuse
and
Relay
.
.
.
....
.
.
.
.
.
.
.
160-6
GENERAL
This
repair
group
covers
service
information
specifically
for
The
cautions
and
warnings
on
this
page
should
beob
the
fuel
supply
system
.
Information
on
the
fue¡
injection
sys-
served
when
servicing
the
fuel
system
.
tem
is
covered
in
130
Fuel
Injection
.
NOTE-
Fue¡
filter
replacement
is
covered
in
020
Maintenance
Program
.
WARNING
-
"
The
fuel
system
is
designed
to
retain
pressure
even
when
the
ignition
isoff
.
When
working
with
the
fuel
system,
loosen
the
fuel
lines
slowly
toal-
low
residual
fuel
pressure
to
dissipate
gradually
.
Avoid
spraying
fuel
.
"
Before
beginning
any
work
on
the
fuel
system,
place
a
tire
extinguisher
in
the
vicinity
of
the
work
area
.
"
Fuel
is
highly
flammable
.
When
working
around
fuel,
do
not
disconnect
any
wires
that
could
cause
electrical
sparks
.
Do
not
smoke
or
work
near
heaters
or
other
tire
hazards
.
"
Always
unscrew
the
fuel
tank
cap
to
release
pres-
sure
in
the
tank
before
working
on
the
tank
or
fines
.
"
Do
not
use
a
work
light
near
any
fuel
.
Fuel
may
spray
onto
the
hot
bulb
causing
a
tire
.
"
Make
sure
the
work
area
is
properly
ventifated
.
FUEL
TANK
AND
FUEL
PUMP
160-1
CAUTION-
"
Prior
to
disconnecting
the
battery,
read
the
bat-tery
disconnection
cautions
given
at
the
front
of
this
manual
onpage
viü
.
"
Before
making
any
electrical
tests
with
the
ignition
tumed
on,
disable
the
ignition
system
as
de-
scribed
in
120
Ignition
System
.
Be
sure
the
bat-tery
is
disconnected
when
replacing
components
.
"
To
prevent
damage
to
the
ignition
system
or
the
electronic
fuel
system
components,
including
the
control
unit,
aiways
connect
and
disconnect
wires
and
test
equipment
with
the
ignition
off
.
"
Cleanliness
is
essential
when
working
with
the
fuel
system
.
Thoroughly
clean
the
fuel
fine
unionsbefore
disconnecting
any
of
the
fines
.
"
Use
only
clean
tools
.
Keep
removed
parts
clean
and
sealed
or
covered
with
a
clean,
lint-free
cloth,
especially
if
completion
of
the
repair
is
delayed
.
"
Do
not
move
the
car
while
the
fuel
system
is
open
.
"
Avoid
using
high
pressure
compressed
air
to
blow
out
fines
and
componente
.
High
pressure
can
rupture
infernal
seals
and
gaskets
.
"
Always
replace
seals
and
O-rings
.
GENERAL
Page 217 of 759
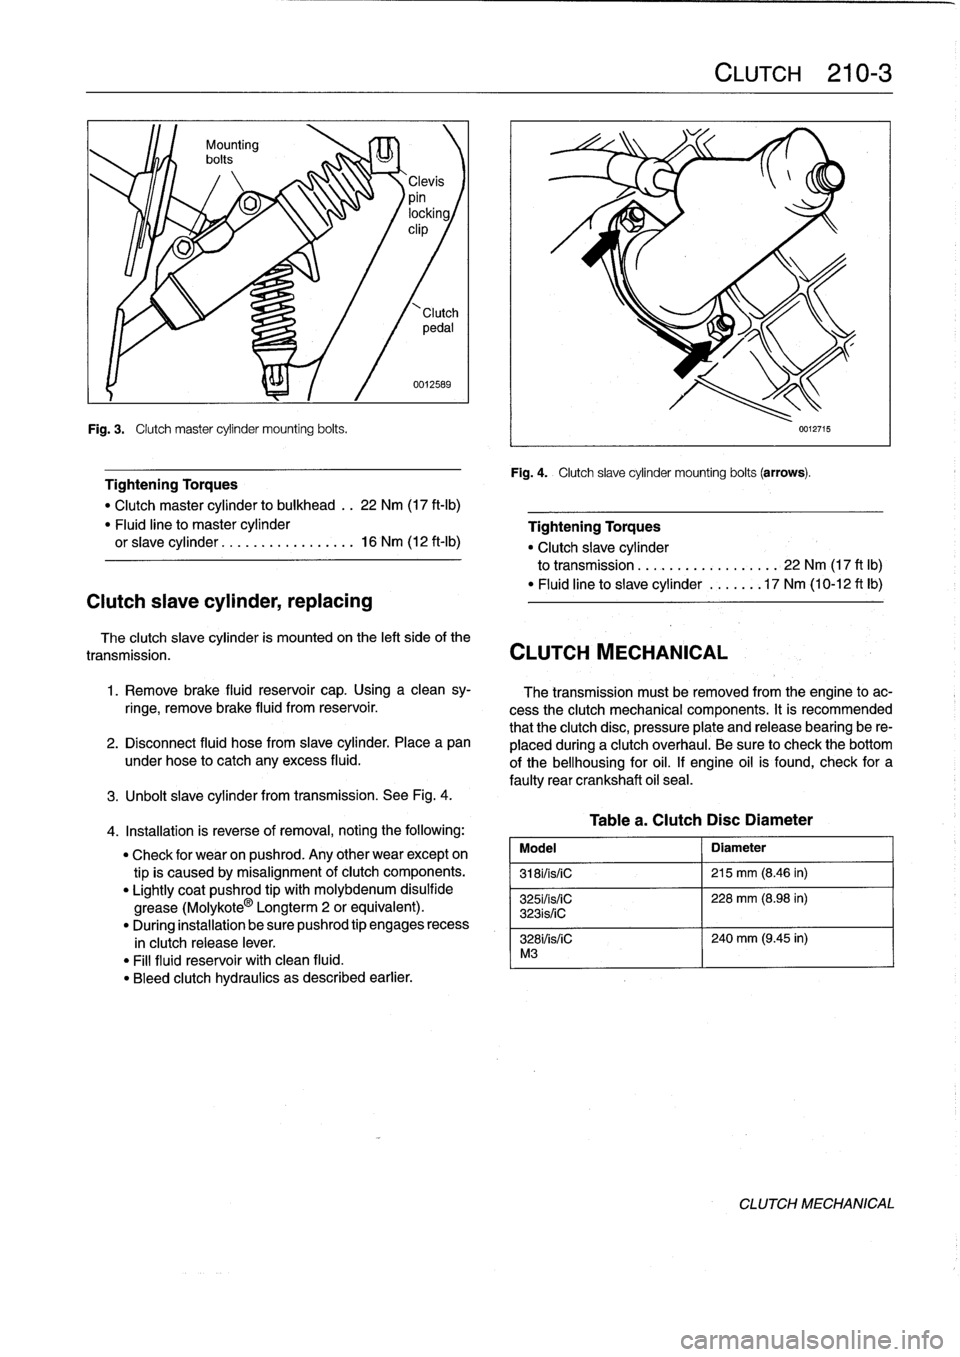
Fig
.
3
.
Clutch
master
cylinder
mounting
bolts
.
Clutch
slave
cylinder,
replacing
0012589
Tightening
Torques
"
Clutch
master
cylinder
to
bulkhead
..
22
Nm
(17
ft-Ib)
"
Fluid
line
to
master
cylinder
orslave
cylinder
.................
16
Nm
(12
ft-1b)
The
clutch
slave
cylinder
is
mounted
on
the
left
side
of
the
transmission
.
CLUTCH
MECHANICAL
1
.
Remove
brake
fluid
reservoir
cap
.
Using
a
clean
sy-
ringe,
remove
brake
fluid
from
reservoir
.
2
.
Disconnect
fluid
hose
from
slave
cylinder
.
Place
a
pan
under
hose
to
catch
any
excess
fluid
.
3
.
Unbolt
slave
cylinder
from
transmission
.
See
Fig
.
4
.
4
.
Installation
is
reverse
of
removal,
noting
the
following
:
"
Check
for
wear
on
pushrod
.
Any
other
wear
except
on
tipis
caused
by
misalignment
of
clutch
components
.
"
Lightly
coat
pushrod
tip
with
molybdenum
disulfide
grease
(Molykote
0
Longterm
2
or
equivalent)
.
"
During
installation
be
sure
pushrod
tip
engages
recess
in
clutch
release
lever
.
"
Fill
fluid
reservoir
with
clean
fluid
.
"
Bleed
clutch
hydraulics
as
described
earlier
.
CLUTCH
210-
3
Fig
.
4
.
Clutch
slave
cylinder
mounting
bolts
(arrows)
.
Tablea
.
ClutchDisc
Diameter
Model
Diameter
3181/is/iC
215
mm
(8
.46
in)
325i/is/iC
228
mm
(8
.98
in)
323is/iC
328i/is/iC
240
mm
(9
.45
in)
M3
0012715
Tightening
Torques
"
Clutch
slave
cylinder
to
transmission
.
.
................
22
Nm
(17
ft
lb)
"
Fluid
line
to
slave
cylinder
......
.17
Nm
(10-12
ft
lb)
The
transmission
must
be
removed
from
the
engine
to
ac-
cess
the
clutch
mechanical
components
.
It
is
recommended
that
the
clutch
disc,
pressure
plate
and
release
bearing
be
re-
placed
duringa
clutch
overhaul
.
Be
sure
to
check
the
bottom
of
the
bellhousing
for
oil
.
If
engine
oil
is
found,
check
for
a
faulty
rear
crankshaft
oil
seal
.
CLUTCH
MECHANICAL
Page 219 of 759
Clutch,
inspecting
and
installing
1
.
Inspect
clutch
disc
for
wear,
cracks,
loose
rivets,
con-
tamination
or
excessive
runout
(warping)
.
Replace
if
necessary
.
2
.
Inspect
flywheel
for
scoring,
hot
spots,
cracks
or
loose
or
worn
guide
pins
.
Replace
flywheel
if
any
faults
are
found
.
WARNING
-
If
flywheel
is
removed
from
vehicle,
use
new
bolts
duríng
installation
.
The
old
stretch-typebolts
should
not
be
reused
.
3
.
Inspecttransmission
pilot
bearing
in
end
of
crankshaft
.
The
bearing
should
rotate
smoothly
without
play
.
If
nec-
essary,
replace
as
described
later
.
4
.
Inspect
and
clean
releasebearing
lever
.
Apply
a
thin
coat
of
grease
to
releasebearíng
lever
contact
points
.
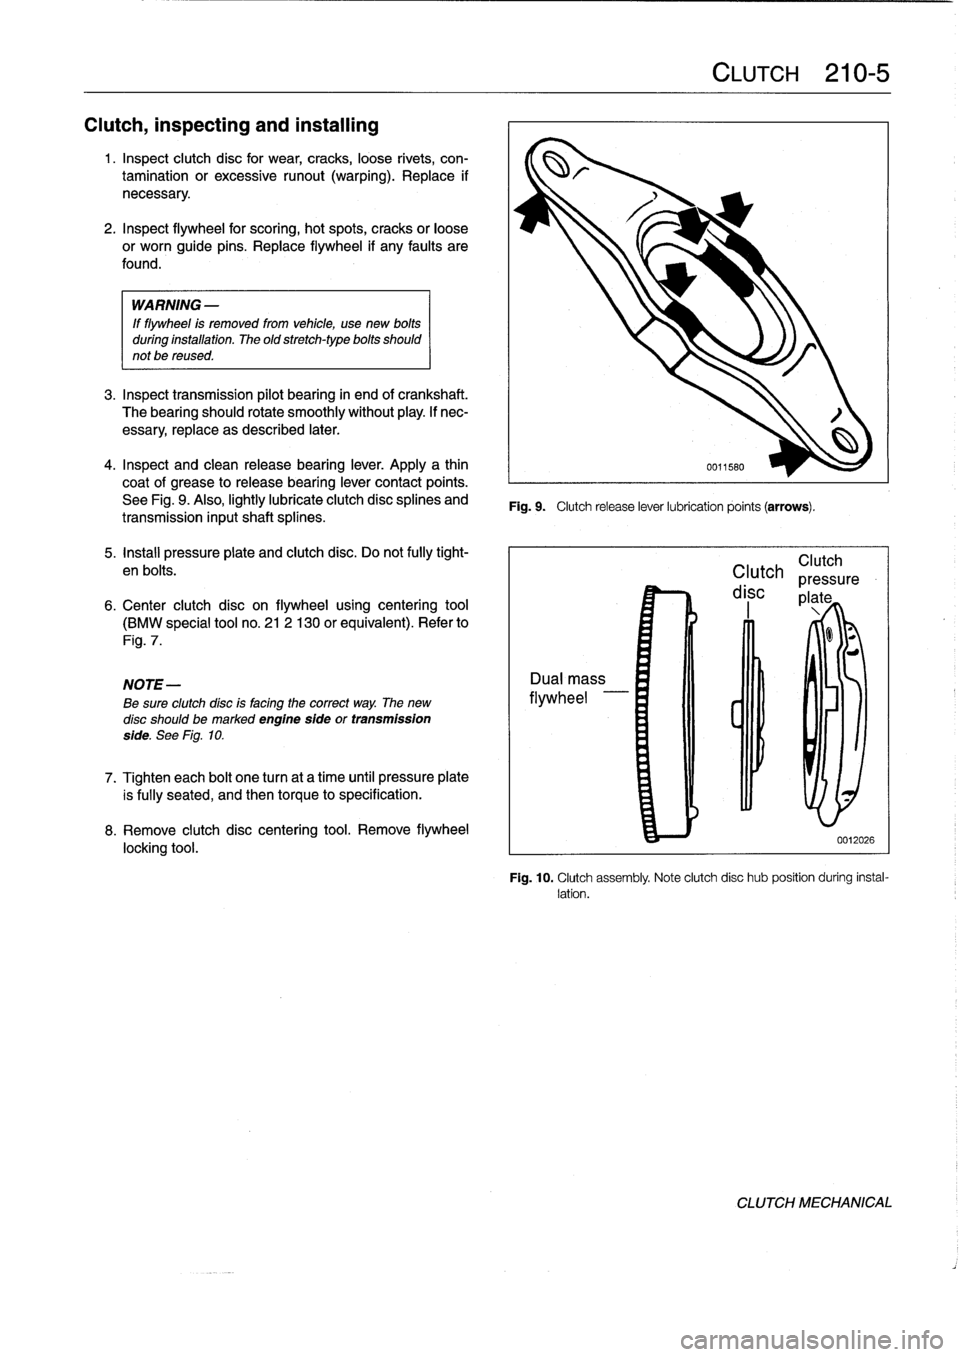
See
Fig
.
9
.
Also,
lightly
lubricate
clutch
disc
splines
and
transmission
inputshaft
splínes
.
5
.
Install
pressure
plate
and
clutch
disc
.
Do
not
fully
tight-
en
bolts
.
6
.
Center
clutch
disc
on
flywheel
using
centering
tool
(BMW
special
tool
no
.
21
2
130
or
equivalent)
.
Refer
to
Fig
.
7
.
NOTE-
Be
sure
clutchdísc
is
facing
the
correct
way
.
The
new
disc
should
bemarked
engine
sfde
or
transmission
side
.
See
Fig
.
10
.
7
.
Tighten
each
bolt
one
turn
at
a
time
until
pressure
plate
is
fully
seated,
and
then
torque
to
specification
.
8
.
Remove
clutch
disc
centering
tool
.
Remove
flywheel
locking
tool
.
Fig
.
9
.
Clutch
release
lever
lubrication
points
(arrows)
.
CLUTCH
210-
5
Clutch
Clutch
pressure
disc
plate
0012026
Fig
.
10
.
Clutch
assembly
Note
clutch
disc
hub
position
during
instal-
lation
.
CLUTCH
MECHANICAL
Page 221 of 759
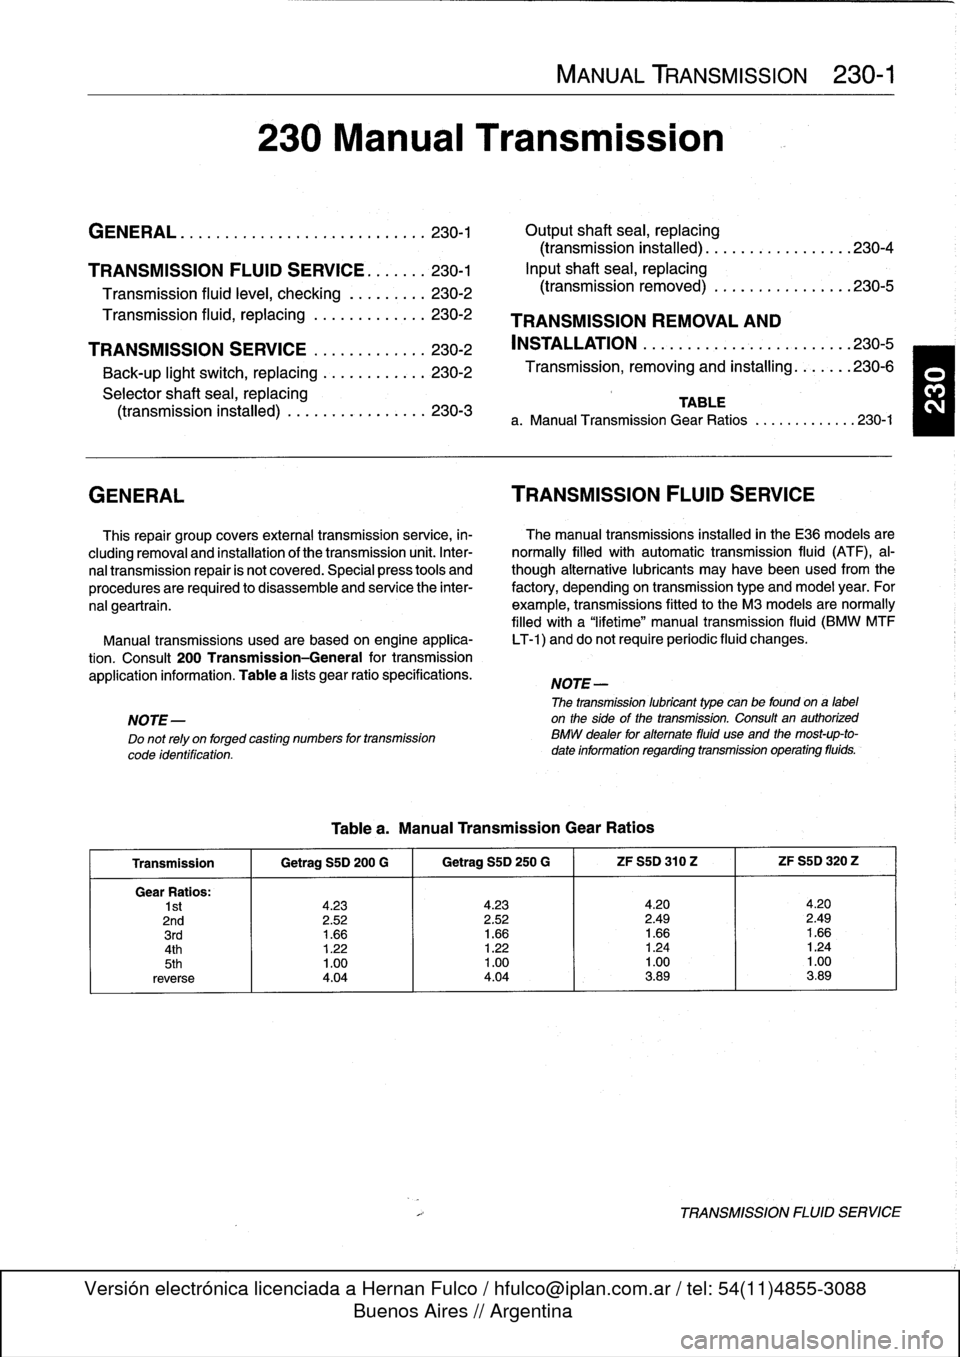
230
Manual
Transmission
MANUAL
TRANSMISSION
230-1
GENERAL
...
.
............
.
.......
.
.
.
.
230-1
Output
shaft
sea¡,
replacing
(transmission
installed)
....
.
.....
.
.....
.230-4
TRANSMISSION
FLUID
SERVICE
.
.
.
.
.
.
.230-1
Inputshaft
sea¡,
replacing
Transmission
fluid
leve¡,
checking
...
.
...
.
.
230-2
(transmission
removed)
.
.
.
.
...
.
.
.
.....
.
230-5
Transmission
fluid,
replacing
.........
.
.
.
.
230-2
TRANSMISSION
REMOVAL
AND
TRANSMISSION
SERVICE
.
.
.....
.
.
.
.
.
.
230-2
INSTALLATION
.
.
.
.
.
.
.....
.
.
.
.
.
.
.
.....
.
230-5
Back-up
light
switch,
replacing
.
.
.
...
.
.
.
.
.
.
230-2
Transmission,
removing
and
installing
...
.
.
.
.
230-6
_
Selector
shaft
sea¡,
replacing
(transmission
installed)
.
.
.
.
.
.
.
.
.
.
.
...
.
.
230-3
TAB
a
.
Manual
Transmission
Gear
Ratios
.
.
.
.........
.230-1
GENERAL
TRANSMISSION
FLUID
SERVICE
This
repair
group
covers
external
transmission
service,
in-
The
manual
transmissions
installed
in
the
E36
models
are
cluding
removal
and
installation
of
thetransmission
unit
.
Inter-
normally
filled
with
automatic
transmission
fluid
(ATF),
al-
nal
transmission
repair
is
not
covered
.
Special
press
tools
and
though
alternative
lubricants
may
have
beenused
from
the
procedures
are
required
to
disassemble
and
service
the
inter-
factory,
depending
on
transmission
type
and
model
year
.
For
nal
geartrain
.
example,
transmissions
fitted
to
the
M3
models
are
normally
filled
with
a
"lifetime"
manual
transmission
fluid
(BMW
MTF
Manual
transmissions
used
are
based
on
engine
applica-
LT-1)
and
do
not
require
periodic
fluid
changes
.
tion
.
Consult
200
Transmission-General
for
transmission
application
information
.
Table
a
lists
gear
ratio
specifications
.
NOTE-
The
transmission
lubricant
type
can
be
found
ona
label
NOTE-
on
the
sideof
the
transmission
.
Consult
an
authorized
Do
not
rely
on
forged
casting
numbers
for
transmission
BMW
dealer
for
altemate
fluid
use
and
the
most-up-to-
code
identification
.
date
information
regarding
transmission
operating
fluids
.
Tablea
.
Manual
Transmission
Gear
Ratios
Transmission
1
Getrag
S5D
200
G
1
Getrag
SSD
250
G
1
ZF
S5D
310
Z
1
ZF
S5D
320
Z
Gear
Ratios
:
1st
4
.23
4
.23
4
.20
4
.20
2nd
2
.52
2
.52
2
.49
2
.49
3rd
1
.66
1
.66
1
.66
1
.664th
1
.22
1
.22
1
.24
1
.24
5th
1
.00
1
.00
1
.00
1
.00
reverse
4
.04
4
.04
3
.89
3
.89
TRANSMISSION
FLUID
SERVICE
Page 222 of 759
230-2
MANUAL
TRANSMISSION
Transmission
fluidleve¡,
checking
Checking
thetransmission
oil
level
involves
simply
remov-
ing
the
side
drain
plug
and
inserting
a
finger
into
the
holeto
check
the
fluid
leve¡
.
lf
the
fluid
leve¡
is
up
to
the
bottom
of
the
drain
hole
(finger
is
wetted
by
transmission
fluid),
the
leve¡
is
correct
.
Transmission
fluid,
replacing
NOTE-
Manual
transmission
fluid
type
should
be
printed
ona
label
on
the
side
of
the
transmission
.
If
in
doubt,
consult
an
authorized
BMW
dealer
for
the
up-to-dateinforma-
tion
on
operating
fluids
.
1
.
Drive
vehicle
for
afew
miles
to
warm
transmission
.
2
.
Raise
and
safely
support
vehicle
to
access
drain
plug
.
WARNING
-
"
When
raising
the
car
uslng
a
floor
jack
or
a
hy-
draulic
lift,
carefully
position
the
jack
pad
to
pre-
vent
damaging
the
car
body
.
A
suitable
liner
(wood,
rubber,
etc
.)
should
be
placed
between
the
jack
and
the
car
to
prevent
body
damage
.
"
Watch
the
jack
closely
.
Make
sure
it
stays
stable
and
does
not
shíít
or
tilt
.
As
the
car
is
raised,
the
car
may
roll
slightly
and
the
jack
may
shift
.
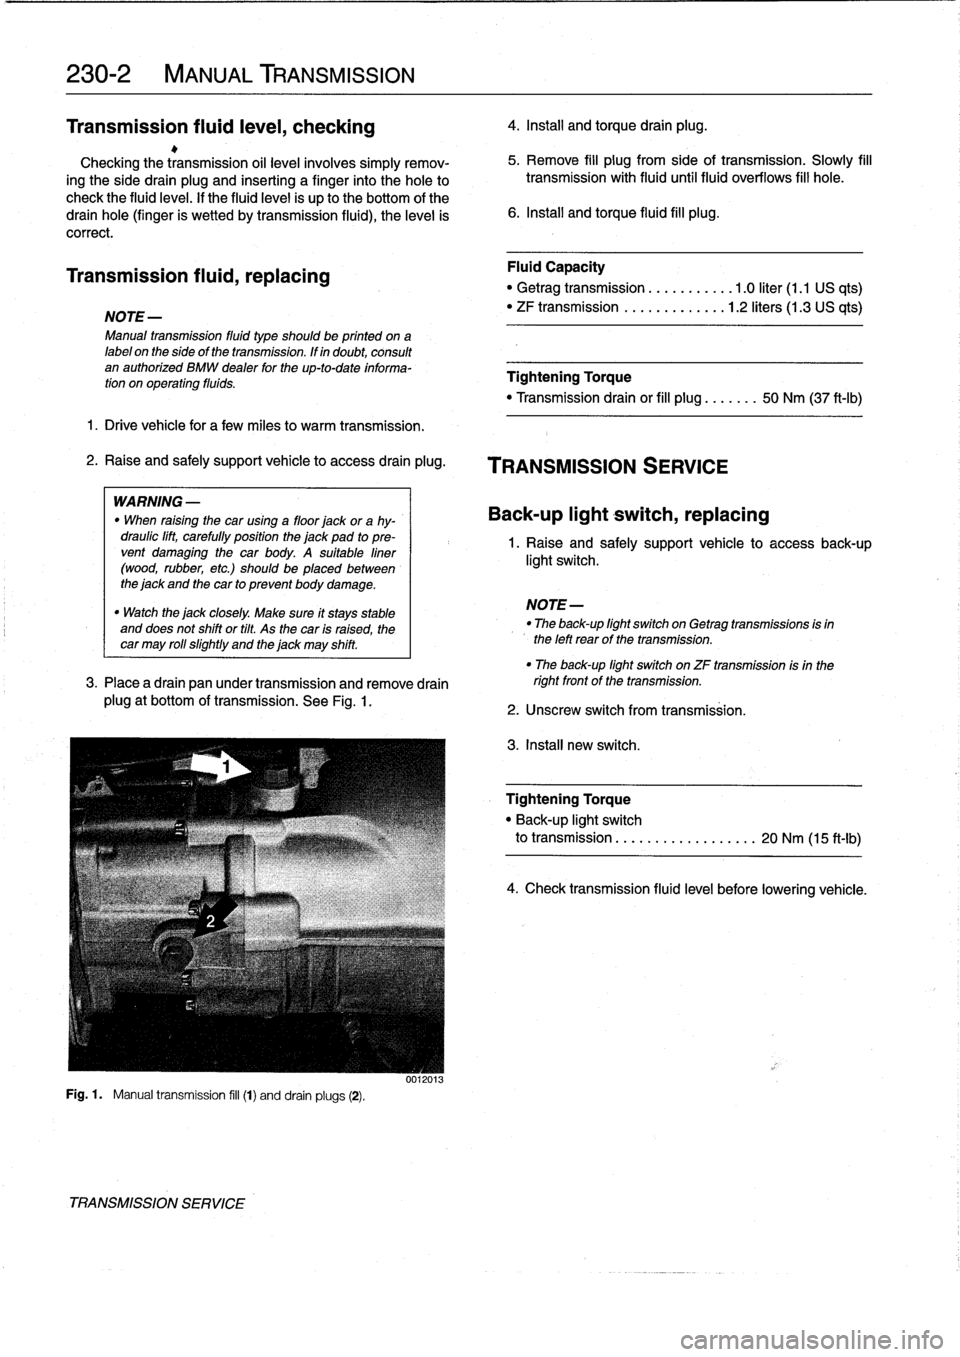
3
.
Place
a
drain
pan
under
transmission
andremove
drain
plug
at
bottom
of
transmission
.
See
Fig
.
1
.
Fig
.
1
.
Manual
transmission
fill
(1)
and
drain
plugs
(2)
.
TRANSMISSION
SERVICE
4
.
Install
and
torque
drain
plug
.
5
.
Remove
fill
plug
from
side
of
transmission
.
Slowly
fill
transmission
with
fluiduntilfluid
overflows
fill
hole
.
6
.
Install
and
torque
fluid
fill
plug
.
Fluid
Capacity
"
Getrag
transmission
...........
1
.0
liter
(1.1
US
qts)
"
ZF
transmission
.............
1
.2
liters(1
.3
US
qts)
Tightening
Torque
"
Transmission
drain
or
fill
plug
.......
50
Nm
(37
ft-Ib)
TRANSMISSION
SERVICE
Back-up
light
switch,
replacing
1
.
Raise
and
safely
support
vehicle
to
accessback-up
light
switch
.
NOTE-
"
The
back-up
light
switch
on
Getrag
transmissions
is
in
the
left
rearof
the
transmission
.
"
Theback-up
light
switch
on
ZF
transmission
isin
the
rightfront
of
thetransmission
.
2
.
Unscrew
switch
from
transmission
.
3
.
Install
new
switch
.
Tightening
Torque
"
Back-up
light
switch
to
transmission
..
..
.
.....
.
..
.....
20
Nm
(15
ft-ib)
4
.
Check
transmission
fluid
leve¡
before
lowering
vehicle
.
Page 224 of 759
230-
4
MANUAL
TRANSMISSION
Output
shaft
sea¡,
replacing
(transmission
installed)
1
.
Raise
and
safely
support
vehicle
.
Support
transmission
with
transmission
jack
.
WARNING
-
"
When
raising
thecar
using
a
floor
jack
or
a
hy-
draulic
lift,
carefully
position
the
jack
pad
to
pre-vent
damaging
the
car
body
.
A
suitable
liner
(wood,
rubber,
etc
.)
should
be
placed
between
the
jack
and
the
car
to
prevent
body
damage
.
"
Watch
the
jack
closely
.
Make
sure
it
stays
stable
and
does
not
shift
or
tilt
.
As
the
car
is
raised,
the
car
may
roll
slightly
and
the
jack
may
shift
.
2
.
Remove
driveshaft
.
See
260
Driveshaft
.
3
.
Remove
transmission
crossmember
and
lower
trans-
mission
at
rear
.
CAUTION-
Tilting
the
engine
to
lower
thetransmissíon
can
lead
to
damage
to
various
componente
due
to
lackof
clearance
.
-On
cars
with
AST
(traction
control)
remove
throt-
tle
body
before
tilting
engine
.
-Remove
brake
fluid
reservoir
if
necessary
.
4
.
Bend
back
and
remove
collar
nut
lockplate
.
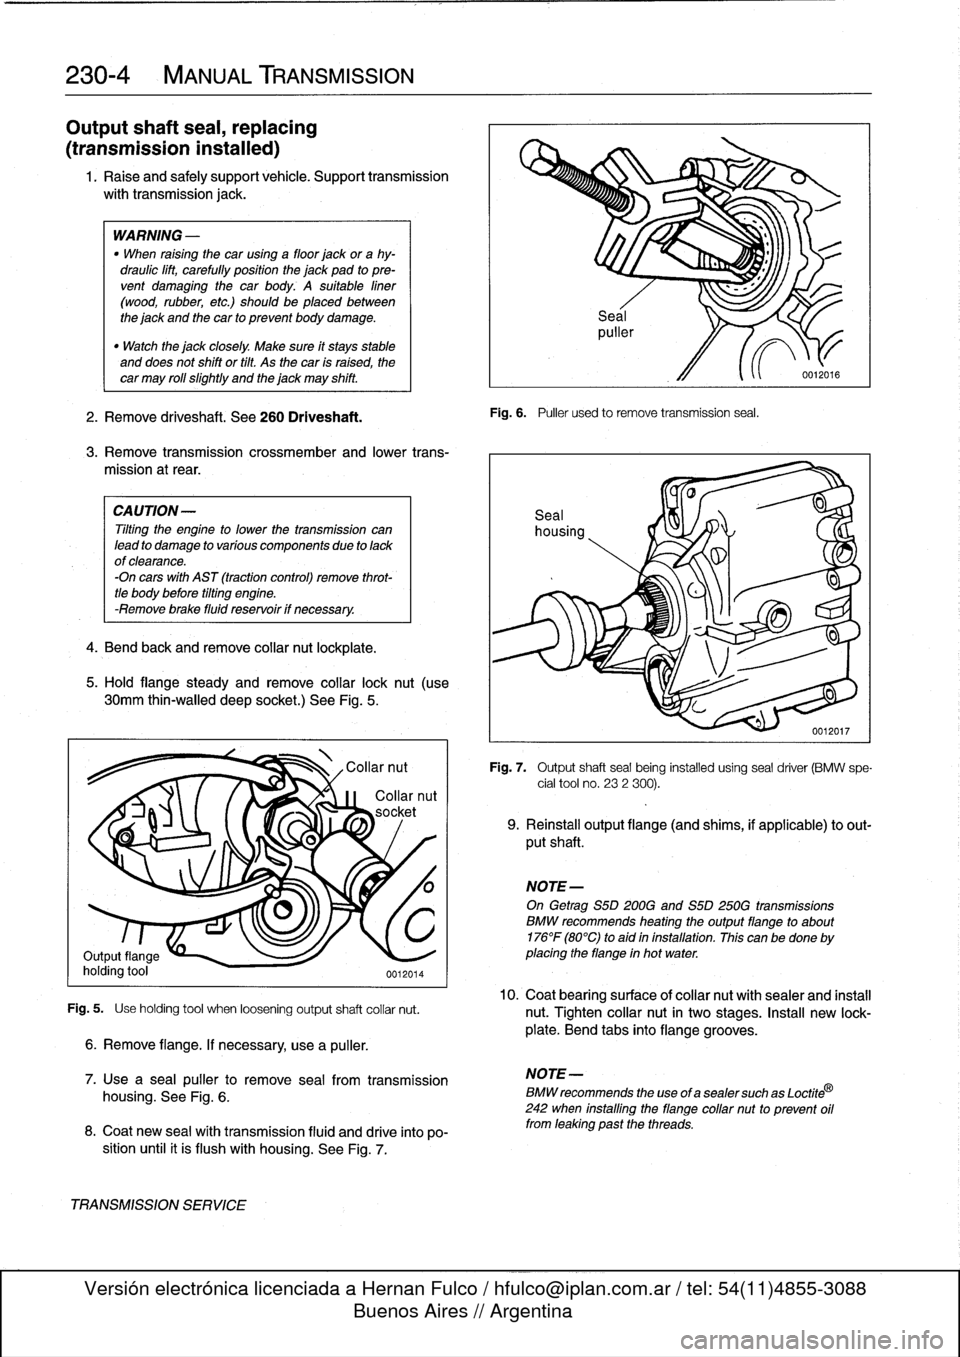
5
.
Hold
flange
steady
andremove
collar
lock
nut
(use
30mm
thin-walled
deep
socket
.)
See
Fig
.
5
.
Fig
.
5
.
Use
holding
tool
when
loosening
output
shaft
collar
nut
.
6
.
Remove
flange
.
If
necessary,
use
a
puller
.
7
.
Use
a
sea¡
puller
to
remove
seal
from
transmission
housing
.
See
Fig
.
6
.
8
.
Coat
new
sea¡
wíth
transmission
fluid
and
drive
into
po-
sition
until
it
is
flush
with
housing
.
See
Fig
.
7
.
TRANSMISSIONSERVICE
Fig
.
6
.
Puller
used
to
remove
transmission
seal
.
Fig
.
7
.
Output
shaftseal
being
installed
using
seal
driver
(BMW
spe-
cial
tool
no
.
232
300)
.
9
.
Reinstall
output
flange
(and
shims,
if
applicable)
to
out-
put
shaft
.
NOTE-
On
Getrag
S5D200G
and
S5D
250G
transmissions
BMW
recommends
heating
theoutputflange
to
about
176°F
(80°C)
to
aid
in
installation
.
This
canbe
done
by
placing
the
flange
in
hot
water
.
10
.
Coat
bearingsurface
ofcollar
nut
withsealer
and
install
nut
.
Tighten
collar
nut
in
two
stages
.
Insta¡¡
new
lock-
plate
.
Bend
tabs
into
flange
grooves
.
NOTE-
BMW
recommends
the
use
of
a
sealer
such
as
Loctite
®
242
when
installing
the
flange
collar
nut
to
prevent
oil
from
leaking
past
the
threads
.
Page 226 of 759
230-
6
MANUAL
TRANSMISSION
Transmission,
removing
and
installing
1
.
Disconnect
negative
(-)
cable
from
battery
.
CAUTION-
Prior
to
disconnecting
the
battery,
read
the
battery
disconnection
cautions
given
at
the
front
of
this
manual
onpage
viii
.
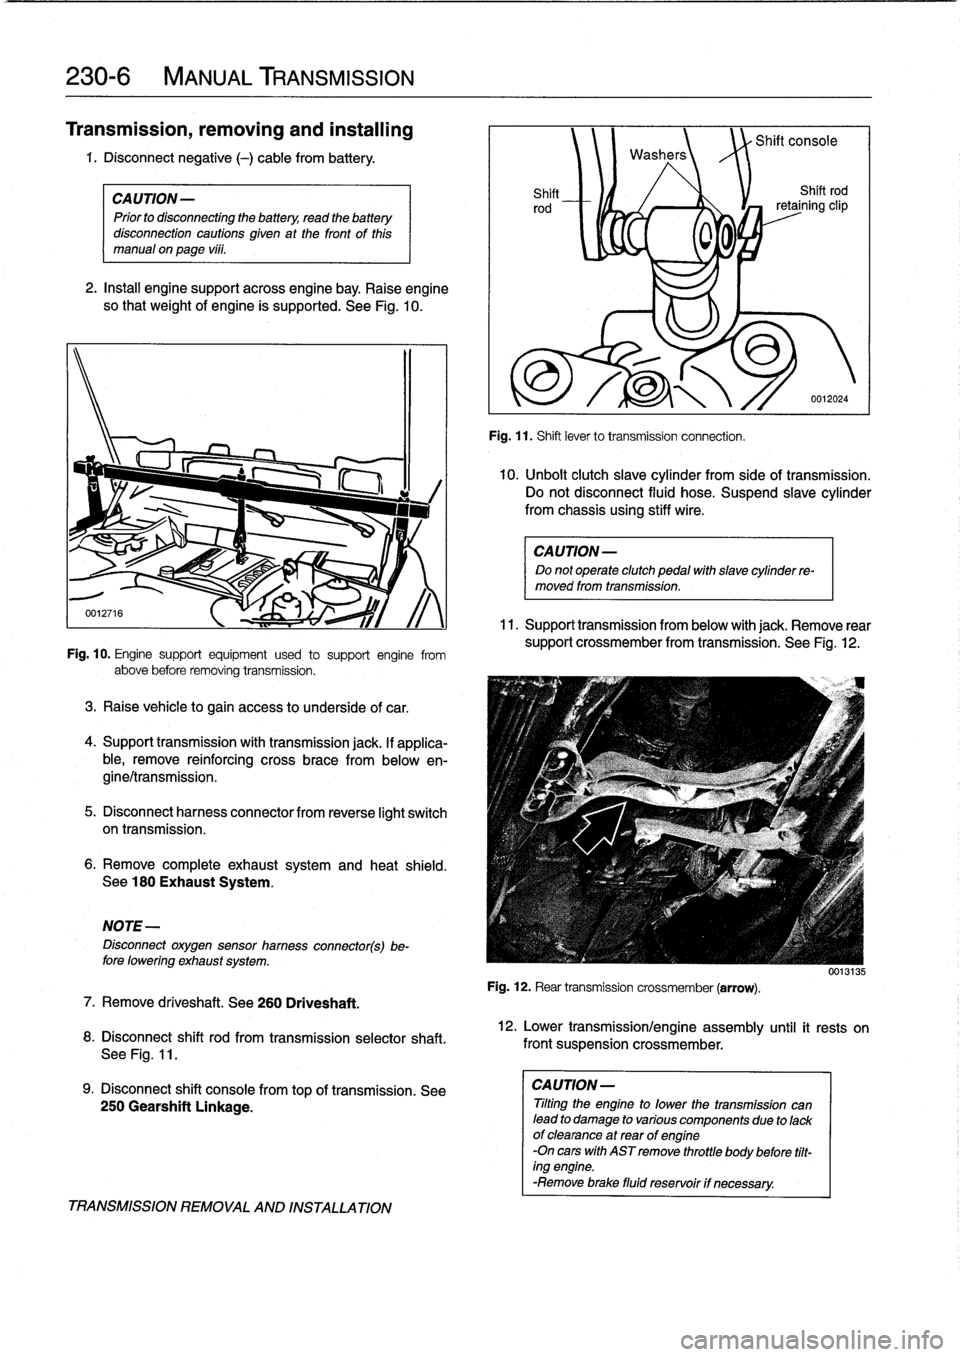
2
.
Insta¡¡
enginesupportacrossengine
bay
.
Raise
engine
so
that
weight
of
engine
ís
supported
.
See
Fig
.
10
.
Fig
.
10
.
Engine
support
equipment
used
to
support
engine
from
above
before
removing
transmission
.
3
.
Raise
vehicle
to
gain
access
to
underside
of
car
.
4
.
Support
transmission
with
transmission
jack
.
lf
applica-
ble,
remove
reinforcing
cross
brace
from
belowen-
gine/transmission
.
5
.
Disconnect
harnesscon
nector
from
reverse
light
switch
on
transmission
.
6
.
Remove
completeexhaustsystem
and
heat
shield
.
See
180
Exhaust
System
.
NOTE-
Disconnect
oxygensensor
hamess
connector(s)be-
fore
lowering
exhaust
system
.
7
.
Remove
driveshaft
.
See260
Driveshaft
.
8
.
Disconnect
shift
rod
from
transmission
selectorshaft
.
See
Fig
.
11
.
9
.
Disconnect
shift
console
fromtop
of
transmission
.
See
250
Gearshift
Linkage
.
TRANSMISSION
REMOVAL
AND
INSTALLATION
Washers
Shift
Shift
rod
rod
retaining
clip
0
0
,
Fig
.
11
.
Shift
lever
to
transmission
connection
.
Shift
console
0012024
10
.
Unbolt
clutch
slave
cylinder
from
sideof
transmission
.
Do
not
disconnect
fluid
hose
.
Suspend
slavecylinder
from
chassis
using
stiff
wire
.
CAUTION-
Do
not
operate
clutch
pedal
with
slave
cylinder
re-
moved
from
transmission
.
11
.
Support
transmission
from
below
with
jack
.
Remove
rear
support
crossmember
from
transmission
.
See
Fig
.
12
.
Fig
.
12
.
Rear
transmission
crossmember
(arrow)
.
12
.
Lower
transmission/engine
assembly
until
it
rests
on
front
suspension
crossmember
.
CAUTION-
Tilting
the
engine
to
lower
thetransmission
can
lead
to
damage
to
various
componente
due
to
lackof
clearance
at
rear
of
engine
-On
cars
with
AST
remove
throttle
body
before
tilt-
ing
engine
.
-Remove
brace
fluid
reservoir
if
necessary
.
0013135
Page 227 of 759
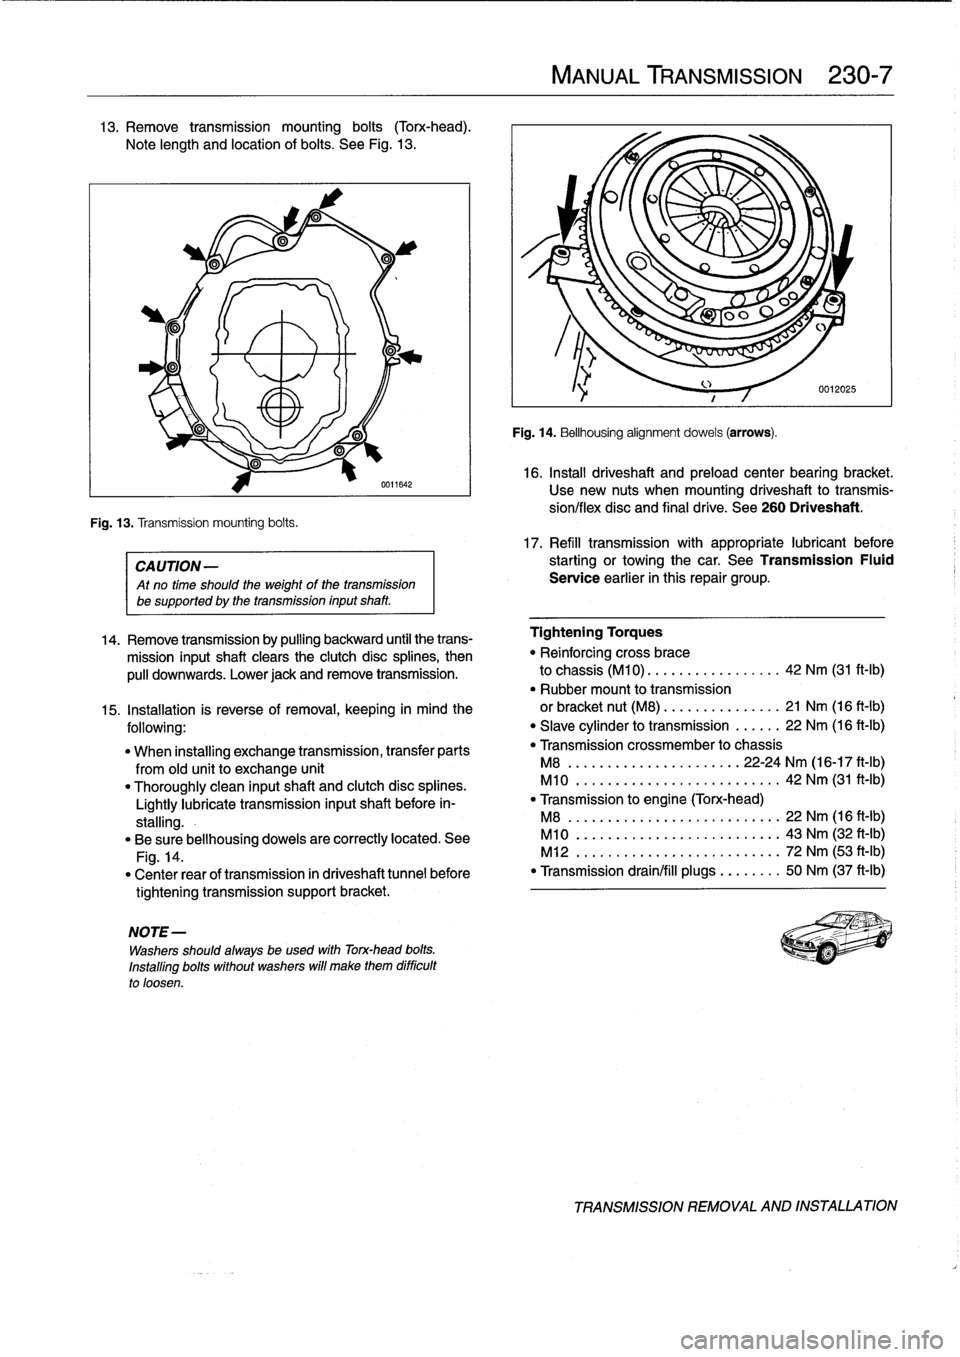
13
.
Remove
transmission
mounting
bolts
(Torx-head)
.
Note
length
and
location
of
bolts
.
See
Fig
.
13
.
Fig
.
13
.
Transmission
mounting
bolts
.
0611642
CA
UTION-
Atno
time
should
the
weight
of
thetransmission
be
supported
by
the
transmission
inputshaft
.
NOTE
-
Washers
should
always
be
used
with
Torx-head
bolts
.
Installing
bolts
without
washers
will
make
them
difficult
to
loosen
.
MANUAL
TRANSMISSION
230-
7
Fig
.
14
.
Bellhousing
alignment
dowels
(arrows)
.
16
.
Install
driveshaft
and
preload
center
bearing
bracket
.
Usenew
nuts
when
mounting
driveshaft
to
transmis-
síon/flex
disc
and
final
drive
.
See
260
Driveshaft
.
17
.
Refill
transmission
with
appropriate
lubricant
before
starting
or
towingthe
car
.
See
Transmission
Fluid
Service
earlier
in
this
repair
group
.
14
.
Remove
transmission
by
pulling
backward
until
the
trans-
Tightening
Torques
mission
inputshaft
clears
the
clutch
disc
splines,
then
"
Reinforcing
cross
brace
pulí
downwards
.
Lower
jack
andremove
transmission
.
to
chassis
(M10)
.
...
.............
42
Nm
(31
ft-Ib)
"
Rubber
mount
to
transmission
15
.
Installation
is
reverse
of
removal,
keeping
in
mind
the
or
bracket
nut
(M8)
.
...
.
...
.......
21
Nm
(16
ft-Ib)
following
:
"
Slave
cylinder
to
transmission
......
22
Nm
(16
ft-Ib)
"
When
installing
exchange
transmission,
transfer
parts
"
Transmission
crossmember
to
chassis
from
old
unit
to
exchange
unit
M8
...............
.
.
...
..
22-24
Nm
(16-17
ft-Ib)
"
Thoroughly
clean
inputshaft
and
clutch
disc
splines
.
M10
..............
.
..
..
.......
42
Nm
(31
ft-Ib)
Lightly
lubrícate
transmission
inputshaft
before
in-
"
Transmission
to
engine
(Torx-head)
stalling
.-
M8
..
..................
..
.
..
..
22
Nm
(16
ft-Ib)
"
Be
sure
bellhousing
dowels
are
correctly
located
.
See
M10
.
.................
...
.
..
..
43
Nm
(32
ft-Ib)
Fig
.
14
.
M12
.
..................
..
.
..
..
72
Nm
(53
ft-Ib)
"
Center
rear
of
transmission
in
driveshaft
tunnel
before
"
Transmission
drain/fill
plugs
.
..
.
..
..
50
Nm
(37
ft-Ib)
tightening
transmission
support
bracket
.
TRANSMISSION
REMOVAL
AND
INSTALLATION
Page 232 of 759
240-
4
AUTOMATIC
TRANSMISSION
TRANSMISSION
REMOVALAND
INSTALLATION
Removal
and
installation
of
thetransmission
is
best
accom-
plished
on
a
lift
using
a
transmission
jack
.
Use
caution
and
safe
workshop
practices
when
working
beneath
car
and
low-
ering
transmission
.
WARNING
-
To
lift
the
vehicle
safely,
see010
Fundamentals
for
the
Do-it-Yourself
Owner
.
CAUTION-
"
Be
sure
the
vehicle
is
properly
supported
.
The
removal
of
the
transmission
may
upset
the
bal-
ance
of
the
vehicle
on
a
lift
.
"
Tilting
the
engine
to
remove
the
transmission
can
lead
to
damage
to
various
components
due
to
lack
of
clearance
.
-On
carswith
AST
remove
throttle
body
.
-Remove
brake
fluid
reservoir
if
necessary
.
Torx-head
bolts
are
used
to
mount
thetransmission
to
the
bellhousing
.
Be
sure
to
have
appropriate
tools
on
hand
before
starting
thejob
.
2
.
Install
engine
support
across
engine
bay
.
Raise
and
safely
support
vehicle
.
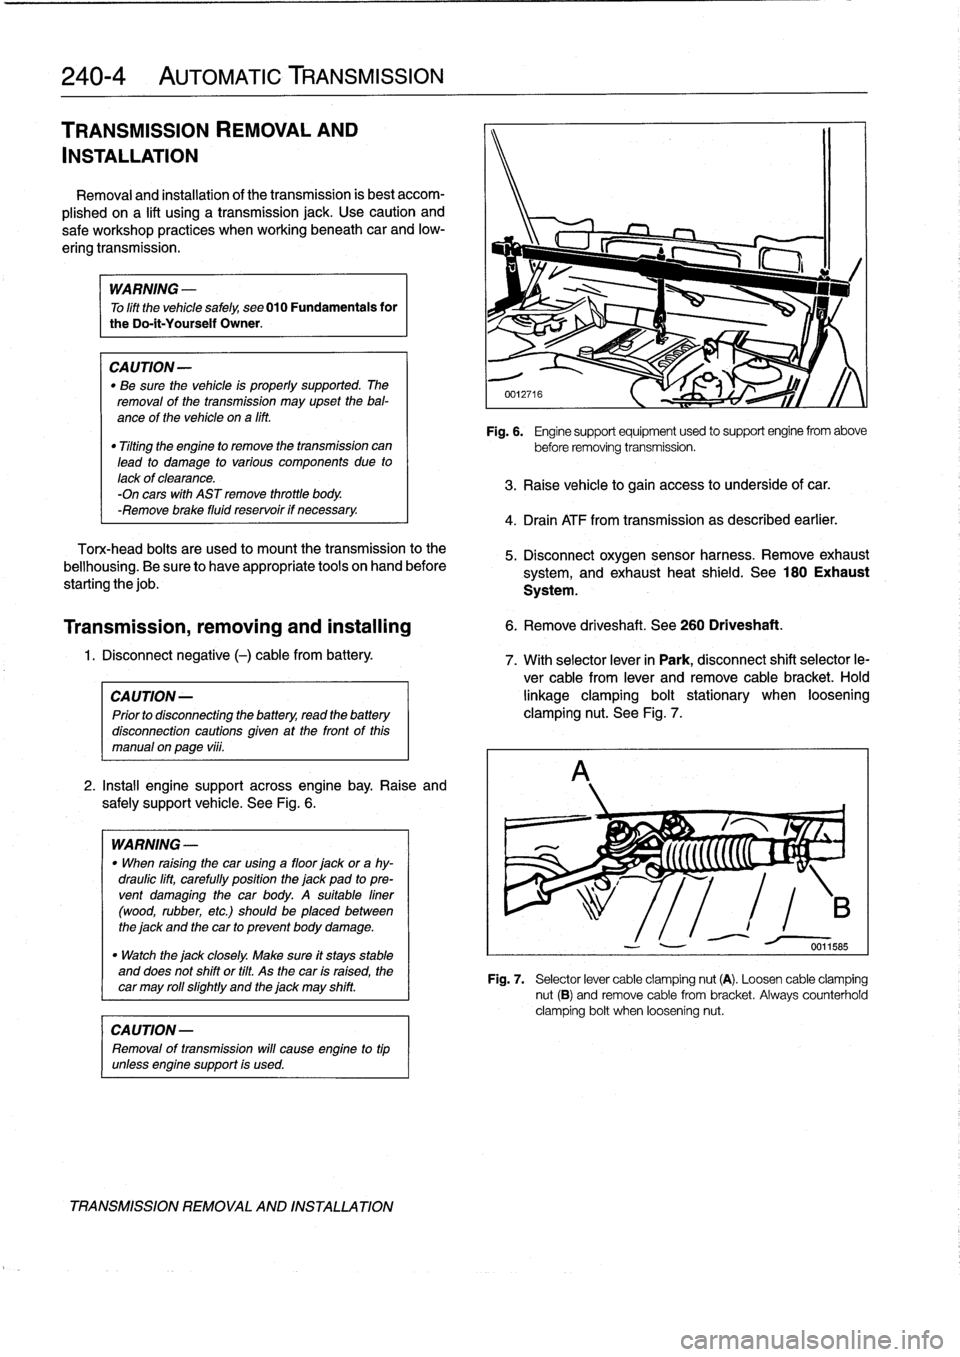
See
Fig
.
6
.
WARNING
-
"
When
raising
thecar
using
a
floor
jack
or
a
hy-
draulic
lift,
carefully
position
the
jack
pad
to
pre-
vent
damaging
the
car
body
.
A
suitable
liner
(wood,
rubber,
etc
.)
should
be
placed
between
the
jack
and
the
car
to
prevent
body
damage
.
"
Watch
the
jack
closely
.
Make
sure
it
stays
stable
and
does
not
shift
or
tilt
.
As
the
car
is
raised,
the
car
may
roll
slightty
and
the
jack
may
shift
.
CAUTION-
Removal
of
transmission
will
cause
engine
to
tip
unlessengine
support
is
used
.
TRANSMISSION
REMOVAL
AND
INSTALLATION
Fig
.
6
.
Engine
support
equipment
used
to
support
engine
from
above
before
removing
transmission
.
3
.
Raise
vehicle
to
gain
access
to
underside
of
car
.
4
.
Drain
ATF
from
transmission
as
described
earlier
.
5
.
Disconnect
oxygen
sensor
harness
.
Remove
exhaust
system,
and
exhaust
heat
shield
.
See
180
Exhaust
System
.
Transmission,
removing
and
installing
6
.
Remove
driveshaft
.
See
260
Driveshaft
.
1
.
Disconnect
negative
(-)
cable
from
battery
.
7
.
With
selector
lever
in
Park,
disconnect
shift
selector
le-
ver
cable
from
lever
and
remove
cable
bracket
.
Hold
CA
UTION-
linkage
clamping
bolt
stationary
when
loosening
Prior
to
disconnectiog
the
battery,
read
the
battery
clamping
nut
.
See
Fig
.
7
.
disconnection
cautions
given
at
the
front
of
this
manual
on
page
vi¡¡
.
Fig
.
7
.
Selector
lever
cable
clamping
nut
(A)
.
Loosen
cable
clamping
nut
(B)
and
remove
cable
from
bracket
.
Always
counterholdclamping
bolt
when
loosening
nut
.