relay BMW M3 1995 E36 Repair Manual
[x] Cancel search | Manufacturer: BMW, Model Year: 1995, Model line: M3, Model: BMW M3 1995 E36Pages: 759
Page 402 of 759
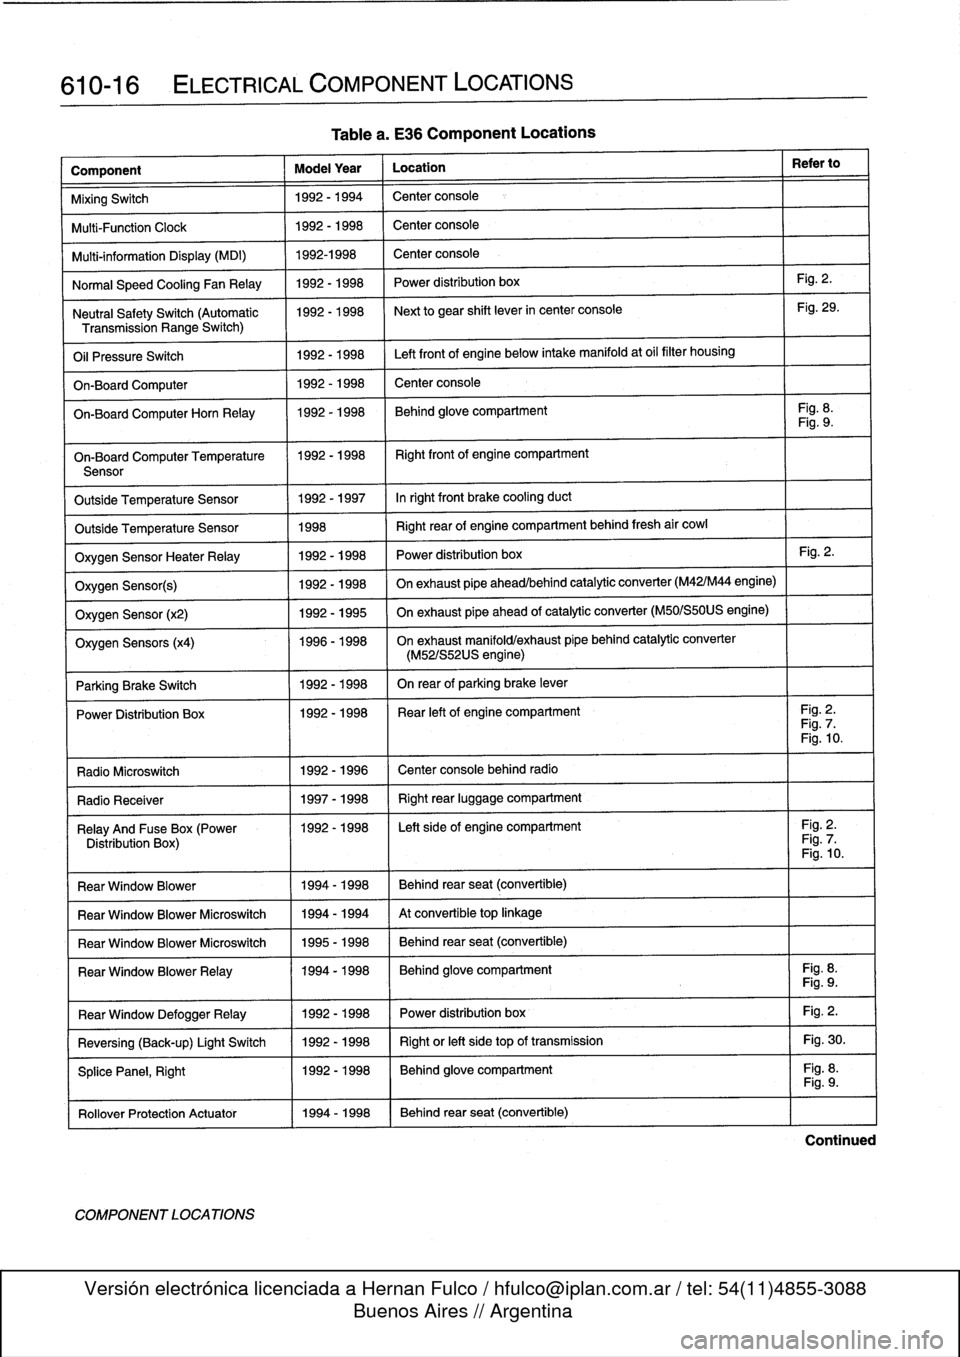
610-16
ELECTRICAL
COMPONENT
LOCATIONS
Component
Model
Year
Location
Refer
to
MixingSwitch
1992-1994
Center
console
Multi-Function
Clock
1992-1998
Center
console
Multi-information
Display
(MDI)
1992-1998
Center
console
Normal
Speed
Cooling
Fan
Relay
1992-1998
Power
distribution
box
Fig
.
2
.
Neutral
SafetySwitch
(Automatic
1992-1998
Next
to
gear
shift
lever
in
center
console
Fig
.
29
.
Transmission
Range
Switch)
Oil
Pressure
Switch
1992-1998
Left
front
of
engine
below
intake
manifold
at
oil
filter
housing
On-Board
Computer
1992-1998
Center
console
On-BoardComputerHorn
Relay
1992-1998
Behind
glove
compartment
Fig
.
8
.
Fig
.
9
.
On-Board
Computer
Temperature
11992-1998
I
Right
front
of
engine
compartment
Sensor
Outside
Temperature
Sensor
1992-1997
Inright
front
brake
cooling
duct
Outside
Temperature
Sensor
1998
Right
rear
of
engine
compartment
behind
fresh
air
cowl
Oxygen
Sensor
HeaterRelay
1992-1998
Power
distribution
box
Fig
.
2
.
Oxygen
Sensor(s)
1992-1998
On
exhaust
pipe
ahead/behind
catalytic
converter
(M42/M44
engine)
Oxygen
Sensor
(x2)
1992-1995
On
exhaust
pipe
ahead
of
catalytic
converter
(M50/S50US
engine)
Oxygen
Sensors
(x4)
1996-1998
On
exhaust
manifold/exhaust
pípe
behind
catalytic
converter
(M52/S52US
engine)
Parking
Brake
Switch
1
1992-1998
I
On
rear
of
parking
brake
lever
Power
Distribution
Box
11992-1998
I
Rear
left
of
engine
compartment
I
Fig
.
2
.
Fig
.
7
.
Fig
.
10
.
Radio
Microswitch
1992
-
1996
Center
console
behind
radio
Radio
Receíver
1
1997-1998
1
Right
rear
luggage
compartment
Relay
And
Fuse
Box
(Power
1992-1998
I
Left
side
of
engine
compartment
I
Fig
.
2
.
Distribution
Box)
Fig
.
7
.
Fig
.
10
.
Rear
Window
Blower
1994-1998
Behind
rear
seat
(convertible)
Rear
Window
Blower
Microswitch
1994-1994
At
convertible
top
linkage
Rear
Window
Blower
Microswitch
1995-1998
Behind
rear
seat
(convertible)
Rear
Window
BlowerRelay
11994-1998
Behind
glove
compartment
Fig
.
8
.
Fig
.
9
.
Fig
.
2
.
Fig
.
30
.
Fig
.
8
.
Rear
Window
DefoggerRelay
Reversing
(Back-up)
Light
Switch
SplicePanel,
Right
Rollover
Protection
Actuator
11994-1998
COMPONENT
LOCATIONS
Table
a
.
E36
Component
Locations
1992-1998
1992-1998
1992-1998
Power
distribution
box
Right
or
left
side
top
of
transmission
Behind
glove
compartment
Behind
rear
seat
(convertible)
Fig
.
9
.
Continued
Page 403 of 759
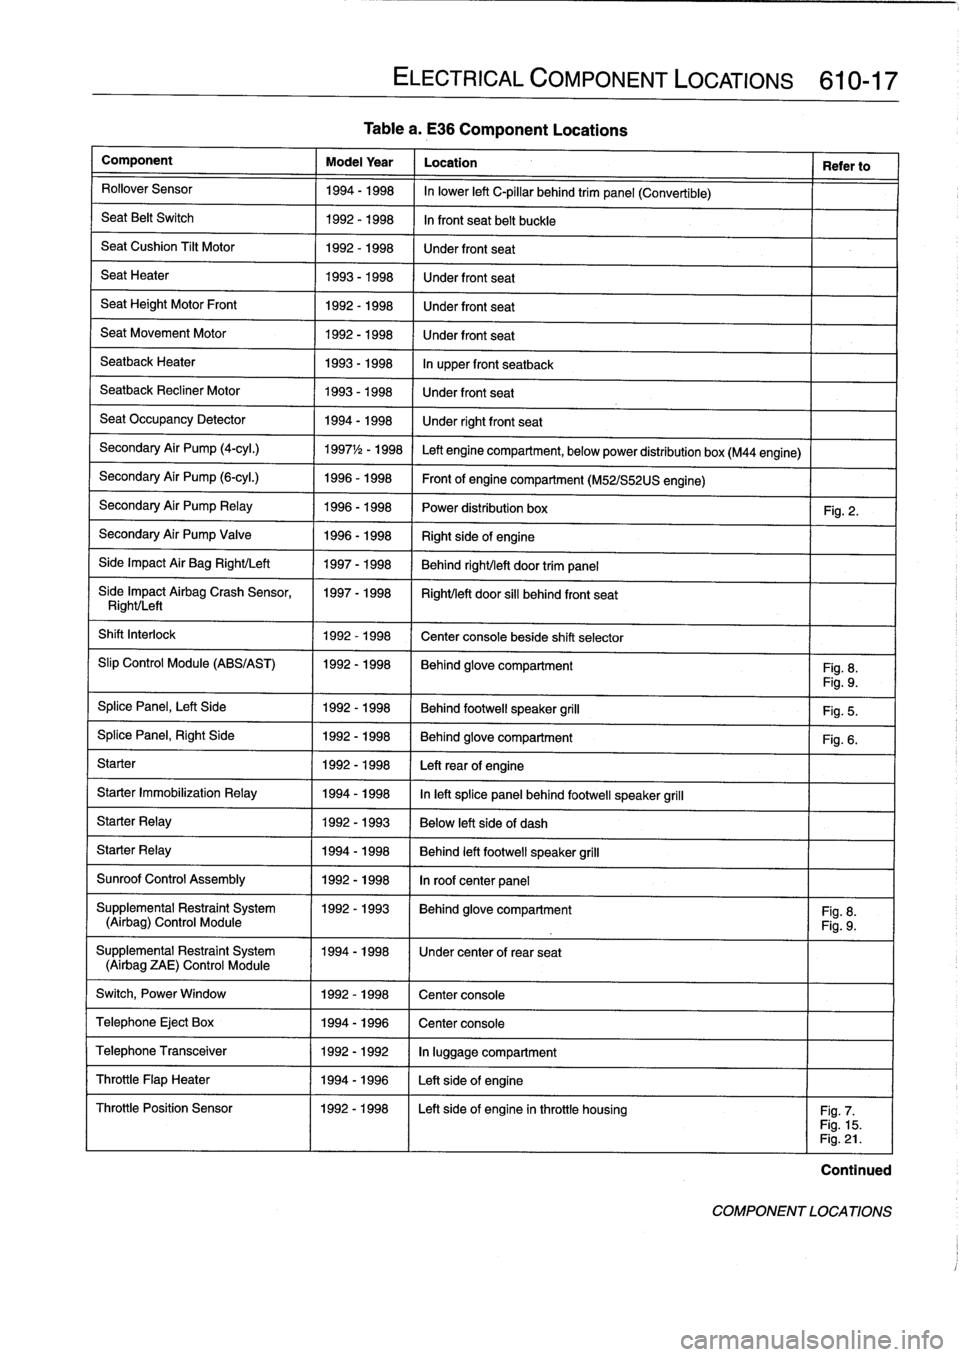
Tablea
.
E36
Component
Locations
Component
Model
Year
Location
Refer
to
Rollover
Sensor
1994-1998
In
lower
left
C-pillar
behind
trim
panel
(Convertible)
Seat
Belt
Switch
1992-1998
In
front
seat
belt
buckle
SeatCushion
Tilt
Motor
1992-1998
Under
front
seat
Seat
Heater
1993-1998
Under
front
seat
Seat
Height
Motor
Front
1992-1998
Under
front
seat
Seat
Movement
Motor
1992-1998
Under
front
seat
Seatback
Heater
1993-1998
In
upper
front
seatback
Seatback
Recliner
Motor
1993-1998
Under
front
seat
Seat
Occupancy
Detector
1994-1998
Under
rightfront
seat
Secondary
Air
Pump
(4-cyl
.)
1997
1
/2
-
1998
Left
engine
compartment,
belowpower
distribution
box
(M44
engine)
Secondary
Air
Pump
(6-cyl
.)
1996-1998
Front
of
engine
compartment
(M52/S52US
engine)
Secondary
Air
Pump
Relay
1996-1998
Power
distribution
box
Fig
.
2
.
Secondary
Air
Pump
Valve
1996-1998
Right
sideof
engine
Side
Impact
Air
Bag
Right/Left
1997-1998
Behind
right/left
door
trim
panel
Síde
Impact
Airbag
Crash
Sensor,
1997-1998
Right/left
door
si¡¡
behind
front
seat
Right/Left
Shift
Interlock
1992-1998
Center
console
beside
shift
selector
Slip
Control
Module
(ABS/AST)
1992-1998
Behind
glove
compartment
Fig
.
8
.
Fig
.
9
.
Splice
Panel,
Left
Side
1992-1998
Behind
footwell
speaker
grill
Fig
.
5
.
SplicePanel,
Right
Side
1992-1998
Behind
glove
compartment
Fig
.
6
.
Starter
1992-1998
Leftrear
of
engine
Starter
Immobilization
Relay
1994-1998
In
left
splice
panelbehind
footwell
speaker
grill
Starter
Relay
1992-1993
Below
left
side
of
dash
Starter
Relay
1994-1998
Behind
left
footwell
speaker
grill
Sunroof
Control
Assembly
1992-1998
In
roof
center
panel
Supplemental
Restraint
System
11992-1993
I
Behind
glove
compartment
I
Fig
.
8
.
(Airbag)
Control
Module
Fig
.
9
.
Supplemental
Restraint
System
1994-1998
1
Under
center
of
rear
seat
(Airbag
ZAE)
Control
Module
Switch,
Power
Window
1
1992-1998
1
Center
console
Telephone
Eject
Box
1
1994-1996
1
Center
console
ELECTRICAL
COMPONENT
LOCATIONS
610-17
Telephone
Transceiver
1992-1992
In
luggage
compartment
Throttle
Flap
Heater
1994-1996
Left
sideof
engine
Throttle
Position
Sensor
1992-1998
I
Left
sideof
engine
inthrottle
housing
I
Fig
.
7
.
Fig
.
15
.
Fig
.
21
.
Continued
COMPONENT
LOCATIONS
Page 404 of 759
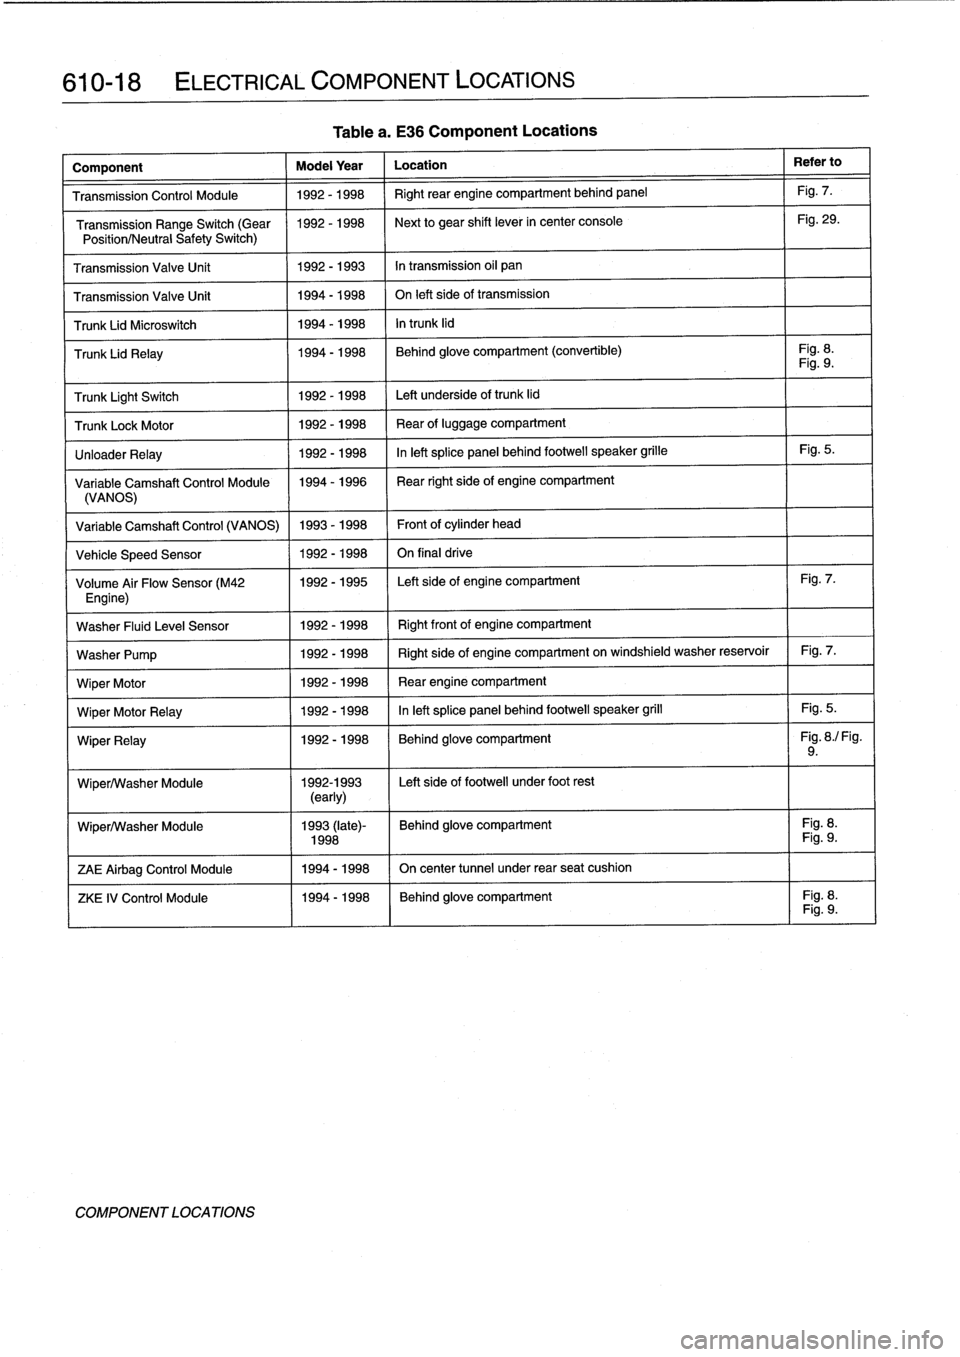
610-18
ELECTRICAL
COMPONENT
LOCATIONS
Tablea
.
E36
Component
Locations
Component
Model
Year
Location
Refer
to
Transmission
Control
Module
1992-1998
Right
rear
engine
compartment
behíndpanel
Fig
.
7
.
Transmission
Range
Switch
(Gear
1992-1998
Next
to
gear
shift
lever
in
center
console
Fig
.
29
.
Position/Neutra
l
Safety
Switch)
Transmission
Valve
Unít
1992-1993
In
transmission
oil
pan
Transmission
Valve
Unit
1994-1998
On
left
side
of
transmission
Trunk
Lid
Microswitch
1994-1998
In
trunk
lid
Trunk
Lid
Relay
1994-1998
Behind
glove
compartment
(convertible)
Fig
.
8
.
Fig
.
9
.
Trunk
Light
Switch
1992-1998
Left
underside
of
trunk
lid
TrunkLockMotor
1992-1998
Rear
of
luggage
compartment
UnloaderRelay
1992-1998
Inleft
splice
panel
behind
footwell
speaker
grille
Fig
.
5
.
Variable
Camshaft
Control
Module
1994-1996
I
Rear
right
side
of
engine
compartment
(VANOS)
Variable
Camshaft
Control
(VANOS)
1993-1998
Front
ofcylinder
head
Veh¡cle
Speed
Sensor
1992-1998
On
final
drive
Volume
Air
Flow
Sensor
(M42
1992-1995
Left
side
of
engine
compartment
Fig
.
7
.
Engine)
Washer
Fluid
Leve¡
Sensor
1992-1998
Right
frontof
engine
compartment
Washer
Pump
1992-1998
Right
side
of
engine
compartment
on
windshield
washer
reservoir
Fig
.
7
.
Wiper
Motor
1992-1998
Rear
engine
compartment
Wiper
Motor
Relay
1992-1998
Inleft
splice
panel
behind
footwell
speaker
grill
Fig
.
5
.
Wiper
Relay
1992-1998
(
Behind
glove
compartment
I
Fig
.
8
./
Fig
.
9
.
Wiper/Washer
Module
1992-1993
Left
side
of
footwell
under
foot
rest
(early)
Wiper/Washer
Module
1993
(late)-
Behind
glove
compartment
Fig
.
8
.
1998
1
Fig
.
9
.
ZAE
Airbag
Control
Module
1
1994-1998
1
On
center
tunnel
under
rear
seat
cushion
ZKE
IV
Control
Module
1994-1998
I
Behind
glove
compartment
Fig
.
8
.I
Fig
.
9
.
COMPONENT
LOCATIONS
Page 405 of 759
FUSE
POSITION
TABLES
Table
b
through
Table
g
list
fuse
positions
in
the
power
dis-
tribution
box
and,
where
applicable,
in
the
auxiliary
relay
pan-
el,
the
left
side
splice
panel
and
the
luggage
compartment
.
Refer
to
the
beginning
ofthis
repair
group
for
locations
of
these
panels
.
ELECTRICAL
COMPONENT
LOCATIONS
610-19
FUSE
POSITION
TABLES
Page 413 of 759
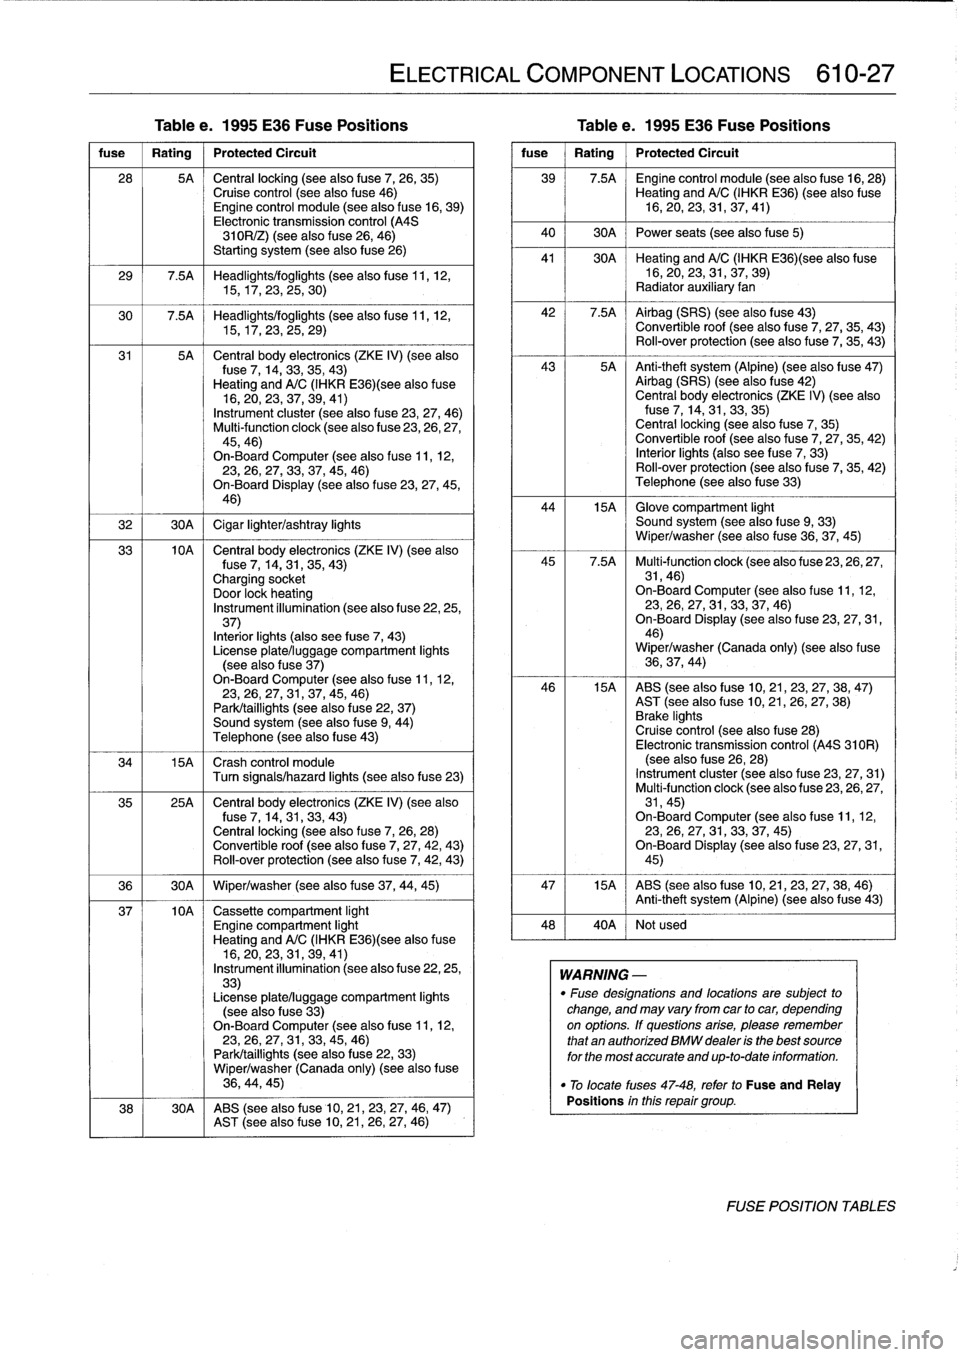
Tablee
.
1995
E36
Fuse
Positions
Table
e
.
1995
E36
Fuse
Positions
fuse
I
Rating
1
Protected
Circuit
28
5A
Central
locking
(see
alsofuse
7,
26,
35)Cruise
control
(see
also
fuse
46)Engine
control
module
(see
also
f
use
16,
39)
Electronic
transmission
control
(A4S
310R/Z)
(see
also
f
use
26,
46)
Starting
system
(seealsofuse
26)
29
7.5A
Headlights/foglights
(seealsofuse
11,
12,
15,17,23,
25,30)
30
7
.5A
Headlights/foglights
(seealsofuse
11,
12,
15,17,23,
25,29)
31
5A
Central
body
electronics
(ZKE
IV)
(see
also
fuse
7,
14,33,35,43)
Heating
and
A/C
(IHKR
E36)(see
also
fuse
16,20,23,
37,
39,
41)
Instrument
cluster
(see
also
fuse
23,27,
46)
Multi-function
clock
(see
also
fuse
23,26,27,
45,46)
On-Board
Computer
(seealso
f
use
11,
12,23,26,27,
33,
37,45,
46)
On-Board
Display
(seealso
f
use
23,27,45,
46)
32
1
30A
1
Cigar
lighter/ashtray
lights
33
10A
Central
body
electronics
(ZKE
IV)
(see
also
fuse
7,
14,31,35,
43)
Charging
socket
Door
lock
heating
Instrument
illumination
(see
also
fuse
22,25,
37)
Interiorlights
(also
see
fuse
7,
43)
License
plate/luggage
compartment
lights
(see
alsofuse
37)
On-Board
Computer
(seealsofuse
11,
12,23,26,27,
31,
37,45,
46)
Park/taillights
(see
also
f
use
22,
37)
Sound
system
(see
also
fuse
9,
44)
Telephone
(see
alsofuse
43)
34
15A
Crash
control
module
Turn
signals/hazard
lights
(see
also
fuse
23)
35
25A
Central
body
electronics
(ZKE
IV)
(see
also
f
use
7,
14,31,
33,43)
Central
locking
(seealso
f
use
7,
26,
28)
Convertible
roof
(see
alsofuse
7,
27,42,
43)
Rol¡-over
protection
(see
alsofuse
7,
42,
43)
36
1
30A
1
Wiper/washer
(see
alsofuse
37,
44,
45)
37
10A
Cassette
compartment
light
Engine
compartment
light
Heating
and
A/C
(IHKR
E36)(see
alsofuse
16,20,23,
31,
39,
41)
Instrument
illumination
(seealsofuse
22,25,
33)
License
plate/luggage
compartment
lights
(see
also
fuse
33)
On-Board
Computer
(see
alsofuse
11,
12,23,26,
27,
31,33,45,
46)
Park/taillights
(see
alsofuse
22,
33)
Wiper/washer
(Canada
only)
(see
also
f
use
36,
44,45)
38
30A
ABS
(see
also
fuse
10,21,23,
27,
46,
47)
AST
(see
alsofuse
10,
21,
26,27,
46)
ELECTRICAL
COMPONENT
LOCATIONS
610-27
fuse
Rating
Protected
Circuit
39
7.5A
~
Engine
control
module
(see
alsofuse
16,28)
Heating
and
A/C(IHKR
E36)(see
also
fuse
16,20,23,
31,
37,
41)
40
1
30A
1
Power
seats
(see
alsofuse5)
41
30A
~
Heating
and
A/C(IHKRE36)(see
also
fuse
16,20,
23,31,
37,
39)
Radiator
auxiliary
fan
42
7
.5A
~
Airbag
(SRS)
(see
also
fuse
43)
Convertible
roof
(see
alsofuse
7,
27,
35,
43)
Rol¡-over
protection
(see
also
fuse
7,
35,
43)
43
5A
Anti-theft
system
(Alpine)
(seealsofuse
47)
Airbag
(SRS)
(see
also
fuse
42)
Central
body
electronics
(ZKE
IV)
(seealsofuse
7,
14,31,33,35)
Central
locking
(seealsofuse
7,
35)
Convertible
roof
(see
alsofuse
7,
27,
35,
42)
Interior
lights
(also
see
fuse
7,
33)
Roll-over
protection
(see
alsofuse
7,
35,42)
Telephone
(seealsofuse
33)
44
15A
~
Glove
compartment
light
Sound
system
(see
also
f
use
9,
33)
Wiper/washer
(see
alsofuse
36,37,
45)
45
7
.5A
Multi-function
clock
(see
also
fuse
23,
26,27,
31,46)
On-Board
Computer
(see
also
f
use
11,12,23,26,
27,31,
33,37,
46)
On-Board
Display
(seealso
fuse
23,27,31,
46)
Wiper/washer
(Canada
only)
(seealsofuse
36,37,
44)
46
15A
ABS
(seealsofuse
10,21,23,27,
38,47)
AST
(seealso
fuse
10,
21,
26,
27,
38)
Brake
lights
Cruise
control
(see
also
fuse
28)
Electronic
transmission
control
(A4S
310R)
(seealsofuse
26,
28)
Instrument
cluster
(see
also
fuse
23,
27,
31)
Multi-function
clock
(see
also
fuse
23,
26,27,
31,45)
On-BoardComputer
(seealsofuse
11,
12,
23,26,
27,31,
33,37,
45)
On-Board
Display
(see
also
fuse
23,27,31,
45)
47
15A
ABS
(see
also
fuse
10,21,23,27,38,
46)
Anti-theft
system
(Alpine)
(see
alsofuse
43)
48
40A
Notused
WARNING
-
"
Fuse
designations
and
locations
are
subject
to
change,
and
may
varyfrom
car
tocar,
depending
on
options
.
lf
questions
arise,
please
remember
that
an
authorized
BMW
dealer
is
the
best
source
for
the
most
accurate
and
up-to-date
information
.
"
To
locate
fuses
47-48,
refer
to
Fuse
and
Relay
Positions
inthis
repair
group
.
FOSE
POSITION
TABLES
Page 419 of 759
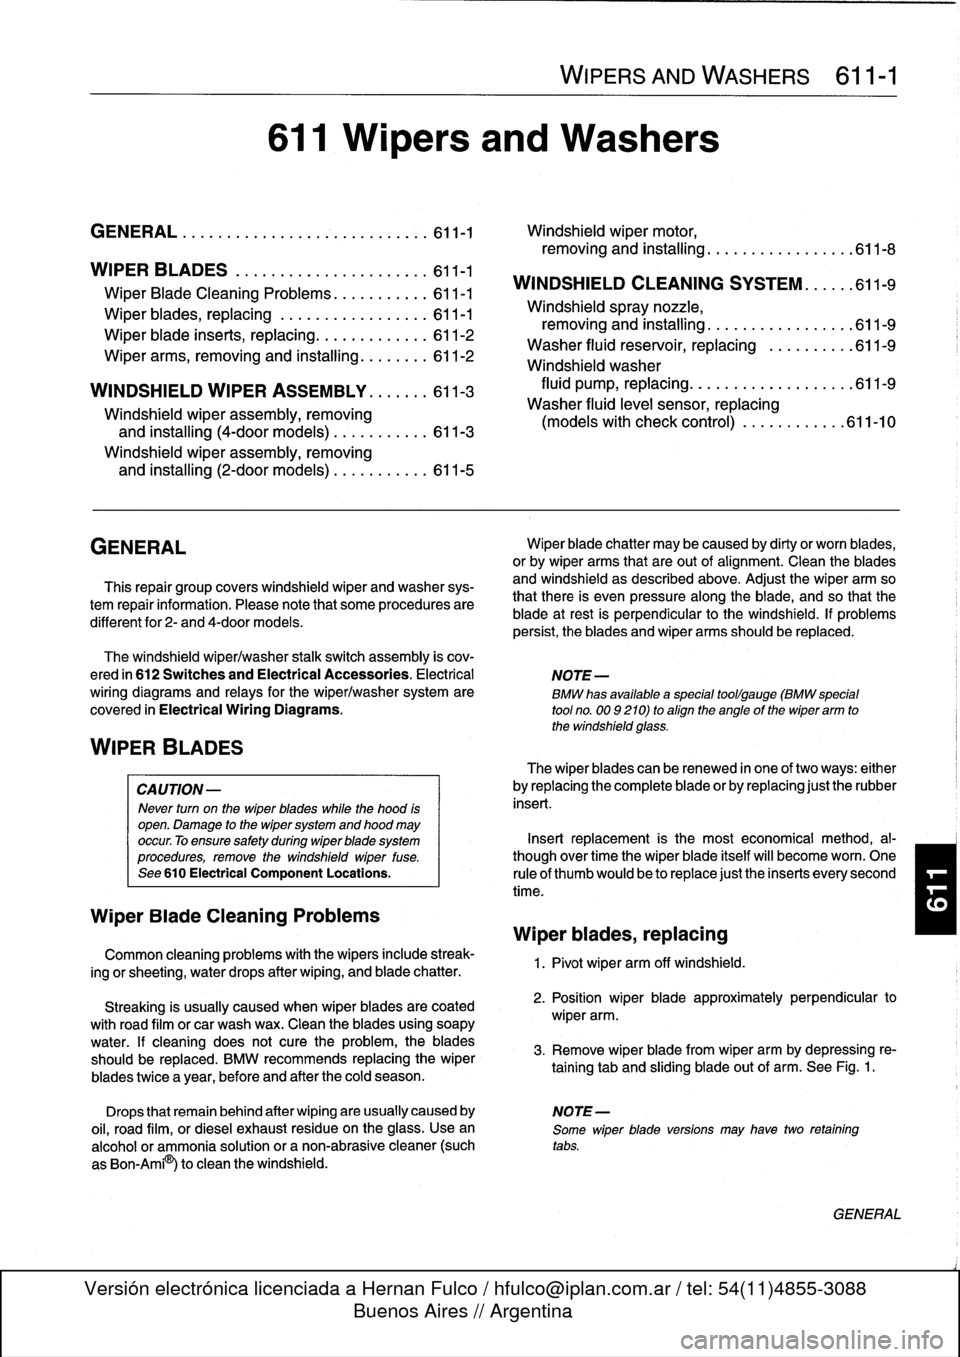
611
Wipers
and
Washers
GENERAL
..
.
.
.
.
.
.
.
.
.
.
.
.
.
.....
.
......
.
611-1
Windshield
wiper
motor,
removing
and
installing
.
...............
.611-8
WIPER
BLADES
.
.
.
.....
.
.
.
.
.
.
...
....
.611-1
Wiper
Blade
Cleaning
Problems
.
.
.
.
.
.
.....
611-1
Wiper
blades,replacing
...
.
.
.
.
.
.
.
.
.
.....
611-1
Wiper
blade
inserts,
replacing
.
.
.
.
.
.
.
.
.....
611-2
Wiper
arms,
removing
and
installing
.
.
.
.....
611-2
WINDSHIELD
WIPER
ASSEMBLY
.
.
.....
611-3
Windshield
wiper
assembly,
removing
and
installing
(4-door
models)
.
.
.
.
.
.
.....
611-3
Windshield
wiper
assembly,
removing
and
installing
(2-door
models)
.
.
.
.
.
.
.....
611-5
GENERAL
This
repair
group
covers
windshield
wiper
and
washer
sys-
tem
repair
information
.
Please
note
that
some
procedures
are
different
for
2-
and
4-door
models
.
The
windshield
wiper/washer
stalk
switch
assembly
is
cov-
ered
in
612
Switches
and
Electrical
Accessories
.
Electrical
NOTE-
wiring
diagrams
and
relays
for
the
wiper/washer
system
are
BMwhas
available
a
special
toollgauge
(BMWspecial
covered
in
Electrical
Wiring
Diagrams
.
tool
no
.
00
9210)
to
align
the
angle
of
the
wiper
arm
to
the
windshield
glass
.
WIPERBLADES
CA
UTION-
Never
turn
on
the
wiper
blades
while
the
hood
is
open
.
Damage
to
the
wiper
system
and
hood
may
occur
.
Toensure
safetyduring
wiper
biade
system
procedures,
remove
the
windshieldwiper
fuse
.
See
610
Electrical
Component
Locations
.
Wiper
Blade
Cleaning
Problems
Common
cleaning
problems
with
thewipers
includestreak-
ing
or
sheeting,
waterdrops
after
wiping,
and
blade
chatter
.
Streaking
is
usually
caused
when
wiper
blades
are
coated
with
road
film
or
car
wash
wax
.
Clean
the
blades
using
soapy
water
.
If
cleaning
does
not
cure
the
problem,
the
blades
should
be
replaced
.
BMW
recommends
replacing
the
wiper
blades
twice
a
year,
before
and
after
the
cold
season
.
WIPERS
AND
WASHERS
611-1
WINDSHIELD
CLEANING
SYSTEM
......
611-9
Windshield
spray
nozzle,
removing
and
installing
.......
.
........
.611-9
Washer
fluid
reservoir,
replacing
.........
.611-9
Windshield
washer
fluid
pump,
replacing
..
.
......
.
........
.611-9
Washer
fluid
level
sensor,
replacing
(models
with
check
control)
.
.
.
.
........
611-10
Wiper
blade
chatter
may
be
caused
by
dirty
or
worn
blades,
or
by
wiper
arms
that
areout
of
alignment
.
Clean
the
blades
and
windshield
as
described
above
.
Adjust
the
wiper
arm
so
that
there
is
even
pressure
along
the
blade,
and
so
that
the
blade
at
rest
is
perpendicular
to
the
windshield
.
If
problems
persist,
theblades
and
wiper
arms
should
be
replaced
.
The
wiper
blades
can
be
renewed
in
one
of
two
ways
:
either
by
replacing
the
complete
blade
or
by
replacing
just
therubber
insert
.
Insert
replacement
is
the
mosteconomicalmethod,
al-
though
overtime
the
wiperblade
itselfwill
become
worn
.
One
ruleof
thumb
wouldbe
to
replace
just
the
inserts
every
second
time
.
Wiper
blades,
replacing
1
.
Pivot
wiper
arm
off
windshield
.
2
.
Position
wiperblade
approximately
perpendicular
to
wiper
arm
.
3
.
Remove
wiperblade
from
wiper
arm
by
depressing
re-
taining
tab
and
sliding
blade
out
of
arm
.
See
Fig
.
1
.
Drops
that
remain
behind
after
wiping
are
usually
caused
by
NOTE-
oil,
road
film,
or
diesel
exhaust
residue
onthe
glass
.
Use
an
Some
wiperblade
versions
may
havetwo
retaining
alcohol
or
ammonia
solution
or
a
non-abrasive
cleaner
(such
tabs
.
a
s
Bon-Ami
to
clean
the
windshield
.
GENERAL
Page 429 of 759
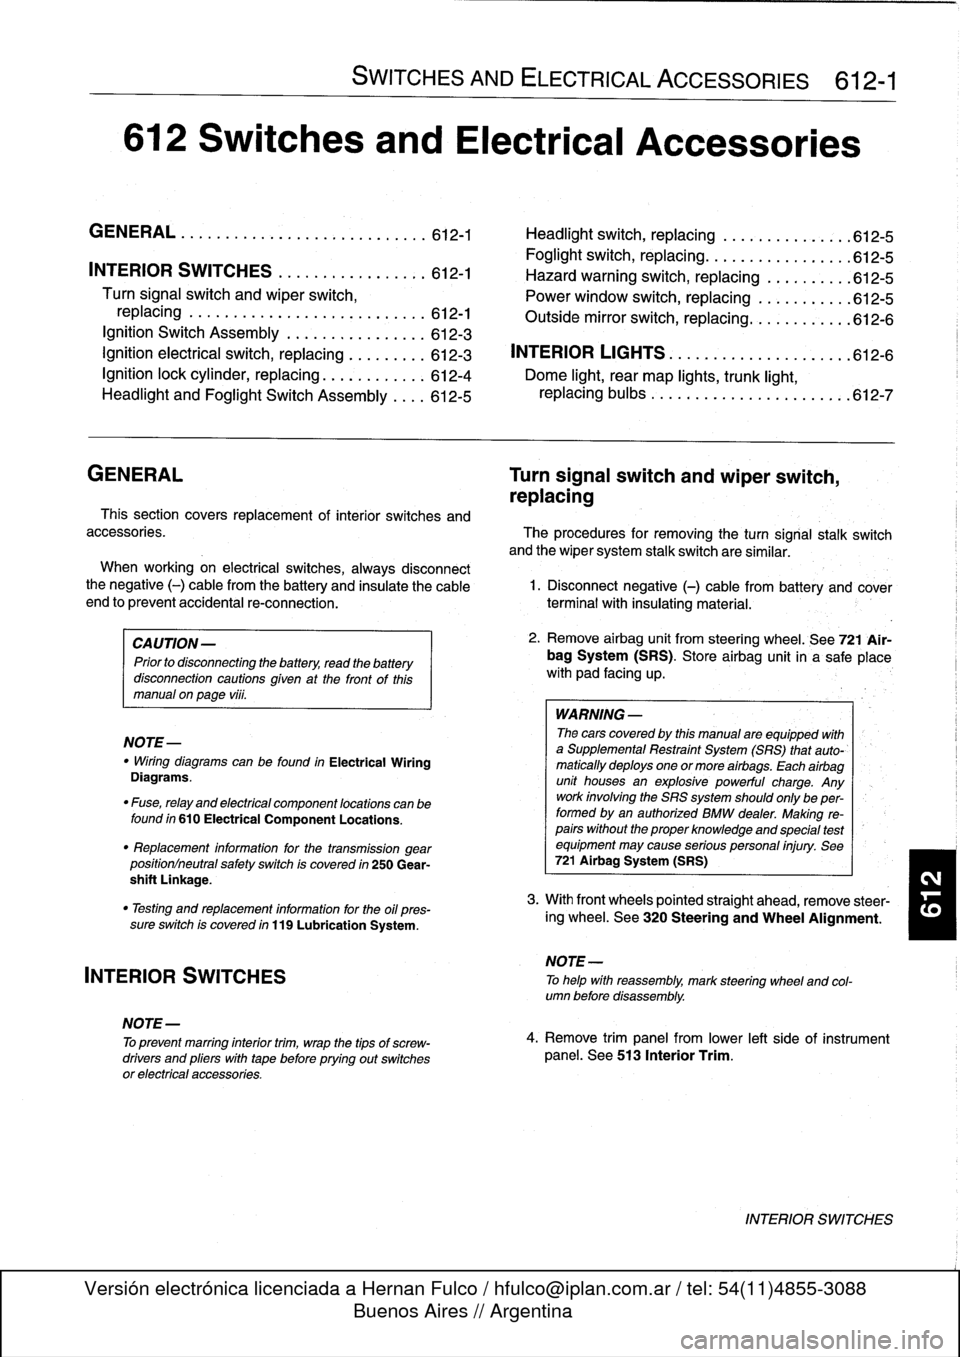
612
Switches
and
Electrical
Accessories
GENERAL
.
.
.
.
.
.
.
.
.
...
.
.
.
.
.
...
.
......
.612-1
Headlight
switch,
replacing
..
.
...
.
.
.
.
.
.
.
.
.
612-5
Foglight
switch,
replacing
....
.
.
.
.
.
.
.
.
.
.
.
.
.
612-5
INTERIOR
SWITCHES
.
.
...
.
.
.
.
.
.
.
.....
612-1
Hazard
warning
switch,
replacing
.
.
.
.
.
.
.
.
.
.612-5
Turn
signal
switch
and
wiper
switch,
Powerwindow
switch,
replacing
.
.
.
...
.
.
.
.
.
612-5
replacing
.
.
.
.
.
.
.
...
.
.
.
.....
.
....
.
.
.
.
612-1
Outside
mirrorswitch,
replacing
.
.
.
.
.....
.
.
.612-6
Ignition
Switch
Assembly
.
.
.
.
.
.
.
.
....
.
...
612-3
Ignition
electrical
switch,
replacing
.
...
.
....
612-3
INTERIOR
LIGHTS
.
.
................
.
..
612-6
Ignition
lock
cylinder,
replacing
.
.
.
.
.....
.
..
612-4
Dome
light,
rear
map
lights,
trunk
light,
Headlight
and
Foglight
Switch
Assembly
.
.
.
.
612-5
replacing
bulbs
.
......
.
.
.
.
.
.
.
.
.
.....
.
.612-7
GENERAL
Turn
signal
switch
and
wiper
switch,
replacing
Thissection
covers
replacement
of
interior
switches
and
accessories
.
The
procedures
for
removing
the
turn
signal
stalk
switch
and
the
wiper
system
stalk
switchare
similar
.
When
working
on
electrical
switches,
always
disconnect
the
negative
(-)
cable
from
the
battery
and
insulate
the
cable
end
to
prevent
accidental
re-connection
.
CAUTION-
Prior
to
disconnectiog
the
battery,
read
the
battery
disconnection
cautions
given
at
the
front
of
this
manual
on
page
viii
.
WARNING
-
The
cars
covered
by
this
manual
are
equipped
with
a
Supplemental
Restraint
System
(SRS)
that
auto-'
matically
deploys
one
or
more
airbags
.
Each
airbag
unit
houses
an
explosive
powerful
charge
.
Any
work
involving
the
SRS
system
should
only
be
per-
formed
byan
authorized
BMW
dealer
.
Making
re-
pairs
without
the
proper
knowledge
and
special
test
equipment
may
cause
serious
personal
injury
.
See
721
Airbag
System
(SRS)
3
.
With
front
wheels
pointed
straight
ahead,
remove
steer-
"
Testing
and
replacement
information
for
the
oil
ores-
¡ng
wheel
.
See
320
Steering
and
Wheel
Alignment
.
sure
switch
is
covered
in
119
Lubrication
System
.
NOTE-
"
Wirfng
diagramscan
be
found
in
Electrical
Wiring
Diagrams
.
"
Fuse,
relay
and
electrical
component
locations
can
be
found
in
610
Electrical
Component
Locations
.
"
Replacement
information
for
thetransmission
gear
position/neutral
safety
switch
is
covered
in
250
Gear-
shift
Unkage
.
INTERIOR
SWITCHES
NOTE
-
To
preventmarring
interior
trim,
wrap
the
tips
of
screw-
drivers
and
pliers
with
tape
beforeprying
out
switches
or
electrical
accessories
.
SWITCHES
AND
ELECTRICAL
ACCESSORIES
612-1
1
.
Disconnect
negative
(-)
cable
from
battery
and
cover
terminal
with
insulating
material
.
2
.
Remove
airbag
unit
from
steering
wheel
.
See
721
Air-
bag
System
(SRS)
.
Store
airbag
unit
in
a
safe
placew¡th
pad
facing
up
.
NOTE
-
To
helo
with
reassembly,
mark
steering
wheel
and
col-
umn
before
disassembly
.
4
.
Remove
trim
panel
from
lower
left
side
of
instrument
panel
.
See513
Interior
Trim
.
INTERIOR
SWITCHES
Page 457 of 759
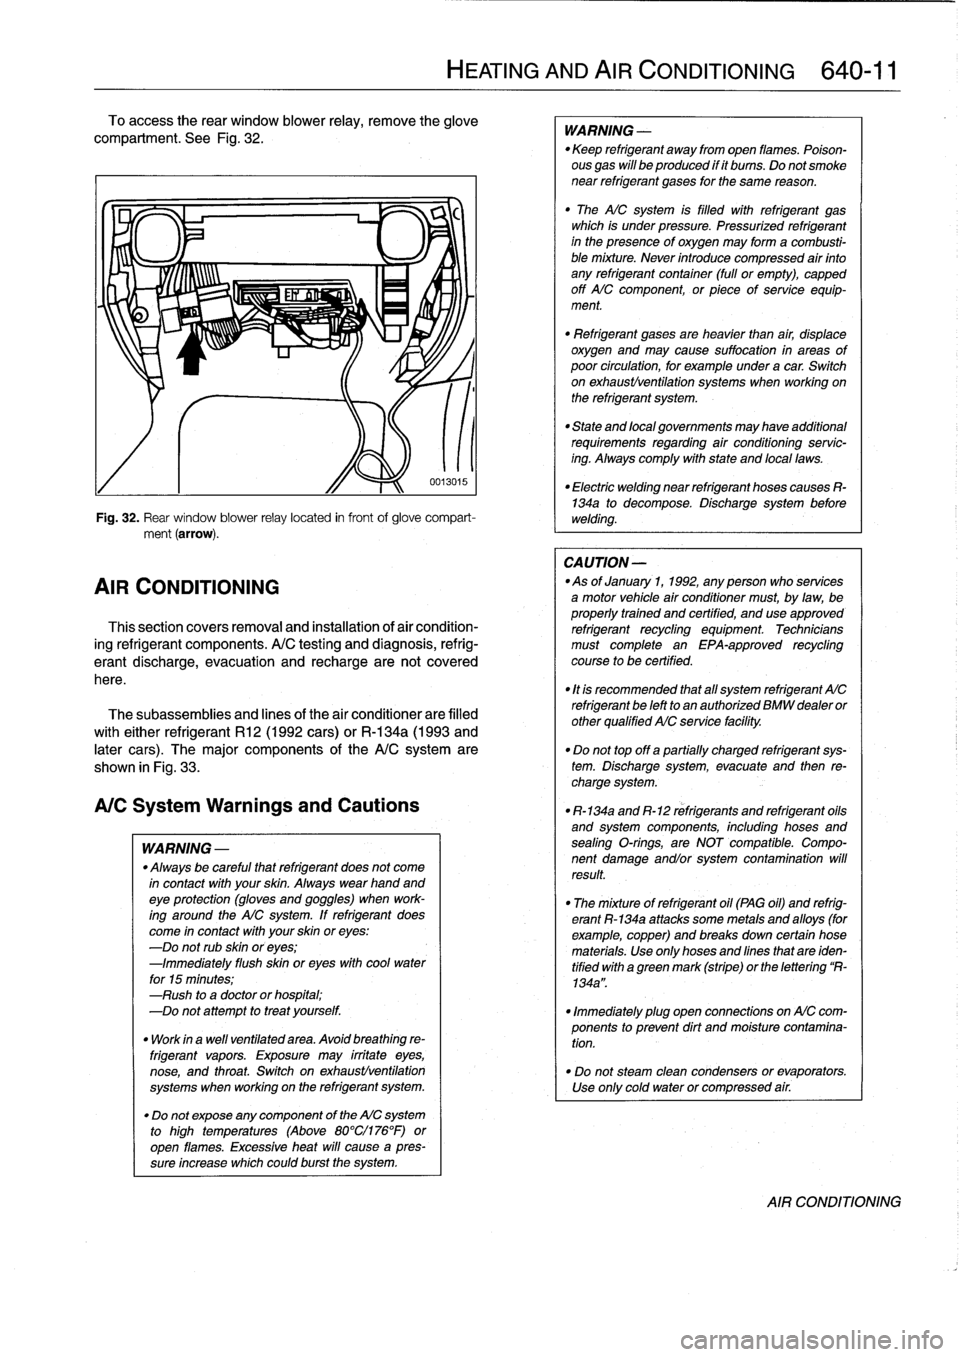
To
access
the
rear
window
blower
relay,
remove
the
glove
compariment
.
See
Fig
.
32
.
Fig
.
32
.
Rear
window
blower
relay
located
in
frontof
glove
compart-
ment
(arrow)
.
AIR
CONDITIONING
Thissection
covers
removal
and
installation
of
air
condition-
ing
refrigerant
components
.
A/C
testing
and
diagnosis,
refrig-
erantdischarge,
evacuatíon
and
recharge
are
not
covered
here
.
The
subassemblies
and
lines
of
the
air
conditionerare
filled
with
either
refrigerant
R12
(1992
cars)
or
R-134a
(1993
and
later
cars)
.
The
major
components
of
the
A/Csystem
are
shown
in
Fig
.
33
.
A/CSystem
Warnings
and
Cautions
WARNING
-
"
Always
be
careful
that
refrigerant
does
not
come
in
contact
with
your
skin
.
Always
wearhand
andeye
protection
(gloves
and
goggles)
when
work-
ing
around
the
AIC
system
.
If
refrigerant
does
come
in
contact
with
your
skin
oreyes
:
-Do
not
rub
skin
oreyes
;
-Immediately
flush
skin
oreyes
withcool
water
for
15
minutes
;
-Rush
to
a
doctor
orhospital
;
-Do
not
attempt
to
treat
yourself
.
"
Work
in
a
wefl
ventilated
area
.
Avoid
breathing
re-
frigerant
vapors
.
Exposure
may
irrítate
eyes,
nose,
and
throat
.
Switch
on
exhaustlventilation
systems
when
working
on
the
refrigerant
system
.
"
Do
not
expose
any
component
of
the
AIC
system
to
high
temperatures
(Above
80°Cl176°F)or
open
flames
.
Excessive
heat
will
cause
a
pres-
sureincrease
whichcould
burst
the
system
.
HEATING
AND
AIR
CONDITIONING
640-
1
1
0013015
WARNING
-
"
Keep
refrigerant
away
from
open
llames
.
Poison-
ous
gas
will
be
produced
if
it
bums
.
Do
not
smoke
near
refrigerant
gases
for
the
same
reason
.
"
The
AICsystem
is
filled
with
refrigerant
gas
which
is
under
pressure
.
Pressurized
refrigerant
in
the
presenceof
oxygen
may
forma
combusti-
ble
mixture
.
Never
introduce
compressed
air
finto
any
refrigerant
container
(full
or
empty),
capped
off
AIC
component,
or
piece
of
service
equip-
ment
.
"
Refrígerant
gases
are
heavier
than
air,
displace
oxygen
and
may
cause
suffocation
in
areas
of
poor
círculation,
for
example
under
a
car
.
Switch
on
exhaustlventilation
systems
when
working
on
the
refrigerant
system
.
"
State
and
local
governments
may
have
additional
requirements
regarding
air
conditioning
servic-
ing
.
Alwayscomply
with
state
and
local
laws
.
"
Electric
welding
near
refrigerant
hoses
causes
R-134a
to
decompose
.
Discharge
system
before
welding
.
CA
UTION
-
-As
of
January
1,
1992,
any
person
who
services
a
motor
vehicle
air
conditioner
must,
by
law,
be
properly
trained
and
certified,
and
use
approved
refrigerant
recycling
equipment
.
Technicians
must
complete
an
EPA-approved
recycling
course
to
be
certified
.
"
It
is
recommended
that
al¡
system
refrigerant
AIC
refrigerant
be
left
to
an
authorized
BMW
dealer
or
other
qualified
AIC
service
facility
.
"
Do
not
top
off
a
partially
charged
refrigerant
sys-
tem
.
Dischargesystem,evacuate
and
then
re-
charge
system
.
"
R-134a
and
R-12
refrigerants
and
refrigerant
oils
and
system
components,
including
hoses
and
sealing
O-rings,
are
NOT
compatible
.
Compo-
nent
damage
andlor
system
contamination
will
result
.
"
The
mixture
of
refrigerant
oil
(PAG
oil)
and
refrig-
erant
R-134a
attacks
some
metals
and
alloys
(for
example,copper)
and
breaks
down
certain
hose
materials
.
Use
only
hoses
and
lines
that
are
iden-
tified
with
a
green
mark
(stripe)
or
the
lettering
R-
134a"
.
"
Immediately
plug
open
connections
on
AIC
com-
ponents
to
prevent
dirt
and
moisture
contamina-
tion
.
"
Do
not
steam
clean
condensers
or
evaporators
.
Use
only
cold
water
or
compressed
air
.
AIR
CONDITIONING
Page 485 of 759
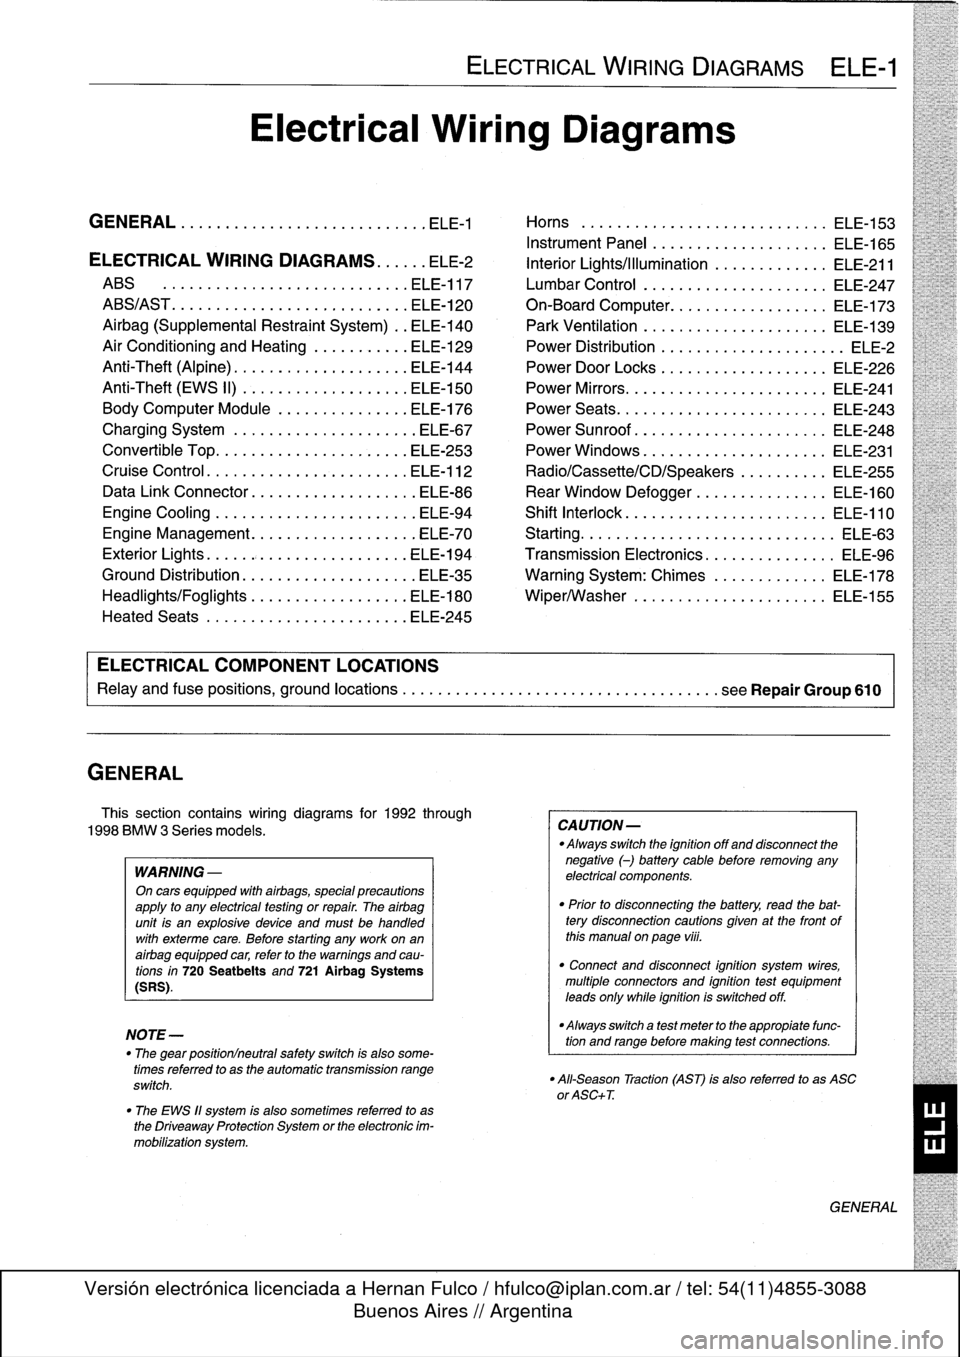
GENERAL
This
section
contains
wiring
diagrams
for
1992
through
1998
BMW
3
Series
models
.
WARNING
-
On
cars
equipped
with
airbags,
special
precautions
apply
to
any
electrical
testing
or
repair
.
The
airbag
unit
is
an
explosive
device
and
must
be
handled
with
exterme
care
.
Before
starting
any
work
onan
airbag
equipped
car,
refer
to
the
warnings
and
cau-
tions
in
720
Seatbelts
and
721
Airbag
Systems
(SRS)
.
NOTE-
The
"
gear
position/neutral
safetyswitch
is
also
some-
timesreferred
to
as
the
automatic
transmission
range
switch
.
"
The
EWS
11
system
is
also
sometimes
referred
to
as
the
Driveaway
Protection
System
or
the
electronic
im-
mobilization
system
.
ELECTRICAL
WIRING
DIAGRAMS
ELE-1
Electrical
Wiring
Diagrams
GENERAL
.
.
.
.
.
.
.
.
.
................
.
.
.
ELE-1
Horns
.....
.
.....
.
.
.
....
.
.
.
.
.
...
.
.
ELE-153
Instrument
Panel
.
.
.
.
.
.
..............
ELE-165
ELECTRICAL
WIRING
DIAGRAMS
...
.
.
.
ELE-2
Interior
Lights/Illumination
.............
ELE-211
ABS
..............
.
.
.
.....
.
.....
ELE-117
Lumbar
Control
.
....................
ELE-247
ABS/AST
.............
.
.
.
...
.
.
.
.....
ELE-120
On-Board
Computer
..................
ELE-173
Airbag
(Supplemental
Restraint
System)
..
ELE-140
Park
Ventilation
.
.
.
...........
.
...
.
..
ELE-139
Air
Conditioning
and
Heating
.
.
.
.
.
.
.....
ELE-129
Power
Distribution
......
.
...
.
.
.
.
.
.
.
...
.
ELE-2
Anti-Theft
(Alpine)
..........
.
.
.
...
.
...
ELE-144
Power
Door
Locks
.
.
......
.
.
.
.
.
.
.
.
.
..
ELE-226
Anti-Theft
(EWS
II)
.
........
.
.
.
...
.
...
ELE-150
Power
Mirrors
...
.
.
.
......
.
.
.
.
.
.
.
.
.
..
ELE-241
Body
Computer
Module
.....
.
.....
.
...
ELE-176
Power
Seats
......
.
......
.
.
.
...
.
.
.
..
ELE-243
Charging
System
.
.
................
.
.
.
ELE-67
Power
Sunroof
.
.
.
.
.
.
.
...............
ELE-248
Convertible
Top
.
.
.
.
................
.
.
ELE-253
Power
Windows
.
.
.
.
.
.
.....
.
.........
ELE-231
Cruise
Control
..
.
.
.
...........
.
....
.
.
ELE-112
Radio/Cassette/CD/Speakers
..........
ELE-255
Data
Link
Connector
................
.
.
.
ELE-86
Rear
Window
Defogger
...............
ELE-160
Engine
Cooling
.......
.
.......
.
....
.
.
.
ELE-94
Shift
Interlock
.
.
.
.
.
.
.
.
...............
ELE-110
Engine
Management
...
.
.......
.
....
.
.
.
ELE-70
Starting
....
.
.
.
.
.
...
.
................
ELE-63
Exterior
Lights
........
.
.
.
.
.
.
.
.
.
......
ELE-194
Transmission
Electronics
.
..............
ELE-96
Ground
Distribution
....
.
.
.
.
.
.
.
.
.
.......
ELE-35
Warning
System
:
Chimes
.............
ELE-178
Headlights/Foglights
...
.
.
.
.
.
.
.
.
.
......
ELE-180
Wiper/Washer
.
.....
.
...............
ELE-155
Heated
Seats
........
.
.
.
.
.
.
.
.
.
......
ELE-245
ELECTRICAL
COMPONENT
LOCATIONS
Relayand
fuse
positions,
ground
locations
...........
.
.
.
.
.
.
.
.
.
................
seeRepair
Group
610
CAUTION-
Always
switchthe
ignition
off
and
disconnect
the
negative
(-)
battery
cablebefore
removing
any
electrical
components
.
"
Prior
to
disconnecting
the
battery,
read
the
bat-tery
disconnection
cautions
given
at
the
front
of
this
manual
on
page
viii
.
"
Connect
and
disconnect
ignition
system
wires,
multiple
connectors
and
ignition
test
equipment
leads
only
while
ignition
is
switched
off
.
-Always
switch
a
test
meter
to
the
appropiate
func-
tion
and
range
before
making
test
connections
.
"
All-Season
Traction
(AST)
is
also
referred
to
as
ASC
or
ASC+T
.
GENERAL
Page 486 of 759
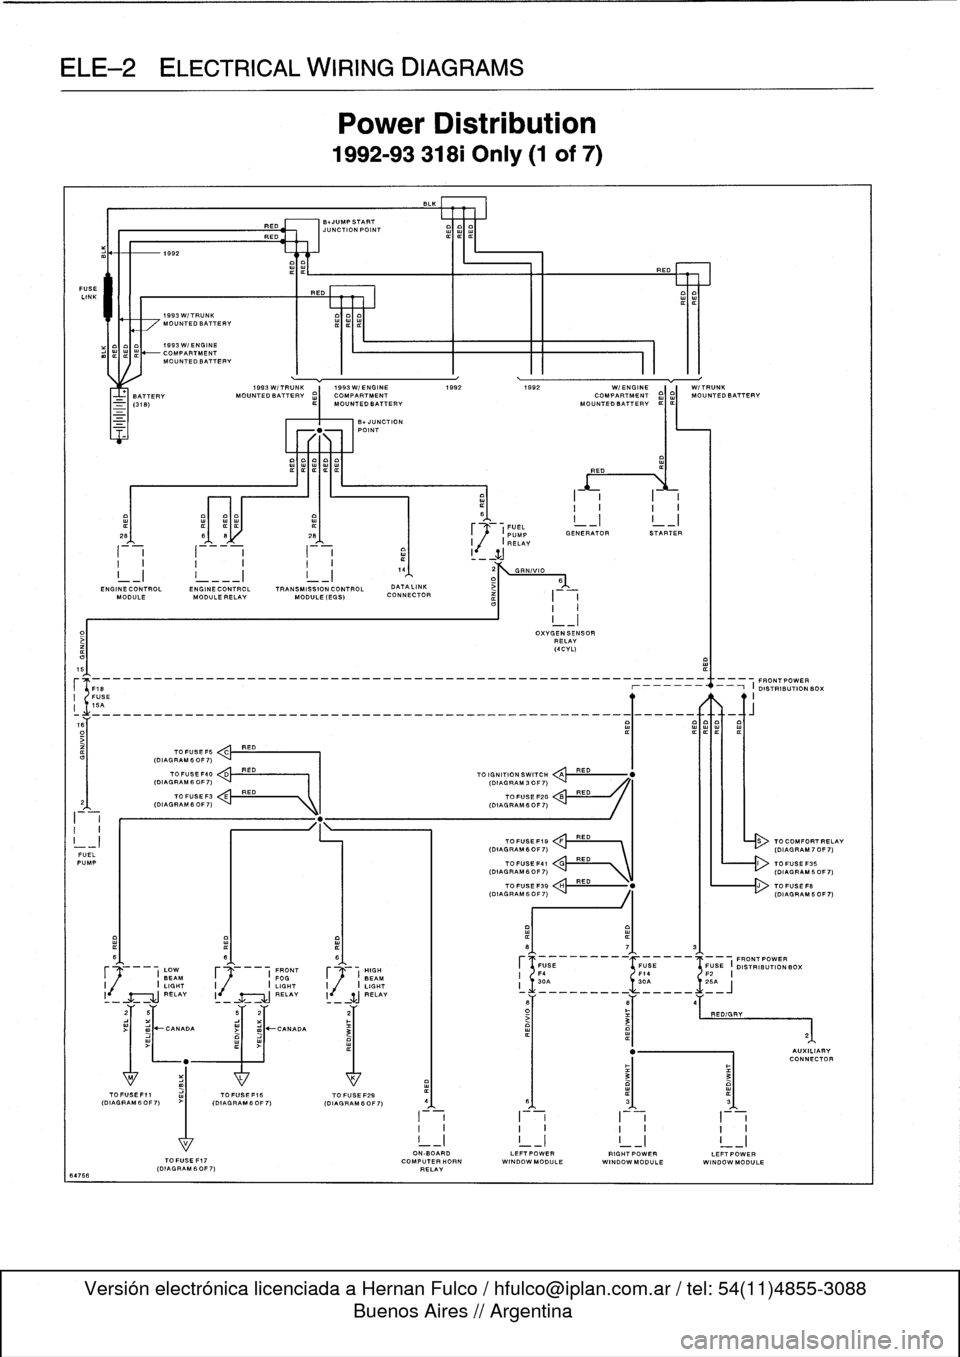
ELE--2
ELECTRICAL
WIRING
DIAGRAMS
FUSE
LINK
64766
I-i
I
-
i
a
1
I
_
ZJ
I
I
I
I
I
I.
4
2
GRN/VIO
I_I
!
___I
I_I
1
D>
6
END
INECONTROL
ENGINECONTROL
TRANSMISSION
CONTROL
DATALINK
MODULE
MODULE
RELAY
MODULE
(EGS)
CONNECTOR
I
I
I
I
5
(F18
--_______________________________________________
O19~
N
RIBUON
BOX
I
FUSE
II
15A
o~___________________________________________________Q~____-aft
TO
FUSE
F5
C
RED
(DIAGRAM
6
OF
7)
FUELPUMP
I
(DIAGRAM60F7)
C'
RED
\
L------r>
(DIAGRAM60F7)
I
LOW
F
I
FRONT
HIGH
BEAM
FOGJ
BEAM
I
I
LIGHT
I
I
LIGHT
I
j
/
I
LIGHT
RELAY
I
RELAY
li
SJ
RELAY
1992
1993W/TRUNK
MOUNTEDBATTERV
1993W/ENGINE
COMPARTMENTMOUNTEDBATTERV
1993W/TRUNK
1993W/ENGINE
1992
1992
WI
ENGINE
W/TRUNK
BATTERY
MOUNTEDBATTERV
¢)
MOUNTED
BATTERY
MOUN
O
TEDBATT
I
ERV
¢I¢I
MOUNTEDBATTERV
TOFUSEF40
<
,.k
RED
(DIAGRAM
6
OF
7)
I
I
(DIAGRAM
3
OF
7)
TO
FUSEF3
E
RED
(DIAGRAMfiOF7)
"
.
1k
I
(DIAGRAM
6OF7)
>I
mJ~CANADA
RED
BNUMPSTART
JUNCTION
POINT
REO
Power
Distribution
1992-93
318i
Only
(1
of
7)
-UNCTION
POINT
TOFUSEF15
TO
FUSE
F29
(DIAGRAM60F7)
(OIAGRAM6OF7)
I
~1
.
FUEL
_I
I
_I
~
(PUMP
GENERATOR
STARTER
I
,(
I
RELAY
TO
IGNITION
SWITCH
QA
TOFUSE
F20
TOFUSEF19
FRED
(DIAGRAM6OF7)
`
I
III
-
(DIAGRAM70F7)
OXVGENSENSOR
RELAY
(4CVL)
RED
RED
RED
ON-BOARD
LEFTPOWERRIGHTPOWERLEFTPOWER
TOFUSEF17
COMPUTERHORN
WINDOWMODULE
WINDOWMODULE
WINDOW
MODULE
(DIAGRAM
60F
7)
RELAY
TO
COMFORTRELAV