Timing BMW M3 1998 E36 Owner's Manual
[x] Cancel search | Manufacturer: BMW, Model Year: 1998, Model line: M3, Model: BMW M3 1998 E36Pages: 759
Page 85 of 759
GENERAL
CYLINDER
HEAD,
DISASSEMBLY
AND
ASSEMBLY
CYLINDER
HEAD
AND
VALVETRAIN
116-1
116
Cylinder
Head
and
Valvetrai
n
GENERAL
.
.....
.
.
.
...
.
.
.
.
.
.
.
.
.
.......
116-1
Hydraulic
cam
followers,
checking
and
replacing
(M42
and
al¡
6-cylinder
engines)
.
...
.....
.
..
116-9
CYLINDER
HEAD,
Valve
guides
.
.
.
...
.
.
.
.
.
.
...
.
.
.
.
.
.
.
.
.
.
116-10
DISASSEMBLY
AND
ASSEMBLY
...
.
...
116-1
Valves
.
.
.
.
.
.
.
.
.
.
.
.
.
...
.
...
.
.
.
.
.
...
.
.
116-11
Camshafts,
removing
and
installing
(M42
engine)
....
.
....
.
.
.
.
.
.
.
.
.
.....
.
.
116-1
Valves,
leak
test
.
.
.
.
.
.
.
.
.
.
...
.
.
.
.
.
.
.
.
.
.
116-11
Camshafts,
removing
and
installing
Valve
stem
oil
seals
.
.
.
.......
.
.
.
.
.
...
.
.
116-11
(M44
engine)
.........
.
.
.
.
.
.
.
.
.
.......
116-3
Valve
seats
.
.
.
.
.
.
.
.
.
...
.
...
.
.
.
.
.
...
.
.116-12
Camshafts,
removing
and
installing
Valve
springs
.
.
.
.
.
.
.
.
...
.
...
.
.
.
.
.
.....
116-12
(6-cylinder
engine)
.....
.
.
.
.
.
.
.
.
.
.......
116-4
Valves,
removing
and
installing
........
.
....
116-6
TABLES
CYLINDER
HEAD
AND
VALVETRAIN,
a
.
Cylinder
Head
Height
........
....
.
..
..........
116-7
RECONDITIONING
.
...
.
.
.
.
.
.
.
.
.
.......
116-7
b
.
Camshaft
Specifications
.......
..
.
..
........
.116-7
Cylinder
head
...
.
.
.
...
.
.
.
.
.
.
.
.
.
....
.
..
116-7
c
.
Valve
Guide
Specifications
....
...
.
..
........
116-10
d
.
Valve
Specifications
...........
..
.
..
........
116-11
Camshaft
.
.
.
.
.
.
.
.
.
.
.
.
.
.
...
.
.
.
.
.
.......
116-7
e
.
Valve
Seat
Dimensions
.........
.
..
..
......
.116-12
Hydraulic
valve
adjusters,
checking
and
replacing
(M44
engine)
..
.
.
.
116-8
Camshafts,
removing
and
installing
(M42
engine)
This
repair
group
covers
cylinder
head
and
valvetrain
ser-
vice
and
repair
.
Most
of
the
repairs
described
here
require
that
The
camshafts
can
be
removed
with
the
cylinder
head
the
cylinder
head
first
be
removed
as
described
in
113
Cylin-
mounted
on
the
engine
.
The
first
step
is
to
remove
the
cylinder
der
HeadRemoval
and
Installation
.
head
cover
.
See
113
Cylinder
HeadRemoval
and
Installa-
tion
.
NOTE-
Special
BMW
service
tools
should
always
be
used
to
remove
"
For
timing
chain
and
VANOS
repair
information,
see
and
install
the
camshafts
.
Removal
and
installation
of
the
cam-
117
Camshaft
Timing
Chain
.
shafts
without
the
special
tools
can
result
in
camshaft
and
valve
"
If
it
is
determined
that
the
cylinder
head
will
require
train
damage
.
significant
reconditioning
work,
a
remanufactured
cyl-
inder
head
may
bea
good
alternative
.
Remanufac-
WARNING-
tured
cylinder
heads
are
available
froman
authorized
The
process
of
evenly
loosening
the
camshaftbear
BMW
dealer
.
ing
cap
nuts
is
NOT
an
acceptable
method
of
re-
moving
the
camshafts
.
Be
sure
to
read
the
The
information
given
in
this
repair
group
is
organized
ac-
procedure
through
before
starting
the¡ob
.
cording
to
engine
code
.
For
engine
applicationinformation,
see100
Engine-General
.
1
.
Disconnect
negative
(-)
battery
cable
.
CAUTION-
Prior
to
disconnectiog
the
battery,
read
the
battery
disconnection
cautions
given
at
the
front
of
this
manualonpage
viii
.
BMW
special
tools
are
required
for
most
cylinder
head
ser-
2
.
Remove
radiator
cooling
fan
shroud
and
cooling
fan
.
vice
described
in
this
repair
group
.
Many
of
these
tools
areex-
See
170
Radiator
and
Cooling
System
.
pensive
and
only
available
through
an
authorized
BMW
dealer
.
If
the
special
tools
are
not
available,
one
altematve
is
to
remove
the
cylinder
head
and
have
it
disassembled
byan
authorized
CAUTION-
BMW
dealer
.
Be
sure
to
read
each
procedure
thoroughlybefore
Radiator
fa
n
has
left
hand
threads
.
starting
a
job
to
determinewhich
special
tools
and
equipment
will
be
necessary
.
CYLINDER
HEAD,
DISASSEMBLYANDASSEMBLY
Page 86 of 759
116-2
CYLINDER
HEADAND
VALVETRAIN
3
.
Remove
timing
chain
sprockets
and
timing
chains
from
7
.
Slowly
release
pressure
oncamshaft
bearing
capsby
camshafts
.
Remove
upper
timing
chain
guidefrom
cyl-
turningeccentric
shaft
.
Remove
bearing
caps
and
inder
head
.
See117
Camshaft
Timing
Chain
.
camshaft
.
Repeat
procedureon
remaining
camshaft
.
NOTE-
It
is
not
necessary
lo
remove
the
lower
timing
chain
cover
.
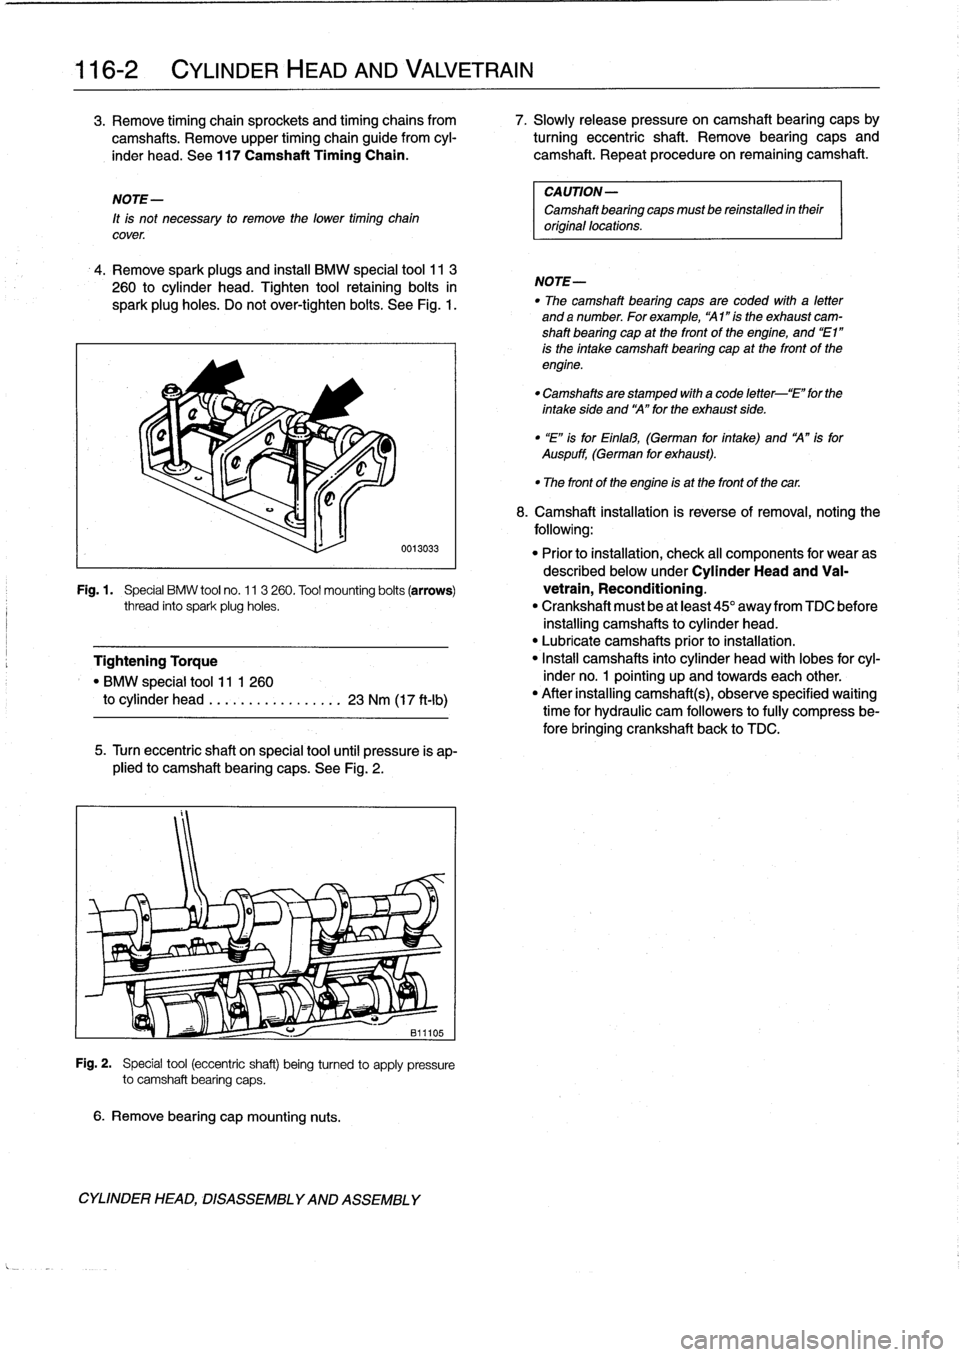
4
.
Remove
spark
plugs
and
instaf
BMW
special
tool
11
3
260
to
cylinder
head
.
Tighten
tool
retaining
bolts
in
spark
plug
holes
.
Do
not
over-tighten
bolts
.
See
Fig
.
1
.
6
.
Remove
bearing
cap
mounting
nuts
.
0013033
5
.
Turn
eccentric
shaft
on
special
tool
until
pressure
is
ap-
plied
to
camshaft
bearing
caps
.
See
Fig
.
2
.
Fig
.
2
.
Special
tool
(eccentric
shaft)
being
turned
to
apply
pressure
to
camshaft
bearing
caps
.
CYLINDER
HEAD,
DISASSEMBLYAND
ASSEMBLY
CAUTION-
Camshaft
bearing
caps
mustbe
reinstalled
intheir
original
locations
.
NOTE-
"
The
camshaft
bearing
caps
are
coded
wíth
a
letter
anda
number
.
Forexample,
"Al
"ís
the
exhaust
cam-
shaft
bearing
cap
at
the
front
of
the
engíne,
and
"El"
is
the
intake
camshaft
bearing
cap
at
the
front
of
the
engine
.
"
Camshafts
are
stamped
with
a
code
letter-`E"
for
the
intakeside
and
`A"forthe
exhaust
side
.
"
"E"
isforEinlal3,
(German
for
íntake)
and
A"
isfor
Auspuff,
(German
for
exhaust)
.
"
The
front
of
the
engine
is
at
the
front
of
thecar
.
8
.
Camshaft
installation
is
reverse
of
removal,noting
the
following
:
"
Prior
to
installation,
check
al¡
components
for
wear
as
described
below
underCylinder
Head
and
Va¡-
Fig
.1
.
Special
BMW
tool
no
.
11
3
260
.
Tool
mounting
bolts
(arrows)
vetrain,
Reconditioning
.
thread
into
spark
plug
holes
.
"
Crankshaft
must
be
at
least
45°
away
from
TDC
before
installing
camshafts
to
cylinder
head
.
"
Lubricate
camshafts
prior
to
installation
.
Tightening
Torque
"
Install
camshafts
into
cylinder
head
with
lobes
for
cyl-
"
BMW
special
tool
11
1
260
inder
no
.
1
pointing
up
and
towards
each
other
.
to
cylinder
head
.
...
.
.
...........
23
Nm
(17
ft-Ib)
"
After
installing
camshafts),observe
specified
waiting
time
for
hydraulic
cam
followers
to
fully
compress
be-
fore
bringing
crankshaft
back
to
TDC
.
Page 87 of 759
Camshaft
installation
waíting
times
"
Ator
above
68°F
(20°C)
............
.
..
10
minutes
"
50-68°F
(10-20°C)
................
..
.
30
minutes
"
32-50°F
(0-10°C)
.
.......
.
.........
..
.
75minutes
"
Reinstall
timing
chain
sprockets
and
tensioner
as
spe-
cifically
described
in
117
Camshaft
Timing
Chain
.
i
"
Wait
at
least
10minutes
before
cranking
engine
over
with
starter
motor
for
the
fi+
1
1/
/~~
.0
time
.
Tightening
Torques
"
Camshaft
bearing
caps
to
cylinder
head
(M7)
.............
15
Nm
(11
ft-Ib)
"
Cylinder
head
cover
to
cylinder
head
(M6)
.............
10
Nm
(89
in-lb)
"
Primary
timing
chain
tensioner
plug
to
cylinder
head
..
..
..
...........
40
Nm
(30
ft-Ib)
(see
117
Camshaft
Timing
Chain)
"
Spark
plugs
(M12)
..
.
.............
23
Nm
(17
ft-Ib
"
Timing
chain
cover
(upper)
to
cylinder
head
..
.
.
...
..........
10
Nm
(89
in-lb)
"
Timing
chainsprockets
to
camshaft
M6
........
.
...
.
..
.
..........
10
Nm
(7.5
ft-Ib)
M7
............
.
..
..
...........
15
Nm
(11
ft
.lb)
(see
117
Camshaft
Timing
Chain)
Camshafts,
removing
and
installing
(M44
engine)
Special
BMW
service
tools
should
always
be
used
to
remove
and
install
the
camshafts
.
Removal
and
installation
of
the
cam-
shafts
without
the
special
tools
can
result
in
camshaft
and
val-
vetrain
damage
.
1.
Disconnect
negative
(-)
battery
cable
.
CAUTION-
Prior
to
disconnecting
the
battery,
read
the
battery
disconnection
cautions
given
at
the
front
of
this
manual
on
page
vi¡¡
.
CYLINDER
HEAD
AND
VALVETRAIN
116-
3
2
.
Remove
spark
plugs
.
See
1201gnition
System
.
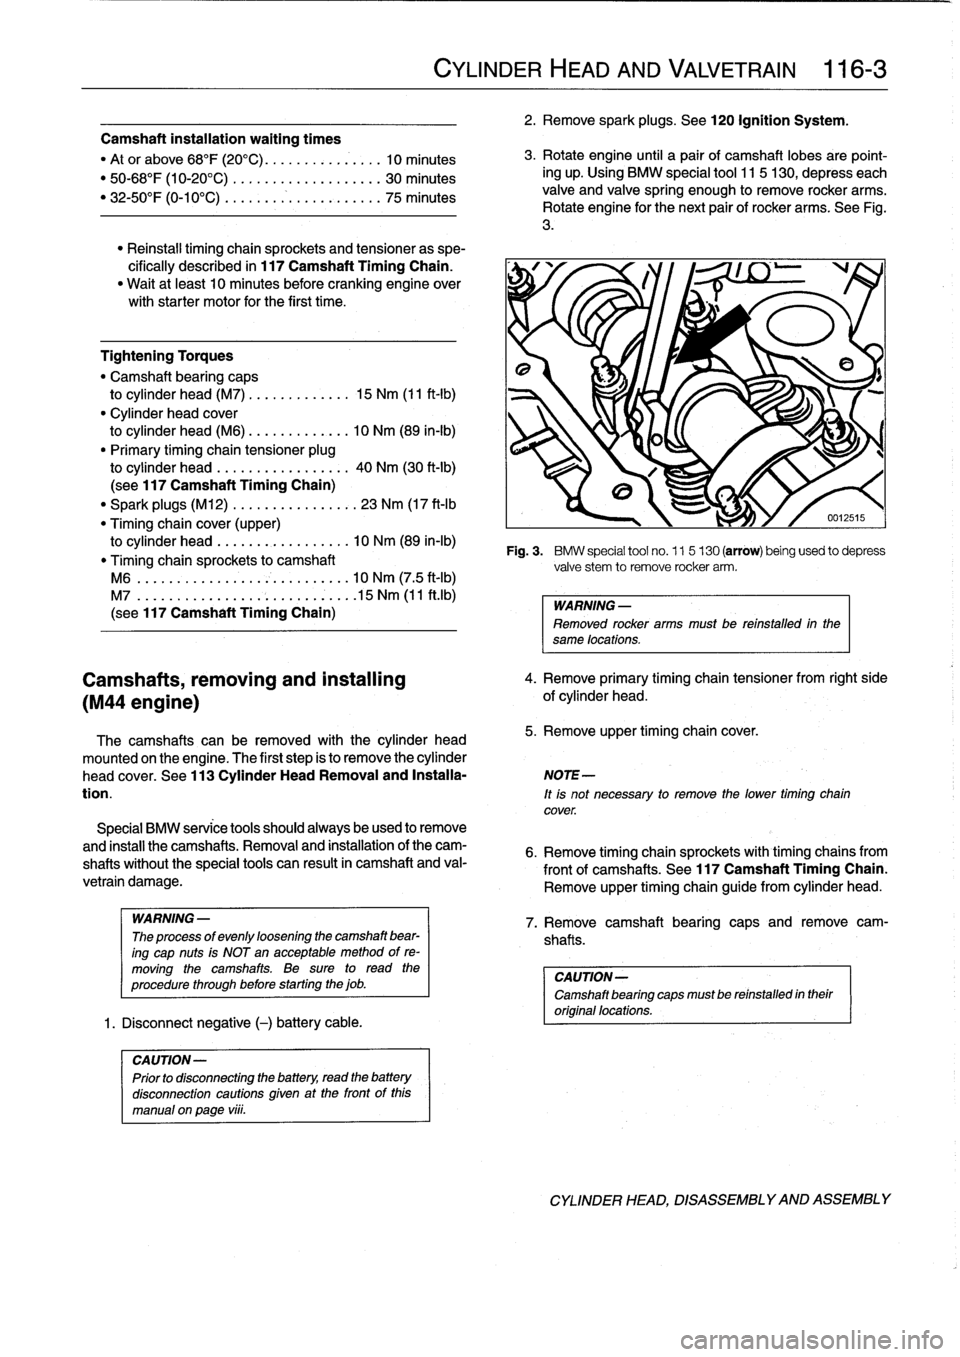
3
.
Rotateengine
until
a
pair
of
camshaft
lobes
are
point-
ing
up
.
Using
BMW
special
tool
115
130,
depresseach
valve
and
valve
spring
enough
to
remove
rocker
arms
.
Rotate
engine
for
the
next
pair
of
rocker
arms
.
See
Fig
.
3
.
cover
.
Fig
.
3
.
BMW
special
tool
no
.
11
5130
(arrow)
being
used
to
depress
valve
stem
to
remove
rocker
arm
.
WARNING
-
Removed
rocker
arms
must
be
reinstalled
in
the
same
locations
.
4
.
Remove
primary
timing
chain
tensioner
from
right
side
of
cylinder
head
.
The
camshafts
can
be
removed
with
the
cylinder
head
5
.
Remove
upper
timing
chaincover
.
mounted
onthe
engine
.
The
first
step
is
to
remove
the
cylinder
head
cover
.
See
113
Cylinder
HeadRemoval
and
Installa-
NOTE-
tion
.
lt
is
not
necessary
to
remove
the
lower
timing
chain
6
.
Remove
timing
chain
sprockets
with
timing
chains
from
front
of
camshafts
.
See
117
Camshaft
Timing
Chain
.
Remove
upper
timing
chain
guide
from
cylinder
head
.
WARNING-
7
.
Remove
camshaft
bearing
caes
and
remove
cam
The
process
of
evenly
loosening
the
camshaft
bear-
shafts
.
ing
cap
nuts
is
NOT
an
acceptable
method
of
re-
moving
the
camshafts
.
Be
sure
to
read
the
CAUTION-
procedure
through
before
starting
the
job
.
Camshaft
bearing
capsmust
be
reinstalled
intheir
original
locations
.
CYLINDER
HEAD,
DISASSEMBLYAND
ASSEMBLY
Page 88 of 759
116-
4
CYLINDER
HEAD
AND
VALVETRAIN
NOTE-
"
The
camshaft
bearing
caps
are
coded
with
a
letter
anda
number
.
Forexample,
'541"is
the
exhaustcam-
shaft
bearing
cap
at
the
front
of
the
engine,
and
`El"
is
the
intake
camshaft
bearing
cap
at
the
front
of
the
engine
.
"
Camshafts
are
stamped
with
a
code
letter-'E"
for
the
intakeside
and
A"
for
the
exhaust
side
.
"
"E"
isfor
Einla3,
(German
for
intake)
and
A"
is
for
Auspuff,
(Germen
for
exhaust)
.
"
The
front
of
the
engine
is
at
the
front
of
the
car
.
8
.
Camshaft
installation
is
reverse
of
removal,
noting
the
following
:
"
Prior
to
installation,
check
all
components
for
wear
as
described
below
underCylinder
Head
and
Val-
vetrain
Reconditioning
.
"
Lubricate
camshafts
prior
to
installation
.
"
Reinstall
timing
chain
sprockets
and
tensioner
and
set
valve
timing
before
reinstalling
rocker
arms,as
spe-
cifically
described
in
117
Camshaft
Timing
Chain
.
"
Be
sure
corresponding
camshaft
lobe
is
pointing
up
before
installing
rocker
arms
.
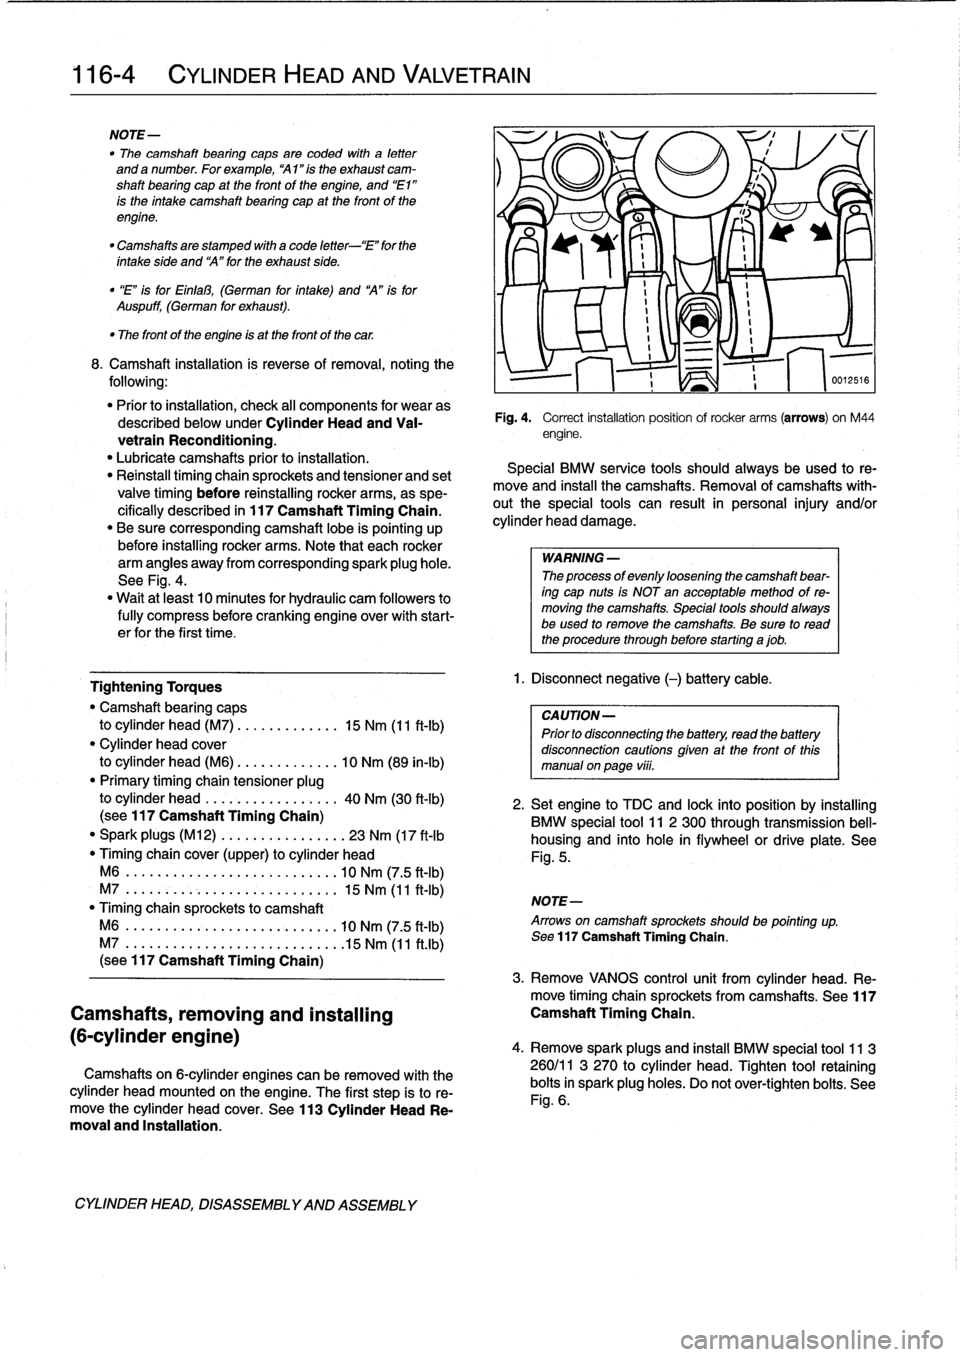
Note
that
each
rocker
arm
angles
away
from
corresponding
spark
plug
hole
.
See
Fig
.
4
.
"
Wait
at
least
10
minutes
for
hydraulic
cam
followers
to
fully
compress
before
cranking
engine
over
with
start-
er
for
the
first
time
.
Tightening
Torques
"
Camshaft
bearing
caps
to
cylinder
head
(M7)
.............
15
Nm
(11
ft-Ib)
"
Cylinder
head
cover
to
cylinder
head
(M6)
.............
10
Nm
(89
in-lb)
"
Primary
timing
chain
tensioner
plug
to
cylinder
head
.
................
40
Nm
(30
ft-lb)
(sea
117
Camshaft
Timing
Chain)
"
Spark
plugs
(M12)
.............
...
23
Nm
(17
ft-lb
Timing
chaincover
(upper)
to
cylinder
head
M6
.....
.
.
...
................
.
10
Nm
(7
.5
ft-Ib)
M7
....
..
.
.
........
.
.....
.
...
.
15
Nm
(11
ft-Ib)
"
Timing
chain
sprockets
to
camshaft
M6
....
.
.
..
..............
.
..
..
10
Nm
(7
.5
ft-Ib)
M7
....
....
..............
.
..
..
.15
Nm
(11
ft
.lb)
(sea
117
Camshaft
Timing
Chain)
Camshafts,
removing
and
installing
(6-cylinder
engine)
Camshafts
on
6-cylinder
engines
can
be
removed
with
the
cylinder
head
mounted
on
the
engine
.
The
first
step
is
to
re-
move
the
cylinder
head
cover
.
See
113
Cylinder
Head
Re-
moval
and
Installation
.
CYLINDER
HEAD,
DISASSEMBLYAND
ASSEMBLY
Fig
.
4
.
Correct
installation
position
ofrocker
arms
(arrows)
on
M44
engine
.
Special
BMW
service
tools
should
always
be
used
to
re-
move
and
instan
the
camshafts
.
Removal
of
camshafts
with-
outthe
special
tools
can
result
in
personal
injury
and/or
cylinder
head
damage
.
WARNING
-
The
processof
evenly
loosening
the
camshaft
bear-
ing
cap
nuts
is
NOT
en
acceptable
method
of
re-
moving
the
camshafts
.
Special
tools
shouldalways
be
used
lo
remove
the
camshafts
.
Be
sure
to
read
the
procedure
through
before
starting
ajob
.
1
.
Disconnect
negative
(-)
battery
cable
.
CAUTION-
Prior
to
disconnectiog
the
battery,
read
the
battery
disconnection
cautions
given
at
the
front
of
this
manual
onpaga
viii
.
516
2
.
Setengine
to
TDC
and
lock
into
position
by
installing
BMW
special
tool
11
2
300
through
transmission
bell-
housing
and
into
hole
in
flywheel
or
drive
platea
See
Fig
.
5
.
NOTE-
Arrows
on
camshaft
sprockets
shouldbe
pointing
up
.
Sea
117
Camshaft
Timing
Chain
.
3
.
Remove
VANOS
control
unit
from
cylinder
head
.
Re-
move
timing
chainsprockets
from
camshafts
.
See117
Camshaft
Timing
Chain
.
4
.
Remove
sparkplugs
and
insta¡¡
BMW
special
tool
11
3
260/11
3
270
to
cylinder
head
.
Tighten
tool
retaining
bolts
in
spark
plug
holes
.
Do
not
ovar-tighten
bolts
.
See
Fig
.
6
.
Page 90 of 759
116-
6
CYLINDER
HEAD
AND
VALVETRAIN
9
.
Camshaft
installation
is
reverse
of
removal,noting
the
following
:
"
Prior
to
installation,
check
al¡
components
for
wear
as
described
below
under
Cylinder
Head
and
Val-
vetrain
Reconditioning
.
"
Crankshaft
must
be
at
least
45°
away
from
MC
before
installing
camshafts
to
cylinder
head
.
"
Lubricate
camshafts
prior
to
installation
.
"
Insta¡¡
camshafts
into
cylinder
head
with
lobes
for
cyl-
inder
no
.
1
pointing
up
and
towards
each
other
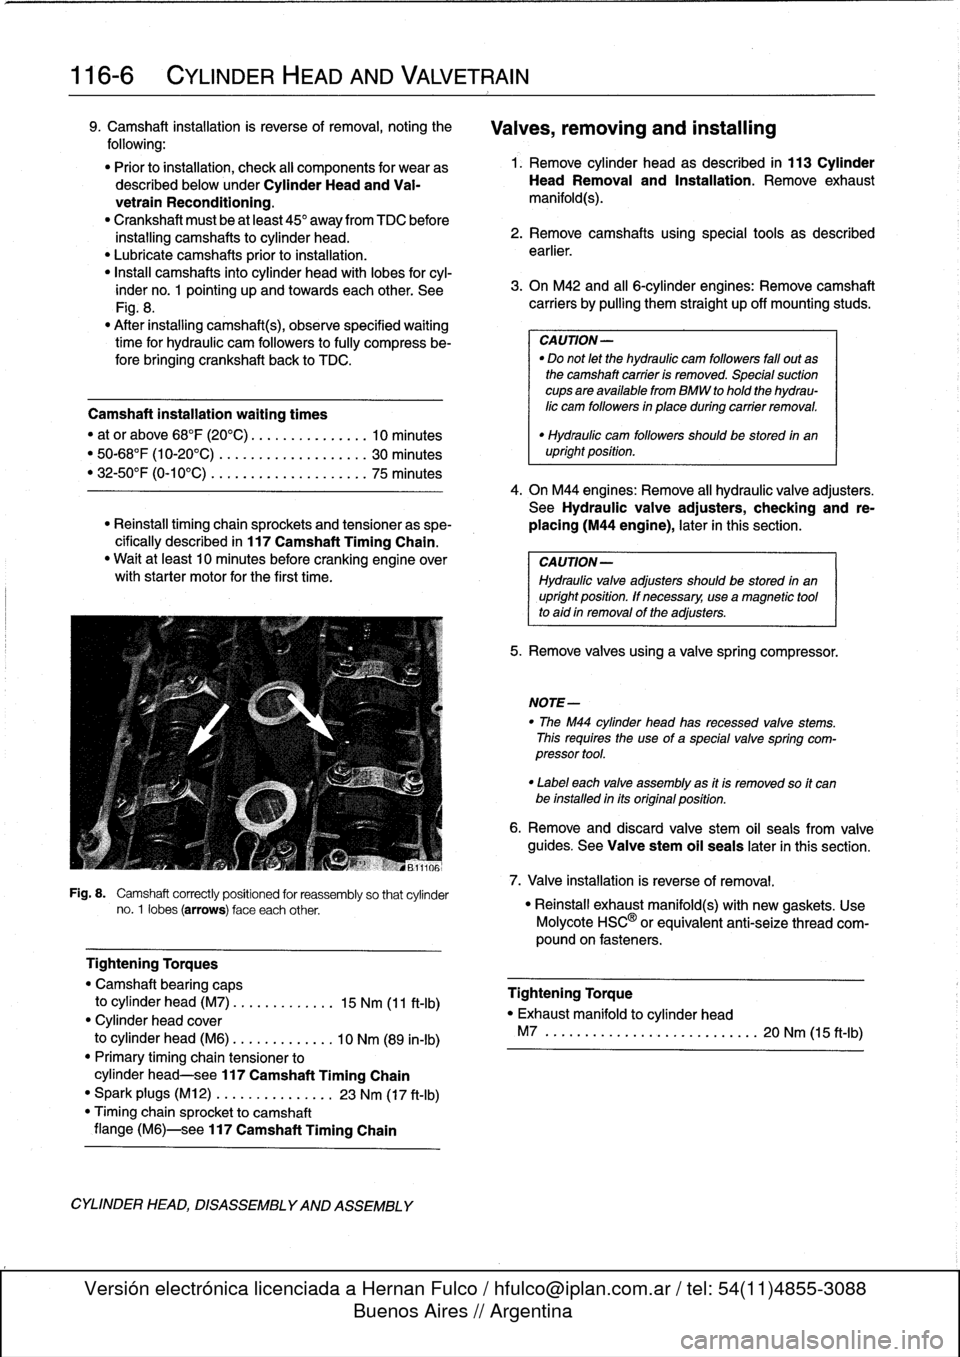
.
See
Fig
.
8
.
"
After
installing
camshaft(s),
observe
specified
waiting
time
for
hydraulic
cam
followers
to
fully
compress
be-
fore
bringing
crankshaft
back
to
TDC
.
Fig
.
8
.
Camshaft
correctly
positioned
for
reassembly
so
thatcylinder
no
.
1
lobes
(arrows)
face
each
other
.
Tightening
Torques
"
Camshaft
bearing
caps
to
cylinder
head
(M7)
.
..
...
..
.
....
15
Nm
(11
ft-Ib)
"
Cylinder
head
cover
to
cylinder
head
(M6)
..
.
..........
10
Nm
(89
in-lb)
"
Primary
timing
chaintensioner
to
cylinder
head-see
117
Camshaft
Timing
Chain
"
Spark
plugs
(M12)
.............
.
.
23
Nm
(17
ft-Ib)
"
Timing
chain
sprocket
to
camshaft
flange
(M6)-see
117
Camshaft
Timing
Chain
CYLINDER
HEAD,
DISASSEMBLYAND
ASSEMBLY
Valves,
removing
and
installing
1
.
Remove
cylinder
head
as
described
in
113
Cylinder
HeadRemoval
and
Installation
.
Remove
exhaust
manifold(s)
.
2
.
Remove
camshafts
using
special
tools
as
descríbed
earlier
.
3
.
On
M42
and
al¡
6-cylinder
engines
:
Remove
camshaft
carriers
by
pulling
them
straight
up
off
mounting
studs
.
CAUTION-
"
Do
not
let
the
hydraulic
cam
followers
fa¡¡
out
as
the
camshaft
carrier
is
removed
.
Special
suction
cupsare
available
from
BMW
to
hold
the
hydrau-
lic
cam
followers
in
place
during
carrier
removal
.
Camshaft
installation
waiting
times
"
at
or
above
68°F
(20
0
C)
....
..
.
..
......
10
minutes
"
50-68°F
(10-20°C)
...
.
..
....
.
..
......
30
minutes
"
32-50°F
(0-10°C)
....
.
..
....
.
..
......
75
minutes
4
.
On
M44
engines
:
Remove
all
hydraulic
valve
adjusters
.
See
Hydraulicvalve
adjusters,
checking
and
re-
"
Reinstall
timing
chainsprockets
and
tensioner
as
spe-
placing
(M44
engine),
later
in
this
section
.
cifically
described
in
117
Camshaft
Timing
Chain
.
"
Waít
at
least
10
minutes
before
cranking
engine
over
CAUTION-
withstarter
motor
for
the
first
time
.
Hydraulic
valve
adjusters
should
be
stored
in
an
upright
position
.
lf
necessary,
use
amagnetic
tool
to
aid
in
removal
of
the
adjusters
.
"
Hydraulic
cam
followers
shouldbe
stored
in
an
upright
position
.
5
.
Remove
valves
using
a
valve
spring
compressor
.
NOTE-
"
The
M44
cylinder
head
has
recessed
valve
stems
.
This
requires
the
use
of
a
special
valve
spring
com-
pressor
tool
.
"
Label
each
valve
assembly
as
it
is
removed
so
it
can
be
installed
in
its
original
position
.
6
.
Remove
and
discard
valve
stem
oil
seals
from
valve
guides
.
See
Valve
stem
oil
seals
later
in
this
section
.
7
.
Valve
installation
is
reverse
of
removal
.
"
Reinstall
exhaust
manifold(s)
with
new
gaskets
.
Use
Molycote
HSC'
5
or
equivalent
anti-seize
thread
com-
pound
on
fasteners
.
Tightening
Torque
"
Exhaust
manifold
to
cylinder
head
M7
............
..
...
....
.
...
..
20
Nm
(15
ft-Ib)
Page 93 of 759
5
.
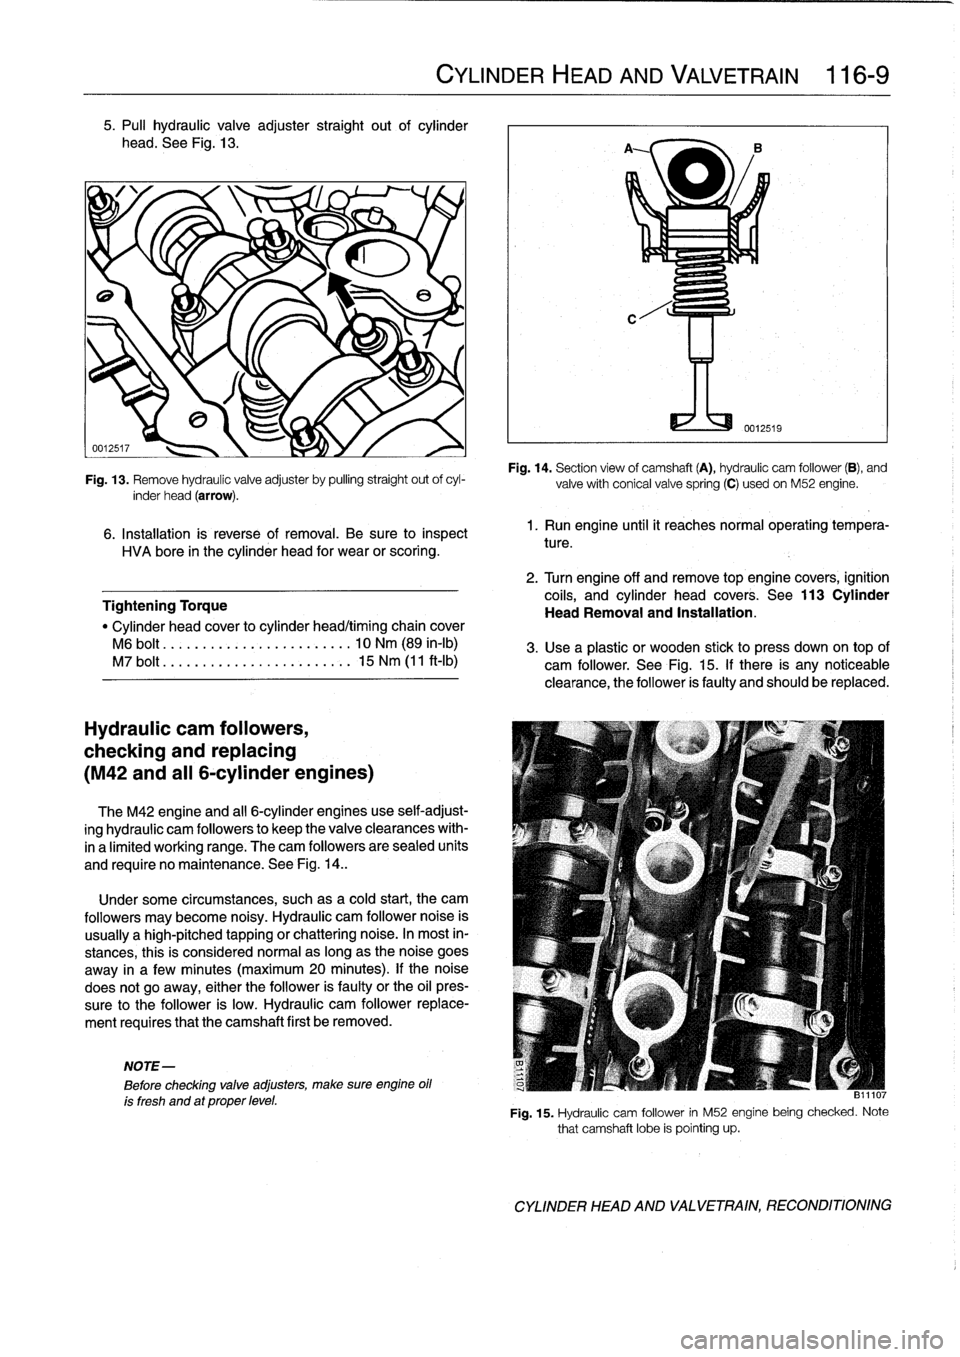
Pull
hydraulic
valve
adjuster
straight
out
of
cylinder
head
.
See
Fig
.
13
.
Fig
.
13
.
Remove
hydraulic
valve
adjuster
by
pulling
straight
out
ofcyl-
inder
head
(arrow)
.
6
.
Installation
is
reverse
of
removal
.
Be
sure
to
inspect
HVA
bore
in
the
cylinder
head
for
wear
or
scoring
.
Tightening
Torque
"
Cylinder
head
cover
to
cylinder
head/timing
chain
cover
M6
bolt
.........
..
..
...
........
10
Nm
(89
in-lb)
M7
bolt
.......
.
.
..
...
.
...
.
.....
15
Nm
(11
ft-Ib)
Hydraulic
cam
followers,
checking
and
replacing
(M42
and
al¡
6-cylinder
engines)
The
M42
engine
and
al¡
6-cylinder
engines
use
self-adjust-
ing
hydraulic
cam
followers
to
keep
the
valveclearances
with-
ina
limited
working
range
.
The
cam
followers
are
sealed
units
and
require
no
maintenance
.
See
Fig
.
14
.
.
Under
some
circumstances,
suchasa
cold
start,
the
cam
followers
may
become
noisy
.
Hydraulic
cam
follower
noise
is
usually
a
high-pitched
tapping
or
chattering
noise
.
In
most
in-
stances,
this
is
considered
normalas
long
as
the
noise
goes
away
in
a
fewminutes
(maximum
20
minutes)
.
lf
the
noise
does
not
go
away,
either
the
follower
is
faulty
or
the
oil
pres-
sure
to
the
follower
is
low
.
Hydraulic
cam
follower
replace-
ment
requires
that
the
camshaft
first
be
removed
.
NOTE-
Before
checking
valve
adjusters,
make
sure
engine
oil
ís
fresh
and
at
proper
level
.
CYLINDER
HEAD
AND
VALVETRAIN
116-
9
Fig
.
14
.
Section
view
of
camshaft
(A),
hydraulic
cam
follower
(B),
and
valvewith
conical
valvespring
(C)
usedon
M52
engine
.
1.
Run
engine
until
it
reachesnormal
operating
tempera-
ture
.
2
.
Turn
engine
off
and
remove
top
engine
covers,
ignition
coils,
and
cylinder
head
covers
.
See
113
Cylinder
Head
Removal
and
Installation
.
3
.
Use
a
plastic
or
wooden
stickto
press
down
on
top
of
cam
follower
.
See
Fig
.
15
.
If
there
is
any
noticeable
clearance,
the
follower
is
faulty
and
should
be
replaced
.
811107
Fig
.
15
.
Hydraulic
cam
follower
in
M52
enginebeing
checked
.
Note
that
camshaft
lobe
is
pointing
up
.
CYLINDER
HEAD
AND
VALVETRAIN,
RECONDITIONING
Page 94 of 759
116-
1
0
CYLINDER
HEADAND
VALVETRAIN
NOTE-
When
checking
a
cam
follower,
make
sure
the
corre-
sponding
camshaft
lobe
ís
facing
up
so
that
there
is
no
valve
spring
pressure
on
the
follower
.
4
.
To
replace
a
cam
follower,
remove
appropriate
cam-
shaft
.
Refer
to
camshaft
removal
procedures
given
ear-
lier
.
5
.
Once
camshaft
is
out
of
way,
withdraw
faulty
cam
fol-
lower
and
replace
with
new
one
.
Inspect
cam
follower
bores
for
wear
and
scoring
.
6
.
Camshaft,
timing
chain
and
cylinder
head
cover
reas-
sembly
is
reverse
of
disassembly
.
Tightening
Torques
"
Camshaft
bearing
caps
to
cylinder
head
M7
....
.
..
.
......
.
.....
...
.
..
.
15
Nm
(11
ft-Ib)
"
Cylinder
head
cover
to
cylinder
headltiming
chain
cover
M6
....
.
..
.
.
.
..........
...
.
.
..
10
Nm
(89
in-lb)
"
Timing
chain
hydraulic
tensioner
to
cylinder
head-see
117
Camshaft
Timing
Chain
"
Timing
chain
sprocket
to
camshaft
flange
(M6)-see
117
Camshaft
Timing
Chain
CYLINDER
HEAD
AND
VALVETRAIN,
RECONDITIONING
Table
c
.
Valve
Guide
Specifications
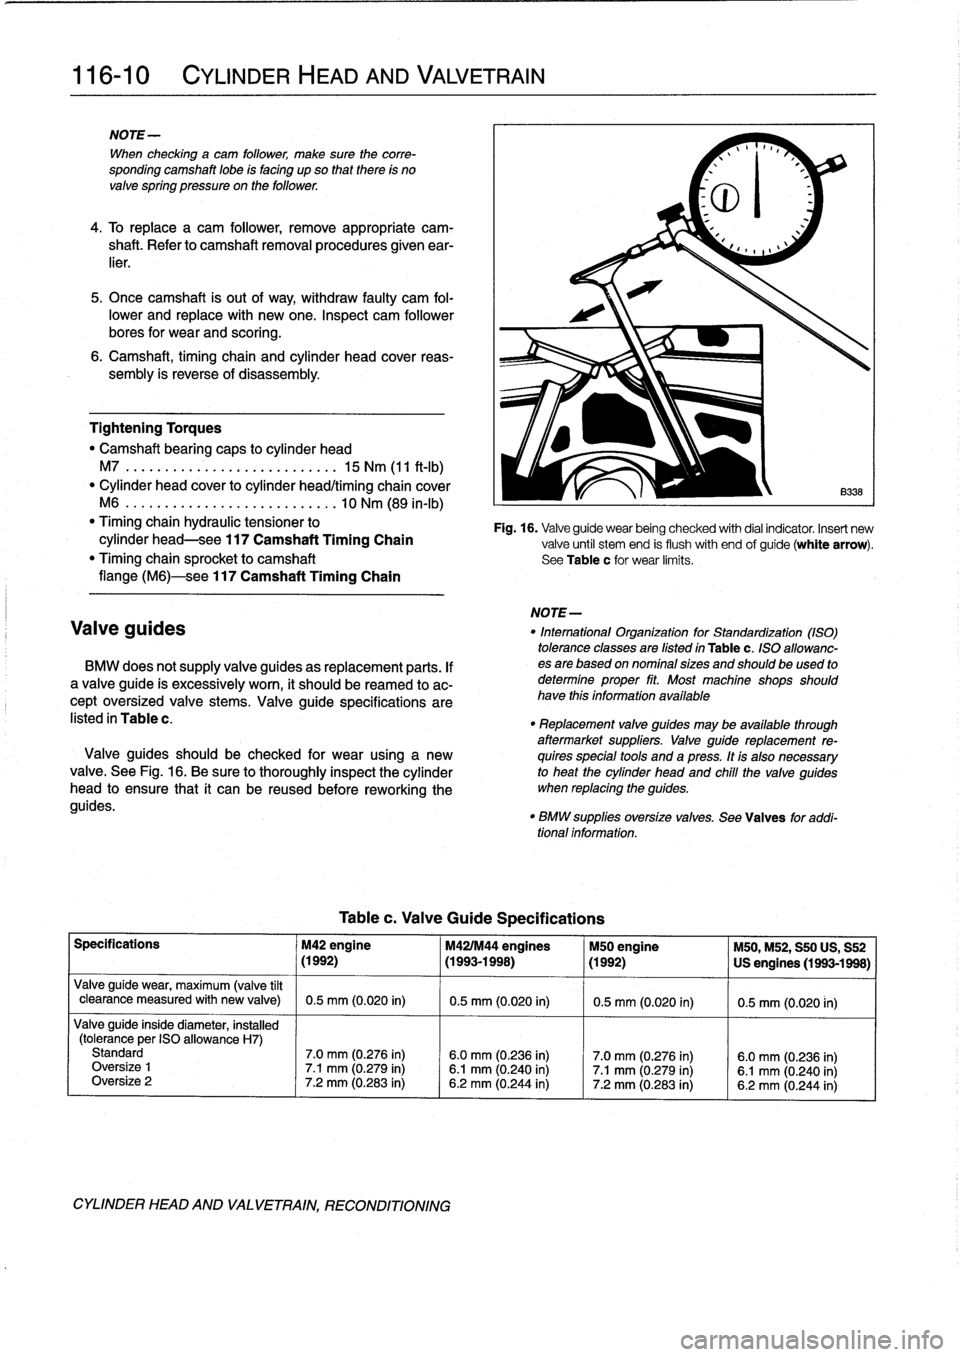
Fig
.
16
.
Valveguide
wear
being
checked
with
dial
indicator
.
Insert
new
valve
until
stem
end
is
flush
with
end
of
guide(white
arrow)
.
See
Table
c
for
wear
limits
.
NOTE-
Valve
guides
"
Intemational
Organization
for
Standardization
(ASO)
tolerance
classes
are
Gsted
in
Table
c
.
ISO
allowanc
BMW
does
notsupply
valve
guides
as
replacement
parts
.
If
esare
based
on
nominal
sizes
and
should
beused
to
a
valve
guide
is
excessively
worn,
it
should
be
reamed
to
ac-
determine
proper
fit
.
Most
machine
shops
should
cept
oversized
valve
stems
.
Valve
guide
specifications
are
have
thís
informationavailable
listed
in
Table
c
.
"
Replacement
valve
guides
may
be
available
through
aftermarket
suppliers
.
Valve
guide
replacement
re-
Valve
guides
should
be
checked
for
wear
using
a
new
quires
specíal
tools
and
a
press
.
It
is
also
necessary
valve
.
See
Fig
.
16
.
Be
sure
to
thoroughly
inspect
the
cylinder
to
heat
the
cylinder
head
and
chile
the
valve
guides
head
to
ensure
that
it
can
be
reused
before
reworking
the
when
replacing
the
guides
.
guides
.
"
BMW
suppllesoversize
valves
.
Sea
Valves
for
addi-
tional
information
.
Specifications
M42
engine
M421M44
engines
M50
engine
M50,M52,
S50
US,
S52
~
(1992)
~
(1993-1998)
~
(1992)
~
US
engines
(1993-1998)
Valve
guide
wear,
maximum
(valve
tílt
clearance
measured
with
new
valve)
0
.5
mm
(0
.020
in)
0
.5
mm
(0
.020
in)
0
.5
mm
(0
.020
in)
0
.5
mm
(0
.020
in)
Valveguide
inside
diameter,
installed
(tolerance
per
ISO
allowance
H7)
Standard
7
.0
mm
(0
.276
in)
6
.0
mm
(0
.236
in)
7
.0
mm
(0.276
in)
6
.0
mm
(0
.236
in)
Oversize
1
7
.1
mm
(0
.279
in)
6
.1
mm
(0
.240
in)
7
.1
mm
(0.279
in)
6
.1
mm
(0
.240
in)
Oversize
2
7
.2
mm
(0
.283
in)
6
.2
mm
(0
.244
in)
7
.2
mm
(0
.283
in)
6
.2
mm
(0
.244
in)
Page 97 of 759
GENERAL
......
.
.
.
.
.
.
.
.
.
...
.
.
.
.
.
.
.
.
.
.
117-1
Camshaft
timing
chains,
removing
(6-cylinder
engines)
....
.
....
..
....
..
...
.117-7
CAMSHAFT
TIMING
CHAIN,
Camshaft
timing
chains,
installing
4-CYLINDER
....
.
.
.
.
.
.
.
.
.
.
.
.......
.
...
117-2
6-clinderen
nes
117-11
Camshaft
timingchain,
removing
(
y
gi
(4-cylinder
engines)
...
..
....
..
...
...
....
117-2
VANOS
(VARIABLE
VALVE
TIMING)
.
..
117-14
Camshaft
timingchain,
installing
VANOS
system
operation,
testing
.....
.
....
117-14
(4-cylinder
engines)
...
..
...
....
..
.
.....
117-4
VANOS
control
unit,
removing
.
..
..........
117-16
CAMSHAFT
TIMINGCHAINS,
VANOS
control
unit,
installing
..
..
..........
117-17
6-CYLINDER
.
.........................
117-6
GENERAL
117
Camshaft
Timing
Chain
This
repair
group
covers
timing
chain
repair
information
for
the
4-
and
6-cylinder
engines
.
4-cylinder
enginesuse
one
double-row
chain
to
drive
the
dual
overhead
camshafts
.
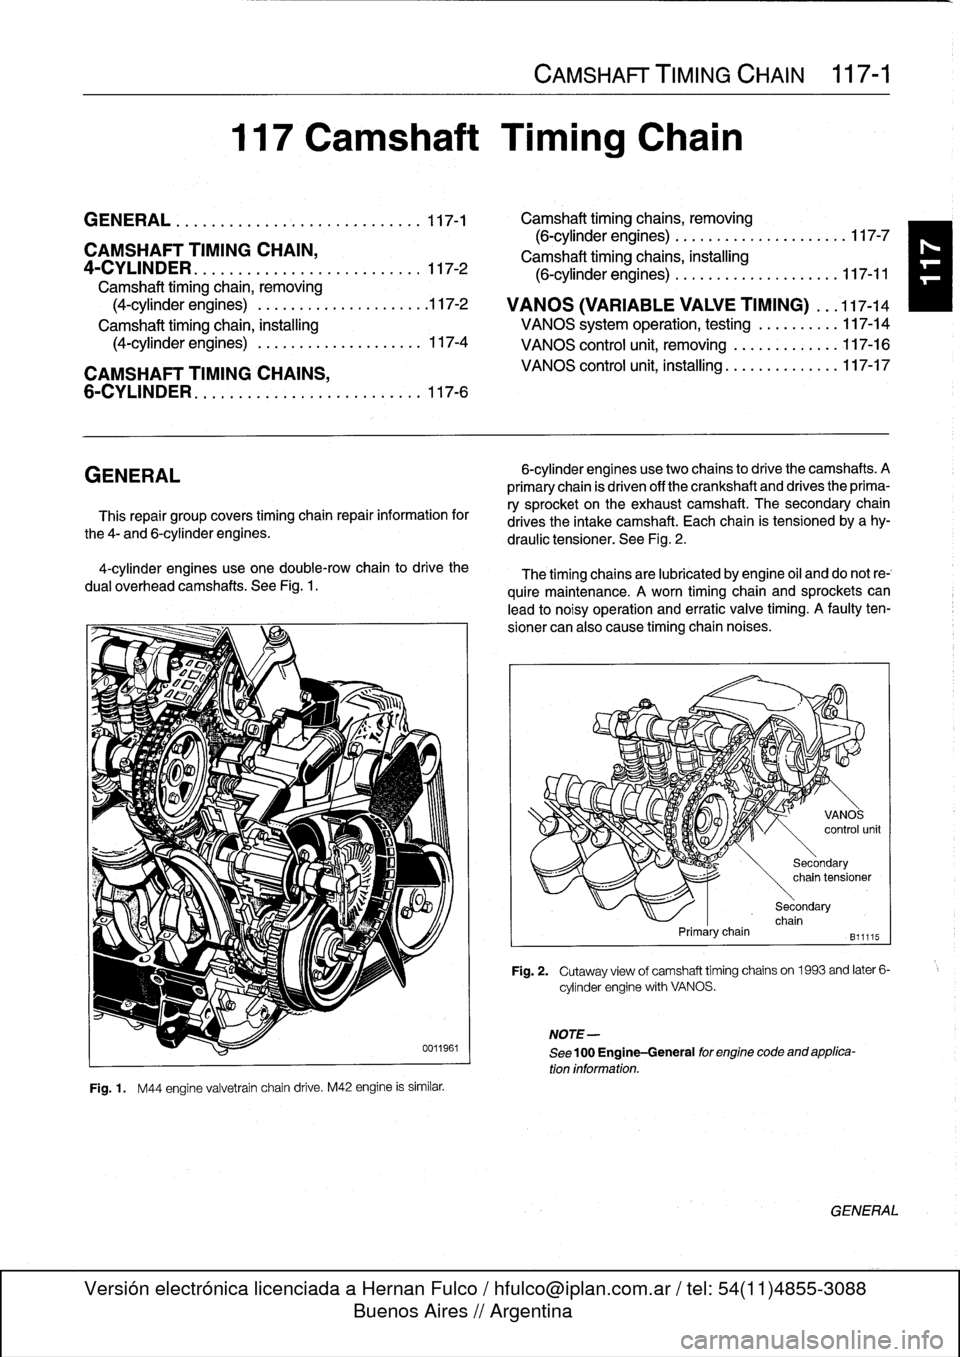
See
Fig
.
1
.
Fig
.
1
.
M44
engine
valvetrain
chain
drive
.
M42
engine
is
similar
.
CAMSHAFT
TIMING
CHAIN
117-1
6-cylinder
enginesusetwo
chains
to
drive
the
camshafts
.
A
primary
chain
is
driven
off
the
crankshaft
and
drives
the
prima-
ry
sprocket
on
the
exhaustcamshaft
.
The
secondary
chain
drives
the
intake
camshaft
.
Each
chain
is
tensioned
by
a
hy-
draulic
tensioner
.
See
Fig
.
2
.
The
timing
chainsare
lubricated
by
engine
oil
and
do
not
re-`
quire
maintenance
.
A
worn
timing
chain
and
sprockets
can
lead
to
noisy
operation
and
erratic
valve
timing
.
A
faulty
ten-
sioner
can
also
cause
timing
chaín
noises
.
Primarychain
NOTE-
See
100
Engine-General
for
engine
code
and
applica-
tion
information
.
Secondary
chain
tensioner
Secondary
chain
B11115
Fig
.
2
.
Cutaway
view
of
camshaft
timing
chains
on1963
and
later
6-
cylinder
engine
with
VANOS
.
GENERAL
Page 98 of 759
117-2
CAMSHAFT
TIMING
CHAIN
CAMSHAFT
TIMING
CHAIN,
4-CYLINDER
Special
BMW
service
tools
are
needed
for
timing
chain
re-
moval
and
installation
procedures
.
The
special
tools
assure
proper
timing
of
the
valvetrain
.
Precíse
marks
to
setthe
timing
on
the
camshafts
are
not
provided
for
reassembly
.
Read
the
procedures
through
before
beginning
the
job
.
CAUTION-
lf
the
camshaftsare
not
properly
timed,
the
pis-
tons
can
contact
thevalves
.
Camshaft
timing
chain,
removing
(4-cylinder
engines)
U0119-
Fig
.
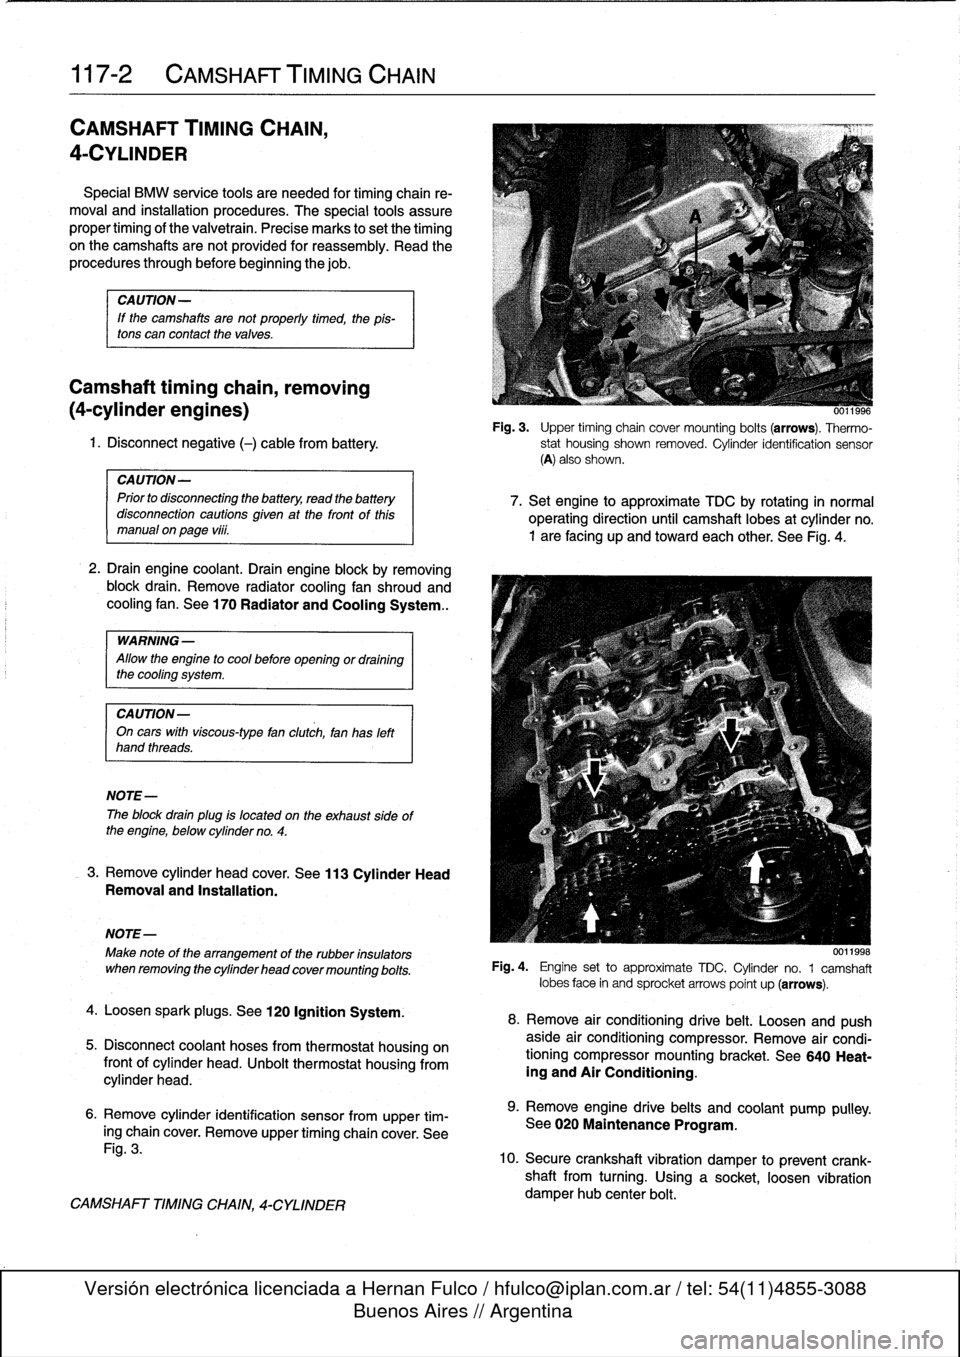
3
.
Upper
timing
chain
covermounting
bolts(arrows)
.
Thermo-
1
.
Disconnect
negative
(-)cablefrom
battery
.
stat
housing
shown
removed
.
Cylinder
ídentification
sensor
(A)
also
shown
.
CAUTION-
Prior
to
disconnecting
the
battery,
read
the
battery
disconnection
cautions
given
at
the
front
of
this
manual
on
page
viii
.
2
.
Drain
engine
coolant
.
Drain
engine
block
byremoving
block
drain
.
Remove
radiator
cooling
fan
shroud
and
cooling
fan
.
See
170
Radiator
and
Cooling
System
..
WARNING
-
Allow
the
engine
to
cool
before
openingor
draining
the
cooling
system
.
CA
UTION-
On
cars
with
viscous-type
fan
clutch,
fan
has
left
hand
threads
.
NOTE-
The
block
drain
plug
is
located
on
the
exhaust
sideof
the
engine,
below
cylinder
no
.
4
.
3
.
Remove
cylinder
head
cover
.
See
113
Cylinder
HeadRemoval
and
Installation
.
NOTE-
Make
note
of
the
arrangement
of
the
rubber
insulators
when
removing
the
cylinder
head
cover
mounting
belts
.
4
.
Loosen
sparkplugs
.
See
120
Ignition
System
.
5
.
Disconnect
coolant
hoses
from
thermostat
housingon
front
of
cylinder
head
.
Unbolt
thermostat
housing
from
cylinder
head
.
6
.
Remove
cylinder
identification
sensor
from
upper
tim-
ing
chain
cover
.
Remove
upper
timing
chain
cover
.
See
Fig
.
3
.
CAMSHAFT
TIMING
CHAIN,
4-CYLINDER
7
.
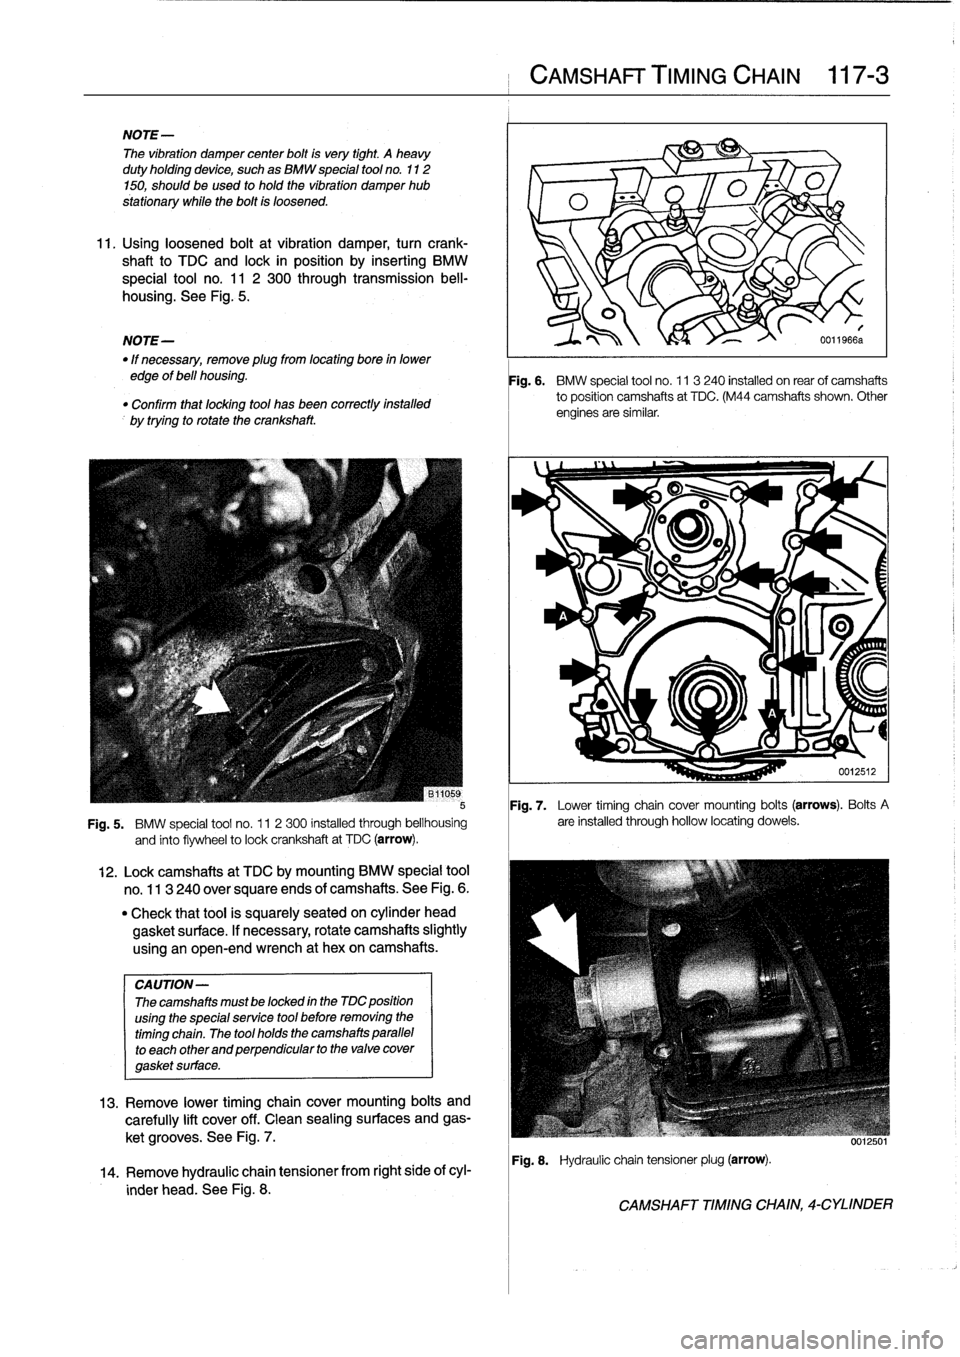
Set
engine
to
approximate
TDC
by
rotating
in
normal
operating
direction
until
camshaft
lobes
at
cylinder
no
.
1
are
facing
up
and
toward
each
other
.
See
Fig
.
4
.
0011998
Fig
.
4
.
Engine
set
to
approximate
TDC
.
Cylinder
no
.
1
camshaft
lobes
face
in
and
sprocket
arrows
point
up
(arrows)
.
8
.
Remove
air
conditioning
drive
belt
.
Loosenand
push
aside
air
conditioning
compressor
.
Remove
air
condi-
tioning
compressor
mounting
bracket
.
See
640
Heat-
ing
and
Air
Conditioning
.
9
.
Remove
engine
drive
belts
and
coolant
pump
pulley
.
See
020
Maintenance
Program
.
10
.
Secure
crankshaft
vibration
damper
to
prevent
crank-
shaft
from
turning
.
Using
a
socket,
loosen
vibration
damper
hub
center
bolt
.
Page 99 of 759
NOTE-
The
vibration
damper
center
bolt
is
very
tight
.
A
heavy
duty
holding
device,
such
as
BMW
special
tool
no
.
112
150,
should
be
used
to
hold
the
vibration
damper
hub
V
stationary
while
the
bolt
is
loosened
.
v
11
.
Usingloosened
bolt
at
vibration
damper,
turn
crank-
shaft
to
TDC
and
lock
in
position
by
inserting
BMW
special
tool
no
.
11
2
300
through
transmission
bell-
-
p
housing
.
See
Fig
.
5
.
v
O
NOTE-
I\
0011966a
"
If
necessary,
remove
plugfrom
locating
boye
in
lower
edge
of
bell
housing
.
"
Confirm
that
locatng
tool
has
been
correctlyinstalled
by
trying
to
rotate
the
crankshaft
.
Fig
.
7
.
Lower
timing
chain
cover
mounting
bolts
(arrows)
.
Bolts
A
Fig
.
5
.
BMW
special
tool
no
.
11
2300
installed
through
bellhousing
are
installed
through
hollow
locating
dowels
.
and
finto
flywheel
to
lock
crankshaft
at
TDC
(arrow)
.
CA
UTION-
Thecamshafts
mustbe
locked
in
the
MC
position
using
the
specialservice
tool
before
removing
the
timing
chain
.
The
tool
holds
the
camshafts
parallel
to
each
other
and
perpendicular
to
the
valve
cover
gasket
surface
.
12
.
Lockcamshafts
at
TDC
bymounting
BMW
special
tool
no
.
113
240
over
square
ends
of
camshafts
.
See
Fig
.
6
.
"
Check
that
tool
is
squarely
seated
on
cylinder
head
gasket
surface
.
If
necessary,
rotate
camshafts
slightly
using
an
open-end
wrench
at
hexon
camshafts
.
13
.
Remove
lower
timing
chaincover
mounting
bolts
and
carefully
lift
cover
off
.
Clean
sealing
surfaces
and
gas-
ket
grooves
.
See
Fig
.
7
.
14
.
Remove
hydraulic
chaintensioner
from
right
side
of
cyl-
inder
head
.
See
Fig
.
8
.
CAMSHAFT
TIMING
CHAIN
117-
3
Fig
.
6
.
BMW
special
tool
no
.
11
3240
installed
on
rearof
camshafts
to
position
camshafts
at
TDC
.
(M44
camshafts
shown
.
Other
engines
are
similar
.
Fig
.
8
.
Hydraulic
chain
tensionerplug
(arrow)
.
CAMSHAFT
TIMING
CHAIN,
4-CYLINDER