tow BMW M3 COUPE 2009 E92 User Guide
[x] Cancel search | Manufacturer: BMW, Model Year: 2009, Model line: M3 COUPE, Model: BMW M3 COUPE 2009 E92Pages: 256, PDF Size: 12.03 MB
Page 95 of 256
Controls
93Reference
At a glance
Driving tips
Communications
Navigation
Entertainment
Mobility
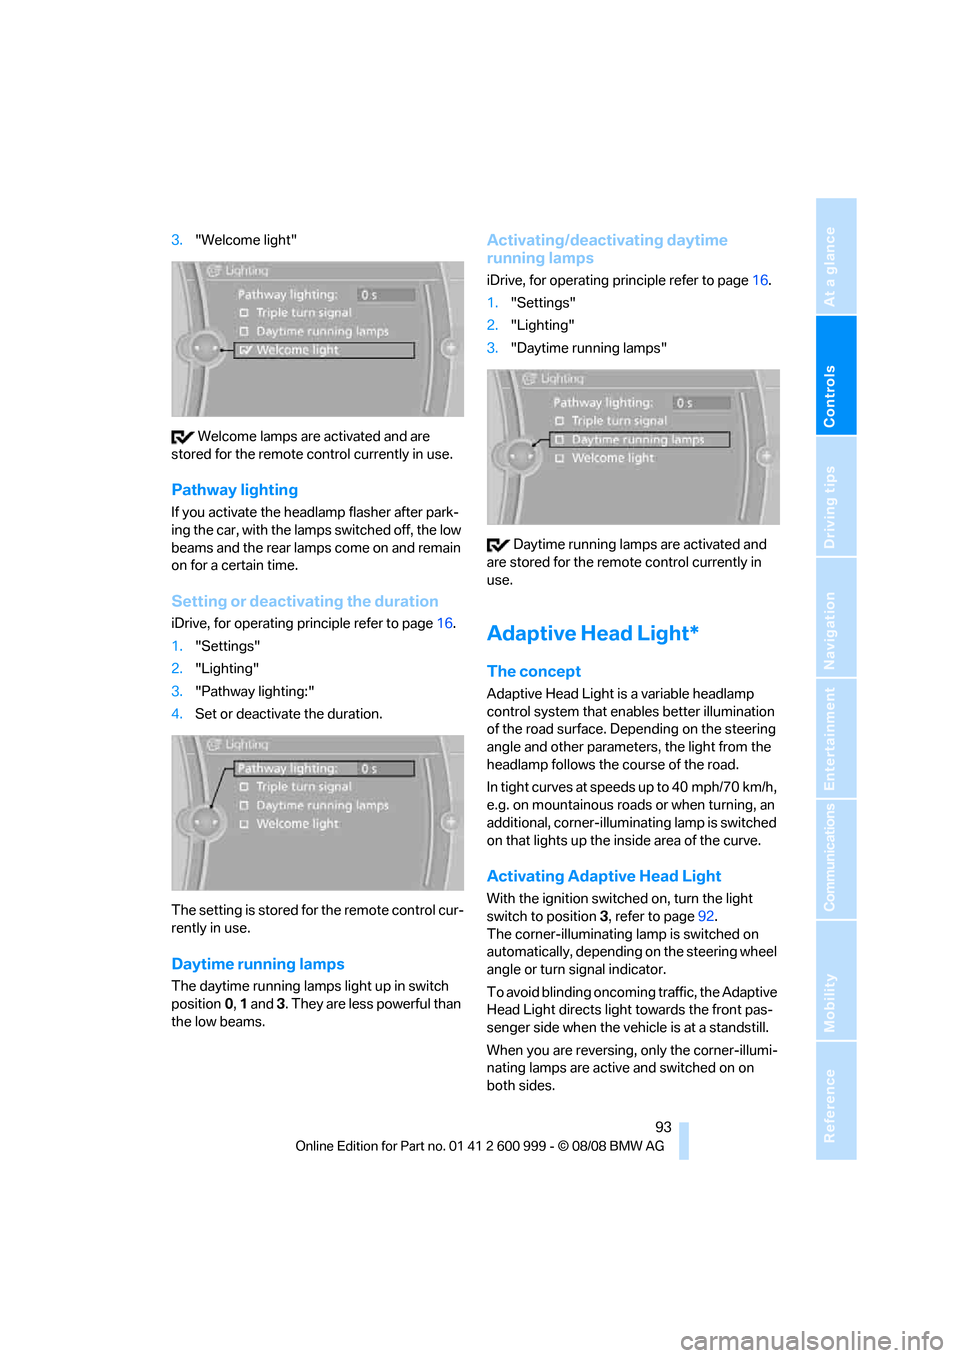
3."Welcome light"
Welcome lamps are activated and are
stored for the remote control currently in use.
Pathway lighting
If you activate the headlamp flasher after park-
ing the car, with the lamps switched off, the low
beams and the rear lamps come on and remain
on for a certain time.
Setting or deactivating the duration
iDrive, for operating principle refer to page16.
1."Settings"
2."Lighting"
3."Pathway lighting:"
4.Set or deactivate the duration.
The setting is stored for the remote control cur-
rently in use.
Daytime running lamps
The daytime running lamps light up in switch
position0, 1 and 3. They are less powerful than
the low beams.
Activating/deactivating daytime
running lamps
iDrive, for operating principle refer to page16.
1."Settings"
2."Lighting"
3."Daytime running lamps"
Daytime running lamps are activated and
are stored for the remote control currently in
use.
Adaptive Head Light*
The concept
Adaptive Head Light is a variable headlamp
control system that enables better illumination
of the road surface. Depending on the steering
angle and other parameters, the light from the
headlamp follows the course of the road.
In tight curves at speeds up to 40 mph/70 km/h,
e.g. on mountainous roads or when turning, an
additional, corner-illuminating lamp is switched
on that lights up the inside area of the curve.
Activating Adaptive Head Light
With the ignition switched on, turn the light
switch to position 3, refer to page92.
The corner-illuminating lamp is switched on
automatically, depending on the steering wheel
angle or turn signal indicator.
To avoid blinding oncoming traffic, the Adaptive
Head Light directs light towards the front pas-
senger side when the vehicle is at a standstill.
When you are reversing, only the corner-illumi-
nating lamps are active and switched on on
both sides.
ba8_E9293M3_cic.book Seite 93 Dienstag, 19. August 2008 12:01 12
Page 98 of 256
Climate
96
Climate
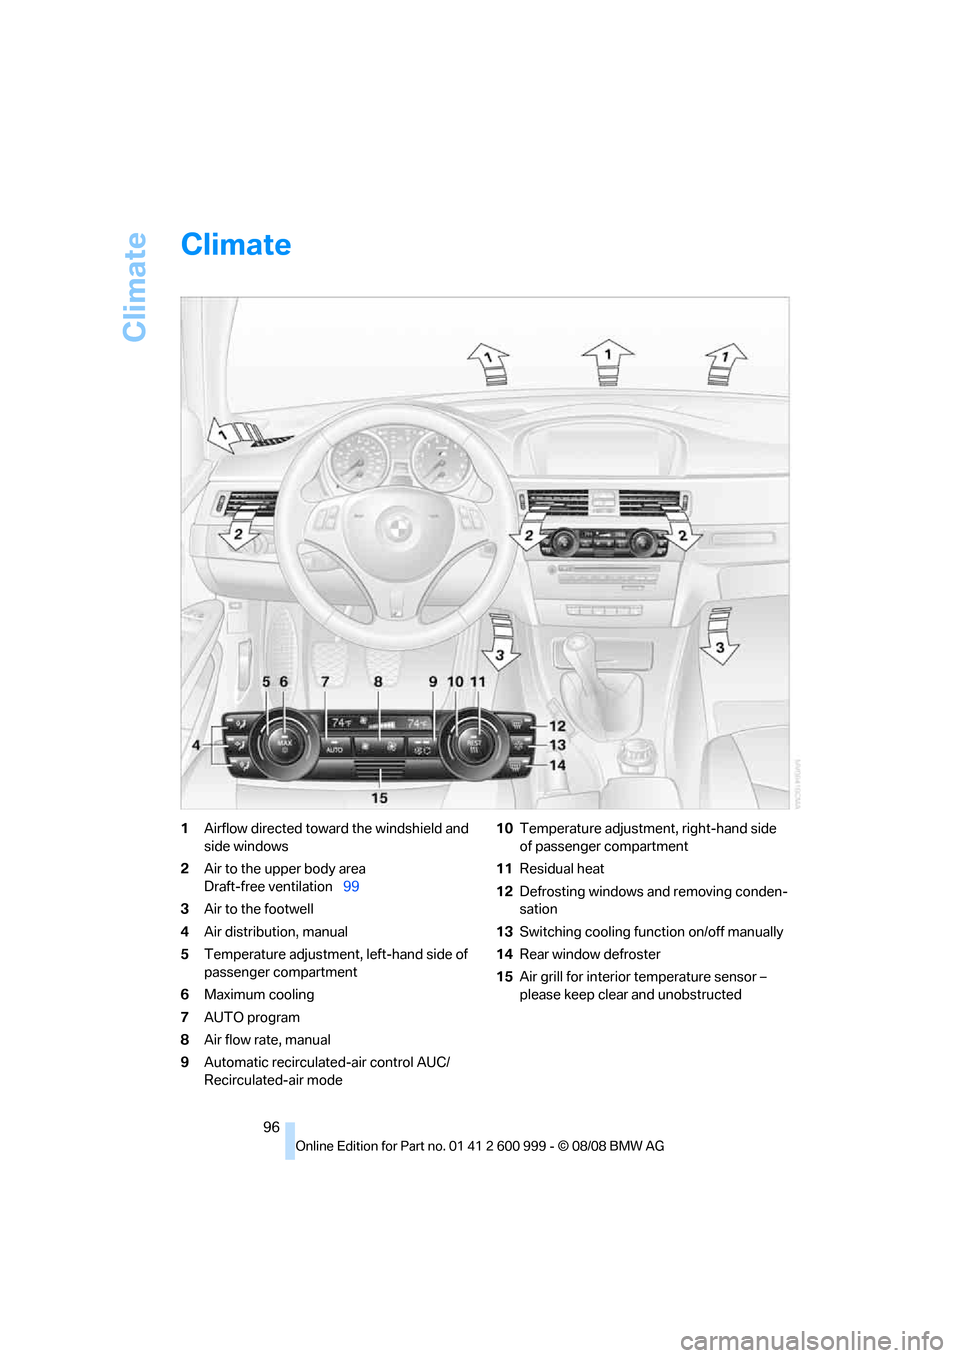
1Airflow directed toward the windshield and
side windows
2Air to the upper body area
Draft-free ventilation99
3Air to the footwell
4Air distribution, manual
5Temperature adjustment, left-hand side of
passenger compartment
6Maximum cooling
7AUTO program
8Air flow rate, manual
9Automatic recirculated-air control AUC/
Recirculated-air mode10Temperature adjustment, right-hand side
of passenger compartment
11Residual heat
12Defrosting windows and removing conden-
sation
13Switching cooling function on/off manually
14Rear window defroster
15Air grill for interior temperature sensor –
please keep clear and unobstructed
ba8_E9293M3_cic.book Seite 96 Dienstag, 19. August 2008 12:01 12
Page 99 of 256
Controls
97Reference
At a glance
Driving tips
Communications
Navigation
Entertainment
Mobility
Automatic climate control
Comfortable interior climate
AUTO program7 offers the ideal air distribution
and air flow rate for almost all conditions, refer
to AUTO program below. All you need to do is
select an interior temperature which is comfort-
able for you.
The following sections inform you in detail
about how to adjust the settings.
Most settings are stored for the remote control
currently in use, refer also to Personal Profile
settings on page26.
Adjusting air distribution manually
The air distribution can be
switched on and off manually. The
air is directed to the windshield, to
the upper body area and to the
footwell. Automatic air distribution adjustment
is deactivated.
The current setting is briefly displayed on the
Control Display when a button is pressed.
You can switch the automatic air distribution
back on by pressing the AUTO button. This
automatically switches on the cooling function
as well.
Temperature
Set the desired temperatures indi-
vidually for the driver's and front
passenger's sides.
The automatic climate control
achieves this temperature as quickly as possi-
ble regardless of the season, using maximum
cooling or heating power if necessary, and then
maintains it.
When you switch between different tem-
perature settings in quick succession, the
automatic climate control does not have
enough time to achieve the set temperature.<
You can achieve maximum heating power with
the highest setting, regardless of the outside
temperature.
The lowest setting effects continuous cooling.
Maximum cooling
At outside temperatures above
327/06 and when the engine is
running, you obtain a maximum
cooling effect as soon as possible.
The automatic climate control goes into recir-
culated-air mode at the lowest temperature. Air
flows at maximum rate from the vents for the
upper body area. You should therefore open
them for maximum cooling.
AUTO program
The AUTO program adjusts the air
distribution to the windshield and
side windows, towards the upper
body area and into the footwell for you. The air
flow rate and your temperature specifications
will be adapted to outside influences as a result
of seasonal changes, e.g. sunlight or window
condensation.
The cooling is switched on automatically with
the AUTO program.
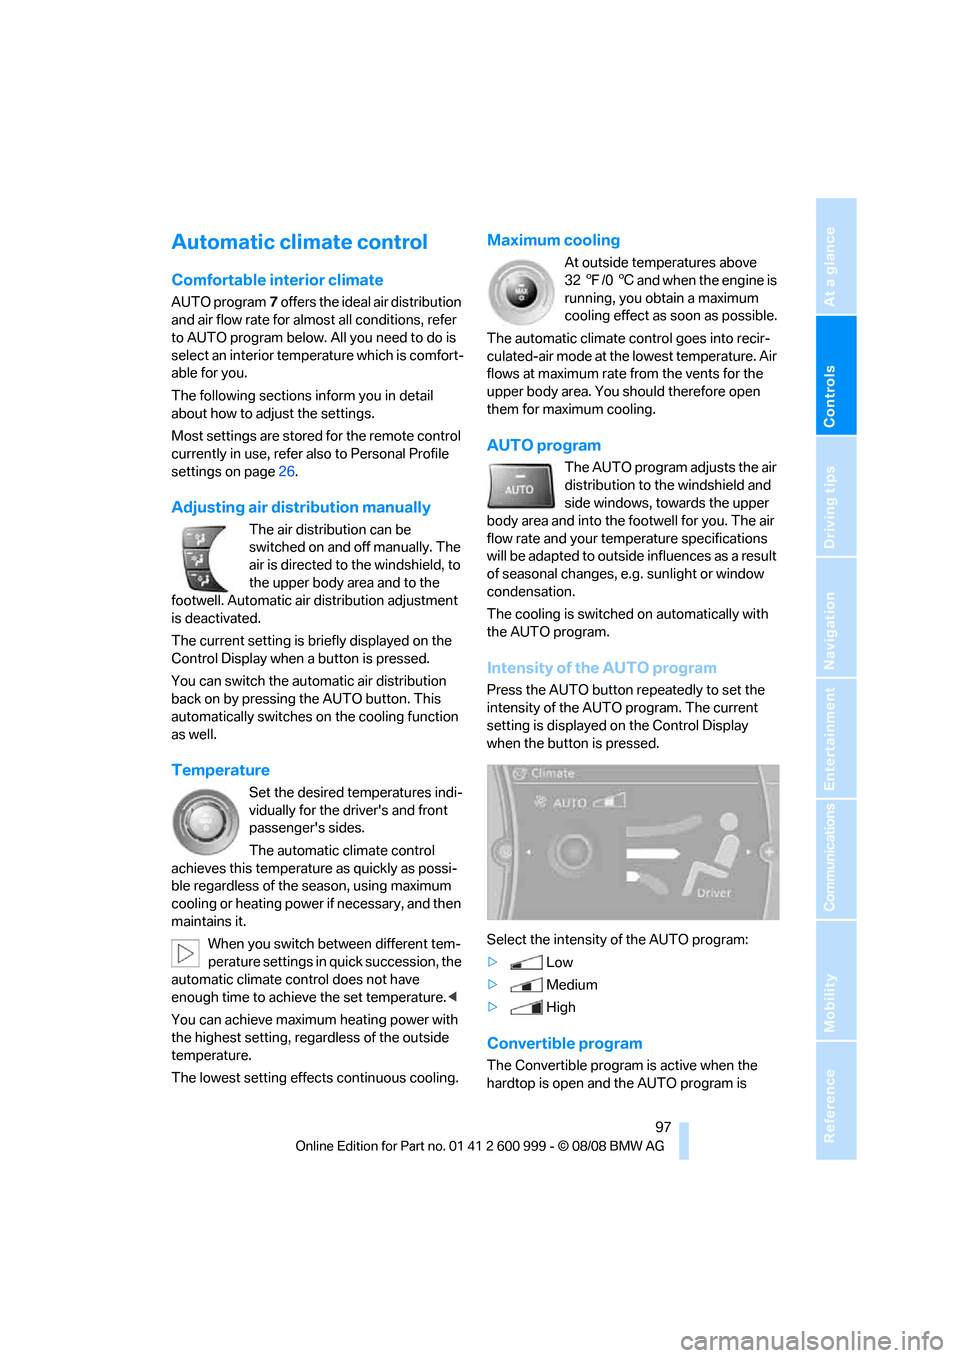
Intensity of the AUTO program
Press the AUTO button repeatedly to set the
intensity of the AUTO program. The current
setting is displayed on the Control Display
when the button is pressed.
Select the intensity of the AUTO program:
>Low
>Medium
>High
Convertible program
The Convertible program is active when the
hardtop is open and the AUTO program is
ba8_E9293M3_cic.book Seite 97 Dienstag, 19. August 2008 12:01 12
Page 101 of 256
Controls
99Reference
At a glance
Driving tips
Communications
Navigation
Entertainment
Mobility
Defrosting windows and removing
condensation
Quickly removes ice and conden-
sation from the windshield and
front side windows.
Switch on the cooling function as well.
Switching cooling function on/off
The cooling function cools and
dehumidifies the incoming air
before reheating it as required,
according to the temperature setting. This
function is only available while the engine is
running.
The cooling function helps prevent condensa-
tion on the windows or removes it quickly.
Depending on the weather, the windshield may
fog over briefly when the engine is started.
Pressing the AUTO button automatically
switches on the cooling function.
Rear window defroster
The defroster is switched off auto-
matically after a certain time.
Depending on your vehicle's
equipment, the upper wires serve as an antenna
and are not part of the rear window defroster.
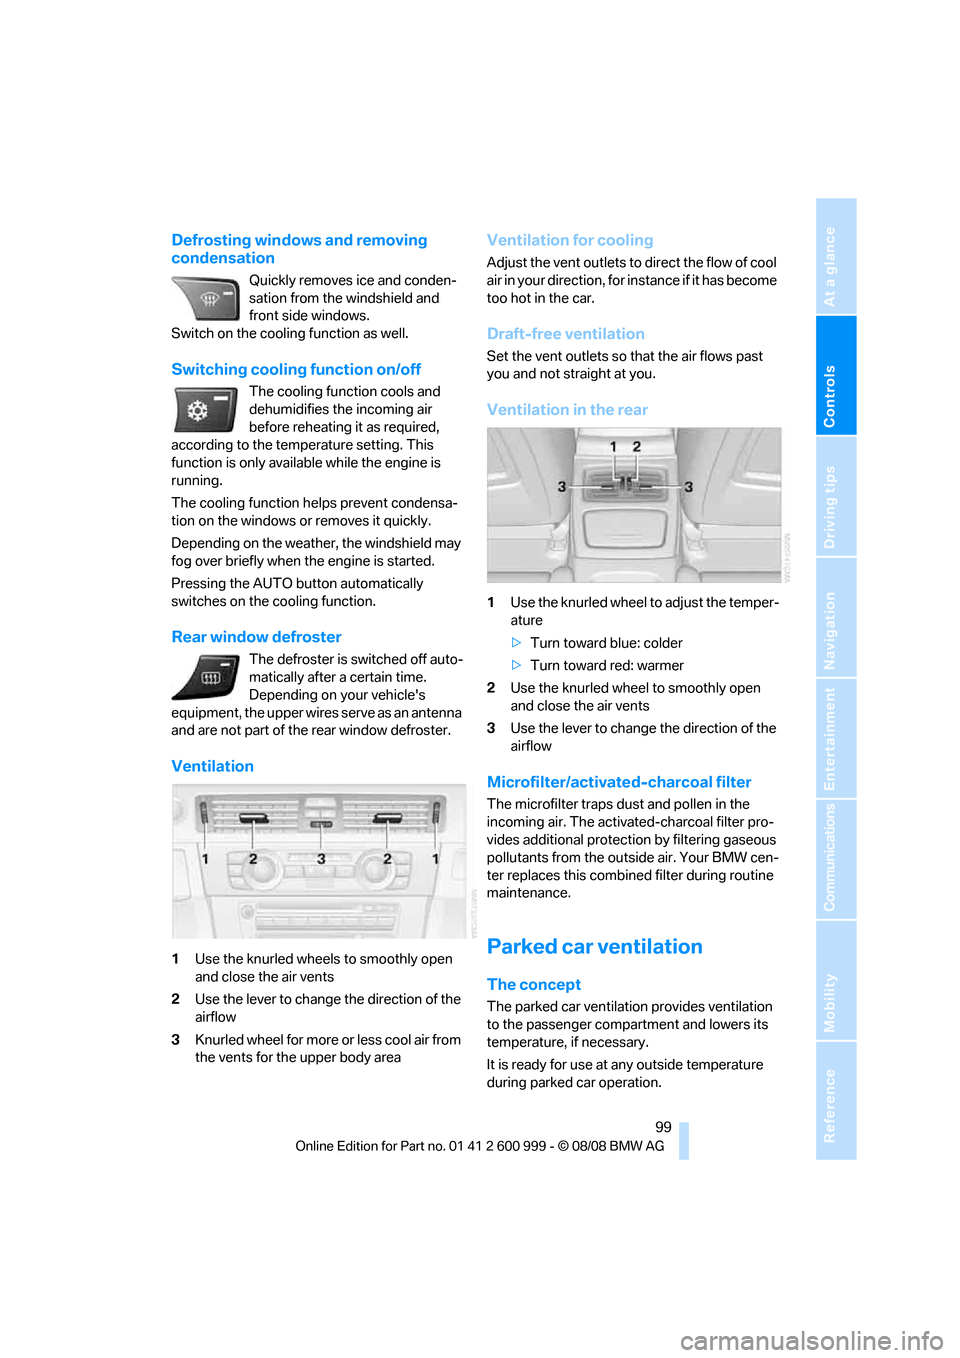
Ventilation
1Use the knurled wheels to smoothly open
and close the air vents
2Use the lever to change the direction of the
airflow
3Knurled wheel for more or less cool air from
the vents for the upper body area
Ventilation for cooling
Adjust the vent outlets to direct the flow of cool
air in your direction, for instance if it has become
too hot in the car.
Draft-free ventilation
Set the vent outlets so that the air flows past
you and not straight at you.
Ventilation in the rear
1Use the knurled wheel to adjust the temper-
ature
>Turn toward blue: colder
>Turn toward red: warmer
2Use the knurled wheel to smoothly open
and close the air vents
3Use the lever to change the direction of the
airflow
Microfilter/activated-charcoal filter
The microfilter traps dust and pollen in the
incoming air. The activated-charcoal filter pro-
vides additional protection by filtering gaseous
pollutants from the outside air. Your BMW cen-
ter replaces this combined filter during routine
maintenance.
Parked car ventilation
The concept
The parked car ventilation provides ventilation
to the passenger compartment and lowers its
temperature, if necessary.
It is ready for use at any outside temperature
during parked car operation.
ba8_E9293M3_cic.book Seite 99 Dienstag, 19. August 2008 12:01 12
Page 112 of 256
Practical interior accessories
110
Convertible
Depending on your vehicle's equipment, the
following storage spaces can be found in the
cargo bay:
>Storage compartment on the left side of the
cargo bay. To open turn handle by 90°
>Net
* for securing smaller objects, to be
attached to the fixtures on the floor panel
>Rubber strap
* for subdividing the cargo
bay; can be hooked onto the lateral lashing
eyes
>Stowage compartment under the floor
panel
Folding up the floor panel
Do not exceed the maximum permissible
load of 55 lbs/25 kg for the storage com-
partment under the floor panel, otherwise dam-
age could result.<
Coupe
Press the floor panel up and secure it with the
catch.
Convertible
To lift, grab hold of the floor panel at the open-
ing at the rear of the panel.
Lashing eyes
You will find lashing eyelets in the cargo bay for
securing luggage items with nets or tensioning
straps, refer to page119.
Coupe: ski bag*
The ski bag is designed for safe, clean transport
of up to 4 pairs of standard skis or up to
2snowboards.
With the ski bag you can stow skis with a length
of up to 6 ft 10 in/2.10 m. When skis of 6 ft 10 in/
2.10 m length are loaded, the overall capacity of
the ski bag is reduced due to its tapered design.
Loading
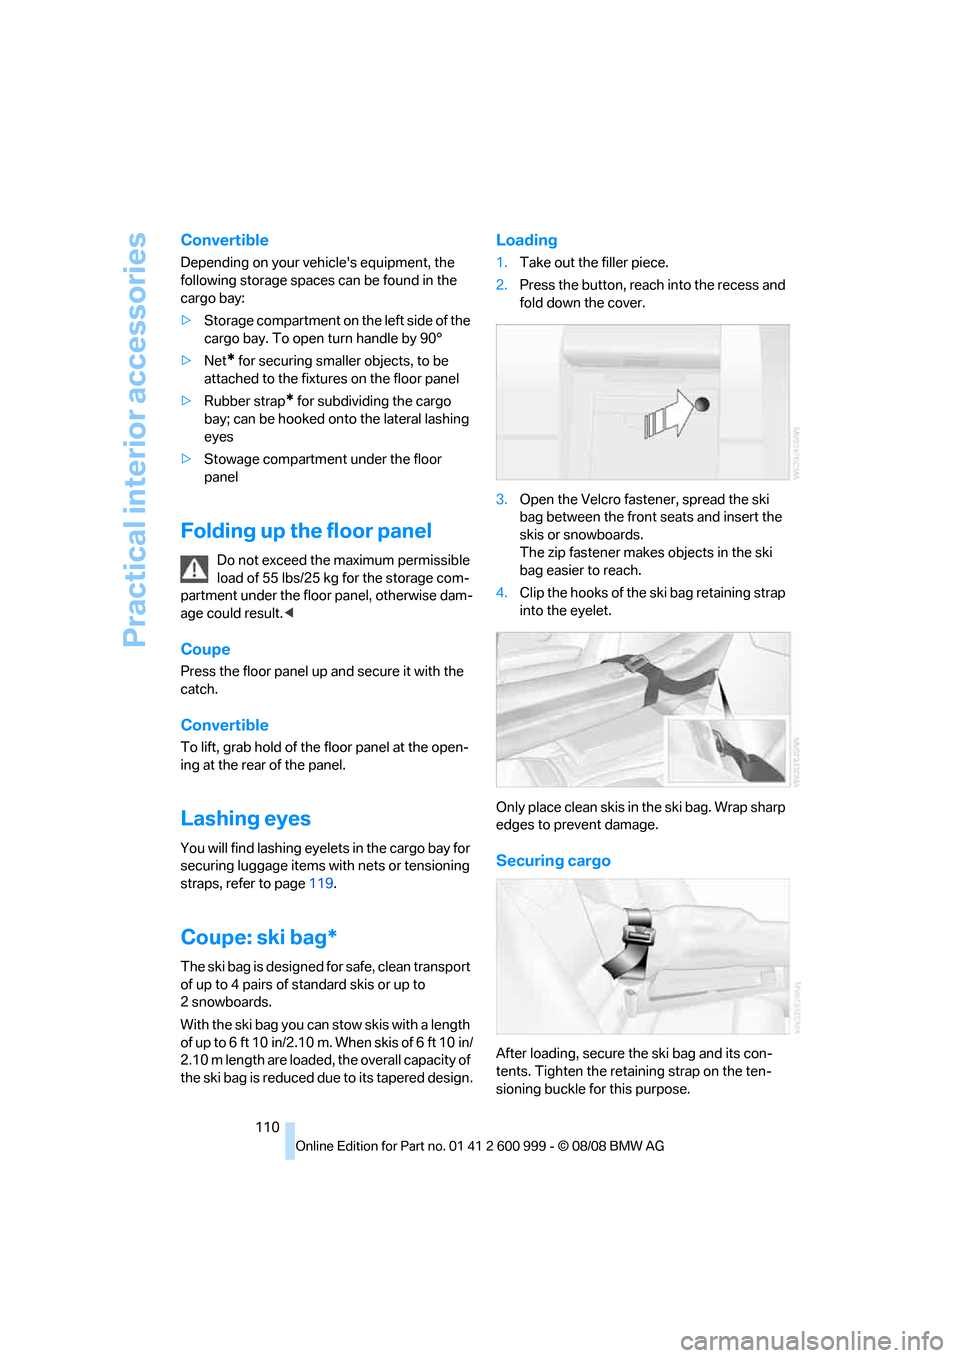
1.Take out the filler piece.
2.Press the button, reach into the recess and
fold down the cover.
3.Open the Velcro fastener, spread the ski
bag between the front seats and insert the
skis or snowboards.
The zip fastener makes objects in the ski
bag easier to reach.
4.Clip the hooks of the ski bag retaining strap
into the eyelet.
Only place clean skis in the ski bag. Wrap sharp
edges to prevent damage.
Securing cargo
After loading, secure the ski bag and its con-
tents. Tighten the retaining strap on the ten-
sioning buckle for this purpose.
ba8_E9293M3_cic.book Seite 110 Dienstag, 19. August 2008 12:01 12
Page 113 of 256
Controls
111Reference
At a glance
Driving tips
Communications
Navigation
Entertainment
Mobility
Secure the ski bag in the manner
described, otherwise it could endanger
the car's occupants, e.g. in case of heavy brak-
ing or sudden swerving.<
To store the ski bag, perform the steps
described for loading in reverse order.
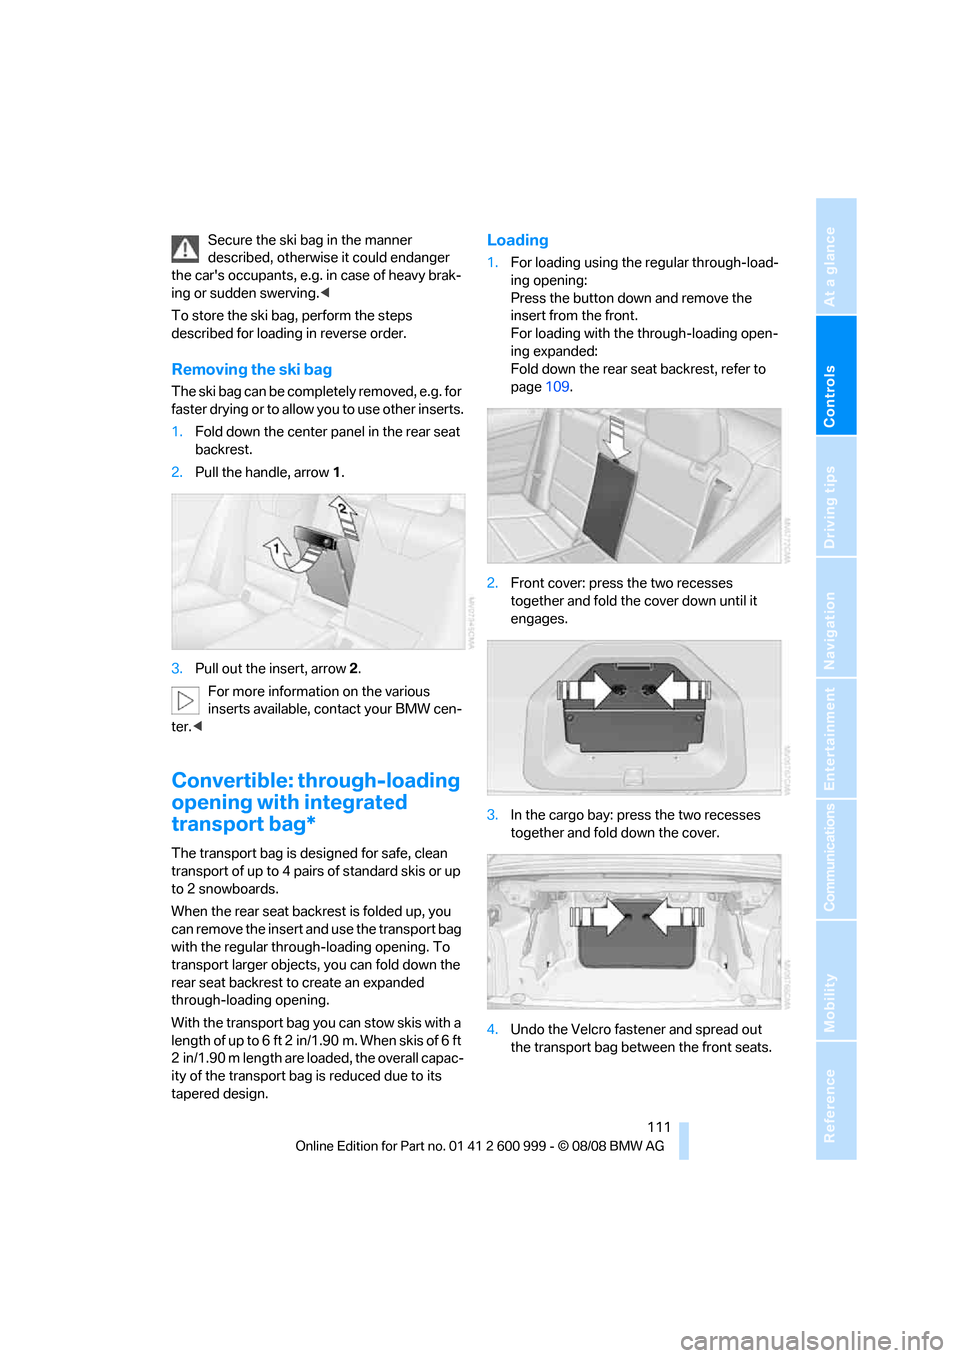
Removing the ski bag
The ski bag can be completely removed, e.g. for
faster drying or to allow you to use other inserts.
1.Fold down the center panel in the rear seat
backrest.
2.Pull the handle, arrow1.
3.Pull out the insert, arrow 2.
For more information on the various
inserts available, contact your BMW cen-
ter.<
Convertible: through-loading
opening with integrated
transport bag*
The transport bag is designed for safe, clean
transport of up to 4 pairs of standard skis or up
to 2 snowboards.
When the rear seat backrest is folded up, you
can remove the insert and use the transport bag
with the regular through-loading opening. To
transport larger objects, you can fold down the
rear seat backrest to create an expanded
through-loading opening.
With the transport bag you can stow skis with a
l e n g t h o f u p t o 6 f t 2 i n /1. 9 0 m . W h e n sk i s o f 6 f t
2 in/1.90 m length are loaded, the overall capac-
ity of the transport bag is reduced due to its
tapered design.
Loading
1.For loading using the regular through-load-
ing opening:
Press the button down and remove the
insert from the front.
For loading with the through-loading open-
ing expanded:
Fold down the rear seat backrest, refer to
page109.
2.Front cover: press the two recesses
together and fold the cover down until it
engages.
3.In the cargo bay: press the two recesses
together and fold down the cover.
4.Undo the Velcro fastener and spread out
the transport bag between the front seats.
ba8_E9293M3_cic.book Seite 111 Dienstag, 19. August 2008 12:01 12
Page 114 of 256
Practical interior accessories
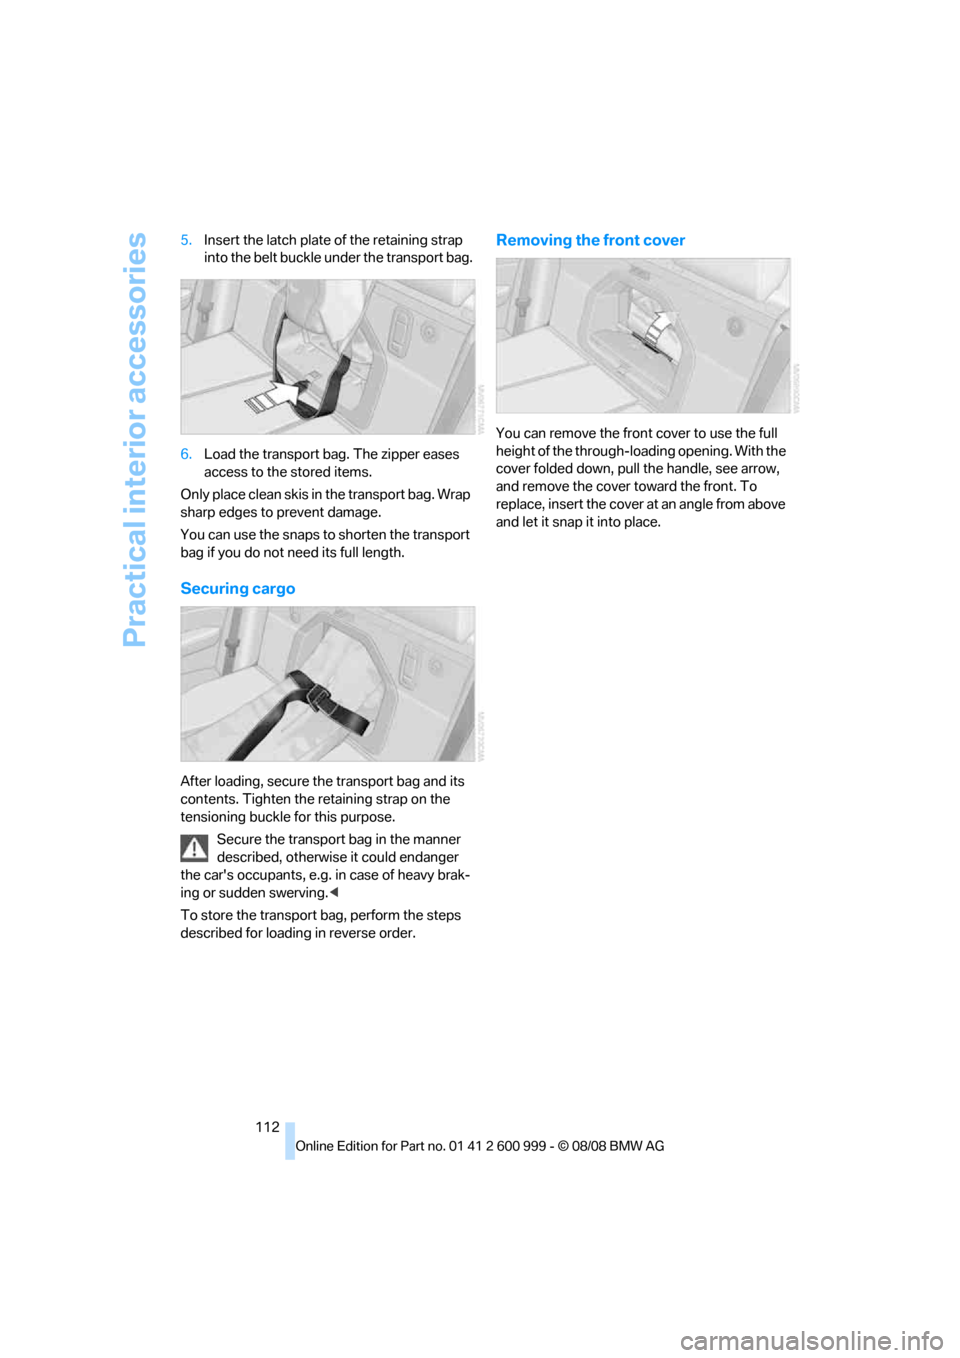
112 5.Insert the latch plate of the retaining strap
into the belt buckle under the transport bag.
6.Load the transport bag. The zipper eases
access to the stored items.
Only place clean skis in the transport bag. Wrap
sharp edges to prevent damage.
You can use the snaps to shorten the transport
bag if you do not need its full length.
Securing cargo
After loading, secure the transport bag and its
contents. Tighten the retaining strap on the
tensioning buckle for this purpose.
Secure the transport bag in the manner
described, otherwise it could endanger
the car's occupants, e.g. in case of heavy brak-
ing or sudden swerving.<
To store the transport bag, perform the steps
described for loading in reverse order.
Removing the front cover
You can remove the front cover to use the full
height of the through-loading opening. With the
cover folded down, pull the handle, see arrow,
and remove the cover toward the front. To
replace, insert the cover at an angle from above
and let it snap it into place.
ba8_E9293M3_cic.book Seite 112 Dienstag, 19. August 2008 12:01 12
Page 120 of 256
Things to remember when driving
118 during brake applications to clean the rotors is
not reached.
This can also lead to a permanent loss in ride
comfort and to squealing noises during braking.
A loss in comfort can also be caused by
extended braking with little pressure on the
pedal.
Should corrosion form on the brake rotors, the
brakes will tend to respond with a pulsating
effect that even extended application will fail to
cure.
For information on brake system technology,
refer to Compound brake on page121.
When the vehicle is parked
Condensation forms while the automatic cli-
mate control is in operation, and then exits
under the vehicle. Traces of condensed water
under the vehicle are therefore normal.
Cargo loading
To avoid loading the tires beyond their
approved carrying capacity, never over-
load the vehicle. Overloading can lead to over-
heating and increases the rate at which damage
develops inside the tires. This can ultimately
result in a sudden blow-out.<
Make sure that no liquids are spilled or
leak from their containers in the cargo
bay, as this could result in damage to the vehi-
cle.<
Determining loading limit
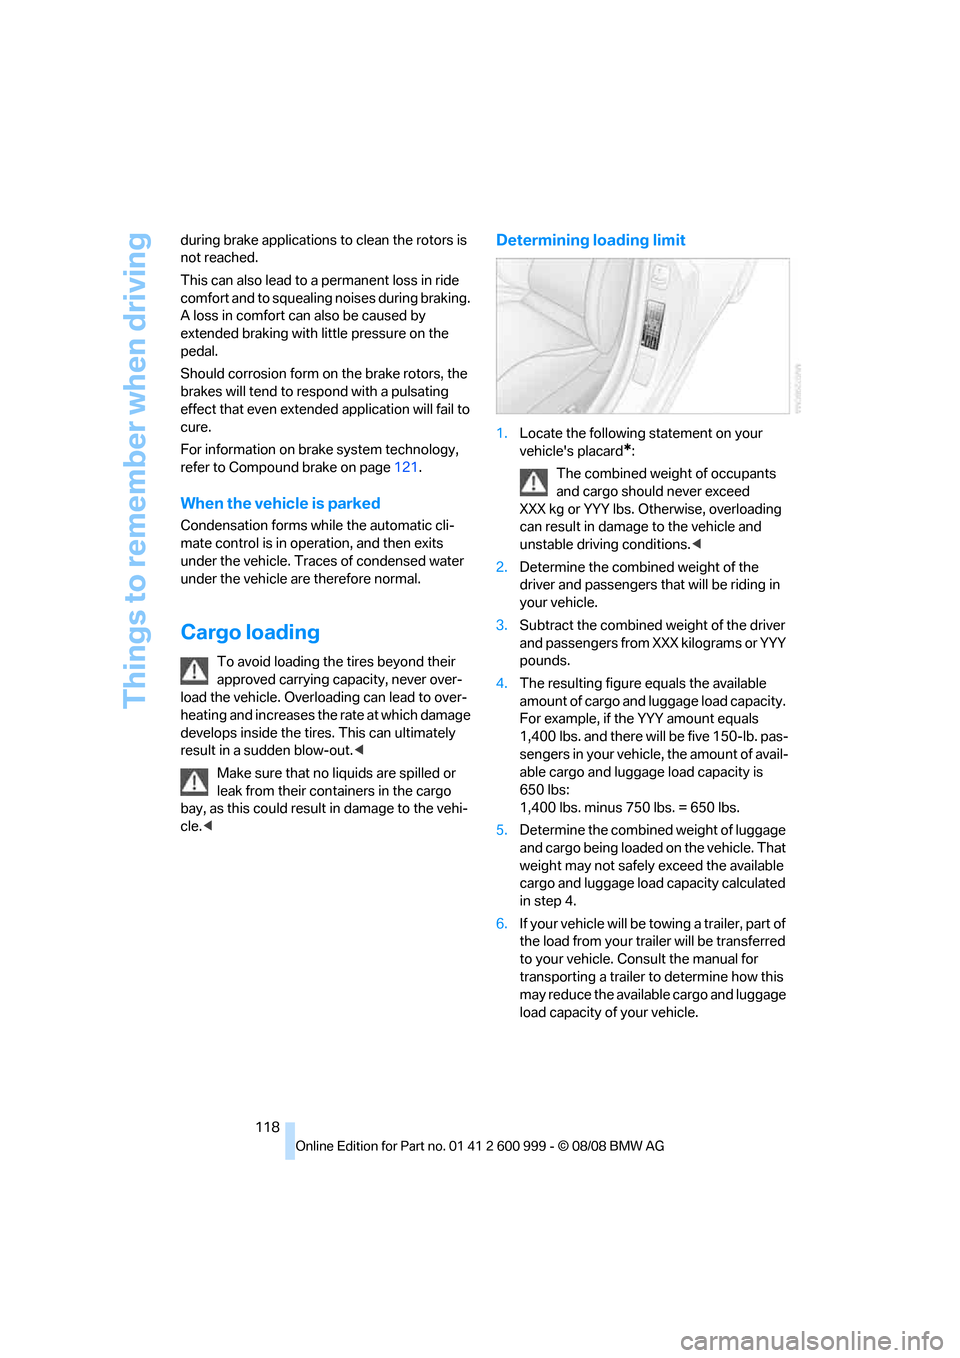
1.Locate the following statement on your
vehicle's placard
*:
The combined weight of occupants
and cargo should never exceed
XXX kg or YYY lbs. Otherwise, overloading
can result in damage to the vehicle and
unstable driving conditions.<
2.Determine the combined weight of the
driver and passengers that will be riding in
your vehicle.
3.Subtract the combined weight of the driver
and passengers from XXX kilograms or YYY
pounds.
4.The resulting figure equals the available
amount of cargo and luggage load capacity.
For example, if the YYY amount equals
1,400 lbs. and there will be five 150-lb. pas-
sengers in your vehicle, the amount of avail-
able cargo and luggage load capacity is
650 lbs:
1,400 lbs. minus 750 lbs. = 650 lbs.
5.Determine the combined weight of luggage
and cargo being loaded on the vehicle. That
weight may not safely exceed the available
cargo and luggage load capacity calculated
in step 4.
6.If your vehicle will be towing a trailer, part of
the load from your trailer will be transferred
to your vehicle. Consult the manual for
transporting a trailer to determine how this
may reduce the available cargo and luggage
load capacity of your vehicle.
ba8_E9293M3_cic.book Seite 118 Dienstag, 19. August 2008 12:01 12
Page 121 of 256
Driving tips
119Reference
At a glance
Controls
Communications
Navigation
Entertainment
Mobility
Load
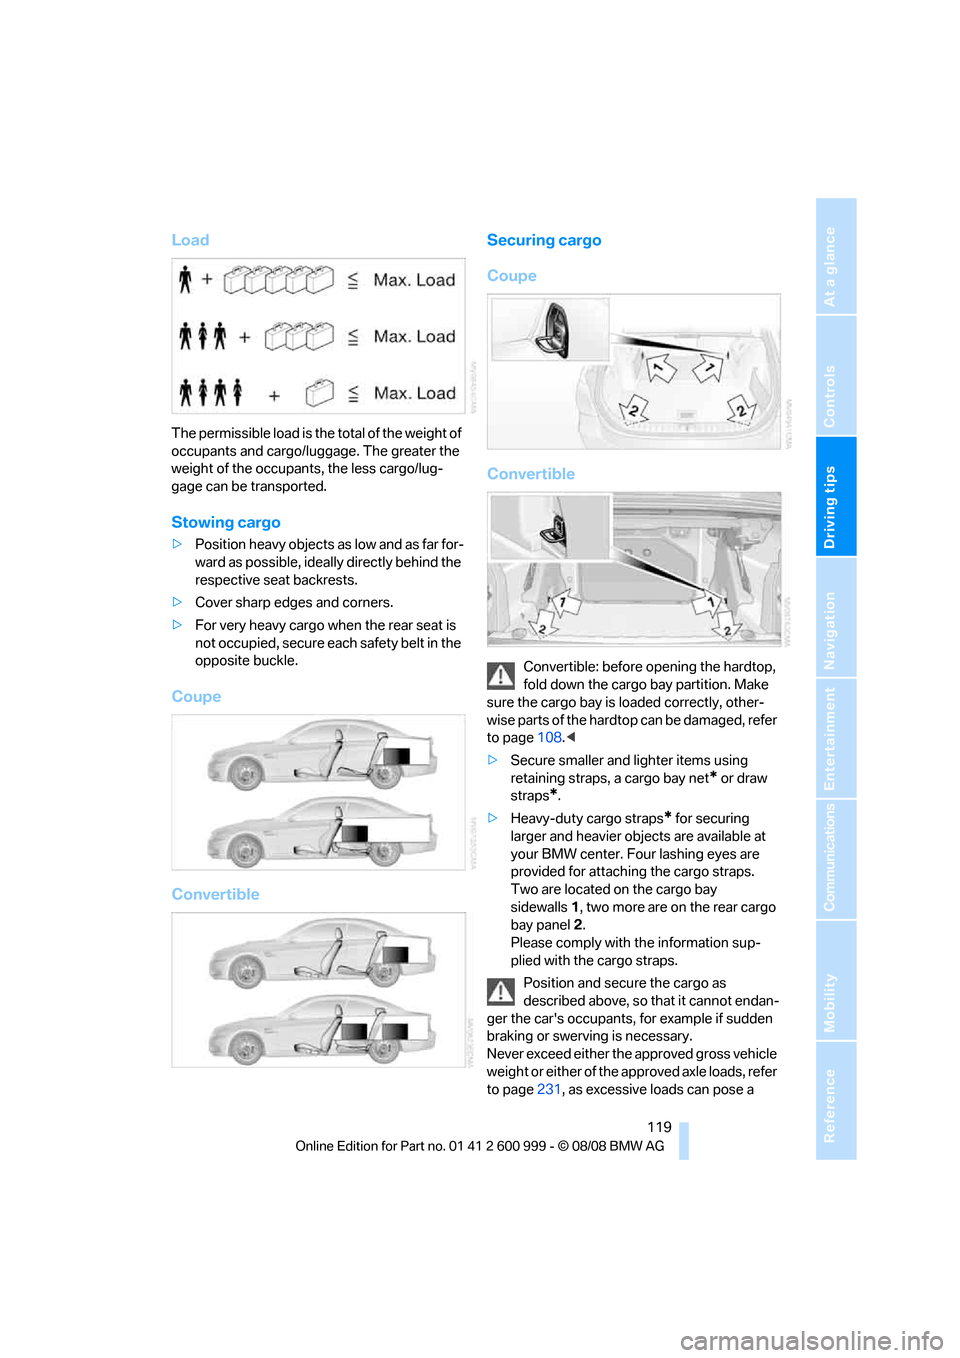
The permissible load is the total of the weight of
occupants and cargo/luggage. The greater the
weight of the occupants, the less cargo/lug-
gage can be transported.
Stowing cargo
>Position heavy objects as low and as far for-
ward as possible, ideally directly behind the
respective seat backrests.
>Cover sharp edges and corners.
>For very heavy cargo when the rear seat is
not occupied, secure each safety belt in the
opposite buckle.
Coupe
ConvertibleSecuring cargo
Coupe
Convertible
Convertible: before opening the hardtop,
fold down the cargo bay partition. Make
sure the cargo bay is loaded correctly, other-
wise parts of the hardtop can be damaged, refer
to page108.<
>Secure smaller and lighter items using
retaining straps, a cargo bay net
* or draw
straps
*.
>Heavy-duty cargo straps
* for securing
larger and heavier objects are available at
your BMW center. Four lashing eyes are
provided for attaching the cargo straps.
Two are located on the cargo bay
sidewalls1, two more are on the rear cargo
bay panel2.
Please comply with the information sup-
plied with the cargo straps.
Position and secure the cargo as
described above, so that it cannot endan-
ger the car's occupants, for example if sudden
braking or swerving is necessary.
Never exceed either the approved gross vehicle
weight or either of the approved axle loads, refer
to page231, as excessive loads can pose a
ba8_E9293M3_cic.book Seite 119 Dienstag, 19. August 2008 12:01 12
Page 129 of 256
Navigation
Driving tips
127Reference
At a glance
Controls
Communications
Entertainment
Mobility
Destination entry
In entering your destination you can select from
the following options:
>Entering a destination manually, see below
>Selecting destination from address book,
refer to page129
>Last destinations, refer to Last destinations,
page130
>Special destinations, refer to page130
>Entering a destination on the map, refer to
page132
>Selecting home address, refer to page130
>Entering a destination by voice com-
mands*, refer to page133
You can also store a navigation destination on
the programmable memory keys, refer to
page20.
Enter data only when the vehicle is sta-
tionary, and always give priority to the
applicable traffic regulations in the event of any
contradiction between traffic and road condi-
tions and the instructions issued by the naviga-
tion system. Otherwise, vehicle occupants and
other road users may be endangered.<
Entering a destination
manually
The system's word-matching principle makes it
easier for you to enter the names of towns or
streets. This allows you to enter different spell-
ings and completes your entry automatically so
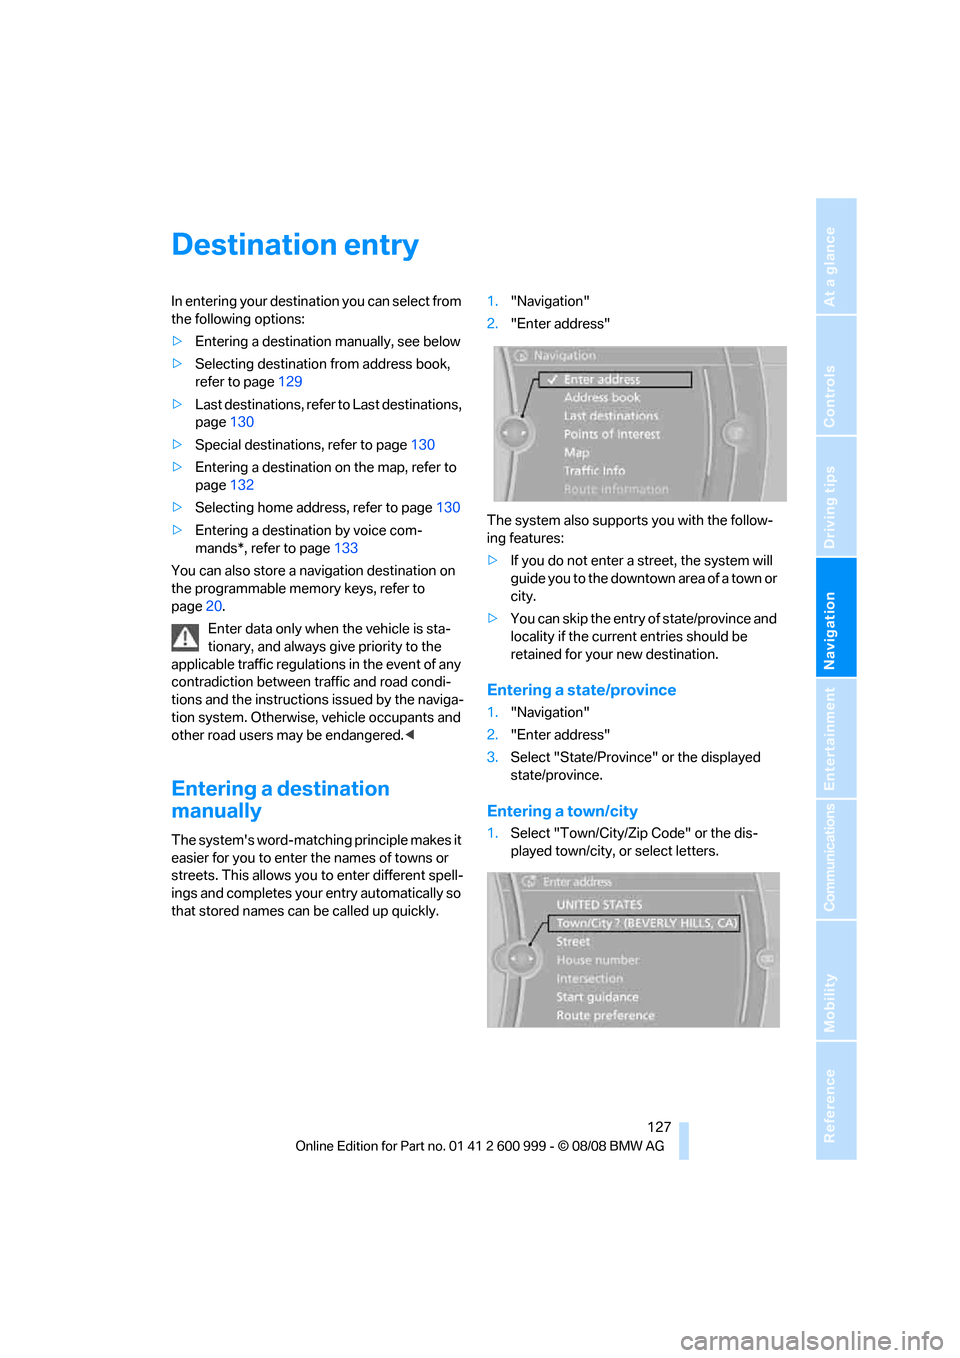
that stored names can be called up quickly.1."Navigation"
2."Enter address"
The system also supports you with the follow-
ing features:
>If you do not enter a street, the system will
guide you to the downtown a r e a o f a t o w n o r
city.
>You can skip the entry of state/province and
locality if the current entries should be
retained for your new destination.
Entering a state/province
1."Navigation"
2."Enter address"
3.Select "State/Province" or the displayed
state/province.
Entering a town/city
1.Select "Town/City/Zip Code" or the dis-
played town/city, or select letters.
ba8_E9293M3_cic.book Seite 127 Dienstag, 19. August 2008 12:01 12