service BMW M5 2008 Owners Manual
[x] Cancel search | Manufacturer: BMW, Model Year: 2008, Model line: M5, Model: BMW M5 2008Pages: 260, PDF Size: 6.66 MB
Page 3 of 260
M5Owner's Manual for Vehicle
Congratulations, and thank you for choosing a BMW M5.
Thorough familiarity with your vehicle will provide you with
enhanced control and security when you drive it. We therefore
have this request:
Please take the time to read this Owner's Manual and familiarize
yourself with the information that we have compiled for you
before starting off in your new vehicle. It contains important data
and instructions intended to assist you in gaining maximum use
and satisfaction from your BMW M5's unique range of technical
features. The manual also contains information on maintenance
designed to enhance operating safety and contribute to main-
taining the value of your BMW M5 throughout an extended ser-
vice life.
This manual is supplemented by a Service and Warranty Informa-
tion Booklet for US models or a Warranty and Service Guide
Booklet for Canadian models.
We wish you an enjoyable driving experience.
BMW AG
Page 9 of 260
7Reference
At a glance
Controls
Driving tips
Communications
Navigation
Entertainment
Mobility
Service and warranty
We recommend that you read this publication
thoroughly.
Your BMW is covered by the following warran-
ties:
>New Vehicle Limited Warranty
>Rust Perforation Limited Warranty
>Federal Emissions System Defect Warranty
>Federal Emissions Performance Warranty
>California Emission Control System Limited
Warranty
Detailed information about these warranties is
listed in the Service and Warranty Information
Booklet for US models or in the Warranty and
Service Guide Booklet for Canadian models.
Reporting safety defects
For US customers
The following applies only to vehicles owned
and operated in the US.
If you believe that your vehicle has a defect
which could cause a crash or could cause injury
or death, you should immediately inform the
National Highway Traffic Safety Administration,
NHTSA, in addition to notifying BMW of North
America, LLC, P.O. Box 1227, Westwood, New
Jersey 07675-1227, Telephone 1-800-831-
1117.
If NHTSA receives similar complaints, it may
open an investigation, and if it finds that a safety
defect exists in a group of vehicles, it may order
a recall and remedy campaign. However,
NHTSA cannot become involved in individual
problems between you, your dealer, or BMW of
North America, LLC.
To contact NHTSA, you may call the Vehicle
Safety Hotline toll-free at 1-888-327-4236
(TTY: 1-800-424-9153); go to
http://www.safercar.gov; or write to: Adminis-
trator, NHTSA, 400 Seventh Street, SW.,
Washington, DC 20590. You can also obtain
other information about motor vehicle safety
from http://www.safercar.gov
For Canadian customers
Canadian customers who wish to report a
safety-related defect to Transport Canada,
Defect Investigations and Recalls, may call
1-800-333-0510 toll-free from anywhere in
Canada or 1-613-993-9851 from the Ottawa
region and from other countries, or contact
Transport Canada by mail at: Transport
Canada, ASFAD, Place de Ville, Tower C,
330 Sparks Street, Ottawa, ON, K1A 0N5.
You can also obtain other information about
motor vehicle safety from http://www.tc.gc.ca
Page 14 of 260
Cockpit
12
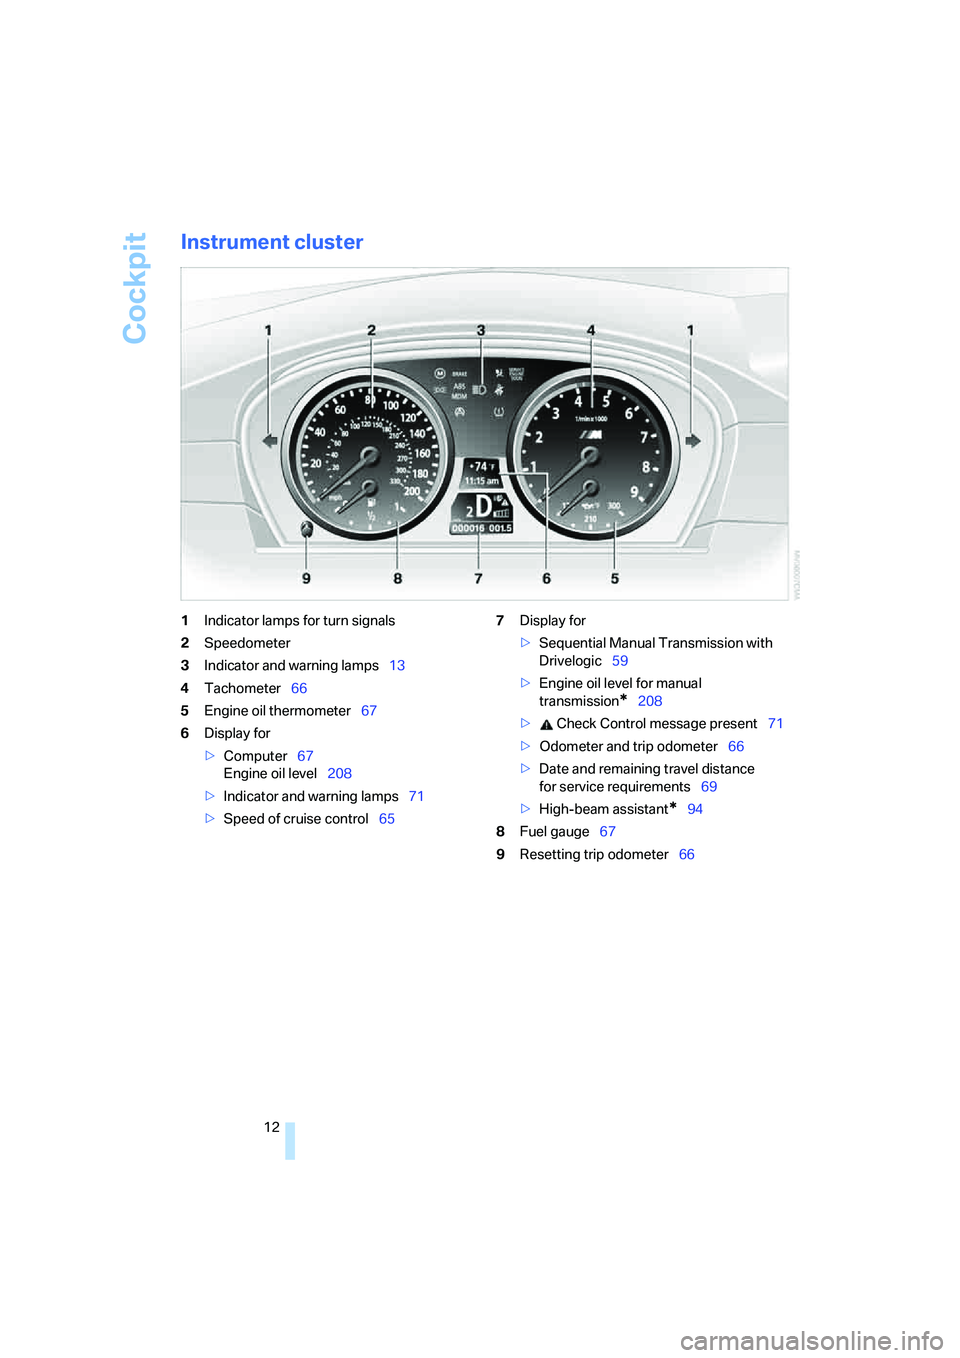
Instrument cluster
1Indicator lamps for turn signals
2Speedometer
3Indicator and warning lamps13
4Tachometer66
5Engine oil thermometer67
6Display for
>Computer67
Engine oil level208
>Indicator and warning lamps71
>Speed of cruise control657Display for
>Sequential Manual Transmission with
Drivelogic59
>Engine oil level for manual
transmission
*208
> Check Control message present71
>Odometer and trip odometer66
>Date and remaining travel distance
for service requirements69
>High-beam assistant
*94
8Fuel gauge67
9Resetting trip odometer66
Page 19 of 260
At a glance
17Reference
Controls
Driving tips
Communications
Navigation
Entertainment
Mobility
Menu overview
Communication
>Telephone*
>BMW Assist* or TeleService*
Navigation or onboard information
>Navigation system*
>Onboard information, e.g. for displaying
the average fuel consumption
Entertainment
>Radio
>CD player and CD changer
*
>AUX-In connection
>USB/audio interface
*
Climate
>Vent settings
>Automatic programs
>Seat heater distribution
*
>Parked car operation
menu
>Switching off Control Display
>Tone and display settings
>Settings for your vehicle, e.g. for MDrive, or
for the central locking system
>Display of maintenance intervals and dead-
lines for legally mandated inspections
>Settings for telephone
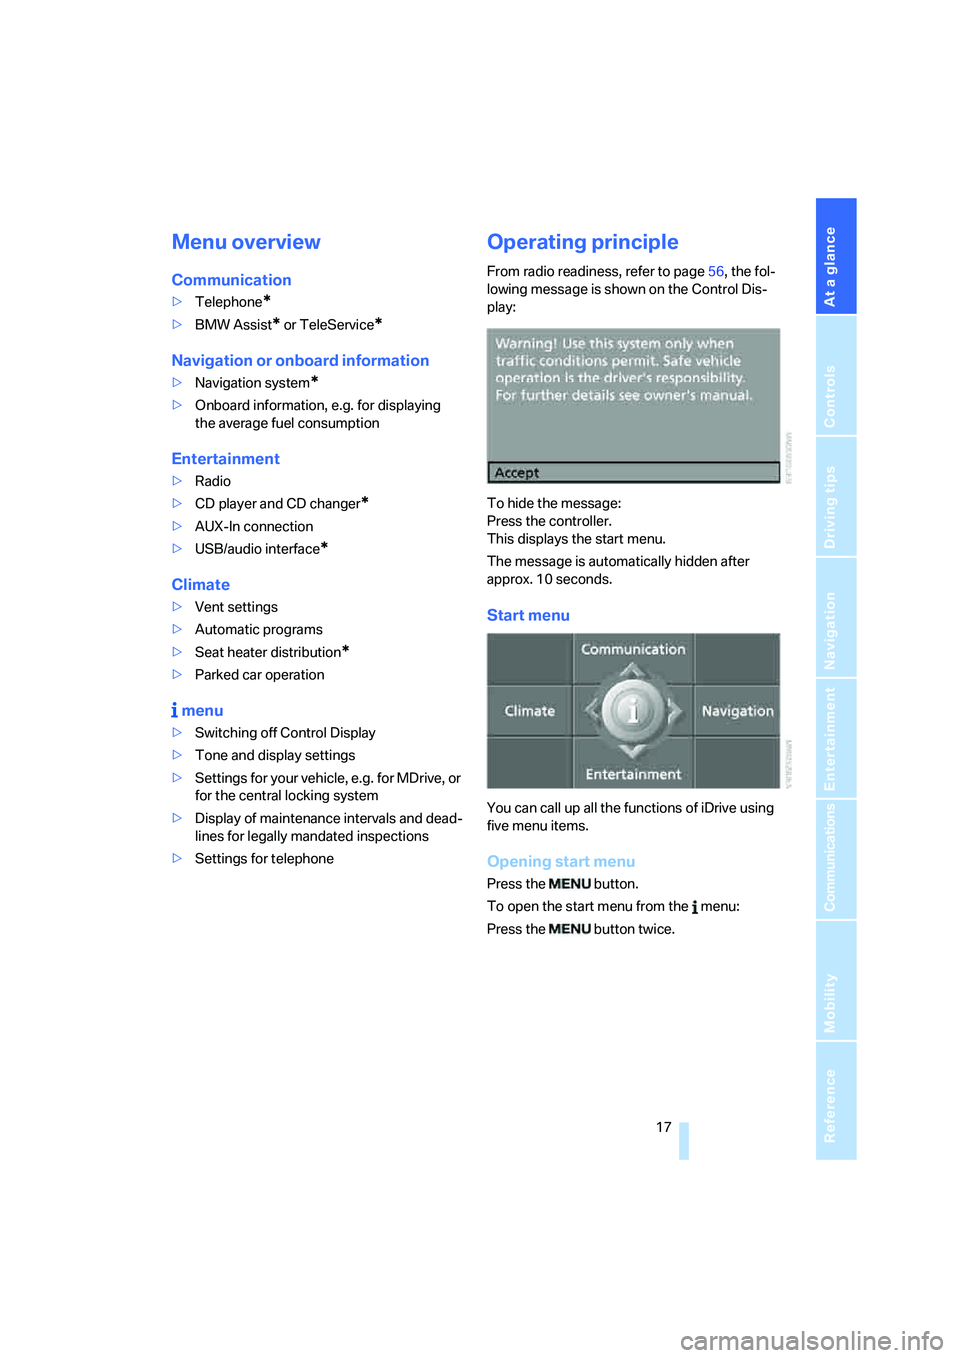
Operating principle
From radio readiness, refer to page56, the fol-
lowing message is shown on the Control Dis-
play:
To hide the message:
Press the controller.
This displays the start menu.
The message is automatically hidden after
approx. 10 seconds.
Start menu
You can call up all the functions of iDrive using
five menu items.
Opening start menu
Press the button.
To open the start menu from the menu:
Press the button twice.
Page 22 of 260
iDrive
20
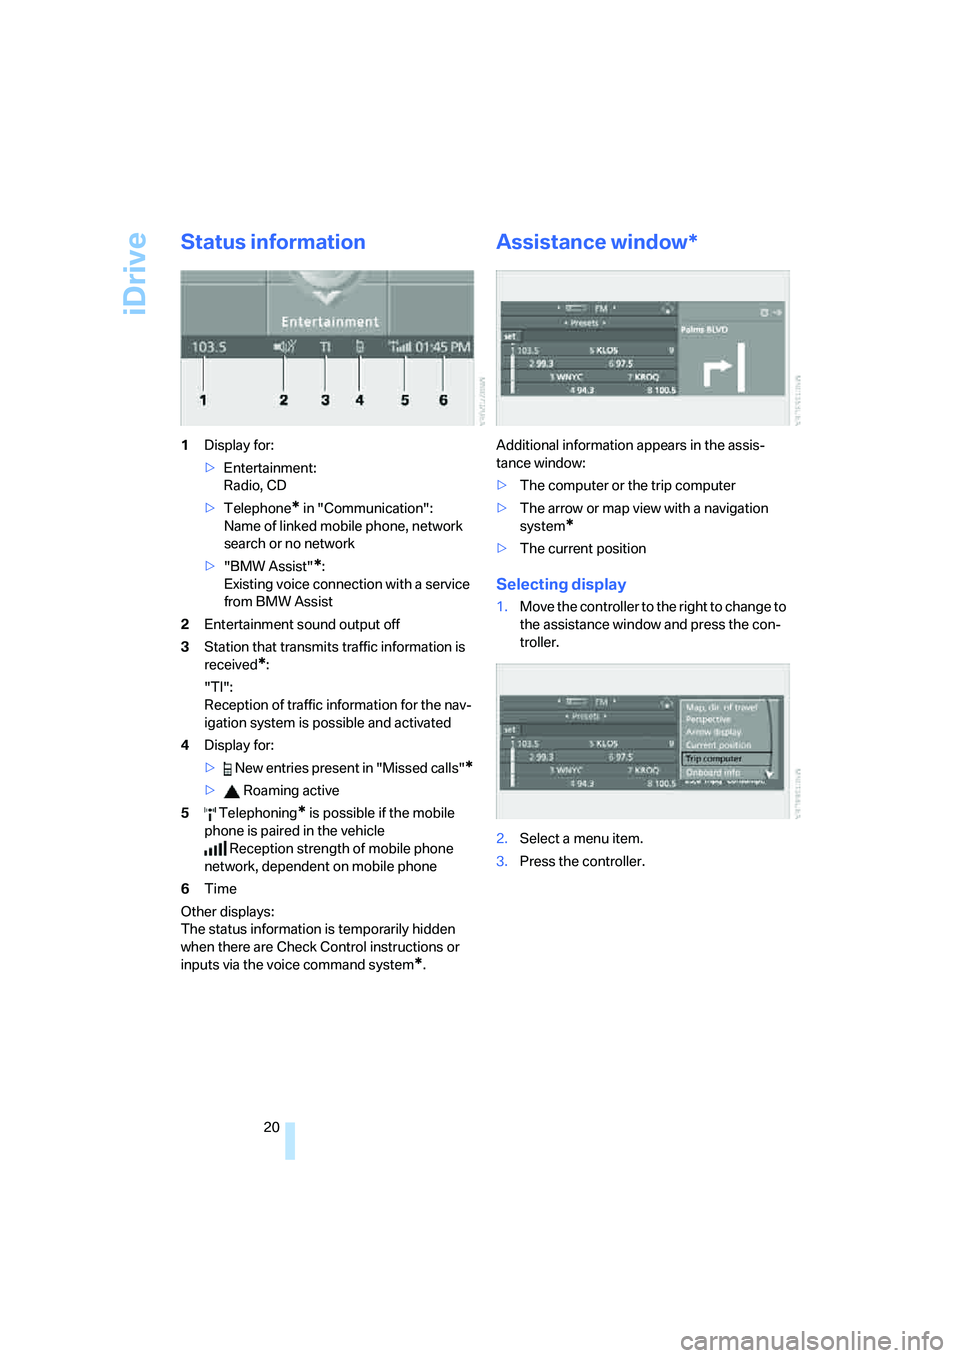
Status information
1Display for:
>Entertainment:
Radio, CD
>Telephone
* in "Communication":
Name of linked mobile phone, network
search or no network
>"BMW Assist"
*:
Existing voice connection with a service
from BMW Assist
2Entertainment sound output off
3Station that transmits traffic information is
received
*:
"TI":
Reception of traffic information for the nav-
igation system
is possible and activated
4Display for:
> New entries present in "Missed calls"
*
> Roaming active
5 Telephoning
* is possible if the mobile
phone is paired in the vehicle
Reception strength of mobile phone
network, dependent on mobile phone
6Time
Other displays:
The status information is temporarily hidden
when there are Check Control instructions or
inputs via the voice command system
*.
Assistance window*
Additional information appears in the assis-
tance window:
>The computer or the trip computer
>The arrow or map view with a navigation
system
*
>The current position
Selecting display
1.Move the controller to the right to change to
the assistance window and press the con-
troller.
2.Select a menu item.
3.Press the controller.
Page 71 of 260
Controls
69Reference
At a glance
Driving tips
Communications
Navigation
Entertainment
Mobility
2.Turn the controller to select the distance to
your destination. If needed, hold it against a
slight resistance to enter a larger differ-
ence.
3.Press the controller to apply the setting.
The distance is automatically preset during the
destination guidance of the navigation sys-
tem
*.
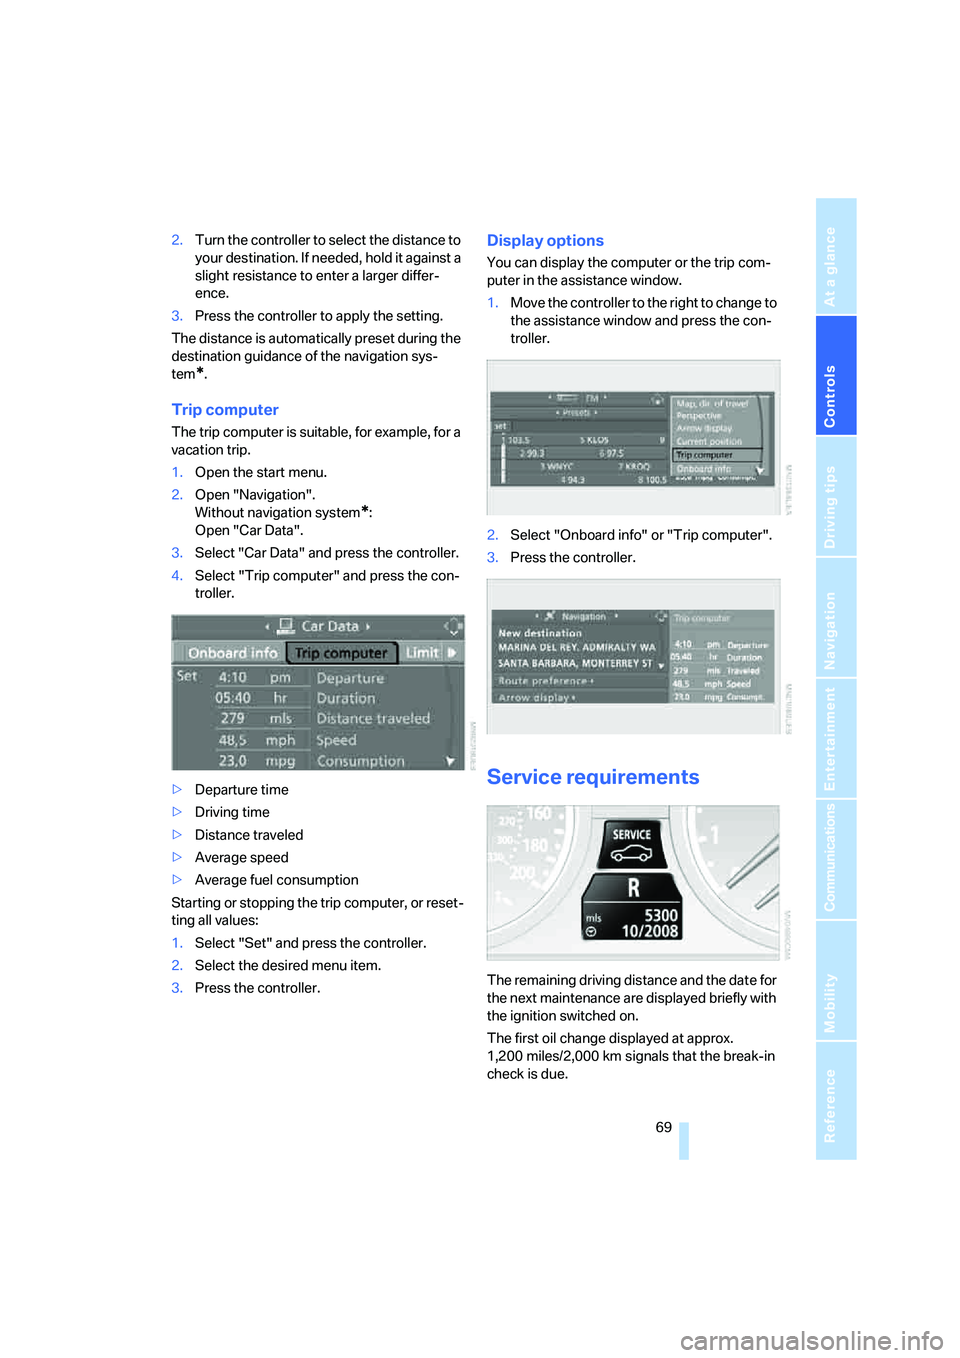
Trip computer
The trip computer is suitable, for example, for a
vacation trip.
1.Open the start menu.
2.Open "Navigation".
Without navigation system
*:
Open "Car Data".
3.Select "Car Data" and press the controller.
4.Select "Trip computer" and press the con-
troller.
>Departure time
>Driving time
>Distance traveled
>Average speed
>Average fuel consumption
Starting or stopping the trip computer, or reset-
ting all values:
1.Select "Set" and press the controller.
2.Select the desired menu item.
3.Press the controller.
Display options
You can display the computer or the trip com-
puter in the assistance window.
1.Move the controller to the right to change to
the assistance window and press the con-
troller.
2.Select "Onboard info" or "Trip computer".
3.Press the controller.
Service requirements
The remaining driving distance and the date for
the next maintenance are displayed briefly with
the ignition switched on.
The first oil change displayed at approx.
1,200 miles/2,000 km signals that the break-in
check is due.
Page 72 of 260
Everything under control
70 Your BMW Service Advisor can deter-
mine your vehicle's current service
requirements by reading out the data stored in
the remote control.<
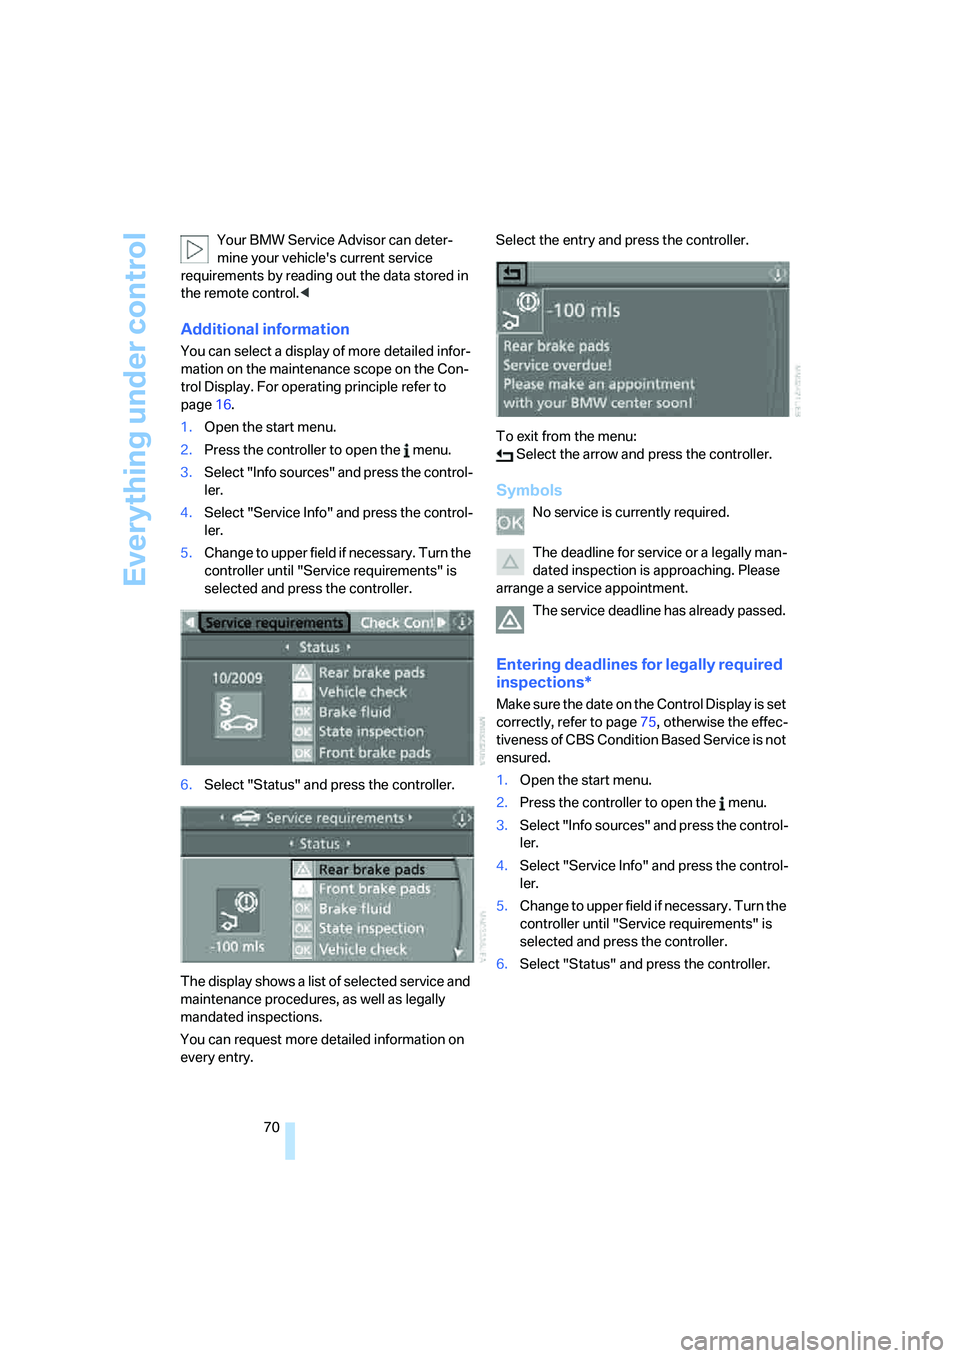
Additional information
You can select a display of more detailed infor-
mation on the maintenance scope on the Con-
trol Display. For operating principle refer to
page16.
1.Open the start menu.
2.Press the controller to open the menu.
3.Select "Info sources" and press the control-
ler.
4.Select "Service Info" and press the control-
ler.
5.Change to upper field if necessary. Turn the
controller until "Service requirements" is
selected and press the controller.
6.Select "Status" and press the controller.
The display shows a list of selected service and
maintenance procedures, as well as legally
mandated inspections.
You can request more detailed information on
every entry.Select the entry and press the controller.
To exit from the menu:
Select the arrow and press the controller.
Symbols
No service is currently required.
The deadline for service or a legally man-
dated inspection is approaching. Please
arrange a service appointment.
The service deadline has already passed.
Entering deadlines for legally required
inspections*
Make sure the date on the Control Display is set
correctly, refer to page75, otherwise the effec-
tiveness of CBS Condition Based Service is not
ensured.
1.Open the start menu.
2.Press the controller to open the menu.
3.Select "Info sources" and press the control-
ler.
4.Select "Service Info" and press the control-
ler.
5.Change to upper field if necessary. Turn the
controller until "Service requirements" is
selected and press the controller.
6.Select "Status" and press the controller.
Page 73 of 260
Controls
71Reference
At a glance
Driving tips
Communications
Navigation
Entertainment
Mobility
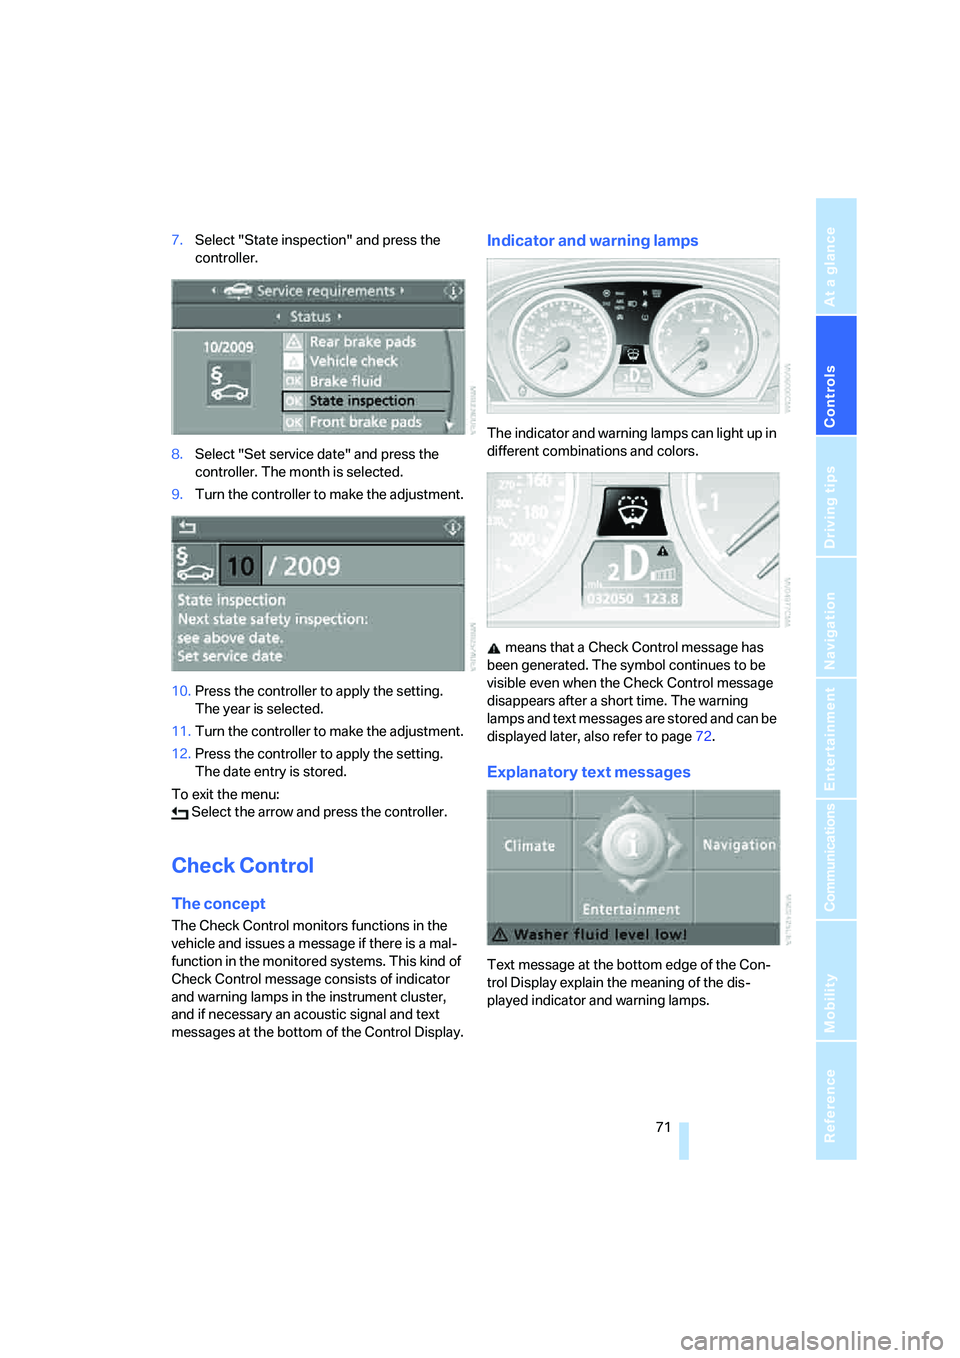
7.Select "State inspection" and press the
controller.
8.Select "Set service date" and press the
controller. The month is selected.
9.Turn the controller to make the adjustment.
10.Press the controller to apply the setting.
The year is selected.
11.Turn the controller to make the adjustment.
12.Press the controller to apply the setting.
The date entry is stored.
To exit the menu:
Select the arrow and press the controller.
Check Control
The concept
The Check Control monitors functions in the
vehicle and issues a message if there is a mal-
function in the monitored systems. This kind of
Check Control message consists of indicator
and warning lamps in the instrument cluster,
and if necessary an acoustic signal and text
messages at the bottom of the Control Display.
Indicator and warning lamps
The indicator and warning lamps can light up in
different combinations and colors.
means that a Check Control message has
been generated. The symbol continues to be
visible even when the Check Control message
disappears after a short time. The warning
lamps and text messages are stored and can be
displayed later, also refer to page72.
Explanatory text messages
Text message at the bottom edge of the Con-
trol Display explain the meaning of the dis-
played indicator and warning lamps.
Page 74 of 260
Everything under control
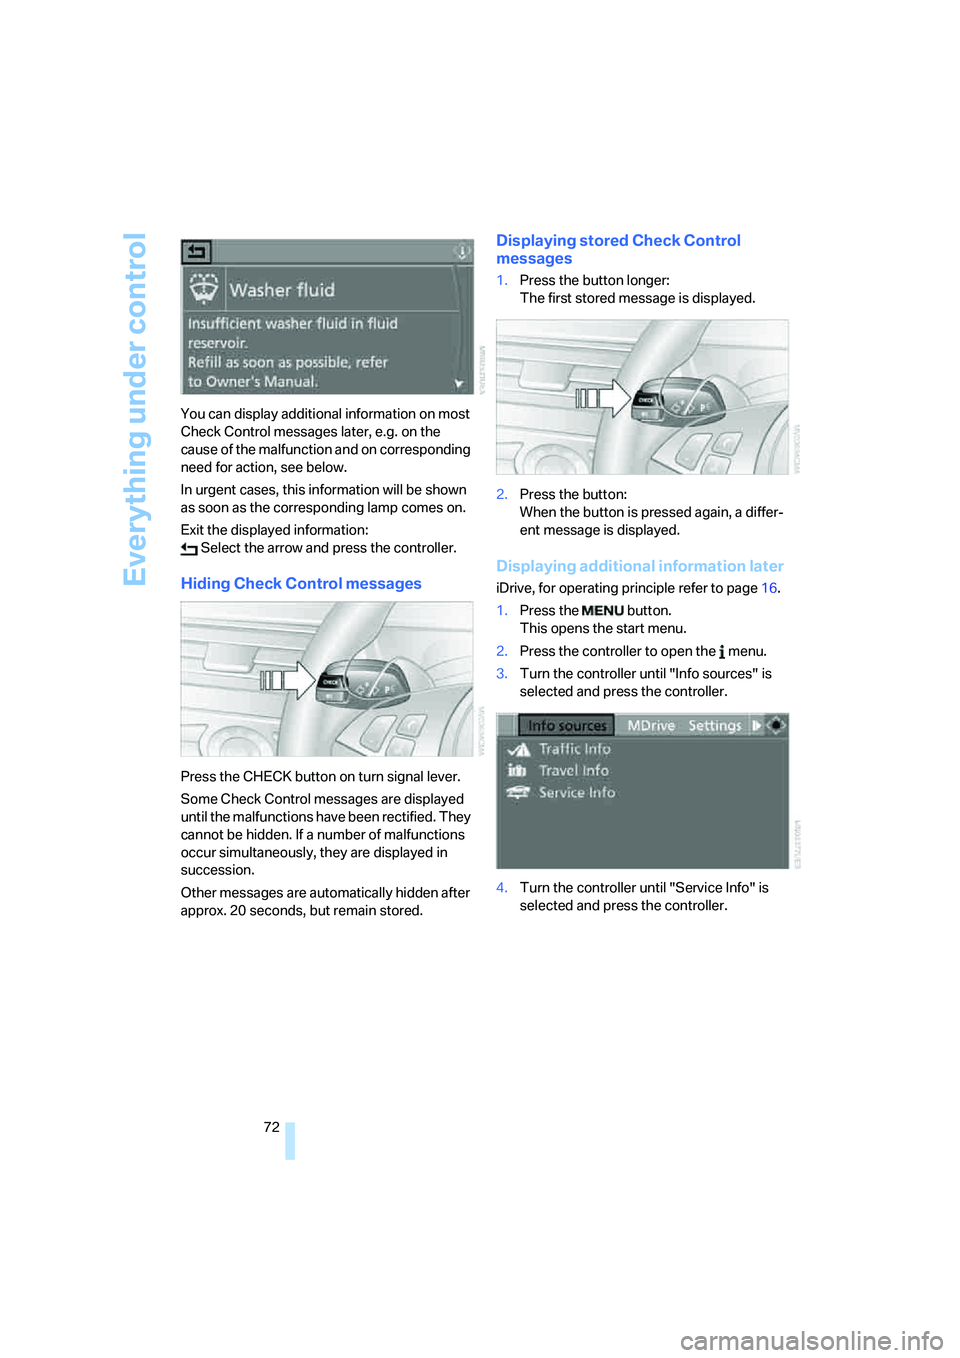
72 You can display additional information on most
Check Control messages later, e.g. on the
cause of the malfunction and on corresponding
need for action, see below.
In urgent cases, this information will be shown
as soon as the corresponding lamp comes on.
Exit the displayed information:
Select the arrow and press the controller.
Hiding Check Control messages
Press the CHECK button on turn signal lever.
Some Check Control messages are displayed
until the malfunctions have been rectified. They
cannot be hidden. If a number of malfunctions
occur simultaneously, they are displayed in
succession.
Other messages are automatically hidden after
approx. 20 seconds, but remain stored.
Displaying stored Check Control
messages
1.Press the button longer:
The first stored message is displayed.
2.Press the button:
When the button is pressed again, a differ-
ent message is displayed.
Displaying additional information later
iDrive, for operating principle refer to page16.
1.Press the button.
This opens the start menu.
2.Press the controller to open the menu.
3.Turn the controller until "Info sources" is
selected and press the controller.
4.Turn the controller until "Service Info" is
selected and press the controller.
Page 90 of 260
Technology for comfort, convenience and safety
88 or a workshop that works according to BMW
repair procedures with correspondingly trained
personnel and has the required explosives
licenses. Otherwise unprofessional attempts to
service the system could lead to failure in an
emergency or undesired airbag triggering,
either of which could result in personal injury.<
Warnings and information on the airbags is also
provided on the sun visors.
Automatic deactivation of front
passenger airbags
The occupation of the seat is detected by eval-
uating the impression on the occupied seat sur-
face of the front passenger seat. The front and
side airbags on the front passenger side are
activated or deactivated accordingly by the sys-
tem.
The current status of the front passenger
airbag, i.e. deactivated or activated, is
indicated by the indicator lamp over the interior
rearview mirror, refer to Operating state of front
passenger airbags in the following.<
Before transporting a child on the front
passenger seat, observe the safety infor-
mation and handling instructions under Trans-
porting children safely refer to page53.
The front and side airbags on the front passen-
ger side can be deactivated for teenagers and
adults in certain sitting positions; then the indi-
cator lamp for the front passenger airbags lights
up. In these cases, change the sitting position
so that the front passenger airbags are acti-
vated and the indicator lamp goes out. If the
desired status cannot be produced by changing
the sitting position, transport the correspond-
ing person on the rear seat. Do not fit seat cov-
ers, seat cushion padding, ball mats or other
items onto the front passenger seat unless they
are specifically recommended by BMW. Do not
lay objects under the seat which could press
against the seat from below. Otherwise a cor-
rect evaluation of the occupied seat surface
cannot be ensured.<
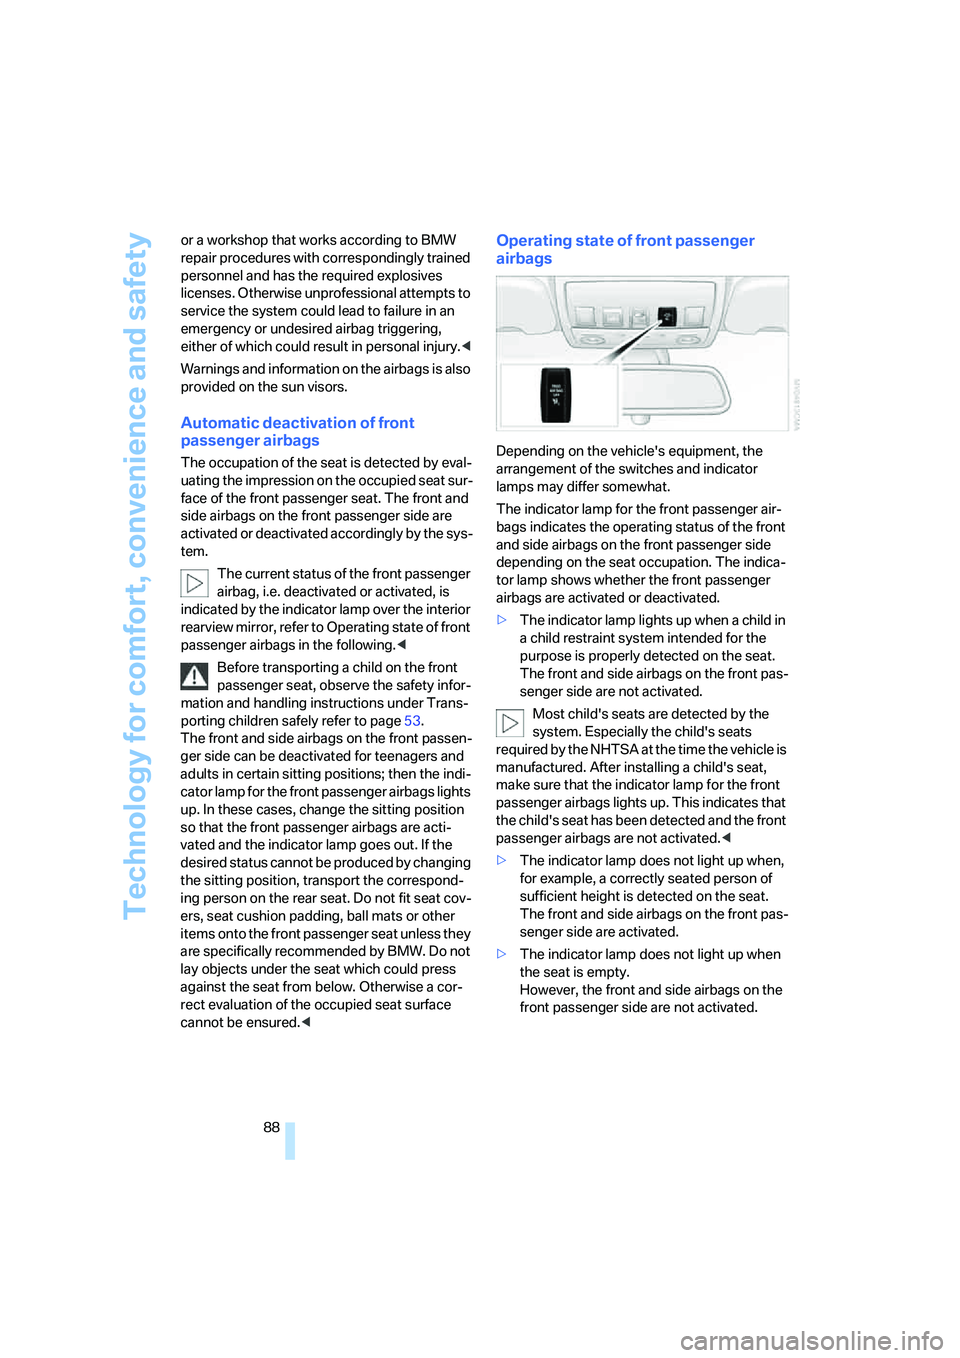
Operating state of front passenger
airbags
Depending on the vehicle's equipment, the
arrangement of the switches and indicator
lamps may differ somewhat.
The indicator lamp for the front passenger air-
bags indicates the operating status of the front
and side airbags on the front passenger side
depending on the seat occupation. The indica-
tor lamp shows whether the front passenger
airbags are activated or deactivated.
>The indicator lamp lights up when a child in
a child restraint system intended for the
purpose is properly detected on the seat.
The front and side airbags on the front pas-
senger side are not activated.
Most child's seats are detected by the
system. Especially the child's seats
required by the NHTSA at the time the vehicle is
manufactured. After installing a child's seat,
make sure that the indicator lamp for the front
passenger airbags lights up. This indicates that
the child's seat has been detected and the front
passenger airbags are not activated.<
>The indicator lamp does not light up when,
for example, a correctly seated person of
sufficient height is detected on the seat.
The front and side airbags on the front pas-
senger side are activated.
>The indicator lamp does not light up when
the seat is empty.
However, the front and side airbags on the
front passenger side are not activated.