run flat BMW M6 CONVERTIBLE 2013 F12 Owner's Manual
[x] Cancel search | Manufacturer: BMW, Model Year: 2013, Model line: M6 CONVERTIBLE, Model: BMW M6 CONVERTIBLE 2013 F12Pages: 222, PDF Size: 7.3 MB
Page 47 of 222
The rear window opens and closes automati‐
cally when the convertible top is opened or
closed.
Closing Pull the switch.
The rear window closes while the switch
is being held.
Pinch protection system
If the closing force exceeds a specific value as
a window closes, the closing action is inter‐ rupted.
The window reopens slightly.
The rear window is not equipped with pinch
protection.
Danger of pinching even with pinch pro‐
tection
Even with the pinch protection system, check
that the window's closing path is clear; other‐
wise, the closing action may not stop in certain
situations, e.g., if thin objects are present.◀
No window accessories
Do not install any accessories in the
range of movement of the windows; otherwise, the pinch protection system will be impaired.◀
Closing without the pinch protection system
Keep the closing path clear
Monitor the closing process and make
sure that the closing path of the window is clear; otherwise, injuries may result.◀
For example, if there is an external danger or if
ice on the windows prevents a window from
closing normally, proceed as follows:1.Pull the switch past the resistance point
and hold it there.The pinch protection is limited and the
window reopens slightly if the closing force
exceeds a certain value.2.Pull the switch past the resistance point
again within approx. 4 seconds and hold it
there.
The window closes without pinch protec‐
tion.
Convertible top
General information The convertible top can be opened or closed
at speeds up to approx. 25 mph/40 km/h.
If the vehicle is accelerated above a speed of
approx. 30 mph/50 km/h while the convertible
top is being moved, the convertible top move‐
ment stops.
Tips about the convertible top:
▷If possible, close the convertible top when
the vehicle is parked. A closed convertible
top protects it from weather-related dam‐
age and to some extent from theft.▷Event when the convertible top is closed,
only store valuables in the locked cargo
area.▷At higher speeds, vacuum produced in the
passenger compartment cause the
convertible top to begin to flatten. Increase
the amount of air via the automatic climate
control so that no vacuum is produced in
the vehicle.
Hints
The trunk lid cannot be opened if the
convertible top is not fully opened or closed.
Safety information about the convertible
top
▷With temperatures below +14 ℉/-10 ℃ do
not open the convertible top; otherwise
damages could result.Seite 43Opening and closingControls43
Online Edition for Part no. 01 40 2 910 746 - VI/13
Page 162 of 222
LoadingVehicle equipment
All standard, country-specific and optional
equipment that is offered in the model series is
described in this chapter. Therefore, equip‐
ment is also described that is not available in a
vehicle, e. g., because of the selected optional
equipment or country variant. This also applies
for safety-related functions and systems.
Hints Overloading the vehicle
To avoid exceeding the approved carry‐
ing capacity of the tires, never overload the ve‐
hicle. Overloading can lead to overheating and
increases the rate at which damage develops
inside the tires. This could result in a sudden
loss of tire inflation pressure.◀
No fluids in the trunk
Make sure that fluids do not leak into the
trunk; otherwise, the vehicle may be dam‐
aged.◀
Determining the load limit1.Locate the following statement on your ve‐
hicle’s placard:▷The combined weight of occupants
and cargo should never exceed XXX kg
or YYY lbs. Otherwise, damage to thevehicle and unstable driving situations
may result.2.Determine the combined weight of the
driver and passengers that will be riding in
your vehicle.3.Subtract the combined weight of the driver
and passengers from XXX kilograms or
YYY pounds.4.The resulting figure equals the available
amount of cargo and luggage load ca‐
pacity.
For example, if the YYY amount equals
1,000 lbs and there will be four 150 lbs
passengers in your vehicle, the amount of
available cargo and luggage load capacity
is 400 lbs: 1,000 lbs minus 600 lbs =
400 lbs.5.Determine the combined weight of lug‐
gage and cargo being loaded on the vehi‐
cle. That weight may not safely exceed the
available cargo and luggage load capacity
calculated in Step 4.
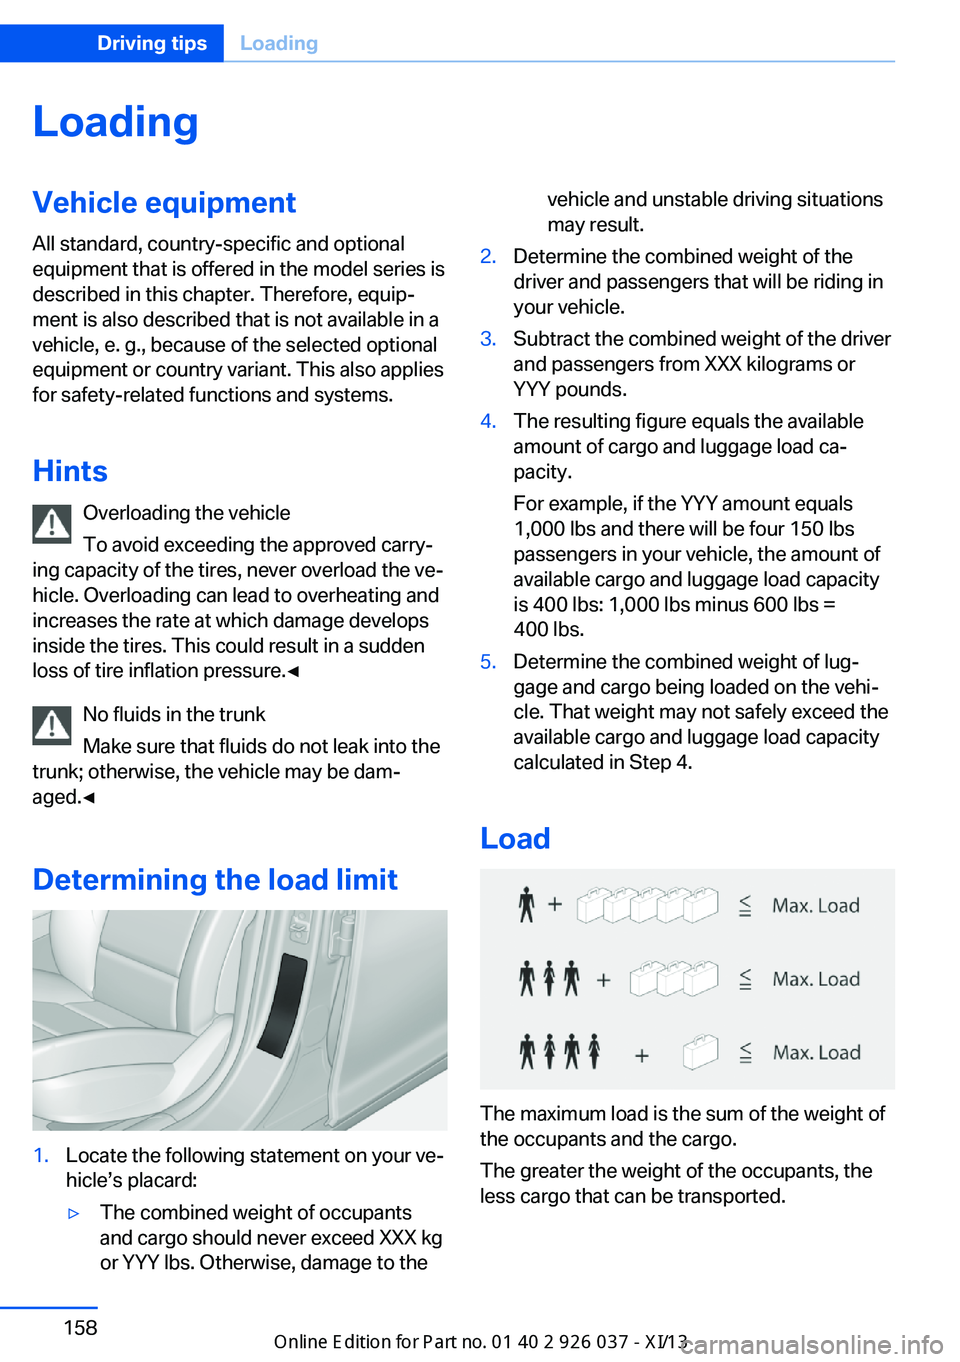
Load
The maximum load is the sum of the weight of
the occupants and the cargo.
The greater the weight of the occupants, the
less cargo that can be transported.
Seite 158Driving tipsLoading158
Online Edition for Part no. 01 40 2 910 746 - VI/13
Page 178 of 222
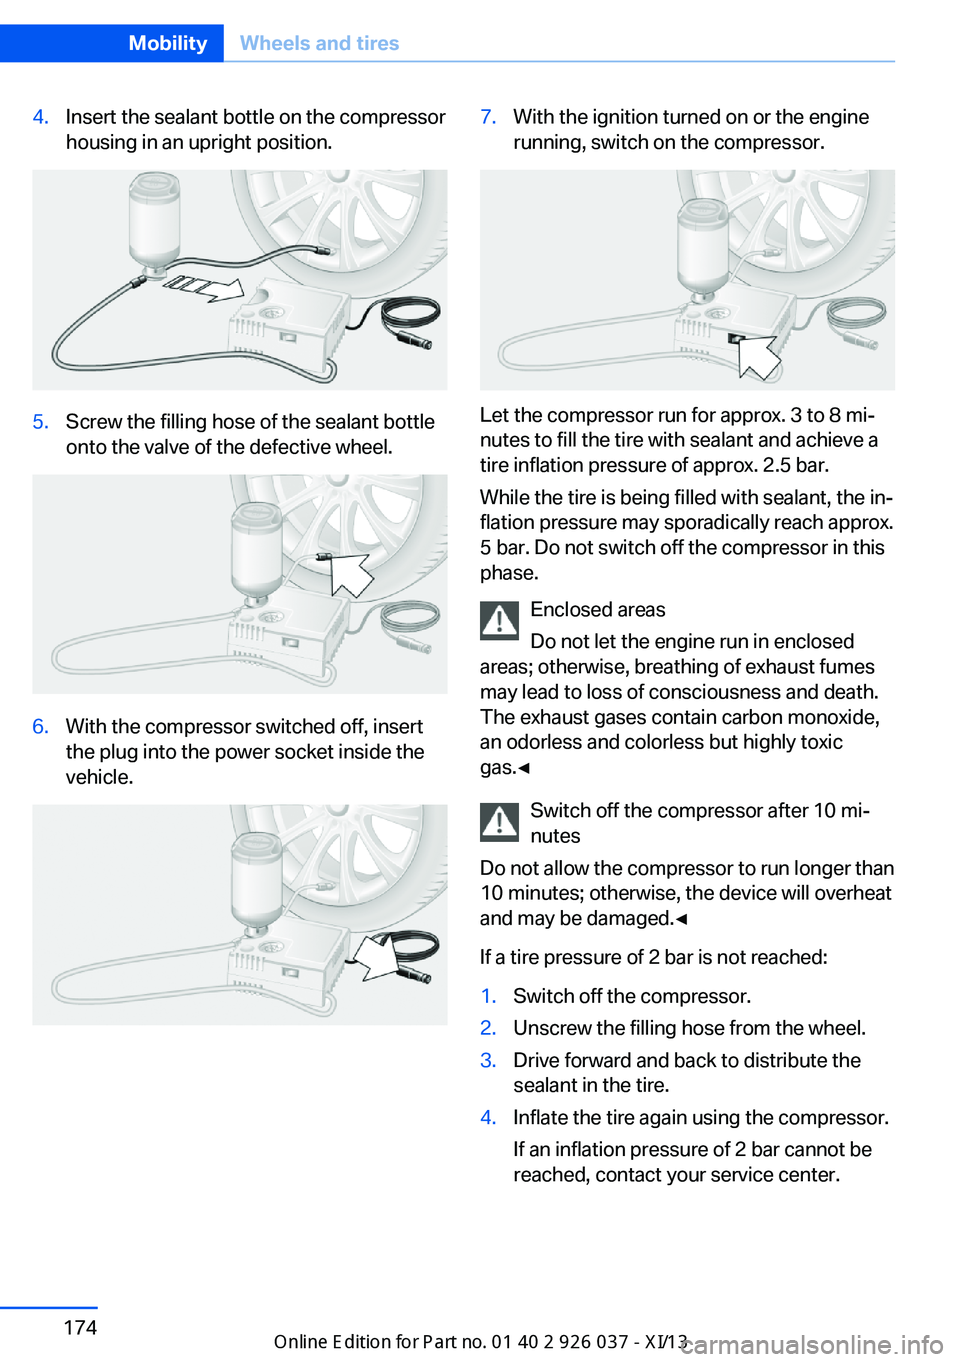
4.Insert the sealant bottle on the compressor
housing in an upright position.5.Screw the filling hose of the sealant bottle
onto the valve of the defective wheel.6.With the compressor switched off, insert
the plug into the power socket inside the
vehicle.7.With the ignition turned on or the engine
running, switch on the compressor.
Let the compressor run for approx. 3 to 8 mi‐
nutes to fill the tire with sealant and achieve a
tire inflation pressure of approx. 2.5 bar.
While the tire is being filled with sealant, the in‐
flation pressure may sporadically reach approx.
5 bar. Do not switch off the compressor in this
phase.
Enclosed areas
Do not let the engine run in enclosed
areas; otherwise, breathing of exhaust fumes
may lead to loss of consciousness and death.
The exhaust gases contain carbon monoxide,
an odorless and colorless but highly toxic
gas.◀
Switch off the compressor after 10 mi‐
nutes
Do not allow the compressor to run longer than
10 minutes; otherwise, the device will overheat
and may be damaged.◀
If a tire pressure of 2 bar is not reached:
1.Switch off the compressor.2.Unscrew the filling hose from the wheel.3.Drive forward and back to distribute the
sealant in the tire.4.Inflate the tire again using the compressor.
If an inflation pressure of 2 bar cannot be
reached, contact your service center.Seite 174MobilityWheels and tires174
Online Edition for Part no. 01 40 2 910 746 - VI/13
Page 179 of 222
Stowing the Mobility System1.Unscrew the filling hose of the sealant bot‐
tle from the wheel.2.Unscrew the compressor connection hose
from the sealant bottle.3.Connect the sealant bottle filling hose that
was previously connected to the valve to
the vacant connector on the sealant bottle.
This prevents left-over sealant from escap‐
ing from the bottle.4.Wrap the empty sealant bottle in suitable
material to avoid dirtying the cargo area.5.Stow the Mobility System back in the vehi‐
cle.
Distributing the sealant
Immediately drive approx. to ensure that the
sealant is evenly distributed in the tire.
Do not exceed a speed of .
Do not drop below if possible.
Correcting the tire inflation pressure
1.Stop at a suitable location.2.Screw the connection hose of the com‐
pressor directly onto the tire valve.3.Insert the connector into the power socket
in the vehicle interior.4.Correct the tire inflation pressure to
2.5 bar.▷Increase pressure: with the ignition
turned on or the engine running, switch
on the compressor.▷To reduce the pressure: press the but‐
ton on the compressor.
Continuing the trip
Do not exceed the maximum permissible
speed of 50 mph/80 km/h.
Reinitialize the Flat Tire Monitor, refer to
page 104.
Reinitialize the Tire Pressure Monitor, refer to
page 102.
Replace the defective tire and the sealant bot‐
tle of the Mobility System as soon as possible.
Snow chains
Fine-link snow chains
Only certain types of fine-link snow chains
have been tested by the manufacturer of your
vehicle, classified as road-safe and recom‐
mended.
Consult your service center for more informa‐
tion.
Use Use only in pairs on the rear wheels, equipped
with the tires of the following size:
255/40 R 19
Follow the chain manufacturer's instructions.
Make sure that the snow chains are always
sufficiently tight. Retighten as needed accord‐
ing to the chain manufacturer's instructions.
Do not initialize the Flat Tire Monitor after
mounting snow chains, as doing so may result
in incorrect readings.
Do not initialize the Tire Pressure Monitor after
mounting snow chains, as doing so may result
in incorrect readings.
When driving with snow chains, if necessary
briefly activate M Dynamic Mode.
Maximum speed with snow chains Do not exceed a speed of 30 mph/50 km/h
when using snow chains.Seite 175Wheels and tiresMobility175
Online Edition for Part no. 01 40 2 910 746 - VI/13
Page 191 of 222
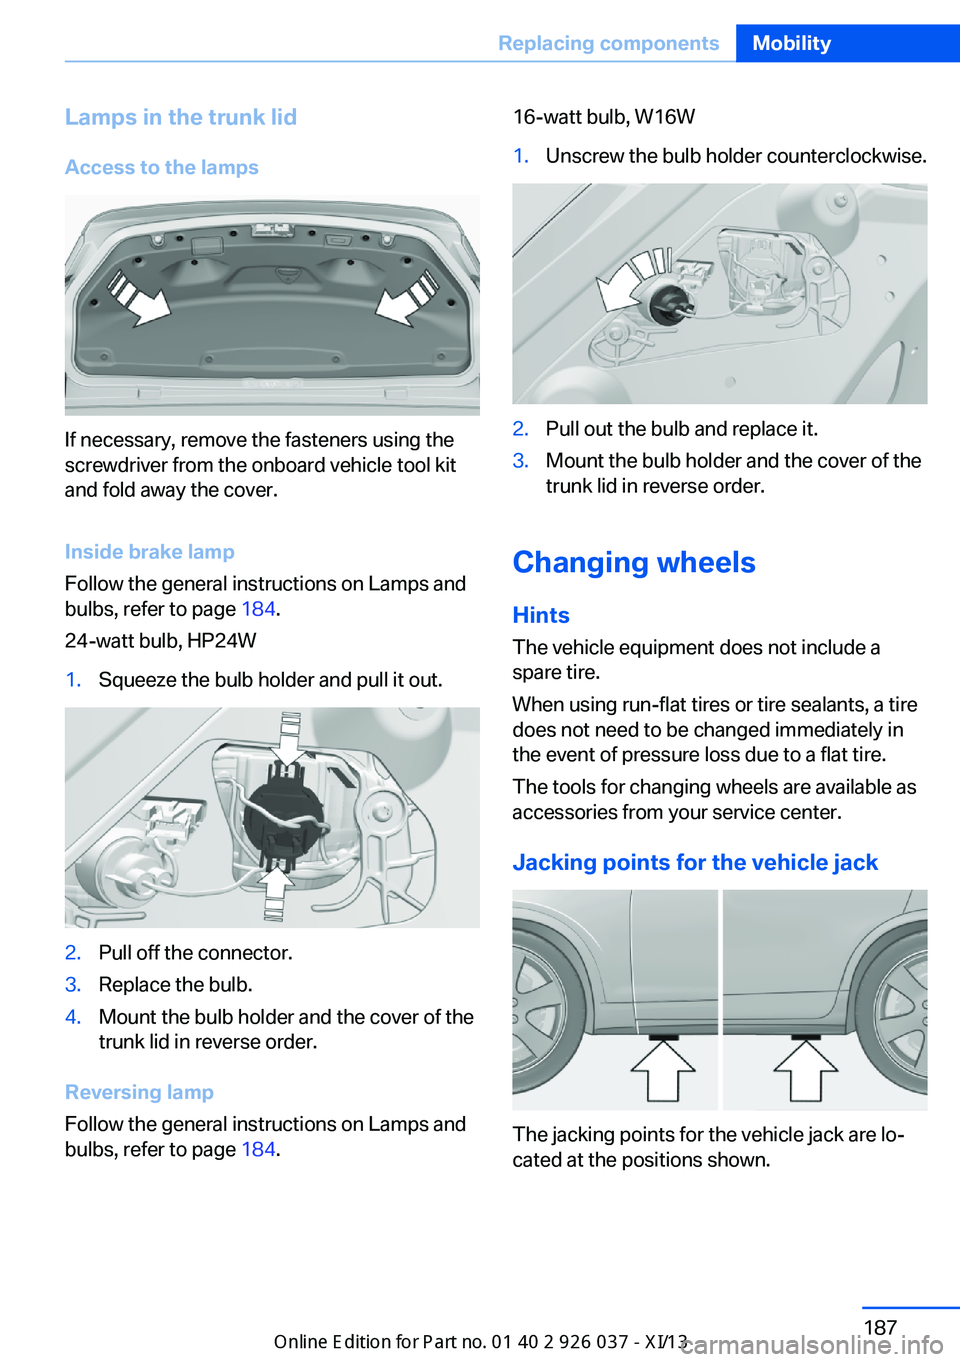
Lamps in the trunk lidAccess to the lamps
If necessary, remove the fasteners using the
screwdriver from the onboard vehicle tool kit
and fold away the cover.
Inside brake lamp
Follow the general instructions on Lamps and
bulbs, refer to page 184.
24-watt bulb, HP24W
1.Squeeze the bulb holder and pull it out.2.Pull off the connector.3.Replace the bulb.4.Mount the bulb holder and the cover of the
trunk lid in reverse order.
Reversing lamp
Follow the general instructions on Lamps and
bulbs, refer to page 184.
16-watt bulb, W16W1.Unscrew the bulb holder counterclockwise.2.Pull out the bulb and replace it.3.Mount the bulb holder and the cover of the
trunk lid in reverse order.
Changing wheels
Hints
The vehicle equipment does not include a
spare tire.
When using run-flat tires or tire sealants, a tire
does not need to be changed immediately in
the event of pressure loss due to a flat tire.
The tools for changing wheels are available as
accessories from your service center.
Jacking points for the vehicle jack
The jacking points for the vehicle jack are lo‐
cated at the positions shown.
Seite 187Replacing componentsMobility187
Online Edition for Part no. 01 40 2 910 746 - VI/13
Page 197 of 222
corresponding engine or body ground of
the vehicle to be started.
Starting the engine
Never use spray fluids to start the engine.
1.Start the engine of the assisting vehicle
and let it run for several minutes at an in‐
creased idle speed.2.Start the engine of the vehicle being
started in the usual way.
If the first starting attempt is not success‐
ful, wait a few minutes before making an‐
other attempt in order to allow the dis‐
charged battery to recharge.3.Let both engines run for several minutes.4.Disconnect the jumper cables in the re‐
verse order.
Check the battery and recharge if necessary.
Tow-starting and towing Manual transmission
Observe before towing your vehicle
Gearshift lever in neutral position.
Towing When the parking brake is blocked
The parking brake cannot be released
manually.
Do not tow the vehicle with the parking brake
blocked, or the vehicle can be damaged.
Contact your service center.◀
Follow the towing instructions
Follow all towing instructions; otherwise,
vehicle damage or accidents may occur.◀
▷Make sure that the ignition is switched on;
otherwise, the low beams, tail lamps, turn
signals, and windshield wipers may be un‐
available.▷Do not tow the vehicle with the rear axle
tilted, as the front wheels could turn.▷When the engine is stopped, there is no
power assist. Consequently, more force
needs to be applied when braking and
steering.▷Larger steering wheel movements are re‐
quired.▷The towing vehicle must not be lighter
than the vehicle being towed; otherwise,
it will not be possible to control the vehicle
response.
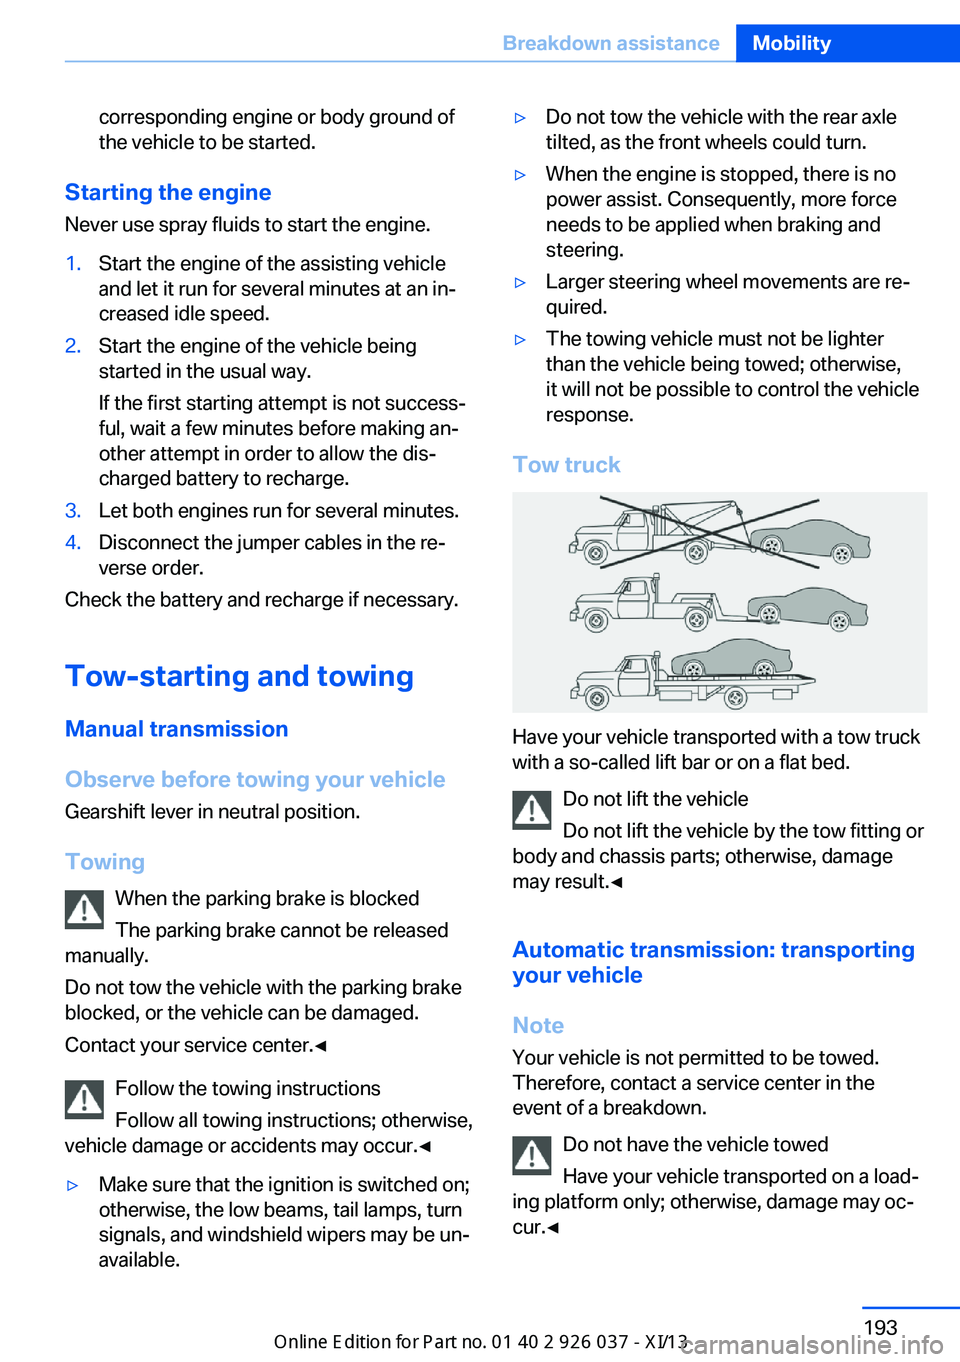
Tow truck
Have your vehicle transported with a tow truck
with a so-called lift bar or on a flat bed.
Do not lift the vehicle
Do not lift the vehicle by the tow fitting or
body and chassis parts; otherwise, damage
may result.◀
Automatic transmission: transporting
your vehicle
Note Your vehicle is not permitted to be towed.
Therefore, contact a service center in the
event of a breakdown.
Do not have the vehicle towed
Have your vehicle transported on a load‐
ing platform only; otherwise, damage may oc‐
cur.◀
Seite 193Breakdown assistanceMobility193
Online Edition for Part no. 01 40 2 910 746 - VI/13
Page 215 of 222
Entering/exiting vehicle, as‐sistance, steering wheel 59
Entering a car wash 196
Equipment, interior 141
ESP Electronic Stability Pro‐ gram, refer to DSC 119
Exchanging wheels/tires 171
Exhaust system 155
Exterior mirror, automatic dimming feature 58
Exterior mirrors 57
External start 192
External temperature dis‐ play 83
External temperature warn‐ ing 83
Eyes for securing cargo 159
F
Failure message, refer to Check Control 80
False alarm, refer to Uninten‐ tional alarm 41
Fan, refer to Air flow 137
Fault displays, refer to Check Control 80
Filler neck for engine oil 179
Fine wood, care 199
First aid kit 191
Fitting for towing, refer to Tow fitting 194
Flat tire, changing wheels 187
Flat Tire Monitor FTM 104
Flat tire, repairing 172
Flat tire, Tire Pressure Moni‐ tor TPM 102
Flat tire, warning lamp 103, 105
Flooding 156
Floor carpet, care 199
Floor mats, care 199
Fold-out position, windshield wipers 77
Foot brake 156 Front airbags 98
Front center armrest 147
Front lamps 184
Front passenger airbags, au‐ tomatic deactivation 100
Front passenger airbags, indi‐ cator lamp 100
Front seats 51
Front turn signals, refer to Light-emitting diodes,
LEDs 185
FTM Flat Tire Monitor 104
Fuel 166
Fuel cap 164
Fuel consumption, current 84
Fuel consumption, refer to Average fuel consump‐
tion 89
Fuel filler flap 164
Fuel gauge 82
Fuel quality 166
Fuel recommendation 166
Fuel, tank capacity 206
Fuse 188
G
Garage door opener, refer to Integrated universal remote
control 141
Gasoline 166
Gasoline quality 166
Gear change 71
Gear shift indicator 86
General driving notes 155
Glove compartment 146
Gross vehicle weight, ap‐ proved 205
Gross weight, permissible for trailer towing 205
Ground clearance 157
H
Handbrake, refer to Parking brake 68 Hand-held transmitter, alter‐
nating code 142
Hazard warning flashers 190
Headlamp control, auto‐ matic 94
Headlamp courtesy delay fea‐ ture 93
Headlamp courtesy delay fea‐ ture via remote control 35
Headlamp flasher 76
Headlamp glass 185
Headlamps 184
Headlamps, care 197
Headlamp washer system 76
Head restraints 51
Head restraints, front 55
Head-Up Display 133
Head-up Display, care 200
Head-up display, M view 134
Head-up display, standard view 134
Heavy cargo, stowing 159
Height, seats 51
Height, vehicle 204
High-beam Assistant 95
High beams 76
High beams/low beams, refer to High-beam Assistant 95
Higher speed range 157
Hills 156
Hill Start Assistant 121
Hill start assistant, refer to Drive-off assistant 119
Hints 6
Holder for beverages 148
Homepage 6
Hood 176
Horn 12
Hotel function, trunk lid 37
Hot exhaust system 155
HUD Head-Up Display 133
Hydroplaning 155 Seite 211Everything from A to ZReference211
Online Edition for Part no. 01 40 2 910 746 - VI/13
Page 216 of 222
IIce warning, refer to External temperature warning 83
Icy roads, refer to External temperature warning 83
Identification marks, tires 169
Identification number, refer to Important features in the en‐
gine compartment 176
iDrive 16
Ignition key, refer to Remote control 30
Ignition off 64
Ignition on 64
Indication of a flat tire 103 , 105
Indicator and warning lamps 80
Individual air distribution 137
Individual settings, refer to M Drive 59
Individual settings, refer to Personal Profile 31
Inflation pressure, tires 167
Inflation pressure warning FTM, tires 104
Info display, refer to Com‐ puter 89
Initialize, Tire Pressure Moni‐ tor TPM 103
Initializing, Flat Tire Monitor FTM 104
Instrument cluster 79
Instrument cluster, electronic displays 80
Instrument lighting 96
Integrated key 30
Integrated universal remote control 141
Intelligent Emergency Re‐ quest 190
Intelligent Safety 105
Intensity, AUTO pro‐ gram 137
Interior equipment 141 Interior lamps 96
Interior lamps via remote con‐ trol 35
Interior motion sensor 41
Interior rearview mirror, auto‐ matic dimming feature 58
Internet page 6
Interval display, service re‐ quirements 85
J Jacking points for the vehicle jack 187
Jump-starting 192
K
Key/remote control 30
Keyless Go, refer to Comfort Access 38
Key Memory, refer to Per‐ sonal Profile 31
Knee airbag 98
L
Lamp replacement, front 184
Lamp replacement, rear 186
Lamps 93
Lamps and bulbs 184
Lane departure warning 113
Lane margin, warning 113
Language on Control Dis‐ play 91
Lashing eyes, securing cargo 159
LATCH child restraint fixing system 62
Launch Control 73
Leather, care 198
LED headlamps, Bulb re‐ placement 186
LED light 186
LEDs, light-emitting di‐ odes 185 Length, vehicle 205
Letters and numbers, enter‐ ing 21
License plate lamp, bulb re‐ placement 186
Light alloy wheels, care 199
Light control 94
Light-emitting diodes, LEDs 185
Lighting 93
Lighting, speaker 97
Lighting via remote con‐ trol 35
Light switch 93
Load 158
Loading 158
Lock, door 36
Locking/unlocking from in‐ side 36
Locking/unlocking via door lock 36
Locking/unlocking with re‐ mote control 34
Locking, automatic 39
Locking, central 33
Locking, settings 39
Locking via trunk lid 37
Low beams 93
Low beams, automatic, refer to High-beam Assistant 95
Lower back support 52
Low Speed Assistant 74
Lumbar support 52
M
Maintenance 182
Maintenance require‐ ments 182
Maintenance, service require‐ ments 85
Maintenance system, BMW 182
Malfunction displays, refer to Check Control 80
Manual air distribution 137 Seite 212ReferenceEverything from A to Z212
Online Edition for Part no. 01 40 2 910 746 - VI/13
Page 219 of 222
Settings, storing for seat, mir‐rors, steering wheel 56
Shift Lights 73
Shoulder support 53
Side airbags 98
Side View 132
Signaling, horn 12
Signals when unlocking 39
Sitting safely 51
Size 204
Ski bag 145
Smallest turning circle 205
Smoker's package 143
Snow chains 175
Socket 144
Socket, OBD Onboard Diag‐ nostics 183
SOS button 190
Spare fuse 188
Speaker lighting 97
Specified engine oil types 179
Speed, average 89
Speed limit detection, on‐ board computer 90
Speed limiter, display 87
Speed Limit Information 87
Speed limit in the com‐ puter 90
Split screen 20
Stability control systems 119
Standard view, head-up dis‐ play 134
Start/stop, automatic func‐ tion 66
Start/Stop button 64
Start function during malfunc‐ tion 31
Starting the engine 65
Status display, tires 102
Status information, iDrive 19
Status of Owner's Manual 6
Steering assistance 122
Steering wheel, adjusting 59
Steering wheel heating 59
Steering wheel memory 56 Stopping the engine 66
Storage compartments 146
Storage compartments, loca‐ tions 146
Storage, tires 172
Storing the vehicle 200
Summer tires, tread 170
Supplementary text mes‐ sage 81
Surround View 127
Switch, refer to Cockpit 12
Symbols 6
SYNC program, automatic cli‐ mate control 138
System states of the driving dynamics 85
T
Tachometer 82
Tail and brake lamps 186
Tailgate 37
Tailgate via remote con‐ trol 35
Tail lamps 186
Tail lamps, bulb replace‐ ment 186
Technical changes, refer to Safety 7
Technical data 204
Technology, BMW M 152
Telephone, see user's manual for Navigation, Entertain‐
ment and Communication
Temperature, automatic cli‐ mate control 137
Temperature display, external temperature 83
Temperature, engine oil 82
Terminal, starting aid 192
Text message, supplemen‐ tary 81
Theft alarm system, refer to Alarm system 40
Theft protection, refer to Central locking system 33 Thermal camera, refer to
Night Vision 110
Thigh support 52
Tilt alarm sensor 41
Tilt, seats 51
Time of arrival 90
Tire damage 170
Tire identification marks 169
Tire inflation pressure 167
Tire inflation pressure moni‐ tor, refer to FTM 104
Tire Pressure Monitor TPM 102
Tires, changing 171
Tire sealant 172
Tires, everything on wheels and tires 167
Tire tread 170
Tone, see user's manual for Navigation, Entertainment
and Communication
Tools 184
Top View 130
Total vehicle weight 205
Tow fitting 194
Towing 193
Tow-starting 193
Tow truck 193
TPM Tire Pressure Moni‐ tor 102
Transmission positions 70
Transporting children safely 61
Tread, tires 170
Trip computer 90
Triple turn signal activa‐ tion 75
Trip odometer 83
Truck for tow-starting/ towing 193
Trunk, cargo area partition 45
Trunk lid 37
Trunk lid, emergency unlock‐ ing 38
Trunk lid, hotel function 37 Seite 215Everything from A to ZReference215
Online Edition for Part no. 01 40 2 910 746 - VI/13
Page 220 of 222
Trunk lid via remote con‐trol 35
Turning circle 205
Turning circle lines, rearview camera 129
Turn signals, operation 75
Turn signals, rear, bulb re‐ placement 186
U
Unintentional alarm 41
Units of measure 91
Universal remote control 141
Unlocking/locking from in‐ side 36
Unlocking/locking via door lock 36
Unlocking/locking with re‐ mote control 34
Unlocking, settings 39
Updates made after the edito‐ rial deadline 7
Upholstery care 198
USB interface 146
V
V8 high-performance engine, High-performance engine
V8 152
Vehicle battery 188
Vehicle battery, replac‐ ing 188
Vehicle, breaking in 154
Vehicle care 197
Vehicle equipment 6
Vehicle identification number, refer to Identification num‐
ber in the engine compart‐
ment 176
Vehicle jack 187
Vehicle paint 197
Vehicle storage 200
Vehicle wash 196
Ventilation 139 Ventilation, refer to Parked-
car ventilation 140
Voice activation system 22
W Warning indicators 80
Warning lamps 80
Warning messages, refer to Check Control 80
Warning triangle 191
Washer fluid 78
Washer fluid reservoir, ca‐ pacity 206
Washer nozzles, wind‐ shield 77
Washer system 76
Washing, vehicle 196
Water on roads 156
Weights 205
Welcome lamps 93
Wheel base, vehicle 205
Wheel cleaner 199
Wheels, changing 171
Wheels, everything on wheels and tires 167
Wheels, Flat Tire Monitor FTM 104
Wheels, Tire Pressure Moni‐ tor TPM 102
Width, vehicle 204
Wind deflector 49
Window defroster, rear 138
Windows, powered 41
Windshield, climate con‐ trol 155
Windshield washer fluid 78
Windshield washer noz‐ zles 77
Windshield washer sys‐ tem 76
Windshield wiper 76
Windshield wipers, fold-out position 77
Winter storage, care 200 Winter tires, suitable
tires 172
Winter tires, tread 170
Wiper blades, replacing 184
Wiper fluid 78
Wiper system 76
Wood, care 199
Word match concept, naviga‐ tion 21
Wrench 184
X Xenon headlamps, bulb re‐ placement 185 Seite 216ReferenceEverything from A to Z216
Online Edition for Part no. 01 40 2 910 746 - VI/13