check engine BMW M6 COUPE 2013 F13 Owner's Manual
[x] Cancel search | Manufacturer: BMW, Model Year: 2013, Model line: M6 COUPE, Model: BMW M6 COUPE 2013 F13Pages: 214, PDF Size: 7.08 MB
Page 35 of 214
Take the used battery to a recycling
center or to your service center.
New remote controls You can obtain new remote controls from your
service center.
Loss of the remote controls Lost remote controls can be blocked by your
service center.
Emergency detection of remote
control
It is possible to switch on the ignition or start
the engine in situations such as the following:▷Interference of radio transmission to re‐
mote control by external sources.▷Discharged battery in the remote control.▷Interference of radio transmission by mo‐
bile devices in close proximity to the re‐
mote control.▷Interference of radio transmission by
charger while charging items such as mo‐
bile devices in the vehicle.
A Check Control message is displayed if an at‐
tempt is made to switch on the ignition or start
the engine.
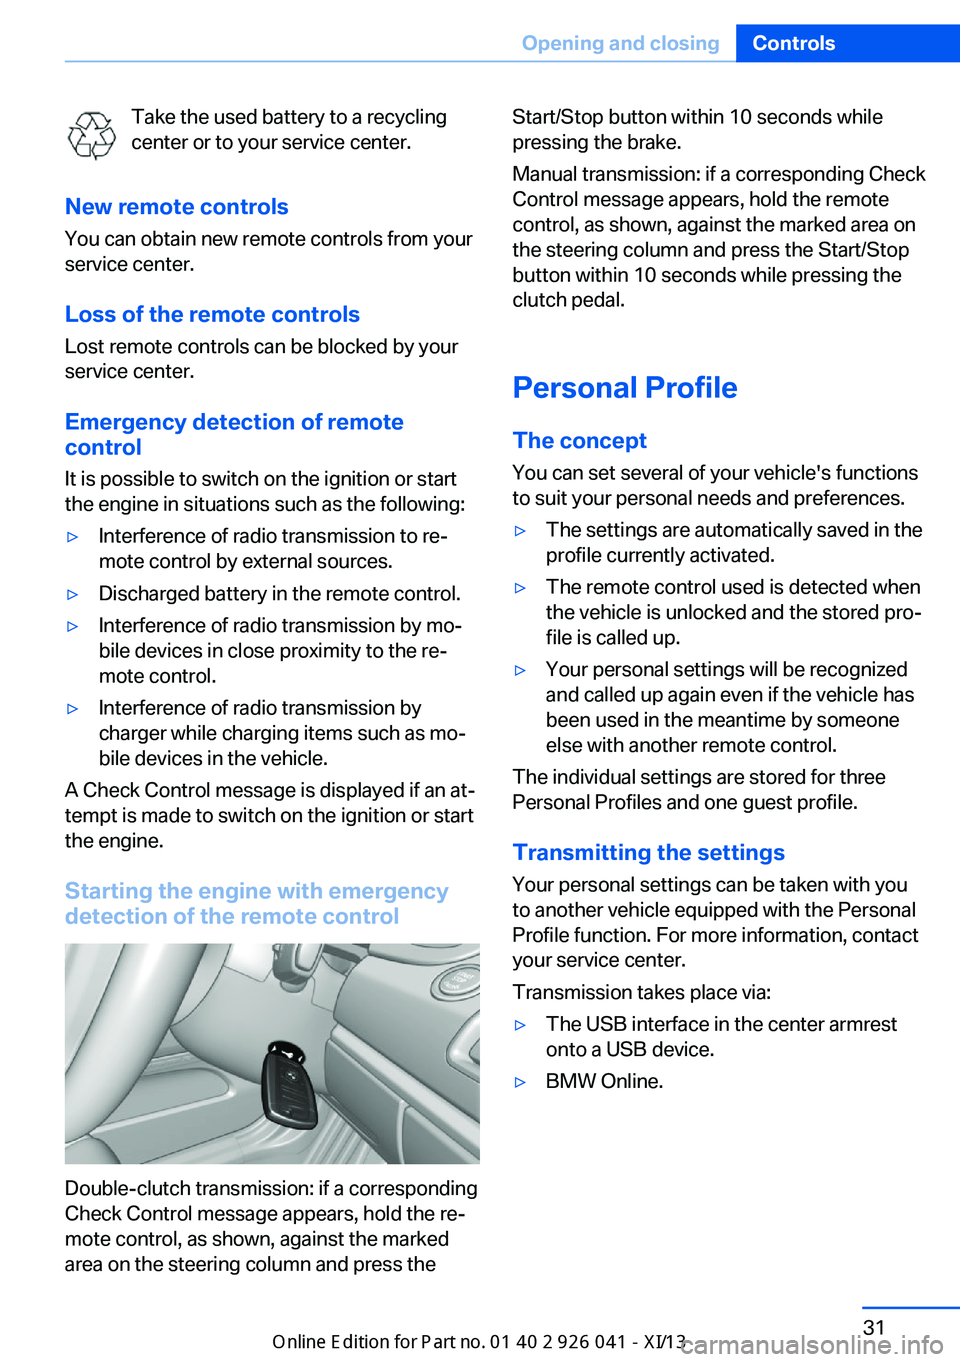
Starting the engine with emergency
detection of the remote control
Double-clutch transmission: if a corresponding
Check Control message appears, hold the re‐
mote control, as shown, against the marked
area on the steering column and press the
Start/Stop button within 10 seconds while
pressing the brake.
Manual transmission: if a corresponding Check
Control message appears, hold the remote
control, as shown, against the marked area on
the steering column and press the Start/Stop
button within 10 seconds while pressing the
clutch pedal.
Personal Profile
The concept You can set several of your vehicle's functions
to suit your personal needs and preferences.▷The settings are automatically saved in the
profile currently activated.▷The remote control used is detected when
the vehicle is unlocked and the stored pro‐
file is called up.▷Your personal settings will be recognized
and called up again even if the vehicle has
been used in the meantime by someone
else with another remote control.
The individual settings are stored for three
Personal Profiles and one guest profile.
Transmitting the settings
Your personal settings can be taken with you
to another vehicle equipped with the Personal
Profile function. For more information, contact
your service center.
Transmission takes place via:
▷The USB interface in the center armrest
onto a USB device.▷BMW Online.Seite 31Opening and closingControls31
Online Edition for Part no. 01 40 2 910 796 - VI/13
Page 47 of 214
Take the remote control with you
Take the remote control with you when
leaving the vehicle so that children, for exam‐
ple, cannot operate the roof and injure them‐
selves.◀
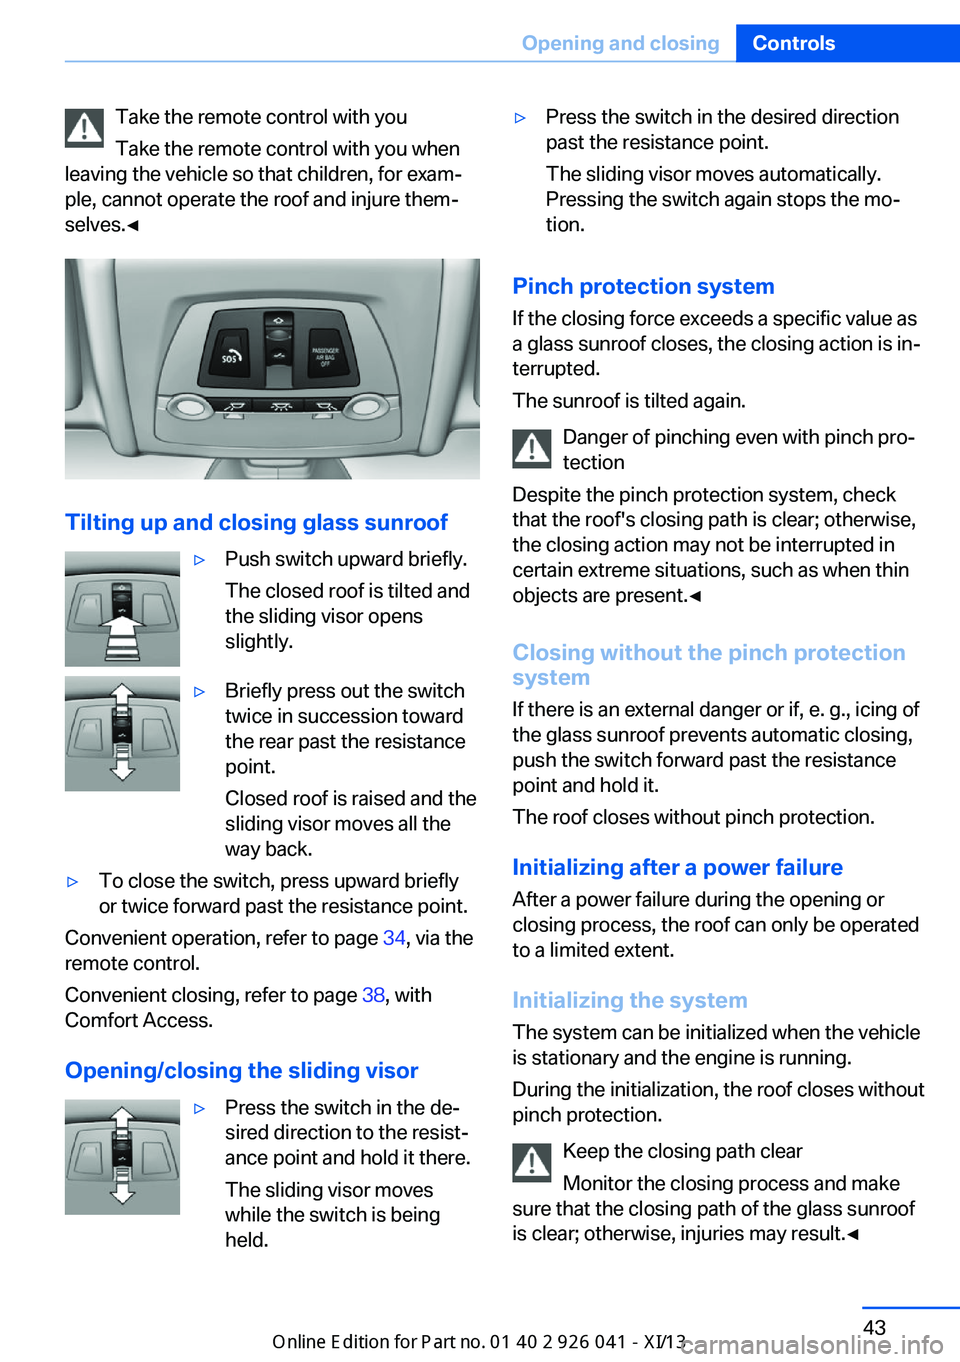
Tilting up and closing glass sunroof
▷Push switch upward briefly.
The closed roof is tilted and
the sliding visor opens
slightly.▷Briefly press out the switch
twice in succession toward
the rear past the resistance
point.
Closed roof is raised and the
sliding visor moves all the
way back.▷To close the switch, press upward briefly
or twice forward past the resistance point.
Convenient operation, refer to page 34, via the
remote control.
Convenient closing, refer to page 38, with
Comfort Access.
Opening/closing the sliding visor
▷Press the switch in the de‐
sired direction to the resist‐
ance point and hold it there.
The sliding visor moves
while the switch is being
held.▷Press the switch in the desired direction
past the resistance point.
The sliding visor moves automatically.
Pressing the switch again stops the mo‐
tion.
Pinch protection system
If the closing force exceeds a specific value as
a glass sunroof closes, the closing action is in‐
terrupted.
The sunroof is tilted again.
Danger of pinching even with pinch pro‐
tection
Despite the pinch protection system, check
that the roof's closing path is clear; otherwise,
the closing action may not be interrupted in
certain extreme situations, such as when thin
objects are present.◀
Closing without the pinch protection
system
If there is an external danger or if, e. g., icing of
the glass sunroof prevents automatic closing,
push the switch forward past the resistance
point and hold it.
The roof closes without pinch protection.
Initializing after a power failure
After a power failure during the opening or
closing process, the roof can only be operated
to a limited extent.
Initializing the system
The system can be initialized when the vehicle
is stationary and the engine is running.
During the initialization, the roof closes without
pinch protection.
Keep the closing path clear
Monitor the closing process and make
sure that the closing path of the glass sunroof
is clear; otherwise, injuries may result.◀
Seite 43Opening and closingControls43
Online Edition for Part no. 01 40 2 910 796 - VI/13
Page 67 of 214
▷Then press the brake pedal with normal
braking force.
Activating/deactivating the system
manually
Using the button
Press the button.
▷LED comes on: Auto Start Stop function is
deactivated.
The engine is started during an automatic
engine stop.
The engine can only be stopped or started
via the Start/Stop button.▷LED goes out: Auto Start Stop function is
activated.
Switching off the vehicle during an
automatic engine stop
During an automatic engine stop, the vehicle
can be switched off permanently, e.g., when
leaving it.
1.Press the Start/Stop button. The ignition is
switched off. The Auto Start/Stop function
is deactivated.
Transmission position P is engaged auto‐
matically.2.Set the parking brake.
Engine start as usual via Start/Stop button.
Automatic deactivation
In certain situations, the Auto Start/Stop func‐
tion is deactivated automatically for safety rea‐
sons, such as when the driver is detected to be
absent.
Malfunction
The Auto Start/Stop function no longer
switches of the engine automatically. A Check
Control message is displayed. It is possible to
continue driving. Have the system checked.
Parking brake
The concept The parking brake is used to prevent the vehi‐
cle from rolling when it is parked.
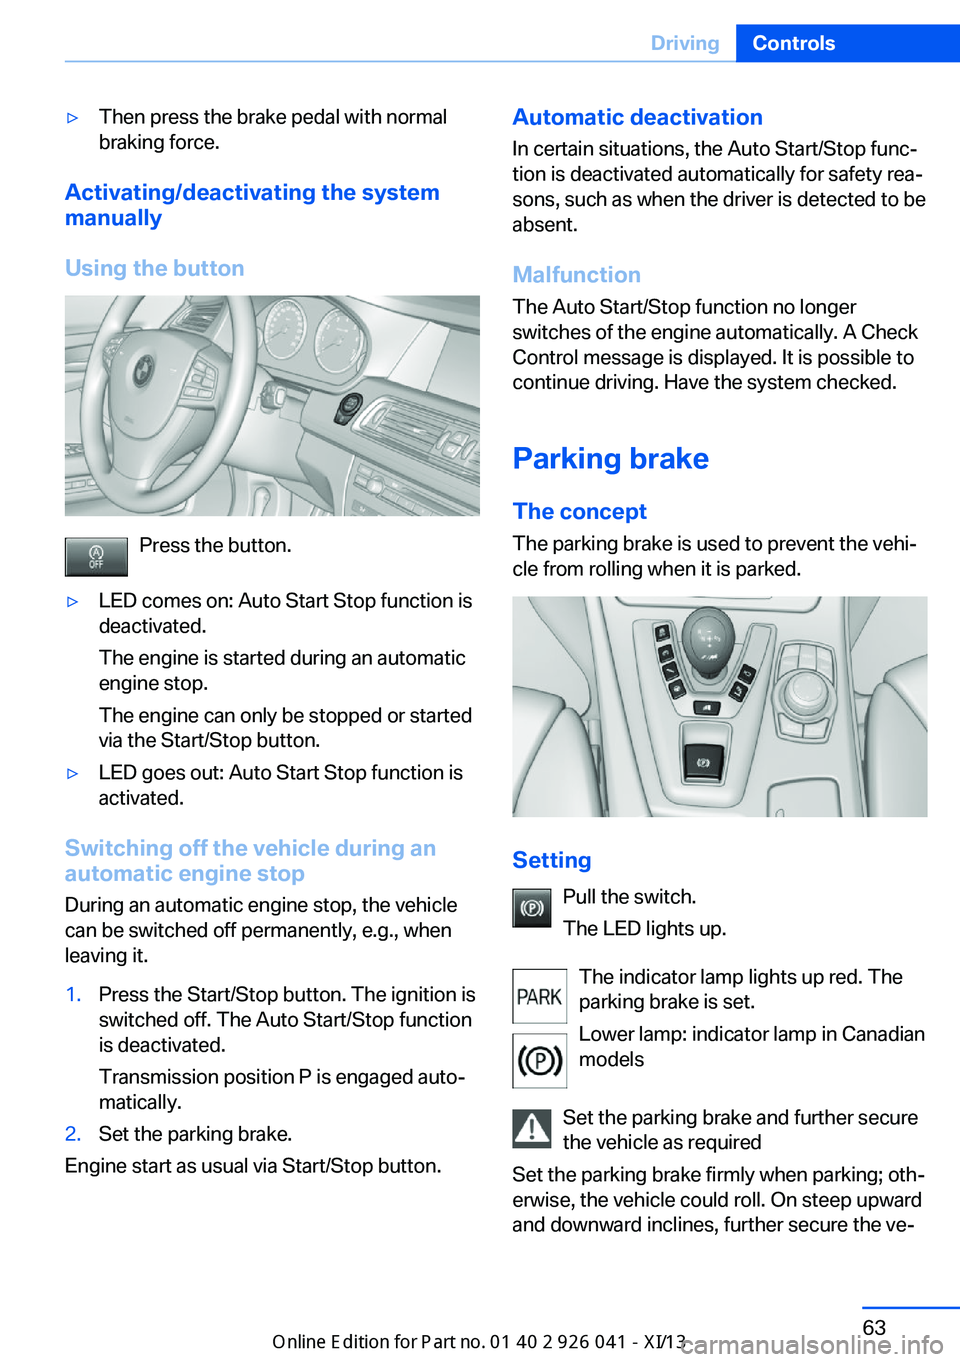
Setting
Pull the switch.
The LED lights up.
The indicator lamp lights up red. The
parking brake is set.
Lower lamp: indicator lamp in Canadian
models
Set the parking brake and further secure
the vehicle as required
Set the parking brake firmly when parking; oth‐
erwise, the vehicle could roll. On steep upward
and downward inclines, further secure the ve‐
Seite 63DrivingControls63
Online Edition for Part no. 01 40 2 910 796 - VI/13
Page 79 of 214
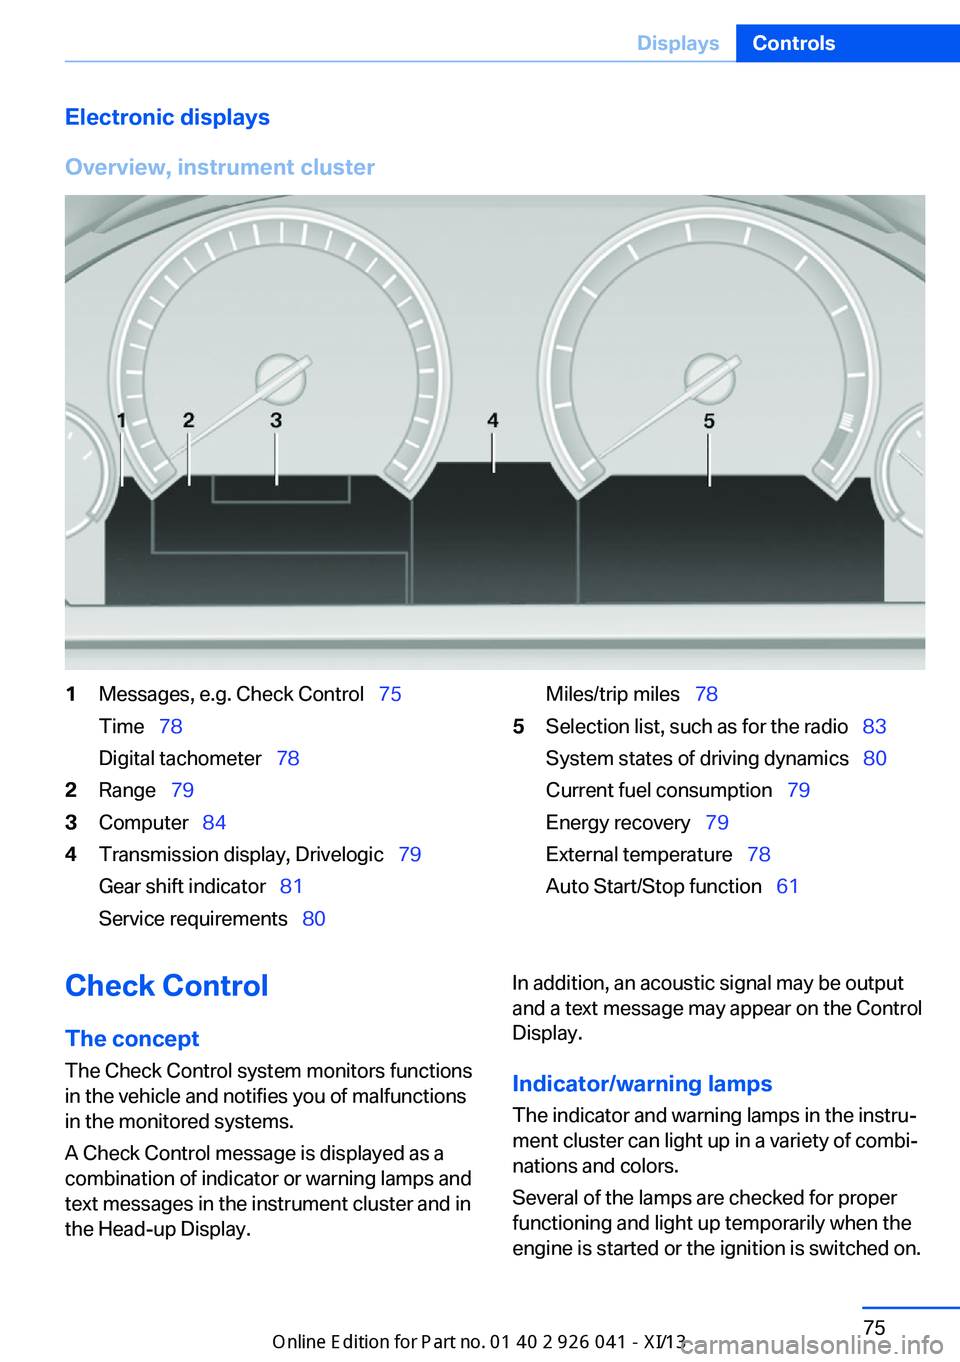
Electronic displays
Overview, instrument cluster1Messages, e.g. Check Control 75
Time 78
Digital tachometer 782Range 793Computer 844Transmission display, Drivelogic 79
Gear shift indicator 81
Service requirements 80Miles/trip miles 785Selection list, such as for the radio 83
System states of driving dynamics 80
Current fuel consumption 79
Energy recovery 79
External temperature 78
Auto Start/Stop function 61Check Control
The concept The Check Control system monitors functions
in the vehicle and notifies you of malfunctions
in the monitored systems.
A Check Control message is displayed as a
combination of indicator or warning lamps and
text messages in the instrument cluster and in
the Head-up Display.In addition, an acoustic signal may be output
and a text message may appear on the Control Display.
Indicator/warning lamps The indicator and warning lamps in the instru‐
ment cluster can light up in a variety of combi‐
nations and colors.
Several of the lamps are checked for proper
functioning and light up temporarily when the
engine is started or the ignition is switched on.Seite 75DisplaysControls75
Online Edition for Part no. 01 40 2 910 796 - VI/13
Page 80 of 214
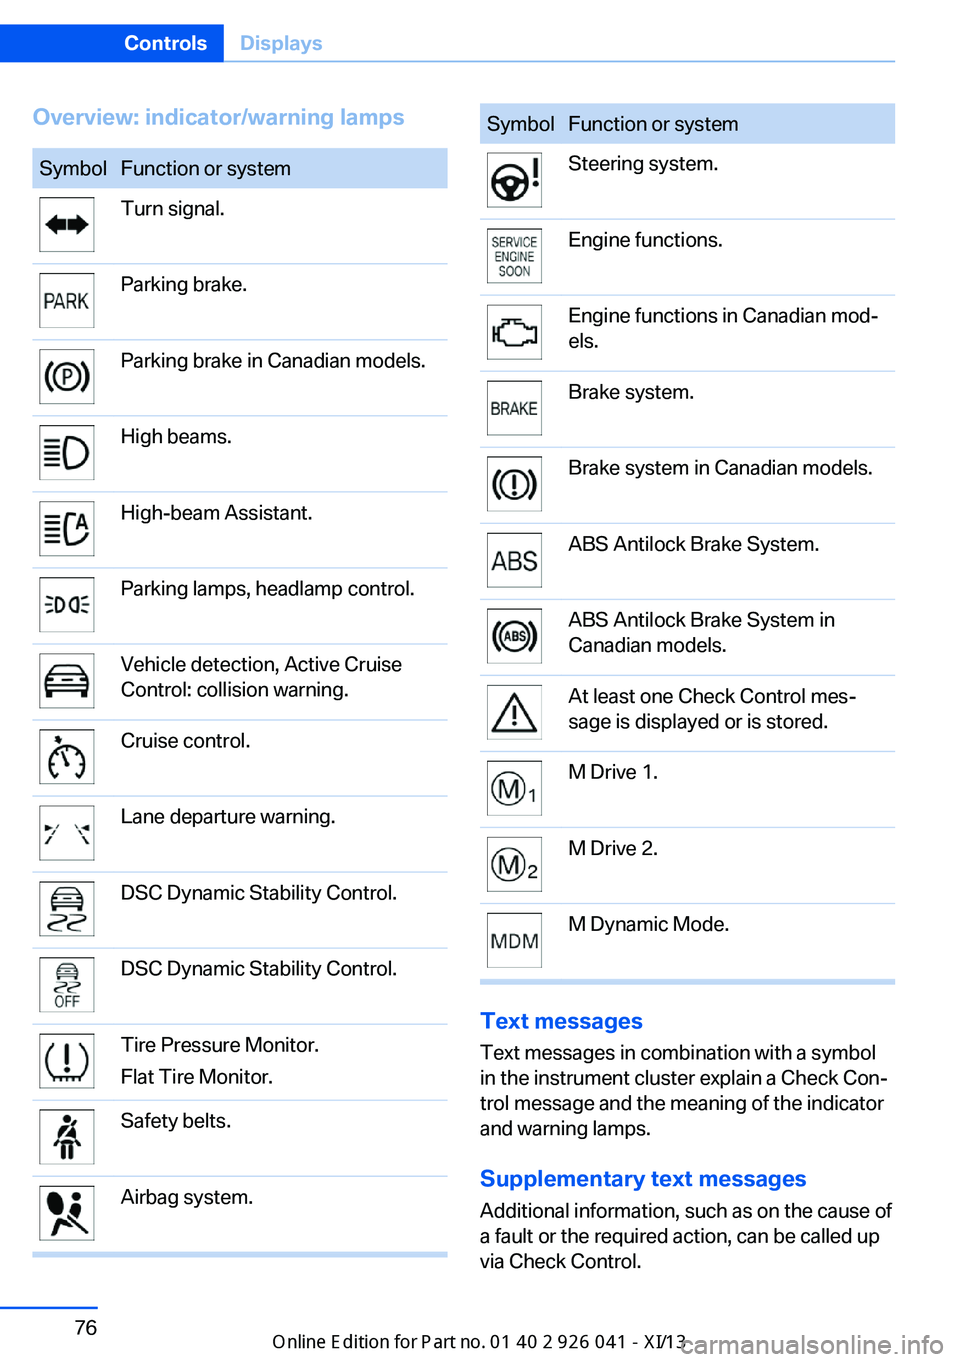
Overview: indicator/warning lampsSymbolFunction or systemTurn signal.Parking brake.Parking brake in Canadian models.High beams.High-beam Assistant.Parking lamps, headlamp control.Vehicle detection, Active Cruise
Control: collision warning.Cruise control.Lane departure warning.DSC Dynamic Stability Control.DSC Dynamic Stability Control.Tire Pressure Monitor.
Flat Tire Monitor.Safety belts.Airbag system.SymbolFunction or systemSteering system.Engine functions.Engine functions in Canadian mod‐
els.Brake system.Brake system in Canadian models.ABS Antilock Brake System.ABS Antilock Brake System in
Canadian models.At least one Check Control mes‐
sage is displayed or is stored.M Drive 1.M Drive 2.M Dynamic Mode.
Text messages
Text messages in combination with a symbol
in the instrument cluster explain a Check Con‐ trol message and the meaning of the indicator
and warning lamps.
Supplementary text messages
Additional information, such as on the cause of
a fault or the required action, can be called up
via Check Control.
Seite 76ControlsDisplays76
Online Edition for Part no. 01 40 2 910 796 - VI/13
Page 81 of 214
The supplementary text of urgent messages is
automatically displayed on the Control Display.
Symbols
Depending on the Check Control message, the
following functions can be selected.▷ "Owner's Manual"
Display additional information about the
Check Control message in the Integrated
Owner's Manual.▷ "Service request"
Contact the service partner.▷ "Roadside Assistance"
Contact Roadside Assistance.
Hiding Check Control messages
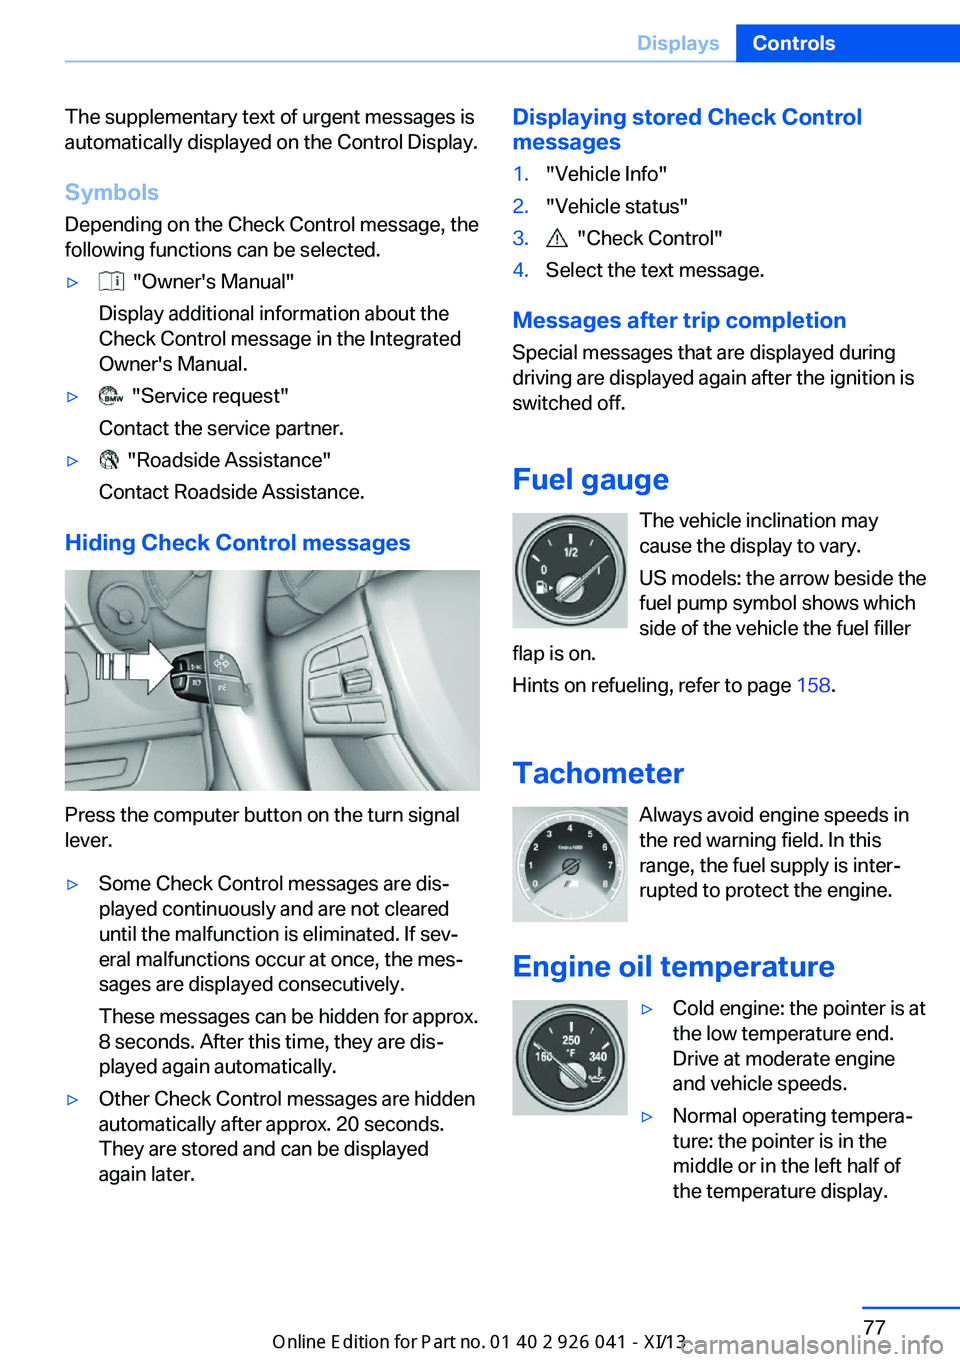
Press the computer button on the turn signal
lever.
▷Some Check Control messages are dis‐
played continuously and are not cleared
until the malfunction is eliminated. If sev‐
eral malfunctions occur at once, the mes‐
sages are displayed consecutively.
These messages can be hidden for approx.
8 seconds. After this time, they are dis‐
played again automatically.▷Other Check Control messages are hidden
automatically after approx. 20 seconds.
They are stored and can be displayed
again later.Displaying stored Check Control
messages1."Vehicle Info"2."Vehicle status"3. "Check Control"4.Select the text message.
Messages after trip completion
Special messages that are displayed during
driving are displayed again after the ignition is
switched off.
Fuel gauge The vehicle inclination may
cause the display to vary.
US models: the arrow beside the
fuel pump symbol shows which
side of the vehicle the fuel filler
flap is on.
Hints on refueling, refer to page 158.
Tachometer Always avoid engine speeds inthe red warning field. In this
range, the fuel supply is inter‐
rupted to protect the engine.
Engine oil temperature
▷Cold engine: the pointer is at
the low temperature end.
Drive at moderate engine
and vehicle speeds.▷Normal operating tempera‐
ture: the pointer is in the
middle or in the left half of
the temperature display.Seite 77DisplaysControls77
Online Edition for Part no. 01 40 2 910 796 - VI/13
Page 82 of 214
▷Hot engine: the pointer is at the high tem‐
perature end. A Check Control message is
also displayed.
Coolant temperature
If the coolant along with the engine becomes
too hot, a Check Control message is displayed.
Check the coolant level, refer to page 175.
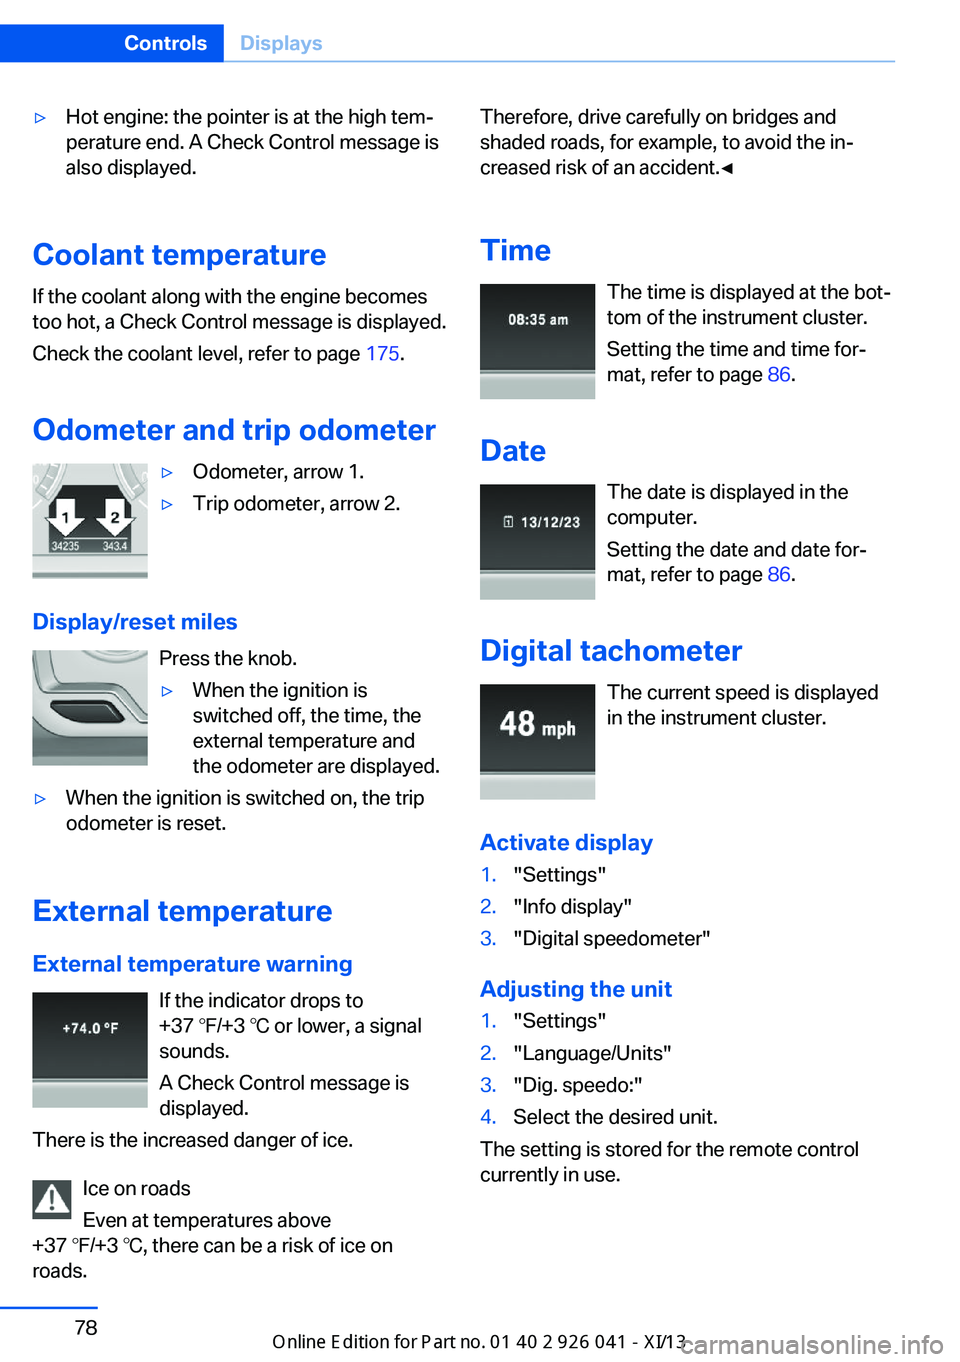
Odometer and trip odometer
▷Odometer, arrow 1.▷Trip odometer, arrow 2.
Display/reset miles Press the knob.
▷When the ignition is
switched off, the time, the
external temperature and
the odometer are displayed.▷When the ignition is switched on, the trip
odometer is reset.
External temperature
External temperature warning If the indicator drops to
+37 ℉/+3 ℃ or lower, a signal
sounds.
A Check Control message is displayed.
There is the increased danger of ice.
Ice on roads
Even at temperatures above
+37 ℉/+3 ℃, there can be a risk of ice on
roads.
Therefore, drive carefully on bridges and
shaded roads, for example, to avoid the in‐
creased risk of an accident.◀
Time The time is displayed at the bot‐
tom of the instrument cluster.
Setting the time and time for‐
mat, refer to page 86.
Date The date is displayed in the
computer.
Setting the date and date for‐
mat, refer to page 86.
Digital tachometer The current speed is displayed
in the instrument cluster.
Activate display1."Settings"2."Info display"3."Digital speedometer"
Adjusting the unit
1."Settings"2."Language/Units"3."Dig. speedo:"4.Select the desired unit.
The setting is stored for the remote control
currently in use.
Seite 78ControlsDisplays78
Online Edition for Part no. 01 40 2 910 796 - VI/13
Page 83 of 214
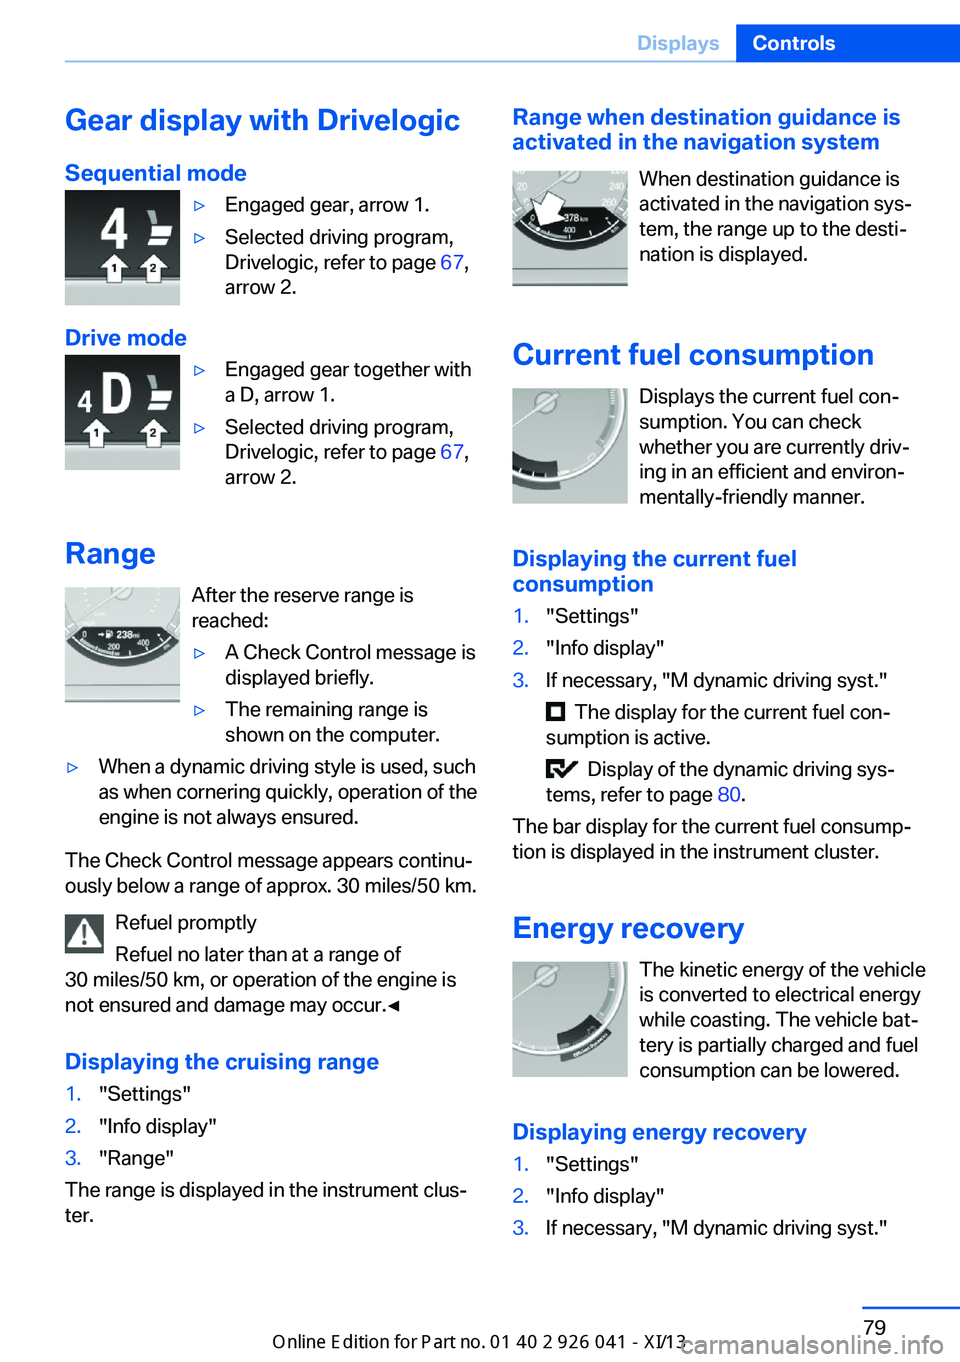
Gear display with Drivelogic
Sequential mode▷Engaged gear, arrow 1.▷Selected driving program,
Drivelogic, refer to page 67,
arrow 2.
Drive mode
▷Engaged gear together with
a D, arrow 1.▷Selected driving program,
Drivelogic, refer to page 67,
arrow 2.
Range
After the reserve range is
reached:
▷A Check Control message is
displayed briefly.▷The remaining range is
shown on the computer.▷When a dynamic driving style is used, such
as when cornering quickly, operation of the
engine is not always ensured.
The Check Control message appears continu‐
ously below a range of approx. 30 miles/50 km.
Refuel promptly
Refuel no later than at a range of
30 miles/50 km, or operation of the engine is
not ensured and damage may occur.◀
Displaying the cruising range
1."Settings"2."Info display"3."Range"
The range is displayed in the instrument clus‐
ter.
Range when destination guidance is
activated in the navigation system
When destination guidance is
activated in the navigation sys‐
tem, the range up to the desti‐
nation is displayed.
Current fuel consumption Displays the current fuel con‐
sumption. You can check whether you are currently driv‐
ing in an efficient and environ‐
mentally-friendly manner.
Displaying the current fuel
consumption1."Settings"2."Info display"3.If necessary, "M dynamic driving syst."
The display for the current fuel con‐
sumption is active.
Display of the dynamic driving sys‐
tems, refer to page 80.
The bar display for the current fuel consump‐
tion is displayed in the instrument cluster.
Energy recovery The kinetic energy of the vehicle
is converted to electrical energy
while coasting. The vehicle bat‐
tery is partially charged and fuel
consumption can be lowered.
Displaying energy recovery
1."Settings"2."Info display"3.If necessary, "M dynamic driving syst."Seite 79DisplaysControls79
Online Edition for Part no. 01 40 2 910 796 - VI/13
Page 101 of 214
All wheels green
System is active and will issue a warning rela‐
tive to the tire inflation pressures stored during
the last reset.
One wheel is yellow
A flat tire or major drop in inflation pressure in
the indicated tire.
All wheels are yellow A flat tire or major drop in inflation pressure in
several tires.
Wheels, gray
The system cannot detect a flat tire. Reasons
for this may be:▷The system is being reset.▷Malfunction.
Additional information
The status display additionally shows the cur‐
rent tire inflation pressures and tire tempera‐
tures. The values shown are current measure‐
ment values and may vary depending on
driving style or weather conditions.
Carry out reset Reset the system after each correction of the
tire inflation pressure and after every tire or
wheel change.
1."Vehicle Info"2."Vehicle status"3. "Perform reset"4.Start the engine - do not drive away.5.Carry out the reset with "Perform reset".6.Drive away.
The tires are shown in gray and the status is
displayed.
After driving faster than 19 mph/30 km/h for a
short period, the tire inflation pressures set are
accepted as reference values. The reset is
completed automatically during driving.
After a successfully completed Reset, the
wheels on the Control Display are shown in
green and "Tire Pressure Monitor (TPM)
active" is displayed.
The trip can be interrupted at any time. If you
drive away again, the reset resumes automati‐
cally.
Low tire pressure message The yellow warning lamp lights up. A
Check Control message is displayed.▷There is a flat tire or a major loss in
tire inflation pressure.▷No reset was performed for the system.
The system therefore issues a warning
based on the tire pressures before the last
reset.1.Reduce your speed and stop cautiously.
Avoid sudden braking and steering maneu‐
vers.2.Identify the damaged wheel. Do so by
checking the tire inflation pressure using
the Mobility System. Correcting the tire in‐
flation pressure, refer to page 169.3.Repair flat tire with the Mobility System, re‐
fer to page 166, or replace the damaged
wheel.
Required inflation pressure check
message
A Check Control message is displayed.
Check the tire inflation pressure and carry out
a reset of the system.
In some cases, a wheel was changed without
having carried out a reset.
System limits
The system does not function properly if a re‐
set has not been carried out, e.g., a flat tire is
reported even though the tire inflation pres‐
sures are correct.
Seite 97SafetyControls97
Online Edition for Part no. 01 40 2 910 796 - VI/13
Page 103 of 214
In the event of a pressure loss, the diameter
and therefore the rotational speed of the corre‐
sponding wheel change. This is detected and
reported as a flat tire.
Functional requirements
The system must have been initialized when
the tire inflation pressure was correct; other‐
wise, reliable signaling of a flat tire is not en‐
sured. Initialize the system after each correc‐ tion of the tire inflation pressure and afterevery tire or wheel change.
Status display The current status of the Flat Tire Monitor can
be displayed on the Control Display, e.g.,
whether or not the FTM is active.1."Vehicle Info"2."Vehicle status"3. "Flat Tire Monitor (FTM)"
The status is displayed.
Initialization
The initialization process adopts the set infla‐
tion tire pressures as reference values for the
detection of a flat tire. Initialization is started by
confirming the inflation pressures.
Do not initialize the system when driving with
snow chains.
1."Vehicle Info"2."Vehicle status"3. "Perform reset"4.Start the engine - do not drive away.5.Start the initialization with "Perform reset".6.Drive away.
The initialization is completed while driving,
which can be interrupted at any time.
The initialization automatically continues when
driving resumes.
Indication of a flat tire
The yellow warning lamp lights up. A
Check Control message is displayed.
There is a flat tire or a major loss in tire
inflation pressure.1.Reduce your speed and stop cautiously.
Avoid sudden braking and steering maneu‐
vers.2.Identify the damaged wheel. Do so by
checking the tire inflation pressure using
the Mobility System. If the tire inflation
pressure in all tires is correct, the Flat Tire
Monitor may not have been initialized. In
this case, initialize the system.3.Repair flat tire with the Mobility System, re‐
fer to page 166, or replace the damaged
wheel.
System limits
Sudden tire damage
Sudden serious tire damage caused by
external influences cannot be indicated in ad‐
vance.◀
A natural, even pressure loss in all four tires
cannot be detected. Therefore, check the tire
inflation pressure regularly.
The system could be delayed or malfunction in
the following situations:
▷When the system has not been initialized.▷When driving on a snowy or slippery road
surface.▷Sporty driving style: slip in the drive
wheels, high lateral acceleration.▷When driving with snow chains.
Intelligent Safety
The concept
Depending on how the vehicle is equipped, In‐
telligent Safety consists of one or more of the
Seite 99SafetyControls99
Online Edition for Part no. 01 40 2 910 796 - VI/13