bulb BMW MOTORRAD G650 XMOTO 2007 Rider's Manual (in English)
[x] Cancel search | Manufacturer: BMW MOTORRAD, Model Year: 2007, Model line: G650 XMOTO, Model: BMW MOTORRAD G650 XMOTO 2007Pages: 132, PDF Size: 2.83 MB
Page 5 of 132
BMW Motorrad front-wheel
stand ......................... 79
Fuses ........................ 81
Bulbs . ........................ 82
Jump starting . . . ............. 90
Battery . . . . . . ................. 91
Number-plate carrier . . . ...... 95
9 Care . . . . . . ................ 97
Care products . . . ............. 98
Washing motorcycle . . . . ...... 98
Cleaning easily damaged
components . ................. 98
Paint care . . . ................. 99
Protective wax coating . .... 100
Laying up motorcycle . . .... 100
Restoring motorcycle to
use......................... 100
10 Technical data . . . . . . . 101
Troubleshooting chart . . .... 102
Threaded fasteners . . . . .... 103
Engine . . . . . . ............... 105
Fuel . . ...................... 106
Engine oil . . . ............... 106
Clutch ...................... 107
Transmission ............... 107 Rear-wheel drive
........... 108
Running gear ............... 108
Brakes . . . . . . ............... 109
Wheels and tyres ........... 109
Electrics . . . . . ............... 110
Frame ...................... 112
Dimensions . ............... 112
Weights . . . . . ............... 113
Riding specifications . . . .... 113
11 Service . . . . . . . . . . . . . . . . 115
BMW Motorrad service . .... 116
BMW Motorrad service
quality ...................... 116
BMW Motorrad Service
Card: on-the-spot break-
down assistance ........... 116
BMW Motorrad service net-
work . . ...................... 117
Maintenance work . . . . . . .... 117
Confirmation of mainten-
ance work . . . ............... 118
Confirmation of service . .... 123
Page 61 of 132
Maintenance
Maintenance
Notes................................ 60
Toolkit . . . ............................ 60
Engine oil ............................ 61
Brake system . ....................... 63
Brake pads . . . ....................... 64
Brake fluid ........................... 65
Coolant . . ............................ 67
Clutch . . . ............................ 68
Tyres ................................ 69
Rims ................................. 69
Chain ................................ 69
Wheels . . ............................ 71
BMW Motorrad auxiliary stand ....... 78
BMW Motorrad front-wheel
stand ................................ 79 Fuses . . .
............................. 81
Bulbs . . . ............................. 82
Jump starting . ....................... 90
Battery . . ............................. 91
Number-plate carrier ................. 95
859zMaintenance
Page 62 of 132
NotesThe Maintenance chapter de-
scribes straightforward proced-
ures for checking and replacing
certain wear parts.
Special tightening torques are lis-
ted as applicable. The tightening
torques for the threaded fasten-
ers on your motorcycle are listed
in the section entitled "Technical
data".
You will find information on more
extensive maintenance and re-
pair work in the Repair Manual
on DVD/CD-ROM (RepROM) for
your motorcycle, which is avail-
able from your authorised BMW
Motorrad dealer.
Some of the work calls for spe-
cial tools and a thorough know-
ledge of motorcycles. If you
are in doubt consult a specialist
workshop, preferably your author-
ised BMW Motorrad dealer.
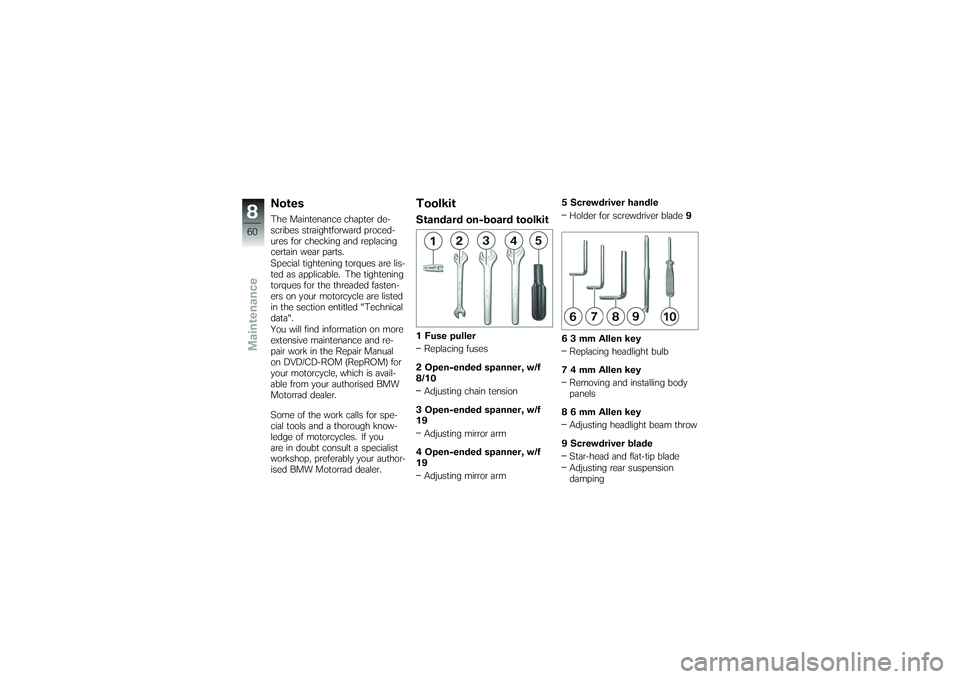
ToolkitStandard on-board toolkit1 Fuse pullerReplacing fuses
2 Open-ended spanner, w/f
8/10 Adjusting chain tension
3 Open-ended spanner, w/f
19 Adjusting mirror arm
4 Open-ended spanner, w/f
19 Adjusting mirror arm 5 Screwdriver handle
Holder for screwdriver blade 9
6 3 mm Allen key Replacing headlight bulb
7 4 mm Allen key Removing and installing body
panels
8 6 mm Allen key Adjusting headlight beam throw
9 Screwdriver blade Star-head and flat-tip blade
Adjusting rear suspension
damping
860zMaintenance
Page 63 of 132
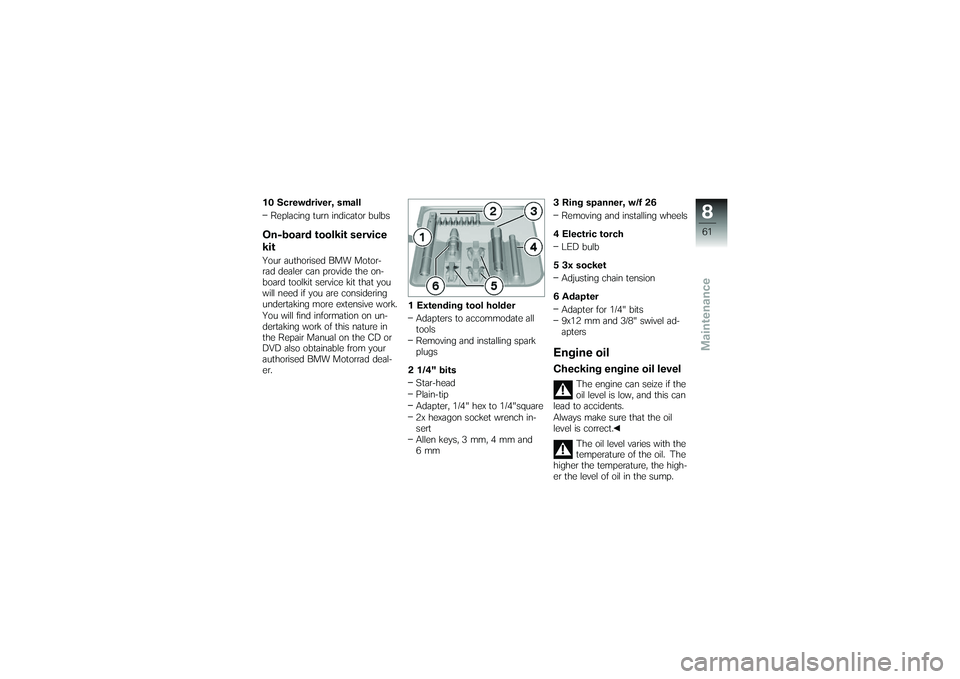
10 Screwdriver, smallReplacing turn indicator bulbsOn-board toolkit service
kitYour authorised BMW Motor-
rad dealer can provide the on-
board toolkit service kit that you
will need if you are considering
undertaking more extensive work.
You will find information on un-
dertaking work of this nature in
the Repair Manual on the CD or
DVD also obtainable from your
authorised BMW Motorrad deal-
er. 1 Extending tool holder
Adapters to accommodate all
tools
Removing and installing spark
plugs
2 1/4" bits Star-head
Plain-tip
Adapter, 1/4" hex to 1/4"square
2x hexagon socket wrench in-
sert
Allen keys, 3 mm, 4 mm and
6mm 3 Ring spanner, w/f 26
Removing and installing wheels
4 Electric torch LED bulb
5 3x socket Adjusting chain tension
6 Adapter Adapter for 1/4" bits
9x12 mm and 3/8" swivel ad-
apters
Engine oilChecking engine oil level
The engine can seize if the
oil level is low, and this can
lead to accidents.
Always make sure that the oil
level is correct.
The oil level varies with the
temperature of the oil. The
higher the temperature, the high-
er the level of oil in the sump.
861zMaintenance
Page 84 of 132
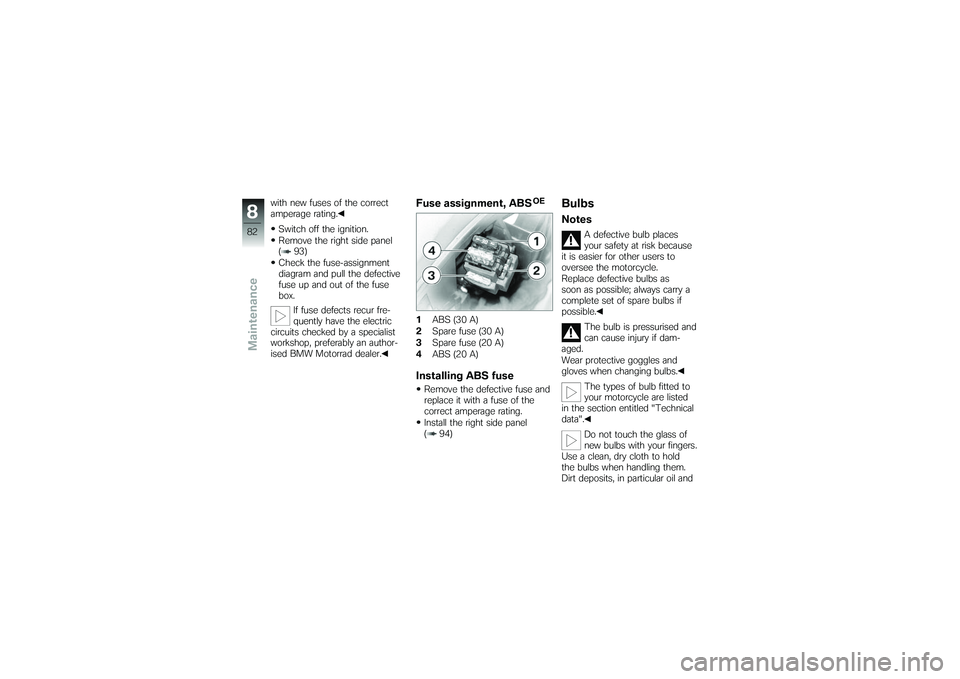
with new fuses of the correct
amperage rating.Switch off the ignition.
Remove the right side panel
( 93)
Check the fuse-assignment
diagram and pull the defective
fuse up and out of the fuse
box. If fuse defects recur fre-
quently have the electric
circuits checked by a specialist
workshop, preferably an author-
ised BMW Motorrad dealer.
Fuse assignment, ABS
OE
1 ABS (30 A)
2 Spare fuse (30 A)
3 Spare fuse (20 A)
4 ABS (20 A)Installing ABS fuseRemove the defective fuse and
replace it with a fuse of the
correct amperage rating.
Install the right side panel
( 94)
BulbsNotes
A defective bulb places
your safety at risk because
it is easier for other users to
oversee the motorcycle.
Replace defective bulbs as
soon as possible; always carry a
complete set of spare bulbs if
possible.
The bulb is pressurised and
can cause injury if dam-
aged.
Wear protective goggles and
gloves when changing bulbs.
The types of bulb fitted to
your motorcycle are listed
in the section entitled "Technical
data".
Do not touch the glass of
new bulbs with your fingers.
Use a clean, dry cloth to hold
the bulbs when handling them.
Dirt deposits, in particular oil and
882zMaintenance
Page 85 of 132
grease, interfere with heat radi-
ation from the bulb. This leads
to overheating and shortens the
bulb's operating life.Removing headlight
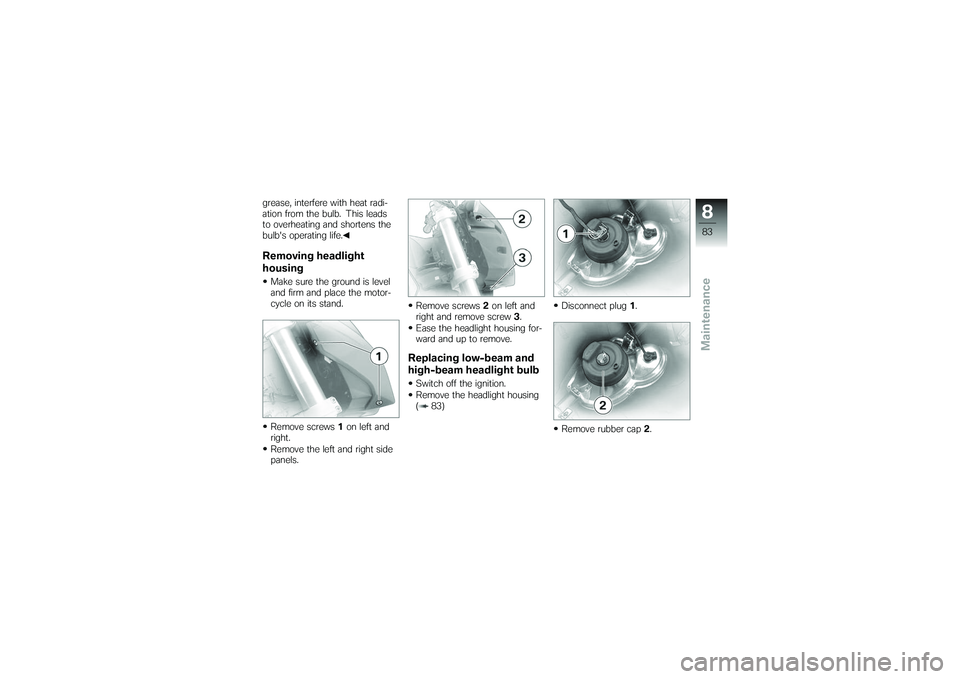
housingMake sure the ground is level
and firm and place the motor-
cycle on its stand.
Remove screws1on left and
right.
Remove the left and right side
panels. Remove screws
2on left and
right and remove screw 3.
Ease the headlight housing for-
ward and up to remove.
Replacing low-beam and
high-beam headlight bulbSwitch off the ignition.
Remove the headlight housing
( 83) Disconnect plug
1.
Remove rubber cap 2.
883zMaintenance
Page 86 of 132
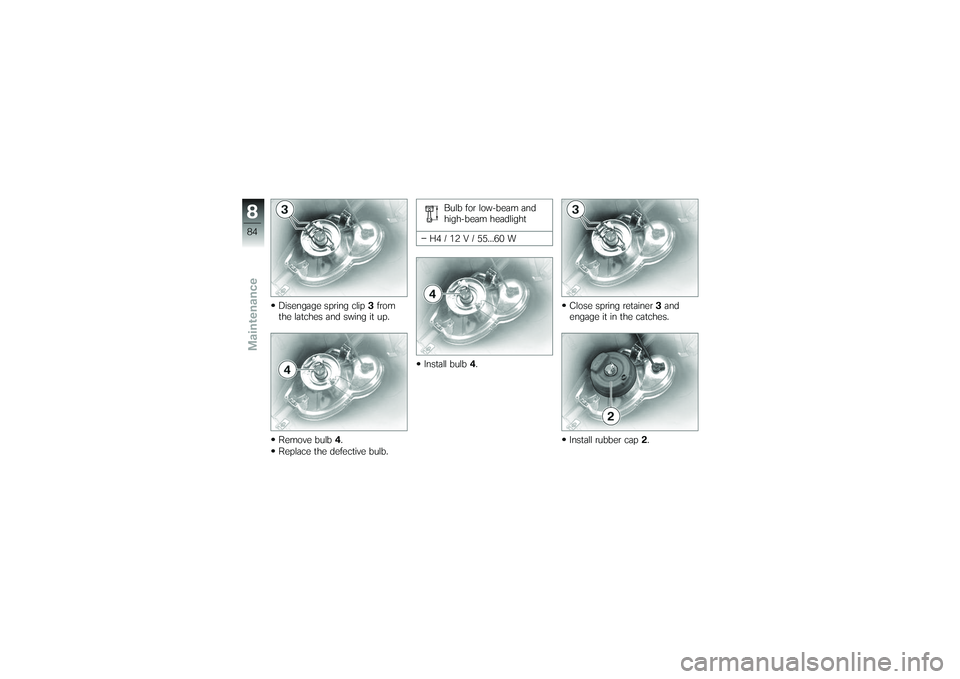
Disengage spring clip3from
the latches and swing it up.
Remove bulb 4.
Replace the defective bulb. Bulb for low-beam and
high-beam headlight
H4 / 12 V / 55...60 W
Install bulb 4. Close spring retainer
3and
engage it in the catches.
Install rubber cap 2.
884zMaintenance
Page 88 of 132
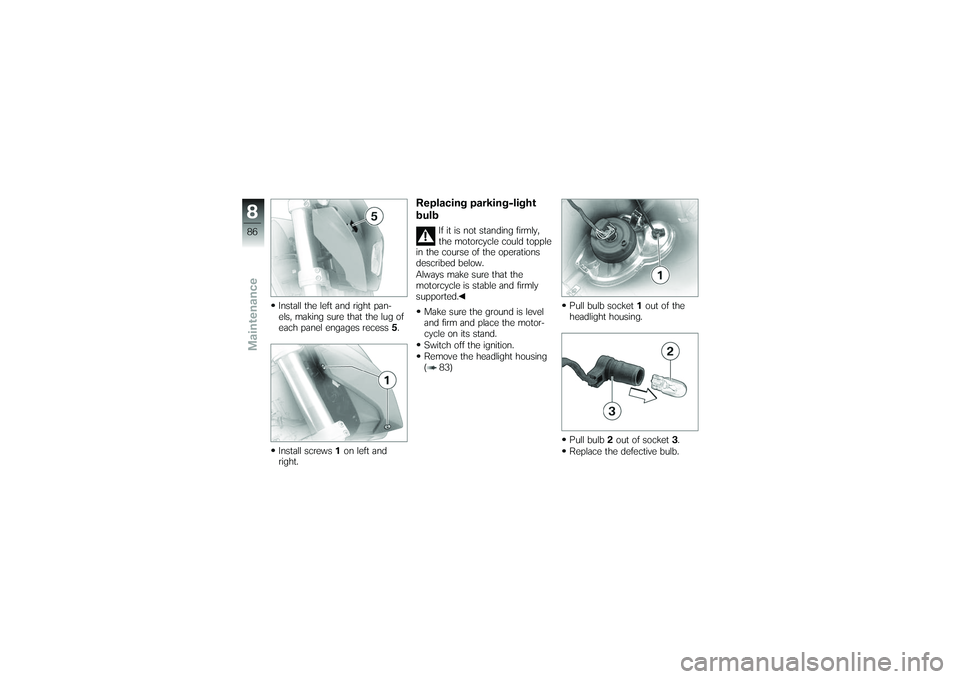
Install the left and right pan-
els, making sure that the lug of
each panel engages recess5.
Install screws 1on left and
right.
Replacing parking-light
bulb
If it is not standing firmly,
the motorcycle could topple
in the course of the operations
described below.
Always make sure that the
motorcycle is stable and firmly
supported.
Make sure the ground is level
and firm and place the motor-
cycle on its stand.
Switch off the ignition.
Remove the headlight housing
( 83) Pull bulb socket
1out of the
headlight housing.
Pull bulb 2out of socket 3.
Replace the defective bulb.
886zMaintenance
Page 89 of 132
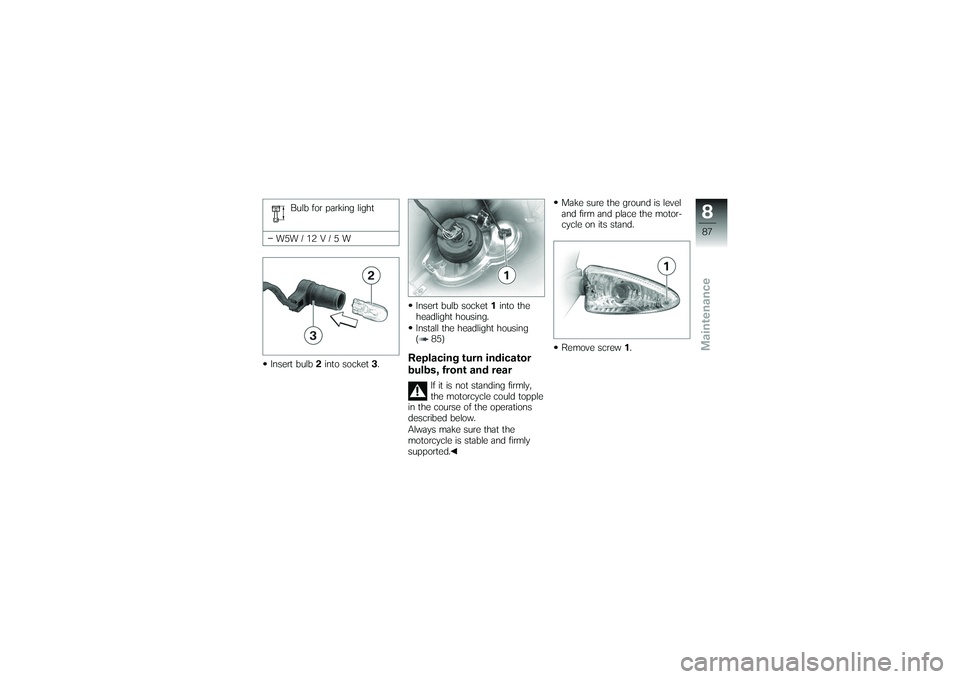
Bulb for parking light
W5W / 12 V / 5 W
Insert bulb 2into socket 3. Insert bulb socket
1into the
headlight housing.
Install the headlight housing
( 85)
Replacing turn indicator
bulbs, front and rear
If it is not standing firmly,
the motorcycle could topple
in the course of the operations
described below.
Always make sure that the
motorcycle is stable and firmly
supported. Make sure the ground is level
and firm and place the motor-
cycle on its stand.
Remove screw
1.
887zMaintenance
Page 90 of 132
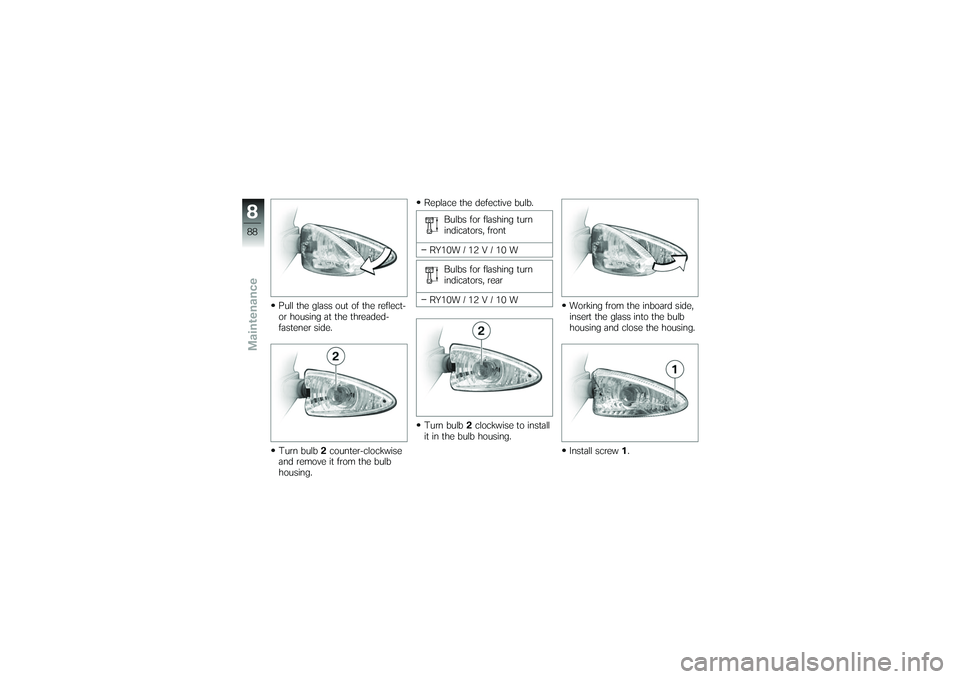
Pull the glass out of the reflect-
or housing at the threaded-
fastener side.
Turn bulb2counter-clockwise
and remove it from the bulb
housing. Replace the defective bulb.
Bulbs for flashing turn
indicators, front
RY10W / 12 V / 10 W Bulbs for flashing turn
indicators, rear
RY10W / 12 V / 10 W
Turn bulb 2clockwise to install
it in the bulb housing. Working from the inboard side,
insert the glass into the bulb
housing and close the housing.
Install screw
1.
888zMaintenance