BMW MOTORRAD K 1200 GT 2004 Rider's Manual (in English)
K 1200 GT 2004
BMW MOTORRAD
BMW MOTORRAD
https://www.carmanualsonline.info/img/47/36992/w960_36992-0.png
BMW MOTORRAD K 1200 GT 2004 Rider's Manual (in English)
Trending: engine oil, lights, ignition, wiring, fuel pressure, wheel, coolant
Page 21 of 100
19
General information and controls
1
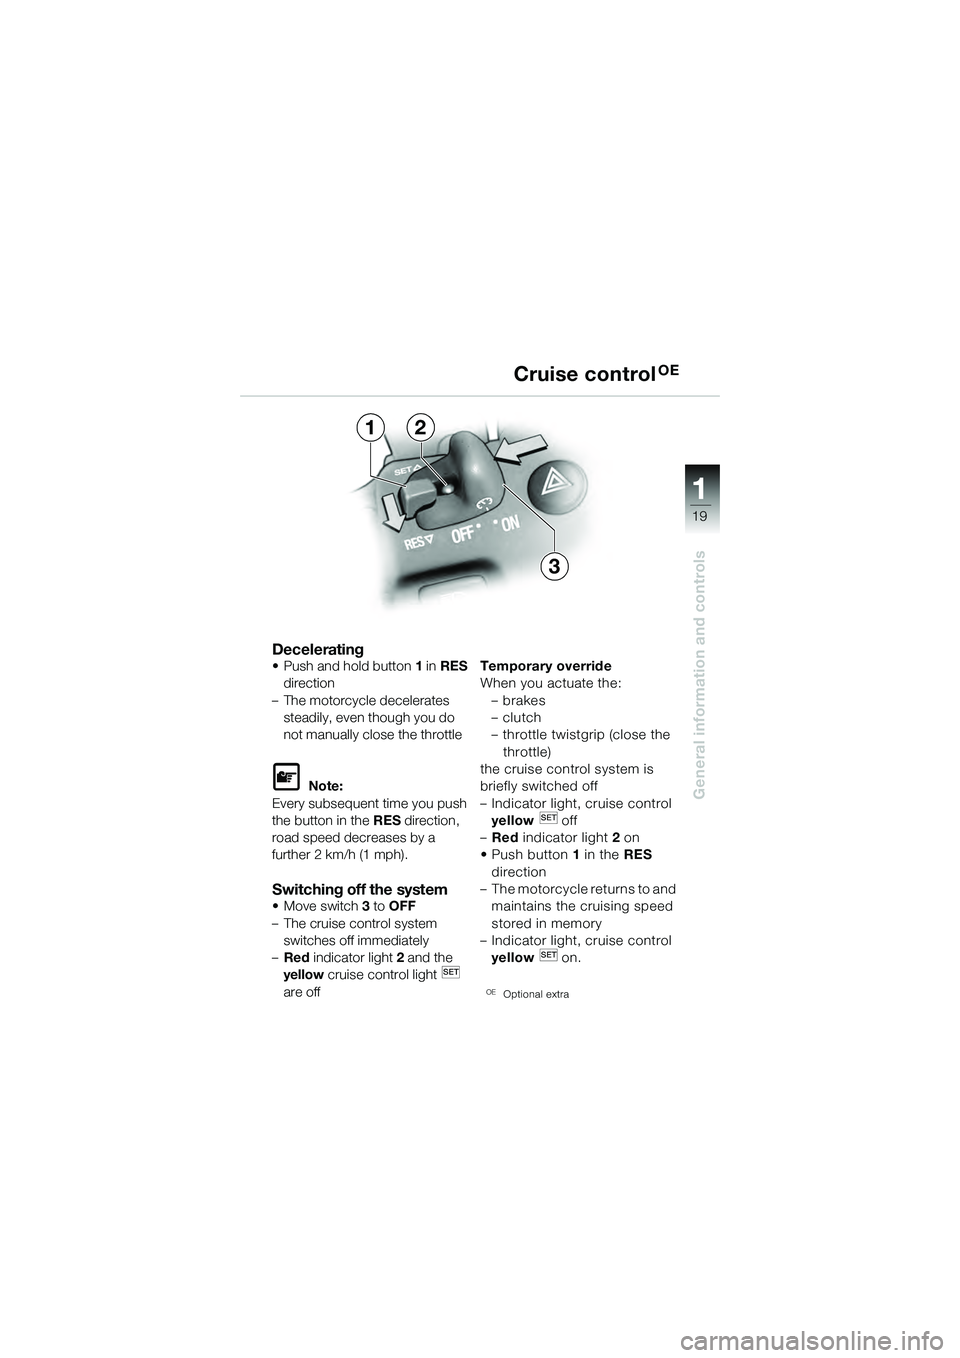
Decelerating• Push and hold button1 in RES
direction
– The motorcycle decelerates steadily, even though you do
not manually close the throttle
� Note:
Every subsequent time you push
the button in the RES direction,
road speed decreases by a
further 2 km/h (1 mph).
Switching off the system• Move switch 3 to OFF
– The cruise control system switches off immediately
– Red indicator light 2 and the
yellow cruise control light
are off
��
Temporary override
When you actuate the: –brakes
–clutch
– throttle twistgrip (close the throttle)
the cruise control system is
briefly switched off
– Indicator light, cruise control yellow off
– Red indicator light 2 on
• Push button 1 in the RES
direction
– The motorcycle returns to and maintains the cruising speed
stored in memory
– Indicator light, cruise control
yellow on.
OEOptional extra
Cruise controlOE
1
3
2
10k41bkg3.book Seite 19 Donnerstag, 27. Mai 2004 5:30 17
Page 22 of 100
20
General information and controls
1
Adjusting footrest plate
� Warning:
If a footrest is repositioned,
the footrest on the other side
of the motorcycle must be
moved to the same height.
Adjust the gearshift lever to
suit the new footrest position.
� Attention:
For a sporting riding style, both
footrest plates should be in the
upper position.
� Warning:
Make sure that lines and cables
are correctly routed.
Do not damage electric wiring.
Always tighten socket-head
screws 1 and 2 to the specified
torque.
If you do not have a suitable
torque wrench, have the foot-
rest plates and gearshift lever
adjusted by a specialist work-
shop, preferably an authorised
BMW motorcycle dealer.
10k41bkg3.book Seite 20 Donnerstag, 27. Mai 2004 5:30 17
Page 23 of 100
21
General information and controls
1
Adjusting footrest plate• Remove 3 socket-head screws 1
• Move the footrest plate to the
desired position A or B
• Retighten the 3 socket-head
screws 1 t o a tor qu e of 20 Nm
• Adjust the gearshift lever to
suit the new footrest position.
Adjusting gearshift lever• Slacken socket-head screw 2
• Reset the gearshift lever to
the desired position C or D
• Retighten socket-head screw
2 to a torque of 8Nm
Adjusting footrest plate
2
AB
D
C1
10k41bkg3.book Seite 21 Donnerstag, 27. Mai 2004 5:30 17
Page 24 of 100
22
General information and controls
1
Removing seat:• Turn key1 in the seat lock to
position A and hold it in this
position
• Pull the seat to the rear and up into the 1st stage C of the
locking mechanism.
• Remove the seat
– Toolkit is accessible
– Fuses are accessible
– Coolant expansion tank is accessible
Adjusting seat:– The seat can be moved to 2 positions:
E = high D = low
� Attention:
When installing the seat, make
sure that it is firmly located.
•Turn key 1 in the seat lock to
position A and hold it in this
position
• Pull the seat to the rear and up into the 1st stage C of the
locking mechanism.
Seat
A
1
B
C
10k41bkg3.book Seite 22 Donnerstag, 27. Mai 2004 5:30 17
Page 25 of 100
23
General information and controls
1
• Push the front of the seat into guide E or D to suit the height
of the rider.
• Engage the seat in the 2nd stage B of the locking
mechanism by pushing it at
the rear.
Installing seat:
� Attention:
When installing the seat, make
sure that it is firmly located. • Push the tongue of the seat
under the seat support
• Carefully insert the seat at the rear into stage 1 of the lock-
ing mechanism.
• Push the front of the seat into guide D or E, to suit the height
of the rider.
• Engage the seat into the
2nd stage B of the locking
mechanism by pushing it at
the rear (arrow).
Seat
E
D
B
C
10k41bkg3.book Seite 23 Donnerstag, 27. Mai 2004 5:30 17
Page 26 of 100
24
General information and controls
1
A
B
1
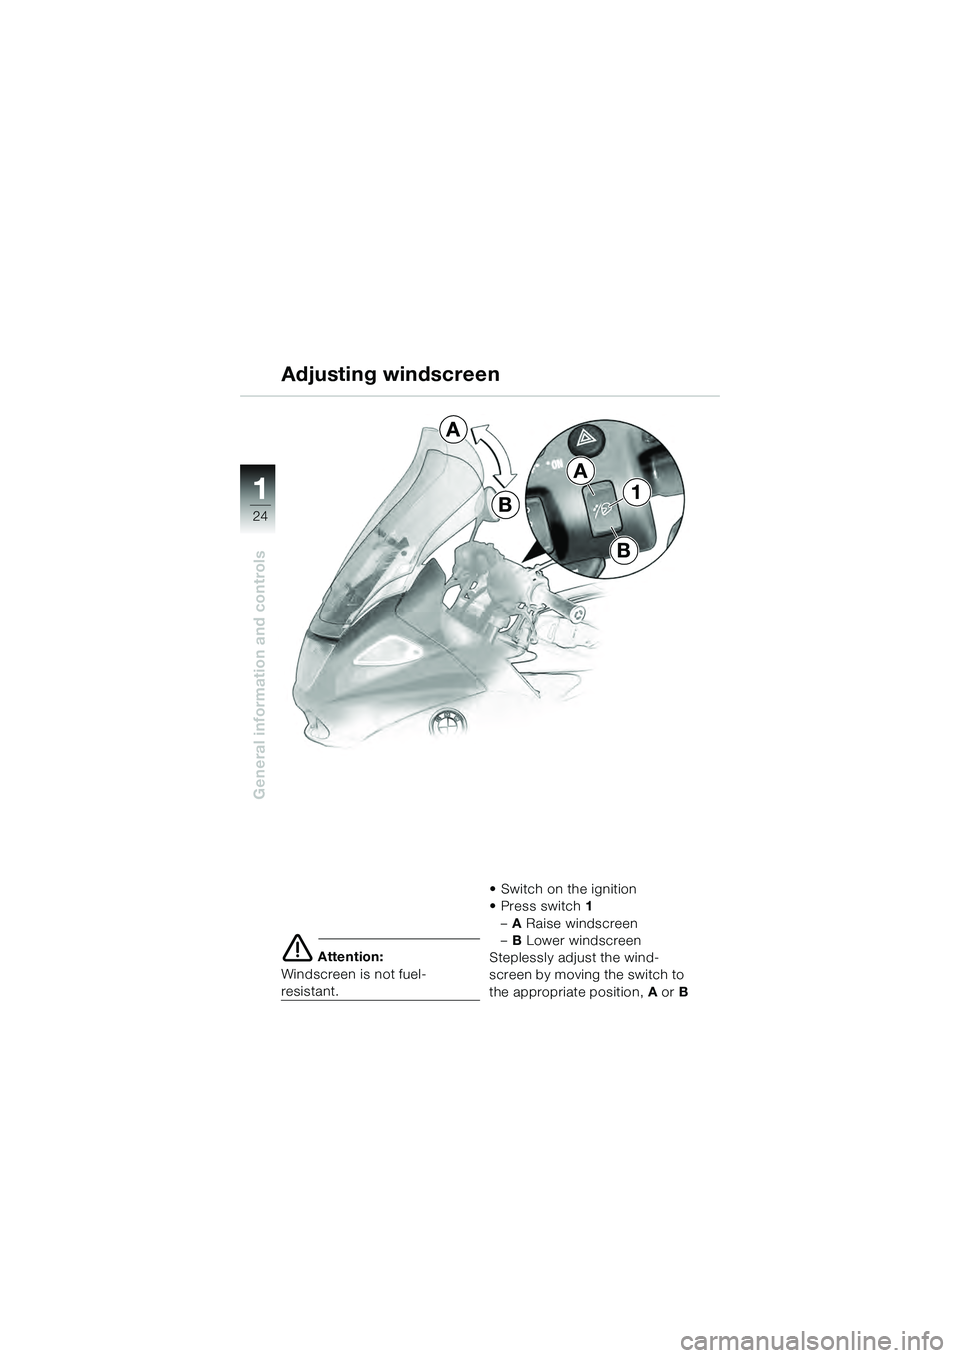
Adjusting windscreen
A
B
� Attention:
Windscreen is not fuel-
resistant. • Switch on the ignition
• Press switch
1
– A Raise windscreen
– B Lower windscreen
Steplessly adjust the wind-
screen by moving the switch to
the appropriate position, A or B
10k41bkg3.book Seite 24 Donnerstag, 27. Mai 2004 5:30 17
Page 27 of 100
25
General information and controls
1
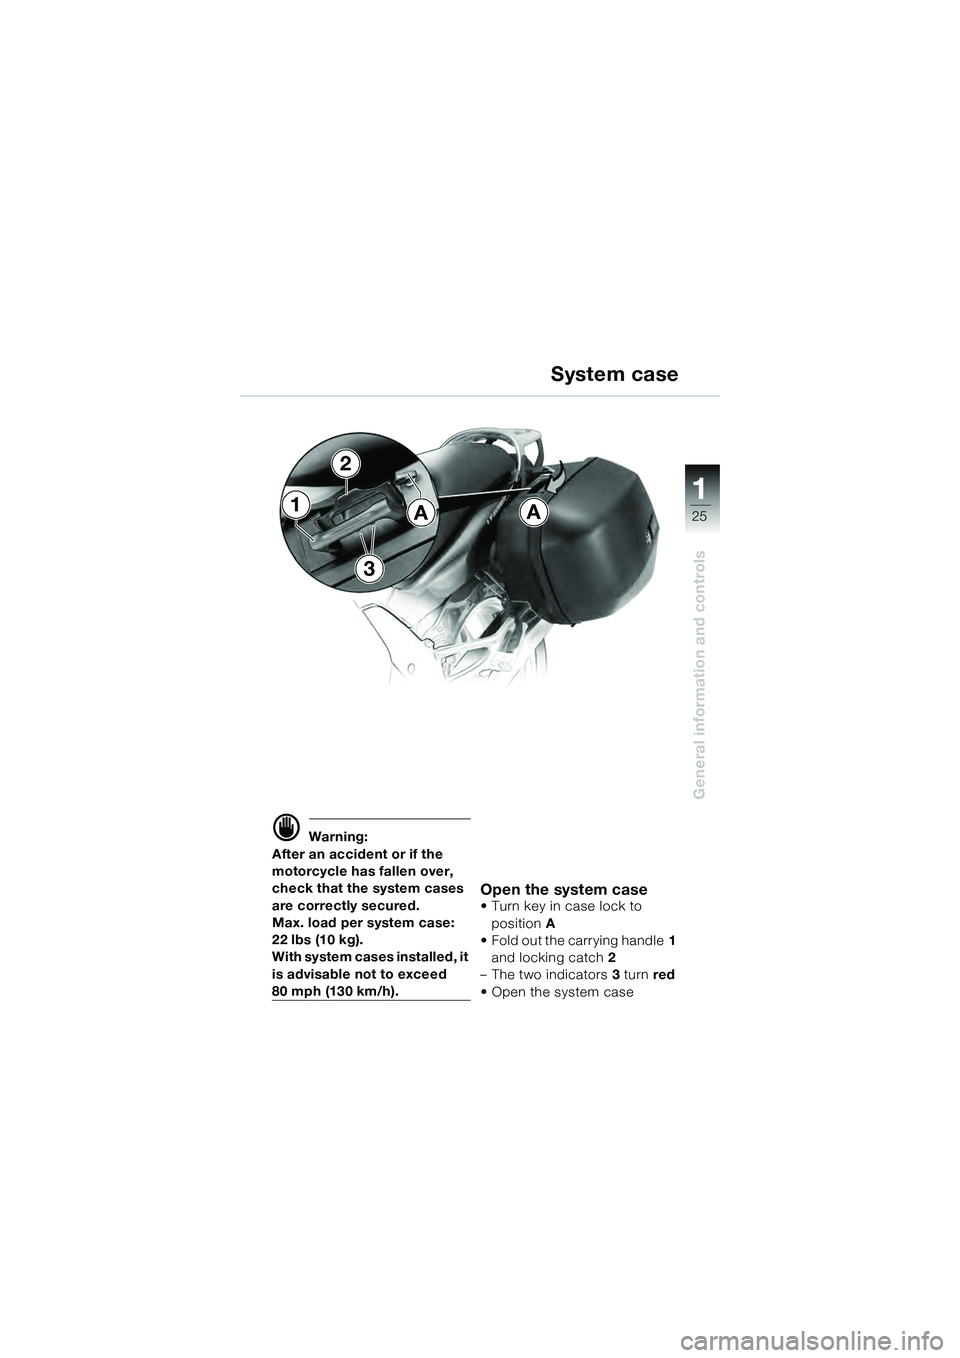
� Warning:
After an accident or if the
motorcycle has fallen over,
check that the system cases
are correctly secured.
Max. load per system case:
22 lbs (10 kg).
With system cases installed, it
is advisable not to exceed
80 mph (130 km/h).
Open the system case• Turn key in case lock to position A
• Fold out the carrying handle 1
and locking catch 2
– The two indicators 3 turn red
• Open the system case
A System case1
2
3
A
10k41bkg3.book Seite 25 Donnerstag, 27. Mai 2004 5:30 17
Page 28 of 100
26
General information and controls
1
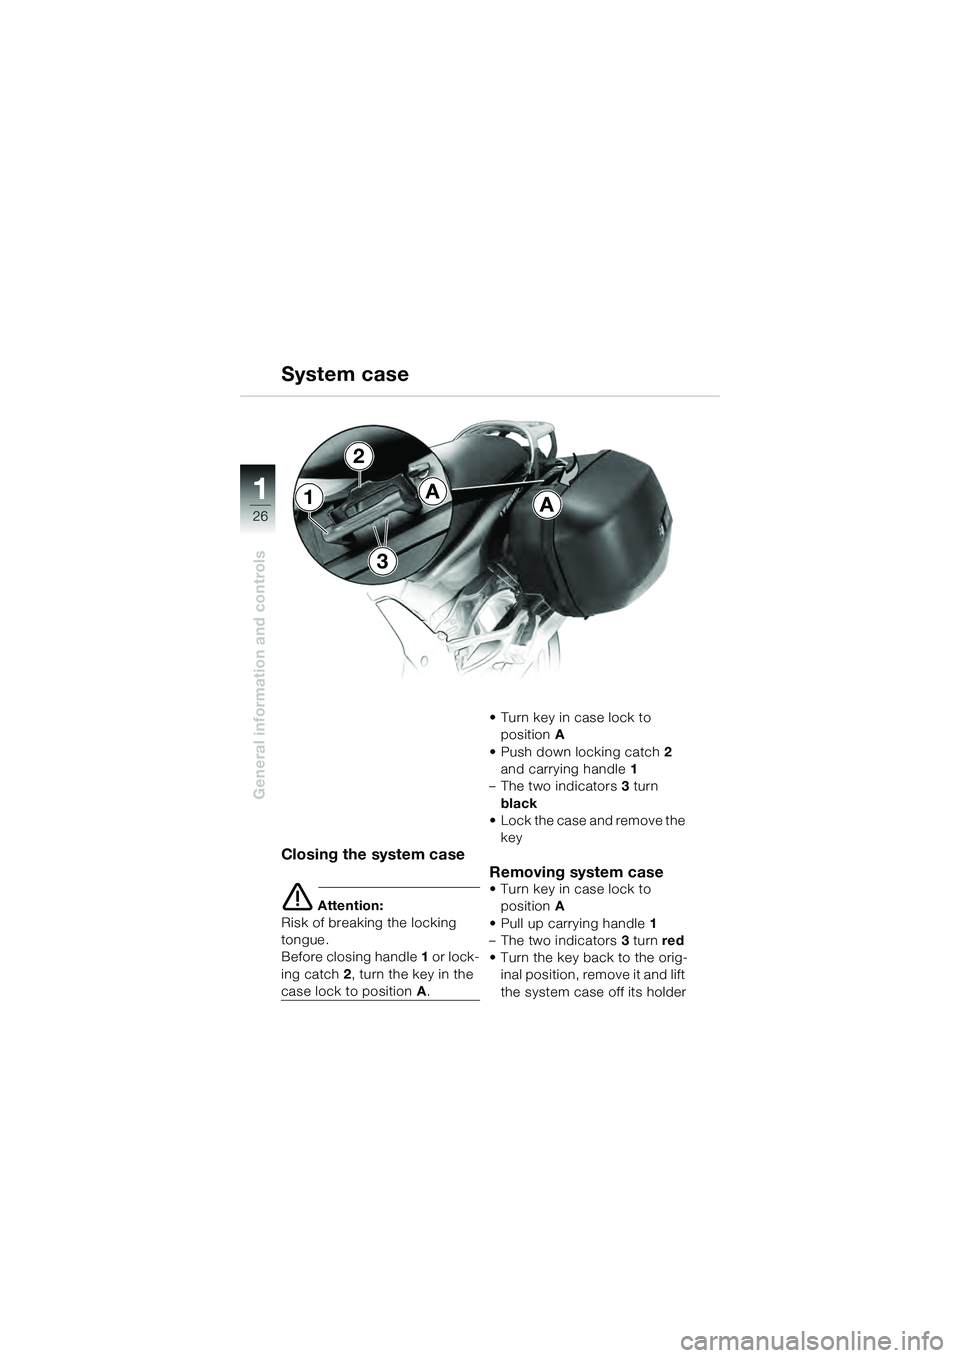
Closing the system case
� Attention:
Risk of breaking the locking
tongue.
Before closing handle 1 or lock-
ing catch 2, turn the key in the
case lock to position A.• Turn key in case lock to
position A
• Push down locking catch 2
and carrying handle 1
– The two indicators 3 turn
black
•Lock the case and remove the
key
Removing system case
• Turn key in case lock to position A
• Pull up carrying handle 1
– The two indicators 3 turn red
• Turn the key back to the orig- inal position, remove it and lift
the system case off its holder
AA1
2
3
System case
10k41bkg3.book Seite 26 Donnerstag, 27. Mai 2004 5:30 17
Page 29 of 100
27
General information and controls
1
System case
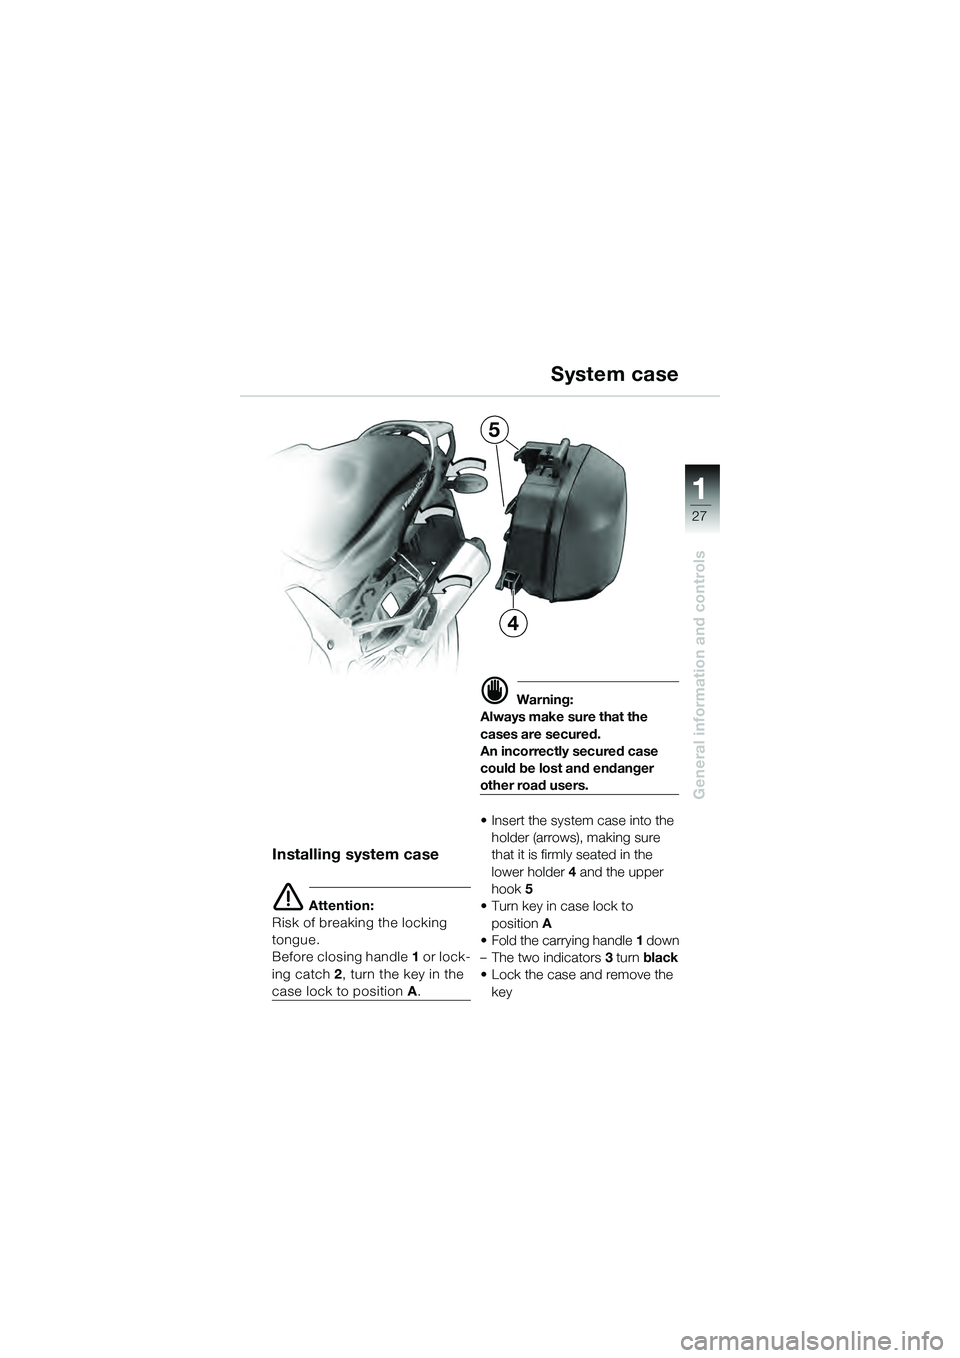
Installing system case
� Attention:
Risk of breaking the locking
tongue.
Before closing handle 1 or lock-
ing catch 2, turn the key in the
case lock to position A.
� Warning:
Always make sure that the
cases are secured.
An incorrectly secured case
could be lost and endanger
other road users.
• Insert the system case into the
holder (arrows), making sure
that it is firmly seated in the
lower holder 4 and the upper
hook 5
• Turn key in case lock to
position A
• Fold the carrying handle 1 down
– The two indicators 3 turn black
• Lock the case and remove the
key
5
4
10k41bkg3.book Seite 27 Donnerstag, 27. Mai 2004 5:30 17
Page 30 of 100
28
Safety check
2
Checklist
Use the safety checklist –
before every journey
Please perform the safety
check accurately. If your motor-
cycle needs any routine mainte-
nance, you can then attend to it
before the journey starts
(
� Maintenance Instructions),
or have it carried out by a spe-
cialist workshop, preferably an
authorised BMW motorcycle
dealer. This is to ensure that
your motorcycle complies with
road-vehicle use and safety
laws.
A motorcycle in perfect techni-
cal condition is essential for
your safety and that of other
road users.
10k41bkg3.book Seite 28 Donnerstag, 27. Mai 2004 5:30 17
Trending: brake fluid, oil level, ABS, tow, fuel pressure, ECU, coolant
 21
General information and controls
1
Adjusting footrest plate• Remove 3 socket-head screws 1
• Move the footrest plate to the
desired position A or B
• Retighten the 3 socket-head
screws 1")
 22
General information and controls
1
Removing seat:• Turn key1 in the seat lock to
position A and hold it in this
position
• Pull the seat to the rear and up into the 1st stage C of the
locki")
 23
General information and controls
1
• Push the front of the seat into guide E or D to suit the height
of the rider.
• Engage the seat in the 2nd stage B of the locking
mechanism by pushing")
 28
Safety check
2
Checklist
Use the safety checklist –
before every journey
Please perform the safety
check accurately. If your motor-
cycle needs any routine mainte-
nance, you can then attend to")