BMW MOTORRAD K 1200 GT 2007 Rider's Manual (in English)
Manufacturer: BMW MOTORRAD, Model Year: 2007, Model line: K 1200 GT, Model: BMW MOTORRAD K 1200 GT 2007Pages: 173, PDF Size: 2.82 MB
Page 121 of 173
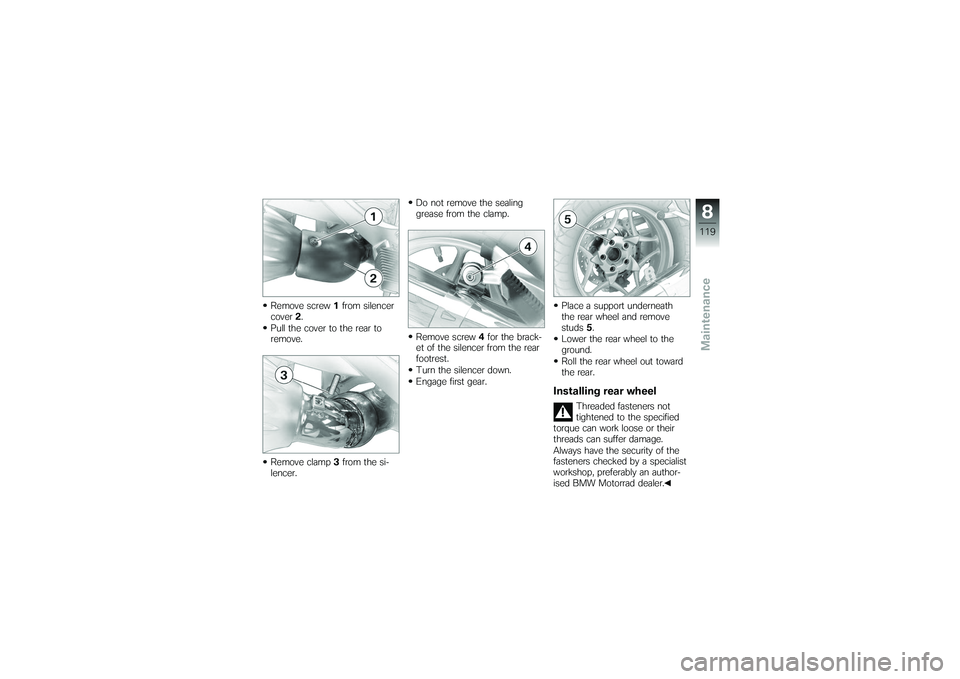
Remove screw1from silencer
cover 2.
Pull the cover to the rear to
remove.
Remove clamp 3from the si-
lencer. Do not remove the sealing
grease from the clamp.
Remove screw
4for the brack-
et of the silencer from the rear
footrest.
Turn the silencer down.
Engage first gear. Place a support underneath
the rear wheel and remove
studs
5.
Lower the rear wheel to the
ground.
Roll the rear wheel out toward
the rear.
Installing rear wheel
Threaded fasteners not
tightened to the specified
torque can work loose or their
threads can suffer damage.
Always have the security of the
fasteners checked by a specialist
workshop, preferably an author-
ised BMW Motorrad dealer.
8119zMaintenance
Page 122 of 173
Roll the rear wheel into position
at the rear-wheel adapter.
Seat the rear wheel on the
rear-wheel adapter.
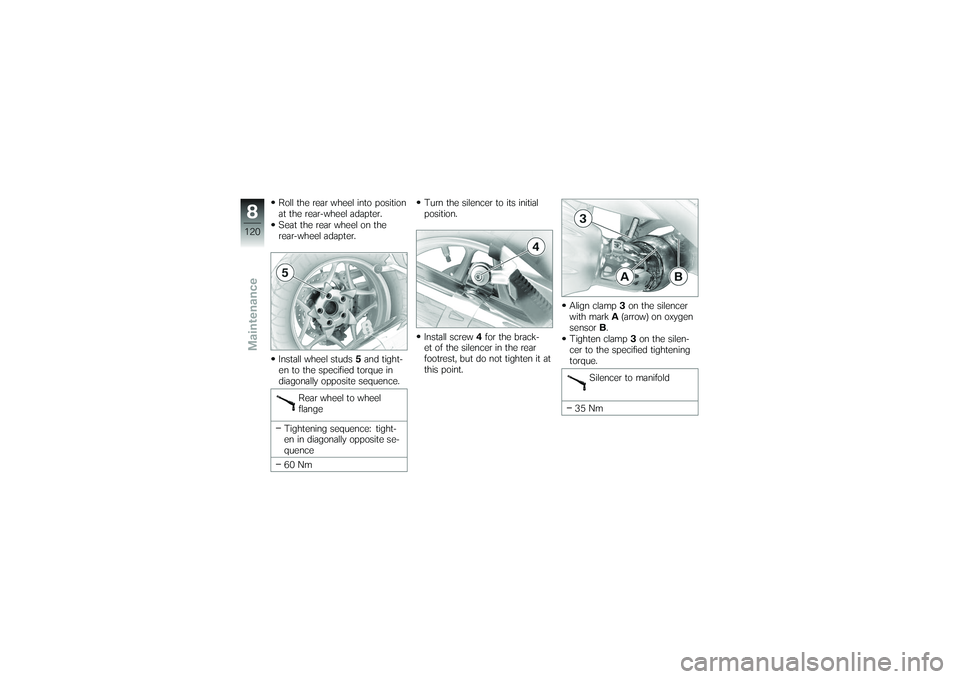
Install wheel studs5and tight-
en to the specified torque in
diagonally opposite sequence.
Rear wheel to wheel
flange
Tightening sequence: tight-
en in diagonally opposite se-
quence
60 Nm Turn the silencer to its initial
position.
Install screw
4for the brack-
et of the silencer in the rear
footrest, but do not tighten it at
this point. Align clamp
3on the silencer
with mark A(arrow) on oxygen
sensor B.
Tighten clamp 3on the silen-
cer to the specified tightening
torque.
Silencer to manifold
35 Nm
8120zMaintenance
Page 123 of 173
If the gap between the rear
wheel and the silencer is
too small, the rear wheel can
overheat.
The gap between the rear wheel
and the silencer must be at least
15 mm.
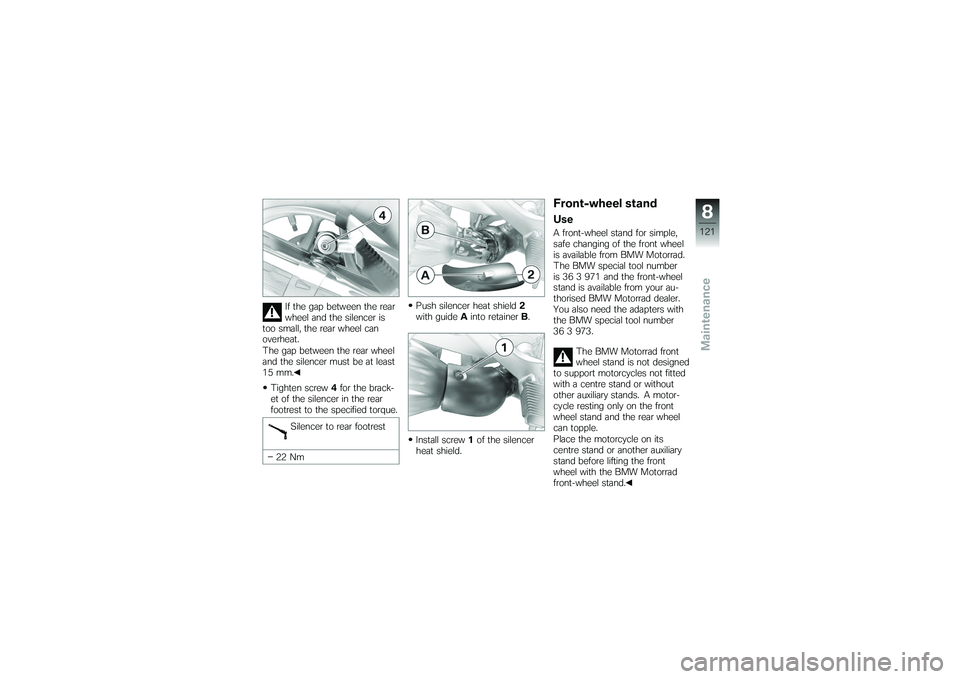
Tighten screw 4for the brack-
et of the silencer in the rear
footrest to the specified torque.
Silencer to rear footrest
22 Nm Push silencer heat shield
2
with guide Ainto retainer B.
Install screw 1of the silencer
heat shield.
Front-wheel standUseA front-wheel stand for simple,
safe changing of the front wheel
is available from BMW Motorrad.
The BMW special tool number
is 36 3 971 and the front-wheel
stand is available from your au-
thorised BMW Motorrad dealer.
You also need the adapters with
the BMW special tool number
36 3 973.
The BMW Motorrad front
wheel stand is not designed
to support motorcycles not fitted
with a centre stand or without
other auxiliary stands. A motor-
cycle resting only on the front
wheel stand and the rear wheel
can topple.
Place the motorcycle on its
centre stand or another auxiliary
stand before lifting the front
wheel with the BMW Motorrad
front-wheel stand.
8121zMaintenance
Page 124 of 173
Installing front-wheel
standMake sure the ground is level
and firm and place the motor-
cycle on its centre stand.
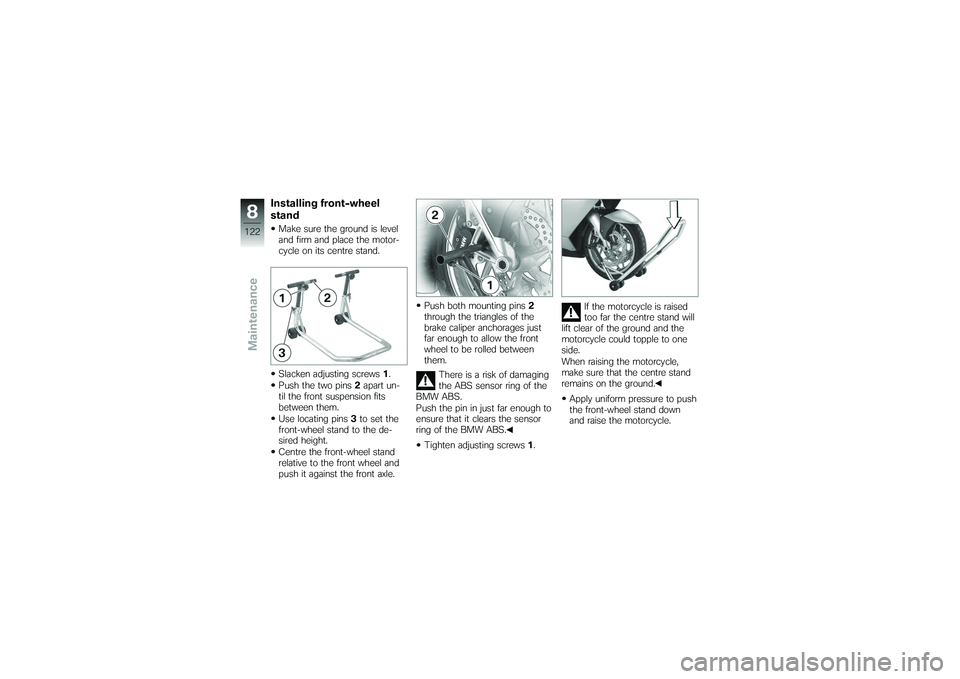
Slacken adjusting screws1.
Push the two pins 2apart un-
til the front suspension fits
between them.
Use locating pins 3to set the
front-wheel stand to the de-
sired height.
Centre the front-wheel stand
relative to the front wheel and
push it against the front axle. Push both mounting pins
2
through the triangles of the
brake caliper anchorages just
far enough to allow the front
wheel to be rolled between
them.
There is a risk of damaging
the ABS sensor ring of the
BMW ABS.
Push the pin in just far enough to
ensure that it clears the sensor
ring of the BMW ABS.
Tighten adjusting screws 1. If the motorcycle is raised
too far the centre stand will
lift clear of the ground and the
motorcycle could topple to one
side.
When raising the motorcycle,
make sure that the centre stand
remains on the ground.
Apply uniform pressure to push
the front-wheel stand down
and raise the motorcycle.
8122zMaintenance
Page 125 of 173
BulbsGeneral instructionsThe failure of a bulb is signalled
in the display by the defect-
ive lamp symbol. The bulbs for
brake light and rear light are the
same; the brightness of the light
is regulated in accordance with
the application.A defective bulb places
your safety at risk because
it is easier for other users to
oversee the motorcycle.
Replace defective bulbs as
soon as possible; always carry a
complete set of spare bulbs if
possible.
The bulb is pressurised and
can cause injury if dam-
aged.
Wear protective goggles and
gloves when changing bulbs. The types of bulb fitted to
your motorcycle are listed
in the section entitled "Technical
data".
Do not touch the glass of
new bulbs with your fingers.
Use a clean, dry cloth to hold
the bulbs when handling them.
Dirt deposits, in particular oil and
grease, interfere with heat radi-
ation from the bulb. This leads
to overheating and shortens the
bulb's operating life.
Replacing low-beam and
high-beam headlight bulb
If it is not standing firmly,
the motorcycle could topple
in the course of the operations
described below.
Always make sure that the
motorcycle is stable and firmly
supported. with OE Xenon lights:
Xenon lights operate with
high voltage; incorrect
working procedures can result in
fatalities.
Have all work on the xenon light
system, including the work in-
volved in replacing bulbs, per-
formed by a specialist work-
shop, preferably by an authorised
BMW Motorrad dealer.
For the time being, ride with
the high-beam headlight
switched on.
In order not to dazzle oncom-
ing traffic, set the headlight
beam throw adjuster to the po-
sition for riding with maximum
payload.
Have the bulb replaced as
soon as possible by a specialist
workshop, preferably an author-
ised BMW Motorrad dealer.
8123zMaintenance
Page 126 of 173
Make sure the ground is level
and firm and place the motor-
cycle on its stand.
Switch off the ignition.
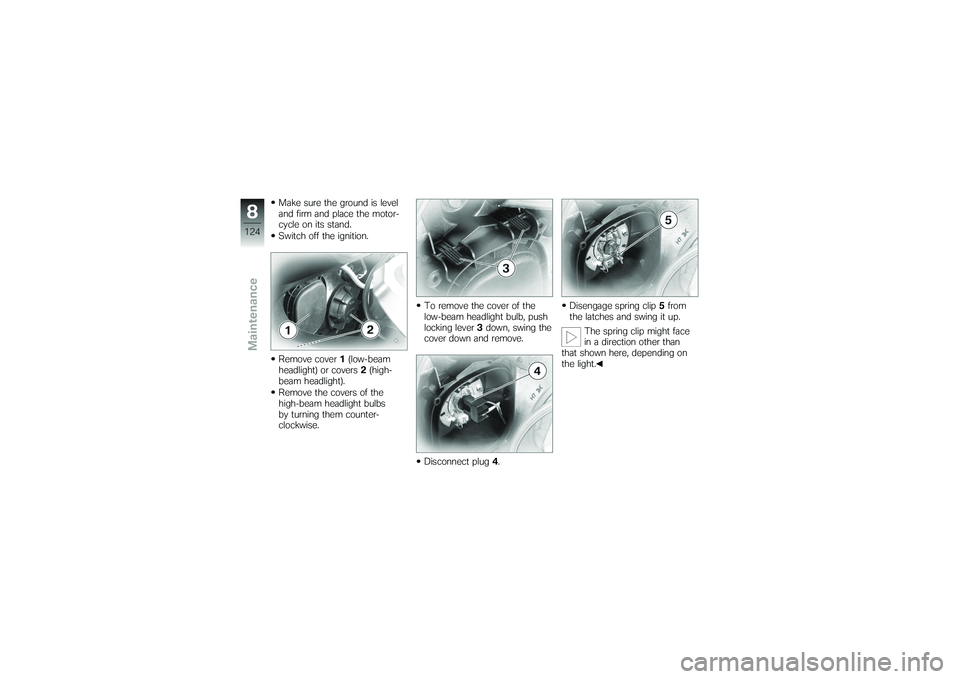
Remove cover1(low-beam
headlight) or covers 2(high-
beam headlight).
Remove the covers of the
high-beam headlight bulbs
by turning them counter-
clockwise. To remove the cover of the
low-beam headlight bulb, push
locking lever
3down, swing the
cover down and remove.
Disconnect plug 4. Disengage spring clip
5from
the latches and swing it up.
The spring clip might face
in a direction other than
that shown here, depending on
the light.
8124zMaintenance
Page 127 of 173
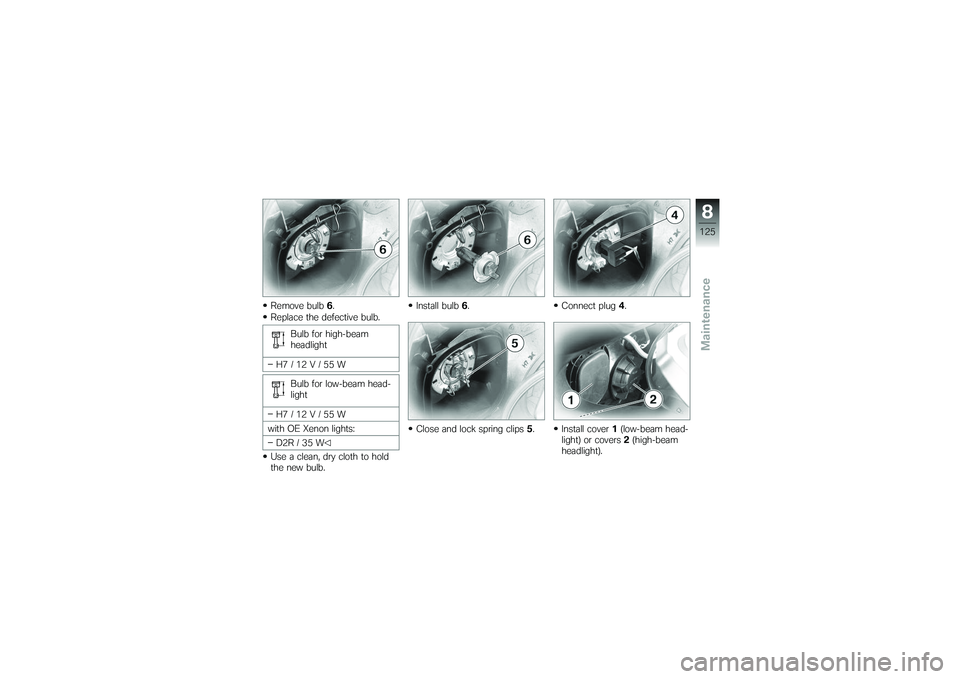
Remove bulb6.
Replace the defective bulb.
Bulb for high-beam
headlight
H7/12V/55W Bulb for low-beam head-
light
H7/12V/55W
with OE Xenon lights: D2R / 35 W
Use a clean, dry cloth to hold
the new bulb. Install bulb
6.
Close and lock spring clips 5. Connect plug
4.
Install cover 1(low-beam head-
light) or covers 2(high-beam
headlight).
8125zMaintenance
Page 128 of 173
Replacing parking-light
bulbs
If it is not standing firmly,
the motorcycle could topple
in the course of the operations
described below.
Always make sure that the
motorcycle is stable and firmly
supported.
Make sure the ground is level
and firm and place the motor-
cycle on its stand.
Switch off the ignition.
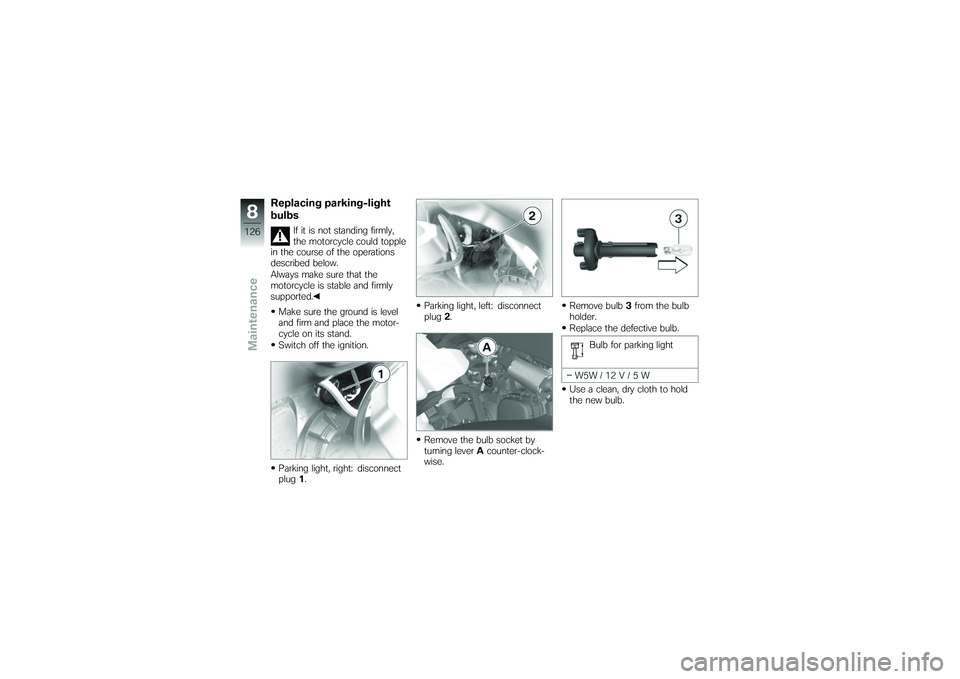
Parking light, right: disconnect
plug 1. Parking light, left: disconnect
plug
2.
Remove the bulb socket by
turning lever Acounter-clock-
wise. Remove bulb
3from the bulb
holder.
Replace the defective bulb.
Bulb for parking light
W5W / 12 V / 5 W
Use a clean, dry cloth to hold
the new bulb.
8126zMaintenance
Page 129 of 173
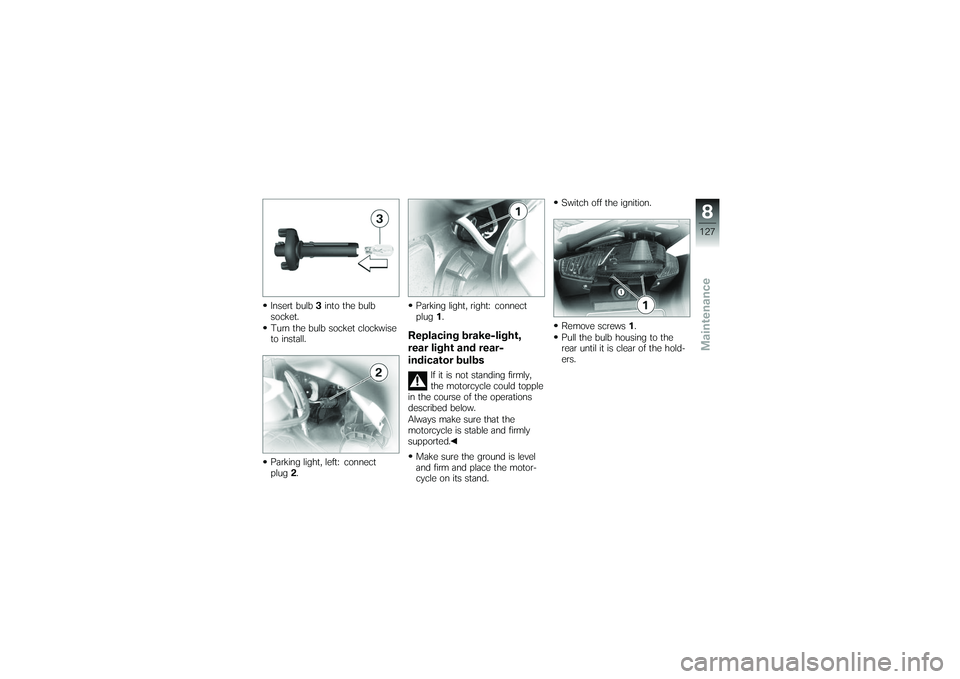
Insert bulb3into the bulb
socket.
Turn the bulb socket clockwise
to install.
Parking light, left: connect
plug 2. Parking light, right: connect
plug
1.
Replacing brake-light,
rear light and rear-
indicator bulbs
If it is not standing firmly,
the motorcycle could topple
in the course of the operations
described below.
Always make sure that the
motorcycle is stable and firmly
supported.
Make sure the ground is level
and firm and place the motor-
cycle on its stand. Switch off the ignition.
Remove screws
1.
Pull the bulb housing to the
rear until it is clear of the hold-
ers.
8127zMaintenance
Page 130 of 173
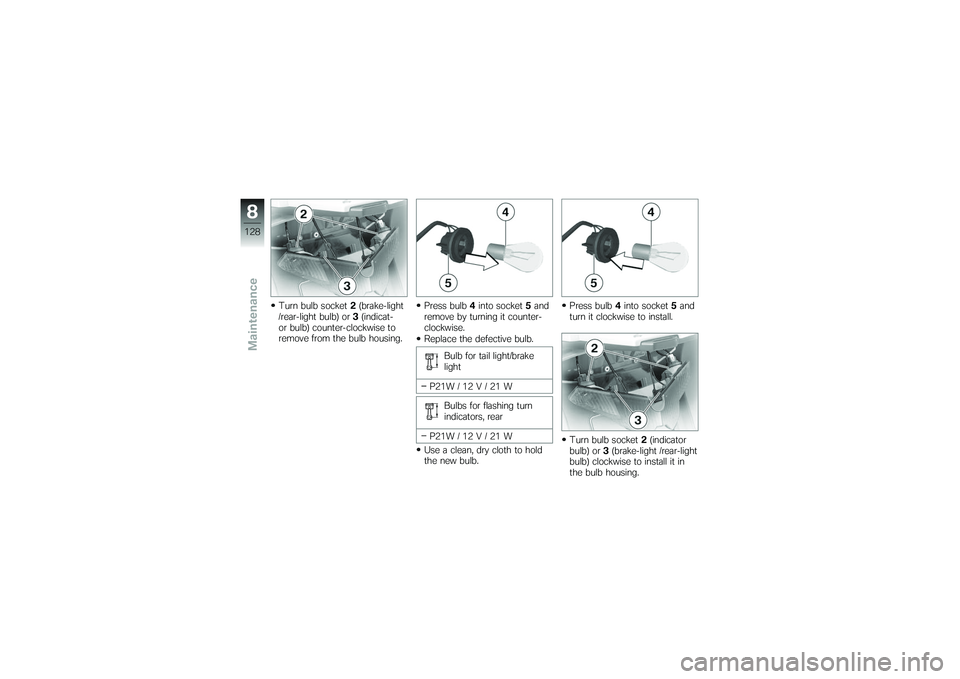
Turn bulb socket2(brake-light
/rear-light bulb) or 3(indicat-
or bulb) counter-clockwise to
remove from the bulb housing. Press bulb
4into socket 5and
remove by turning it counter-
clockwise.
Replace the defective bulb.
Bulb for tail light/brake
light
P21W / 12 V / 21 W Bulbs for flashing turn
indicators, rear
P21W / 12 V / 21 W
Use a clean, dry cloth to hold
the new bulb. Press bulb
4into socket 5and
turn it clockwise to install.
Turn bulb socket 2(indicator
bulb) or 3(brake-light /rear-light
bulb) clockwise to install it in
the bulb housing.
8128zMaintenance