BMW X3 2017 Owners Manual
Manufacturer: BMW, Model Year: 2017, Model line: X3, Model: BMW X3 2017Pages: 265, PDF Size: 5.37 MB
Page 171 of 265
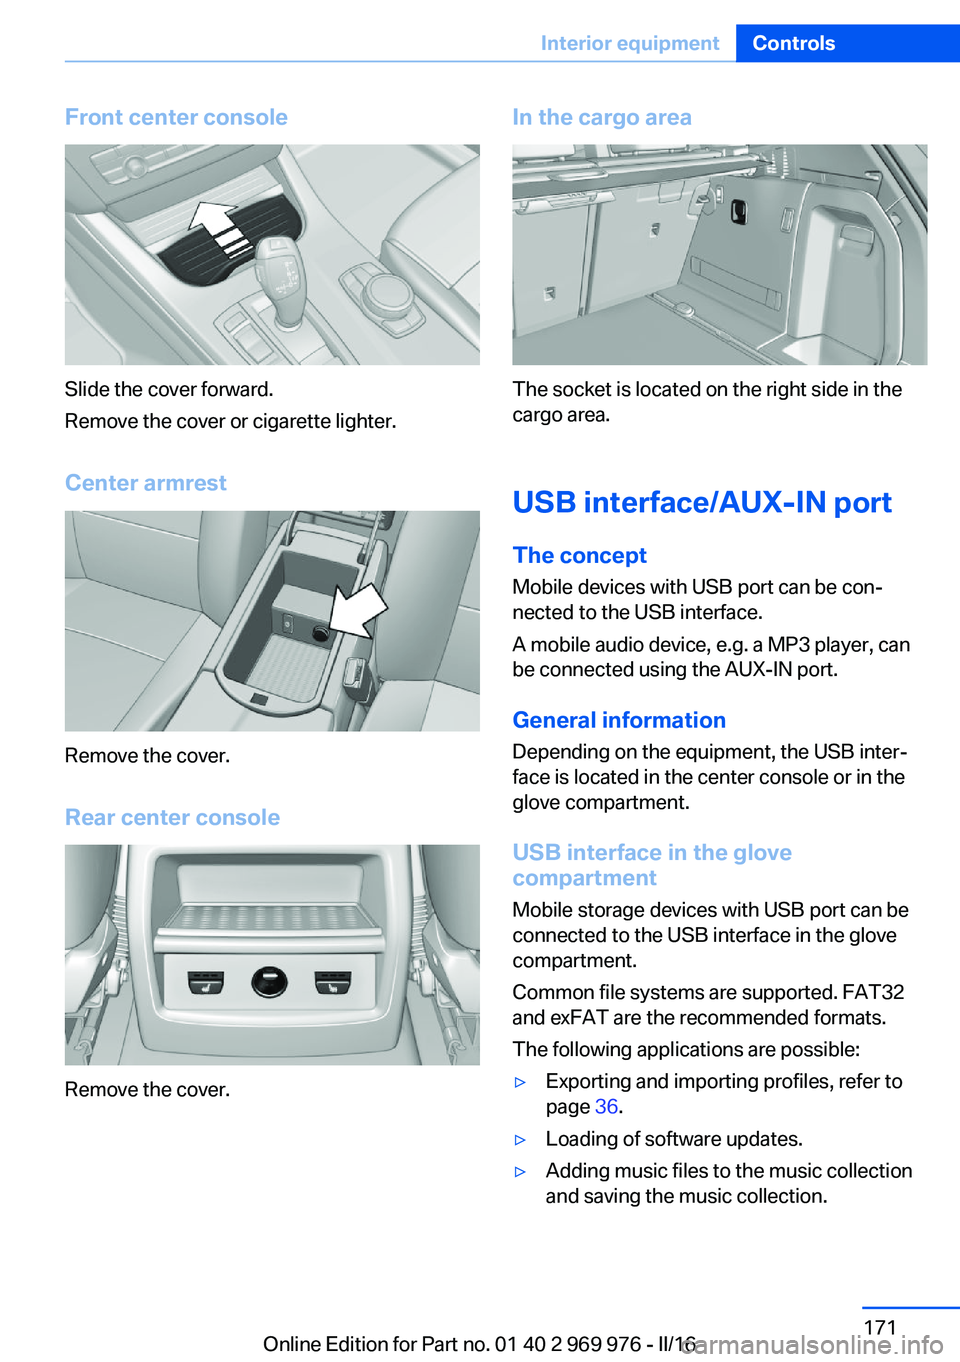
Front center console
Slide the cover forward.
Remove the cover or cigarette lighter.
Center armrest
Remove the cover.
Rear center console
Remove the cover.
In the cargo area
The socket is located on the right side in the
cargo area.
USB interface/AUX-IN port
The concept Mobile devices with USB port can be con‐
nected to the USB interface.
A mobile audio device, e.g. a MP3 player, can
be connected using the AUX-IN port.
General information Depending on the equipment, the USB inter‐
face is located in the center console or in the
glove compartment.
USB interface in the glove
compartment
Mobile storage devices with USB port can be
connected to the USB interface in the glove
compartment.
Common file systems are supported. FAT32
and exFAT are the recommended formats.
The following applications are possible:
▷Exporting and importing profiles, refer to
page 36.▷Loading of software updates.▷Adding music files to the music collection
and saving the music collection.Seite 171Interior equipmentControls171
Online Edition for Part no. 01 40 2 969 976 - II/16
Page 172 of 265
USB interface in the center consoleIn addition to the USB storage devices descri‐
bed above, additional mobile devices with USB
port can be connected to the USB interface in
the center console.▷Mobile phones supported by the USB in‐
terface.
The snap-in adapter features a separate
USB port that is automatically connected
when a compatible mobile phone is in‐
serted.▷Audio devices with USB port, for example
MP3 player.
This allows further uses:
▷Playing music files via USB audio.▷Playing video films via USB video.
Information about compatible USB devices can
be found at www.bmwusa.com/bluetooth.
Information Observe the following when connecting:
▷Do not use force when plugging the con‐
nector into the USB interface.▷Use a flexible adapter cable.▷Protect the USB device against mechanical
damage.▷Due to the large number of USB devices
available on the market, it cannot be guar‐
anteed that every device is operable on the
vehicle.▷Do not expose USB devices to extreme en‐
vironmental conditions, such as very high
temperatures; refer to the owner's manual
of the device.▷Due to the many different compression
techniques, proper playback of the media
stored on the USB device cannot be guar‐
anteed in all cases.▷A connected USB device is supplied with
charging current via the USB interface, as‐
suming this is supported by the device.▷To ensure proper transmission of the
stored data, do not charge an USB device
via the onboard socket, when it is con‐
nected to the USB interface.▷Depending on how the USB device should
be used, settings may be required on the
USB device, refer to the owner's manual of
the device.
Not suitable USB devices:
▷USB hard drives.▷USB hubs.▷USB memory card readers with multiple in‐
serts.▷HFS-formatted USB devices.▷MTP devices.▷Devices such as fans or lights.
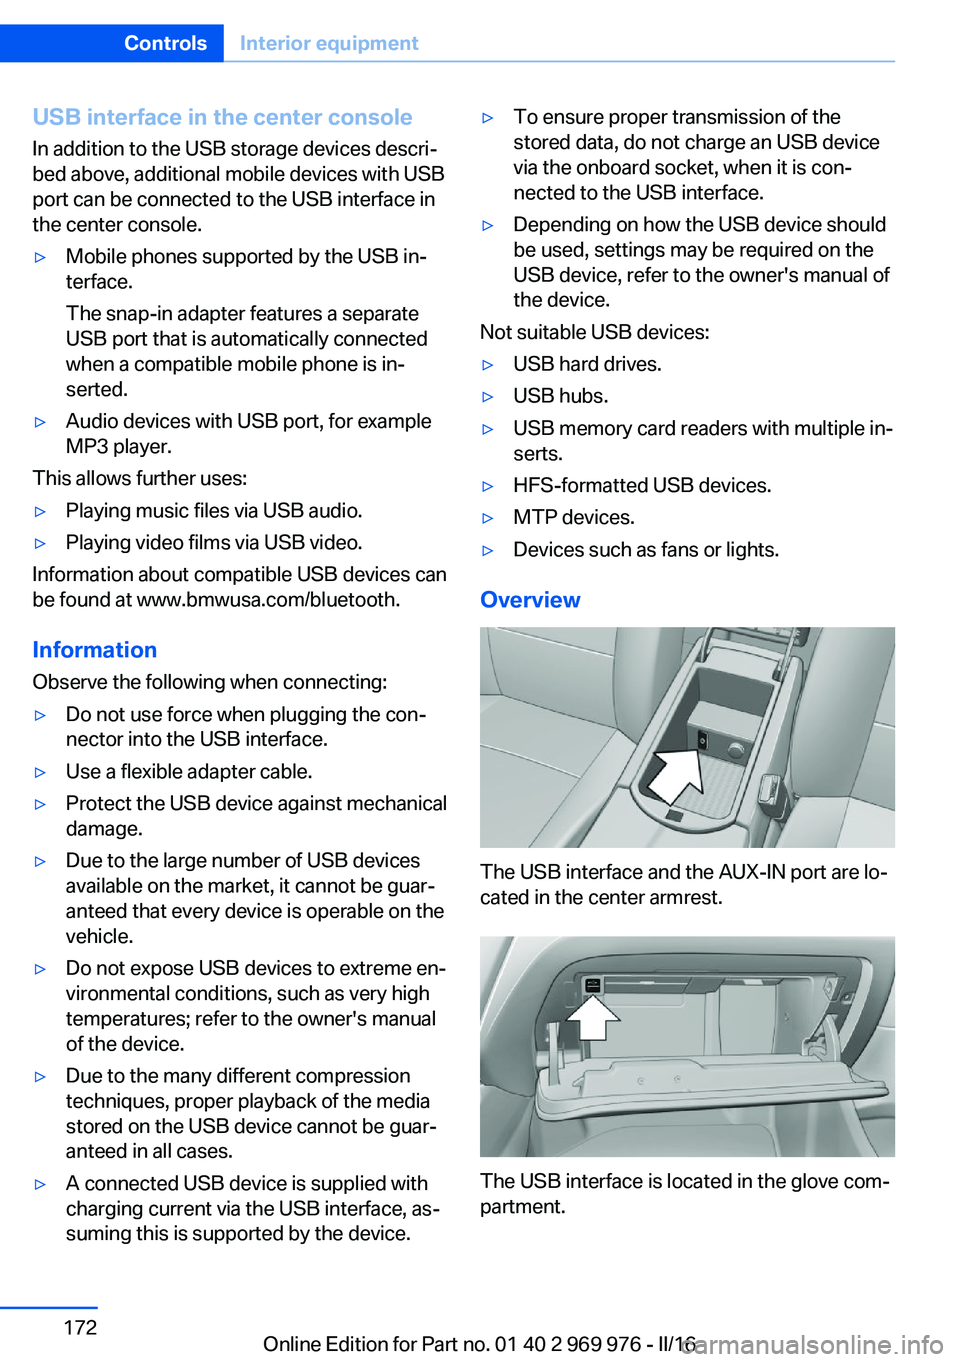
Overview
The USB interface and the AUX-IN port are lo‐
cated in the center armrest.
The USB interface is located in the glove com‐
partment.
Seite 172ControlsInterior equipment172
Online Edition for Part no. 01 40 2 969 976 - II/16
Page 173 of 265
Cargo area
Cargo cover
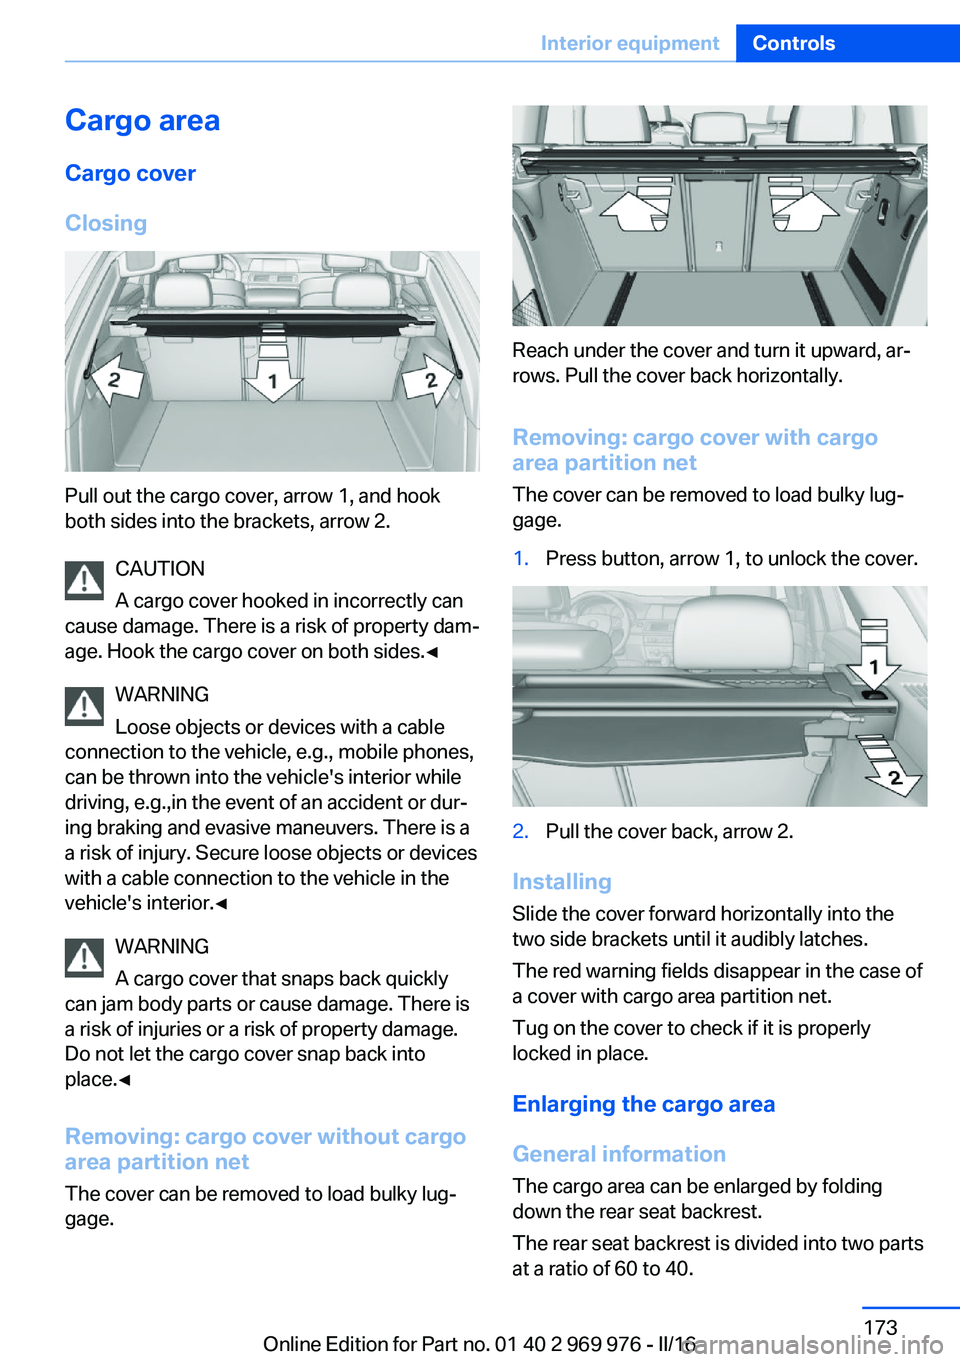
Closing
Pull out the cargo cover, arrow 1, and hook
both sides into the brackets, arrow 2.
CAUTION
A cargo cover hooked in incorrectly can
cause damage. There is a risk of property dam‐
age. Hook the cargo cover on both sides.◀
WARNING
Loose objects or devices with a cable
connection to the vehicle, e.g., mobile phones,
can be thrown into the vehicle's interior while
driving, e.g.,in the event of an accident or dur‐
ing braking and evasive maneuvers. There is a
a risk of injury. Secure loose objects or devices
with a cable connection to the vehicle in the
vehicle's interior.◀
WARNING
A cargo cover that snaps back quickly
can jam body parts or cause damage. There is
a risk of injuries or a risk of property damage.
Do not let the cargo cover snap back into
place.◀
Removing: cargo cover without cargo
area partition net
The cover can be removed to load bulky lug‐
gage.
Reach under the cover and turn it upward, ar‐
rows. Pull the cover back horizontally.
Removing: cargo cover with cargoarea partition net
The cover can be removed to load bulky lug‐
gage.
1.Press button, arrow 1, to unlock the cover.2.Pull the cover back, arrow 2.
Installing
Slide the cover forward horizontally into the
two side brackets until it audibly latches.
The red warning fields disappear in the case of
a cover with cargo area partition net.
Tug on the cover to check if it is properly
locked in place.
Enlarging the cargo area
General information
The cargo area can be enlarged by folding
down the rear seat backrest.
The rear seat backrest is divided into two parts
at a ratio of 60 to 40.
Seite 173Interior equipmentControls173
Online Edition for Part no. 01 40 2 969 976 - II/16
Page 174 of 265
If equipped with through-loading system: the
rear seat backrest is divided in the ratio 40–20–
40. The sides and the middle section can be
folded down separately.
Information WARNING
Danger of jamming with folding down the
backrests. There is a risk of injuries or a risk of
property damage. Make sure that the area of
movement of the rear backrest and the of the
head restraint is clear prior to folding down.◀
WARNING
The stability of the child restraint system
is limited or compromised with incorrect seat
adjustment or improper installation of the child
seat. There is a risk of injury or danger to life.
Make sure that the child restraint system fits
securely against the backrest. If possible, ad‐
just the backrest tilt for all affected backrests
and correctly adjust the seats. Make sure that
seats and backrests are securely engaged. If
possible, adjust the height of the head re‐
straints or remove them.◀
WARNING
With an unlocked backrest, an unsecured
load can be thrown into the vehicle's interior,
e.g., in case of an accident, braking or evasive
maneuver. There is a a risk of injury. Make sure
that the backrest engages into the locking af‐
ter folding it back.◀
WARNING
With a rear backrest that is not locked,
the protective function of the middle safety
belt is not guaranteed. There is a risk of inju‐
ries or danger to life. If you are using the mid‐
dle safety belt, lock the wider rear backrest.◀
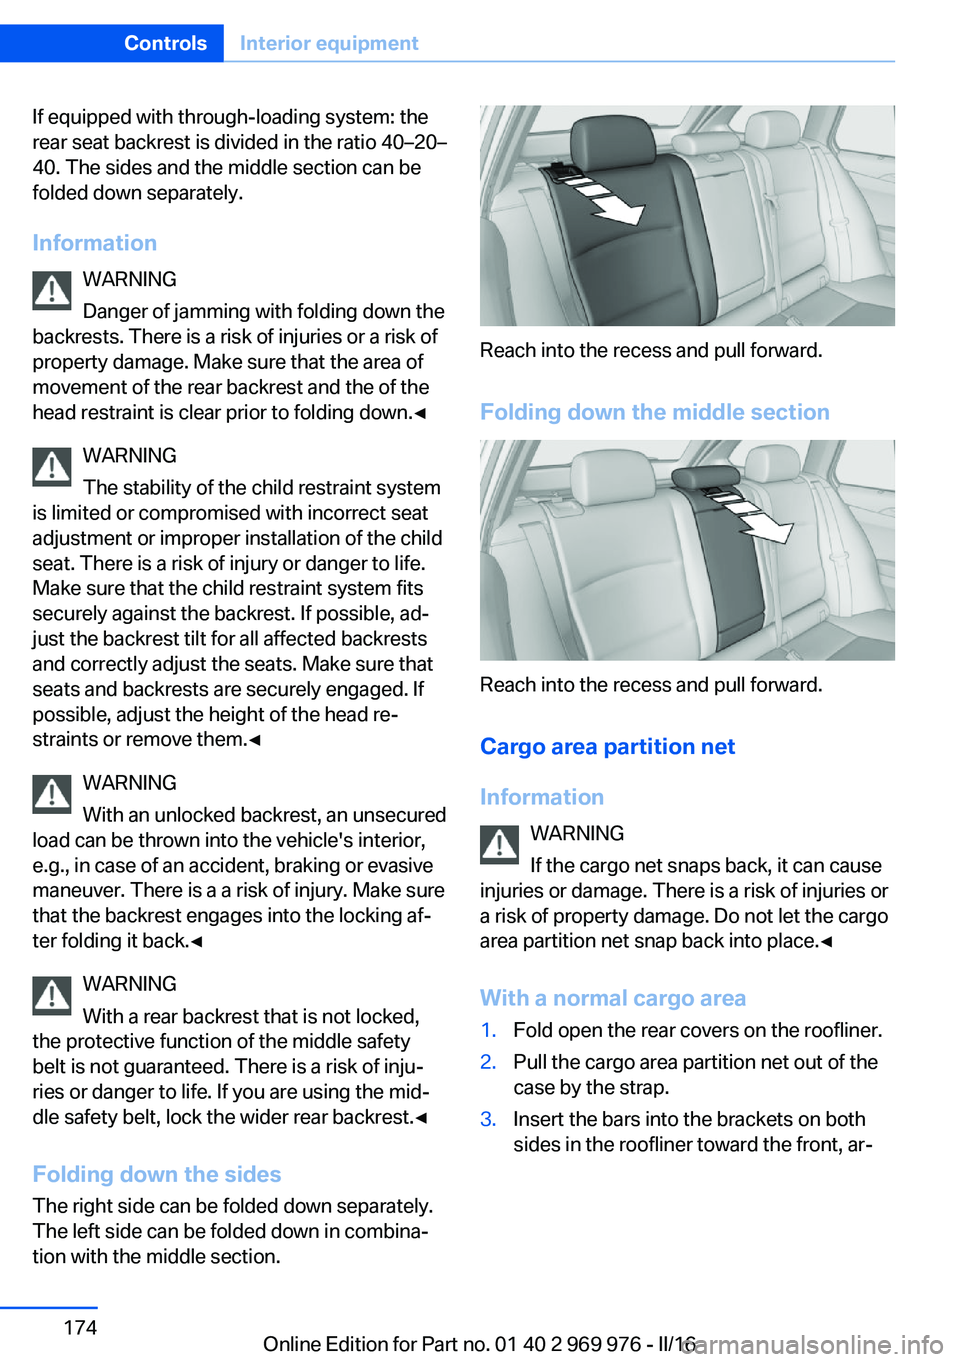
Folding down the sidesThe right side can be folded down separately.
The left side can be folded down in combina‐
tion with the middle section.
Reach into the recess and pull forward.
Folding down the middle section
Reach into the recess and pull forward.
Cargo area partition net
Information WARNING
If the cargo net snaps back, it can cause
injuries or damage. There is a risk of injuries or
a risk of property damage. Do not let the cargo
area partition net snap back into place.◀
With a normal cargo area
1.Fold open the rear covers on the roofliner.2.Pull the cargo area partition net out of the
case by the strap.3.Insert the bars into the brackets on both
sides in the roofliner toward the front, ar‐Seite 174ControlsInterior equipment174
Online Edition for Part no. 01 40 2 969 976 - II/16
Page 175 of 265
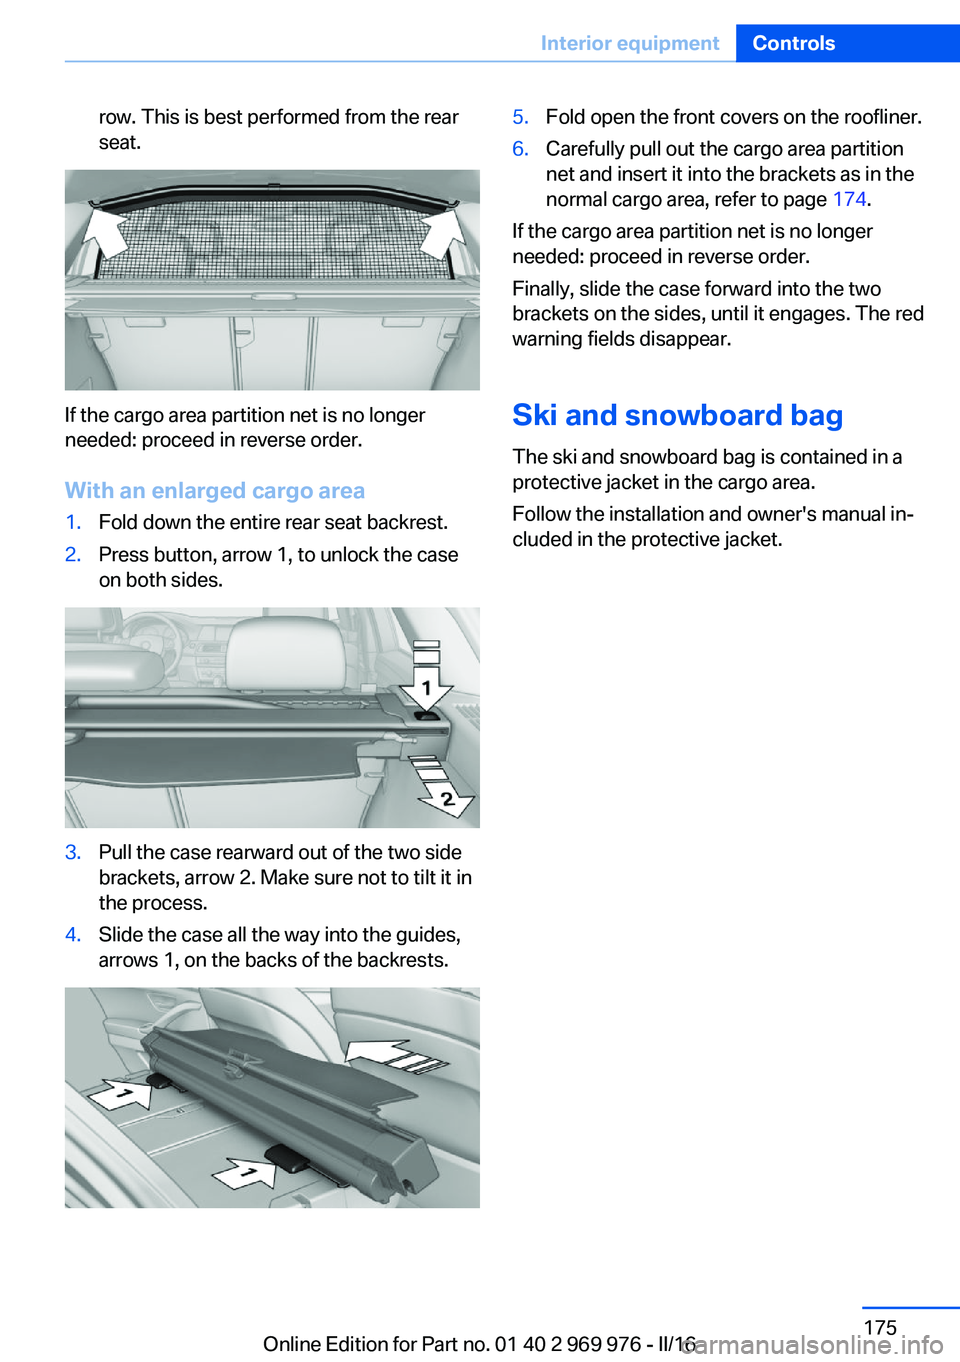
row. This is best performed from the rear
seat.
If the cargo area partition net is no longer
needed: proceed in reverse order.
With an enlarged cargo area
1.Fold down the entire rear seat backrest.2.Press button, arrow 1, to unlock the case
on both sides.3.Pull the case rearward out of the two side
brackets, arrow 2. Make sure not to tilt it in
the process.4.Slide the case all the way into the guides,
arrows 1, on the backs of the backrests.5.Fold open the front covers on the roofliner.6.Carefully pull out the cargo area partition
net and insert it into the brackets as in the
normal cargo area, refer to page 174.
If the cargo area partition net is no longer
needed: proceed in reverse order.
Finally, slide the case forward into the two
brackets on the sides, until it engages. The red
warning fields disappear.
Ski and snowboard bag The ski and snowboard bag is contained in a
protective jacket in the cargo area.
Follow the installation and owner's manual in‐
cluded in the protective jacket.
Seite 175Interior equipmentControls175
Online Edition for Part no. 01 40 2 969 976 - II/16
Page 176 of 265
Storage compartmentsVehicle features and optionsThis chapter describes all standard, country-
specific and optional features offered with the
series. It also describes features that are not
necessarily available in your car, e. g., due to
the selected options or country versions. This
also applies to safety-related functions and
systems. The respectively applicable country
provisions must be observed when using the
respective features and systems.
Information WARNING
Loose objects or devices with a cable
connection to the vehicle, e.g., mobile phones,
can be thrown into the vehicle's interior while
driving, e.g.,in the event of an accident or dur‐
ing braking and evasive maneuvers. There is a
a risk of injury. Secure loose objects or devices
with a cable connection to the vehicle in the
vehicle's interior.◀
ATTENTION
Anti-slip pads such as anti-slip mats can
damage the dashboard. There is a risk of dam‐
age to property. Do not use anti-slip pads.◀
Storage compartments The following storage compartments are avail‐
able in the vehicle interior:▷Glove compartment on the front passenger
side, refer to page 176.▷Storage compartment in the front center
armrest, refer to page 177.▷Compartments in the doors, refer to
page 177.▷Pockets on the backrests of the front
seats.▷Net in the front passenger floor area.
Glove compartment
Front passenger side
Information WARNING
Folded open, the glove compartment
protrudes in the vehicle's interior. Objects in the glove compartment can be thrown into the
vehicle's interior while driving, e.g., in the event of an accident or during braking and evasive
maneuvers. There is a a risk of injury. Always
close the glove compartment immediately after
using it.◀
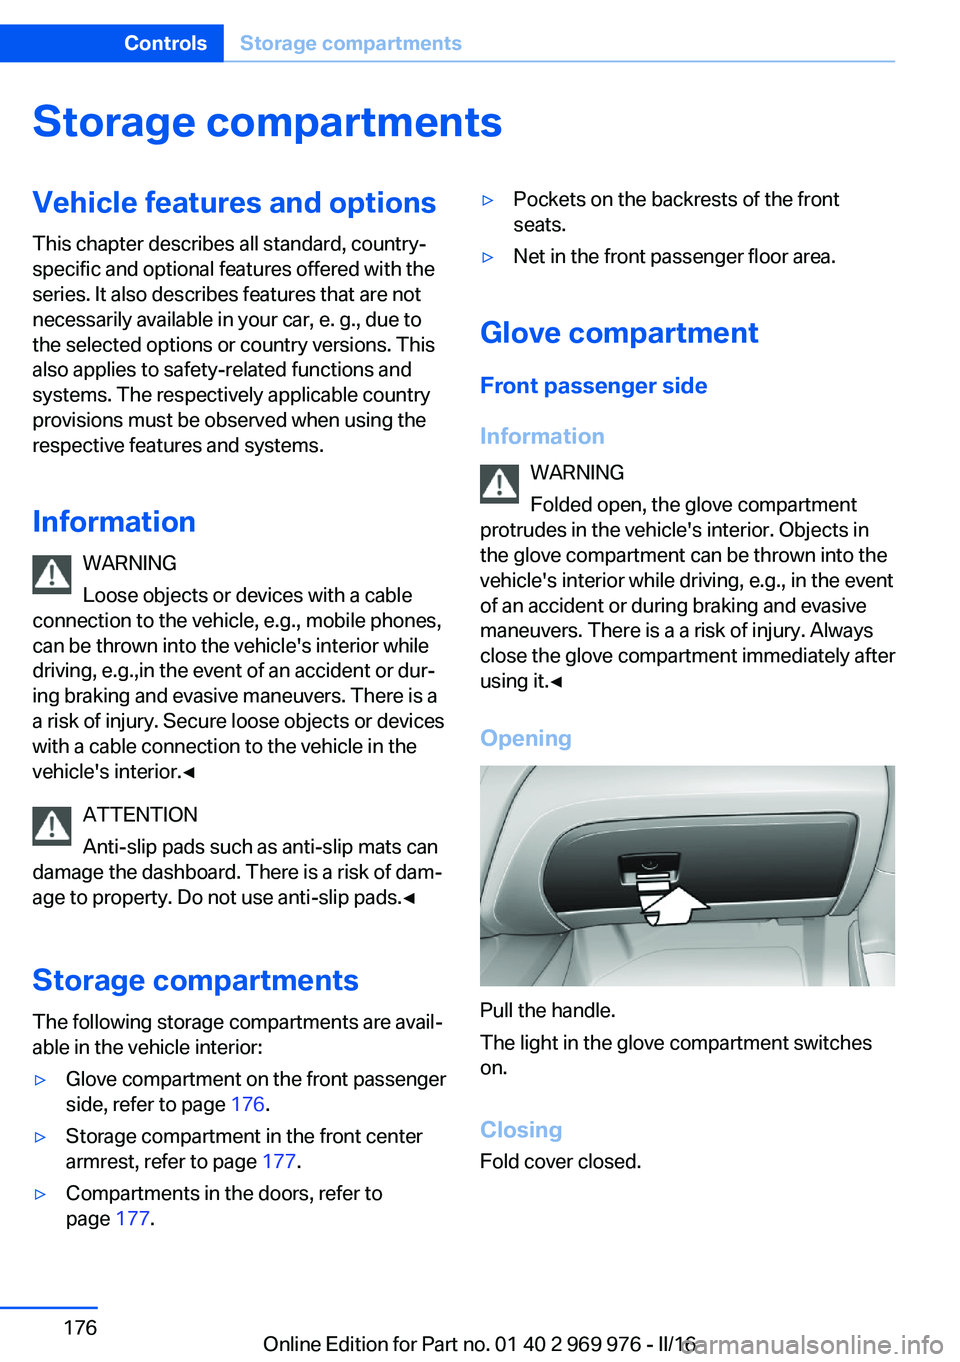
Opening
Pull the handle.
The light in the glove compartment switches
on.
ClosingFold cover closed.
Seite 176ControlsStorage compartments176
Online Edition for Part no. 01 40 2 969 976 - II/16
Page 177 of 265
LockingThe glove compartment can be locked with an
integrated key. This prevents access to the
glove compartment.
After the glove compartment is locked, the re‐
mote control can be handed over, such as at a
hotel, without the integrated key.
Compartments in the doors WARNING
Breakable objects, e.g., glass bottles, can
break in the event of an accident. Broken glass
can be scattered in the vehicle's interior. There
is a a risk of injury. Do not stow any breakable
objects in the vehicle's interior.◀
Center armrest
Opening
Press button, arrow 1, and fold the center arm
rest up, arrow 2.
Connection for an external audio
device
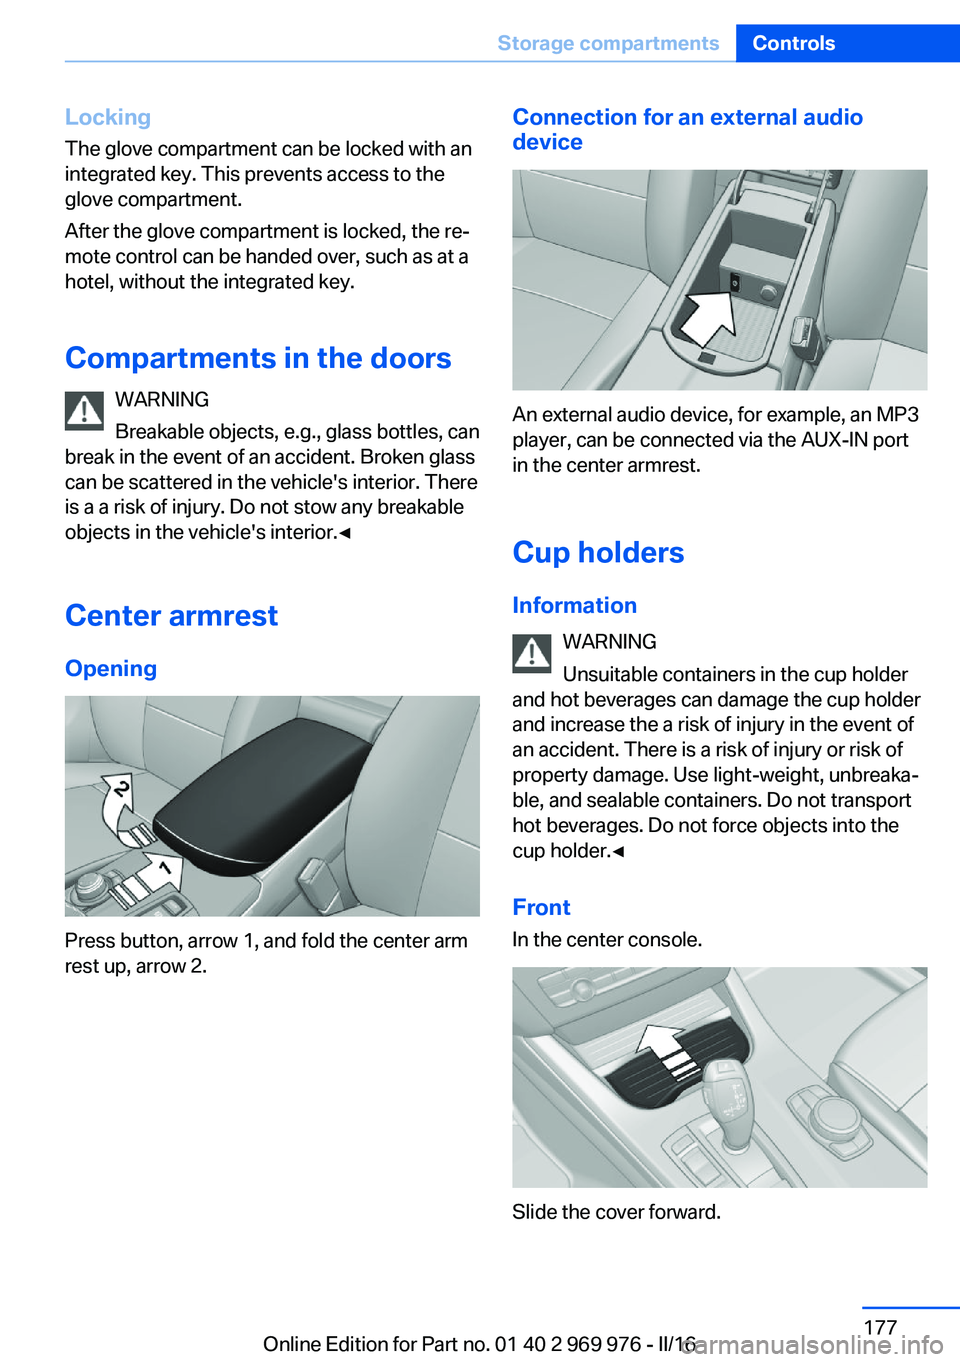
An external audio device, for example, an MP3
player, can be connected via the AUX-IN port
in the center armrest.
Cup holders Information WARNING
Unsuitable containers in the cup holder
and hot beverages can damage the cup holder
and increase the a risk of injury in the event of
an accident. There is a risk of injury or risk of
property damage. Use light-weight, unbreaka‐
ble, and sealable containers. Do not transport
hot beverages. Do not force objects into the
cup holder.◀
Front
In the center console.
Slide the cover forward.
Seite 177Storage compartmentsControls177
Online Edition for Part no. 01 40 2 969 976 - II/16
Page 178 of 265
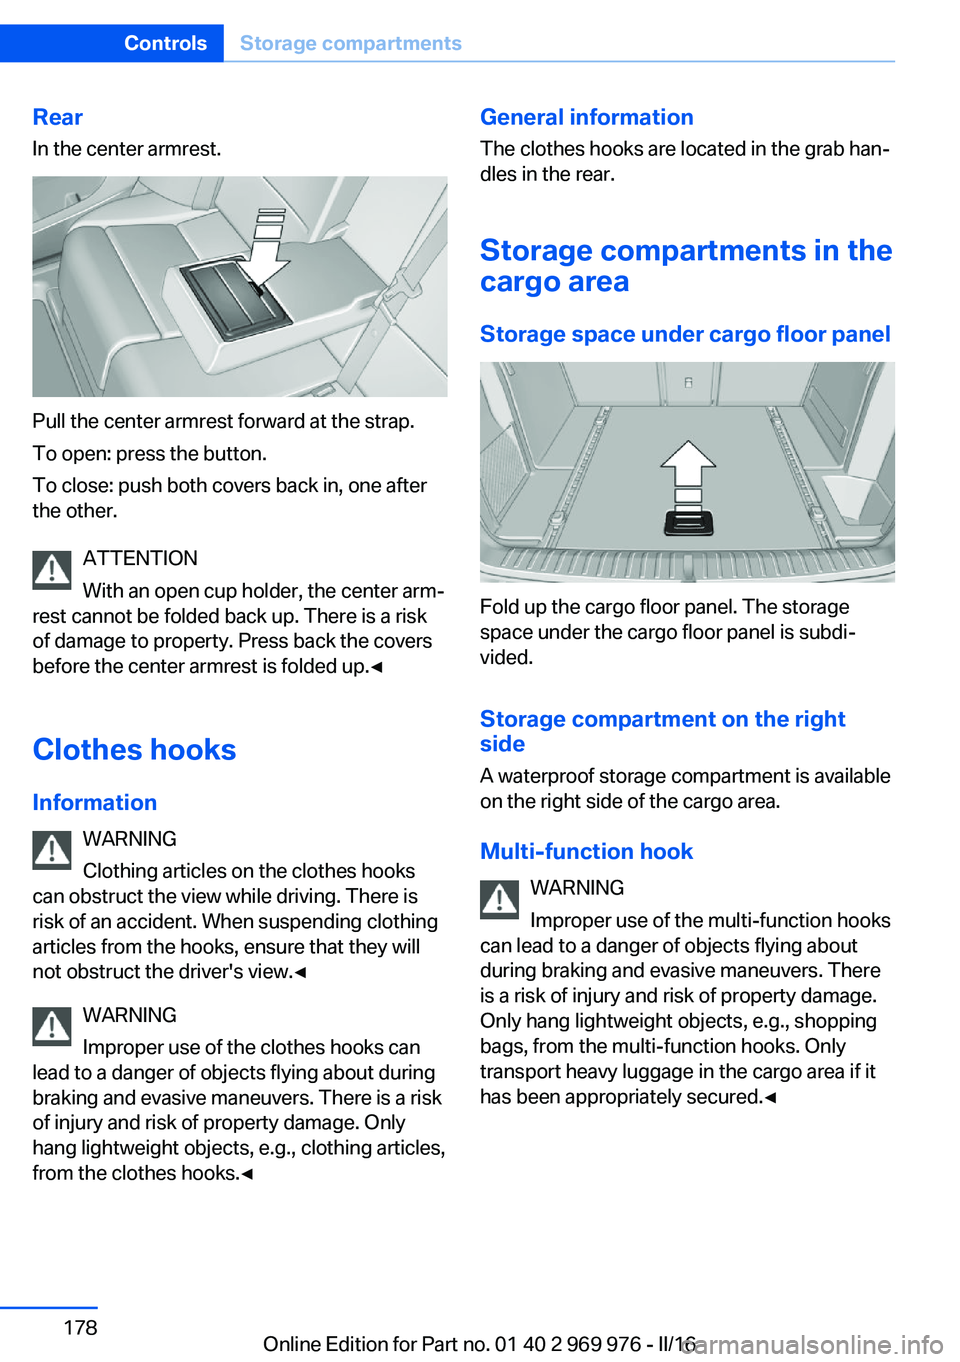
RearIn the center armrest.
Pull the center armrest forward at the strap.
To open: press the button.
To close: push both covers back in, one after
the other.
ATTENTION
With an open cup holder, the center arm‐
rest cannot be folded back up. There is a risk
of damage to property. Press back the covers
before the center armrest is folded up.◀
Clothes hooks Information WARNING
Clothing articles on the clothes hooks
can obstruct the view while driving. There is
risk of an accident. When suspending clothing
articles from the hooks, ensure that they will
not obstruct the driver's view.◀
WARNING
Improper use of the clothes hooks can
lead to a danger of objects flying about during
braking and evasive maneuvers. There is a risk
of injury and risk of property damage. Only
hang lightweight objects, e.g., clothing articles,
from the clothes hooks.◀
General information
The clothes hooks are located in the grab han‐
dles in the rear.
Storage compartments in the
cargo area
Storage space under cargo floor panel
Fold up the cargo floor panel. The storage
space under the cargo floor panel is subdi‐
vided.
Storage compartment on the right side
A waterproof storage compartment is available
on the right side of the cargo area.
Multi-function hook WARNING
Improper use of the multi-function hooks
can lead to a danger of objects flying about
during braking and evasive maneuvers. There
is a risk of injury and risk of property damage.
Only hang lightweight objects, e.g., shopping
bags, from the multi-function hooks. Only
transport heavy luggage in the cargo area if it
has been appropriately secured.◀
Seite 178ControlsStorage compartments178
Online Edition for Part no. 01 40 2 969 976 - II/16
Page 179 of 265
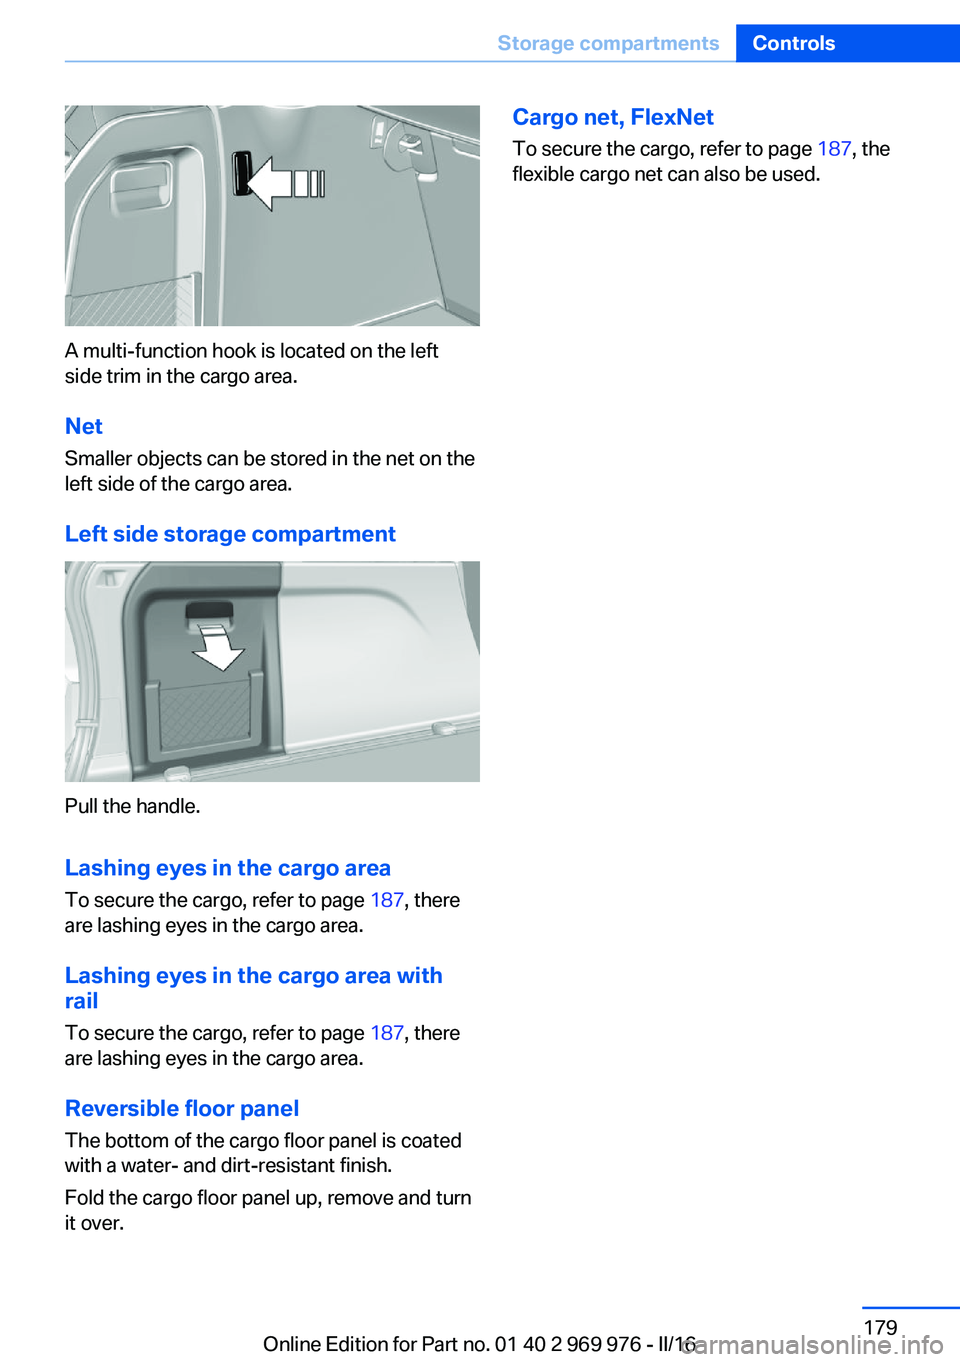
A multi-function hook is located on the left
side trim in the cargo area.
Net
Smaller objects can be stored in the net on the
left side of the cargo area.
Left side storage compartment
Pull the handle.
Lashing eyes in the cargo area
To secure the cargo, refer to page 187, there
are lashing eyes in the cargo area.
Lashing eyes in the cargo area with rail
To secure the cargo, refer to page 187, there
are lashing eyes in the cargo area.
Reversible floor panel
The bottom of the cargo floor panel is coated
with a water- and dirt-resistant finish.
Fold the cargo floor panel up, remove and turn
it over.
Cargo net, FlexNet
To secure the cargo, refer to page 187, the
flexible cargo net can also be used.Seite 179Storage compartmentsControls179
Online Edition for Part no. 01 40 2 969 976 - II/16
Page 180 of 265

Online Edition for Part no. 01 40 2 969 976 - II/16