BMW X3 3.0I 2005 E83 Owners Manual
Manufacturer: BMW, Model Year: 2005, Model line: X3 3.0I, Model: BMW X3 3.0I 2005 E83Pages: 126, PDF Size: 4.65 MB
Page 91 of 126
Under the hood
90
Washer fluid
Headlamp* and windshield washer
system
The antifreeze for the washer systems is
flammable. For this reason, keep it away
from sources of flame and store it only in its
original containers. Store it so that it is inacces-
sible to children. Always observe the instruc-
tions for use provided on the containers.<
We recommend that you mix the washer
fluid before adding it to the reservoir.<
Capacity of the windshield washer system:
approx. 3.2 US quarts/3 liters.
Capacity for equipment with headlamp washer
system: approx. 6.9 US quarts/6.5 liters.
Fill with water and, if required, with an antifreeze
additive according to manufacturer's recom-
mendations.
Engine oil
Engine oil consumption depends on driving
style and operating conditions.
Warning lamp
Engine oil pressure
The warning lamp lights up red:
Stop the vehicle immediately and
switch off the engine. Check the engine
oil level; top off as required. If the oil level is cor-
rect: have the system checked immediately.
Do not continue driving. The engine could
be damaged because of inadequate lubri-
cation.<
Engine oil level
The warning lamp lights up yellow while
driving:
The oil level is at the absolute mini-
mum. Add engine oil as soon as possible. Until
then, do not drive more than approx. 30 miles/
50 km.
The warning lamp lights up yellow after
the engine is switched off:
Top off engine oil at the earliest oppor-
tunity, e.g. when refueling.
Engine oil sensor
The warning lamp lights up yellow
within 20 seconds after starting the
engine:
The oil level sensor is defective. Have checked
as soon as possible.
Checking oil level
1.With the engine at operating temperature,
i.e. after at least 6 miles/10 km of uninter-
rupted driving, park the vehicle in a horizon-
tal position.
2.Switch off engine.
3.After approx. 5 minutes, pull the dipstick out
and wipe it off with a clean lint-free. cloth,
paper towel, or similar material.
4.Carefully push the dipstick all the way into
the guide tube and pull it out again.
The oil should extend to between the two
marks on the dipstick.
5.Push the oil dipstick into the dipstick tube
as far as possible again.
The oil quantity between the two marks of the
dipstick is approx. 1.1 US quarts/1 liter.
Page 92 of 126
Reference
At a glance
Controls
Driving tips
Mobility
91
Do not fill beyond the upper mark on the
dipstick. Excess oil can damage the
engine.<
Adding engine oil
Do not add oil until the oil level has dropped to
just above the lower marking on the dipstick,
refer to page90.
Add oil within the next 30 miles/50 km,
otherwise engine damage could result.<
Store oil, grease etc., well out of the reach
of children; always observe all warning
labels on the containers.<
Oil change
Have oil changed only at your BMW Sports
Activity Vehicle Center or at a workshop that
works according to BMW repair procedures
with correspondingly trained personnel.
Approved engine oils
The quality of the engine oil selected has critical
significance for the operation and service life of
an engine. Based on extensive testing, BMW
has approved only certain engine oils.
Use only approved BMW High Performance
Synthetic Oil.
If you are unable to obtain BMW High Perfor-
mance Synthetic Oil, you can add small
amounts of another synthetic oil between oil
changes. Use only oils with the API SH specifi-
cation or higher.
Ask your BMW Sports Activity Vehicle
Center for details concerning the specific
BMW High Performance Synthetic Oil or syn-
thetic oils which have been approved.
www.bmwusa.com to obtain this information.
BMW engines are designed to operate
without additives, and their use could
even lead to damage in some cases.<
Viscosity ratings
Viscosity is the oil flow rating as defined in
SAE classes.
The selection of the correct SAE class depends
on the climate conditions in the area where you
typically drive your BMW.
Approved oils are in SAE classes 5W-40
and 5W-30.<
These oils may be used for driving in all ambient
temperatures.
Coolant
Warning lamp
The warning lamp lights up: coolant
level is too low; top off at the next
opportunity.
Do not open the cooling system when the
engine is hot. Escaping coolant can cause
burns.<
Coolant consists of water and coolant additive.
Not all commercially available additives are suit-
able for your BMW. Ask your BMW Sport Activ-
ity Vehicle Center for suitable additives.
Only use suitable additives, as otherwise
engine damage may result. The additives
present a health hazard.<
Always observe all applicable environ-
mental laws and regulations when dis-
posing of used coolant additives.<
Checking coolant level
1.The engine must be at ambient tempera-
ture.
2.Turn the cap of the expansion tank counter-
clockwise to allow any accumulated pres-
Page 93 of 126
Under the hood
92 sure to escape, then continue turning to
open.
3.The coolant level is correct if the upper end
of the red float bar is at least at the same
height as the top edge of the filler neck,
refer to arrow. The bar end may only pro-
trude by a maximum of ιin/2 cm, i.e. up to
the second mark on the float bar, refer also
to sketch beside the filler neck.
4.If the coolant is low, slowly add coolant up to
the specified level – do not overfill.
5.Screw on the cap and tighten firmly.
6.Have the reason for the coolant loss elimi-
nated as soon as possible.
Brake system
Malfunction
Brake fluid
The warning lamp lights up red despite
the handbrake being released:
Stop immediately.
The brake fluid in the reservoir has fallen to
below the minimum level. At the same time, a
considerably longer brake pedal travel may be
noticeable. Have the system checked immedi-
ately.
During continued driving increased brake
pedal pressure may be necessary, and
considerably longer braking distances may
result. Please adapt your driving style accord-
ingly.<
Display of the previously described
malfunction on Canadian models.
Brake pads
The warning lamp lights up.
The brake pads have reached their min-
imum pad thickness. Have brake pads
replaced immediately.
For your own safety: use only brake pads
that BMW has approved for your particu-
lar vehicle model. As BMW cannot assess the
suitability of other brake pads for use in your
vehicle, we are unable to assume continued
responsibility for the vehicle's operating safety
if non-approved pads are installed.<
Page 94 of 126
Reference
At a glance
Controls
Driving tips
Mobility
93
Maintenance
The BMW maintenance
system
The BMW maintenance system supports the
preservation of the traffic and operating safety
of your BMW.
Regular maintenance is not only required for
the safety of the vehicle, it also improves the
resale value.
Service Interval Display
The BMW maintenance system takes the driv-
ing conditions of the vehicle into account when
determining service intervals:
From the point of view of maintenance,
62,000 miles/100,000 km accumulated in
short-distance urban driving are not the equiva-
lent of the same distance covered at moderate
speeds in long-distance highway travel.
The BMW maintenance system is divided into
engine oil service as well as Inspections I and II.
Determining the maintenance intervals accord-
ing to the actual loads on the vehicle covers
every kind of operating situation. However,
even those who drive only short distances,
significantly less than 6,200 miles/10,000 km
annually, should have the engine oil changed at
least every 2 years since oil deteriorates over
time, regardless of use.
Brake fluid is hygroscopic: it absorbs
moisture from the atmosphere over the
course of time. To ensure that the brake system
continues to provide safe and reliable perfor-
mance, remember to have the brake fluid changed at least every two years by a BMW
Sports Activity Vehicle Center, also refer to the
Service and Warranty Information Booklet for
US models or the Warranty and Service Guide
Booklet for Canadian models.<
Service and Warranty Information
Booklet for US models/Warranty and
Service Guide Booklet for Canadian
models
For detailed information on required mainte-
nance items and the work involved, please refer
to the Service and Warranty Information Book-
let for US models or to the Warranty and Service
Guide Booklet for Canadian models.
Depending on operating conditions, it may be
advisable to have the body checked for damage
from rocks or gravel as a precaution against cor-
rosion.
BMW recommends that you have your
BMW Sports Activity Vehicle Center per-
form the maintenance and repair.
Check that the maintenance work is recorded in
the Service and Warranty Information Booklet
for US models or the Warranty and Service
Guide Booklet for Canadian models. These
entries will serve as proof that the vehicle has
received regular maintenance.<
OBD connector
The interface socket for the Onboard Diagnos-
tics is located on the left of the driver's side at
Page 95 of 126
Maintenance
94 the bottom of the instrument cluster and under
a cover. The cover has the letters OBD on it.
The most important components for the com-
position of the emissions can be checked by a
device via this interface.
If the Service Engine Soon indicator
lamp lights up either continuously or
intermittently, this indicates a malfunc-
tion in the emissions-related electronic sys-
tems. Although the vehicle remains operational,
you should have the systems checked by your
BMW Sports Activity Vehicle Center at the ear-
liest possible opportunity.
The illuminated indicator informs you of the
need for service, not that you need to stop the
vehicle. However, the systems should be
checked by your BMW Sports Activity Vehicle
Center at the next opportunity.
If the indicator blinks or flashes, this indicates
a high level of engine misfire. Reduce speed
and contact the nearest BMW Sports Activity
Vehicle Center immediately. Severe engine
misfiring over even a short period of time can
seriously damage emission control system
components, especially the catalytic converter.
Display of the previously described
malfunction on Canadian models.
If the fuel filler cap is not on tight enough,
the OBD system can detect leaking vapor
and the indicator lamp will light up. If the fuel
filler cap is then tightened, the indicator lamp
will usually go out after a short period of time.<
Event Data Recorders
Your vehicle may be equipped with one or more
sensing and diagnostic modules or a recording
device capable of recording or transmitting cer-
tain vehicle data or information. In addition, if
you have a Subscription Service Agreement for
the BMW Assist system, certain vehicle infor-
mation may be transmitted or recorded in order
to provide such services.
Care
For all information on this subject, refer to the
Caring for your vehicle brochure.
Page 96 of 126
Reference
At a glance
Controls
Driving tips
Mobility
95
Replacing components
Onboard tool kit
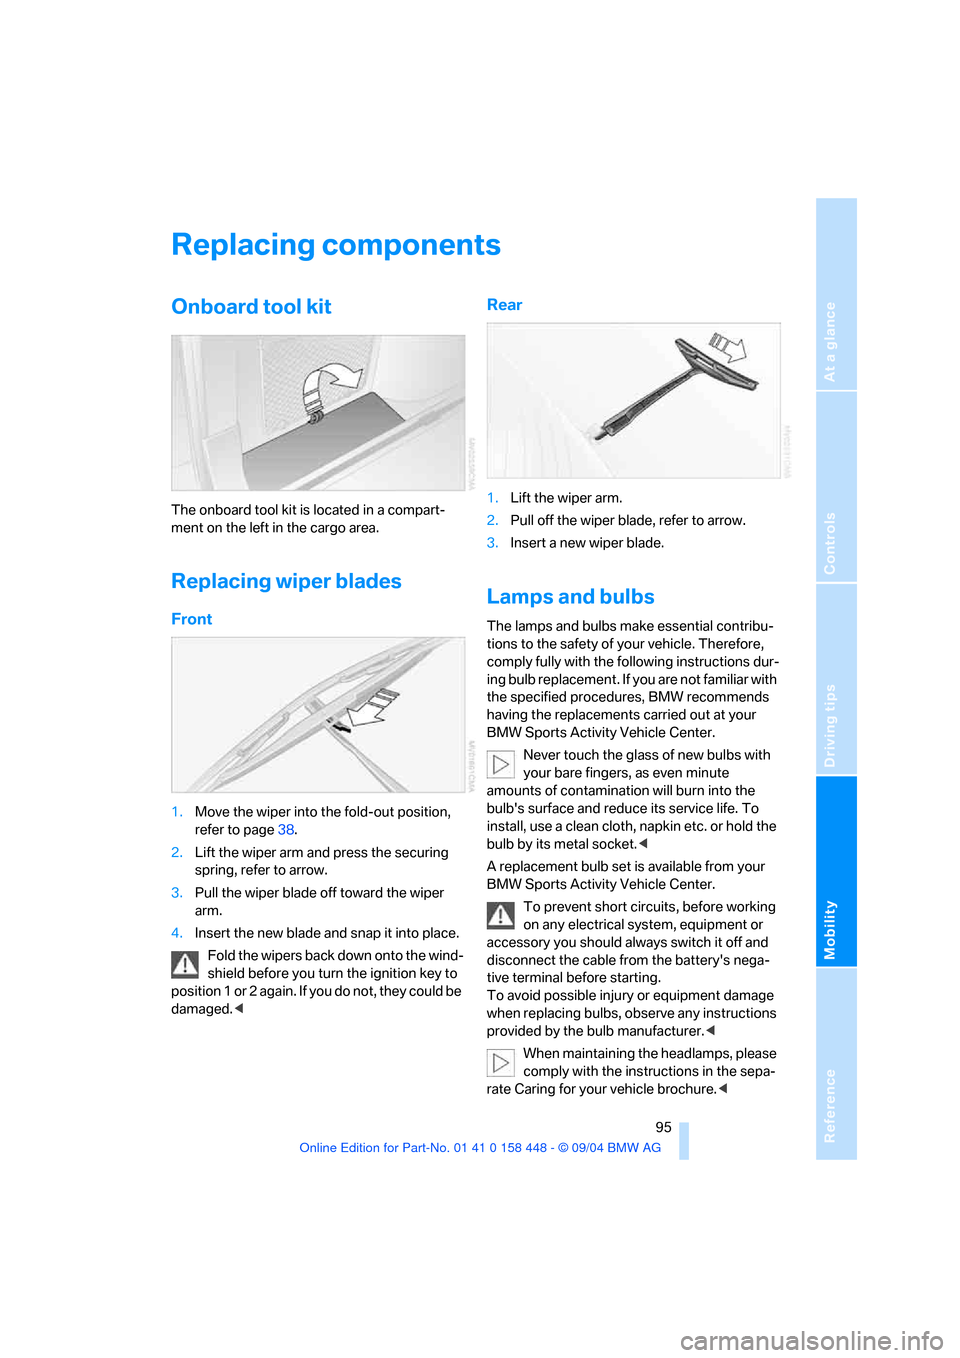
The onboard tool kit is located in a compart-
ment on the left in the cargo area.
Replacing wiper blades
Front
1.Move the wiper into the fold-out position,
refer to page38.
2.Lift the wiper arm and press the securing
spring, refer to arrow.
3.Pull the wiper blade off toward the wiper
arm.
4.Insert the new blade and snap it into place.
Fold the wipers back down onto the wind-
shield before you turn the ignition key to
p o s i t i o n 1 o r 2 a g a i n . I f y o u d o n o t , t h e y c o u l d b e
damaged.<
Rear
1.Lift the wiper arm.
2.Pull off the wiper blade, refer to arrow.
3.Insert a new wiper blade.
Lamps and bulbs
The lamps and bulbs make essential contribu-
tions to the safety of your vehicle. Therefore,
comply fully with the following instructions dur-
ing bulb replacement. If you are not familiar with
the specified procedures, BMW recommends
having the replacements carried out at your
BMW Sports Activity Vehicle Center.
Never touch the glass of new bulbs with
your bare fingers, as even minute
amounts of contamination will burn into the
bulb's surface and reduce its service life. To
install, use a clean cloth, napkin etc. or hold the
bulb by its metal socket.<
A replacement bulb set is available from your
BMW Sports Activity Vehicle Center.
To prevent short circuits, before working
on any electrical system, equipment or
accessory you should always switch it off and
disconnect the cable from the battery's nega-
tive terminal before starting.
To avoid possible injury or equipment damage
when replacing bulbs, observe any instructions
provided by the bulb manufacturer.<
When maintaining the headlamps, please
comply with the instructions in the sepa-
rate Caring for your vehicle brochure.<
Page 97 of 126
Replacing components
96
Halogen low beams
H7 bulb, 55 watts
Always wear gloves and eye protection –
the atmosphere within the bulb is pres-
surized. Failure to observe this precaution can
lead to personal injury should the bulb be dam-
aged.<
Driver's side
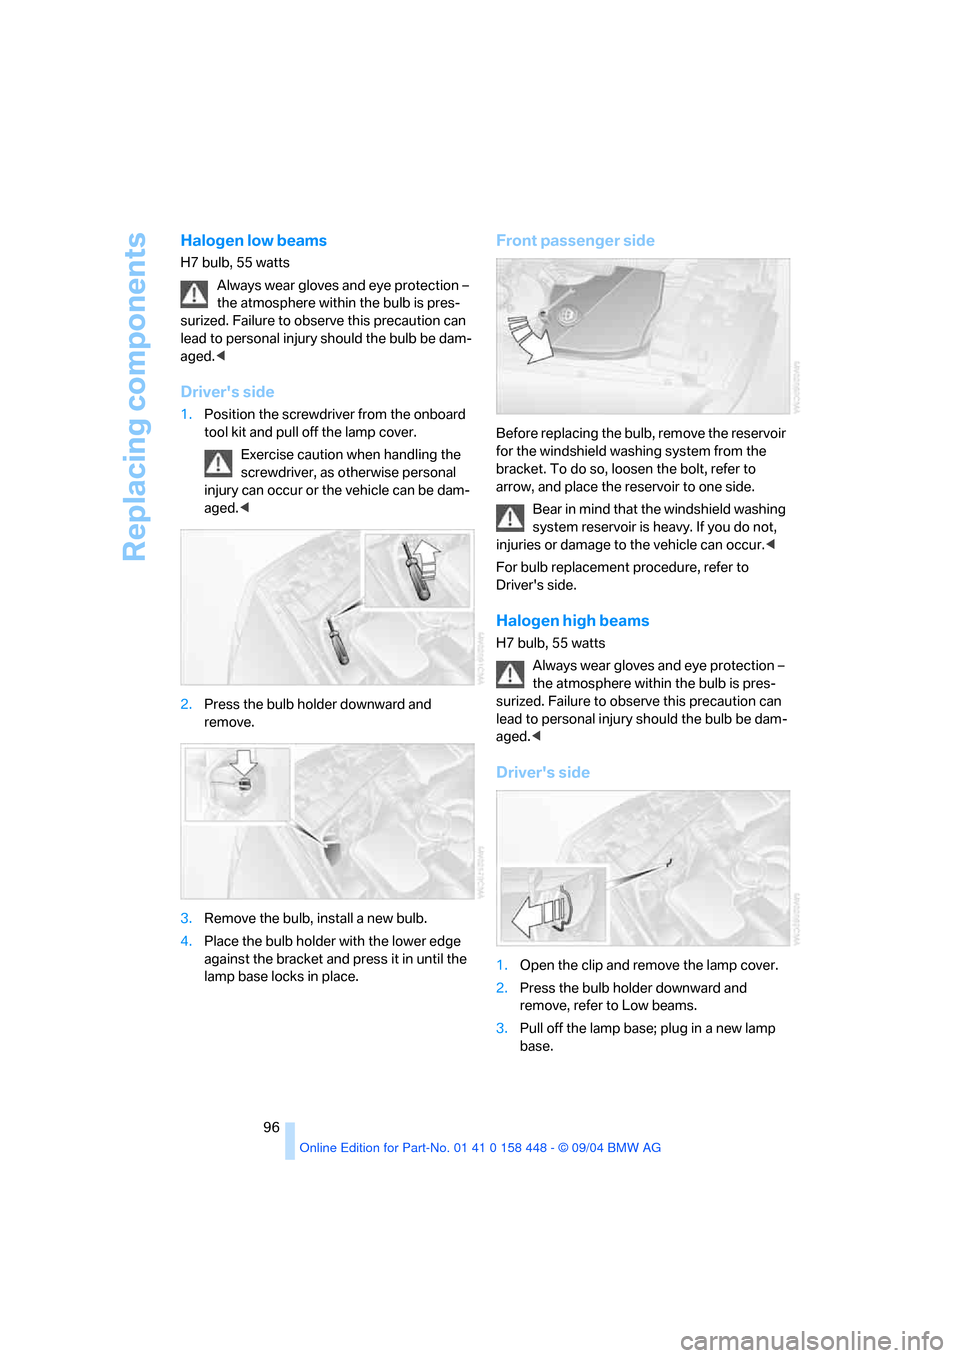
1.Position the screwdriver from the onboard
tool kit and pull off the lamp cover.
Exercise caution when handling the
screwdriver, as otherwise personal
injury can occur or the vehicle can be dam-
aged.<
2.Press the bulb holder downward and
remove.
3.Remove the bulb, install a new bulb.
4.Place the bulb holder with the lower edge
against the bracket and press it in until the
lamp base locks in place.
Front passenger side
Before replacing the bulb, remove the reservoir
for the windshield washing system from the
bracket. To do so, loosen the bolt, refer to
arrow, and place the reservoir to one side.
Bear in mind that the windshield washing
system reservoir is heavy. If you do not,
injuries or damage to the vehicle can occur.<
For bulb replacement procedure, refer to
Driver's side.
Halogen high beams
H7 bulb, 55 watts
Always wear gloves and eye protection –
the atmosphere within the bulb is pres-
surized. Failure to observe this precaution can
lead to personal injury should the bulb be dam-
aged.<
Driver's side
1.Open the clip and remove the lamp cover.
2.Press the bulb holder downward and
remove, refer to Low beams.
3.Pull off the lamp base; plug in a new lamp
base.
Page 98 of 126
Reference
At a glance
Controls
Driving tips
Mobility
97
4.Place the lamp base with the lower edge
against the bracket and press it in until the
lamp base locks in place.
Make sure that the cover does not fall into
the engine compartment, as otherwise
the vehicle can be damaged or other road users
can be endangered.<
Front passenger side
Before replacing the bulb, remove the reservoir
of the windshield washer system from the
bracket, refer to Halogen low beams on
page96.
For bulb replacement procedure, refer to
Driver's side.
Xenon lamps*
The service life of these bulbs is very long and
the probability of a failure is very low, provided
that they are not switched on and off an unusual
number of times. If one of these bulbs should
nevertheless fail, it is possible to continue driv-
ing with great caution using the fog lamps, pro-
vided traffic laws in your area do not prohibit
this.
To avoid risk of potentially fatal injuries:
owing to the extremely high voltages at
which these units operate, service work should
always be entrusted to qualified personnel.<
Parking and roadside parking lamps
5 Watt bulb
In case of a malfunction, please contact your
BMW Sports Activity Vehicle Center.
Turn signal, front
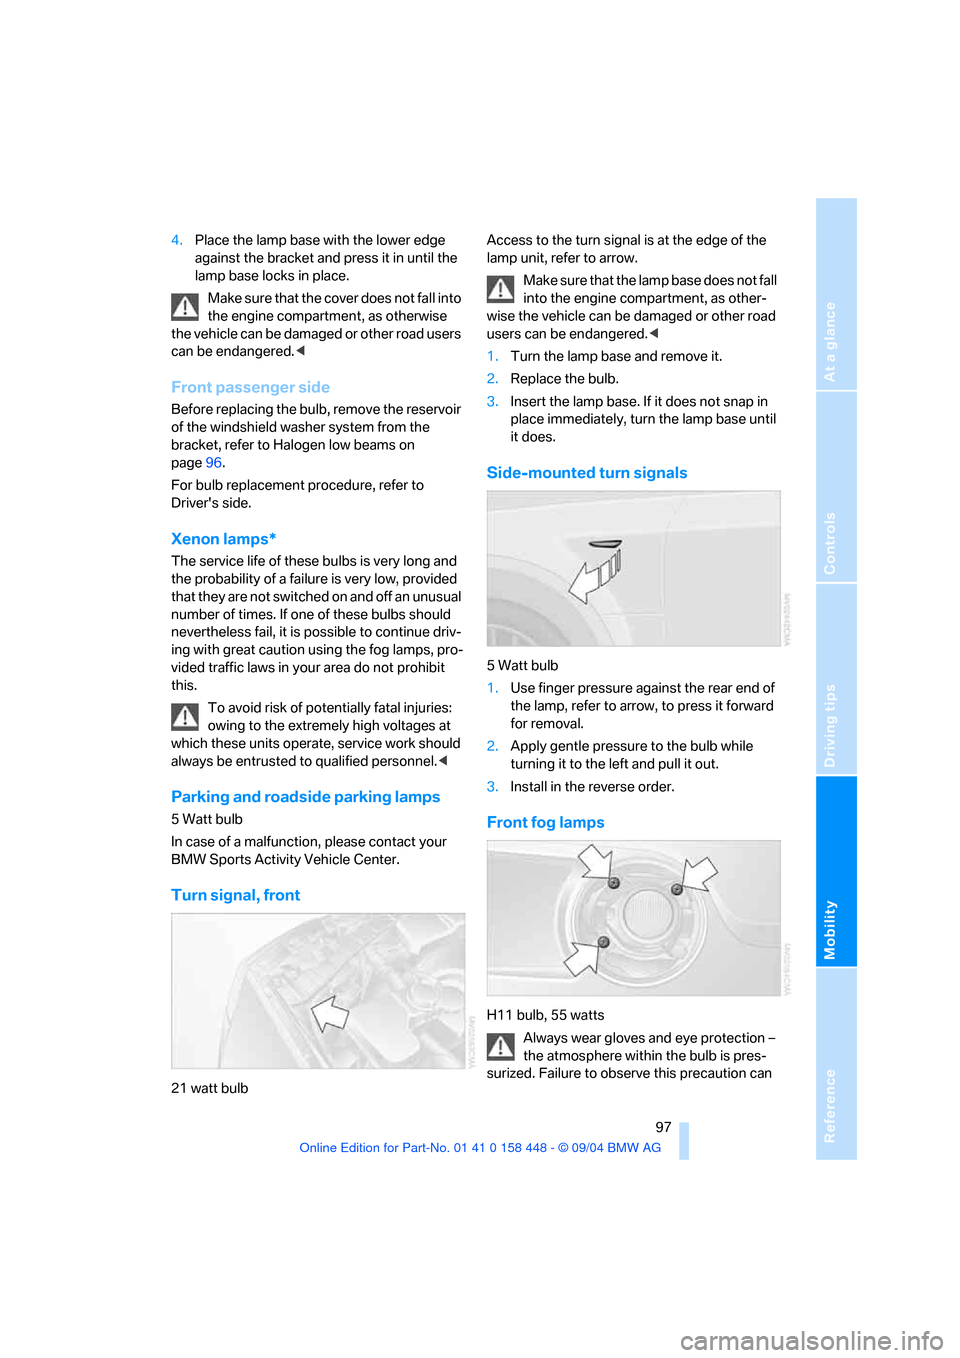
21 watt bulb Access to the turn signal is at the edge of the
lamp unit, refer to arrow.
Make sure that the lamp base does not fall
into the engine compartment, as other-
wise the vehicle can be damaged or other road
users can be endangered.<
1.Turn the lamp base and remove it.
2.Replace the bulb.
3.Insert the lamp base. If it does not snap in
place immediately, turn the lamp base until
it does.
Side-mounted turn signals
5 Watt bulb
1.Use finger pressure against the rear end of
the lamp, refer to arrow, to press it forward
for removal.
2.Apply gentle pressure to the bulb while
turning it to the left and pull it out.
3.Install in the reverse order.
Front fog lamps
H11 bulb, 55 watts
Always wear gloves and eye protection –
the atmosphere within the bulb is pres-
surized. Failure to observe this precaution can
Page 99 of 126
Replacing components
98 lead to personal injury should the bulb be dam-
aged.<
1.Pull the cover in front of the fog lamp for-
ward.
2.Loosen the screws, refer to arrow, and pull
out the headlamp.
3.Turn the lamp base at the back of the head-
lamp to the left and remove it.
4.Replace the bulb.
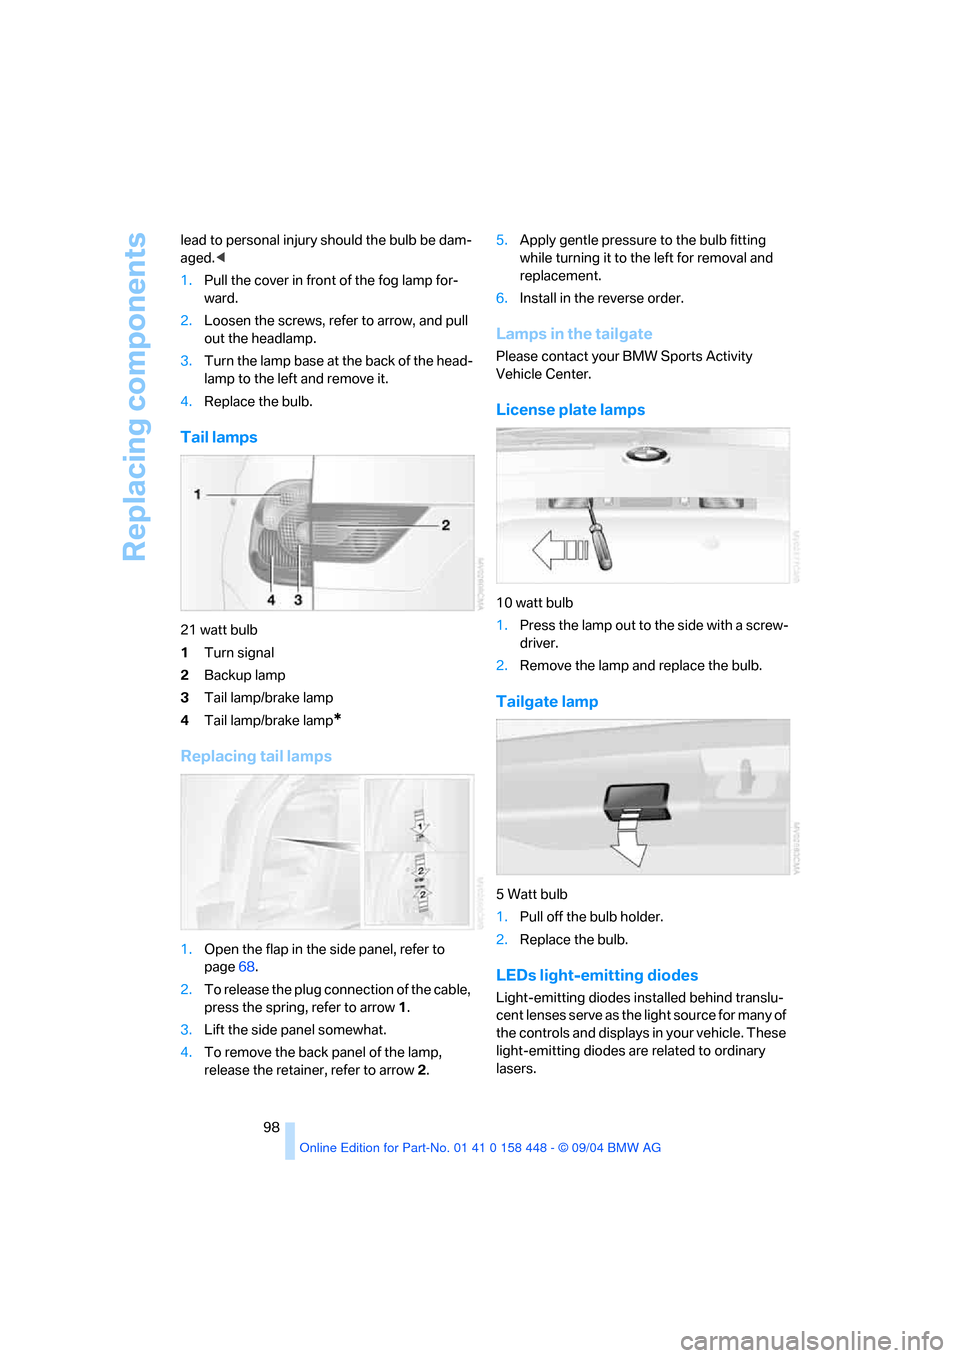
Tail lamps
21 watt bulb
1Turn signal
2Backup lamp
3Tail lamp/brake lamp
4Tail lamp/brake lamp
*
Replacing tail lamps
1.Open the flap in the side panel, refer to
page68.
2.To release the plug connection of the cable,
press the spring, refer to arrow1.
3.Lift the side panel somewhat.
4.To remove the back panel of the lamp,
release the retainer, refer to arrow2.5.Apply gentle pressure to the bulb fitting
while turning it to the left for removal and
replacement.
6.Install in the reverse order.
Lamps in the tailgate
Please contact your BMW Sports Activity
Vehicle Center.
License plate lamps
10 watt bulb
1.Press the lamp out to the side with a screw-
driver.
2.Remove the lamp and replace the bulb.
Tailgate lamp
5 Watt bulb
1.Pull off the bulb holder.
2.Replace the bulb.
LEDs light-emitting diodes
Light-emitting diodes installed behind translu-
cent lenses serve as the light source for many of
the controls and displays in your vehicle. These
light-emitting diodes are related to ordinary
lasers.
Page 100 of 126
Reference
At a glance
Controls
Driving tips
Mobility
99
Do not remove the covers, and never
stare into the unfiltered light for several
hours, as irritation of the retina could result.<
Changing a wheel
Safety precautions to observe in the
event of a flat tire and during all tire
changes:
Park the vehicle as far as possible from passing
traffic. Park on a firm, flat, surface. Switch on the
hazard warning flashers.
Lock the steering wheel in straight-ahead set-
ting of the wheels. Engage the handbrake and
engage first gear, reverse gear or selector-lever
setting P.
All passengers should be outside the vehicle
and well away from your immediate working
area, behind a guardrail, for instance.
If a warning triangle or portable hazard warning
lamp is required, set it up on the roadside at an
appropriate distance from the rear of the vehi-
cle. Comply with all safety guidelines and regu-
lations.
Change the wheel only on a level, firm surface
which is not slippery. The vehicle or the jack
could slip to the side if you attempt to raise the
vehicle on a soft or slippery surface such as
snow, ice, tiles, etc.
Position the jack on a firm support surface.
Do not use a wooden block or similar object as a
support base for the jack, as this would prevent
it from extending to its full support height and
reduce its load-carrying capacity.
To avoid serious or fatal injury: never lie under
the vehicle, and never start the engine while it is
supported by the jack.<
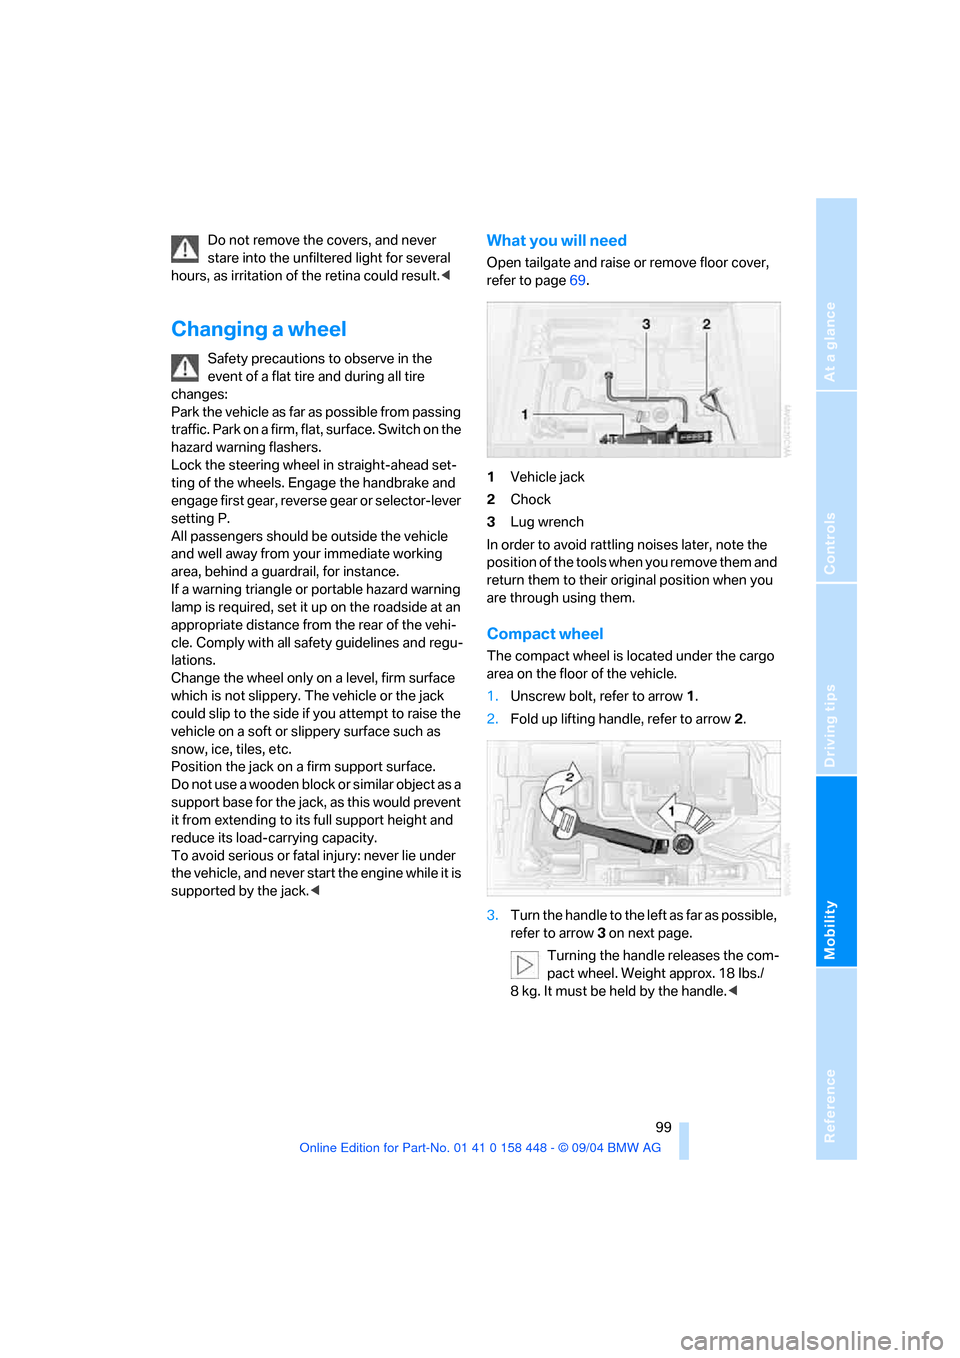
What you will need
Open tailgate and raise or remove floor cover,
refer to page69.
1Vehicle jack
2Chock
3Lug wrench
In order to avoid rattling noises later, note the
position of the tools when you remove them and
return them to their original position when you
are through using them.
Compact wheel
The compact wheel is located under the cargo
area on the floor of the vehicle.
1.Unscrew bolt, refer to arrow1.
2.Fold up lifting handle, refer to arrow2.
3.Turn the handle to the left as far as possible,
refer to arrow3 on next page.
Turning the handle releases the com-
pact wheel. Weight approx. 18 Ibs./
8 kg. It must be held by the handle.<