BMW X3 3.0I 2005 E83 Manual Online
Manufacturer: BMW, Model Year: 2005, Model line: X3 3.0I, Model: BMW X3 3.0I 2005 E83Pages: 126, PDF Size: 4.65 MB
Page 81 of 126
Refueling
80
Refueling
Fuel filler door
Always switch off the engine before refu-
eling, as it is not possible to add fuel with
the engine running, and attempts to do so may
also trigger the Service Engine Soon lamp.<
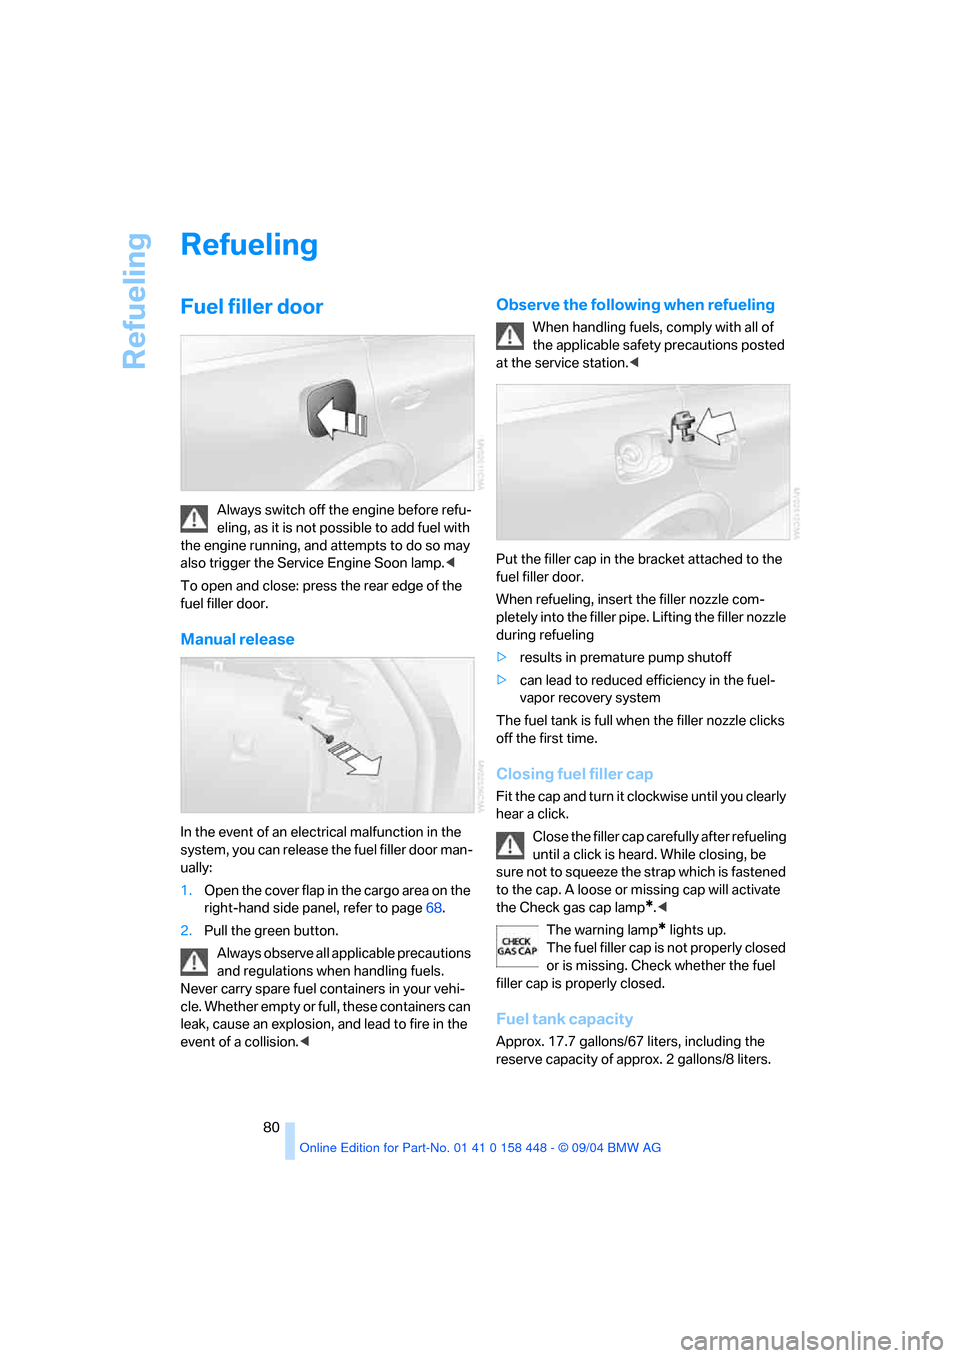
To open and close: press the rear edge of the
fuel filler door.
Manual release
In the event of an electrical malfunction in the
system, you can release the fuel filler door man-
ually:
1.Open the cover flap in the cargo area on the
right-hand side panel, refer to page68.
2.Pull the green button.
Always observe all applicable precautions
and regulations when handling fuels.
Never carry spare fuel containers in your vehi-
cle. Whether empty or full, these containers can
leak, cause an explosion, and lead to fire in the
event of a collision.<
Observe the following when refueling
When handling fuels, comply with all of
the applicable safety precautions posted
at the service station.<
Put the filler cap in the bracket attached to the
fuel filler door.
When refueling, insert the filler nozzle com-
pletely into the filler pipe. Lifting the filler nozzle
during refueling
>results in premature pump shutoff
>can lead to reduced efficiency in the fuel-
vapor recovery system
The fuel tank is full when the filler nozzle clicks
off the first time.
Closing fuel filler cap
Fit the cap and turn it clockwise until you clearly
hear a click.
Close the filler cap carefully after refueling
until a click is heard. While closing, be
sure not to squeeze the strap which is fastened
to the cap. A loose or missing cap will activate
the Check gas cap lamp
*.<
The warning lamp
* lights up.
The fuel filler cap is not properly closed
or is missing. Check whether the fuel
filler cap is properly closed.
Fuel tank capacity
Approx. 17.7 gallons/67 liters, including the
reserve capacity of approx. 2 gallons/8 liters.
Page 82 of 126
Reference
At a glance
Controls
Driving tips
Mobility
81
Never attempt to continue driving until
the tank is completely empty, as engine
functions could be affected, and the vehicle
could sustain damage as a result.<
Fuel specifications
The engine uses unleaded gasoline only.
Required fuel
Premium unleaded gasoline,
minimum octane rating: 91.
Minimum octane rating corresponds to the
Anti Knock Index AKI and is determined to the
so-called (R+M)/2 method.
Do not use leaded gasoline, as otherwise
the lambda probe and catalytic converter
will be permanently damaged.<
Use high-quality brands
Field experience has indicated significant dif-
ferences in fuel quality: volatility, composition,
additives, etc., among gasolines offered for sale
in the United States and Canada. Fuels contain-
ing up to and including 10 % ethanol or other
oxygenates with up to 2.8 % oxygen by weight,
that is, 15 % MTBE or 3 % methanol plus an
equivalent amount of co-solvent, will not void
the applicable warranties with respect to
defects in materials or workmanship.
The use of poor-quality fuels may result in
drivability, starting and stalling problems
especially under certain environmental condi-
tions such as high ambient temperature and
high altitude.
Should you encounter drivability problems
which you suspect could be related to the fuel
you are using, we recommend that you respond
by switching to a recognized high-quality
brand. Failure to comply with these recommen-
dations may also result in unscheduled mainte-
nance.<
Page 83 of 126
Wheels and tires
82
Wheels and tires
Tire inflation pressure
Information for your safety
It is not merely the tire's service life, but also
driving comfort and – to a great extent – driving
safety that depend on the condition of the tires
and the maintenance of the specified tire pres-
sure.
Checking pressure
Only check tire inflation pressure when the tires
are cold, i.e. after a maximum of 1.25 miles/2 km
driving or when the vehicle has been parked for
at least 2 hours. When tires are warm, the tire
inflation pressure increases.
Check the tire inflation pressure regularly
and correct it if necessary, including com-
pact wheel: at least every two weeks and before
beginning a longer trip. If you fail to observe this
precaution you may be driving on tires with
incorrect tire pressures, a condition that can not
only compromise your vehicle's driving stability,
but also lead to tire damage and the risk of an
accident. Do not drive with a depressurized, i.e.
flat tire. A flat tire will seriously impair your vehi-
cle's handling and braking response. Attempts
to drive on a flat tire can lead to loss of control
over the vehicle.<
After correcting the inflation pressure(s),
always reinitialize the Flat Tire Monitor,
refer to page50.<
Inflation pressures for factory-installed
tires
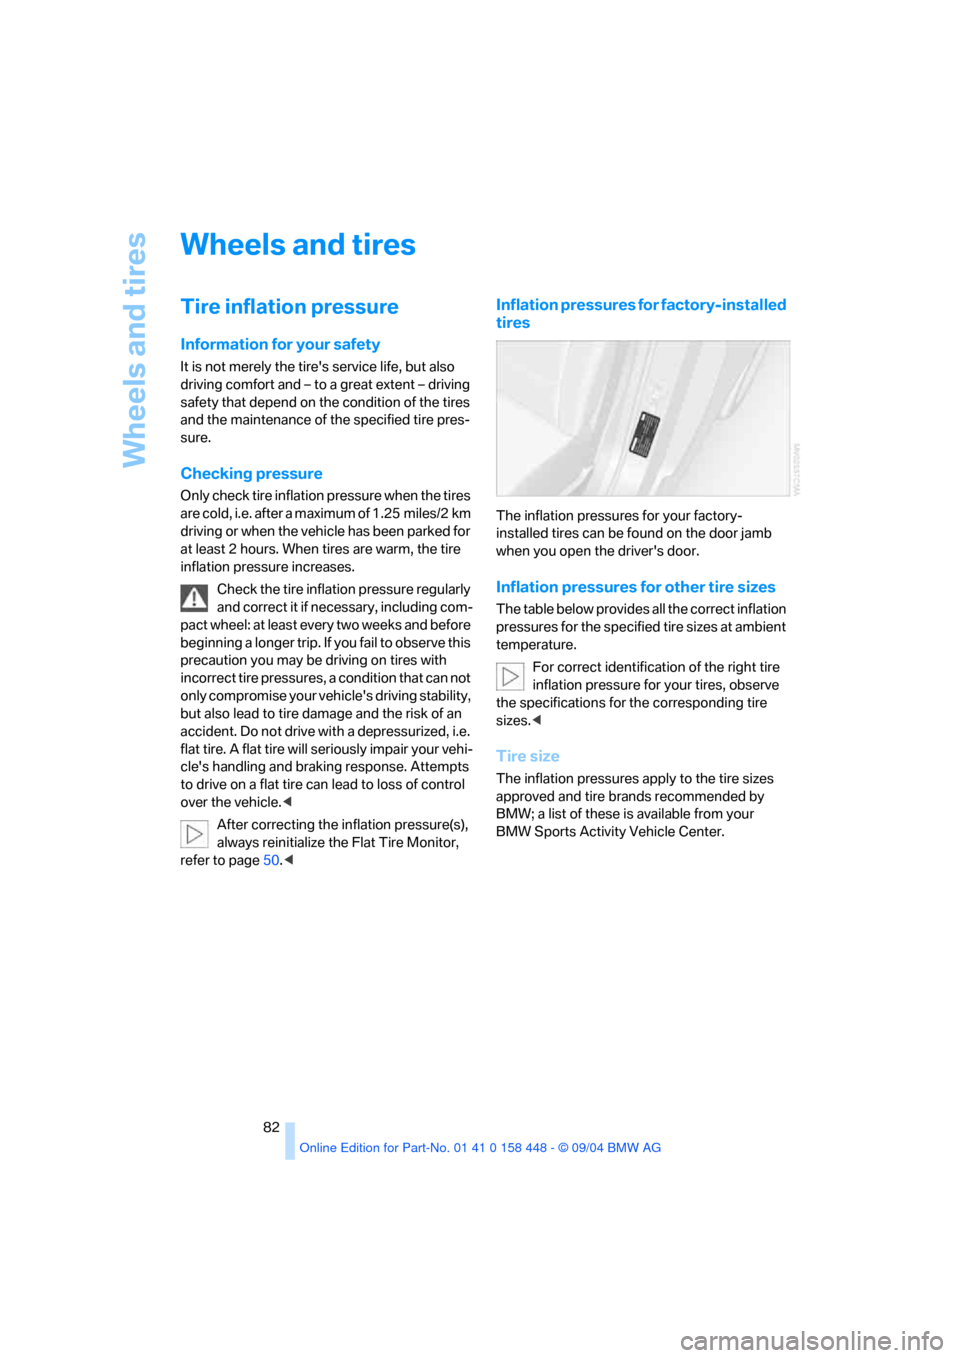
The inflation pressures for your factory-
installed tires can be found on the door jamb
when you open the driver's door.
Inflation pressures for other tire sizes
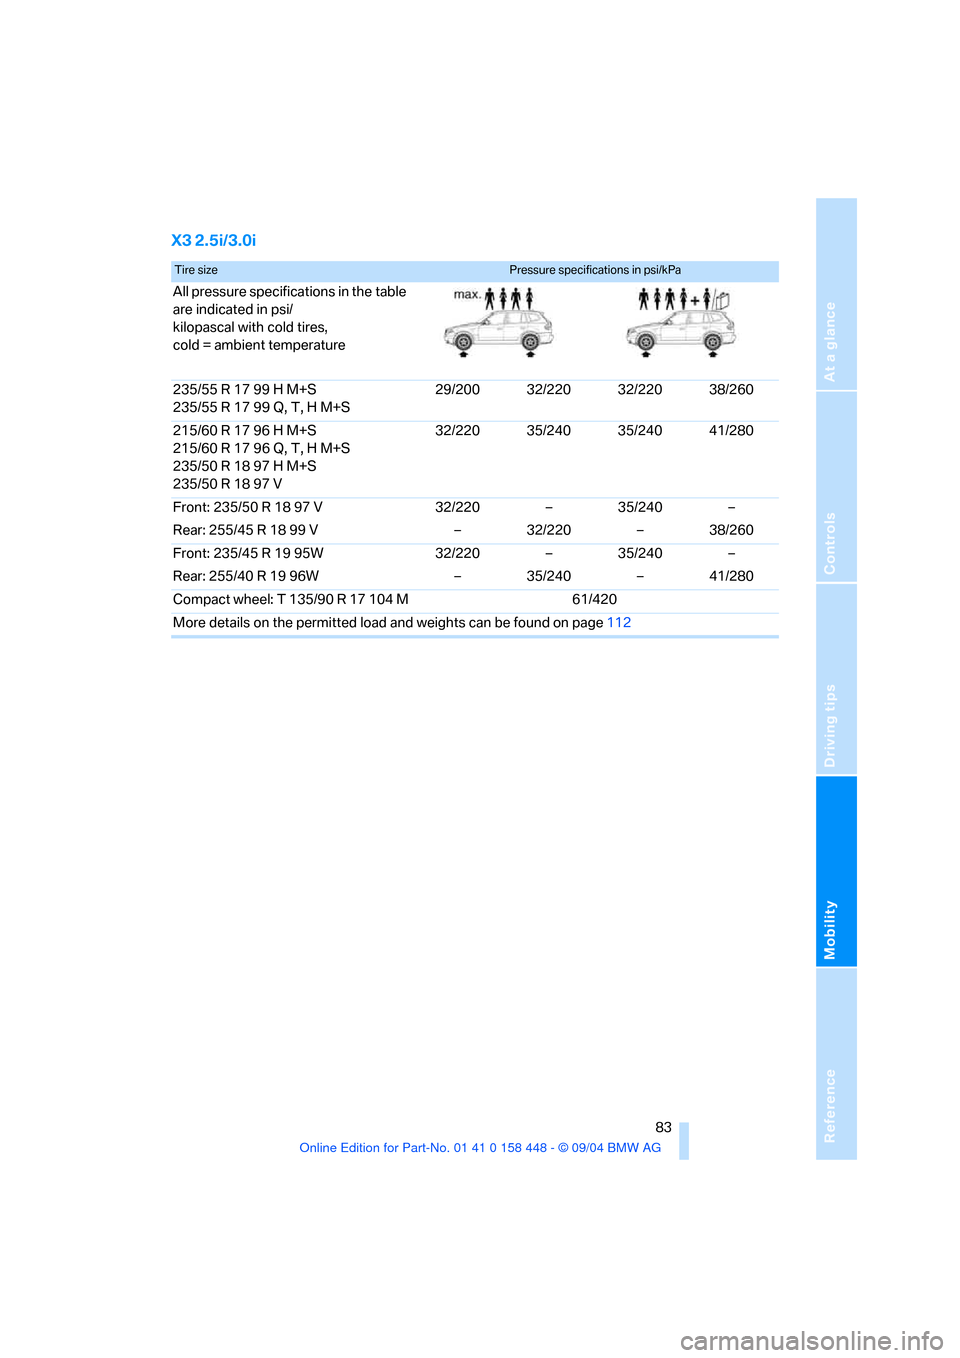
The table below provides all the correct inflation
pressures for the specified tire sizes at ambient
temperature.
For correct identification of the right tire
inflation pressure for your tires, observe
the specifications for the corresponding tire
sizes.<
Tire size
The inflation pressures apply to the tire sizes
approved and tire brands recommended by
BMW; a list of these is available from your
BMW Sports Activity Vehicle Center.
Page 84 of 126
Reference
At a glance
Controls
Driving tips
Mobility
83
X3 2.5i/3.0i
Tire sizePressure specifications in psi/kPa
All pressure specifications in the table
are indicated in psi/
kilopascal with cold tires,
cold = ambient temperature
235/55 R 17 99 H M+S
235/55 R 17 99 Q, T, H M+S29/200 32/220 32/220 38/260
215/60 R 17 96 H M+S
215/60 R 17 96 Q, T, H M+S
235/50 R 18 97 H M+S
235/50 R 18 97 V32/220 35/240 35/240 41/280
Front: 235/50 R 18 97 V
Rear: 255/45 R 18 99 V32/220
––
32/22035/240
––
38/260
Front: 235/45 R 19 95W
Rear: 255/40 R 19 96W32/220
––
35/24035/240
––
41/280
Compact wheel: T 135/90 R 17 104 M 61/420
More details on the permitted load and weights can be found on page112
Page 85 of 126
Wheels and tires
84
Tire identification marks
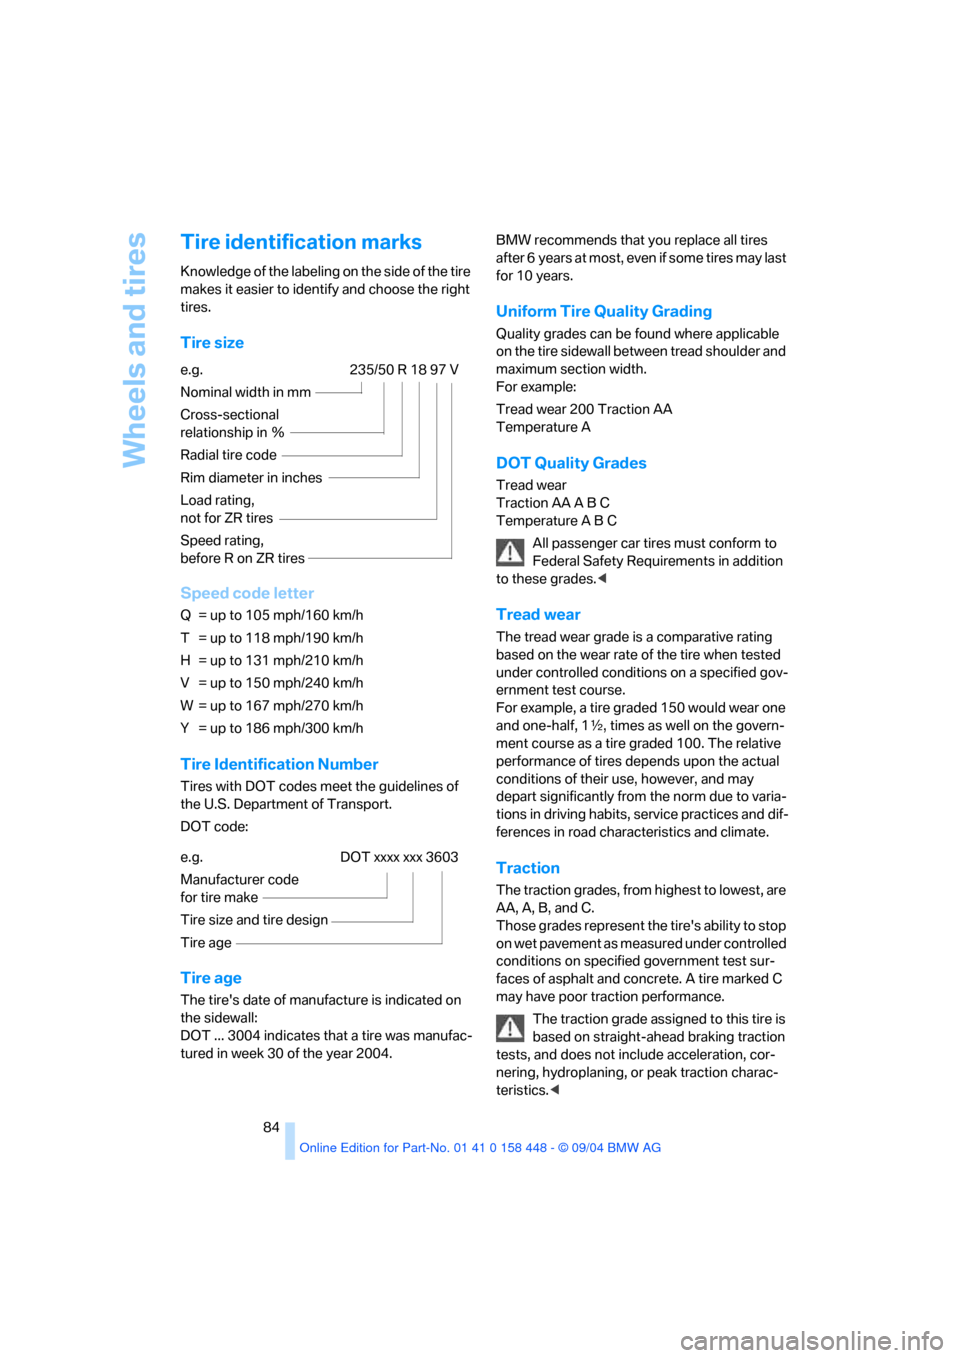
Knowledge of the labeling on the side of the tire
makes it easier to identify and choose the right
tires.
Tire size
Speed code letter
Q = up to 105 mph/160 km/h
T = up to 118 mph/190 km/h
H = up to 131 mph/210 km/h
V = up to 150 mph/240 km/h
W = up to 167 mph/270 km/h
Y = up to 186 mph/300 km/h
Tire Identification Number
Tires with DOT codes meet the guidelines of
the U.S. Department of Transport.
DOT code:
Tire age
The tire's date of manufacture is indicated on
the sidewall:
DOT ... 3004 indicates that a tire was manufac-
tured in week 30 of the year 2004.BMW recommends that you replace all tires
after 6 years at most, even if some tires may last
for 10 years.
Uniform Tire Quality Grading
Quality grades can be found where applicable
on the tire sidewall between tread shoulder and
maximum section width.
For example:
Tread wear 200 Traction AA
Temperature A
DOT Quality Grades
Tread wear
Traction AA A B C
Temperature A B C
All passenger car tires must conform to
Federal Safety Requirements in addition
to these grades.<
Tread wear
The tread wear grade is a comparative rating
based on the wear rate of the tire when tested
under controlled conditions on a specified gov-
ernment test course.
For example, a tire graded 150 would wear one
and one-half, 1γ, times as well on the govern-
ment course as a tire graded 100. The relative
performance of tires depends upon the actual
conditions of their use, however, and may
depart significantly from the norm due to varia-
tions in driving habits, service practices and dif-
ferences in road characteristics and climate.
Traction
The traction grades, from highest to lowest, are
AA, A, B, and C.
Those grades represent the tire's ability to stop
on wet pavement as measured under controlled
conditions on specified government test sur-
faces of asphalt and concrete. A tire marked C
may have poor traction performance.
The traction grade assigned to this tire is
based on straight-ahead braking traction
tests, and does not include acceleration, cor-
nering, hydroplaning, or peak traction charac-
teristics.< e.g. 235/50 R 18 97 V
Nominal width in mm
Cross-sectional
relationship in Ξ
Radial tire code
Rim diameter in inches
Load rating,
not for ZR tires
Speed rating,
before R on ZR tires
e.g. DOT xxxx xxx 3603
Manufacturer code
for tire make
Tire size and tire design
Tire age
Page 86 of 126
Reference
At a glance
Controls
Driving tips
Mobility
85
Temperature
The temperature grades are A, the highest, B
and C, representing the tire's resistance to the
generation of heat and its ability to dissipate
heat when tested under controlled conditions
on a specified indoor laboratory test wheel.
Sustained high temperature can cause the
material of the tire to degenerate and reduce
tire life, and excessive temperature can lead to
sudden tire failure. The grade C corresponds to
a level of performance which all passenger car
tires must meet under the Federal Motor Vehi-
cle Safety Standard No. 109. Grades B and A
represent higher levels of performance on the
laboratory test wheel than the minimum
required by law.
The temperature grade for this tire is
established for a tire that is properly
inflated and not overloaded. Excessive speed,
underinflation, or excessive loading, either sep-
arately or in combination, can cause heat
buildup and possible tire failure.<
M+S
Winter and all-season tires.
These have better winter properties than sum-
mer tires.
Tire condition
Inspect your tires frequently for tread wear,
signs of damage and for foreign objects lodged
in the tread. Check the tread pattern depth.
Tire tread
The tread depth should not drop below 0.12 in/
3 mm, although, for example, European legisla-
tion only specifies a minimum tread depth of
0.063 in/1.6 mm.
At tread depths below 0.12 in/3 mm, there is an
increased risk of high-speed hydroplaning,
even when only small amounts of water are
present on the road surface. As winter tires dis-
play a noticeable loss in their ability to cope with
cold-weather driving conditions once the tread
wears to below 0.16 in/4 mm, to ensure contin-ued safety you should always have such tires
replaced.
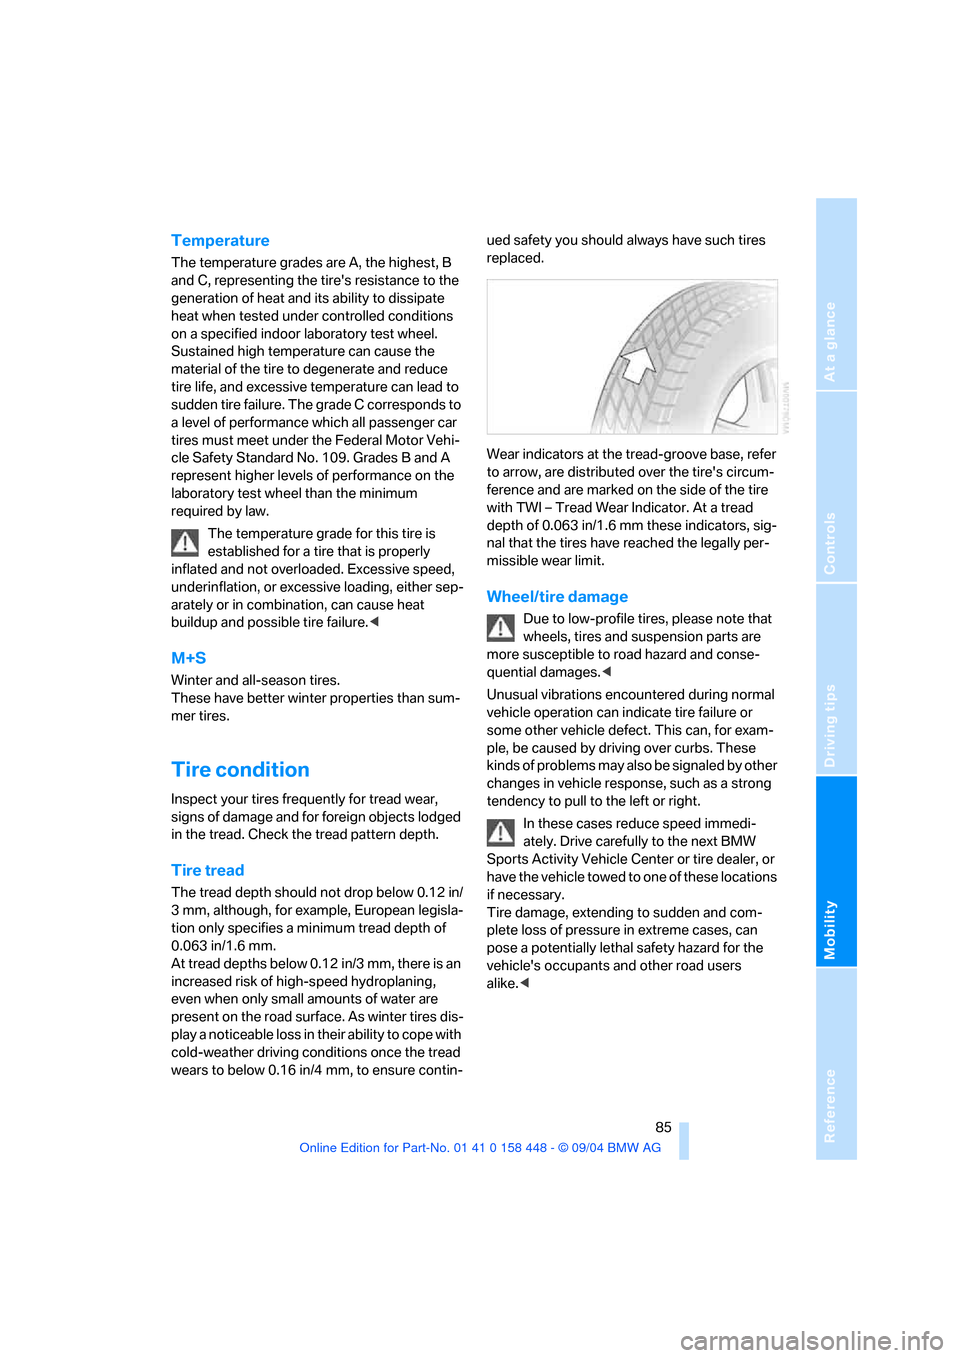
Wear indicators at the tread-groove base, refer
to arrow, are distributed over the tire's circum-
ference and are marked on the side of the tire
with TWI – Tread Wear Indicator. At a tread
depth of 0.063 in/1.6 mm these indicators, sig-
nal that the tires have reached the legally per-
missible wear limit.
Wheel/tire damage
Due to low-profile tires, please note that
wheels, tires and suspension parts are
more susceptible to road hazard and conse-
quential damages.<
Unusual vibrations encountered during normal
vehicle operation can indicate tire failure or
some other vehicle defect. This can, for exam-
ple, be caused by driving over curbs. These
kinds of problems may also be signaled by other
changes in vehicle response, such as a strong
tendency to pull to the left or right.
In these cases reduce speed immedi-
ately. Drive carefully to the next BMW
Sports Activity Vehicle Center or tire dealer, or
have the vehicle towed to one of these locations
if necessary.
Tire damage, extending to sudden and com-
plete loss of pressure in extreme cases, can
pose a potentially lethal safety hazard for the
vehicle's occupants and other road users
alike.<
Page 87 of 126
Wheels and tires
86
New wheels and tires
Have new wheels and tires installed only
by your BMW Sports Activity Vehicle
Center or tire shop that works according to
BMW repair procedures with correspondingly
trained personnel. If this work is not carried out
properly, there is a danger of subsequent dam-
age and related safety hazards.<
Retreaded tires
BMW does not recommend the use of
retreaded tires, as otherwise driving
safety may be reduced. The causes for this
include the possibly different tire casing struc-
tures and the often wide variations in their age,
which can result in a limited service life.<
The right wheels and tires
BMW recommends that you use only
wheel and tire combinations that BMW
has tested and approved for your particular
vehicle. Variations in factors such as manufac-
turing tolerances mean that even wheels and
tires with identical official size ratings could
actually have different dimensions than the
approved units – these differences could lead to
body contact, and with it the risk of severe acci-
dents. If non-approved wheels and tires are
used, BMW cannot evaluate their suitability,
and therefore cannot be held liable for driving
safety.<
You can ask your BMW Sports Activity Vehicle
Center for the correct wheel-and-tire combina-
tion.
The correct wheel-and-tire combination affects
various systems whose function would other-
wise be impaired, e.g. ABS, DSC or xDrive.
To maintain good handling and vehicle
response, use only tires of a single tread config-
uration from a single manufacturer. After a flat
tire, always remember to have the specified
wheel-and-tire combination remounted on the
vehicle as soon as possible.
Recommended tire sizes and brands
BMW tests certain tire brands for each tire size,
classifies them as road-safe and approves
them. These are available at a specialized
dealer, preferably your BMW Sports Activity
Vehicle Center. Observe any country-specific
regulations, e.g. on making a corresponding
entry in the vehicle documents.
The factory-mounted tires have been specially
selected to provide optimized performance
when installed on your vehicle; if properly cared
for, they will provide a combination of safety and
excellent ride comfort.
Special characteristics of winter tires
BMW recommends winter tires for use in cold
winter driving conditions. Although all-season
M+S tires provide better winter traction than
summer tires, they generally fail to provide the
same levels of cold-weather performance as
winter tires.
Observing speed ratings
Never exceed the maximum speed for
which the winter tires are rated. Unpro-
fessional attempts by laymen to service tires
can lead to damage and accidents. Have this
work performed by skilled professionals only.
The technicians at your BMW Sports Activity
V e h i c l e C e n t e r w i l l b e g l a d t o a s s i s t y o u w i t h t h e
required professional knowledge and special-
ized equipment.<
Storage
Store wheels or tires in a cool, dry place, pro-
tecting them against light whenever possible.
Protect the tires against contact with oil, grease
and fuel. Do not exceed the maximum tire infla-
tion pressure indicated on the side wall of the
tire.
Page 88 of 126
Reference
At a glance
Controls
Driving tips
Mobility
87
Snow chains*
Only certain snow chains have been tested by
BMW and classified and approved as safe. You
can obtain a list of these from your BMW Sports
Activity Vehicle Center. BMW recommends the
use of approved narrow-link snow chains only.
These snow chains are approved exclusively for
use on summer or winter tires in pairs on the
rear wheels.
Observe the manufacturer's instructions when
installing snow chains.
Do not exceed a vehicle speed of 30 mph/
50 km/h with snow chains mounted.
Snow chains may not be mounted on the fol-
lowing tires:
>255/45 R 18
>255/40 R 19
After mounting snow chains, do not ini-
tialize the Flat Tire Monitor.
When you are driving with snow chains, it can
be beneficial to switch off DSC briefly, refer to
page48.<
Page 89 of 126
Under the hood
88
Under the hood
Never attempt to perform any service or
repair operations on your vehicle without
the required professional technical training. If
you are not familiar with the regulations to be
observed, have work on your vehicle carried out
only by a BMW Sports Activity Vehicle Center
or a workshop that uses personnel trained in
accordance with BMW requirements. If this
work is not carried out properly, there is a dan-
ger of subsequent damage and related safety
hazards.<
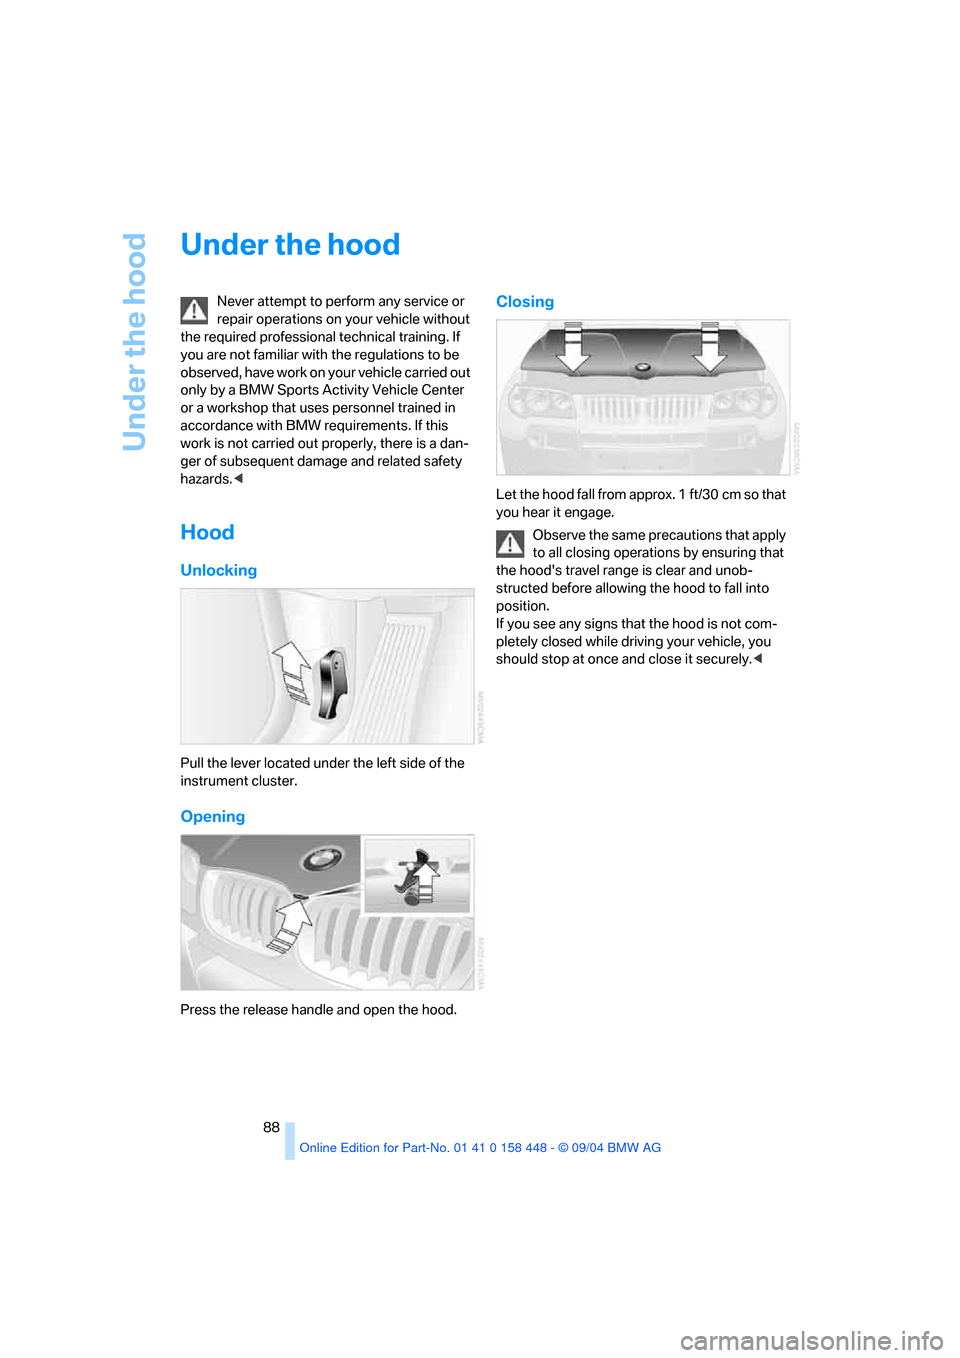
Hood
Unlocking
Pull the lever located under the left side of the
instrument cluster.
Opening
Press the release handle and open the hood.
Closing
Let the hood fall from approx. 1 ft/30 cm so that
you hear it engage.
Observe the same precautions that apply
to all closing operations by ensuring that
the hood's travel range is clear and unob-
structed before allowing the hood to fall into
position.
If you see any signs that the hood is not com-
pletely closed while driving your vehicle, you
should stop at once and close it securely.<
Page 90 of 126
Reference
At a glance
Controls
Driving tips
Mobility
89
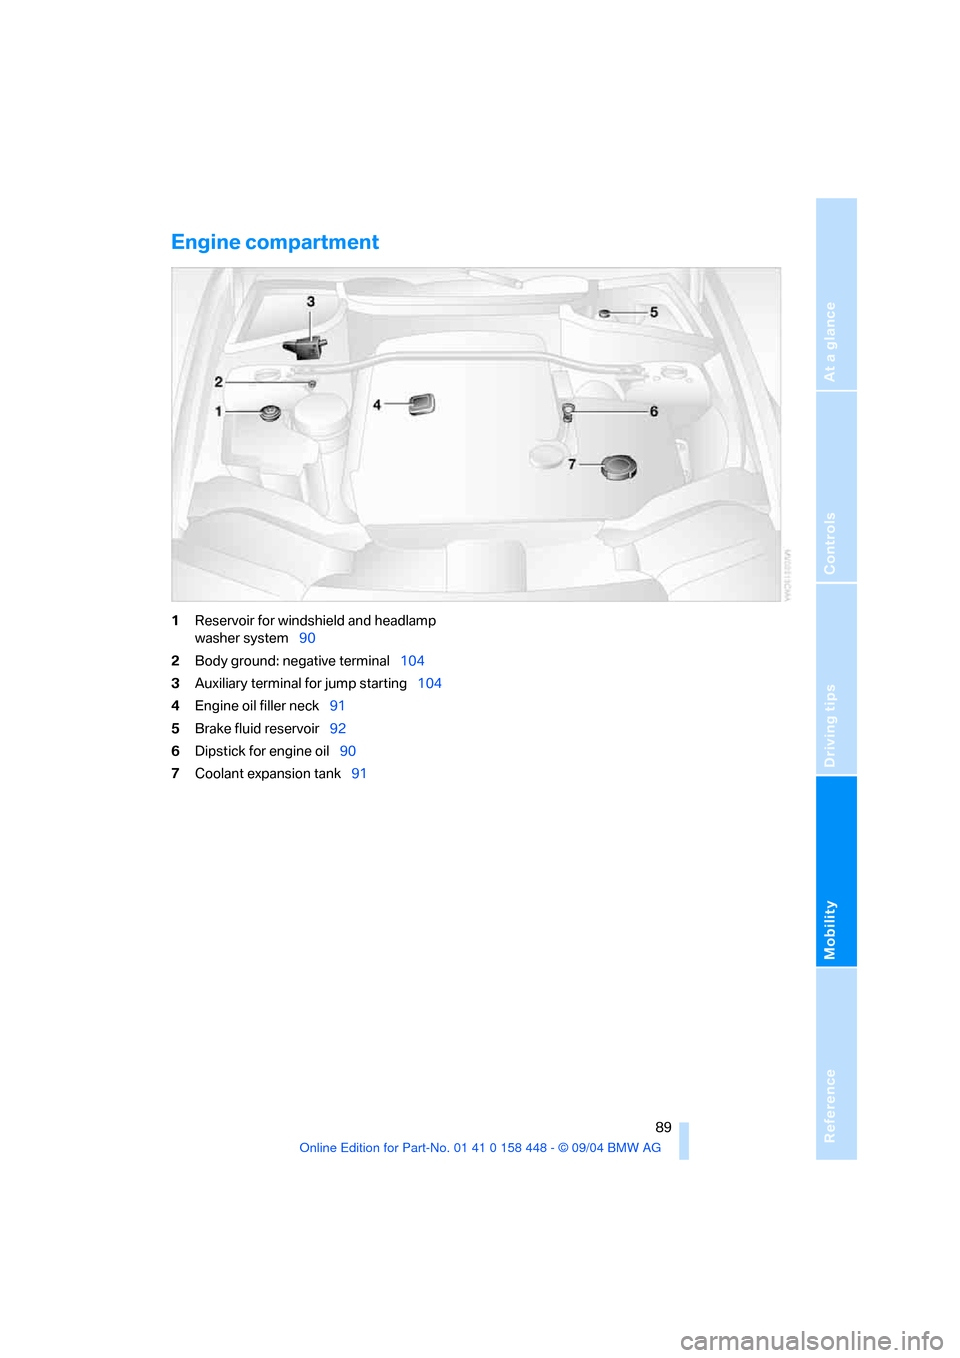
Engine compartment
1Reservoir for windshield and headlamp
washer system90
2Body ground: negative terminal104
3Auxiliary terminal for jump starting104
4Engine oil filler neck91
5Brake fluid reservoir92
6Dipstick for engine oil90
7Coolant expansion tank91