rear entertainment BMW X3 XDRIVE 35I 2011 Owner's Manual
[x] Cancel search | Manufacturer: BMW, Model Year: 2011, Model line: X3 XDRIVE 35I, Model: BMW X3 XDRIVE 35I 2011Pages: 262, PDF Size: 11.2 MB
Page 111 of 262
no one reaches into the area of movement of the
rear seat backrests when the middle section is
folded down. Otherwise, injury or damage may
result.◀
Locking the backrest
Before letting passengers ride in the rear,
engage the seat backrests, locking them in
place. Otherwise, the restraining effect of the
safety belts may be limited in an accident.◀
Ensure that the lock is securely engaged
When folding back the backrest, be sure
that it locks in place securely. The red warning
field in the control display disappears. If it is not
properly engaged, transported cargo could en‐
ter the passenger compartment during braking
or evasive maneuvers and endanger the vehicle
occupants.◀
Using the middle safety belt
If the middle safety belt in the rear is used,
the larger section of the backrest must be
locked. Otherwise, the safety belt will not have
a restraining effect.◀
Folding down the right side
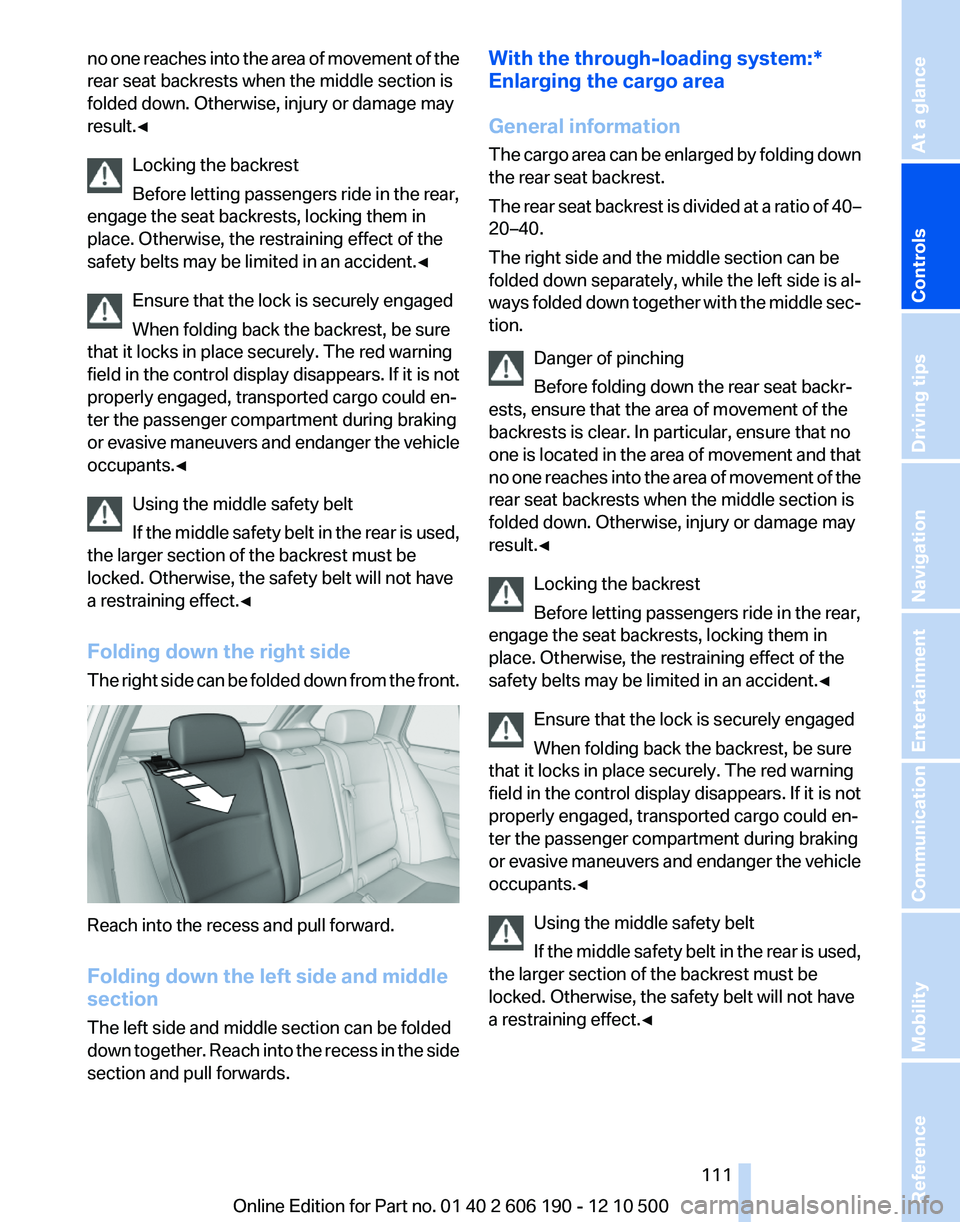
The right side can be folded down from the front.
Reach into the recess and pull forward.
Folding down the left side and middle
section
The left side and middle section can be folded
down together. Reach into the recess in the side
section and pull forwards.
With the through-loading system:*
Enlarging the cargo area
General information
The cargo area can be enlarged by folding down
the rear seat backrest.
The rear seat backrest is divided at a ratio of 40–
20–40.
The right side and the middle section can be
folded down separately, while the left side is al‐
ways folded down together with the middle sec‐
tion.
Danger of pinching
Before folding down the rear seat backr‐
ests, ensure that the area of movement of the
backrests is clear. In particular, ensure that no
one is located in the area of movement and that
no one reaches into the area of movement of the
rear seat backrests when the middle section is
folded down. Otherwise, injury or damage may
result.◀
Locking the backrest
Before letting passengers ride in the rear,
engage the seat backrests, locking them in
place. Otherwise, the restraining effect of the
safety belts may be limited in an accident.◀
Ensure that the lock is securely engaged
When folding back the backrest, be sure
that it locks in place securely. The red warning
field in the control display disappears. If it is not
properly engaged, transported cargo could en‐
ter the passenger compartment during braking
or evasive maneuvers and endanger the vehicle
occupants.◀
Using the middle safety belt
If the middle safety belt in the rear is used,
the larger section of the backrest must be
locked. Otherwise, the safety belt will not have
a restraining effect.◀Seite 111111
Online Edition for Part no. 01 40 2 606 190 - 12 10 500
ReferenceMobilityCommunicationEntertainmentNavigationDriving tipsControlsAt a glance
Page 115 of 262
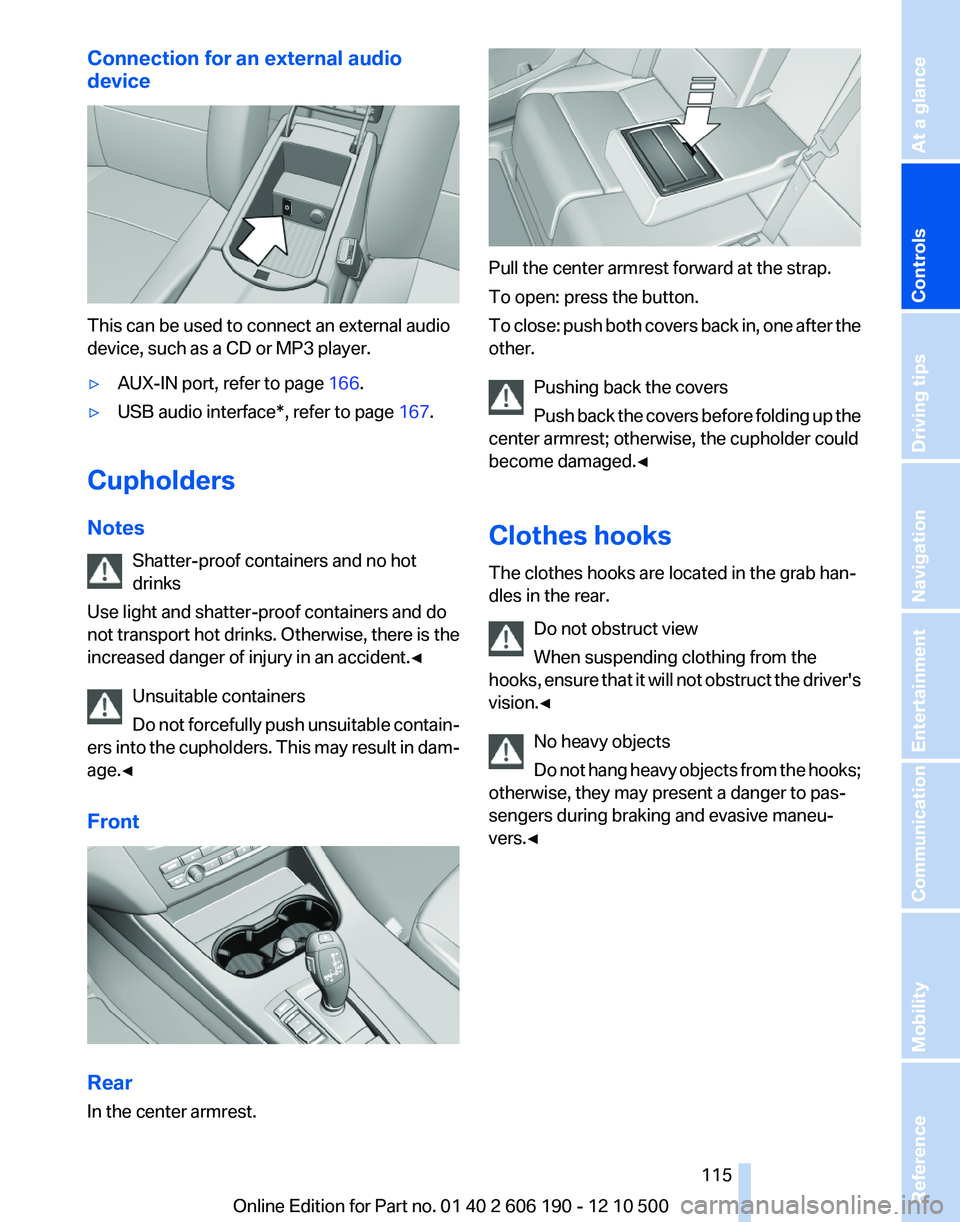
Connection for an external audio
device
This can be used to connect an external audio
device, such as a CD or MP3 player.
▷AUX-IN port, refer to page 166.▷USB audio interface*, refer to page 167.
Cupholders
Notes Shatter-proof containers and no hot
drinks
Use light and shatter-proof containers and do
not transport hot drinks. Otherwise, there is the
increased danger of injury in an accident.◀
Unsuitable containers
Do not forcefully push unsuitable contain‐
ers into the cupholders. This may result in dam‐
age.◀
Front
Rear
In the center armrest.
Pull the center armrest forward at the strap.
To open: press the button.
To close: push both covers back in, one after the
other.
Pushing back the covers
Push back the covers before folding up the
center armrest; otherwise, the cupholder could
become damaged.◀
Clothes hooks
The clothes hooks are located in the grab han‐
dles in the rear.
Do not obstruct view
When suspending clothing from the
hooks, ensure that it will not obstruct the driver's
vision.◀
No heavy objects
Do not hang heavy objects from the hooks;
otherwise, they may present a danger to pas‐
sengers during braking and evasive maneu‐
vers.◀
Seite 115115
Online Edition for Part no. 01 40 2 606 190 - 12 10 500
ReferenceMobilityCommunicationEntertainmentNavigationDriving tipsControlsAt a glance
Page 123 of 262
Load
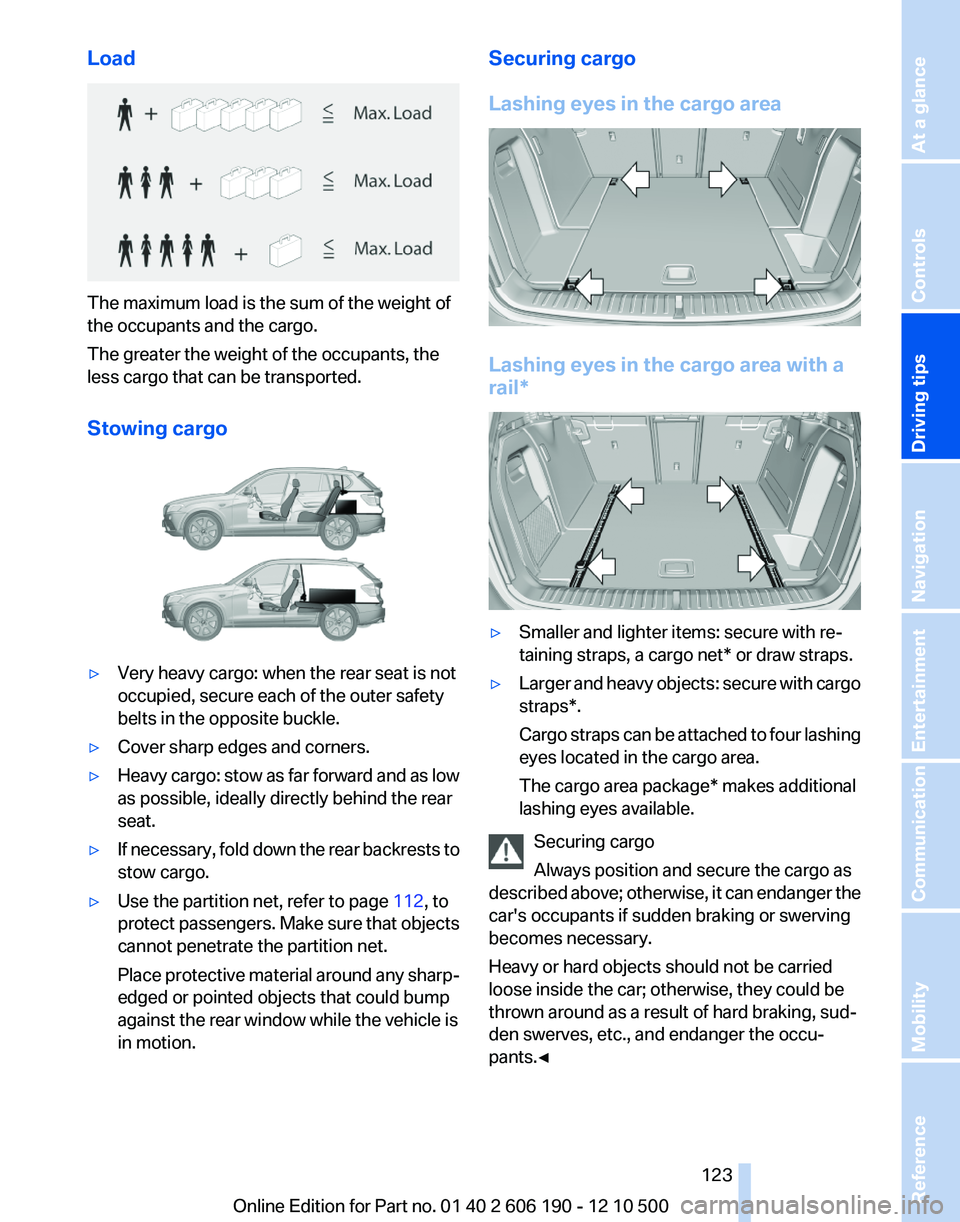
The maximum load is the sum of the weight of
the occupants and the cargo.
The greater the weight of the occupants, the
less cargo that can be transported.
Stowing cargo
▷Very heavy cargo: when the rear seat is not
occupied, secure each of the outer safety
belts in the opposite buckle.▷Cover sharp edges and corners.▷Heavy cargo: stow as far forward and as low
as possible, ideally directly behind the rear
seat.▷If necessary, fold down the rear backrests to
stow cargo.▷Use the partition net, refer to page 112, to
protect passengers. Make sure that objects
cannot penetrate the partition net.
Place protective material around any sharp-
edged or pointed objects that could bump
against the rear window while the vehicle is
in motion.Securing cargo
Lashing eyes in the cargo area
Lashing eyes in the cargo area with a
rail*
▷Smaller and lighter items: secure with re‐
taining straps, a cargo net* or draw straps.▷Larger and heavy objects: secure with cargo
straps*.
Cargo straps can be attached to four lashing
eyes located in the cargo area.
The cargo area package* makes additional
lashing eyes available.
Securing cargo
Always position and secure the cargo as
described above; otherwise, it can endanger the
car's occupants if sudden braking or swerving
becomes necessary.
Heavy or hard objects should not be carried
loose inside the car; otherwise, they could be
thrown around as a result of hard braking, sud‐
den swerves, etc., and endanger the occu‐
pants.◀
Seite 123123
Online Edition for Part no. 01 40 2 606 190 - 12 10 500
ReferenceMobilityCommunicationEntertainmentNavigationDriving tipsControlsAt a glance
Page 125 of 262
Look well ahead when driving
Avoid unnecessary acceleration and braking.
By maintaining a suitable distance to the vehicle
driving ahead of you.
Driving smoothly and looking ahead reduces
fuel consumption.
Use coasting conditions
When approaching a red light, take your foot off
the accelerator and coast to a halt in the highest
applicable gear.
The flow of fuel is interrupted while coasting.
Switch off the engine during longer
stops
Switch off the engine during longer stops, e.g.,
at traffic lights, railroad crossings or in traffic
congestion.
Fuel savings are achieved after the vehicle is
switched off for only approx. 4 seconds.
Switch off any functions that are not
currently needed
Functions such as seat heating and the rear win‐
dow defroster require a lot of energy and con‐
sume additional fuel, especially in city and stop-
and-go traffic.
Therefore, switch off these functions if they are
not actually needed.
Have maintenance carried out
Have vehicles maintained regularly to achieve
optimal vehicle economy and operating life.
Have the maintenance carried out by your serv‐
ice center.
Please also note the BMW Maintenance Sys‐
tem, refer to page 219.Seite 125125
Online Edition for Part no. 01 40 2 606 190 - 12 10 500
ReferenceMobilityCommunicationEntertainmentNavigationDriving tipsControlsAt a glance
Page 213 of 262
Retreaded tires
Possibly substantial variations in the de‐
sign and age of the tire casing structures can
limit service life and have a negative impact on
road safety.◀
Winter tires
The manufacturer of your vehicle recommends
winter tires for winter roads or at temperatures
below +45 ℉/+7 ℃.
Although so-called all-season M+S tires do pro‐
vide better winter traction than summer tires,
they do not provide the same level of perform‐
ance as winter tires.
Maximum speed of winter tires
If the maximum speed of the vehicle is higher
than the permissible speed for the winter tires,
then display a corresponding sign in the field of
vision. You can obtain this sign from the tire spe‐
cialist or from your service center.
Maximum speed for winter tires
Do not exceed the maximum speed for the
winter tires; otherwise, tire damage and acci‐
dents can occur.◀
Run-flat tires
For your own safety, only use run-flat tires. No
spare tire is available in the case of a flat tire. Your
service center will be glad to advise you.
Rotating wheels between axles
The manufacturer of your vehicle advises
against swapping wheels between the front and
rear axles.
This can impair the handling characteristics.
Storage
Store wheels and tires in a cool, dry place with
as little exposure to light as possible.
Always protect tires against all contact with oil,
grease and fuels.
Do not exceed the maximum tire inflation pres‐
sure indicated on the side wall of the tire.Run-flat tires*
Label
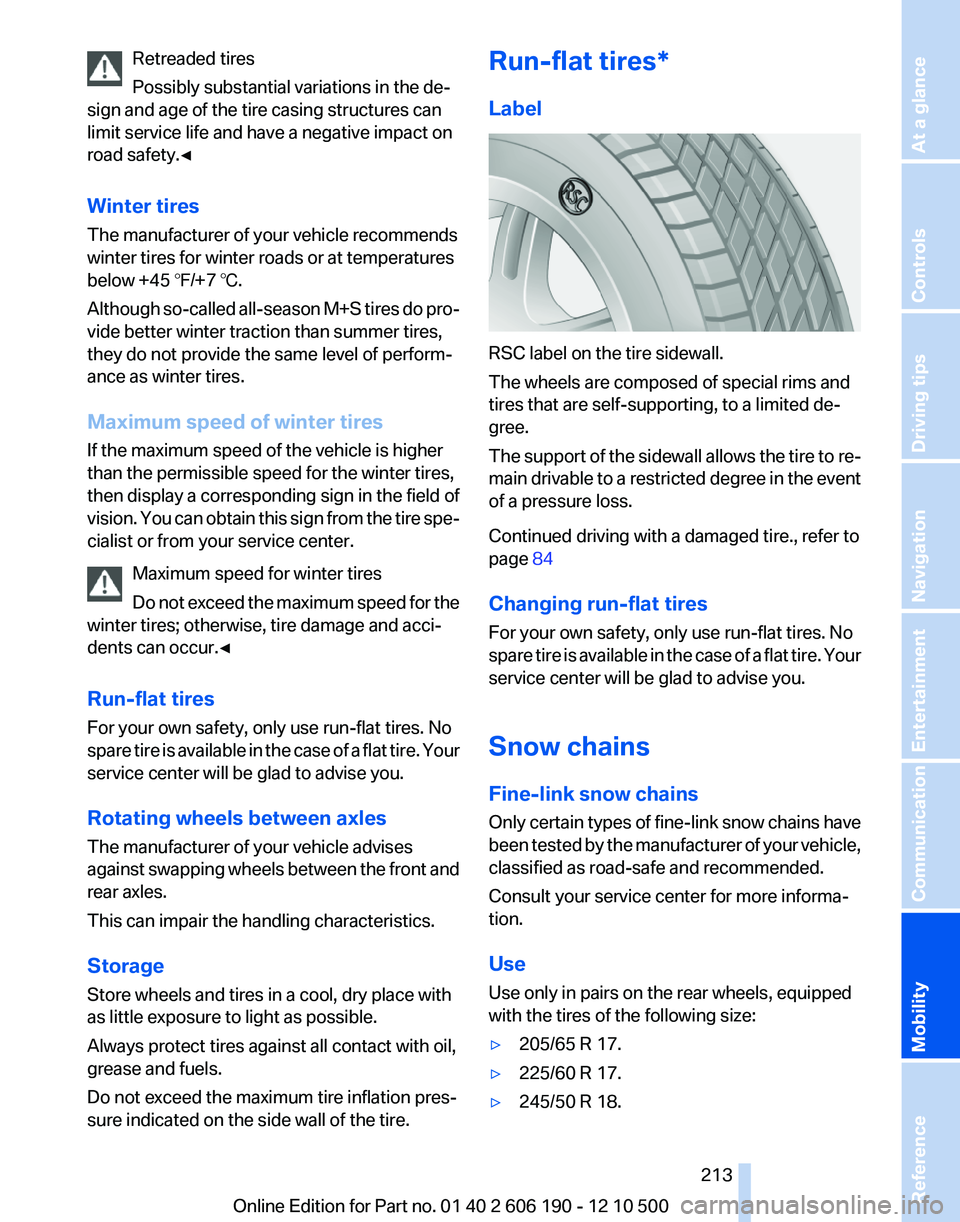
RSC label on the tire sidewall.
The wheels are composed of special rims and
tires that are self-supporting, to a limited de‐
gree.
The support of the sidewall allows the tire to re‐
main drivable to a restricted degree in the event
of a pressure loss.
Continued driving with a damaged tire., refer to
page 84
Changing run-flat tires
For your own safety, only use run-flat tires. No
spare tire is available in the case of a flat tire. Your
service center will be glad to advise you.
Snow chains
Fine-link snow chains
Only certain types of fine-link snow chains have
been tested by the manufacturer of your vehicle,
classified as road-safe and recommended.
Consult your service center for more informa‐
tion.
Use
Use only in pairs on the rear wheels, equipped
with the tires of the following size:
▷205/65 R 17.▷225/60 R 17.▷245/50 R 18.Seite 213213
Online Edition for Part no. 01 40 2 606 190 - 12 10 500
ReferenceMobilityCommunicationEntertainmentNavigationDriving tipsControlsAt a glance
Page 221 of 262
Replacing componentsTool kit
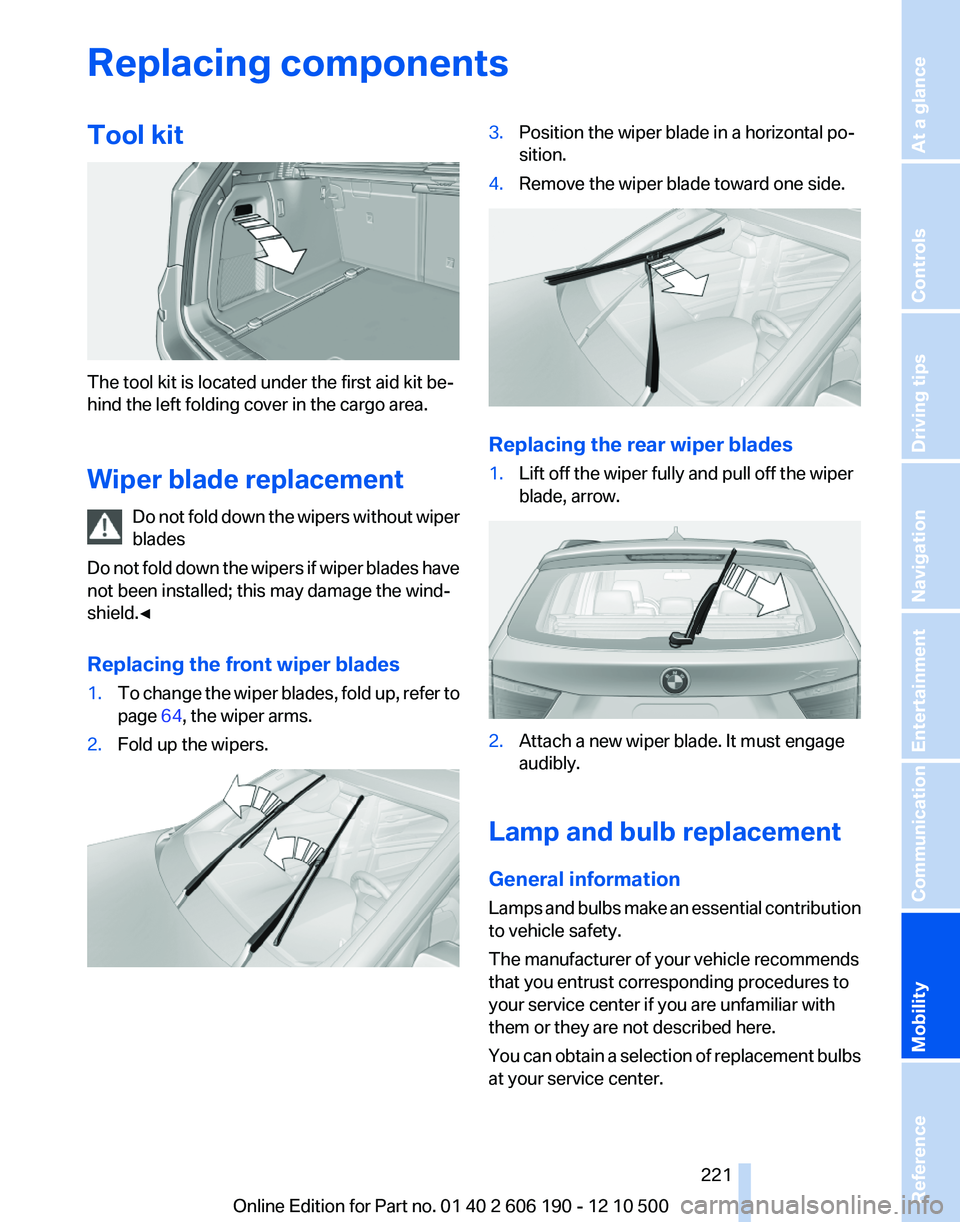
The tool kit is located under the first aid kit be‐
hind the left folding cover in the cargo area.
Wiper blade replacement Do not fold down the wipers without wiper
blades
Do not fold down the wipers if wiper blades have
not been installed; this may damage the wind‐
shield.◀
Replacing the front wiper blades
1.To change the wiper blades, fold up, refer to
page 64, the wiper arms.2.Fold up the wipers.3.Position the wiper blade in a horizontal po‐
sition.4.Remove the wiper blade toward one side.
Replacing the rear wiper blades
1.Lift off the wiper fully and pull off the wiper
blade, arrow.2.Attach a new wiper blade. It must engage
audibly.
Lamp and bulb replacement
General information
Lamps and bulbs make an essential contribution
to vehicle safety.
The manufacturer of your vehicle recommends
that you entrust corresponding procedures to
your service center if you are unfamiliar with
them or they are not described here.
You can obtain a selection of replacement bulbs
at your service center.
Seite 221221
Online Edition for Part no. 01 40 2 606 190 - 12 10 500
ReferenceMobilityCommunicationEntertainmentNavigationDriving tipsControlsAt a glance
Page 231 of 262
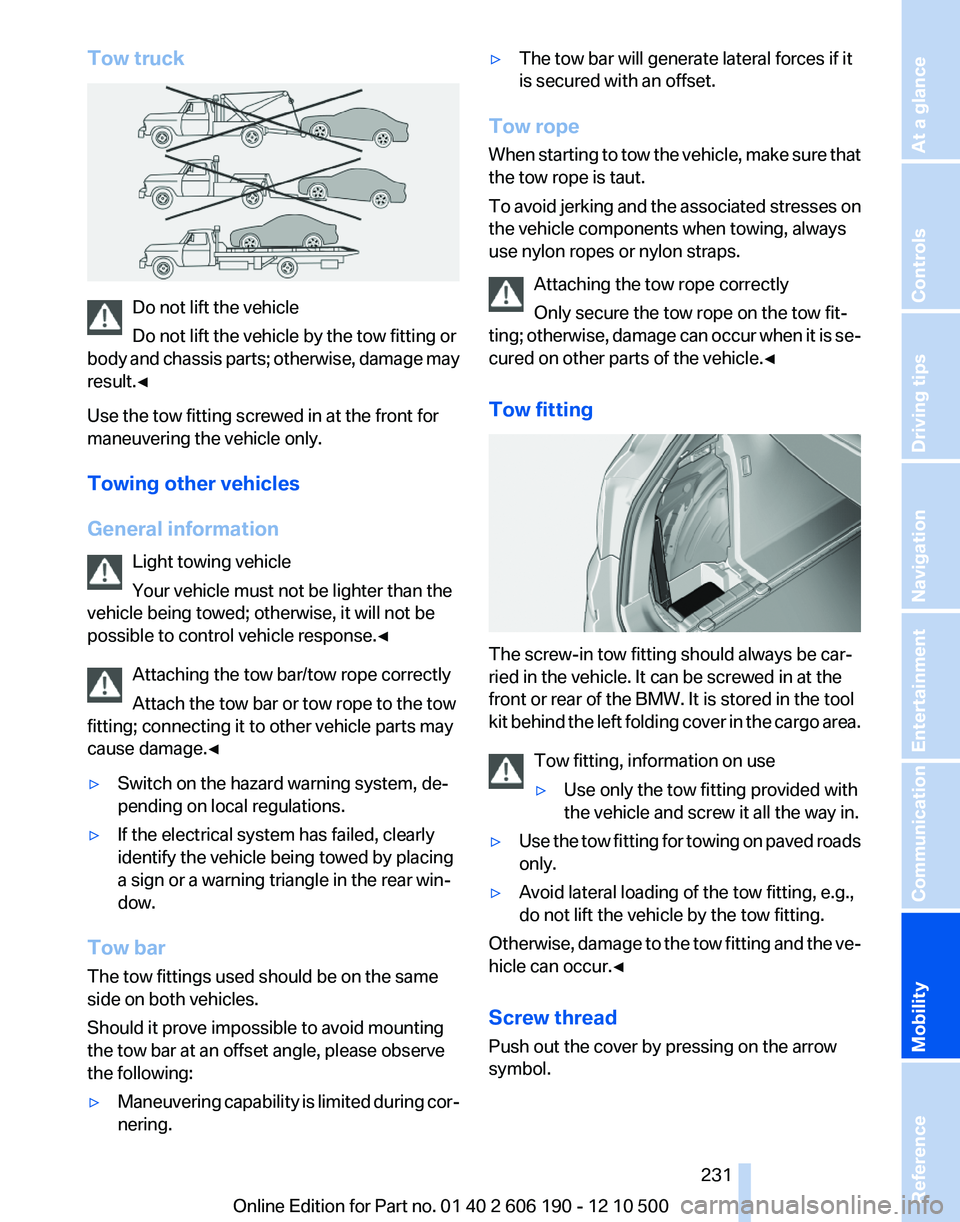
Tow truck
Do not lift the vehicle
Do not lift the vehicle by the tow fitting or
body and chassis parts; otherwise, damage may
result.◀
Use the tow fitting screwed in at the front for
maneuvering the vehicle only.
Towing other vehicles
General information Light towing vehicle
Your vehicle must not be lighter than the
vehicle being towed; otherwise, it will not be
possible to control vehicle response.◀
Attaching the tow bar/tow rope correctly
Attach the tow bar or tow rope to the tow
fitting; connecting it to other vehicle parts may
cause damage.◀
▷Switch on the hazard warning system, de‐
pending on local regulations.▷If the electrical system has failed, clearly
identify the vehicle being towed by placing
a sign or a warning triangle in the rear win‐
dow.
Tow bar
The tow fittings used should be on the same
side on both vehicles.
Should it prove impossible to avoid mounting
the tow bar at an offset angle, please observe
the following:
▷Maneuvering capability is limited during cor‐
nering.▷The tow bar will generate lateral forces if it
is secured with an offset.
Tow rope
When starting to tow the vehicle, make sure that
the tow rope is taut.
To avoid jerking and the associated stresses on
the vehicle components when towing, always
use nylon ropes or nylon straps.
Attaching the tow rope correctly
Only secure the tow rope on the tow fit‐
ting; otherwise, damage can occur when it is se‐
cured on other parts of the vehicle.◀
Tow fitting
The screw-in tow fitting should always be car‐
ried in the vehicle. It can be screwed in at the
front or rear of the BMW. It is stored in the tool
kit behind the left folding cover in the cargo area.
Tow fitting, information on use
▷Use only the tow fitting provided with
the vehicle and screw it all the way in.▷Use the tow fitting for towing on paved roads
only.▷Avoid lateral loading of the tow fitting, e.g.,
do not lift the vehicle by the tow fitting.
Otherwise, damage to the tow fitting and the ve‐
hicle can occur.◀
Screw thread
Push out the cover by pressing on the arrow
symbol.
Seite 231231
Online Edition for Part no. 01 40 2 606 190 - 12 10 500
ReferenceMobilityCommunicationEntertainmentNavigationDriving tipsControlsAt a glance
Page 241 of 262
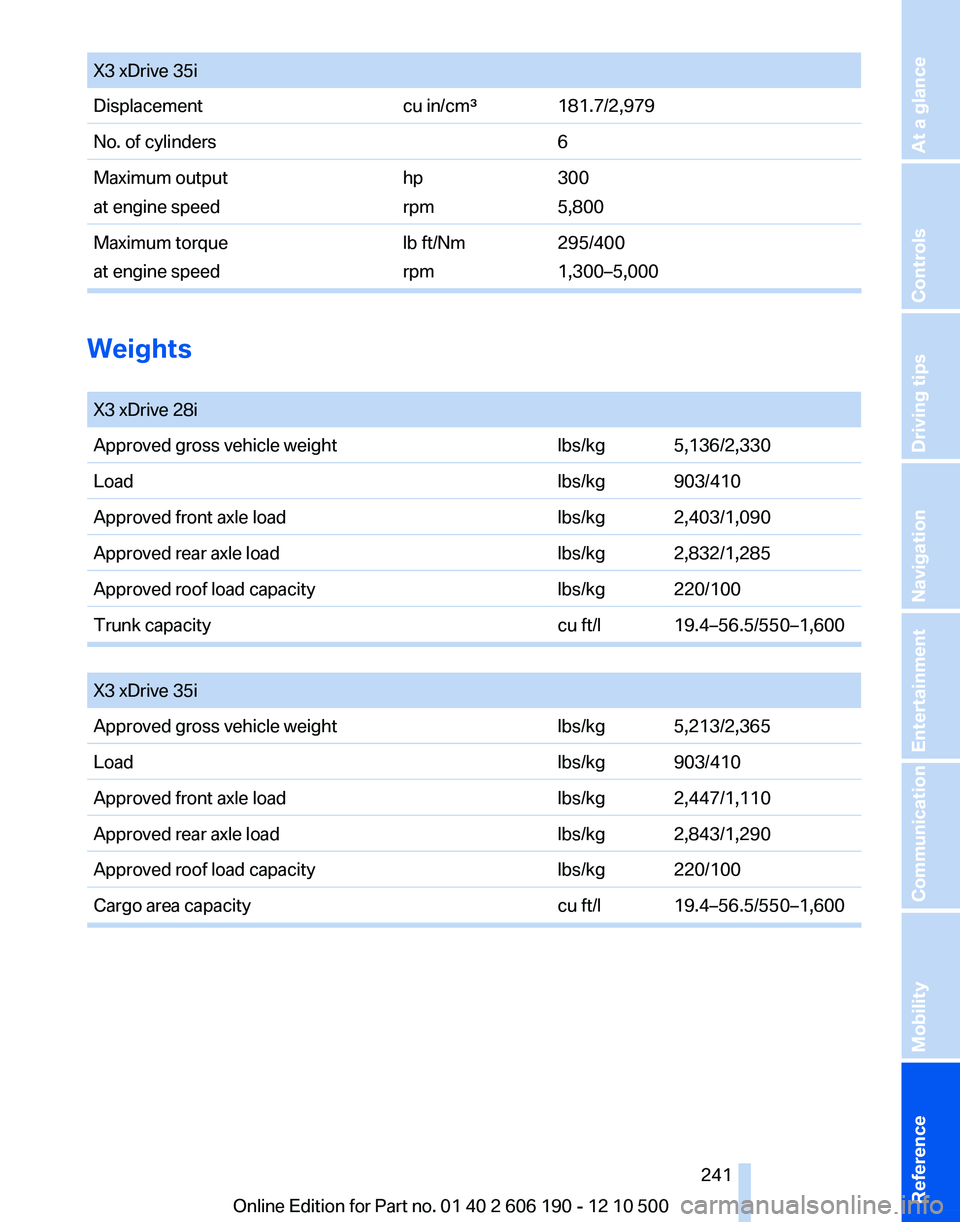
X3 xDrive 35iDisplacementcu in/cm³181.7/2,979No. of cylinders6Maximum output
at engine speedhp
rpm300
5,800Maximum torque
at engine speedlb ft/Nm
rpm295/400
1,300–5,000
Weights
X3 xDrive 28iApproved gross vehicle weightlbs/kg5,136/2,330Loadlbs/kg903/410Approved front axle loadlbs/kg2,403/1,090Approved rear axle loadlbs/kg2,832/1,285Approved roof load capacitylbs/kg220/100Trunk capacitycu ft/l19.4–56.5/550–1,600
X3 xDrive 35iApproved gross vehicle weightlbs/kg5,213/2,365Loadlbs/kg903/410Approved front axle loadlbs/kg2,447/1,110Approved rear axle loadlbs/kg2,843/1,290Approved roof load capacitylbs/kg220/100Cargo area capacitycu ft/l19.4–56.5/550–1,600Seite 241241
Online Edition for Part no. 01 40 2 606 190 - 12 10 500
ReferenceMobilityCommunicationEntertainmentNavigationDriving tipsControlsAt a glance
Page 253 of 262
Brake force display 85
Brake lamps, brake force dis‐ play 85
Brake lights, adaptive 85
Brake pads, breaking in 120
Braking, notes 121
Breakdown assis‐ tance 228, 229
Breaking in 120
Brightness of Control Dis‐ play 73
Bulb replacement 221
Bulb replacement, front 222
Bulb replacement, rear 225
Bulbs and lamps 221
Button, Start/Stop 58
C
Calendar 189
California Proposition 65 Warning 7
Camera, backup camera 97
Camera, care 235
Camera, Top View 99
Can holder, refer to Cu‐ pholder 115
Car battery 227
Car care products 234
Care, displays 235
Care, vehicle 234
Cargo 122
Cargo area 110
Cargo area, enlarg‐ ing 110 , 111
Cargo area lid 39
Cargo area, storage compart‐ ments 116
Cargo straps, securing cargo 123
Car key, refer to Remote con‐ trol 32
Carpet, care 235
Car wash 233
Catalytic converter, refer to Hot exhaust system 120
CBS Condition Based Serv‐ ice 219 CD/DVD 155
CDs, storing 162
Cell phone 176
Center armrest 114
Center console 17
Central locking system 35
Central screen, refer to Control Display 19
Changes, technical, refer to Safety 6
Changing parts 221
Changing wheels/tires 212
Check Control 74
Children, seating position 55
Children, transporting safely 55
Child restraint fixing sys‐ tem 55
Child restraint fixing system LATCH 56
Child restraint fixing systems, mounting 55
Child-safety locks 57
Child seat, mounting 55
Child seats 55
Chrome parts, care 234
Cigarette lighter 108
Cleaning, displays 235
Climate control 101, 103
Clock 69
Closing/opening from in‐ side 38
Closing/opening via door lock 38
Closing/opening with remote control 36
Clothes hooks 115
Combination instrument 13
Combination instrument, elec‐ tronic displays 15
Combination switch, refer to Turn signals 61
Combination switch, refer to Wiper system 62
Comfort Access 41
Computer 70
Concierge service 196 Condensation on win‐
dows 102, 105
Condensation under the vehi‐ cle 122
Condition Based Service CBS 219
Confirmation signal 37
Contacts 185
Control Display 19
Control Display, settings 72
Controller 19
Control systems, driving sta‐ bility 86
Convenient opening 36
Coolant 218
Cooling function 102, 105
Cooling, maximum 104
Cooling system 218
Corrosion on brake discs 122
Cruise control 91
Cruising range 67
Cupholder 115
Current fuel consumption 68
Current location, storing 130
Customer Relations 200
D
Damage, tires 211
Damping control, dynamic 88
Data, technical 238
Date 69
Daytime running lights 77
Defrosting, refer to Windows, defrosting 102, 105
Destination distance 70
Destination guidance 135
Destination guidance with in‐ termediate destinations 134
Destination input, naviga‐ tion 128
Digital clock 69
Digital radio 149
Dimensions 238
Dimmable mirrors 54
Direction indicator, refer to Turn signals 61
Displacement, engine 240 Seite 253253
Online Edition for Part no. 01 40 2 606 190 - 12 10 500
ReferenceMobilityCommunicationEntertainmentNavigationDriving tipsControlsAt a glance
Page 255 of 262
Fuel filler flap 204
Fuel gauge 67
Fuel quality 206
Fuel, tank capacity 242
Fuse 227
G
Garage door opener, refer to Integrated universal remote
control 107
Gas station recommenda‐ tion 137
Gear change, automatic trans‐ mission 65
General driving notes 120
Glass sunroof, refer to Panor‐ amic glass sunroof 45
Glove compartment 114
GPS navigation, refer to Navi‐ gation system 128
Gross vehicle weight, ap‐ proved 241
Gross weight, permissible for trailer towing 241
H
Hand brake, refer to Parking brake 59
Hand-held transmitter, alter‐ nating code 108
Hazard warning flashers 228
HDC Hill Descent Control 87
HD Radio 149
Head airbags 80
Headlamp control, auto‐ matic 77
Headlamp courtesy delay fea‐ ture 76
Headlamp courtesy delay fea‐ ture via remote control 36
Headlamp flasher 62
Headlamp flasher, bulb re‐ placement 223
Headlamp glass 222
Headlamps 222
Headlamps, care 234 Headlamp washer system 62
Headliner 18
Head restraints 47
Head restraints, front 51
Head restraints, rear 51
Head-up Display 99
Head-up Display, care 235
Heavy cargo, stowing 123
Height, seats 47
Height, vehicle 238
High-beam Assistant 78
High beams 62
High beams/low beams, refer to High-beam Assistant 78
High beams, bulb replace‐ ment 223
Hill Descent Control HDC 87
Hills 121
Holder for beverages 115
Homepage 6
Hood 215
Horn 12
Hot exhaust system 120
House number, entering for navigation 129
Hydroplaning 121
I
Ice warning, refer to External temperature warning 69
Icy roads, refer to External temperature warning 69
Identification marks, tires 210
Identification number, refer to Engine compartment 215
iDrive 19
Ignition key, refer to Remote control 32
Ignition off 58
Ignition on 58
Indication of a flat tire 83
Indicator and warning mes‐ sages 14
Indicator lamps 14
Individual air distribu‐ tion 101, 103 Individual settings, refer to
Personal Profile 33
Inflation pressure, tires 207
Info display, refer to Com‐ puter 70
Information on the navigation data 142
Initializing, Tire Pressure Mon‐ itor TPM 83
Instrument cluster 13, 67
Instrument cluster, electronic displays 15
Instrument lighting 79
Integrated key 32
Integrated universal remote control 107
Intensity, AUTO program 104
Interactive map 132
Interior equipment 107
Interior lamps 79
Interior lamps via remote con‐ trol 36
Interior motion sensor 43
Interior rearview and exterior mirrors, automatic dimming
feature 54
Interior rearview mirror 54
Intermediate destinations 134
Internet 198
Internet page 6
Intersection, entering for navi‐ gation 129
Interval display, service re‐ quirements 73
iPod/iPhone 167
J
Jacking points for the vehicle jack 226
Jack, refer to Vehicle jack 226
Joystick, automatic transmis‐ sion 65
Jump starting 229
K
Key/remote control 32 Seite 255255
Online Edition for Part no. 01 40 2 606 190 - 12 10 500
ReferenceMobilityCommunicationEntertainmentNavigationDriving tipsControlsAt a glance