rear entertainment BMW X5 2009 E70 Owner's Guide
[x] Cancel search | Manufacturer: BMW, Model Year: 2009, Model line: X5, Model: BMW X5 2009 E70Pages: 317, PDF Size: 9.56 MB
Page 95 of 317
Controls
93Reference
At a glance
Driving tips
Communications
Navigation
Entertainment
Mobility
Rear view camera*
The concept
The rear view camera in the liftgate displays the
area behind your vehicle on the Control Display.
Also check the traffic situation around the
vehicle during parking and maneuvering
with direct vision, as otherwise danger of an
accident could result, for example, from road
users or objects locate d outside the picture
area of the rear view camera. <
Switching on
Automatically
With the engine running, shift into reverse.
If the image of the PDC Park Distance
Control appears on the Control Display,
you can switch the image to the rear view cam-
era, refer to Displays on page 95.<
Manually
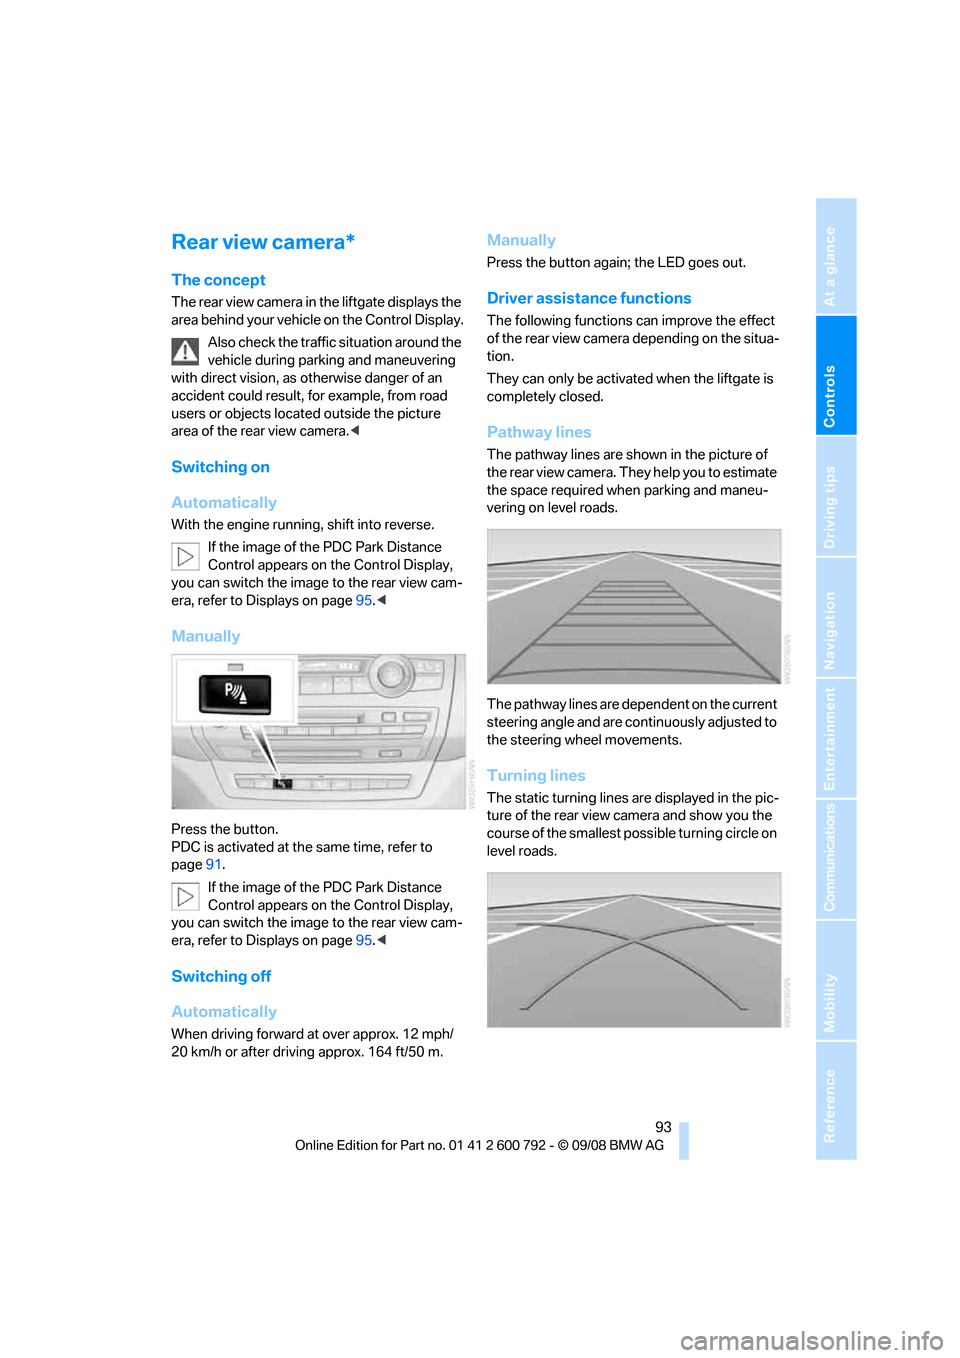
Press the button.
PDC is activated at th e same time, refer to
page 91.
If the image of the PDC Park Distance
Control appears on the Control Display,
you can switch the image to the rear view cam-
era, refer to Displays on page 95.<
Switching off
Automatically
When driving forward at over approx. 12 mph/
20 km/h or after driving approx. 164 ft/50 m.
Manually
Press the button again; the LED goes out.
Driver assistan ce functions
The following functions can improve the effect
of the rear view camera depending on the situa-
tion.
They can only be activated when the liftgate is
completely closed.
Pathway lines
The pathway lines are shown in the picture of
the rear view camera. They help you to estimate
the space required when parking and maneu-
vering on level roads.
The pathway lines are dependent on the current
steering angle and are continuously adjusted to
the steering wheel movements.
Turning lines
The static turning lines are displayed in the pic-
ture of the rear view camera and show you the
course of the smallest possible turning circle on
level roads.
Page 97 of 317
Controls
95Reference
At a glance
Driving tips
Communications
Navigation
Entertainment
Mobility
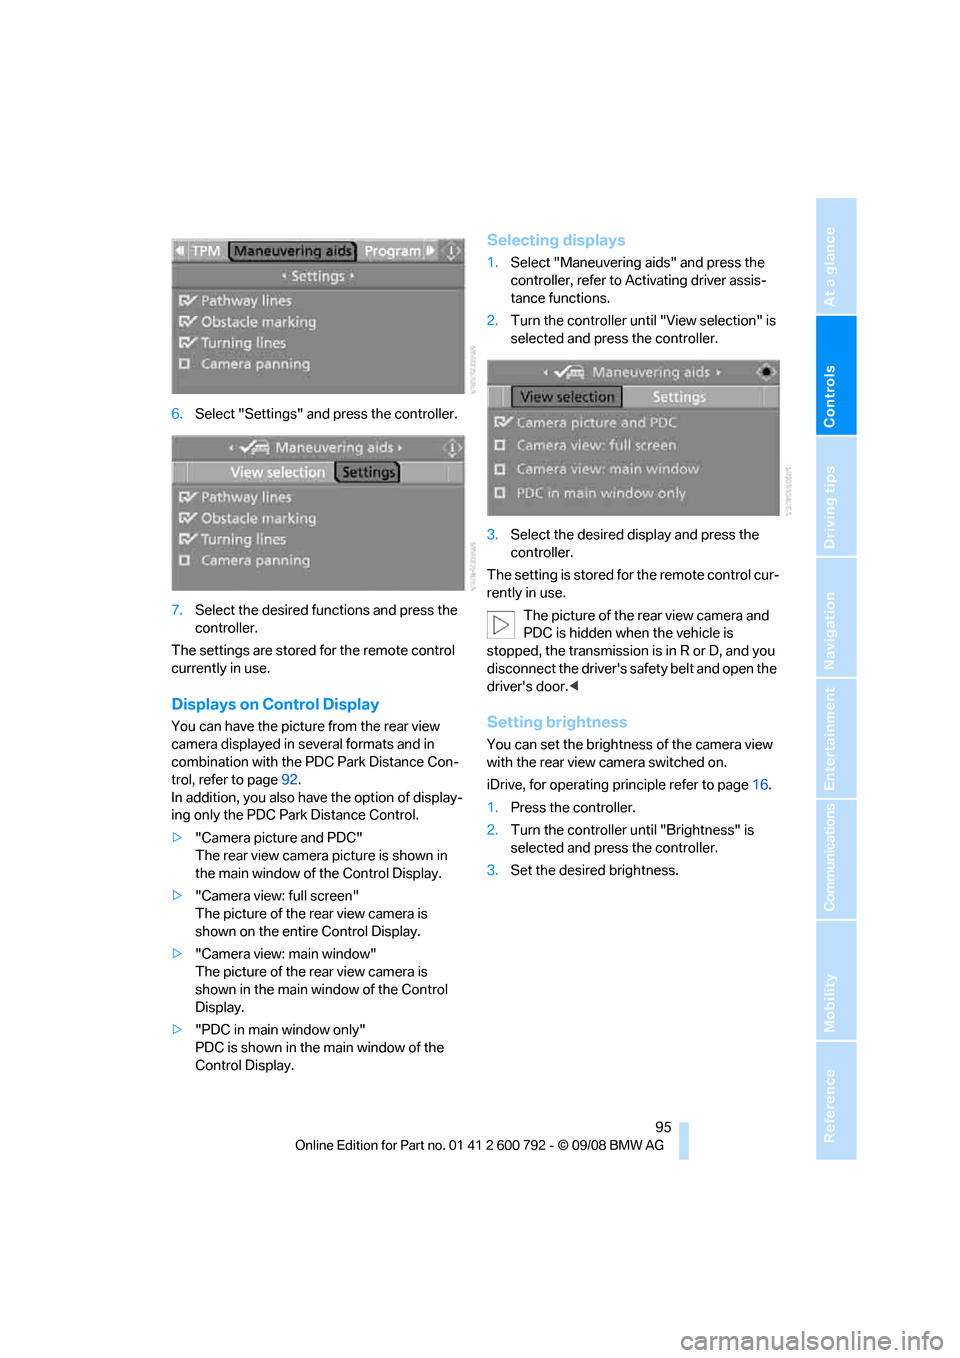
6.Select "Settings" and press the controller.
7. Select the desired fu nctions and press the
controller.
The settings are stored for the remote control
currently in use.
Displays on Control Display
You can have the picture from the rear view
camera displayed in se veral formats and in
combination with the PDC Park Distance Con-
trol, refer to page 92.
In addition, you also have the option of display-
ing only the PDC Park Distance Control.
> "Camera picture and PDC"
The rear view camera picture is shown in
the main window of the Control Display.
> "Camera view: full screen"
The picture of the rear view camera is
shown on the entire Control Display.
> "Camera view: main window"
The picture of the rear view camera is
shown in the main window of the Control
Display.
> "PDC in main window only"
PDC is shown in the main window of the
Control Display.
Selecting displays
1.Select "Maneuvering aids" and press the
controller, refer to Activating driver assis-
tance functions.
2. Turn the controller until "View selection" is
selected and press the controller.
3. Select the desired display and press the
controller.
The setting is stored for the remote control cur-
rently in use. The picture of the rear view camera and
PDC is hidden when the vehicle is
stopped, the transmission is in R or D, and you
disconnect the driver's safety belt and open the
driver's door. <
Setting brightness
You can set the brightness of the camera view
with the rear view camera switched on.
iDrive, for operating pr inciple refer to page16.
1. Press the controller.
2. Turn the controller until "Brightness" is
selected and press the controller.
3. Set the desired brightness.
Page 99 of 317
Controls
97Reference
At a glance
Driving tips
Communications
Navigation
Entertainment
Mobility
Activating DSC
Press the button; the indicator lamp in the
instrument panel goes out.
For better control
The indicator lamp flashes:
DSC controls the drive forces and
brake forces.
The indicator lamps light up:
DSC is deactivated.
DTC Dynamic Traction Control
DTC is a version of DSC in which the drive out-
put is optimized for particular road conditions,
e.g. unplowed snow-covered roads. The sys-
tem assures the maximal drive output, but with
reduced driving stability. It is therefore neces-
sary to drive with appropriate caution.
You may find it useful to briefly activate DTC
under the following special circumstances:
> When driving in sand, on snowy inclines, in
slush or on unplowed, snow-covered road
surfaces
> When rocking a stuck vehicle free or start-
ing off in deep snow, sand or on loose
ground
> When driving with snow chains
*
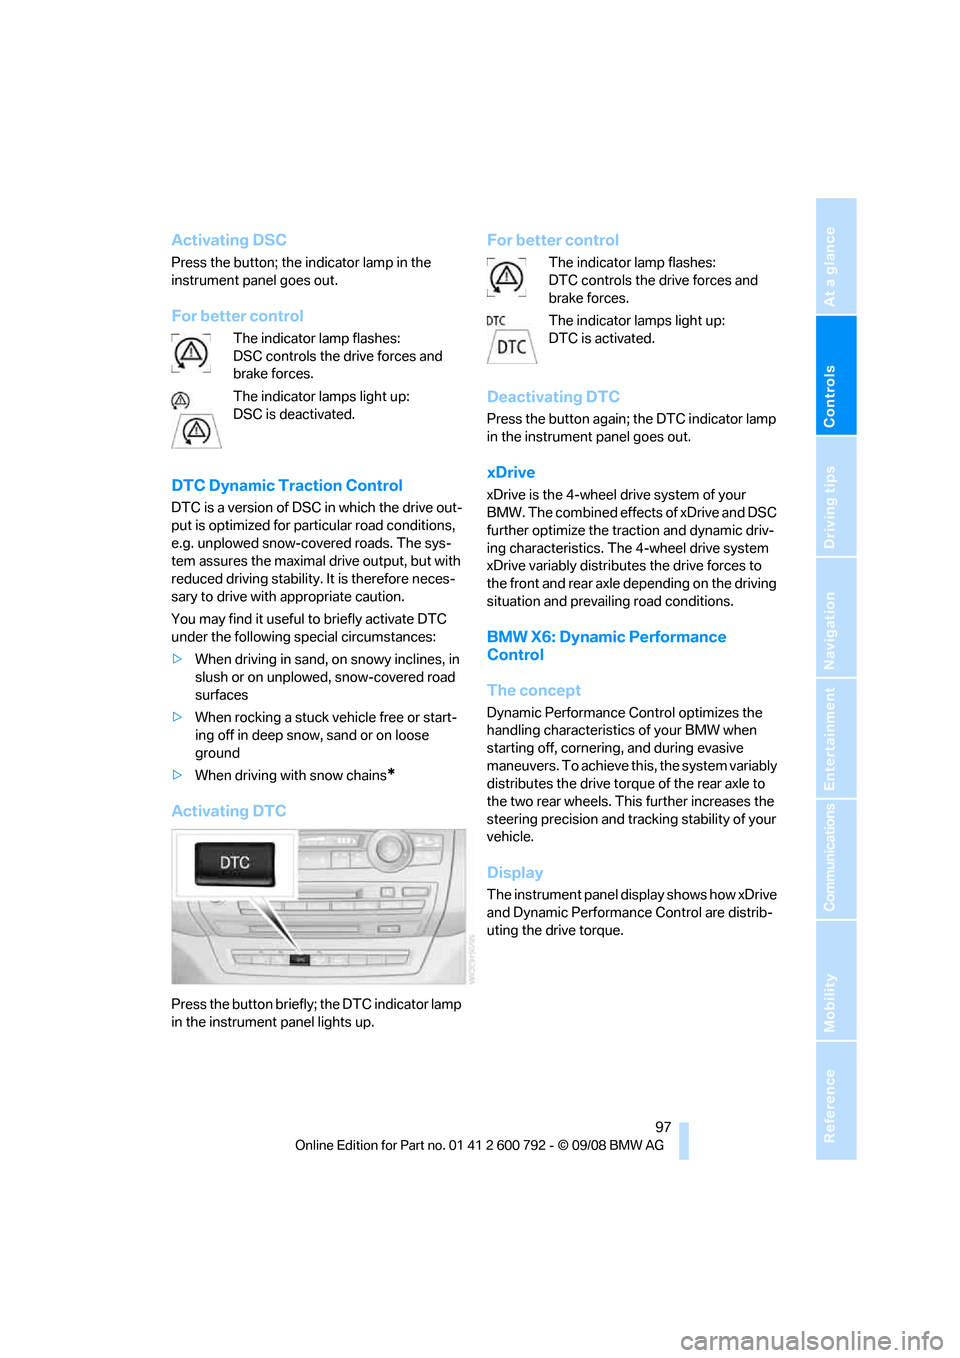
Activating DTC
Press the button briefly; the DTC indicator lamp
in the instrument panel lights up.
For better control
The indicator lamp flashes:
DTC controls the drive forces and
brake forces.
The indicator lamps light up:
DTC is activated.
Deactivating DTC
Press the button again; the DTC indicator lamp
in the instrument panel goes out.
xDrive
xDrive is the 4-wheel drive system of your
BMW. The combined effects of xDrive and DSC
further optimize the traction and dynamic driv-
ing characteristics. The 4-wheel drive system
xDrive variably distributes the drive forces to
the front and rear axle depending on the driving
situation and prevailing road conditions.
BMW X6: Dynamic Performance
Control
The concept
Dynamic Performance Control optimizes the
handling characteristic s of your BMW when
starting off, cornering, and during evasive
maneuvers. To achieve this, the system variably
distributes the drive torque of the rear axle to
the two rear wheels. This further increases the
steering precision and tracking stability of your
vehicle.
Display
The instrument panel display shows how xDrive
and Dynamic Performanc e Control are distrib-
uting the drive torque.
Page 107 of 317
Controls
105Reference
At a glance
Driving tips
Communications
Navigation
Entertainment
Mobility
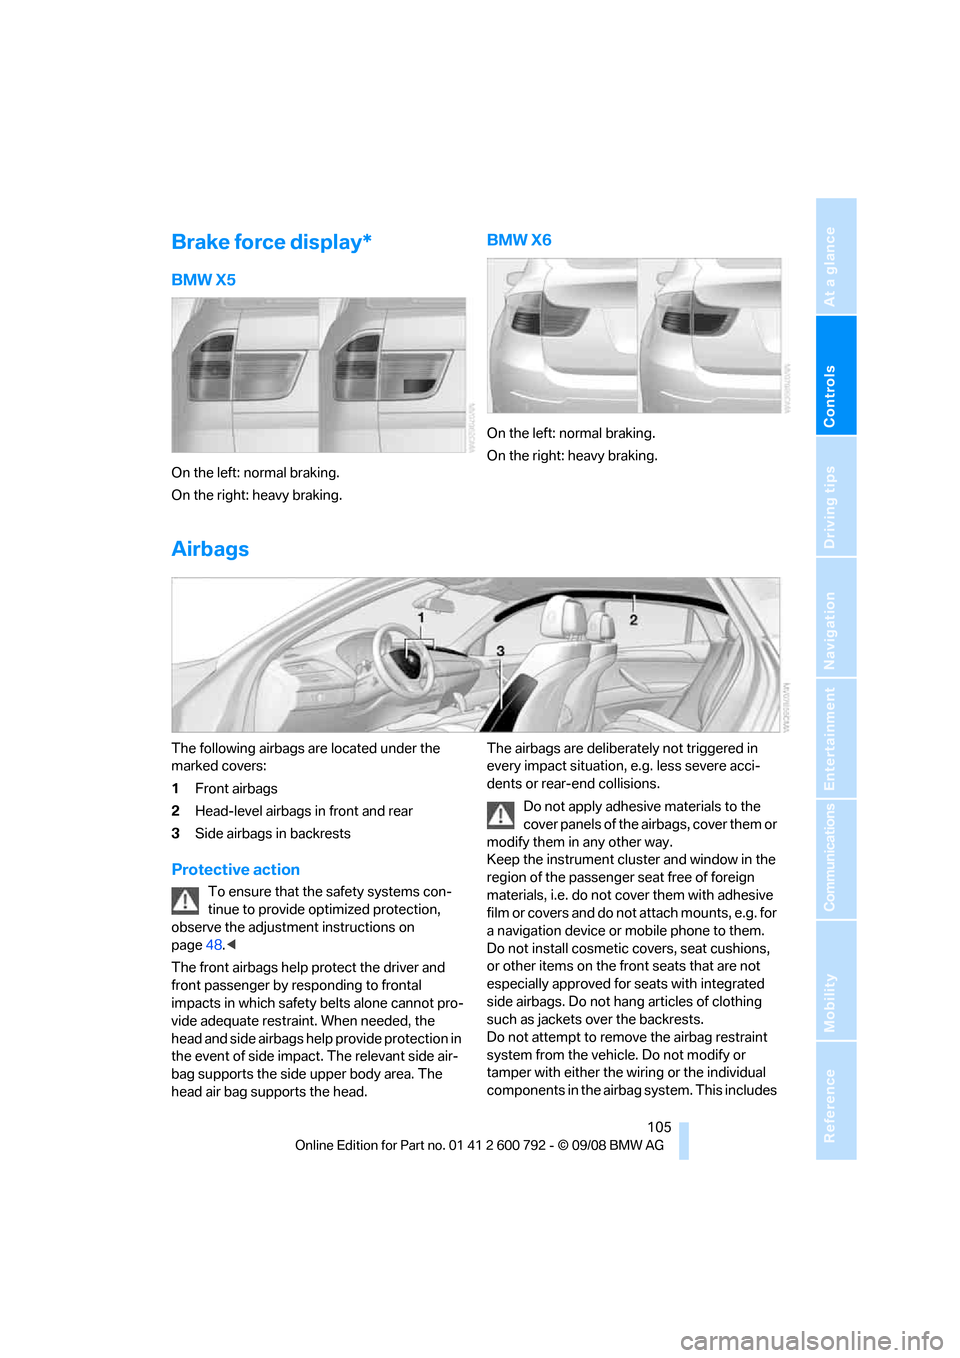
Brake force display*
BMW X5
On the left: normal braking.
On the right: heavy braking.
BMW X6
On the left: normal braking.
On the right: heavy braking.
Airbags
The following airbags are located under the
marked covers:
1Front airbags
2 Head-level airbags in front and rear
3 Side airbags in backrests
Protective action
To ensure that the safety systems con-
tinue to provide optimized protection,
observe the adjustment instructions on
page 48.<
The front airbags help protect the driver and
front passenger by re sponding to frontal
impacts in which safety belts alone cannot pro-
vide adequate restraint. When needed, the
head and side airbags help provide protection in
the event of side impact. The relevant side air-
bag supports the side upper body area. The
head air bag supports the head. The airbags are deliberately not triggered in
every impact situation, e.g. less severe acci-
dents or rear-end collisions.
Do not apply adhesive materials to the
cover panels of the airbags, cover them or
modify them in any other way.
Keep the instrument cluster and window in the
region of the passenger seat free of foreign
materials, i.e. do not co ver them with adhesive
film or covers and do not attach mounts, e.g. for
a navigation device or mobile phone to them.
Do not install cosmetic covers, seat cushions,
or other items on the fr ont seats that are not
especially approved for seats with integrated
side airbags. Do not hang articles of clothing
such as jackets over the backrests.
Do not attempt to remove the airbag restraint
system from the vehicle. Do not modify or
tamper with either the wiring or the individual
components in the airbag system. This includes
Page 115 of 317
Controls
113Reference
At a glance
Driving tips
Communications
Navigation
Entertainment
Mobility
Instrument lighting
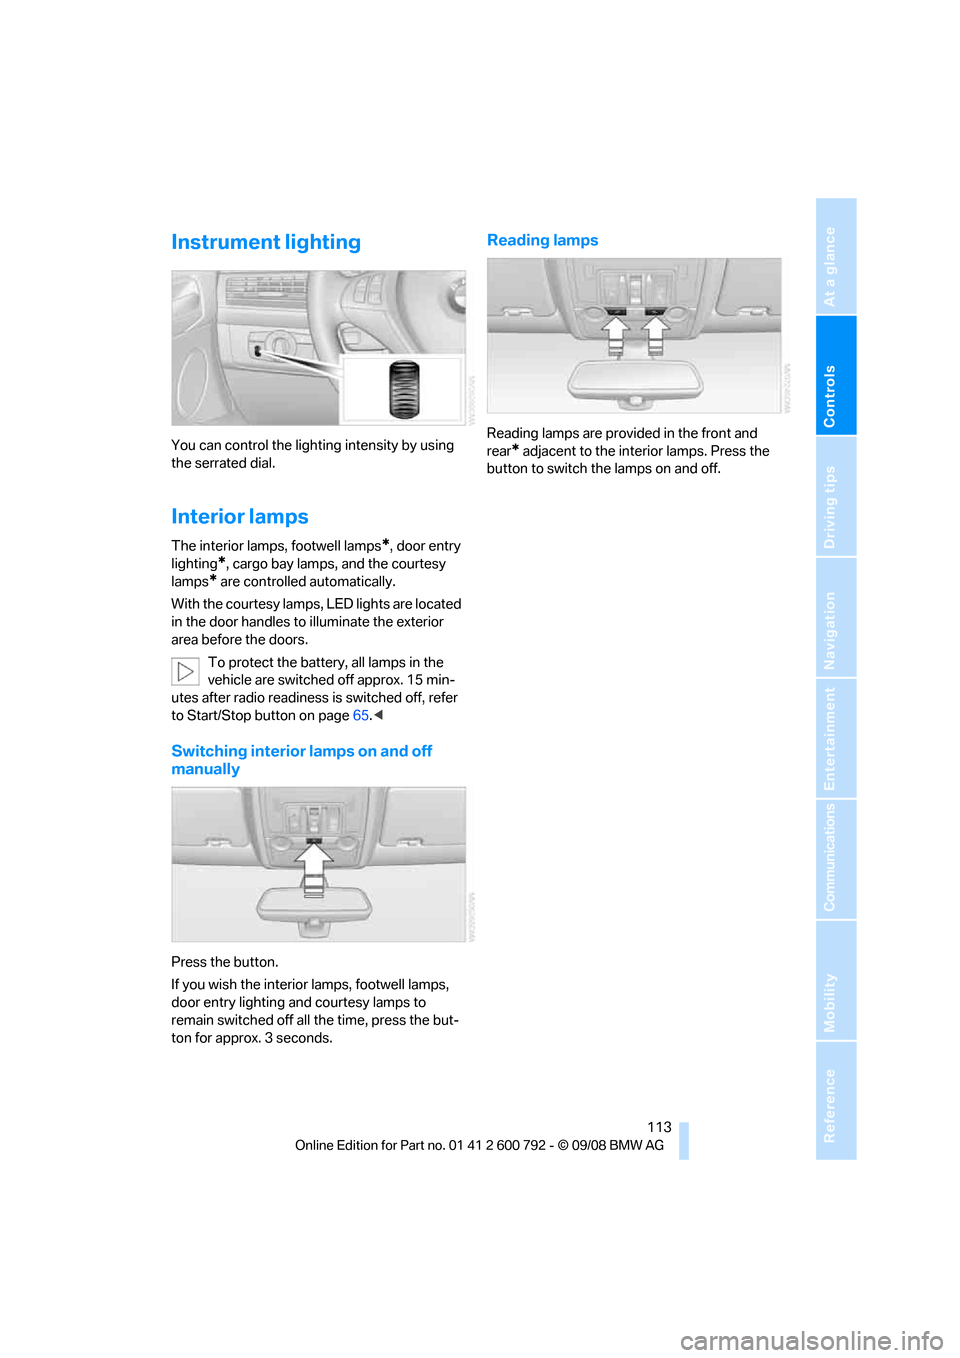
You can control the lighting intensity by using
the serrated dial.
Interior lamps
The interior lamps, footwell lamps*, door entry
lighting
*, cargo bay lamps, and the courtesy
lamps
* are controlled automatically.
With the courtesy lamps, LED lights are located
in the door handles to illuminate the exterior
area before the doors.
To protect the battery, all lamps in the
vehicle are switched off approx. 15 min-
utes after radio readiness is switched off, refer
to Start/Stop button on page 65.<
Switching interior lamps on and off
manually
Press the button.
If you wish the interior lamps, footwell lamps,
door entry lighting and courtesy lamps to
remain switched off all the time, press the but-
ton for approx. 3 seconds.
Reading lamps
Reading lamps are provided in the front and
rear
* adjacent to the inte rior lamps. Press the
button to switch the lamps on and off.
Page 117 of 317
Controls
115Reference
At a glance
Driving tips
Communications
Navigation
Entertainment
Mobility
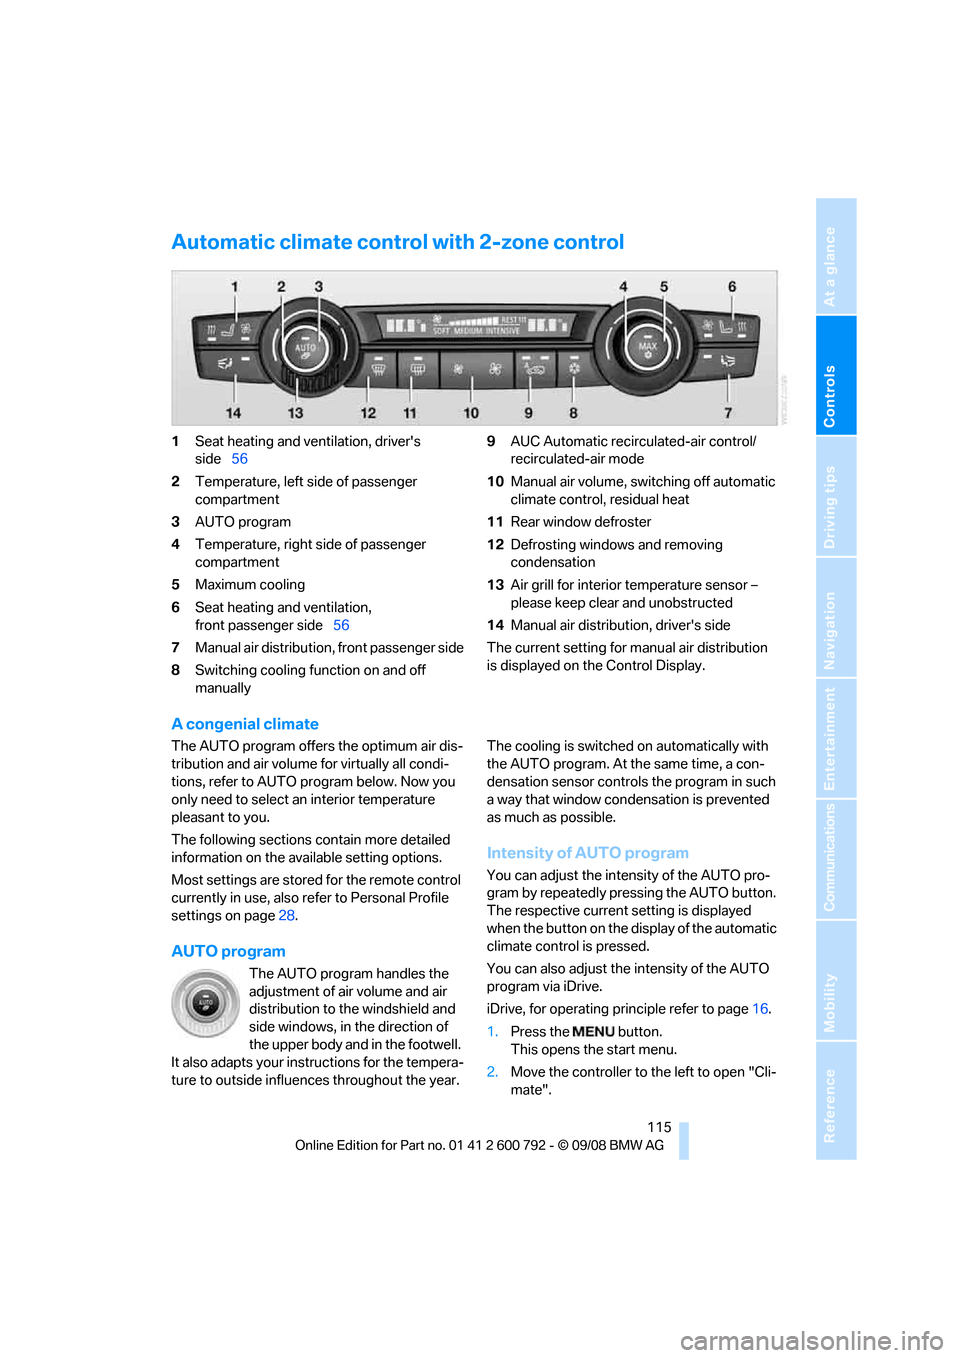
Automatic climate control with 2-zone control
1Seat heating and ventilation, driver's
side 56
2 Temperature, left side of passenger
compartment
3 AUTO program
4 Temperature, right side of passenger
compartment
5 Maximum cooling
6 Seat heating
and ventilation,
front passenger side 56
7 Manual air distribution, front passenger side
8 Switching cooling function on and off
manually 9
AUC Automatic recirculated-air control/
recirculated-air mode
10 Manual air volume, sw itching off automatic
climate control, residual heat
11 Rear window defroster
12 Defrosting windows and removing
condensation
13 Air grill for interior temperature sensor –
please keep clear and unobstructed
14 Manual air distribution, driver's side
The current setting for manual air distribution
is displayed on the Control Display.
A congenial climate
The AUTO program offers the optimum air dis-
tribution and air volume for virtually all condi-
tions, refer to AUTO pr ogram below. Now you
only need to select an interior temperature
pleasant to you.
The following sections contain more detailed
information on the available setting options.
Most settings are stored for the remote control
currently in use, also re fer to Personal Profile
settings on page 28.
AUTO program
The AUTO program handles the
adjustment of air volume and air
distribution to the windshield and
side windows, in the direction of
the upper body and in the footwell.
It also adapts your inst ructions for the tempera-
ture to outside influenc es throughout the year. The cooling is switched
on automatically with
the AUTO program. At the same time, a con-
densation sensor controls the program in such
a way that window condensation is prevented
as much as possible.
Intensity of AUTO program
You can adjust the intensity of the AUTO pro-
gram by repeatedly pr essing the AUTO button.
The respective current setting is displayed
when the button on the display of the automatic
climate control is pressed.
You can also adjust the intensity of the AUTO
program via iDrive.
iDrive, for operating pr inciple refer to page16.
1. Press the button.
This opens the start menu.
2. Move the controller to the left to open "Cli-
mate".
Page 121 of 317
Controls
119Reference
At a glance
Driving tips
Communications
Navigation
Entertainment
Mobility
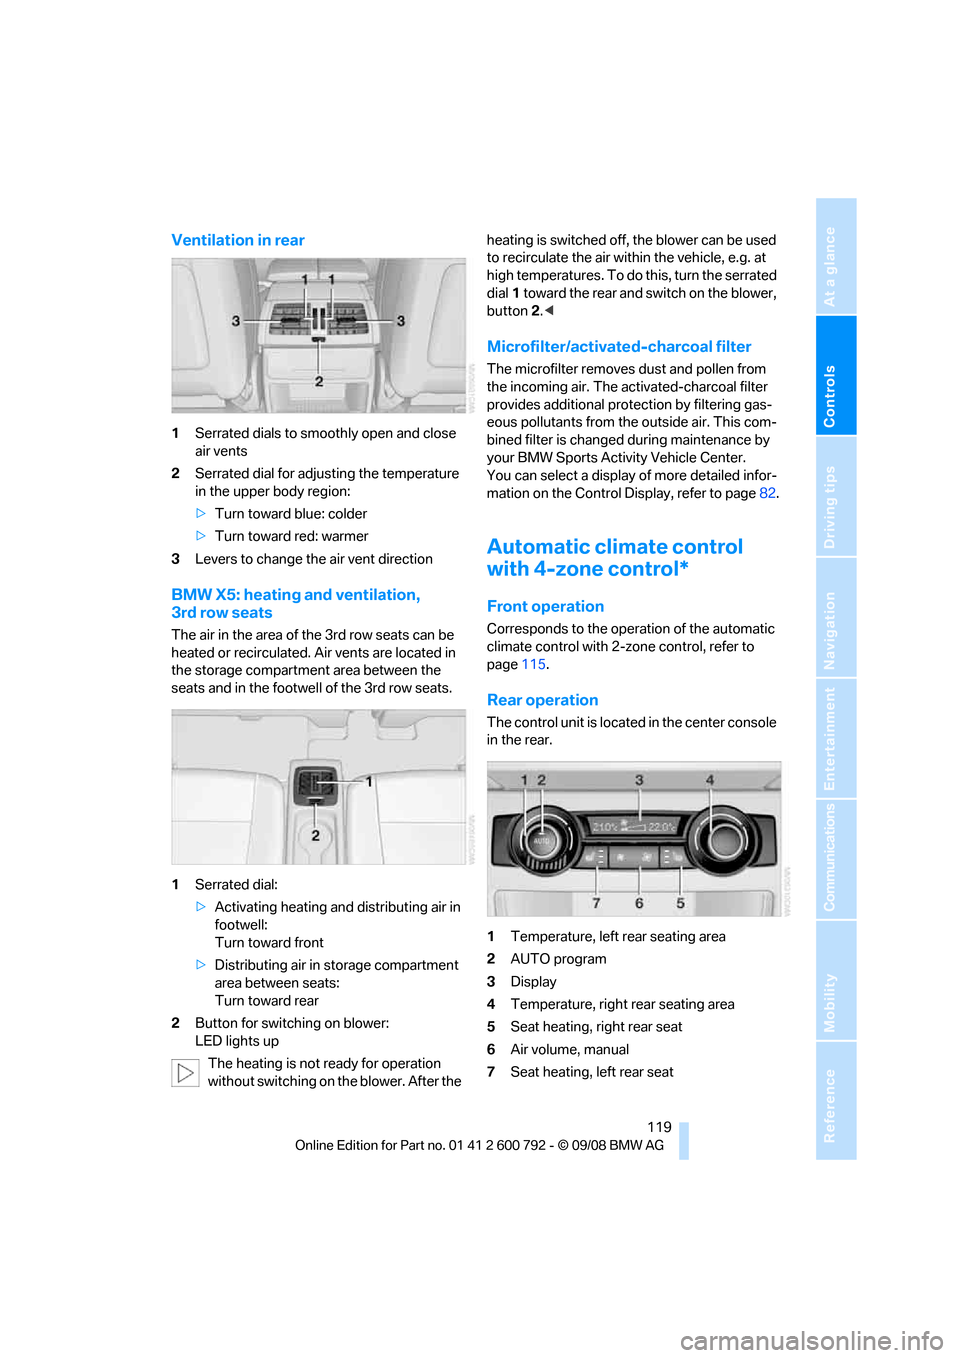
Ventilation in rear
1Serrated dials to smoothly open and close
air vents
2 Serrated dial for adjusting the temperature
in the upper body region:
>Turn toward blue: colder
> Turn toward red: warmer
3 Levers to change the air vent direction
BMW X5: heating and ventilation,
3rd row seats
The air in the area of the 3rd row seats can be
heated or recirculated. Air vents are located in
the storage compartmen t area between the
seats and in the footwell of the 3rd row seats.
1 Serrated dial:
>Activating heating and distributing air in
footwell:
Turn toward front
> Distributing air in storage compartment
area between seats:
Turn toward rear
2 Button for switching on blower:
LED lights up
The heating is not ready for operation
without switching on the blower. After the heating is switched off, the blower can be used
to recirculate the air within the vehicle, e.g. at
high temperatures. To do
this, turn the serrated
dial 1 toward the rear and switch on the blower,
button 2.<
Microfilter/activated-charcoal filter
The microfilter removes dust and pollen from
the incoming air. The activated-charcoal filter
provides additional protection by filtering gas-
eous pollutants from the outside air. This com-
bined filter is changed during maintenance by
your BMW Sports Activity Vehicle Center.
You can select a display of more detailed infor-
mation on the Control Display, refer to page 82.
Automatic climate control
with 4-zone control*
Front operation
Corresponds to the operation of the automatic
climate control with 2-zone control, refer to
page 115.
Rear operation
The control unit is located in the center console
in the rear.
1Temperature, left rear seating area
2 AUTO program
3 Display
4 Temperature, right rear seating area
5 Seat heating, right rear seat
6 Air volume, manual
7 Seat heating, left rear seat
Page 123 of 317
Controls
121Reference
At a glance
Driving tips
Communications
Navigation
Entertainment
Mobility
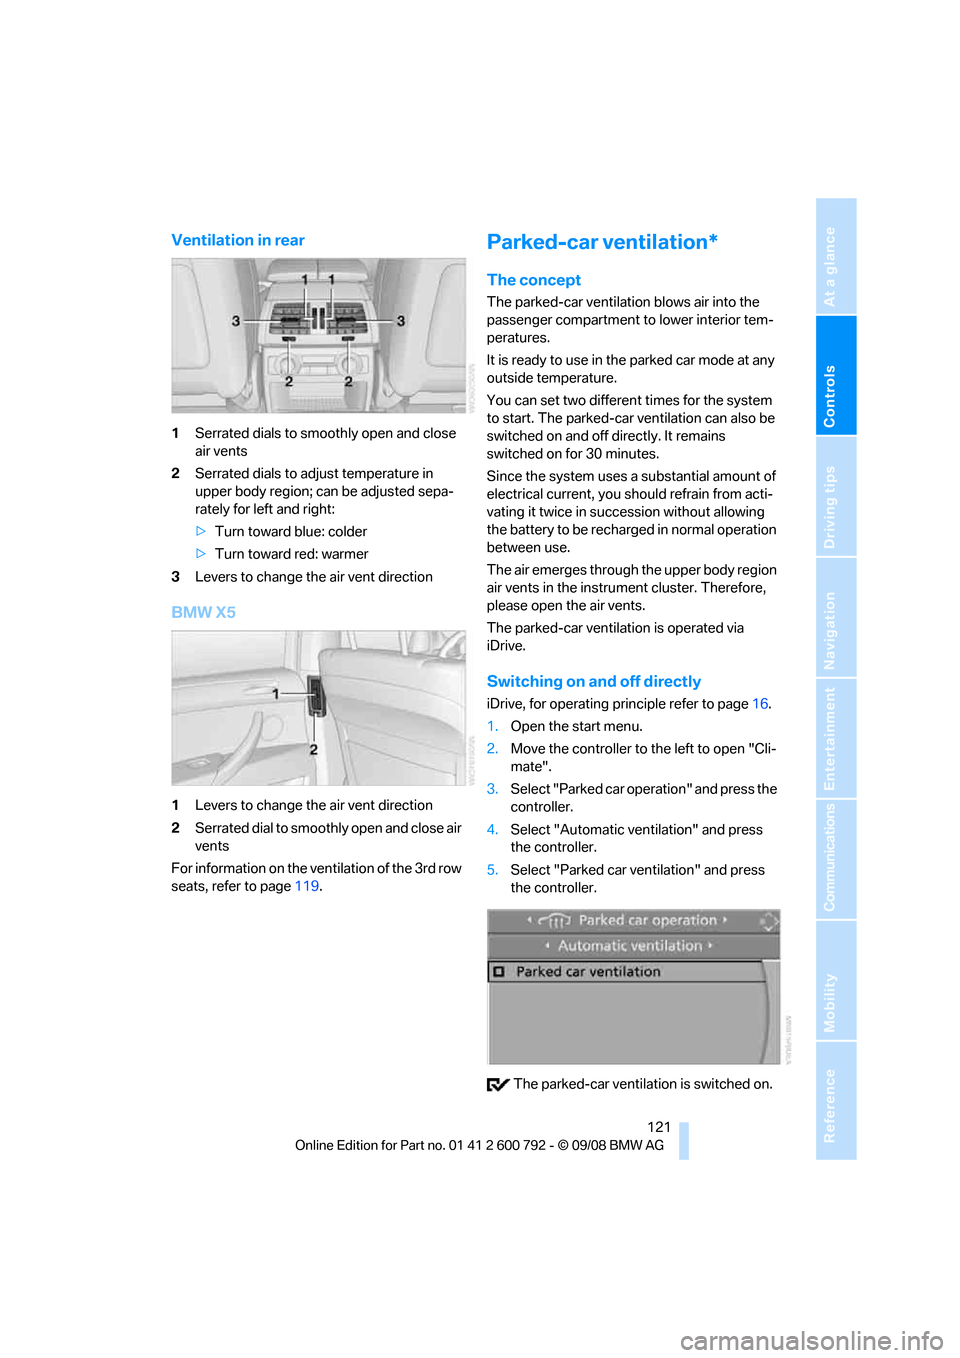
Ventilation in rear
1Serrated dials to smoothly open and close
air vents
2 Serrated dials to adjust temperature in
upper body region; ca n be adjusted sepa-
rately for left and right:
> Turn toward blue: colder
> Turn toward red: warmer
3 Levers to change the air vent direction
BMW X5
1Levers to change the air vent direction
2 Serrated dial to smoothly open and close air
vents
For information on the ventilation of the 3rd row
seats, refer to page 119.
Parked-car ventilation*
The concept
The parked-car ventilation blows air into the
passenger compartment to lower interior tem-
peratures.
It is ready to use in the parked car mode at any
outside temperature.
You can set two different times for the system
to start. The parked-car ventilation can also be
switched on and off directly. It remains
switched on for 30 minutes.
Since the system uses a substantial amount of
electrical current, you should refrain from acti-
vating it twice in succ ession without allowing
the battery to be rechar ged in normal operation
between use.
The air emerges through the upper body region
air vents in the instrument cluster. Therefore,
please open the air vents.
The parked-car ventilation is operated via
iDrive.
Switching on and off directly
iDrive, for operating pr inciple refer to page16.
1. Open the start menu.
2. Move the controller to the left to open "Cli-
mate".
3. Select "Parked car operation" and press the
controller.
4. Select "Automatic ventilation" and press
the controller.
5. Select "Parked car ventilation" and press
the controller.
The parked-car ventila tion is switched on.
Page 129 of 317
Controls
127Reference
At a glance
Driving tips
Communications
Navigation
Entertainment
Mobility
Center armrest front
A storage compartment is located under the
armrest between the front seats and, depend-
ing on the vehicle's equipment, also a cover for
the mobile phone bracket or the snap-in
adapter. Also refer to page 220.
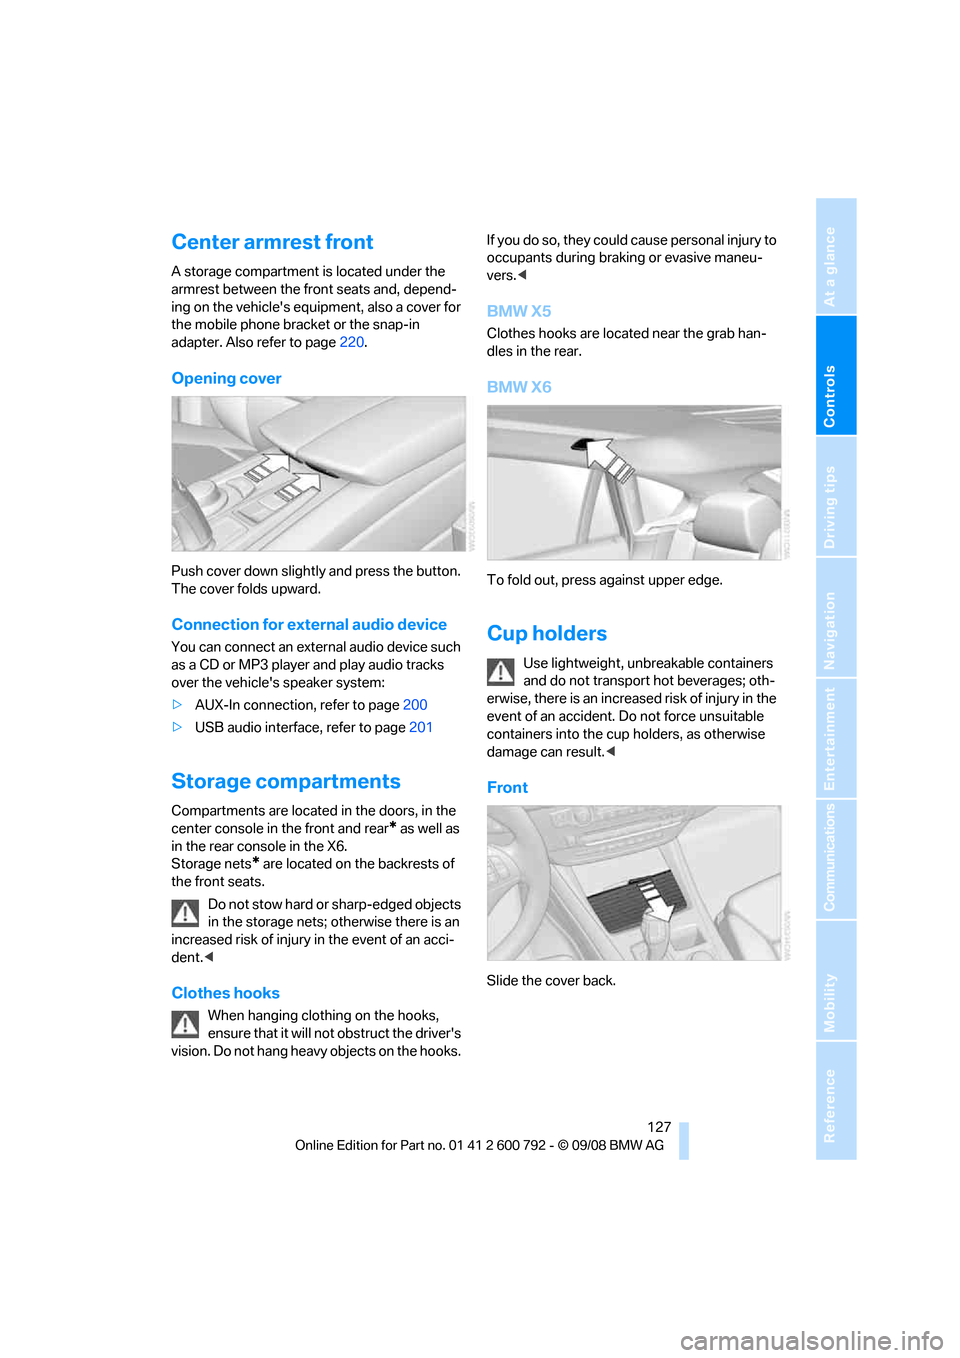
Opening cover
Push cover down slightly and press the button.
The cover folds upward.
Connection for external audio device
You can connect an external audio device such
as a CD or MP3 player and play audio tracks
over the vehicle's speaker system:
>AUX-In connection, refer to page 200
> USB audio interface, refer to page 201
Storage compartments
Compartments are located in the doors, in the
center console in the front and rear
* as well as
in the rear console in the X6.
Storage nets
* are located on the backrests of
the front seats.
Do not stow hard or sharp-edged objects
in the storage nets; otherwise there is an
increased risk of injury in the event of an acci-
dent. <
Clothes hooks
When hanging clothing on the hooks,
ensure that it will not obstruct the driver's
vision. Do not hang heavy objects on the hooks. If you do so, they could cause personal injury to
occupants during brak
ing or evasive maneu-
vers. <
BMW X5
Clothes hooks are located near the grab han-
dles in the rear.
BMW X6
To fold out, press against upper edge.
Cup holders
Use lightweight, unbreakable containers
and do not transport hot beverages; oth-
erwise, there is an increased risk of injury in the
event of an accident. Do not force unsuitable
containers into the cup holders, as otherwise
damage can result. <
Front
Slide the cover back.
Page 131 of 317
Controls
129Reference
At a glance
Driving tips
Communications
Navigation
Entertainment
Mobility
Rear
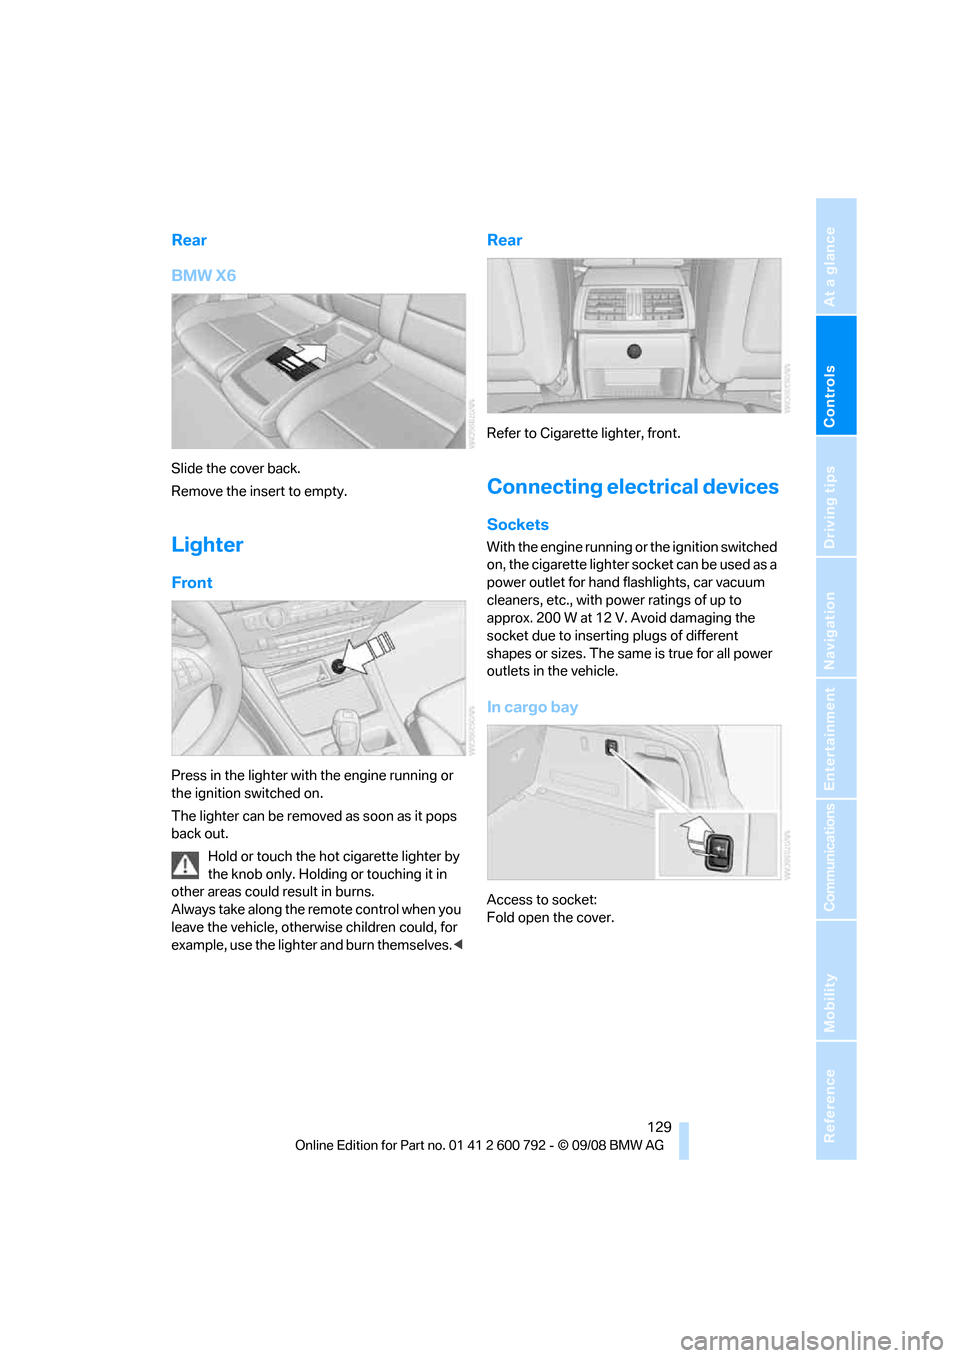
BMW X6
Slide the cover back.
Remove the insert to empty.
Lighter
Front
Press in the lighter with the engine running or
the ignition switched on.
The lighter can be removed as soon as it pops
back out.Hold or touch the hot cigarette lighter by
the knob only. Holding or touching it in
other areas could result in burns.
Always take along the remote control when you
leave the vehicle, otherw ise children could, for
example, use the lighter and burn themselves. <
Rear
Refer to Cigarette lighter, front.
Connecting electrical devices
Sockets
With the engine running or the ignition switched
on, the cigarette lighter socket can be used as a
power outlet for hand flashlights, car vacuum
cleaners, etc., with power ratings of up to
approx. 200 W at 12 V. Avoid damaging the
socket due to inserting plugs of different
shapes or sizes. The same is true for all power
outlets in the vehicle.
In cargo bay
Access to socket:
Fold open the cover.