set date BMW X5 2010 E70 Owner's Manual
[x] Cancel search | Manufacturer: BMW, Model Year: 2010, Model line: X5, Model: BMW X5 2010 E70Pages: 300, PDF Size: 12.41 MB
Page 14 of 300
Cockpit
12
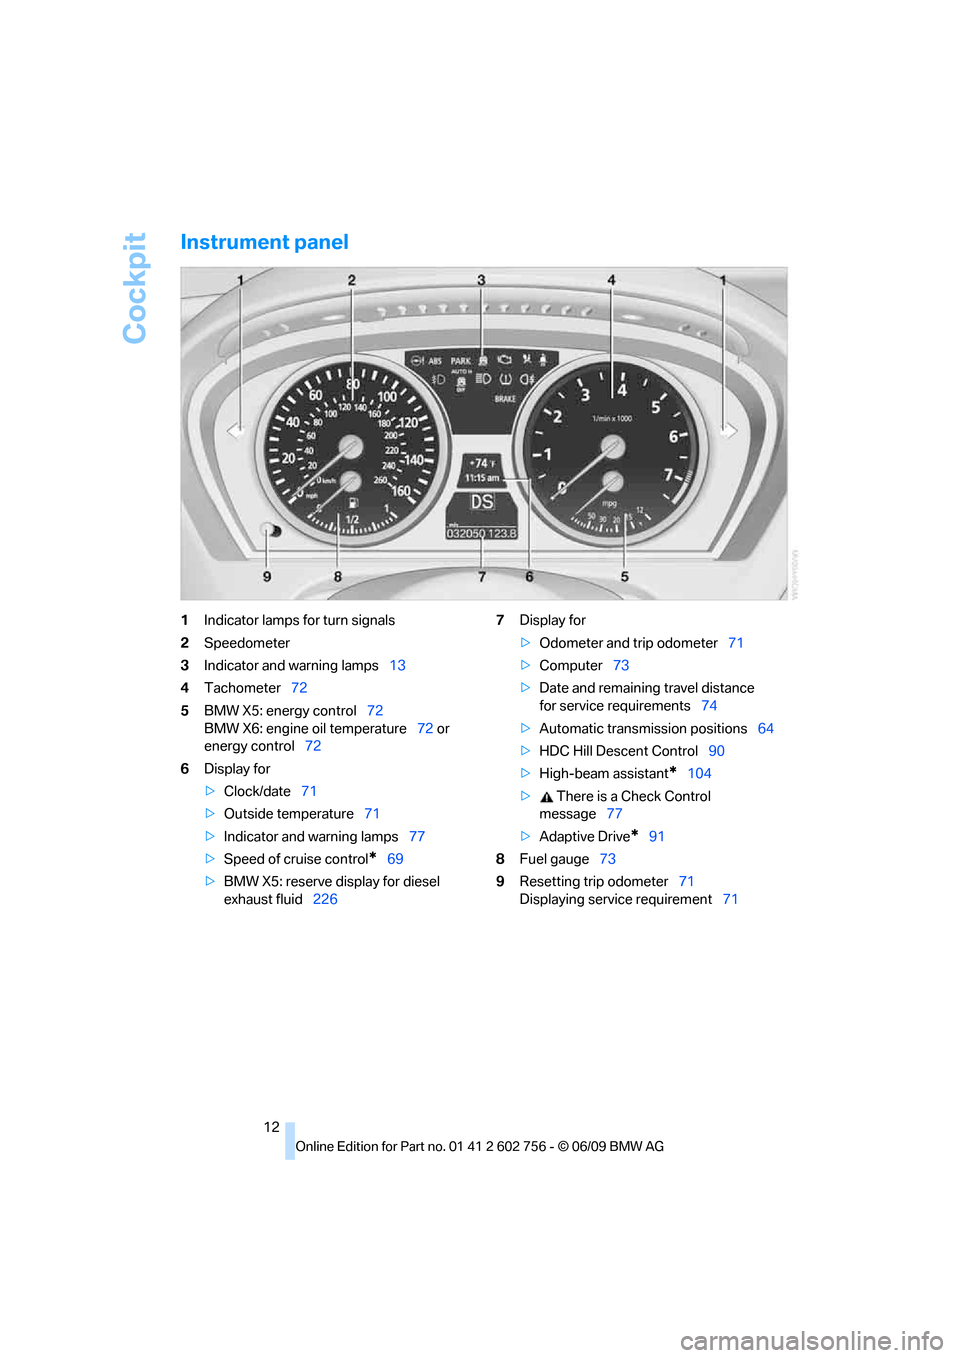
Instrument panel
1Indicator lamps for turn signals
2Speedometer
3Indicator and warning lamps13
4Tachometer72
5BMW X5: energy control72
BMW X6: engine oil temperature72 or
energy control72
6Display for
>Clock/date71
>Outside temperature71
>Indicator and warning lamps77
>Speed of cruise control
*69
>BMW X5: reserve display for diesel
exhaust fluid2267Display for
>Odometer and trip odometer71
>Computer73
>Date and remaining travel distance
for service requirements74
>Automatic transmission positions64
>HDC Hill Descent Control90
>High-beam assistant
*104
> There is a Check Control
message77
>Adaptive Drive
*91
8Fuel gauge73
9Resetting trip odometer71
Displaying service requirement71
ba8_e70ag.book Seite 12 Freitag, 5. Juni 2009 11:42 11
Page 20 of 300
iDrive
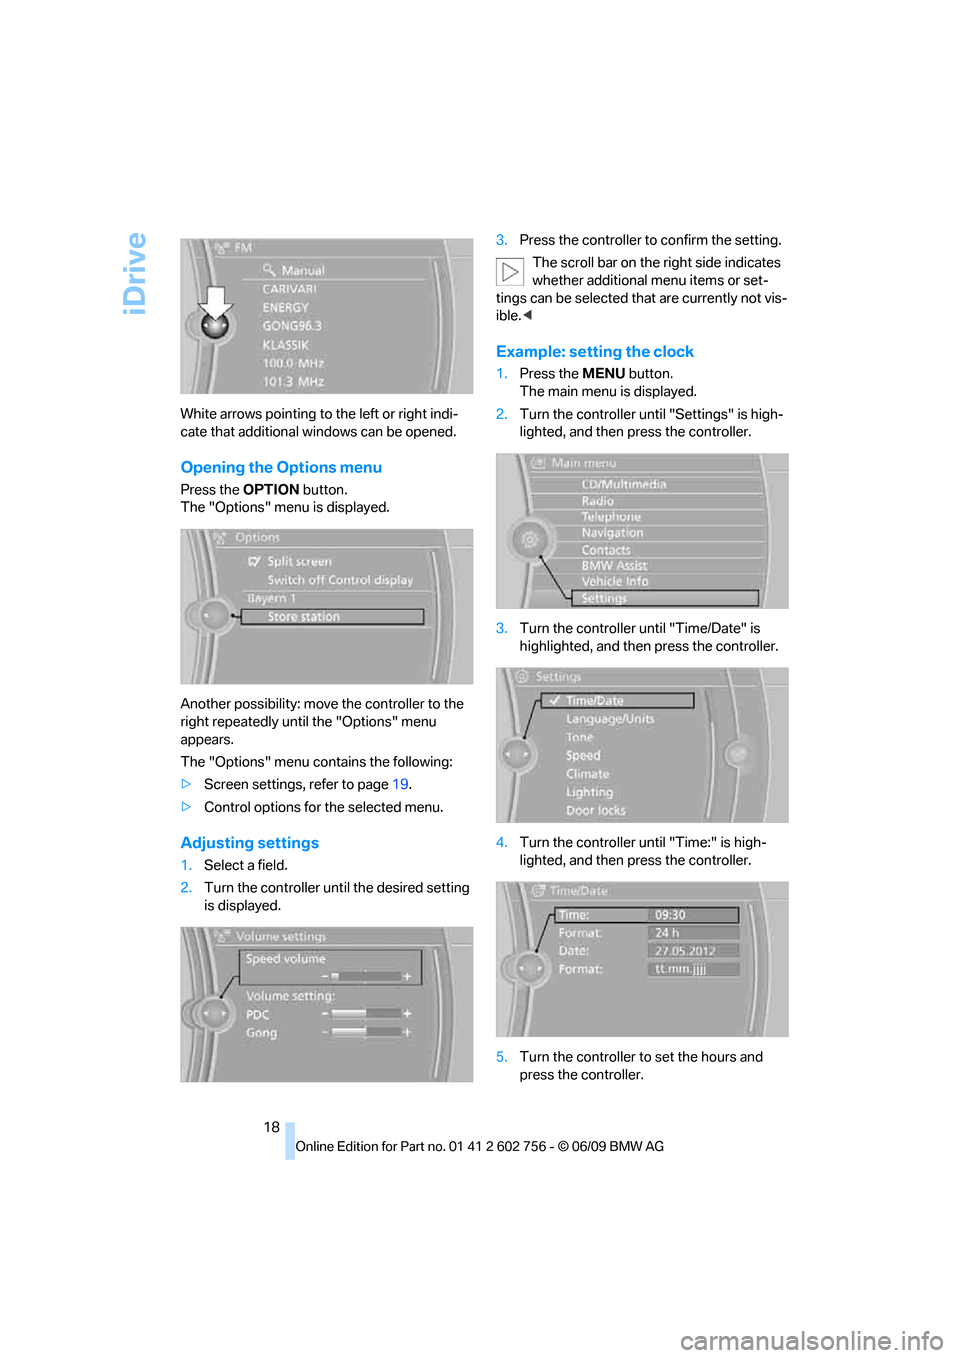
18 White arrows pointing to the left or right indi-
cate that additional windows can be opened.
Opening the Options menu
Press the OPTIONbutton.
The "Options" menu is displayed.
Another possibility: move the controller to the
right repeatedly until the "Options" menu
appears.
The "Options" menu contains the following:
>Screen settings, refer to page19.
>Control options for the selected menu.
Adjusting settings
1.Select a field.
2.Turn the controller until the desired setting
is displayed.3.Press the controller to confirm the setting.
The scroll bar on the right side indicates
whether additional menu items or set-
tings can be selected that are currently not vis-
ible.<
Example: setting the clock
1.Press the MENUbutton.
The main menu is displayed.
2.Turn the controller until "Settings" is high-
lighted, and then press the controller.
3.Turn the controller until "Time/Date" is
highlighted, and then press the controller.
4.Turn the controller until "Time:" is high-
lighted, and then press the controller.
5.Turn the controller to set the hours and
press the controller.
ba8_e70ag.book Seite 18 Freitag, 5. Juni 2009 11:42 11
Page 29 of 300
Controls
27Reference
At a glance
Driving tips
Communications
Navigation
Entertainment
Mobility
>12h/24h clock format, refer to page80
>Date format, refer to page80
>Lighting settings:
>Triple turn signal activation, refer to
page67
>Welcome lamps, refer to page102
>Pathway lighting, refer to page103
>Daytime driving lamps
*, refer to
page103
>High-beam assistant
*, refer to page104
>PDC Park Distance Control
*: optical warn-
ing, refer to page83
>Top View
*: optical warning, refer to
page85
>Rear view camera
*:
>Selecting functions, refer to page86
>Type of display, refer to page87
>Head-Up Display
*: selection, brightness
and position of display, refer to page100
>Automatic climate control: AUTO program
and intensity, cooling function, and auto-
matic recirculated-air control/recirculated-
air mode, temperature, air distribution, ven-
tilation temperature, starting on page108
>Programmable memory buttons: selecting
stored functions, refer to page20
>Positions of driver's seat, outside mirrors,
and steering wheel
*, refer to page45
>Adaptive Drive
*: selected chassis and sus-
pension tuning, refer to page91
>Audio sources: volume and tone settings,
refer to page160
>Radio:
>Display of stored stations, refer to
page165
>Switching RDS Radio Data System on/
off
*, refer to page164
>Phone: volume setting, refer to
pages205,210
Central locking system
The concept
The central locking system functions when the
driver's door is closed.
The system simultaneously engages and
releases the locks on the following:
>Doors
>liftgate
>Fuel filler door
Operating from outside
>using the remote control
>using the door lock
>with comfort access
* using the door han-
dles
The interior lamps and the courtesy lamps
* are
also switched on and off with the remote con-
trol. The alarm system
is armed/disarmed at the
same time.
You can find more detailed information on the
alarm system
on page34.
Operating from inside
Using the button for central locking, refer to
page30. The fuel filler door is not locked.
In an accident of sufficient severity, the central
locking system automatically unlocks the vehi-
cle. In addition, the hazard warning flashers and
interior lamps come on.
Opening and closing:
Using remote control
Persons or animals in a parked vehicle
could lock the doors from the inside.
Always take along the remote control when
leaving the vehicle so that the vehicle can then
be opened from the outside.<
Unlocking
Press the button.
This unlocks the vehicle.
ba8_e70ag.book Seite 27 Freitag, 5. Juni 2009 11:42 11
Page 73 of 300
Controls
71Reference
At a glance
Driving tips
Communications
Navigation
Entertainment
Mobility
Everything under control
Odometer, outside
temperature display, clock
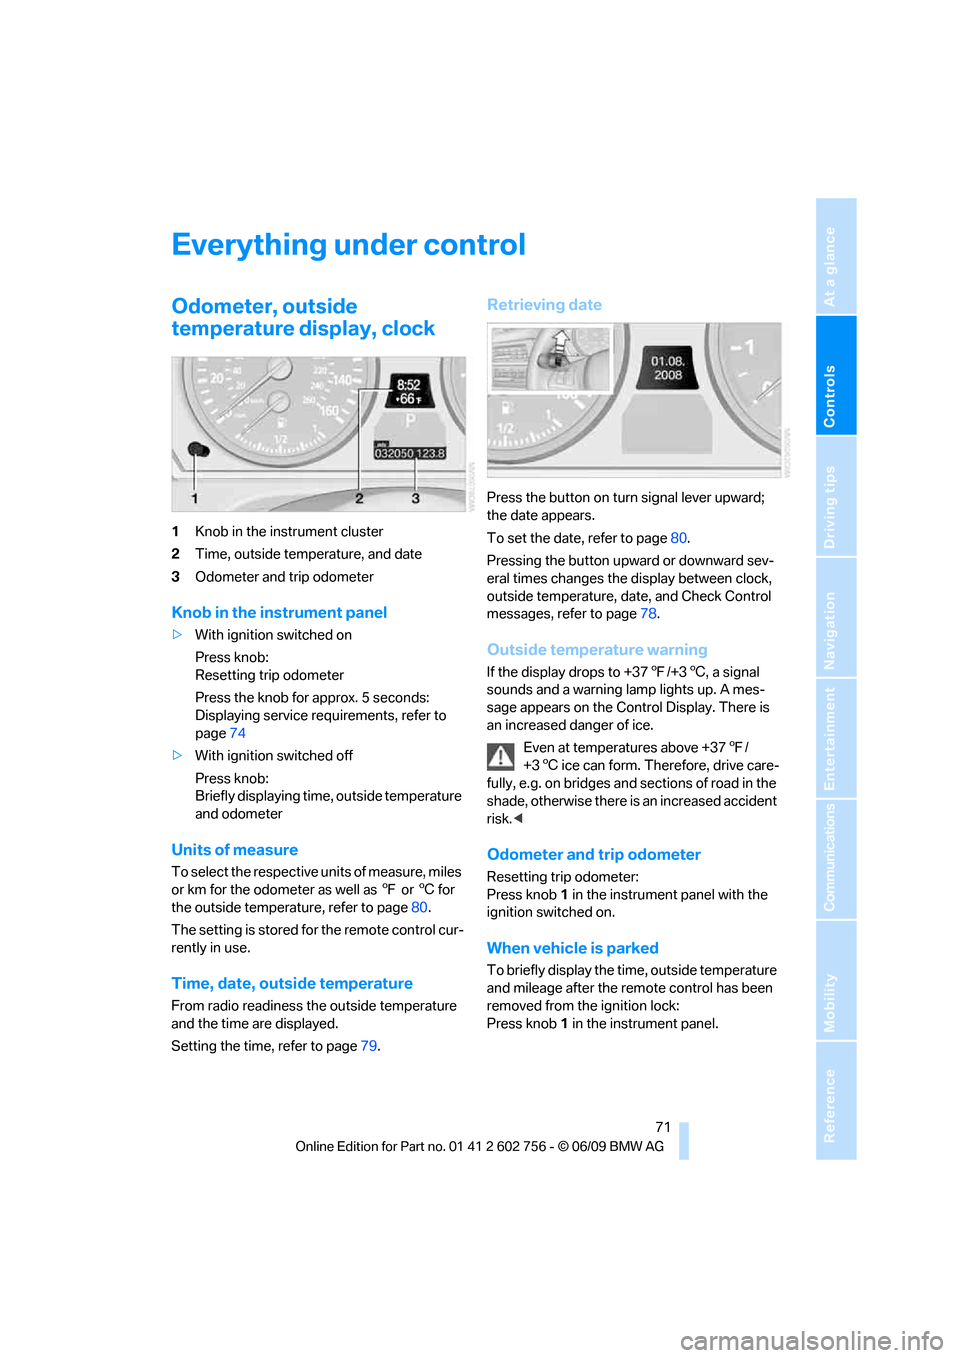
1Knob in the instrument cluster
2Time, outside temperature, and date
3Odometer and trip odometer
Knob in the instrument panel
>With ignition switched on
Press knob:
Resetting trip odometer
Press the knob for approx. 5 seconds:
Displaying service requirements, refer to
page74
>With ignition switched off
Press knob:
Briefly displaying time, outside temperature
and odometer
Units of measure
To select the respective units of measure, miles
or km for the odometer as well as 7 or 6 for
the outside temperature, refer to page80.
The setting is stored for the remote control cur-
rently in use.
Time, date, outside temperature
From radio readiness the outside temperature
and the time are displayed.
Setting the time, refer to page79.
Retrieving date
Press the button on turn signal lever upward;
the date appears.
To set the date, refer to page80.
Pressing the button upward or downward sev-
eral times changes the display between clock,
outside temperature, date, and Check Control
messages, refer to page78.
Outside temperature warning
If the display drops to +377/+36, a signal
sounds and a warning lamp lights up. A mes-
sage appears on the Control Display. There is
an increased danger of ice.
Even at temperatures above +377/
+36 ice can form. Therefore, drive care-
fully, e.g. on bridges and sections of road in the
shade, otherwise there is an increased accident
risk.<
Odometer and trip odometer
Resetting trip odometer:
Press knob 1 in the instrument panel with the
ignition switched on.
When vehicle is parked
To briefly display the time, outside temperature
and mileage after the remote control has been
removed from the ignition lock:
Press knob 1 in the instrument panel.
ba8_e70ag.book Seite 71 Freitag, 5. Juni 2009 11:42 11
Page 76 of 300
Everything under control
74
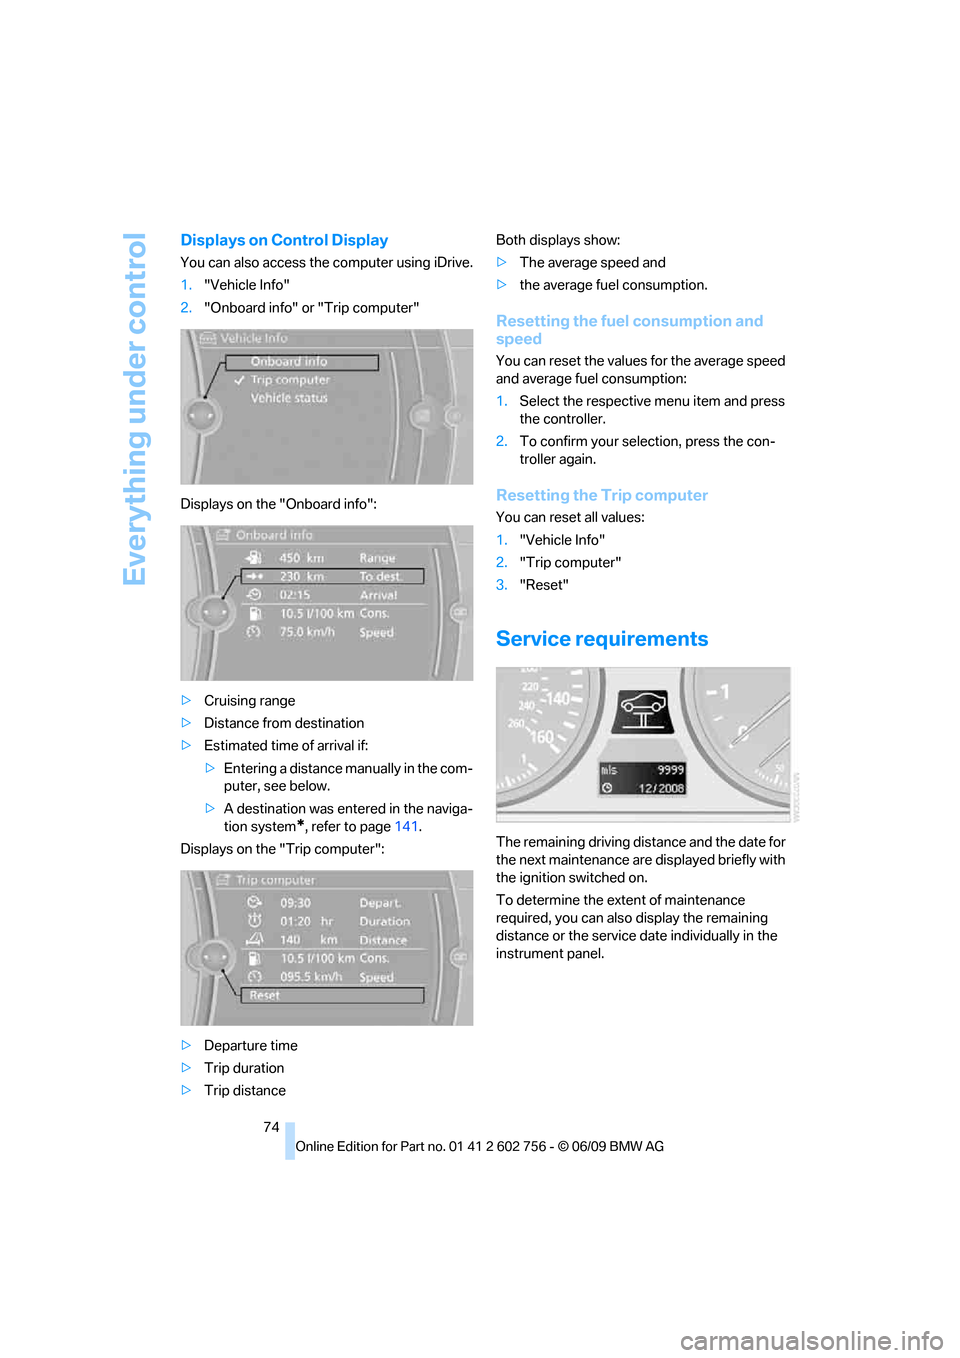
Displays on Control Display
You can also access the computer using iDrive.
1."Vehicle Info"
2."Onboard info" or "Trip computer"
Displays on the "Onboard info":
>Cruising range
>Distance from destination
>Estimated time of arrival if:
>Entering a distance manually in the com-
puter, see below.
>A destination was entered in the naviga-
tion system
*, refer to page141.
Displays on the "Trip computer":
>Departure time
>Trip duration
>Trip distanceBoth displays show:
>The average speed and
>the average fuel consumption.
Resetting the fuel consumption and
speed
You can reset the values for the average speed
and average fuel consumption:
1.Select the respective menu item and press
the controller.
2.To confirm your selection, press the con-
troller again.
Resetting the Trip computer
You can reset all values:
1."Vehicle Info"
2."Trip computer"
3."Reset"
Service requirements
The remaining driving distance and the date for
the next maintenance are displayed briefly with
the ignition switched on.
To determine the extent of maintenance
required, you can also display the remaining
distance or the service date individually in the
instrument panel.
ba8_e70ag.book Seite 74 Freitag, 5. Juni 2009 11:42 11
Page 78 of 300
Everything under control
76
More information
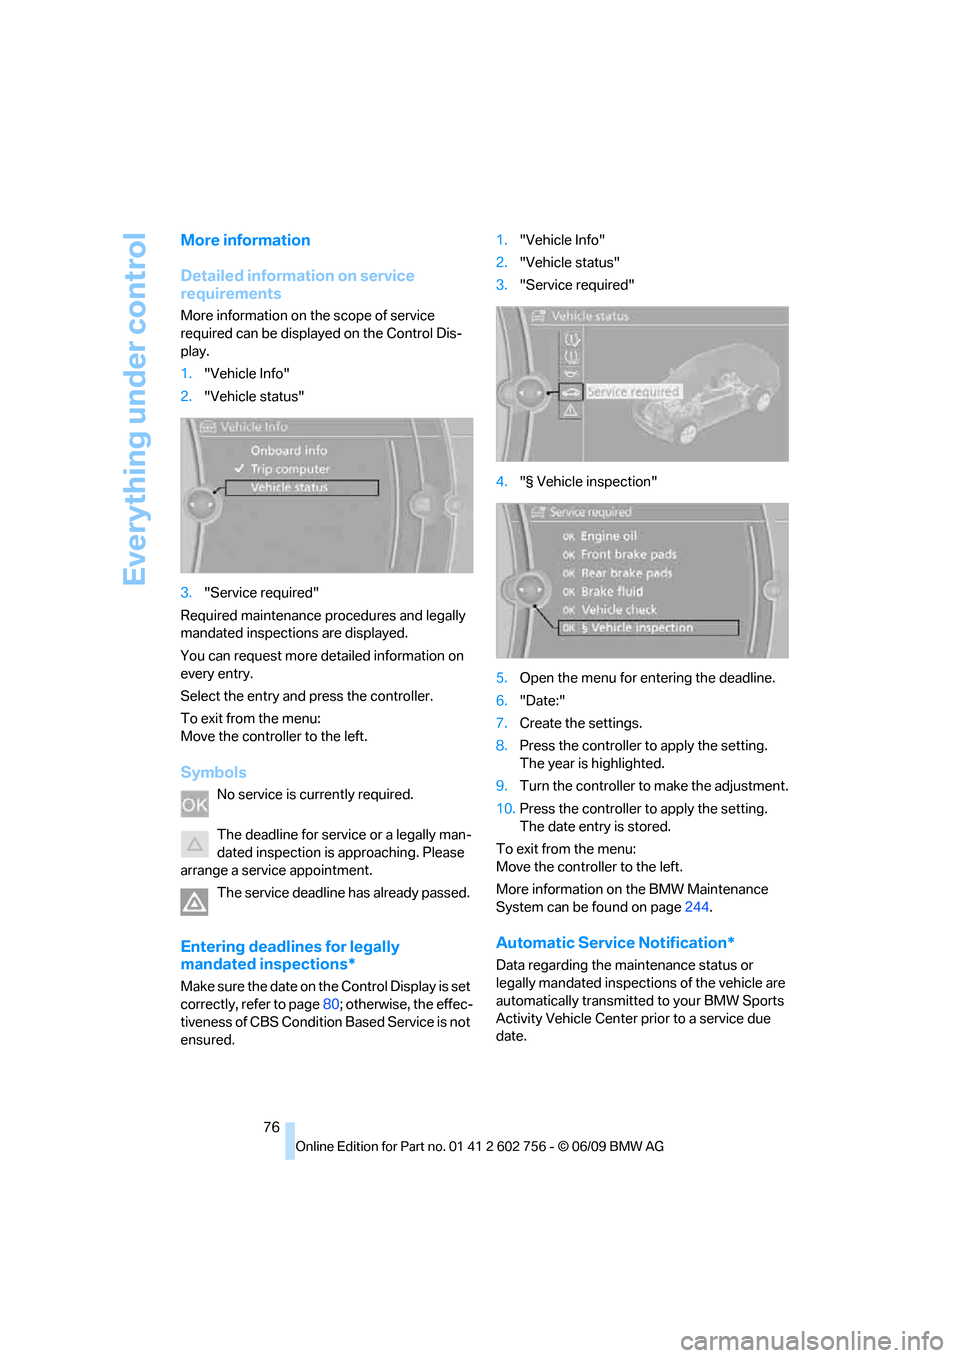
Detailed information on service
requirements
More information on the scope of service
required can be displayed on the Control Dis-
play.
1."Vehicle Info"
2."Vehicle status"
3."Service required"
Required maintenance procedures and legally
mandated inspections are displayed.
You can request more detailed information on
every entry.
Select the entry and press the controller.
To exit from the menu:
Move the controller to the left.
Symbols
No service is currently required.
The deadline for service or a legally man-
dated inspection is approaching. Please
arrange a service appointment.
The service deadline has already passed.
Entering deadlines for legally
mandated inspections*
Make sure the date on the Control Display is set
correctly, refer to page80; otherwise, the effec-
tiveness of CBS Condition Based Service is not
ensured.1."Vehicle Info"
2."Vehicle status"
3."Service required"
4."§ Vehicle inspection"
5.Open the menu for entering the deadline.
6."Date:"
7.Create the settings.
8.Press the controller to apply the setting.
The year is highlighted.
9.Turn the controller to make the adjustment.
10.Press the controller to apply the setting.
The date entry is stored.
To exit from the menu:
Move the controller to the left.
More information on the BMW Maintenance
System can be found on page244.
Automatic Service Notification*
Data regarding the maintenance status or
legally mandated inspections of the vehicle are
automatically transmitted to your BMW Sports
Activity Vehicle Center prior to a service due
date.
ba8_e70ag.book Seite 76 Freitag, 5. Juni 2009 11:42 11
Page 80 of 300
Everything under control
78
Hiding Check Control messages
Press the button in the turn signal lever up or
down.
Some Check Control messages are displayed
until the malfunctions have been rectified. They
cannot be hidden. If a number of malfunctions
occur simultaneously, they are displayed in
succession.
Other messages are automatically hidden after
approx. 20 seconds, but remain stored.
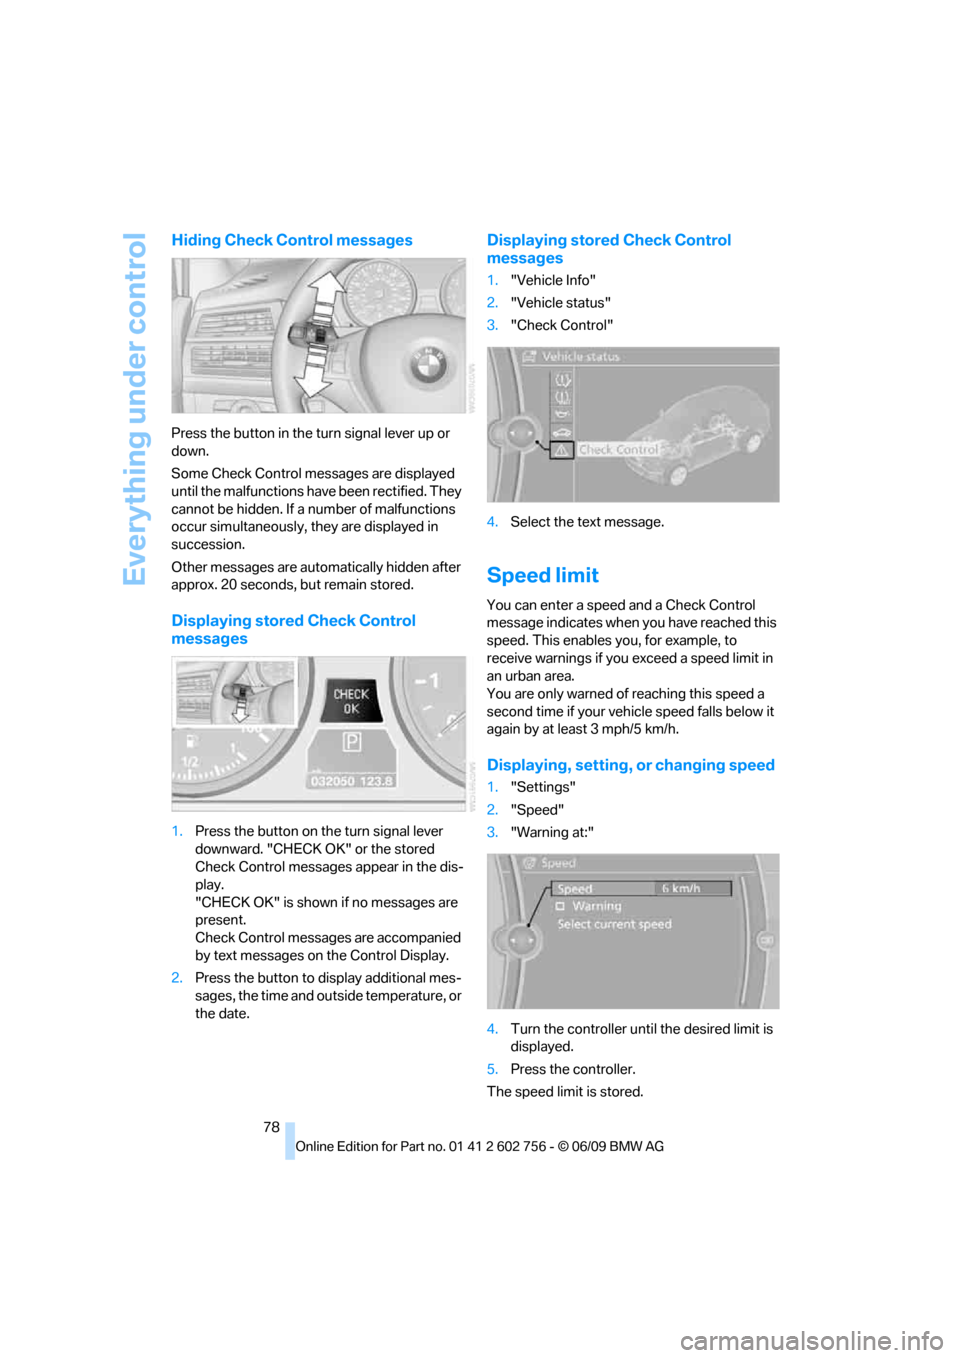
Displaying stored Check Control
messages
1.Press the button on the turn signal lever
downward. "CHECK OK" or the stored
Check Control messages appear in the dis-
play.
"CHECK OK" is shown if no messages are
present.
Check Control messages are accompanied
by text messages on the Control Display.
2.Press the button to display additional mes-
sages, the time and outside temperature, or
the date.
Displaying stored Check Control
messages
1."Vehicle Info"
2."Vehicle status"
3."Check Control"
4.Select the text message.
Speed limit
You can enter a speed and a Check Control
message indicates when you have reached this
speed. This enables you, for example, to
receive warnings if you exceed a speed limit in
an urban area.
You are only warned of reaching this speed a
second time if your vehicle speed falls below it
again by at least 3 mph/5 km/h.
Displaying, setting, or changing speed
1."Settings"
2."Speed"
3."Warning at:"
4.Turn the controller until the desired limit is
displayed.
5.Press the controller.
The speed limit is stored.
ba8_e70ag.book Seite 78 Freitag, 5. Juni 2009 11:42 11
Page 81 of 300
Controls
79Reference
At a glance
Driving tips
Communications
Navigation
Entertainment
Mobility
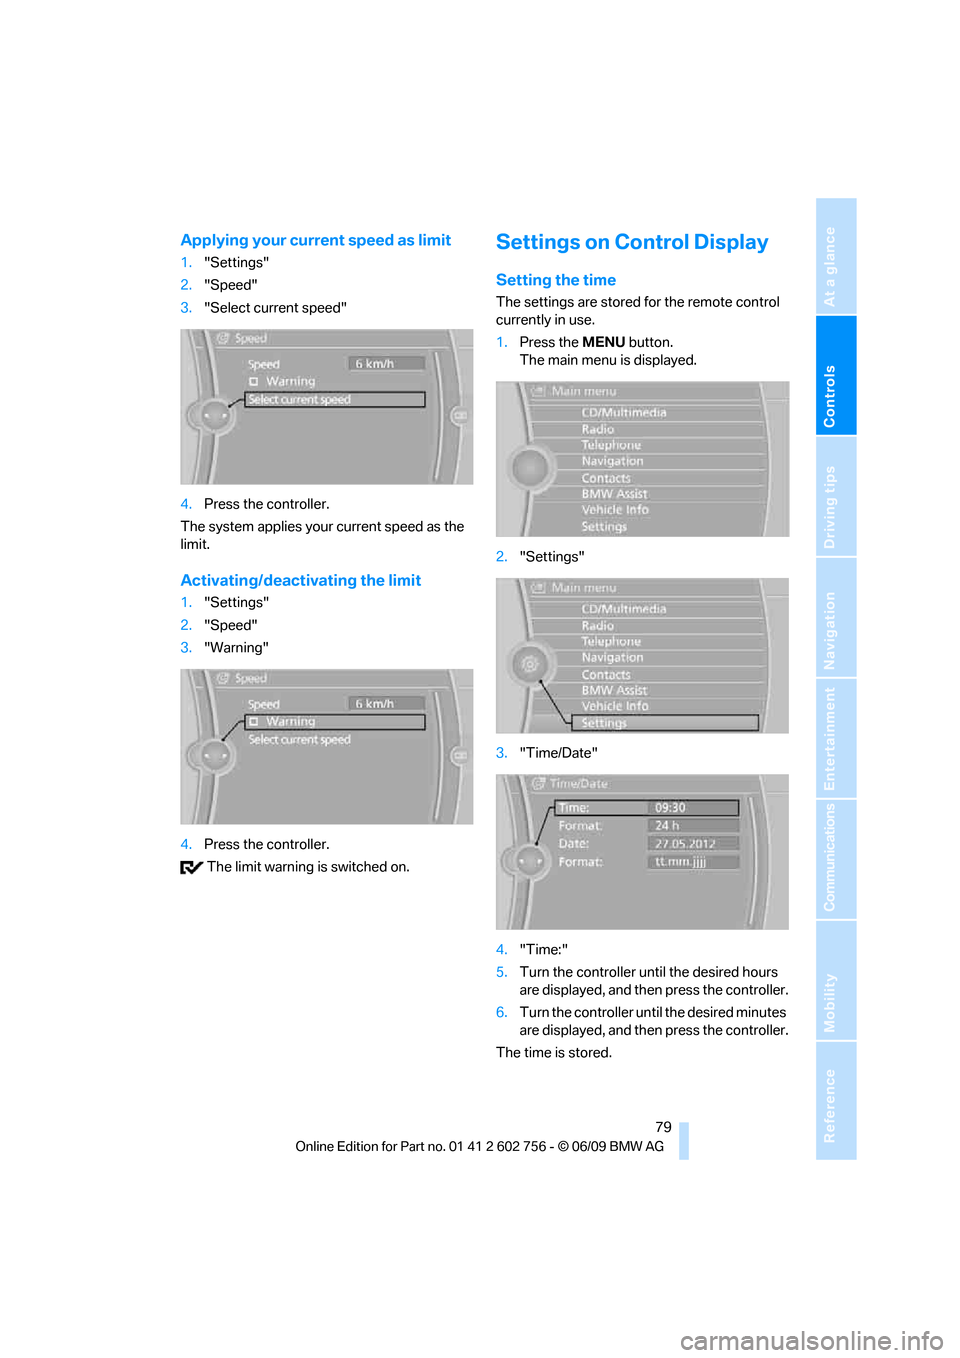
Applying your current speed as limit
1."Settings"
2."Speed"
3."Select current speed"
4.Press the controller.
The system applies your current speed as the
limit.
Activating/deactivating the limit
1."Settings"
2."Speed"
3."Warning"
4.Press the controller.
The limit warning is switched on.
Settings on Control Display
Setting the time
The settings are stored for the remote control
currently in use.
1.Press the MENUbutton.
The main menu is displayed.
2."Settings"
3."Time/Date"
4."Time:"
5.Turn the controller until the desired hours
are displayed, and then press the controller.
6.Turn the controller until the desired minutes
are displayed, and then press the controller.
The time is stored.
ba8_e70ag.book Seite 79 Freitag, 5. Juni 2009 11:42 11
Page 82 of 300
Everything under control
80
Setting time format
1."Settings"
2."Time/Date"
3."Format:"
4.Select the desired format and press the
controller.
The time format is stored.
Setting date
The settings are stored for the remote control
currently in use.
1."Settings"
2."Time/Date"
3."Date:"
4.Turn the controller until the desired day is
displayed, and press the controller.
5.Create the necessary settings for the
month and year.
The date is stored.
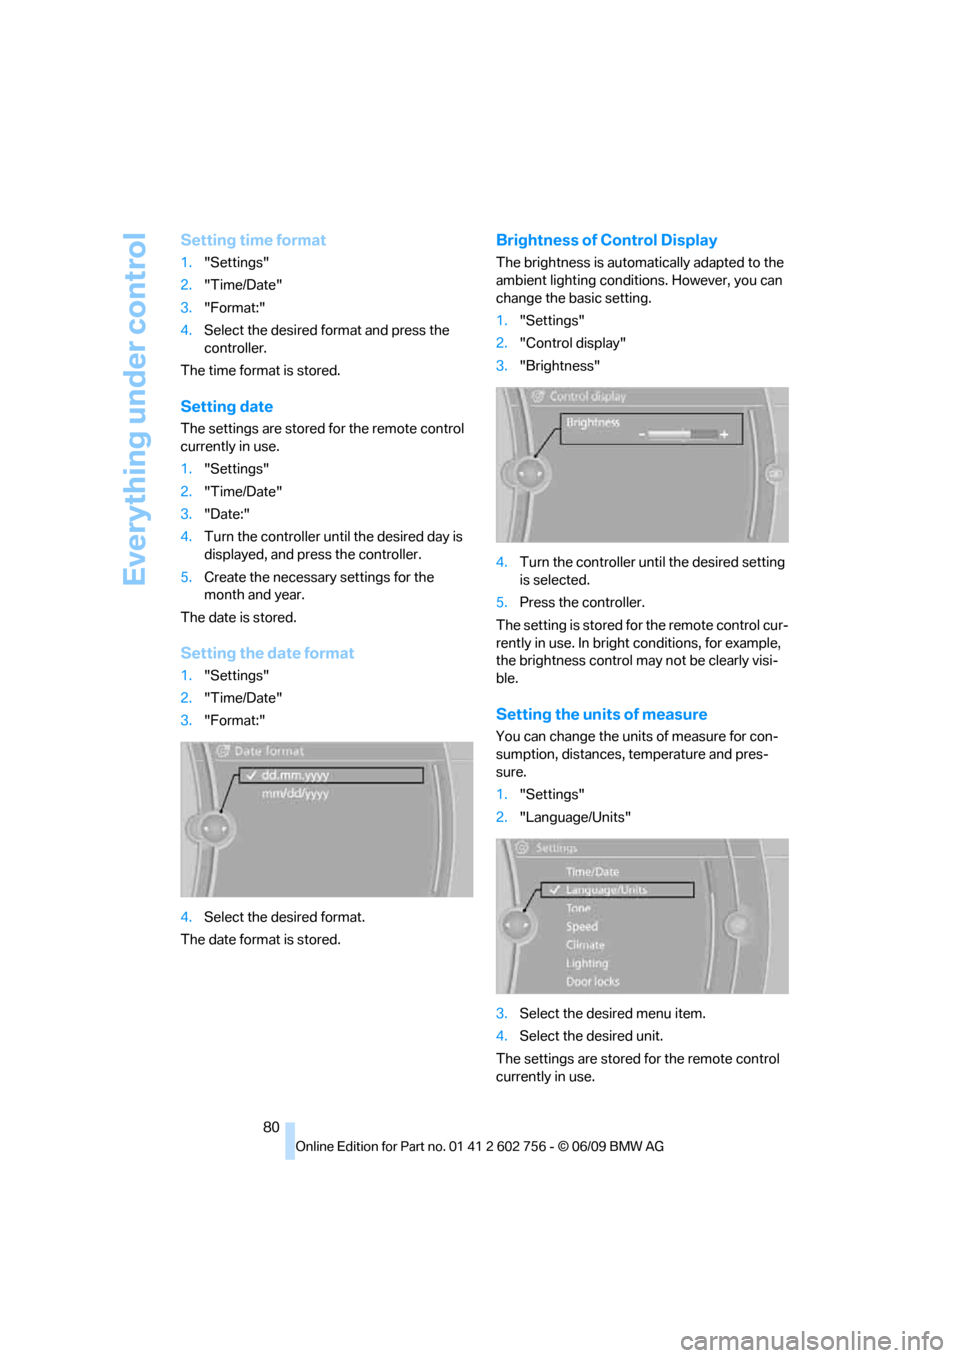
Setting the date format
1."Settings"
2."Time/Date"
3."Format:"
4.Select the desired format.
The date format is stored.
Brightness of Control Display
The brightness is automatically adapted to the
ambient lighting conditions. However, you can
change the basic setting.
1."Settings"
2."Control display"
3."Brightness"
4.Turn the controller until the desired setting
is selected.
5.Press the controller.
The setting is stored for the remote control cur-
rently in use. In bright conditions, for example,
the brightness control may not be clearly visi-
ble.
Setting the units of measure
You can change the units of measure for con-
sumption, distances, temperature and pres-
sure.
1."Settings"
2."Language/Units"
3.Select the desired menu item.
4.Select the desired unit.
The settings are stored for the remote control
currently in use.
ba8_e70ag.book Seite 80 Freitag, 5. Juni 2009 11:42 11
Page 155 of 300
Navigation
Driving tips
153Reference
At a glance
Controls
Communications
Entertainment
Mobility
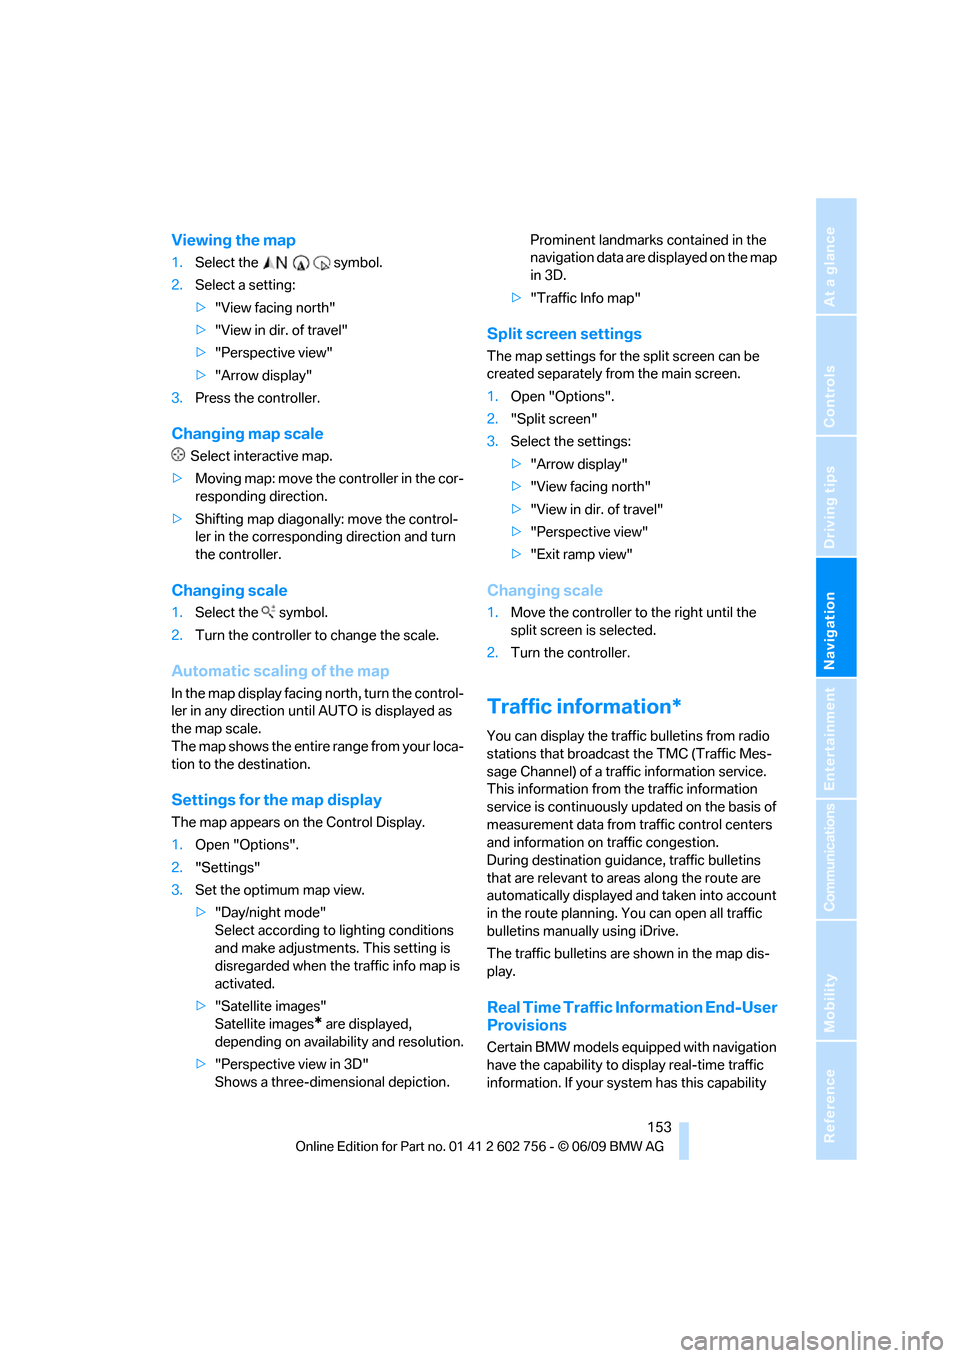
Viewing the map
1.Select the symbol.
2.Select a setting:
>"View facing north"
>"View in dir. of travel"
>"Perspective view"
>"Arrow display"
3.Press the controller.
Changing map scale
Select interactive map.
>Moving map: move the controller in the cor-
responding direction.
>Shifting map diagonally: move the control-
ler in the corresponding direction and turn
the controller.
Changing scale
1.Select the symbol.
2.Turn the controller to change the scale.
Automatic scaling of the map
In the map display facing north, turn the control-
ler in any direction until AUTO is displayed as
the map scale.
The map shows the entire range from your loca-
tion to the destination.
Settings for the map display
The map appears on the Control Display.
1.Open "Options".
2."Settings"
3.Set the optimum map view.
>"Day/night mode"
Select according to lighting conditions
and make adjustments. This setting is
disregarded when the traffic info map is
activated.
>"Satellite images"
Satellite images
* are displayed,
depending on availability and resolution.
>"Perspective view in 3D"
Shows a three-dimensional depiction. Prominent landmarks contained in the
navigation data are displayed on the map
in 3D.
>"Traffic Info map"
Split screen settings
The map settings for the split screen can be
created separately from the main screen.
1.Open "Options".
2."Split screen"
3.Select the settings:
>"Arrow display"
>"View facing north"
>"View in dir. of travel"
>"Perspective view"
>"Exit ramp view"
Changing scale
1.Move the controller to the right until the
split screen is selected.
2.Turn the controller.
Traffic information*
You can display the traffic bulletins from radio
stations that broadcast the TMC (Traffic Mes-
sage Channel) of a traffic information service.
This information from the traffic information
service is continuously updated on the basis of
measurement data from traffic control centers
and information on traffic congestion.
During destination guidance, traffic bulletins
that are relevant to areas along the route are
automatically displayed and taken into account
in the route planning. You can open all traffic
bulletins manually using iDrive.
The traffic bulletins are shown in the map dis-
play.
Real Time Traffic Information End-User
Provisions
Certain BMW models equipped with navigation
have the capability to display real-time traffic
information. If your system has this capability
ba8_e70ag.book Seite 153 Freitag, 5. Juni 2009 11:42 11