ESP BMW X5 2011 E70 Service Manual
[x] Cancel search | Manufacturer: BMW, Model Year: 2011, Model line: X5, Model: BMW X5 2011 E70Pages: 312, PDF Size: 8.91 MB
Page 121 of 312
Controls
119Reference
At a glance
Driving tips
Communications
Navigation
Entertainment
Mobility
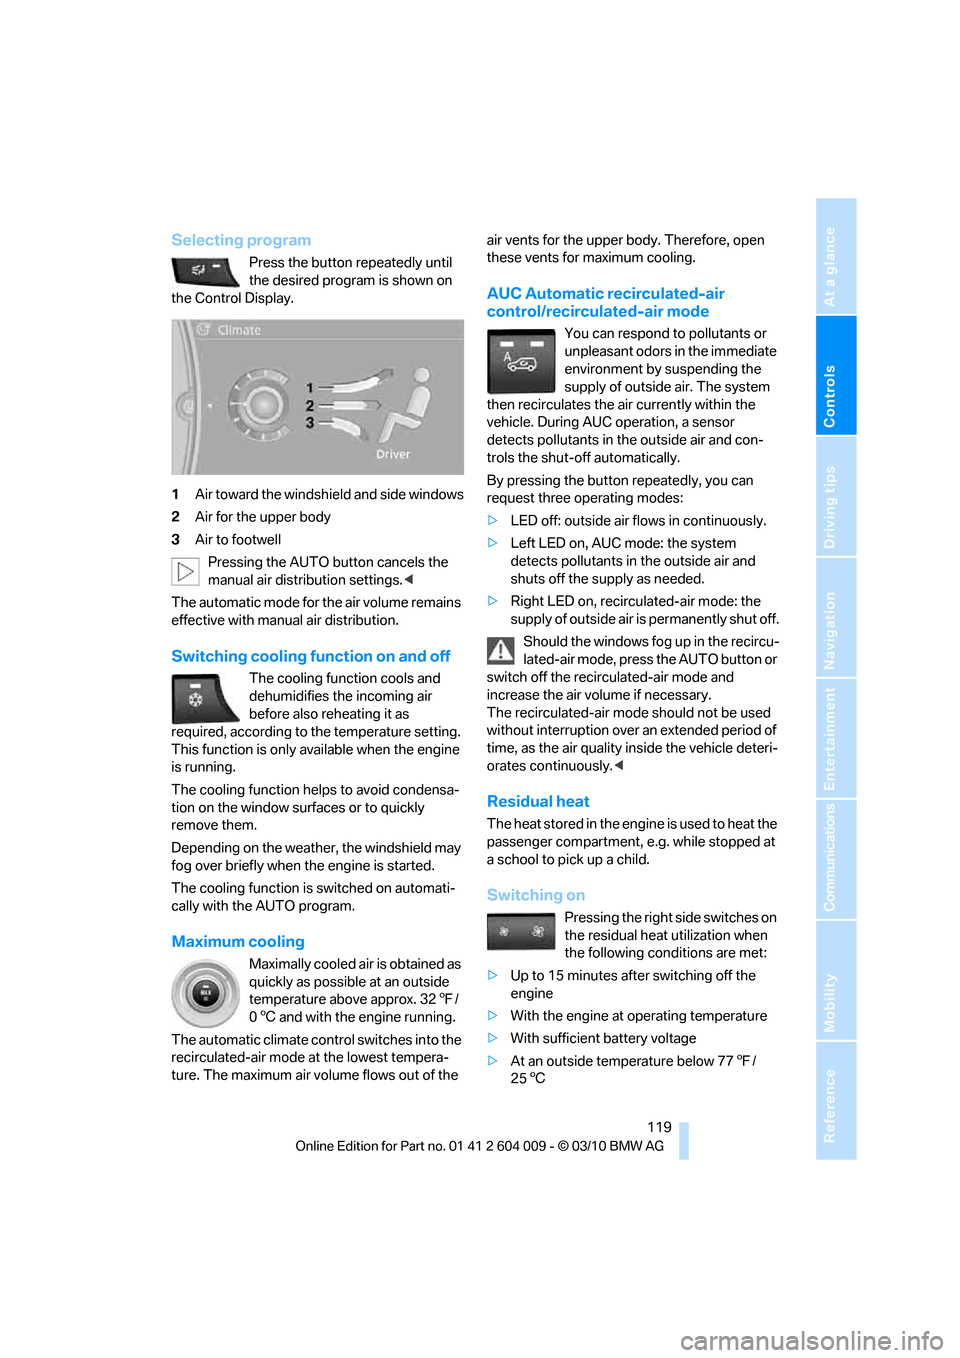
Selecting program
Press the button repeatedly until
the desired program is shown on
the Control Display.
1Air toward the windshield and side windows
2Air for the upper body
3Air to footwell
Pressing the AUTO button cancels the
manual air distribution settings.<
The automatic mode for the air volume remains
effective with manual air distribution.
Switching cooling function on and off
The cooling function cools and
dehumidifies the incoming air
before also reheating it as
required, according to the temperature setting.
This function is only available when the engine
is running.
The cooling function helps to avoid condensa-
tion on the window surfaces or to quickly
remove them.
Depending on the weather, the windshield may
fog over briefly when the engine is started.
The cooling function is switched on automati-
cally with the AUTO program.
Maximum cooling
Maximally cooled air is obtained as
quickly as possible at an outside
temperature above approx. 327/
06 and with the engine running.
The automatic climate control switches into the
recirculated-air mode at the lowest tempera-
ture. The maximum air volume flows out of the air vents for the upper body. Therefore, open
these vents for maximum cooling.
AUC Automatic recirculated-air
control/recirculated-air mode
You can respond to pollutants or
unpleasant odors in the immediate
environment by suspending the
supply of outside air. The system
then recirculates the air currently within the
vehicle. During AUC operation, a sensor
detects pollutants in the outside air and con-
trols the shut-off automatically.
By pressing the button repeatedly, you can
request three operating modes:
>LED off: outside air flows in continuously.
>Left LED on, AUC mode: the system
detects pollutants in the outside air and
shuts off the supply as needed.
>Right LED on, recirculated-air mode: the
supply of outside air is permanently shut off.
Should the windows fog up in the recircu-
lated-air mode, press the AUTO button or
switch off the recirculated-air mode and
increase the air volume if necessary.
The recirculated-air mode should not be used
without interruption over an extended period of
time, as the air quality inside the vehicle deteri-
orates continuously.<
Residual heat
The heat stored in the engine is used to heat the
passenger compartment, e.g. while stopped at
a school to pick up a child.
Switching on
Pressing the right side switches on
the residual heat utilization when
the following conditions are met:
>Up to 15 minutes after switching off the
engine
>With the engine at operating temperature
>With sufficient battery voltage
>At an outside temperature below 777/
256
Page 123 of 312
Controls
121Reference
At a glance
Driving tips
Communications
Navigation
Entertainment
Mobility
to recirculate the air within the vehicle, e.g. at
high temperatures. To do this, turn the
thumbwheel1 toward the rear and switch on
the blower, button2.<
Microfilter/activated-charcoal filter
The microfilter removes dust and pollen from
the incoming air. The activated-charcoal filter
provides additional protection by filtering gas-
eous pollutants from the outside air. This com-
bined filter is changed during maintenance by
your BMW Sports Activity Vehicle Center.
You can select a display of more detailed infor-
mation on the Control Display, refer to page79.
Automatic climate control
with 4-zone control*
Front operation
Corresponds to the operation of the automatic
climate control with 2-zone control, refer to
page117.
Rear operation
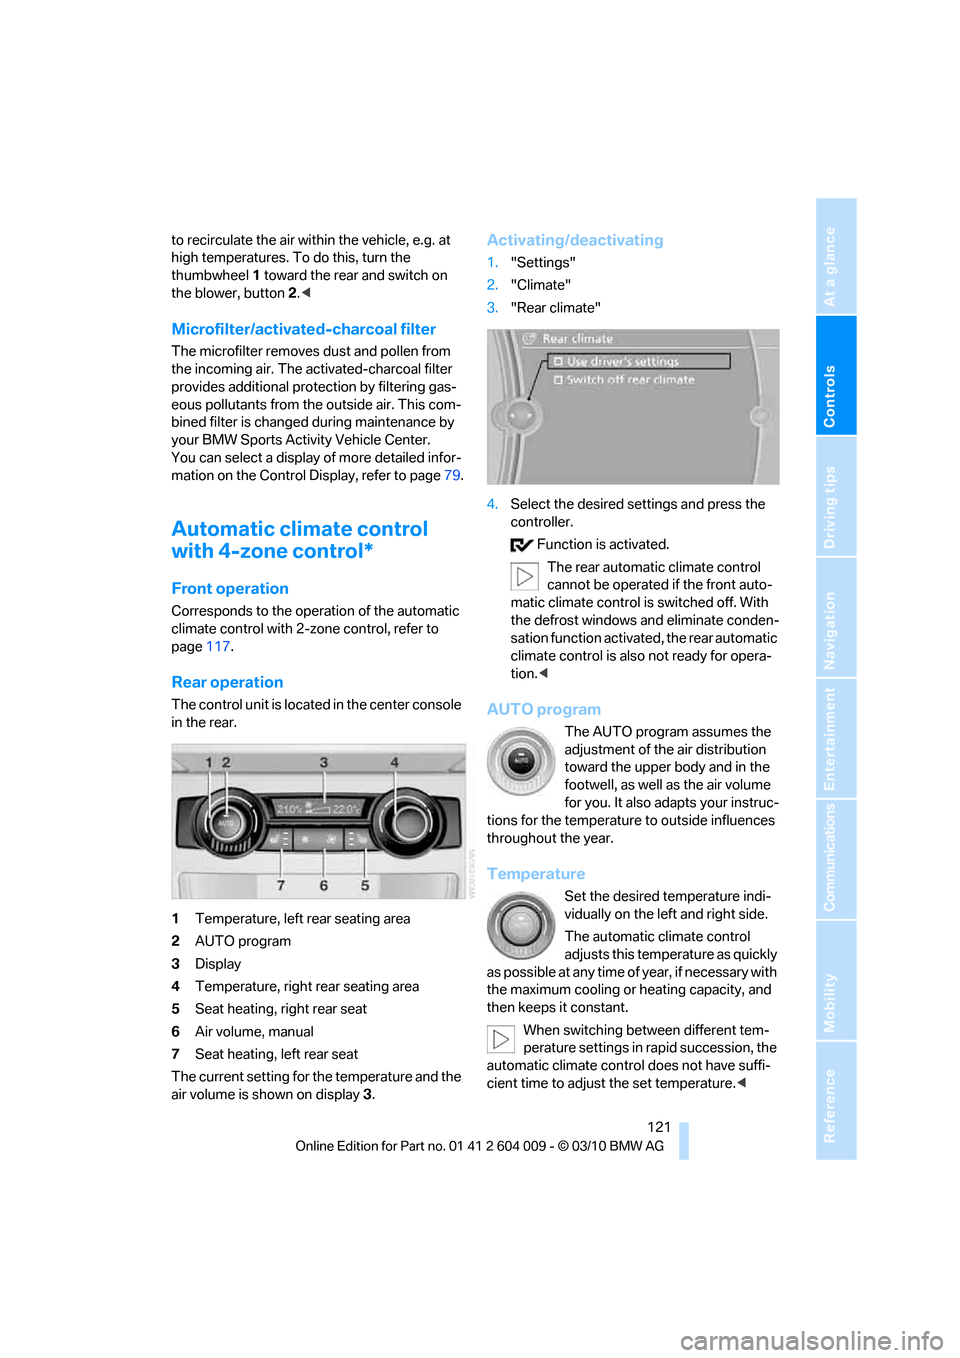
The control unit is located in the center console
in the rear.
1Temperature, left rear seating area
2AUTO program
3Display
4Temperature, right rear seating area
5Seat heating, right rear seat
6Air volume, manual
7Seat heating, left rear seat
The current setting for the temperature and the
air volume is shown on display3.
Activating/deactivating
1."Settings"
2."Climate"
3."Rear climate"
4.Select the desired settings and press the
controller.
Function is activated.
The rear automatic climate control
cannot be operated if the front auto-
matic climate control is switched off. With
the defrost windows and eliminate conden-
sation function activated, the rear automatic
climate control is also not ready for opera-
tion.<
AUTO program
The AUTO program assumes the
adjustment of the air distribution
toward the upper body and in the
footwell, as well as the air volume
for you. It also adapts your instruc-
tions for the temperature to outside influences
throughout the year.
Temperature
Set the desired temperature indi-
vidually on the left and right side.
The automatic climate control
adjusts this temperature as quickly
as possible at any time of year, if necessary with
the maximum cooling or heating capacity, and
then keeps it constant.
When switching between different tem-
perature settings in rapid succession, the
automatic climate control does not have suffi-
cient time to adjust the set temperature.<
Page 124 of 312
Climate
122
Air volume, manual
You can vary the air volume by
pressing on the corresponding
side. You can reactivate the auto-
matic mode for the air volume with the AUTO
button.
Switching off rear automatic climate
control
You can select the lowest blower
speed by pressing and holding the
left side. Pressing again switches
off the automatic climate control.
The automatic climate control can also be
switched off with iDrive. To switch on the
automatic climate control again, the system
must first be reactivated, refer to Activating/
deactivating.<
Y o u s w i t c h o n t h e s y s t e m a g a i n b y p r e s s i n g a n y
button of the rear automatic climate control.
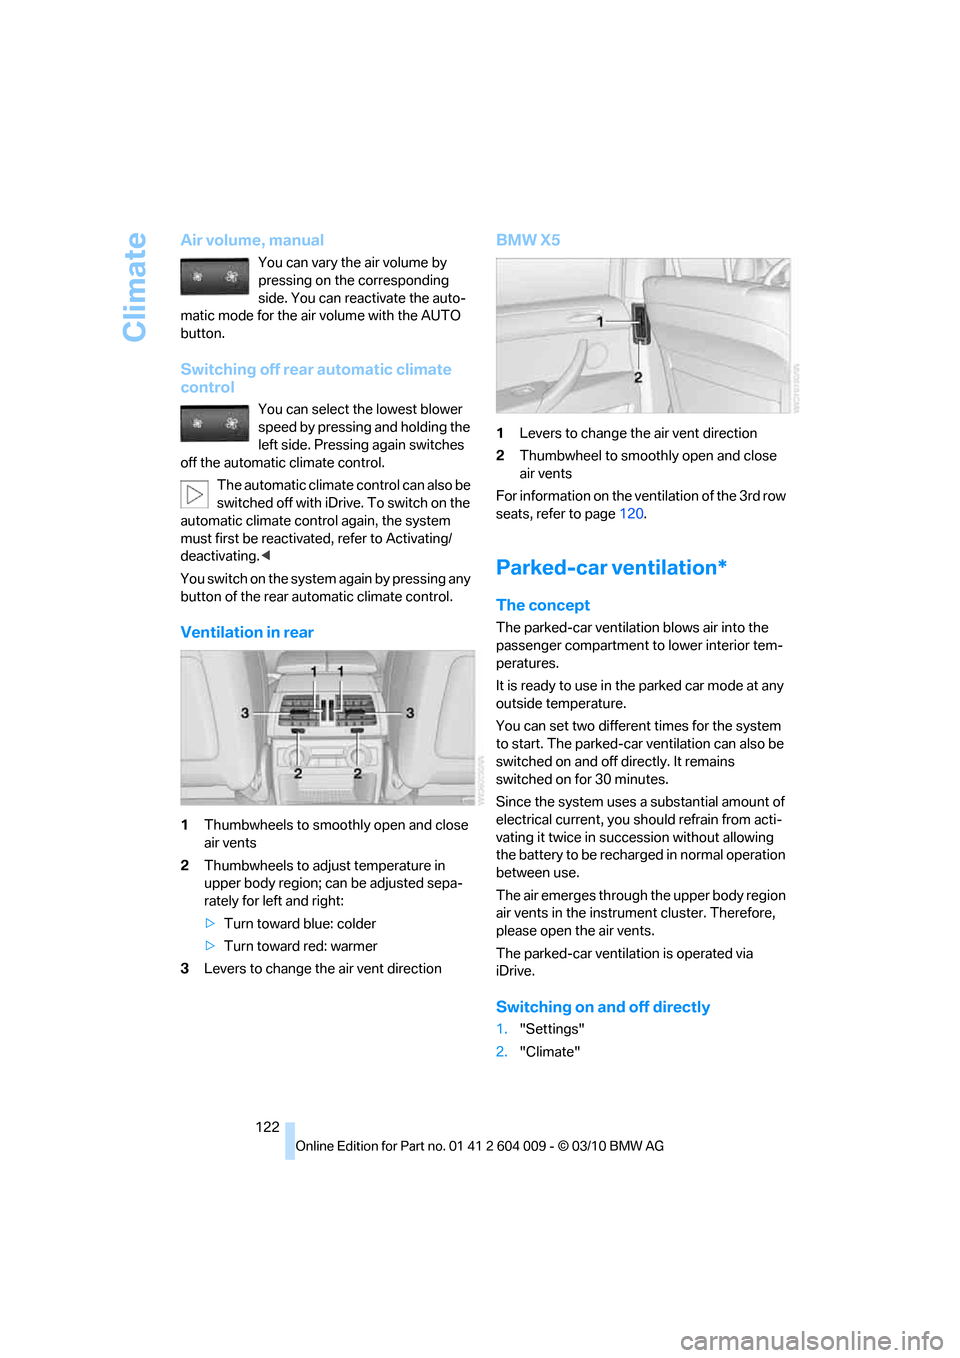
Ventilation in rear
1Thumbwheels to smoothly open and close
air vents
2Thumbwheels to adjust temperature in
upper body region; can be adjusted sepa-
rately for left and right:
>Turn toward blue: colder
>Turn toward red: warmer
3Levers to change the air vent direction
BMW X5
1Levers to change the air vent direction
2Thumbwheel to smoothly open and close
air vents
For information on the ventilation of the 3rd row
seats, refer to page120.
Parked-car ventilation*
The concept
The parked-car ventilation blows air into the
passenger compartment to lower interior tem-
peratures.
It is ready to use in the parked car mode at any
outside temperature.
You can set two different times for the system
to start. The parked-car ventilation can also be
switched on and off directly. It remains
switched on for 30 minutes.
Since the system uses a substantial amount of
electrical current, you should refrain from acti-
vating it twice in succession without allowing
the battery to be recharged in normal operation
between use.
The air emerges through the upper body region
air vents in the instrument cluster. Therefore,
please open the air vents.
The parked-car ventilation is operated via
iDrive.
Switching on and off directly
1."Settings"
2."Climate"
Page 126 of 312
Practical interior accessories
124
Practical interior accessories
Integrated universal remote
control*
The concept
The integrated universal remote control can
replace as many as three hand-held transmit-
ters for various remote-controlled accessories,
such as garage and gate or lighting systems.
The integrated universal remote control regis-
ters and stores signals from the original hand-
held transmitters.
The signal of an original hand-held transmitter
can be programmed on one of the three mem-
ory buttons1. Then with the ignition switched
on, this programmed memory button1 can be
used to operate the respective feature. The
LED2 flashes to confirm transmission of the
signal.
Should you sell your vehicle one day, be sure to
delete the stored programs beforehand for your
safety, refer to page125.
To prevent possible damage or injury,
before programming or using the inte-
grated universal remote control, always inspect
the immediate area to make certain that no peo-
ple, animals or objects are within the travel
range of the device. Also, comply with the
safety precautions of the original hand-held
transmitter.<
Checking compatibility
If you see this symbol on the packaging
or in the manual supplied with the orig-
inal hand-held transmitter, it is safe to
assume that it is compatible with the integrated
universal remote control.
Should you have additional questions,
please contact your BMW Sports Activity
Vehicle Center or call: 1-800-355-3515.
Information is also provided on the Internet at:
www.bmwusa.com or
www.homelink.com.HomeLink is a registered trademark of Johnson
Controls, Inc.<
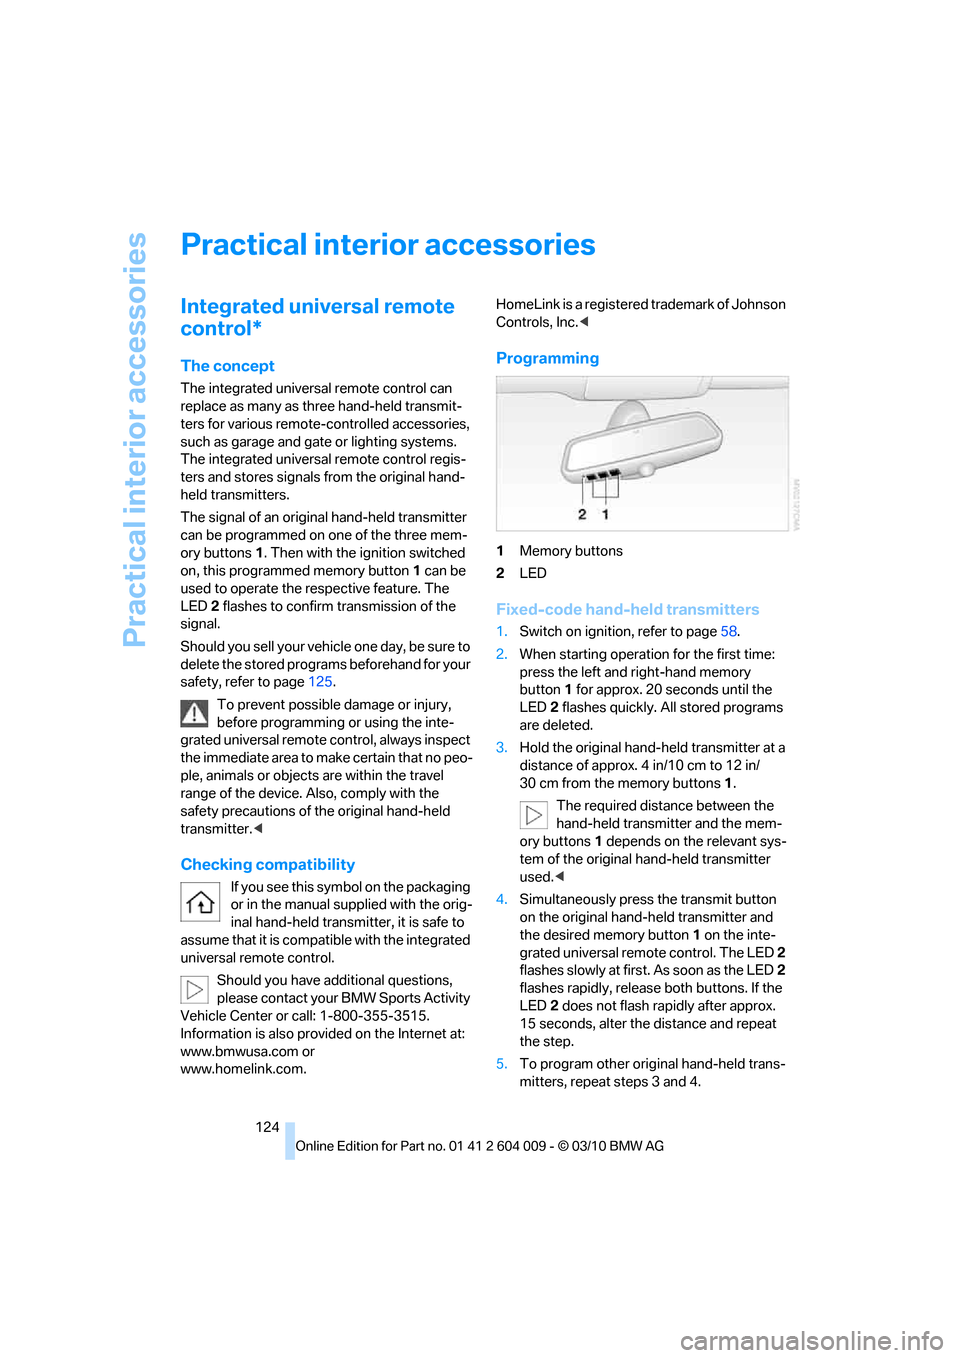
Programming
1Memory buttons
2LED
Fixed-code hand-held transmitters
1.Switch on ignition, refer to page58.
2.When starting operation for the first time:
press the left and right-hand memory
button1 for approx. 20 seconds until the
LED2 flashes quickly. All stored programs
are deleted.
3.Hold the original hand-held transmitter at a
distance of approx. 4 in/10 cm to 12 in/
30 cm from the memory buttons1.
The required distance between the
hand-held transmitter and the mem-
ory buttons1 depends on the relevant sys-
tem of the original hand-held transmitter
used.<
4.Simultaneously press the transmit button
on the original hand-held transmitter and
the desired memory button1 on the inte-
grated universal remote control. The LED 2
flashes slowly at first. As soon as the LED2
flashes rapidly, release both buttons. If the
LED2 does not flash rapidly after approx.
15 seconds, alter the distance and repeat
the step.
5.To program other original hand-held trans-
mitters, repeat steps 3 and 4.
Page 127 of 312
Controls
125Reference
At a glance
Driving tips
Communications
Navigation
Entertainment
Mobility
The corresponding memory button1 is now
programmed with the signal of the original
hand-held transmitter.
You can operate the device when the engine is
running or when the ignition is switched on.
If the device cannot be used after
repeated programming, check whether
the original hand-held transmitter uses an alter-
nating-code system. To do so, either read the
instructions for the original hand-held transmit-
ter or hold down the programmed memory
button1 of the integrated universal remote
control. If the LED2 on the integrated universal
remote control flashes rapidly for a short time
and then remains lit for approx. 2 seconds, this
indicates that the original hand-held transmitter
uses an alternating-code system. In the case of
an alternating-code system, program the mem-
ory buttons1 as described at Alternating-code
hand-held transmitters.<
Alternating-code hand-held
transmitters
To program the integrated universal remote
control, consult the operating instructions for
the equipment to be set. You will find informa-
tion there on the possibilities for synchroniza-
tion.
When programming hand-held transmitters
that employ an alternating code, observe the
following supplementary instructions:
Programming will be easier with the aid of
a second person.<
1.Park your vehicle within the range of the
remote-controlled device.
2.Program the integrated universal remote
control as described above in the section
Fixed-code hand-held transmitters.
3.Locate the button on the receiver of the
device to be set, e.g. on the drive unit.
4.Press the button on the receiver of the
device to be set. After step 4, you have
approx. 30 seconds for step 5.
5.Press the programmed memory button1
of the integrated universal remote control
three times.The corresponding memory button1 is now
programmed with the signal of the original
hand-held transmitter.
Should you have questions, please con-
tact your BMW Sports Activity Vehicle
Center.<
Deleting all stored programs
Press the left and right-hand memory button1
for approx. 20 seconds until the LED2 flashes
quickly:
All stored programs are deleted.
Reassigning individual programs
1.Hold the original hand-held transmitter at a
distance of approx. 4 in/10 cm to 12 in/
30 cm from the memory buttons1.
The required distance between the
hand-held transmitter and the mem-
ory buttons1 depends on the relevant sys-
tem of the original hand-held transmitter
used.<
2.Press the desired memory button1 of the
integrated universal remote control.
3.When the LED2 flashes slowly after approx.
20 seconds, press the transmit button of
the original hand-held transmitter. Release
both buttons as soon as the LED2 flashes
rapidly. If the LED2 does not flash rapidly
after approx. 15 seconds, alter the distance
and repeat the step.
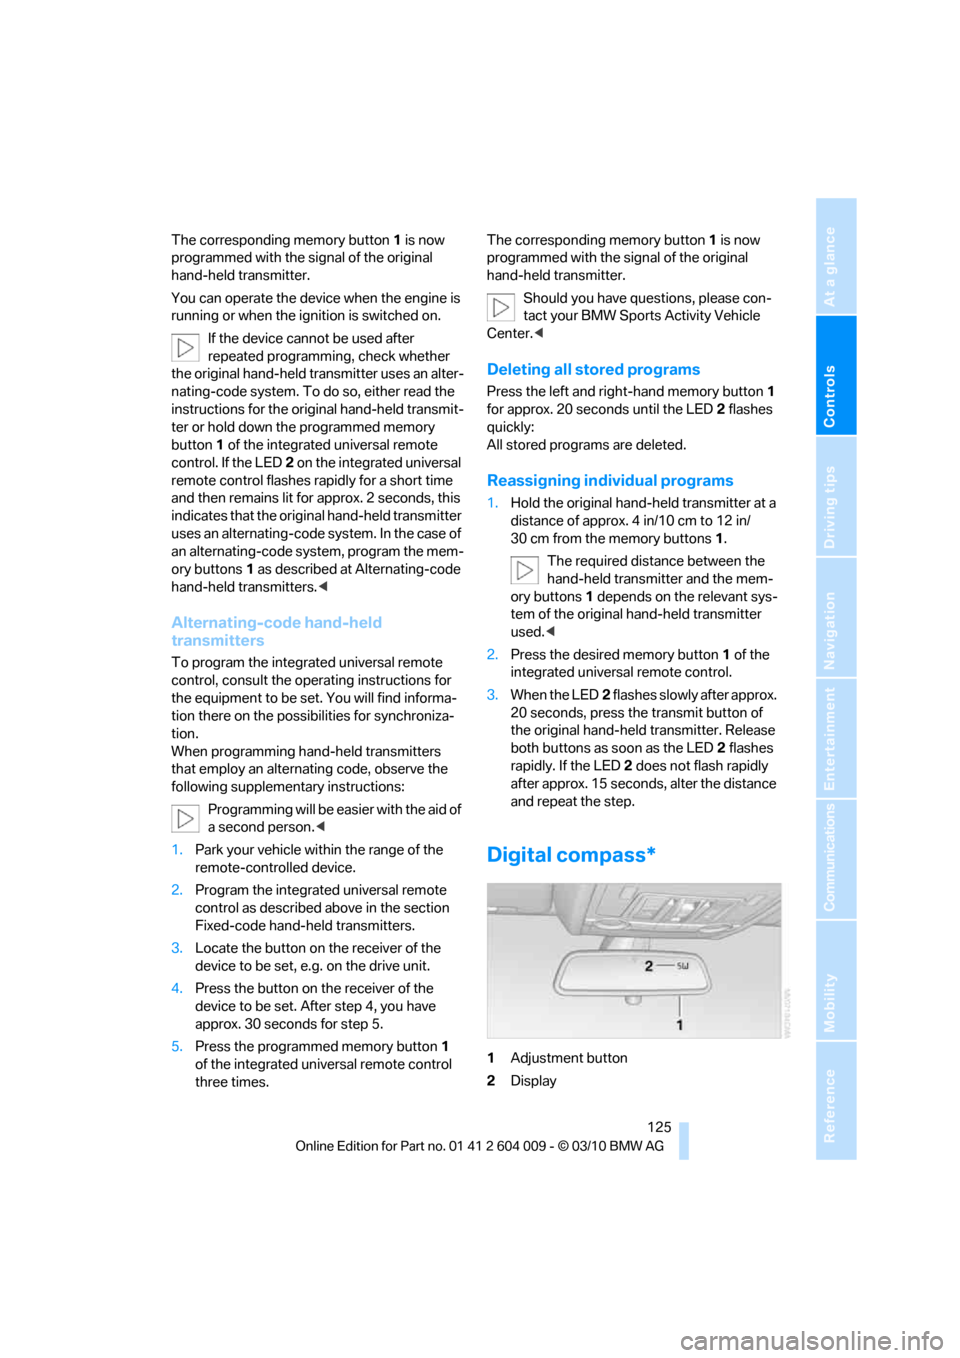
Digital compass*
1Adjustment button
2Display
Page 128 of 312
Practical interior accessories
126 The display indicates the cardinal or intercardi-
nal direction in which you are currently driving.
Operating principle
You can run various functions by pressing the
adjustment button with a pointed object, e.g. a
ball-point pen etc. The following setting options
are displayed consecutively, depending on how
long the adjustment button is pressed:>Press briefly: switch display on/off
>3 to 6 seconds: set compass zone
>6 to 9 seconds: calibrate compass
>9 to 12 seconds: set left/right-hand drive
vehicle
>12 to 15 seconds: setting language
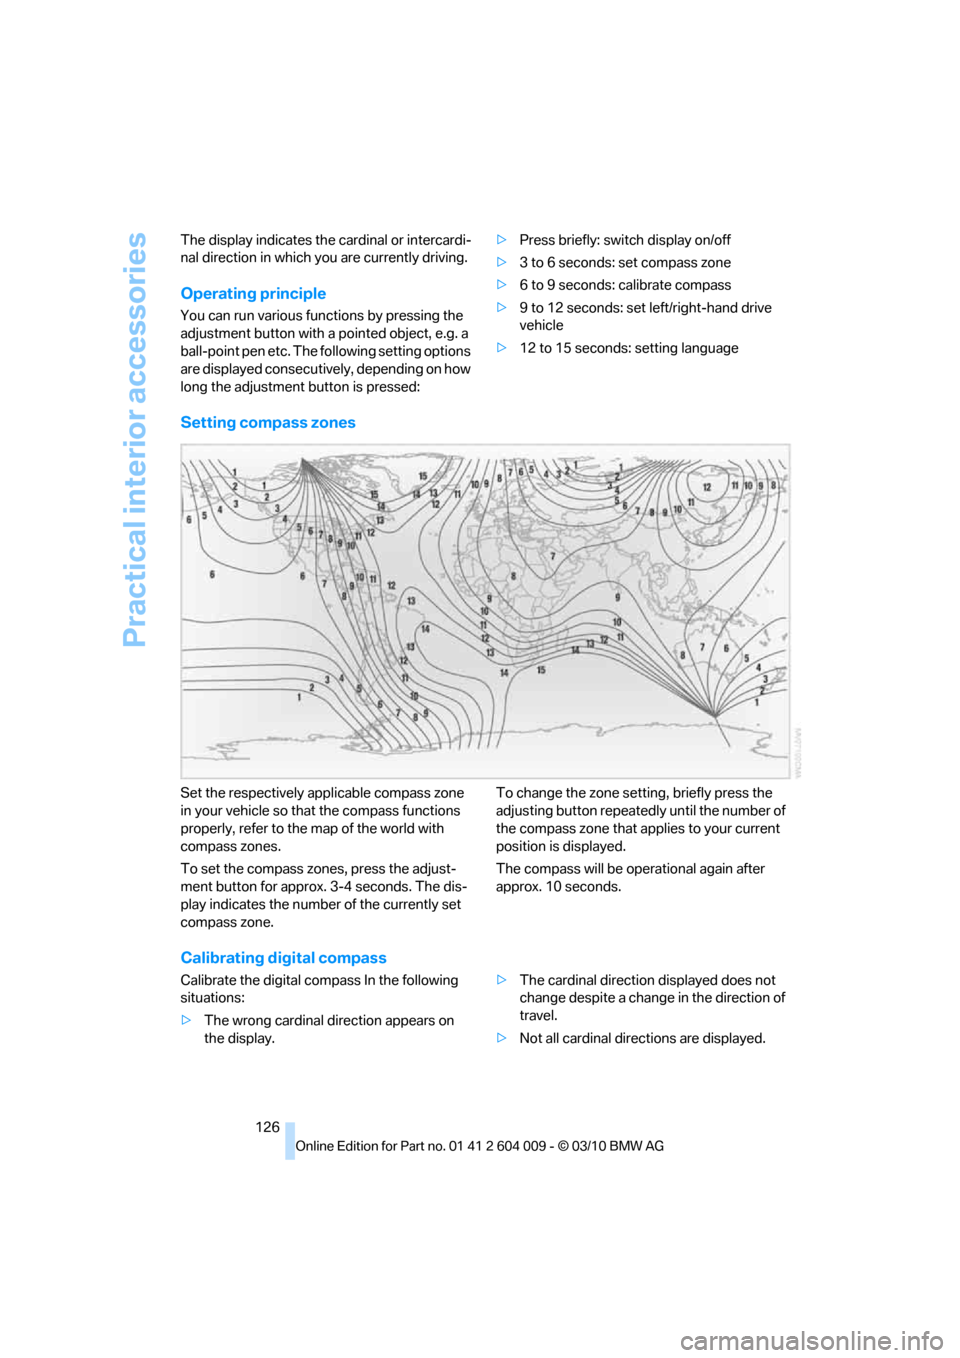
Setting compass zones
Set the respectively applicable compass zone
in your vehicle so that the compass functions
properly, refer to the map of the world with
compass zones.
To set the compass zones, press the adjust-
ment button for approx. 3-4 seconds. The dis-
play indicates the number of the currently set
compass zone.To change the zone setting, briefly press the
adjusting button repeatedly until the number of
the compass zone that applies to your current
position is displayed.
The compass will be operational again after
approx. 10 seconds.
Calibrating digital compass
Calibrate the digital compass In the following
situations:
>The wrong cardinal direction appears on
the display.>The cardinal direction displayed does not
change despite a change in the direction of
travel.
>Not all cardinal directions are displayed.
Page 136 of 312
Practical interior accessories
134 1.Insert the brackets at the respective notch
in the rail on the cargo area floor.
2.Press down the brackets to push them into
the desired position.
3.Check the firm seating of the brackets.
They must be clearly heard to engage.
Do not lay cargo on the brackets, as oth-
erwise they could be unlocked.<
Dividing up cargo area
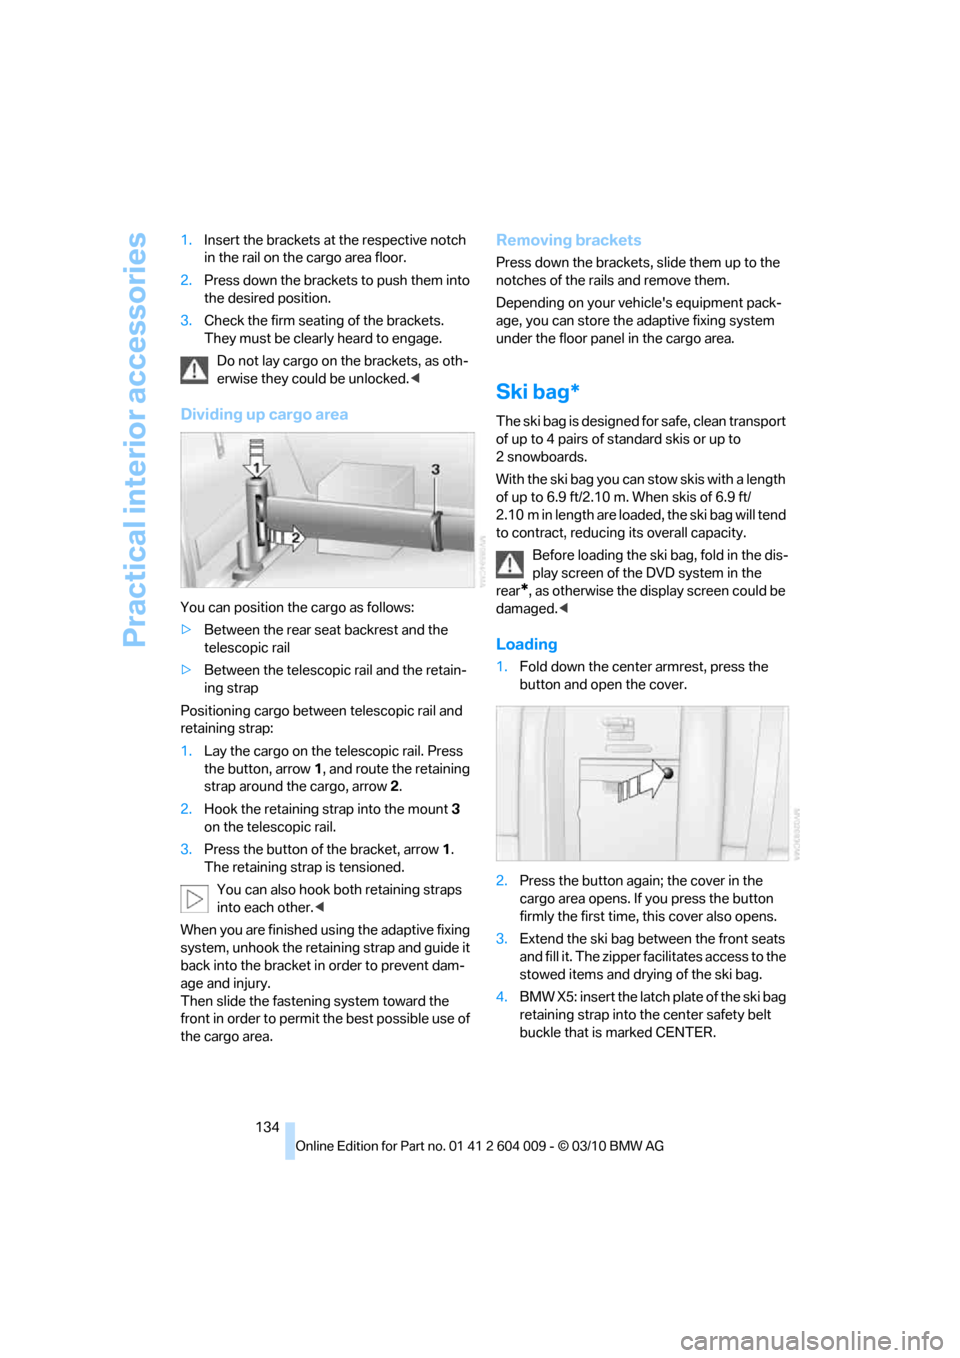
You can position the cargo as follows:
>Between the rear seat backrest and the
telescopic rail
>Between the telescopic rail and the retain-
ing strap
Positioning cargo between telescopic rail and
retaining strap:
1.Lay the cargo on the telescopic rail. Press
the button, arrow1, and route the retaining
strap around the cargo, arrow2.
2.Hook the retaining strap into the mount3
on the telescopic rail.
3.Press the button of the bracket, arrow1.
The retaining strap is tensioned.
You can also hook both retaining straps
into each other.<
When you are finished using the adaptive fixing
system, unhook the retaining strap and guide it
back into the bracket in order to prevent dam-
age and injury.
Then slide the fastening system toward the
front in order to permit the best possible use of
the cargo area.
Removing brackets
Press down the brackets, slide them up to the
notches of the rails and remove them.
Depending on your vehicle's equipment pack-
age, you can store the adaptive fixing system
under the floor panel in the cargo area.
Ski bag*
The ski bag is designed for safe, clean transport
of up to 4 pairs of standard skis or up to
2snowboards.
With the ski bag you can stow skis with a length
of up to 6.9 ft/2.10 m. When skis of 6.9 ft/
2.10 m in length are loaded, the ski bag will tend
to contract, reducing its overall capacity.
Before loading the ski bag, fold in the dis-
play screen of the DVD system in the
rear
*, as otherwise the display screen could be
damaged.<
Loading
1.Fold down the center armrest, press the
button and open the cover.
2.Press the button again; the cover in the
cargo area opens. If you press the button
firmly the first time, this cover also opens.
3.Extend the ski bag between the front seats
and fill it. The zipper facilitates access to the
stowed items and drying of the ski bag.
4.BMW X5: insert the latch plate of the ski bag
retaining strap into the center safety belt
buckle that is marked CENTER.
Page 142 of 312
Things to remember when driving
140 planing, and is characterized by a partial or
complete loss of contact between the tires and
the road surface, ultimately undermining your
ability to steer and brake the vehicle.<
The risk of hydroplaning increases as the tread
depth of the tires decreases, also refer to Mini-
mum tread depth on page248.
Driving through water
Maximum water depth:
>BMW X5 20 in/50 cm
>BMW X6 17 in/45 cm
Only drive through water up to the above-
mentioned depth at no greater than walk-
ing speed; otherwise, the engine, electrical sys-
tem, and transmission can be damaged.<
Braking safely
Your BMW is equipped with ABS as a standard
feature. In situations that require it, it is best to
brake with full force. Since the vehicle maintains
steering responsiveness, you can still avoid
possible obstacles with a minimum of steering
effort.
Pulsation of the brake pedal, combined with
sounds from the hydraulic circuits, indicate that
ABS is in its active mode.
Do not drive with your foot resting on the
brake pedal. Even light but consistent
pedal pressure can lead to high temperatures,
brake wear and possibly even brake failure.<
Driving in wet conditions
When roads are wet or there is heavy rain,
briefly exert gentle pressure on the brake pedal
every few miles. Monitor traffic conditions to
ensure that this maneuver does not endanger
other road users. The heat generated in this
process helps dry the pads and rotors to ensure
that full braking efficiency will then be available
when you need it.
Hills
To prevent overheating and the resulting
reduced efficiency of the brake system,
drive long or steep downhill gradients in the gear in which the least braking is required. Even
light but consistent pressure on the brake pedal
can lead to high temperatures, brake wear and
possibly even brake failure.<
The braking effect of the engine can be further
increased by downshifting in the manual mode
of the automatic transmission, if necessary into
first gear, refer to page64. This prevents an
excessive strain on the brakes.
Do not drive in idle or with the engine
stopped, otherwise there will be no
engine braking action or support of the braking
force and steering.
Never allow floor mats, carpets or any other
objects to protrude into the area of movement
of the pedals and impair their operation.<
Corrosion on brake rotors
When the vehicle is driven only occasionally,
during extended periods when the vehicle is not
used at all, and in operating conditions where
brake applications are less frequent, there is an
increased tendency for corrosion to form on
rotors, while contaminants accumulate on the
brake pads. This occurs because the minimum
pressure which must be exerted by the pads
during brake applications to clean the rotors is
not reached.
Should corrosion form on the brake rotors, the
brakes will tend to respond with a pulsating
effect that even extended application will fail to
cure.
When vehicle is parked
Condensation forms in the automatic climate
control system during operation, and then exits
under the vehicle. Traces of condensed water
under the vehicle are therefore normal.
Loading
To avoid loading the tires beyond their
approved carrying capacity, never over-
load the vehicle. Overloading can lead to over-
heating and increases the rate at which damage
develops inside the tires. The ultimate result
can assume the form of a sudden blowout.<
Page 145 of 312
Driving tips
143Reference
At a glance
Controls
Communications
Navigation
Entertainment
Mobility
ger the car's occupants, for example if sudden
braking or evasive maneuvers are necessary.
Never exceed either the approved gross vehicle
weight or either of the approved axle weights,
refer to page283, as excessive loads can pose
a safety hazard, and may also place you in viola-
tion of traffic safety laws.
You should never transport unsecured heavy or
hard objects in the passenger compartment, as
they could fly around and pose a safety hazard
to the vehicle's occupants during abrupt brak-
ing or evasive maneuvers.
Use only the lashing eyes pictured to fasten the
heavy-duty cargo straps. Do not secure cargo
with the attachment points for the top tether,
refer to page55; otherwise they could be dam-
aged.<
Roof-mounted luggage rack*
A special rack system is available as an option
for your BMW. Please comply with the precau-
tions included with the installation instructions.
Loading roof-mounted luggage rack
Because roof racks raise the vehicle's center of
gravity when loaded, they have a major effect on
its handling and steering response. You should
therefore always remember not to exceed the
approved roof load capacity, the approved
gross vehicle weight or the axle weights when
loading the rack.
You can find the specified weights under
Weights on page283.
The load on the roof must be evenly distributed
and must not extend outward beyond the limits
of the loading surface. Always stow the heaviest
pieces on the bottom. Be sure that adequate
clearance is maintained for raising the glass
sunroof
*/panoramic glass sunroof* and that
objects do not project into the opening path of
the liftgate.
Secure roof-mounted cargo correctly and
securely to prevent it from shifting or falling off
during the trip.
Drive smoothly. Avoid sudden acceleration and
braking maneuvers. Take corners gently.
Driving on poor roads
Y our B MW is at hom e on a ll r oa ds a nd surfac e s.
It combines a 4-wheel drive system with the
advantages of a normal passenger car.
Do not drive on unpaved terrain, as other-
wise the vehicle may be damaged.<
When you are driving on poor roads, there are a
few points which you should strictly observe for
your own safety, for that of your passengers,
and for the safety of the vehicle:
>Familiarize yourself with the vehicle before
driving off and avoid taking risks at all costs.
>Adapt your driving speed to the road condi-
tions. The steeper and rougher the road
surface is, the lower the speed should be.
>If you want to drive on very steep uphill or
downhill gradients, make sure beforehand
that the engine oil and coolant levels are
near the MAX mark, refer to page252.
BMW X5: you can operate your vehicle on
uphill and downhill gradients with a maxi-
mum slope of 50 %.
>On very steep downhill slopes, use Hill
Descent Control HDC, refer to page97.
BMW X5: it is possible to start off on inclines
of up to 33 %. The permissible body roll is
50 %.
>While driving, watch carefully for obstacles
such as rocks or holes. Try to avoid these
obstacles whenever possible.
>Make sure that the undercarriage does not
touch the ground, for example on crests and
bumpy roads. The ground clearance of the
vehicle is a maximum of approx. 8 in/20 cm.
Please note that the ground clearance can
vary depending on loading and the driving
conditions of the vehicle.
>Only drive through road surface water up to
a maximum water depth of
>BMW X5 20 in/50 cm
>BMW X6 17 in/45 cm
And only drive at walking speed; do not
remain stationary.
Page 154 of 312
Destination entry
152
Editing or deleting an address
1."Navigation"
2."Address book"
3.Highlight the entry.
4.Open "Options".
5."Edit in Contacts" or "Delete entry".
Using home address as destination
The home address must be stored as a destina-
tion. Refer to Specifying a contact as the home
address, page224.
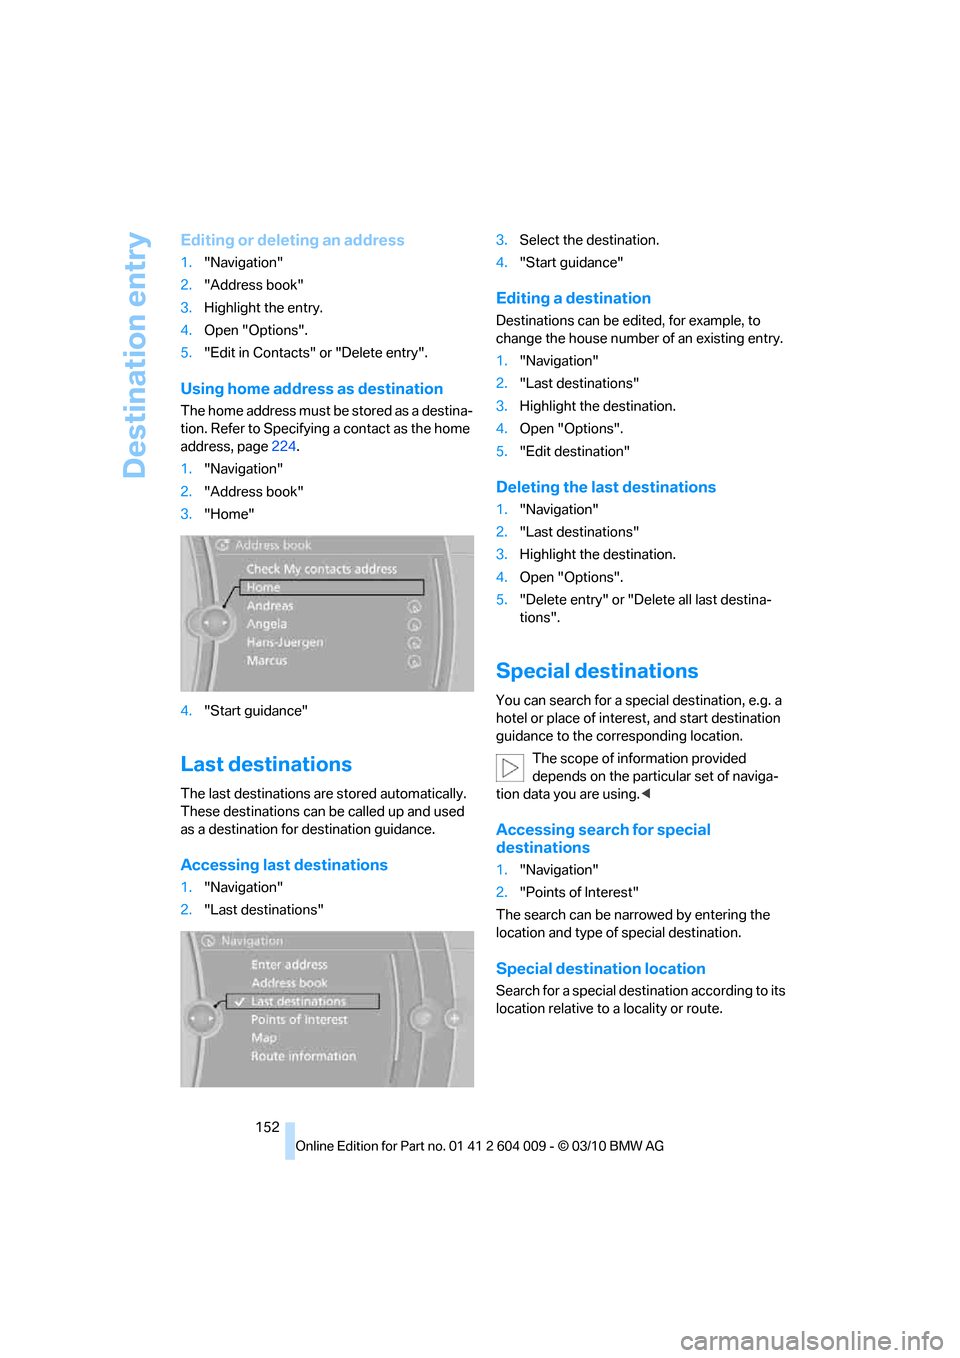
1."Navigation"
2."Address book"
3."Home"
4."Start guidance"
Last destinations
The last destinations are stored automatically.
These destinations can be called up and used
as a destination for destination guidance.
Accessing last destinations
1."Navigation"
2."Last destinations"3.Select the destination.
4."Start guidance"
Editing a destination
Destinations can be edited, for example, to
change the house number of an existing entry.
1."Navigation"
2."Last destinations"
3.Highlight the destination.
4.Open "Options".
5."Edit destination"
Deleting the last destinations
1."Navigation"
2."Last destinations"
3.Highlight the destination.
4.Open "Options".
5."Delete entry" or "Delete all last destina-
tions".
Special destinations
You can search for a special destination, e.g. a
hotel or place of interest, and start destination
guidance to the corresponding location.
The scope of information provided
depends on the particular set of naviga-
tion data you are using.<
Accessing search for special
destinations
1."Navigation"
2."Points of Interest"
The search can be narrowed by entering the
location and type of special destination.
Special destination location
Search for a special destination according to its
location relative to a locality or route.