BMW X5 3.0I 2007 E70 Owner's Manual
Manufacturer: BMW, Model Year: 2007, Model line: X5 3.0I, Model: BMW X5 3.0I 2007 E70Pages: 272, PDF Size: 9.03 MB
Page 231 of 272
Mobility
229Reference
At a glance
Controls
Driving tips
Communications
Navigation
Entertainment
For care and maintenance of the headlamps,
please follow the instructions in the separate
Caring for your vehicle brochure.
For bulbs for which replacement is not
described and for checking and adjusting
headlamp aim, please contact your BMW
Sports Activity Vehicle Center.<
Light-emitting diodes LEDs
Light-emitting diodes installed behind translu-
cent lenses serve as the light source for many of
the controls and displays in your vehicle. These
light-emitting diodes, which operate using a
concept similar to that applied in conventional
lasers, are officially designated as Class 1 light-
emitting diodes.
Do not remove the covers, and never
stare into the unfiltered light for several
hours, as irritation of the retina could result.<
Xenon bulbs
The service life of these bulbs is very long and
the probability of a failure is very low, provided
that they are not switched on and off an unusual
number of times. If one of these bulbs should
nevertheless fail, it is possible to continue driv-
ing with great caution using the fog lamps, pro-
vided traffic laws in your area do not prohibit
this.
Have work on the xenon light unit includ-
ing changing the bulb carried out only by
your BMW Sports Activity Vehicle Center or a
workshop that works according to BMW repair
procedures with correspondingly trained per-
sonnel. Due to the high voltage present in the
system, there is a danger of fatal injuries when
work is carried out improperly.<
Halogen bulbs:
Parking lamps and low beams
H8 bulb, 35 watts
The bulb is pressurized. Therefore, wear
safety glasses and protective gloves.
Otherwise there is a danger of injuries if the
bulb is accidentally damaged during replace-
ment.<
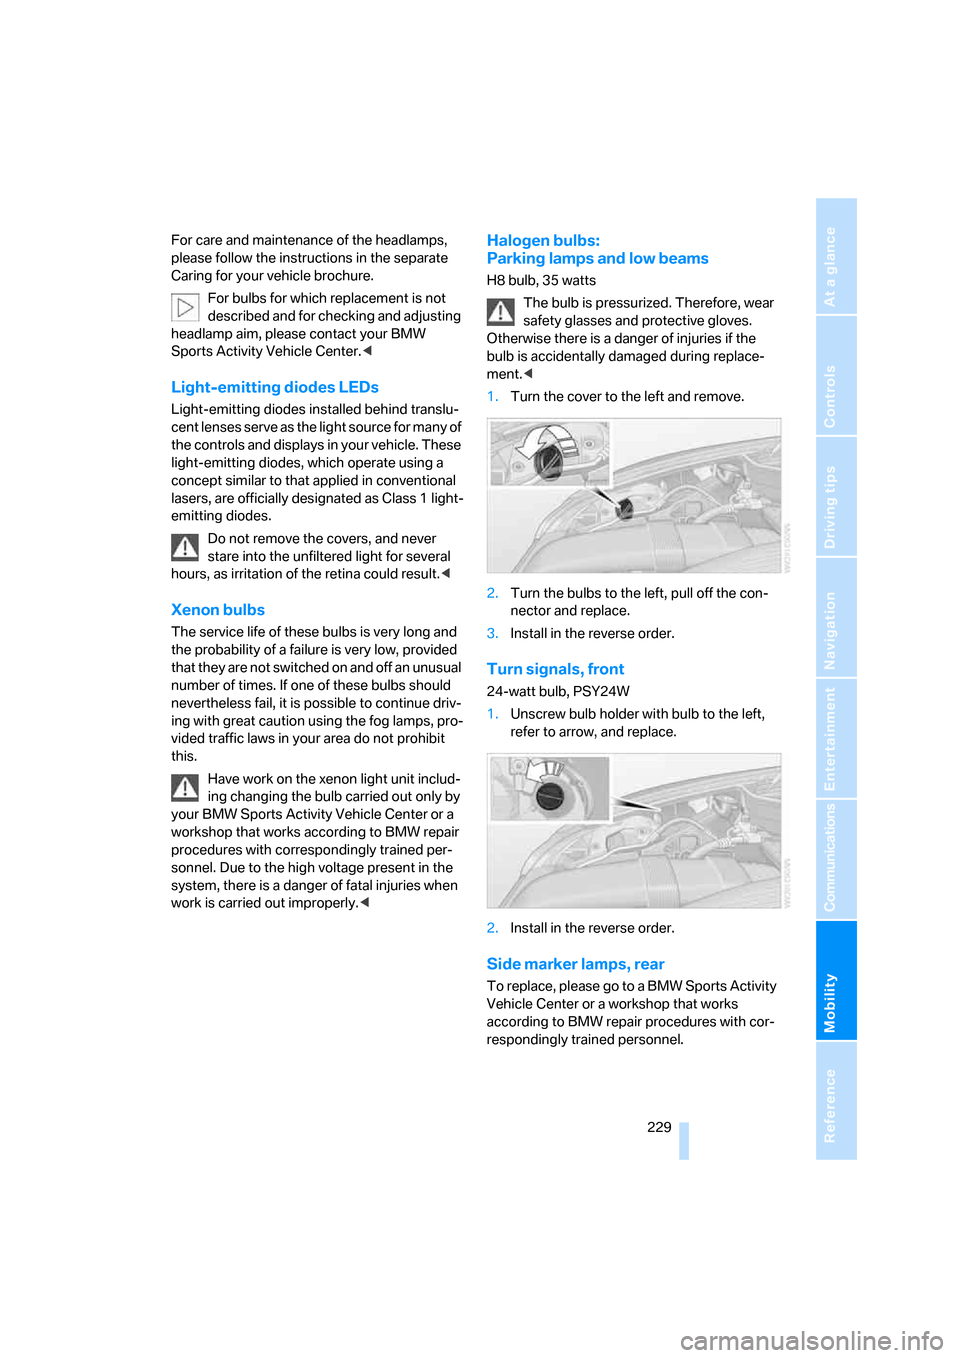
1.Turn the cover to the left and remove.
2.Turn the bulbs to the left, pull off the con-
nector and replace.
3.Install in the reverse order.
Turn signals, front
24-watt bulb, PSY24W
1.Unscrew bulb holder with bulb to the left,
refer to arrow, and replace.
2.Install in the reverse order.
Side marker lamps, rear
To replace, please go to a BMW Sports Activity
Vehicle Center or a workshop that works
according to BMW repair procedures with cor-
respondingly trained personnel.
Page 232 of 272
Replacing components
230
Tail lamps
>Turn signals, brake lamps: 21-watt bulb,
P21W
>Backup lamps and brake force display:
16-watt bulb, W16W
>Rear lamp: LED technology.
In case of a defect, please go to a BMW
Sports Activity Vehicle Center or a work-
shop that works according to BMW repair
procedures with correspondingly trained
personnel.
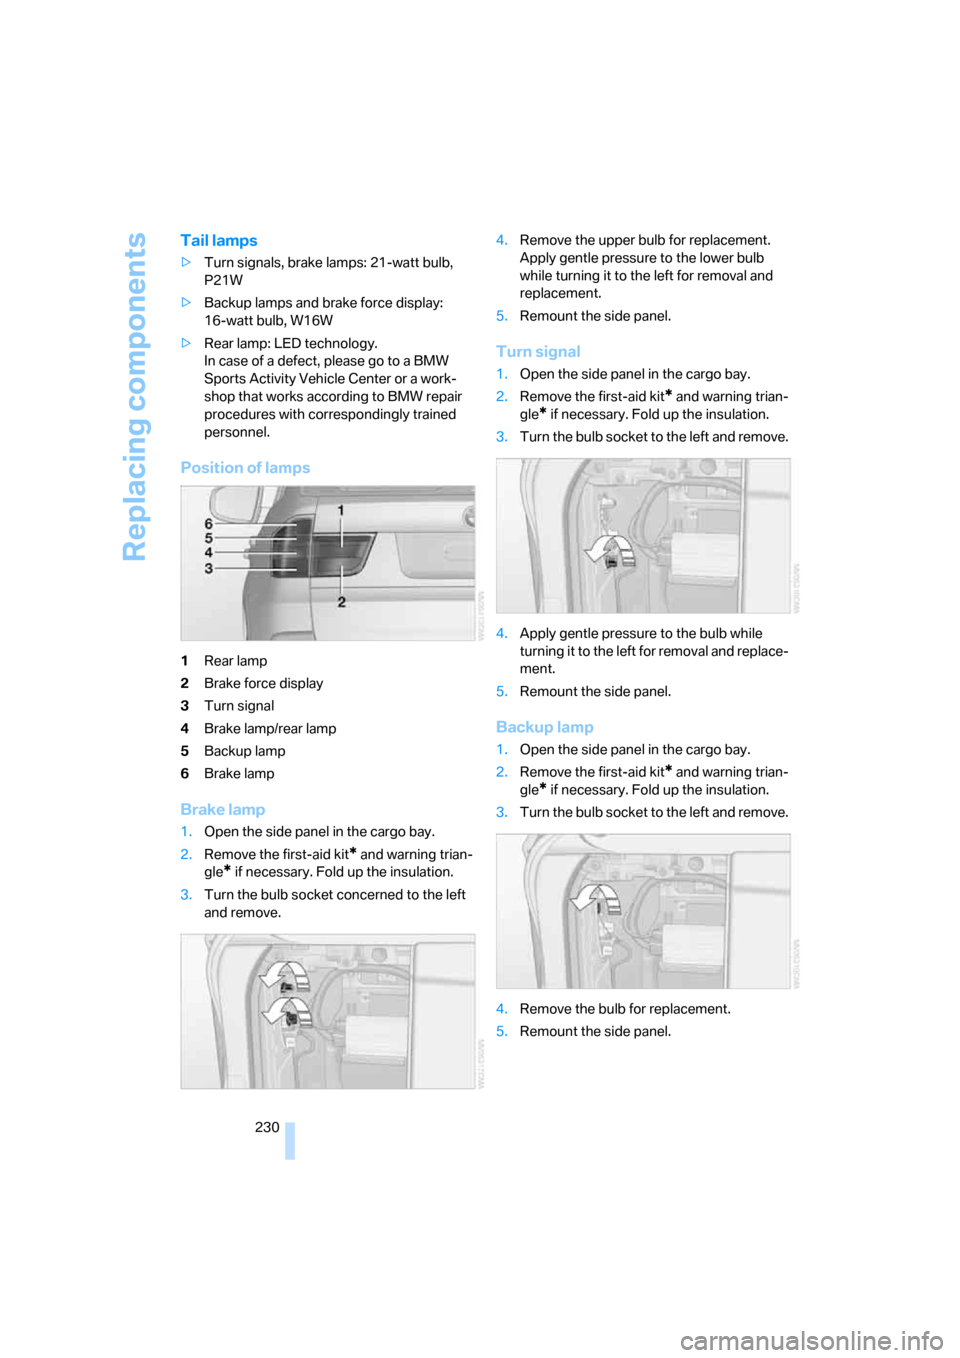
Position of lamps
1Rear lamp
2Brake force display
3Turn signal
4Brake lamp/rear lamp
5Backup lamp
6Brake lamp
Brake lamp
1.Open the side panel in the cargo bay.
2.Remove the first-aid kit
* and warning trian-
gle
* if necessary. Fold up the insulation.
3.Turn the bulb socket concerned to the left
and remove.4.Remove the upper bulb for replacement.
Apply gentle pressure to the lower bulb
while turning it to the left for removal and
replacement.
5.Remount the side panel.
Turn signal
1.Open the side panel in the cargo bay.
2.Remove the first-aid kit
* and warning trian-
gle
* if necessary. Fold up the insulation.
3.Turn the bulb socket to the left and remove.
4.Apply gentle pressure to the bulb while
turning it to the left for removal and replace-
ment.
5.Remount the side panel.
Backup lamp
1.Open the side panel in the cargo bay.
2.Remove the first-aid kit
* and warning trian-
gle
* if necessary. Fold up the insulation.
3.Turn the bulb socket to the left and remove.
4.Remove the bulb for replacement.
5.Remount the side panel.
Page 233 of 272
Mobility
231Reference
At a glance
Controls
Driving tips
Communications
Navigation
Entertainment
Brake force display
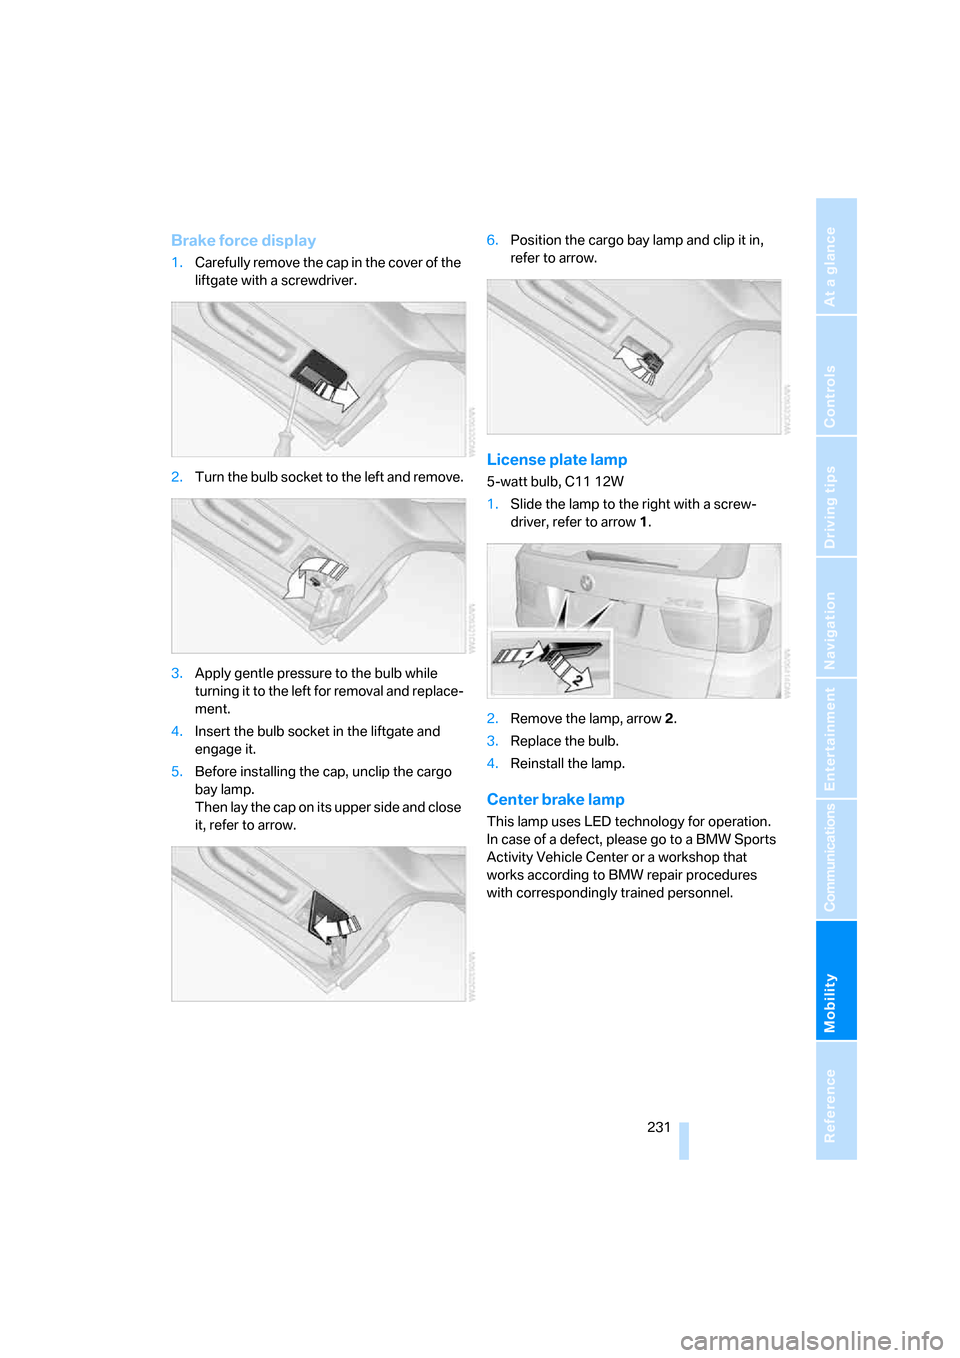
1.Carefully remove the cap in the cover of the
liftgate with a screwdriver.
2.Turn the bulb socket to the left and remove.
3.Apply gentle pressure to the bulb while
turning it to the left for removal and replace-
ment.
4.Insert the bulb socket in the liftgate and
engage it.
5.Before installing the cap, unclip the cargo
bay lamp.
Then lay the cap on its upper side and close
it, refer to arrow.6.Position the cargo bay lamp and clip it in,
refer to arrow.
License plate lamp
5-watt bulb, C11 12W
1.Slide the lamp to the right with a screw-
driver, refer to arrow1.
2.Remove the lamp, arrow2.
3.Replace the bulb.
4.Reinstall the lamp.
Center brake lamp
This lamp uses LED technology for operation.
In case of a defect, please go to a BMW Sports
Activity Vehicle Center or a workshop that
works according to BMW repair procedures
with correspondingly trained personnel.
Page 234 of 272
Replacing components
232
Changing wheels
Your BMW is equipped with run-flat tires as
standard. As a result, it is not necessary to
change the wheel immediately in the case of air
loss in the event of a breakdown.
To continue driving with a damaged tire:
>With Flat Tire Monitor, refer to Indication of
a flat tire page88
>With Tire Pressure Monitor, refer to Mes-
sage with low tire inflation pressure page90
You will recognize run-flat tires by a circular
symbol containing the letters RSC on the side
of the tire, refer to Run-flat tires, page220.
When mounting new tires, or changing from
summer to winter tires or vice versa, use run-flat
tires for your own safety. No spare tire is avail-
able in case of a flat tire. Your BMW Sports
Activity Vehicle Center will be happy to advise
you. Also refer to New wheels and tires,
page220.
Suitable tools for changing tires are avail-
able as accessories at your BMW Sports
Activity Vehicle Center.<
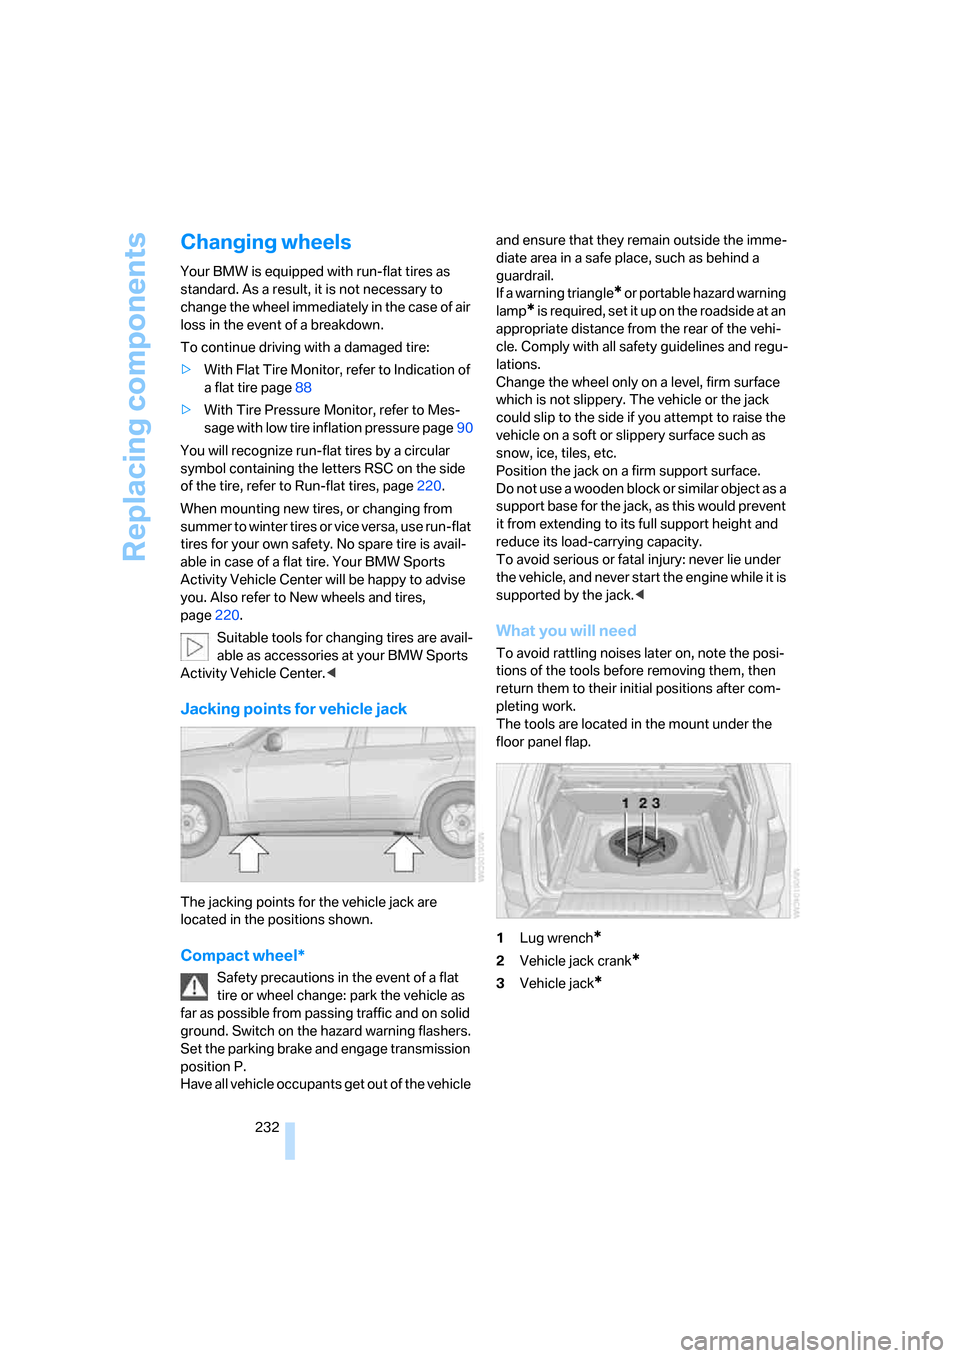
Jacking points for vehicle jack
The jacking points for the vehicle jack are
located in the positions shown.
Compact wheel*
Safety precautions in the event of a flat
tire or wheel change: park the vehicle as
far as possible from passing traffic and on solid
ground. Switch on the hazard warning flashers.
Set the parking brake and engage transmission
position P.
Have all vehicle occupants get out of the vehicle and ensure that they remain outside the imme-
diate area in a safe place, such as behind a
guardrail.
If a warning triangle
* or portable hazard warning
lamp
* is required, set it up on the roadside at an
appropriate distance from the rear of the vehi-
cle. Comply with all safety guidelines and regu-
lations.
Change the wheel only on a level, firm surface
which is not slippery. The vehicle or the jack
could slip to the side if you attempt to raise the
vehicle on a soft or slippery surface such as
snow, ice, tiles, etc.
Position the jack on a firm support surface.
Do not use a wooden block or similar object as a
support base for the jack, as this would prevent
it from extending to its full support height and
reduce its load-carrying capacity.
To avoid serious or fatal injury: never lie under
the vehicle, and never start the engine while it is
supported by the jack.<
What you will need
To avoid rattling noises later on, note the posi-
tions of the tools before removing them, then
return them to their initial positions after com-
pleting work.
The tools are located in the mount under the
floor panel flap.
1Lug wrench
*
2Vehicle jack crank*
3Vehicle jack*
Page 235 of 272
Mobility
233Reference
At a glance
Controls
Driving tips
Communications
Navigation
Entertainment
Removing compact wheel
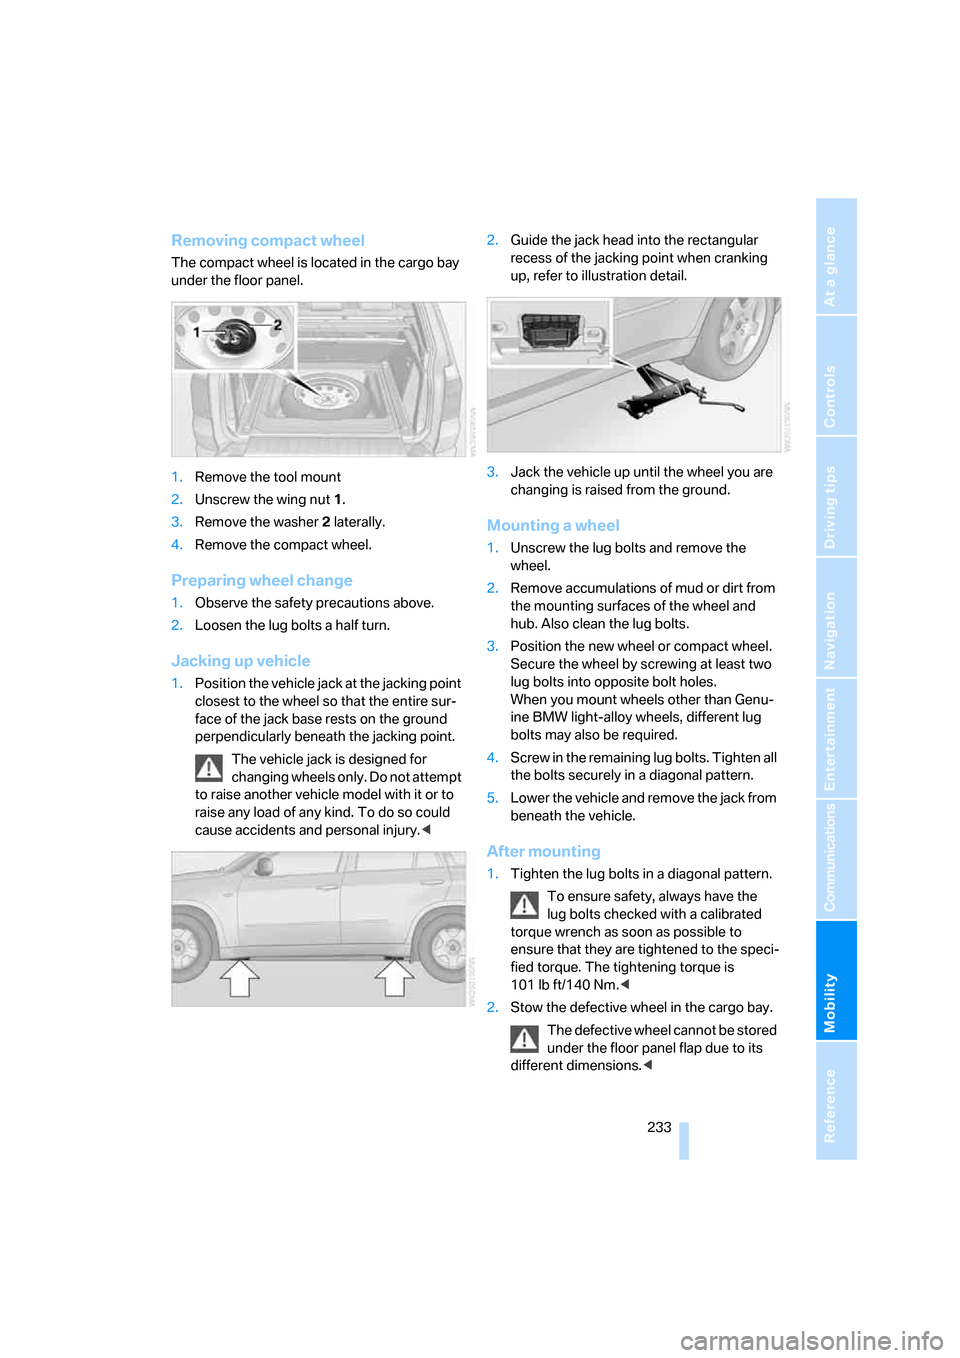
The compact wheel is located in the cargo bay
under the floor panel.
1.Remove the tool mount
2.Unscrew the wing nut 1.
3.Remove the washer 2 laterally.
4.Remove the compact wheel.
Preparing wheel change
1.Observe the safety precautions above.
2.Loosen the lug bolts a half turn.
Jacking up vehicle
1.Position the vehicle jack at the jacking point
closest to the wheel so that the entire sur-
face of the jack base rests on the ground
perpendicularly beneath the jacking point.
The vehicle jack is designed for
changing wheels only. Do not attempt
to raise another vehicle model with it or to
raise any load of any kind. To do so could
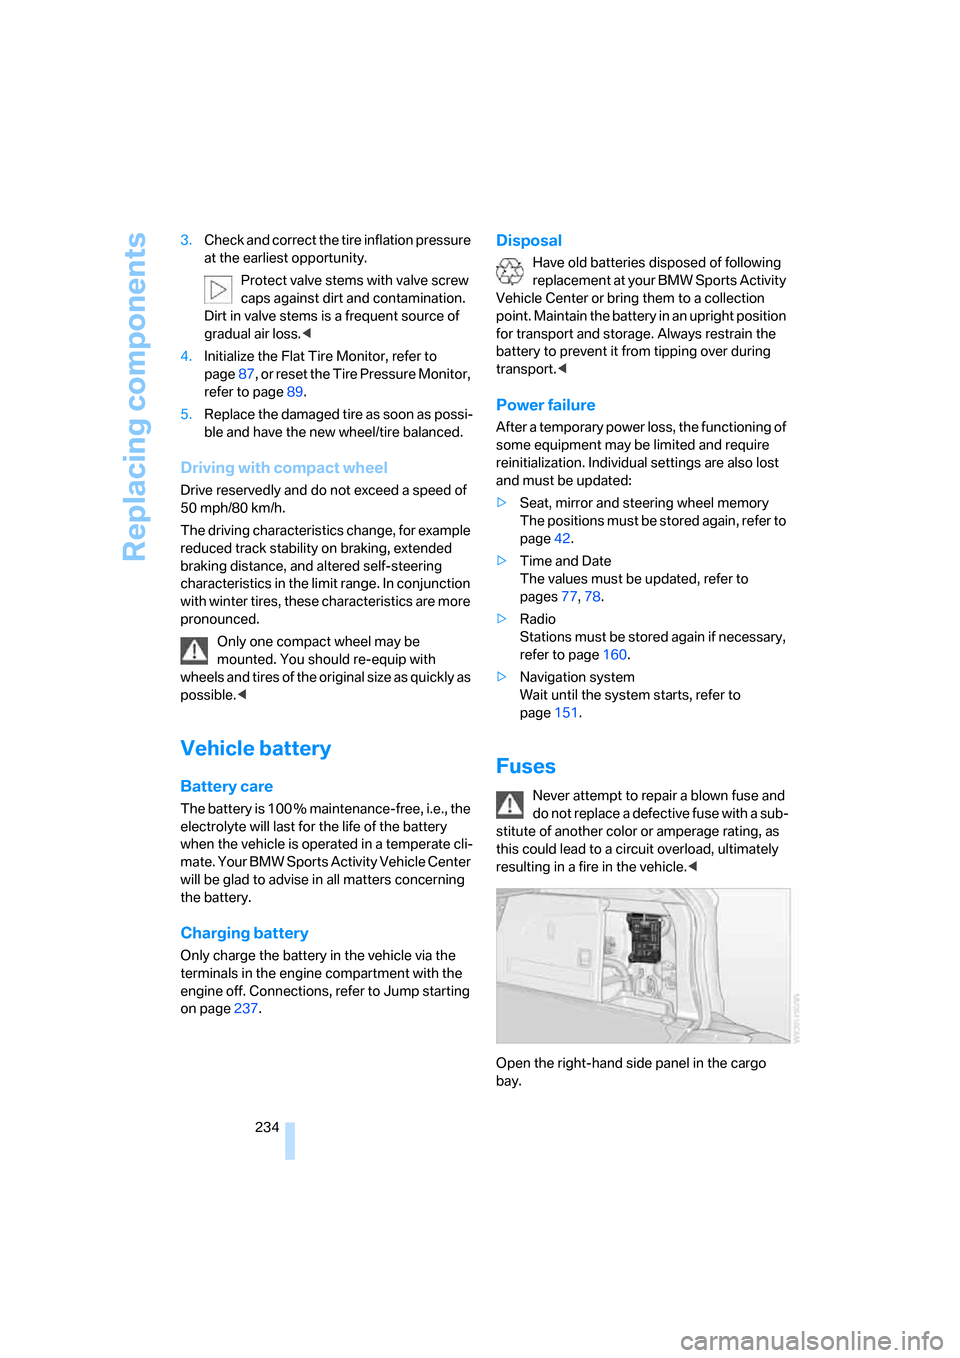
cause accidents and personal injury.<2.Guide the jack head into the rectangular
recess of the jacking point when cranking
up, refer to illustration detail.
3.Jack the vehicle up until the wheel you are
changing is raised from the ground.
Mounting a wheel
1.Unscrew the lug bolts and remove the
wheel.
2.Remove accumulations of mud or dirt from
the mounting surfaces of the wheel and
hub. Also clean the lug bolts.
3.Position the new wheel or compact wheel.
Secure the wheel by screwing at least two
lug bolts into opposite bolt holes.
When you mount wheels other than Genu-
ine BMW light-alloy wheels, different lug
bolts may also be required.
4.Screw in the remaining lug bolts. Tighten all
the bolts securely in a diagonal pattern.
5.Lower the vehicle and remove the jack from
beneath the vehicle.
After mounting
1.Tighten the lug bolts in a diagonal pattern.
To ensure safety, always have the
lug bolts checked with a calibrated
torque wrench as soon as possible to
ensure that they are tightened to the speci-
fied torque. The tightening torque is
101lbft/140Nm.<
2.Stow the defective wheel in the cargo bay.
The defective wheel cannot be stored
under the floor panel flap due to its
different dimensions.<
Page 236 of 272
Replacing components
234 3.Check and correct the tire inflation pressure
at the earliest opportunity.
Protect valve stems with valve screw
caps against dirt and contamination.
Dirt in valve stems is a frequent source of
gradual air loss.<
4.Initialize the Flat Tire Monitor, refer to
page87, or reset the Tire Pressure Monitor,
refer to page89.
5.Replace the damaged tire as soon as possi-
ble and have the new wheel/tire balanced.
Driving with compact wheel
Drive reservedly and do not exceed a speed of
50 mph/80 km/h.
The driving characteristics change, for example
reduced track stability on braking, extended
braking distance, and altered self-steering
characteristics in the limit range. In conjunction
with winter tires, these characteristics are more
pronounced.
Only one compact wheel may be
mounted. You should re-equip with
wheels and tires of the original size as quickly as
possible.<
Vehicle battery
Battery care
The battery is 100 % maintenance-free, i.e., the
electrolyte will last for the life of the battery
when the vehicle is operated in a temperate cli-
mate. Your BMW Sports Activity Vehicle Center
will be glad to advise in all matters concerning
the battery.
Charging battery
Only charge the battery in the vehicle via the
terminals in the engine compartment with the
engine off. Connections, refer to Jump starting
on page237.
Disposal
Have old batteries disposed of following
replacement at your BMW Sports Activity
Vehicle Center or bring them to a collection
point. Maintain the battery in an upright position
for transport and storage. Always restrain the
battery to prevent it from tipping over during
transport.<
Power failure
After a temporary power loss, the functioning of
some equipment may be limited and require
reinitialization. Individual settings are also lost
and must be updated:
>Seat, mirror and steering wheel memory
The positions must be stored again, refer to
page42.
>Time and Date
The values must be updated, refer to
pages77, 78.
>Radio
Stations must be stored again if necessary,
refer to page160.
>Navigation system
Wait until the system starts, refer to
page151.
Fuses
Never attempt to repair a blown fuse and
do not replace a defective fuse with a sub-
stitute of another color or amperage rating, as
this could lead to a circuit overload, ultimately
resulting in a fire in the vehicle.<
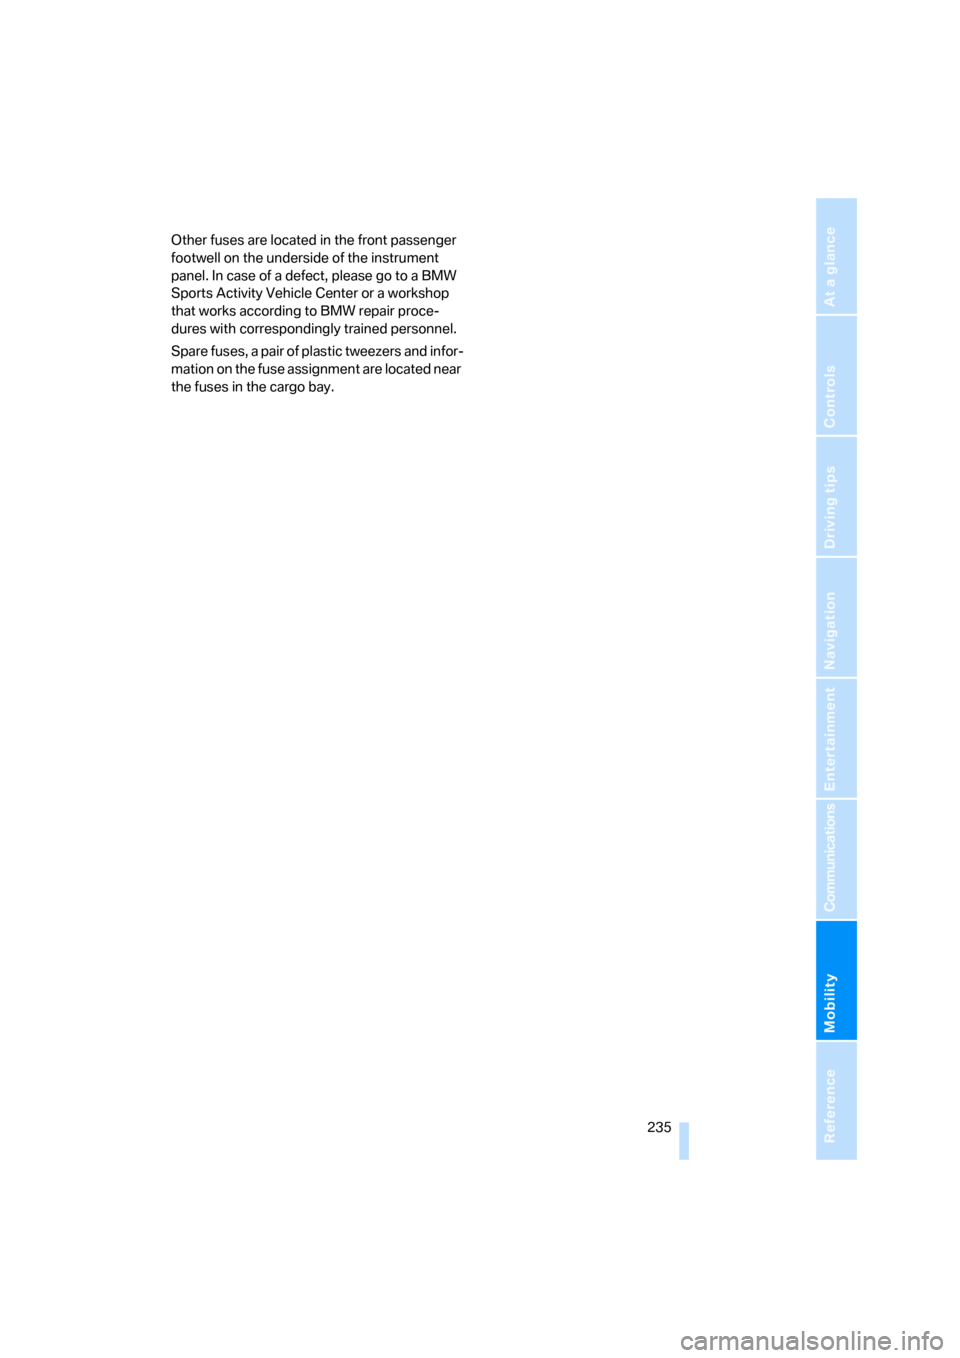
Open the right-hand side panel in the cargo
bay.
Page 237 of 272
Mobility
235Reference
At a glance
Controls
Driving tips
Communications
Navigation
Entertainment
Other fuses are located in the front passenger
footwell on the underside of the instrument
panel. In case of a defect, please go to a BMW
Sports Activity Vehicle Center or a workshop
that works according to BMW repair proce-
dures with correspondingly trained personnel.
Spare fuses, a pair of plastic tweezers and infor-
mation on the fuse assignment are located near
the fuses in the cargo bay.
Page 238 of 272
Giving and receiving assistance
236
Giving and receiving assistance
Emergency call
Conditions for an emergency call:
>Full preparation package mobile phone.
With this equipment, an emergency call is
still possible when no mobile phone is
logged on in the vehicle.
>BMW Assist is activated.
Activating BMW Assist, refer to page207.
>Radio readiness is switched on.
>The BMW Assist system is logged in on a
wireless communications network.
>The emergency call system is operable.
When the contract of participation with
BMW Assist expires, the BMW Assist system
can be deactivated by a BMW Sports Activity
Vehicle Center without having to visit a work-
shop. Following deactivation of the BMW Assist
system, no emergency calls can be made. The
BMW Assist system be reactivated by a BMW
Sports Activity Vehicle Center after signing a
new contract.
Initiating an emergency call
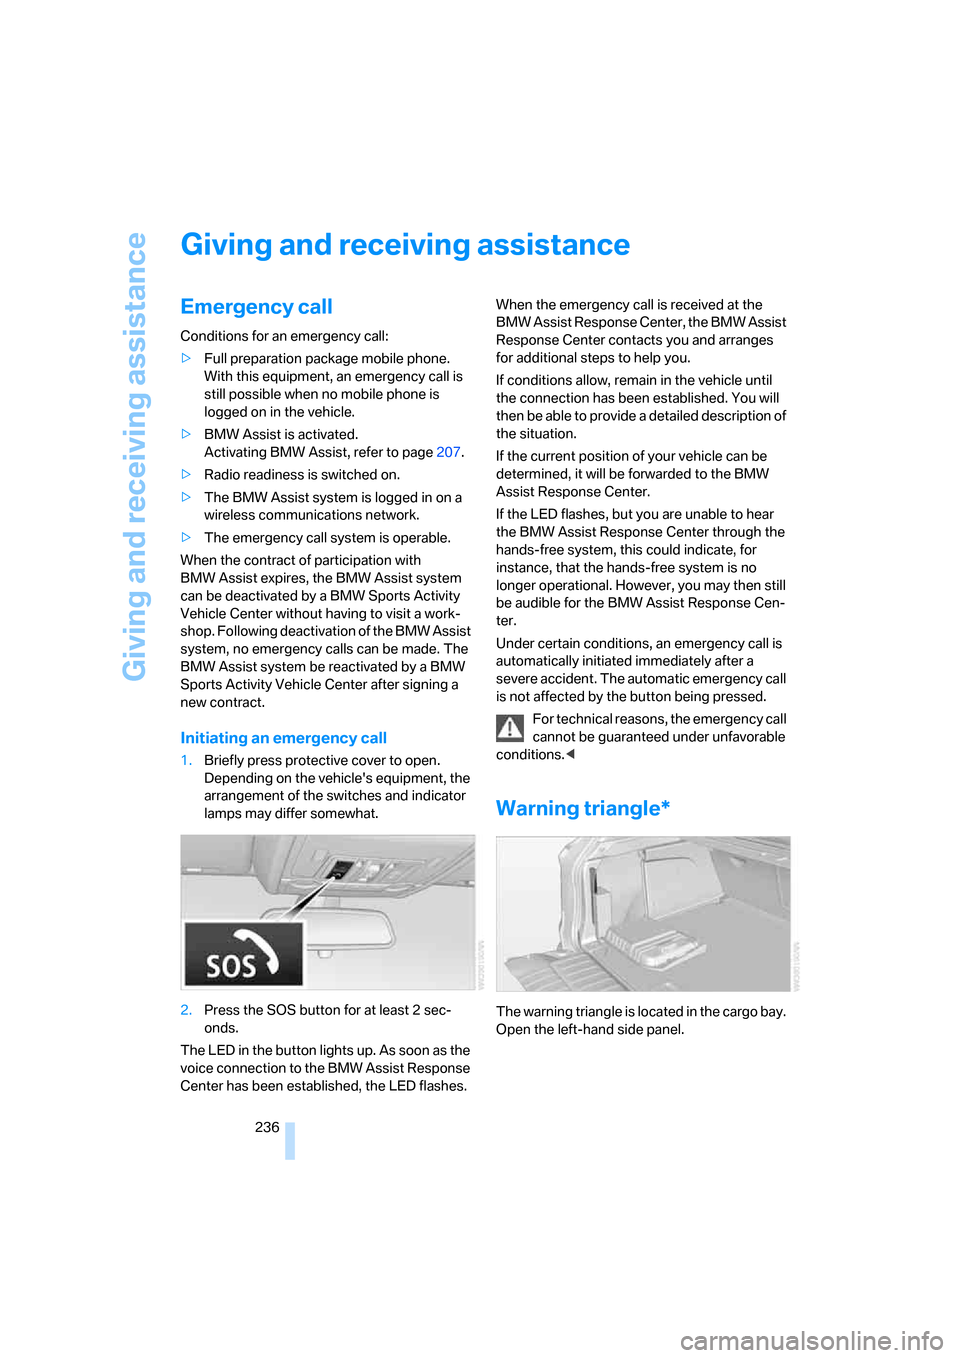
1.Briefly press protective cover to open.
Depending on the vehicle's equipment, the
arrangement of the switches and indicator
lamps may differ somewhat.
2.Press the SOS button for at least 2 sec-
onds.
The LED in the button lights up. As soon as the
voice connection to the BMW Assist Response
Center has been established, the LED flashes.When the emergency call is received at the
BMW Assist Response Center, the BMW Assist
Response Center contacts you and arranges
for additional steps to help you.
If conditions allow, remain in the vehicle until
the connection has been established. You will
then be able to provide a detailed description of
the situation.
If the current position of your vehicle can be
determined, it will be forwarded to the BMW
Assist Response Center.
If the LED flashes, but you are unable to hear
the BMW Assist Response Center through the
hands-free system, this could indicate, for
instance, that the hands-free system is no
longer operational. However, you may then still
be audible for the BMW Assist Response Cen-
ter.
Under certain conditions, an emergency call is
automatically initiated immediately after a
severe accident. The automatic emergency call
is not affected by the button being pressed.
For technical reasons, the emergency call
cannot be guaranteed under unfavorable
conditions.<
Warning triangle*
The warning triangle is located in the cargo bay.
Open the left-hand side panel.
Page 239 of 272
Mobility
237Reference
At a glance
Controls
Driving tips
Communications
Navigation
Entertainment
First-aid kit*
Some of the articles contained in the first-aid kit
have a limited service life. Therefore, check the
expiration dates of the contents regularly and
replace the contents concerned in good time if
necessary.
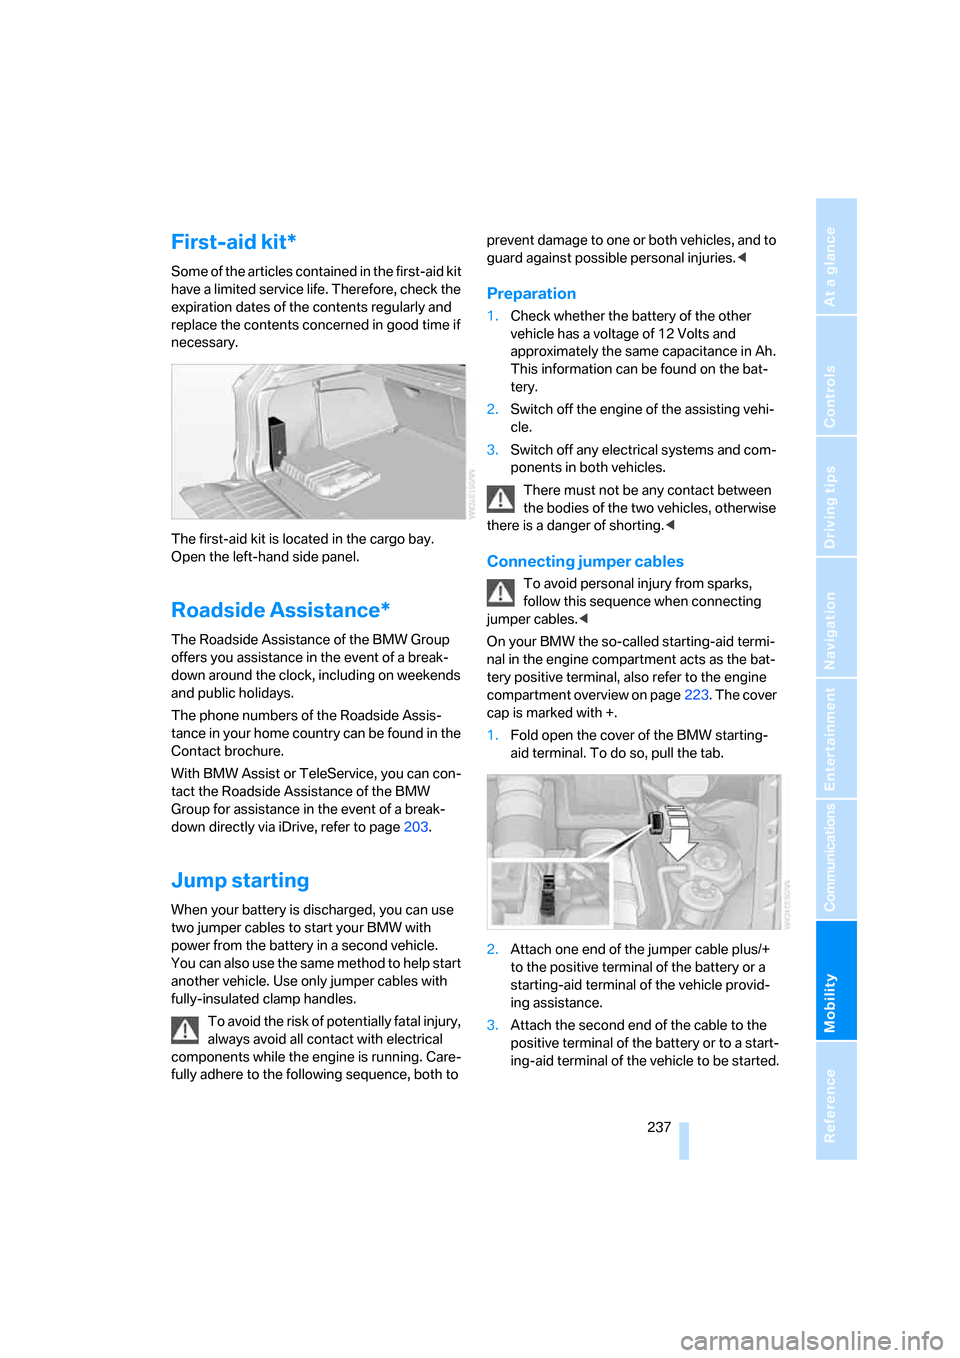
The first-aid kit is located in the cargo bay.
Open the left-hand side panel.
Roadside Assistance*
The Roadside Assistance of the BMW Group
offers you assistance in the event of a break-
down around the clock, including on weekends
and public holidays.
The phone numbers of the Roadside Assis-
tance in your home country can be found in the
Contact brochure.
With BMW Assist or TeleService, you can con-
tact the Roadside Assistance of the BMW
Group for assistance in the event of a break-
down directly via iDrive, refer to page203.
Jump starting
When your battery is discharged, you can use
two jumper cables to start your BMW with
power from the battery in a second vehicle.
You can also use the same method to help start
another vehicle. Use only jumper cables with
fully-insulated clamp handles.
To avoid the risk of potentially fatal injury,
always avoid all contact with electrical
components while the engine is running. Care-
fully adhere to the following sequence, both to prevent damage to one or both vehicles, and to
guard against possible personal injuries.<
Preparation
1.Check whether the battery of the other
vehicle has a voltage of 12 Volts and
approximately the same capacitance in Ah.
This information can be found on the bat-
tery.
2.Switch off the engine of the assisting vehi-
cle.
3.Switch off any electrical systems and com-
ponents in both vehicles.
There must not be any contact between
the bodies of the two vehicles, otherwise
there is a danger of shorting.<
Connecting jumper cables
To avoid personal injury from sparks,
follow this sequence when connecting
jumper cables.<
On your BMW the so-called starting-aid termi-
nal in the engine compartment acts as the bat-
tery positive terminal, also refer to the engine
compartment overview on page223. The cover
cap is marked with +.
1.Fold open the cover of the BMW starting-
aid terminal. To do so, pull the tab.
2.Attach one end of the jumper cable plus/+
to the positive terminal of the battery or a
starting-aid terminal of the vehicle provid-
ing assistance.
3.Attach the second end of the cable to the
positive terminal of the battery or to a start-
ing-aid terminal of the vehicle to be started.
Page 240 of 272
Giving and receiving assistance
238 4.Attach one end of the jumper cable minus/–
to the negative terminal of the battery or to
an engine or body ground of the assisting
vehicle.
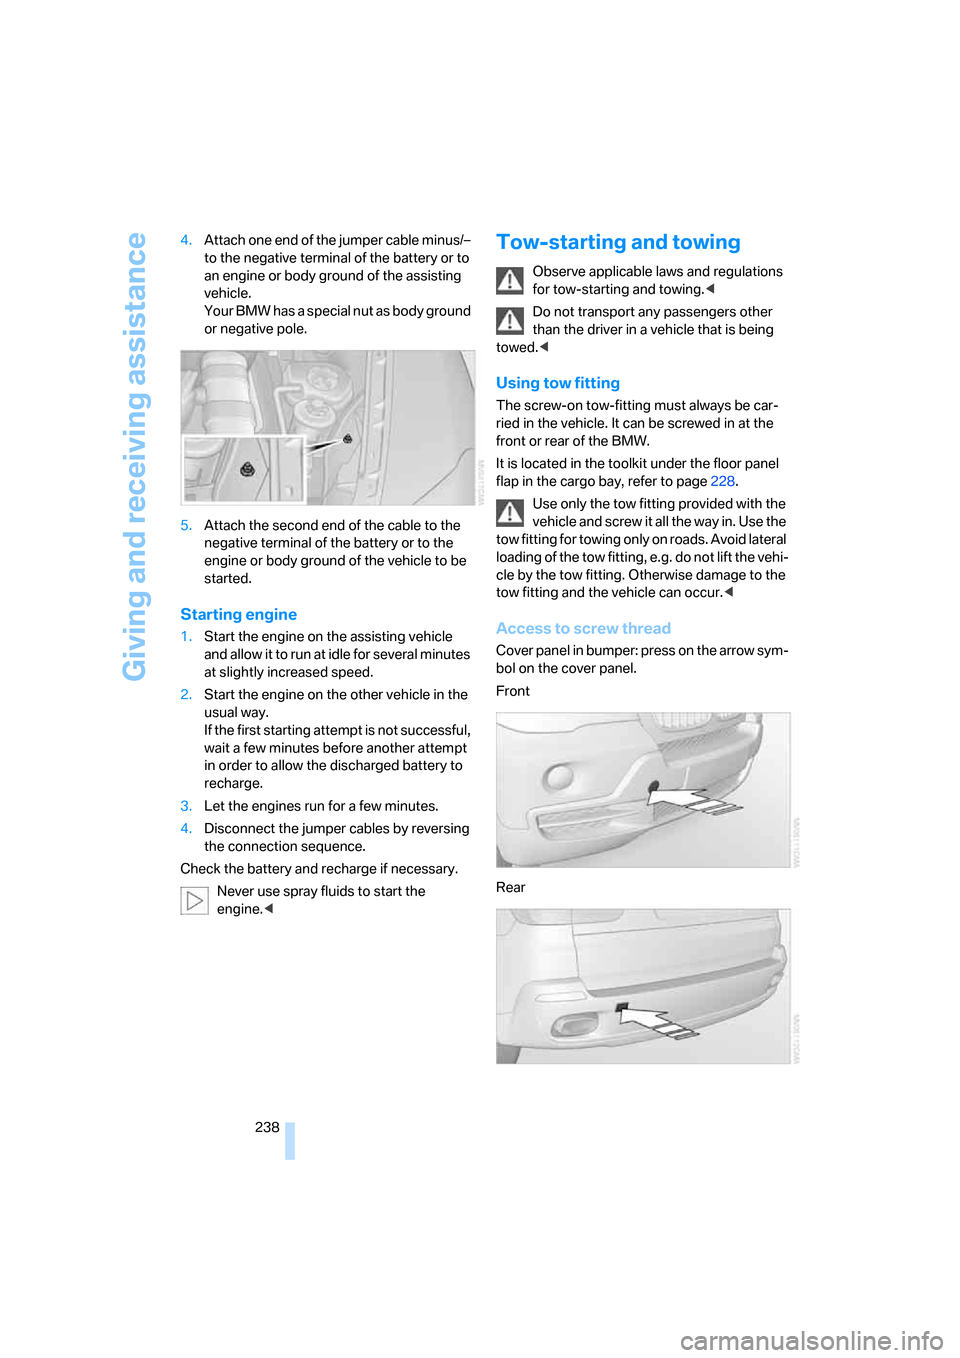
Your BMW has a special nut as body ground
or negative pole.
5.Attach the second end of the cable to the
negative terminal of the battery or to the
engine or body ground of the vehicle to be
started.
Starting engine
1.Start the engine on the assisting vehicle
and allow it to run at idle for several minutes
at slightly increased speed.
2.Start the engine on the other vehicle in the
usual way.
If the first starting attempt is not successful,
wait a few minutes before another attempt
in order to allow the discharged battery to
recharge.
3.Let the engines run for a few minutes.
4.Disconnect the jumper cables by reversing
the connection sequence.
Check the battery and recharge if necessary.
Never use spray fluids to start the
engine.<
Tow-starting and towing
Observe applicable laws and regulations
for tow-starting and towing.<
Do not transport any passengers other
than the driver in a vehicle that is being
towed.<
Using tow fitting
The screw-on tow-fitting must always be car-
ried in the vehicle. It can be screwed in at the
front or rear of the BMW.
It is located in the toolkit under the floor panel
flap in the cargo bay, refer to page228.
Use only the tow fitting provided with the
vehicle and screw it all the way in. Use the
tow fitting for towing only on roads. Avoid lateral
loading of the tow fitting, e.g. do not lift the vehi-
cle by the tow fitting. Otherwise damage to the
tow fitting and the vehicle can occur.<
Access to screw thread
Cover panel in bumper: press on the arrow sym-
bol on the cover panel.
Front
Rear