ESP BMW X5 3.0I 2007 E70 Service Manual
[x] Cancel search | Manufacturer: BMW, Model Year: 2007, Model line: X5 3.0I, Model: BMW X5 3.0I 2007 E70Pages: 272, PDF Size: 9.03 MB
Page 115 of 272
Controls
113Reference
At a glance
Driving tips
Communications
Navigation
Entertainment
Mobility
Setting language
You can set the language of the display.
Press the adjustment button for approx.
12-13 seconds. Briefly press the adjustment
button again to switch between English "E" and
German "O".
The setting is automatically stored after approx.
10 seconds.
Roller sun blinds for rear side
windows*
Pull the loop of the roller sun blind and hook
onto bracket.
With roller sun blinds attached, do not
open the windows during travel. The
blinds may otherwise be damaged by the
wind.<
Glove compartment
Opening
Press the button. The covers open upward and
downward and the lighting in the glove com-
partment switches on.
To prevent injury in the event of an acci-
dent while the vehicle is being driven,
close the glove compartment immediately after
use.<
Closing
Press one of the two covers closed; both covers
are closed.
Center armrest
A storage compartment is located under the
armrest between the front seats and, depend-
ing on the vehicle's equipment, also a cover for
the mobile phone bracket or snap-in adapter.
Also refer to page188.
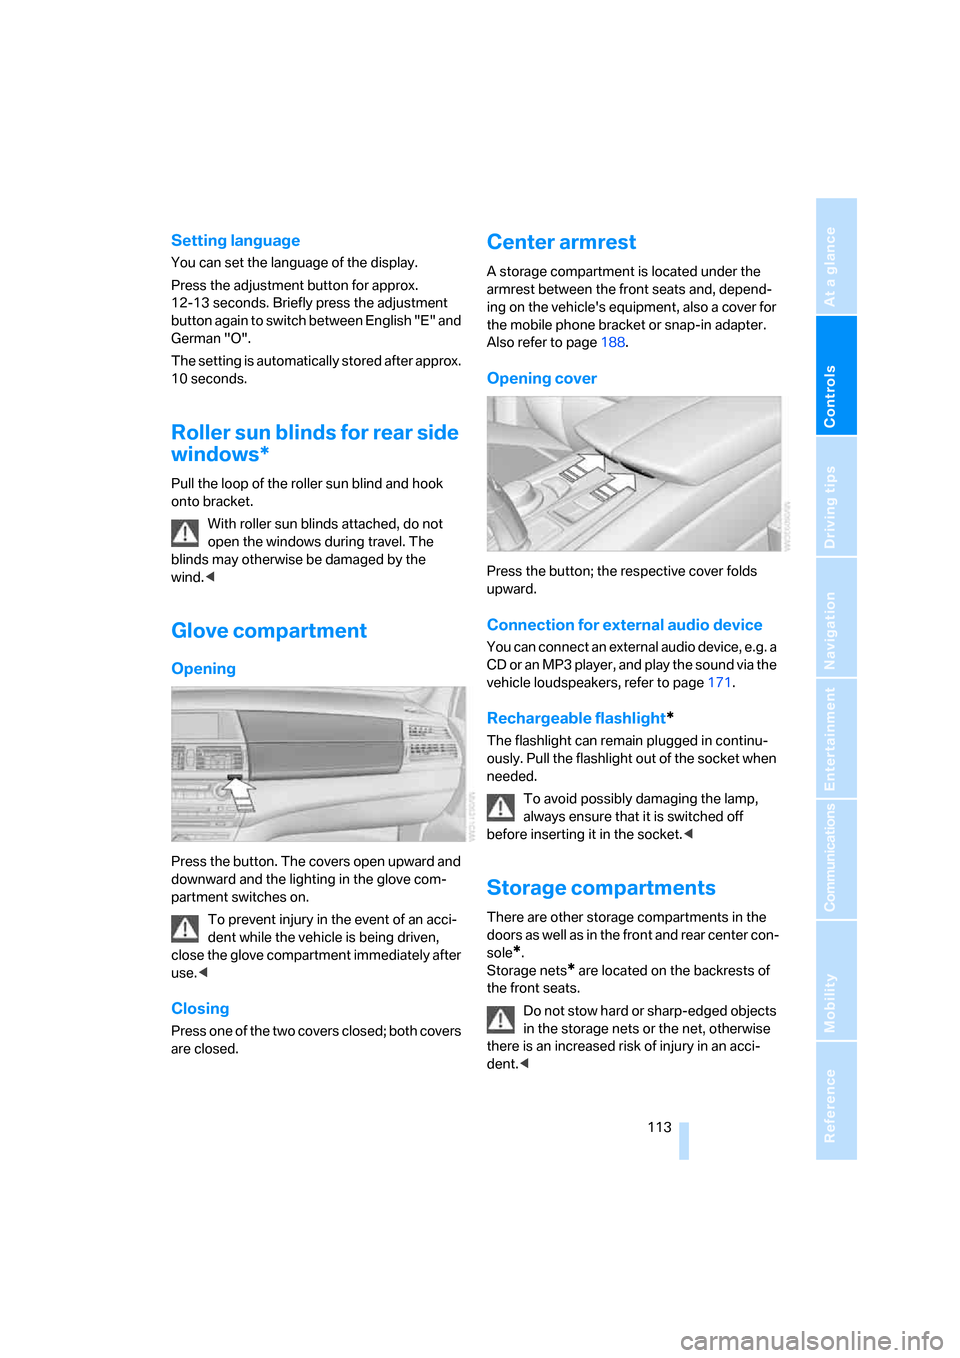
Opening cover
Press the button; the respective cover folds
upward.
Connection for external audio device
You can connect an external audio device, e.g. a
CD or an MP3 player, and play the sound via the
vehicle loudspeakers, refer to page171.
Rechargeable flashlight*
The flashlight can remain plugged in continu-
ously. Pull the flashlight out of the socket when
needed.
To avoid possibly damaging the lamp,
always ensure that it is switched off
before inserting it in the socket.<
Storage compartments
There are other storage compartments in the
doors as well as in the front and rear center con-
sole
*.
Storage nets
* are located on the backrests of
the front seats.
Do not stow hard or sharp-edged objects
in the storage nets or the net, otherwise
there is an increased risk of injury in an acci-
dent.<
Page 120 of 272
Practical interior accessories
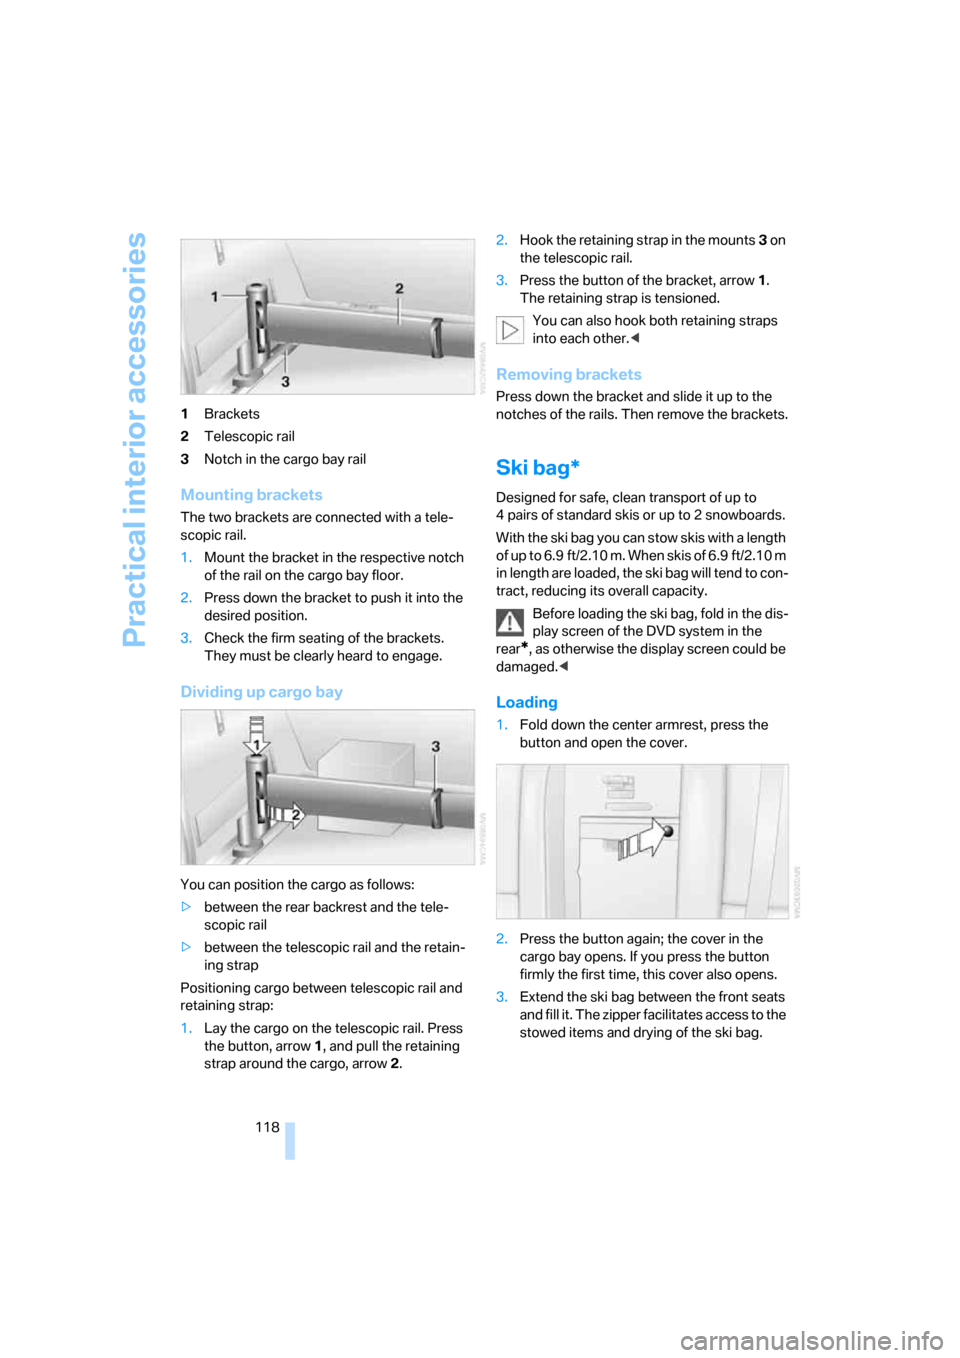
118 1Brackets
2Telescopic rail
3Notch in the cargo bay rail
Mounting brackets
The two brackets are connected with a tele-
scopic rail.
1.Mount the bracket in the respective notch
of the rail on the cargo bay floor.
2.Press down the bracket to push it into the
desired position.
3.Check the firm seating of the brackets.
They must be clearly heard to engage.
Dividing up cargo bay
You can position the cargo as follows:
>between the rear backrest and the tele-
scopic rail
>between the telescopic rail and the retain-
ing strap
Positioning cargo between telescopic rail and
retaining strap:
1.Lay the cargo on the telescopic rail. Press
the button, arrow1, and pull the retaining
strap around the cargo, arrow2.2.Hook the retaining strap in the mounts3 on
the telescopic rail.
3.Press the button of the bracket, arrow1.
The retaining strap is tensioned.
You can also hook both retaining straps
into each other.<
Removing brackets
Press down the bracket and slide it up to the
notches of the rails. Then remove the brackets.
Ski bag*
Designed for safe, clean transport of up to
4 pairs of standard skis or up to 2 snowboards.
With the ski bag you can stow skis with a length
o f u p t o 6 . 9 f t / 2 . 1 0 m . W h e n s k i s o f 6 . 9 f t / 2 . 1 0 m
in length are loaded, the ski bag will tend to con-
tract, reducing its overall capacity.
Before loading the ski bag, fold in the dis-
play screen of the DVD system in the
rear
*, as otherwise the display screen could be
damaged.<
Loading
1.Fold down the center armrest, press the
button and open the cover.
2.Press the button again; the cover in the
cargo bay opens. If you press the button
firmly the first time, this cover also opens.
3.Extend the ski bag between the front seats
and fill it. The zipper facilitates access to the
stowed items and drying of the ski bag.
Page 125 of 272
Driving tips
123Reference
At a glance
Controls
Communications
Navigation
Entertainment
Mobility
Hydroplaning
When driving on wet or slushy roads,
reduce road speed. If you do not, a wedge
of water can form between tires and road sur-
face. This phenomenon is referred to as hydro-
planing, and is characterized by a partial or
complete loss of contact between the tires and
the road surface, ultimately undermining your
ability to steer and brake the vehicle.<
The risk of hydroplaning increases as the tread
depth of the tires decreases, refer also to Mini-
mum tread depth on page219.
Driving through water
Do not drive through water on the road if it
is deeper than 20 in/50 cm, and then only
at walking speed at the most. Otherwise, the
vehicle's engine, the electrical systems and the
transmission may be damaged.<
Starting assistant
The starting assistant enables you to start off
conveniently on slopes. The parking brake is
not required for this purpose.
1.Hold the vehicle with the footbrake.
2.Release the footbrake and immediately
drive off quickly.
The starting assistant holds the vehicle
for approx. 2 seconds after releasing the
footbrake. Depending on the load, the vehicle
may also roll back slightly during this time.
After releasing the footbrake, immediately start
quickly, otherwise the starting assistant no
longer holds the vehicle after approx. 2 seconds
and it begins to roll back.<
Braking safely
Your BMW is equipped with ABS as a standard
feature. In situations that require it, it is best to
brake with full force. Since the vehicle maintains
steering responsiveness, you can still avoid
possible obstacles with a minimum of steering
effort.
Pulsation of the brake pedal, combined with
sounds from the hydraulic circuits, indicate that
ABS is in its active mode.Do not drive with your foot resting on the
brake pedal. Even light but consistent
pedal pressure can lead to high temperatures,
brake wear and possibly even brake failure.<
Driving in wet conditions
When roads are wet or there is heavy rain,
briefly exert gentle pressure on the brake pedal
every few miles. Monitor traffic conditions to
ensure that this maneuver does not endanger
other road users. The heat generated in this
process helps dry the pads and rotors to ensure
that full braking efficiency will then be available
when you need it.
Hills
To prevent overheating and the resulting
reduced efficiency of the brake system,
drive long or steep downhill gradients in the
gear in which the least braking is required. Even
light but consistent pressure on the brake pedal
can lead to high temperatures, brake wear and
possibly even brake failure.<
The braking effect of the engine can be further
increased by downshifting in the manual mode
of the automatic transmission, if necessary into
first gear, refer to page61. This prevents an
excessive strain on the brakes.
Do not drive in idle or with the engine
stopped, otherwise there will be no
engine braking action or support of the braking
force and steering.
Never allow floor mats, carpets or any other
objects to protrude into the area of movement
of the pedals and impair their operation.<
Corrosion on brake rotors
When the vehicle is driven only occasionally,
during extended periods when the vehicle is not
used at all, and in operating conditions where
brake applications are less frequent, there is an
increased tendency for corrosion to form on
rotors, while contaminants accumulate on the
brake pads. This occurs because the minimum
pressure which must be exerted by the pads
during brake applications to clean the rotors is
not reached.
Page 126 of 272
Things to remember when driving
124 Should corrosion form on the brake rotors, the
brakes will tend to respond with a pulsating
effect that even extended application will fail to
cure.
When vehicle is parked
Condensation forms in the automatic climate
control system during operation, and then exits
under the vehicle. Traces of condensed water
under the vehicle are therefore normal.
Before driving into a car wash
Fold in the exterior mirrors, refer to page48,
otherwise they could be damaged due to the
width of the vehicle.
General information on the care and mainte-
nance of your BMW is contained in the Caring
for your vehicle brochure.
Rear window wiper
The rear window wiper can be damaged in car
washes. Take appropriate protective measures;
ask the car wash operator if necessary.
With comfort access*
Insert the remote control into the ignition lock.
The engine can be switched off in transmission
position N. Also refer to page36.
Loading
To avoid loading the tires beyond their
approved carrying capacity, never over-
load the vehicle. Overloading can lead to over-
heating and increases the rate at which damage
develops inside the tires. The ultimate result
can assume the form of a sudden blow-out.<
Determining loading limit
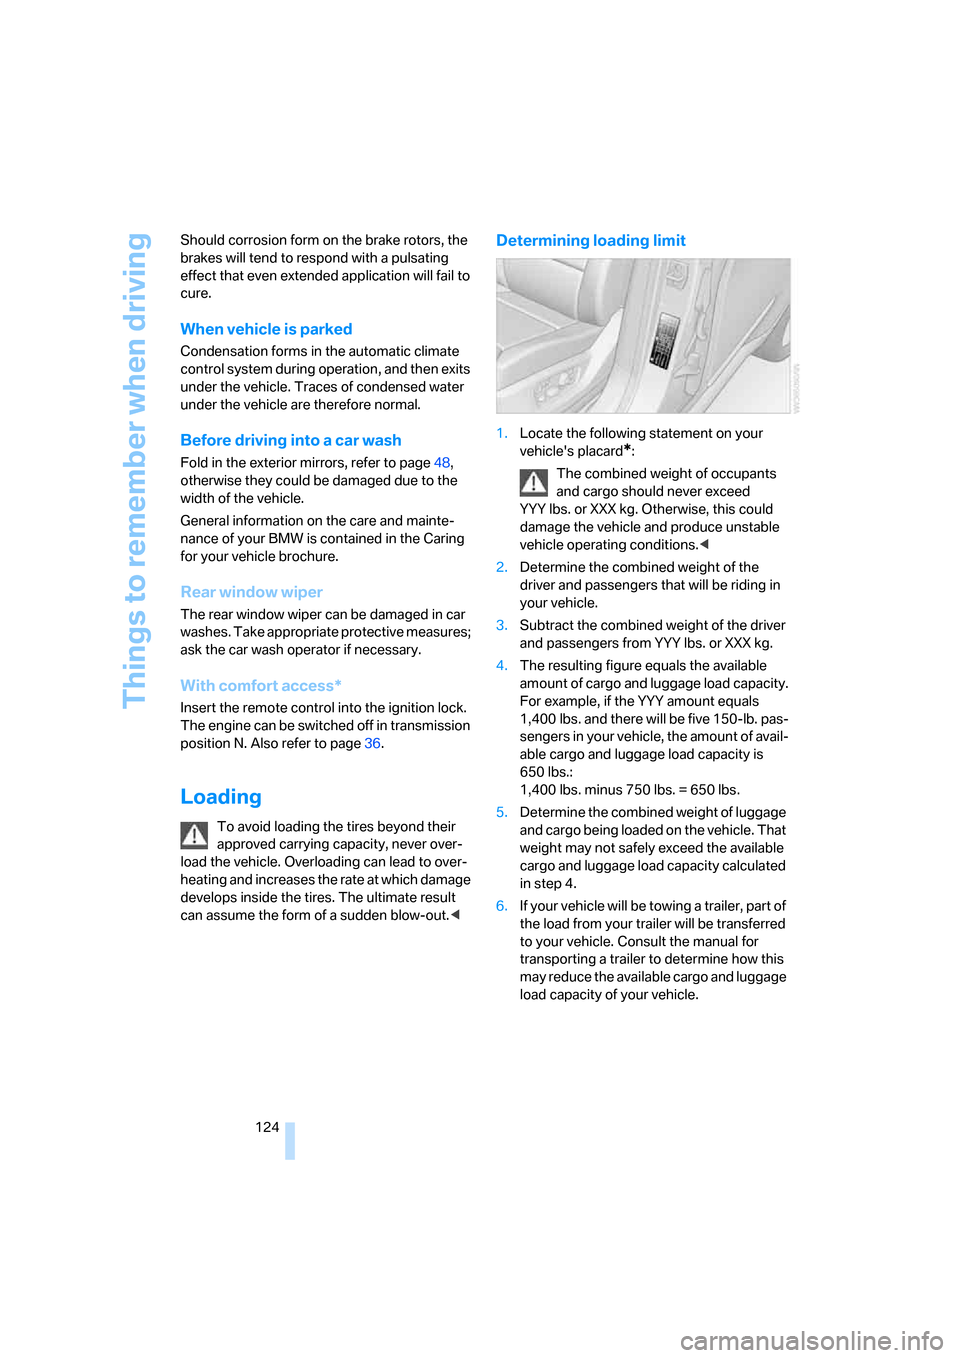
1.Locate the following statement on your
vehicle's placard
*:
The combined weight of occupants
and cargo should never exceed
YYY lbs. or XXX kg. Otherwise, this could
damage the vehicle and produce unstable
vehicle operating conditions.<
2.Determine the combined weight of the
driver and passengers that will be riding in
your vehicle.
3.Subtract the combined weight of the driver
and passengers from YYY lbs. or XXX kg.
4.The resulting figure equals the available
amount of cargo and luggage load capacity.
For example, if the YYY amount equals
1,400 lbs. and there will be five 150-lb. pas-
sengers in your vehicle, the amount of avail-
able cargo and luggage load capacity is
650 lbs.:
1,400 lbs. minus 750 lbs. = 650 lbs.
5.Determine the combined weight of luggage
and cargo being loaded on the vehicle. That
weight may not safely exceed the available
cargo and luggage load capacity calculated
in step 4.
6.If your vehicle will be towing a trailer, part of
the load from your trailer will be transferred
to your vehicle. Consult the manual for
transporting a trailer to determine how this
may reduce the available cargo and luggage
load capacity of your vehicle.
Page 128 of 272
Things to remember when driving
126
Roof-mounted luggage rack*
A special rack system is available as an option
for your BMW. Please comply with the precau-
tions included with the installation instructions.
Loading roof-mounted luggage rack
Because roof racks raise the vehicle's center of
gravity when loaded, they have a major effect on
its handling and steering response. You should
therefore always remember not to exceed the
approved roof load capacity, the approved
gross vehicle weight or the axle loads when
loading the rack.
You can find the specified weights under
Weights on page244.
The load on the roof must be evenly distributed
and must not extend outward beyond the limits
of the loading surface. Always stow the heaviest
pieces on the bottom. Be sure that adequate
clearance is maintained for raising the pan-
orama glass sunroof, and that objects do not
project into the opening path of the liftgate.
Secure roof-mounted cargo correctly and
securely to prevent it from shifting or falling off
during the trip.
Drive smoothly. Avoid sudden acceleration and
braking maneuvers. Take corners gently.
Driving on poor roads
Your X5 is at home on all roads and surfaces.
It combines a 4-wheel drive system with the
advantages of a normal passenger car.
Driving on unpaved terrain can cause
damage to the vehicle.<
When you are driving on poor roads, there are a
few points which you should strictly observe for
your own safety, for that of your passengers,
and for the safety of the vehicle:
>Familiarize yourself with the vehicle before
driving off and avoid taking risks at all costs.
>Adapt your driving speed to the road condi-
tions. The steeper and rougher the road
surface is, the lower the speed should be.>You can operate your vehicle on uphill and
downhill gradients with a maximum slope of
50 %. If you want to drive on uphill or down-
hill gradients of this kind, make sure before-
hand that the engine oil and coolant levels
are near the MAX mark, refer to page225.
>Use the HDC Hill Descent Control when
driving down extremely steep grades, refer
to page85. It is possible to start off on
grades of up to 33 %.
The permissible body roll is 50 %.
>While driving, watch carefully for obstacles
such as rocks or holes. Try to avoid these
obstacles whenever possible.
>Please make sure that the undercarriage
does not touch the ground, for example on
crests and bumpy roads. The ground clear-
ance of the vehicle is a maximum of approx.
8.0 in/20 cm. Please note that the ground
clearance can vary depending on loading
and the driving conditions of the vehicle.
>Only drive through water on roads up to a
maximum depth of 20 in/50 cm and only at
walking speed, making sure not to stop in
the process.
>After driving through water at low speed,
lightly press the brake pedal several times
to dry the brakes and to prevent the braking
effect from being reduced by wetness.
>Depending on the condition of the surface,
it may be practical to briefly activate DTC,
refer to DTC Dynamic Traction Control on
page85.
>If the drive wheels spin on one side, depress
the accelerator pedal sufficiently so that the
driving stability control systems can distrib-
ute the drive forces to the individual wheels.
Please note the following points after driving on
poor roads to maintain the driving safety of your
BMW:
>Clean the coarsest dirt from the body.
>Clean mud, snow, ice etc. from the wheels
and tires and check the tires for damage.
Page 135 of 272
Navigation
Driving tips
133Reference
At a glance
Controls
Communications
Entertainment
Mobility
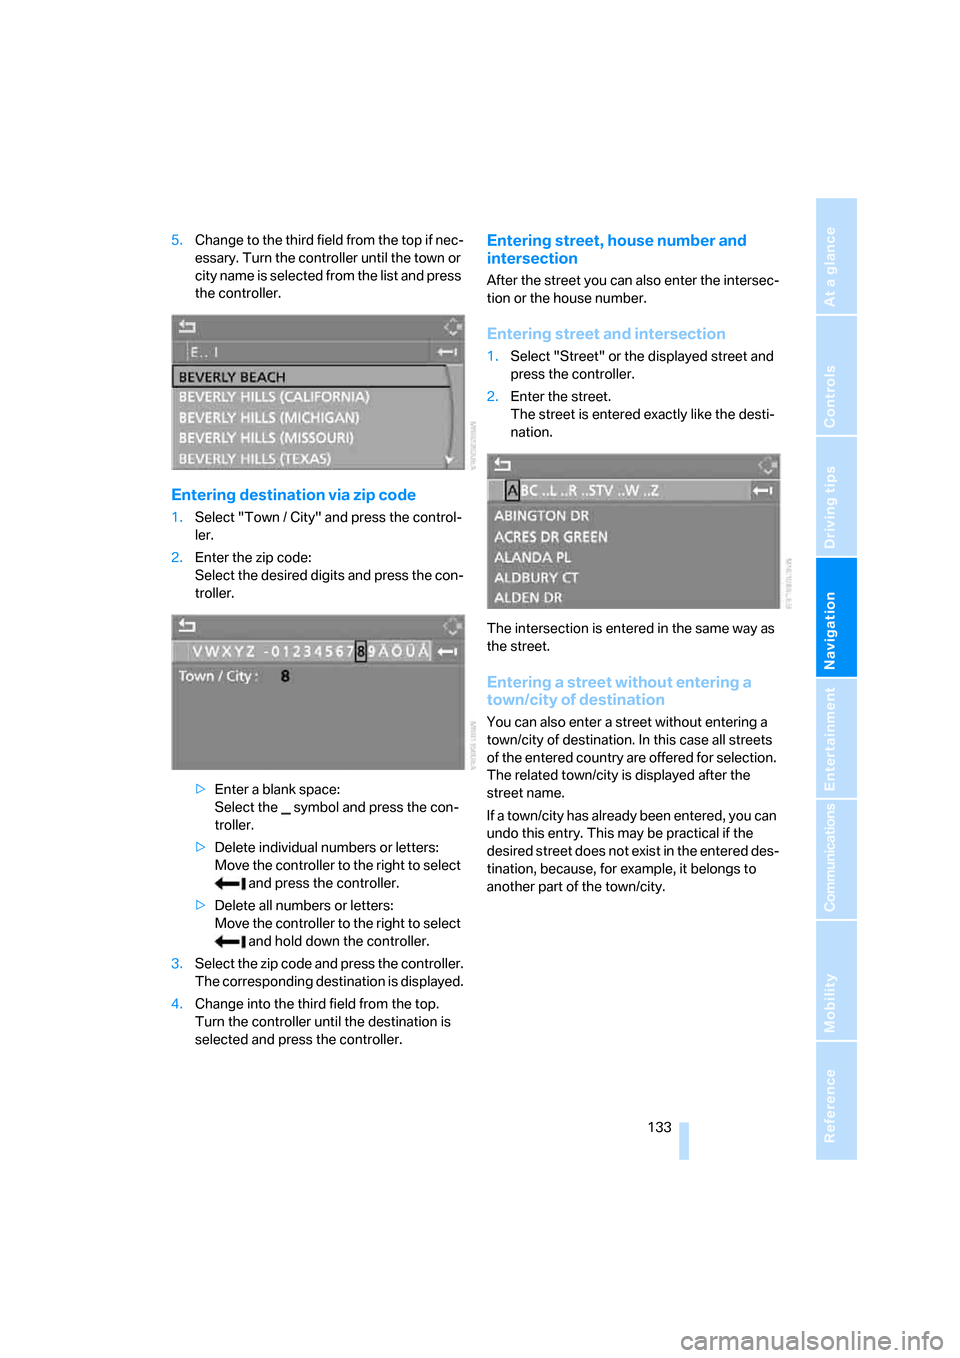
5.Change to the third field from the top if nec-
essary. Turn the controller until the town or
city name is selected from the list and press
the controller.
Entering destination via zip code
1.Select "Town / City" and press the control-
ler.
2.Enter the zip code:
Select the desired digits and press the con-
troller.
>Enter a blank space:
Select the symbol and press the con-
troller.
>Delete individual numbers or letters:
Move the controller to the right to select
and press the controller.
>Delete all numbers or letters:
Move the controller to the right to select
and hold down the controller.
3.Select the zip code and press the controller.
The corresponding destination is displayed.
4.Change into the third field from the top.
Turn the controller until the destination is
selected and press the controller.
Entering street, house number and
intersection
After the street you can also enter the intersec-
tion or the house number.
Entering street and intersection
1.Select "Street" or the displayed street and
press the controller.
2.Enter the street.
The street is entered exactly like the desti-
nation.
The intersection is entered in the same way as
the street.
Entering a street without entering a
town/city of destination
You can also enter a street without entering a
town/city of destination. In this case all streets
of the entered country are offered for selection.
The related town/city is displayed after the
street name.
If a town/city has already been entered, you can
undo this entry. This may be practical if the
desired street does not exist in the entered des-
tination, because, for example, it belongs to
another part of the town/city.
Page 138 of 272
Destination entry
136 Destinations that sound the same which
cannot be differentiated by the system
are summarized in a separate list and shown as
a destination followed by three dots.
Select this entry with {Yes} if necessary. Then
select the desired city/town in this list.<
Entering street and house number
The street is entered in the same way as the
destination.
To enter the house number:
Up to 4-digit house numbers can be entered.
Say the house number as individual numbers.
Starting destination guidance
Destination guidance starts immediately.
Saving destination
The destination is added to the destination list
or can be stored in the address book.
Selecting destination via map
If you only know the location of the town/city or
street of the destination, then you can enter the
destination by using a map. You can use the
cursor to select the destination on the map and
then apply it in the destination guidance.
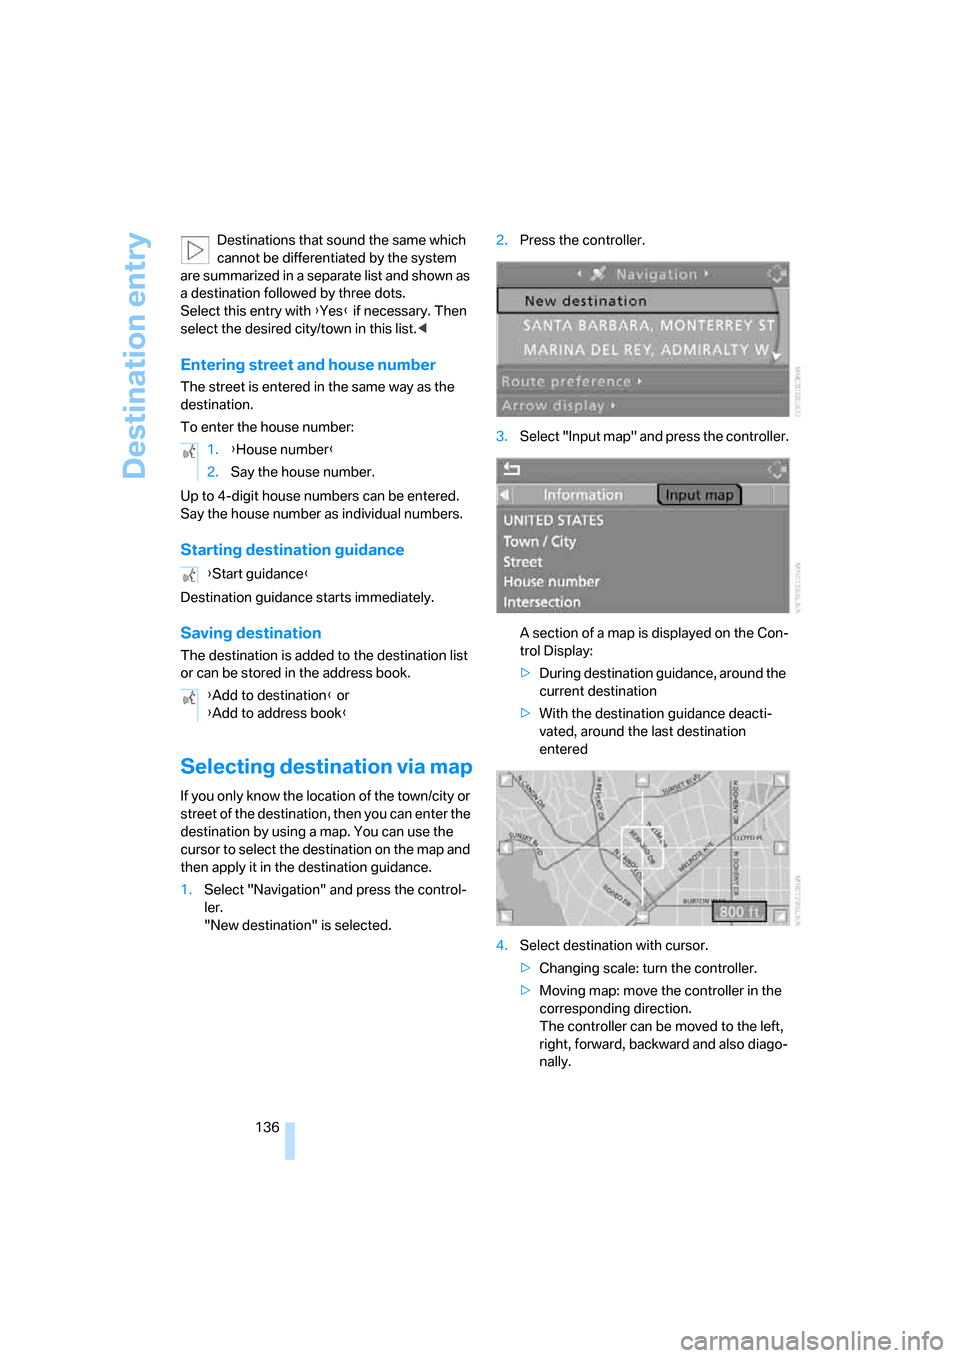
1.Select "Navigation" and press the control-
ler.
"New destination" is selected.2.Press the controller.
3.Select "Input map" and press the controller.
A section of a map is displayed on the Con-
trol Display:
>During destination guidance, around the
current destination
>With the destination guidance deacti-
vated, around the last destination
entered
4.Select destination with cursor.
>Changing scale: turn the controller.
>Moving map: move the controller in the
corresponding direction.
The controller can be moved to the left,
right, forward, backward and also diago-
nally. 1.{House number}
2.Say the house number.
{Start guidance}
{Add to destination} or
{Add to address book}
Page 143 of 272
Navigation
Driving tips
141Reference
At a glance
Controls
Communications
Entertainment
Mobility
Home address
You can store your current position or the cur-
rent destination as the home address in the
address book. This entry occupies the second
position in the address book.
Storing home address
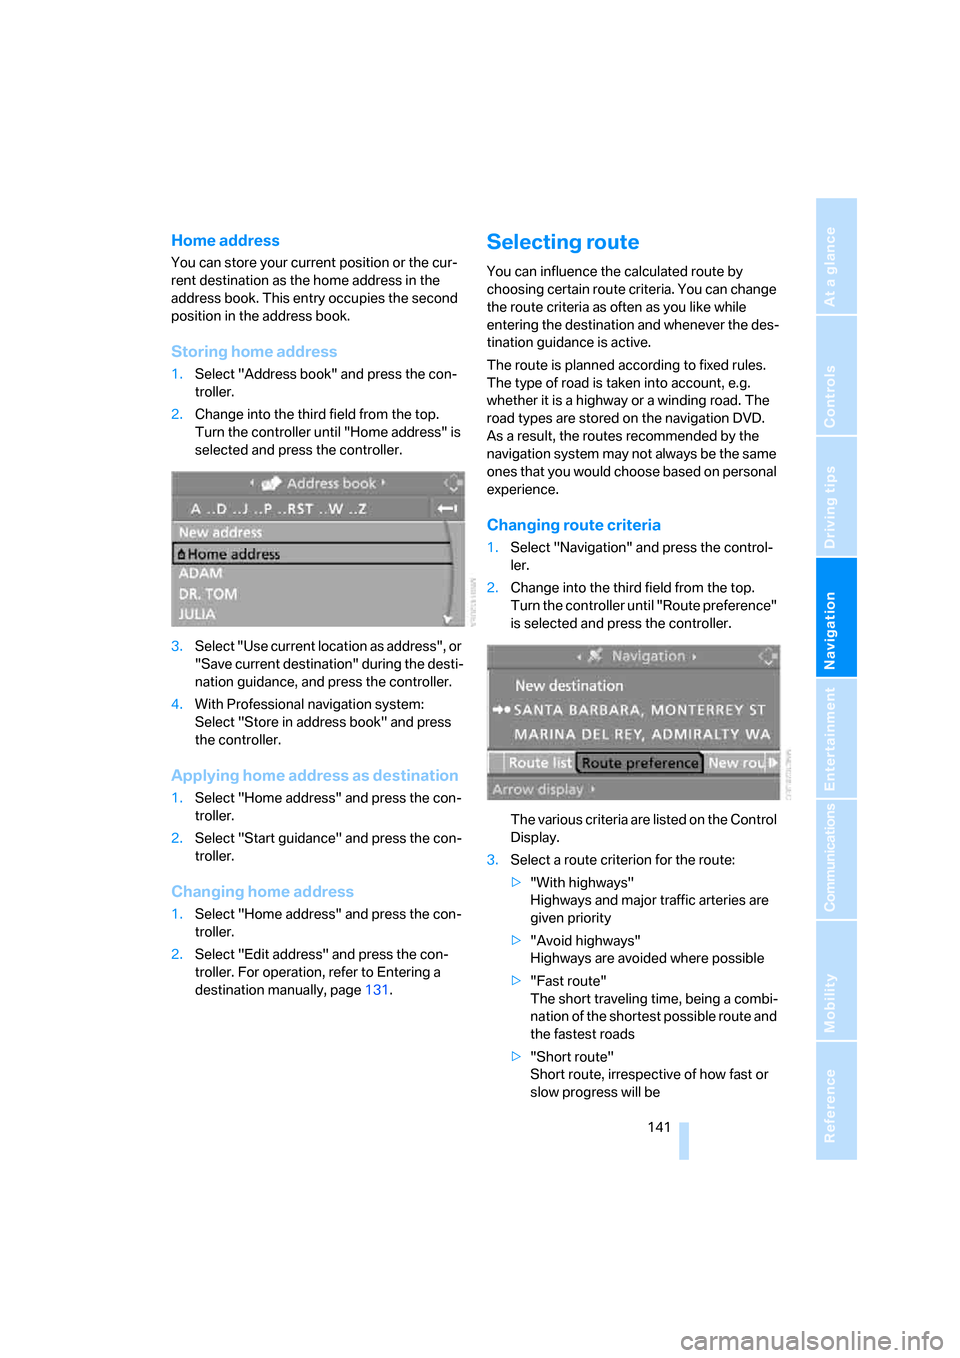
1.Select "Address book" and press the con-
troller.
2.Change into the third field from the top.
Turn the controller until "Home address" is
selected and press the controller.
3.Select "Use current location as address", or
"Save current destination" during the desti-
nation guidance, and press the controller.
4.With Professional navigation system:
Select "Store in address book" and press
the controller.
Applying home address as destination
1.Select "Home address" and press the con-
troller.
2.Select "Start guidance" and press the con-
troller.
Changing home address
1.Select "Home address" and press the con-
troller.
2.Select "Edit address" and press the con-
troller. For operation, refer to Entering a
destination manually, page131.
Selecting route
You can influence the calculated route by
choosing certain route criteria. You can change
the route criteria as often as you like while
entering the destination and whenever the des-
tination guidance is active.
The route is planned according to fixed rules.
The type of road is taken into account, e.g.
whether it is a highway or a winding road. The
road types are stored on the navigation DVD.
As a result, the routes recommended by the
navigation system may not always be the same
ones that you would choose based on personal
experience.
Changing route criteria
1.Select "Navigation" and press the control-
ler.
2.Change into the third field from the top.
Turn the controller until "Route preference"
is selected and press the controller.
The various criteria are listed on the Control
Display.
3.Select a route criterion for the route:
>"With highways"
Highways and major traffic arteries are
given priority
>"Avoid highways"
Highways are avoided where possible
>"Fast route"
The short traveling time, being a combi-
nation of the shortest possible route and
the fastest roads
>"Short route"
Short route, irrespective of how fast or
slow progress will be
Page 144 of 272
Destination entry
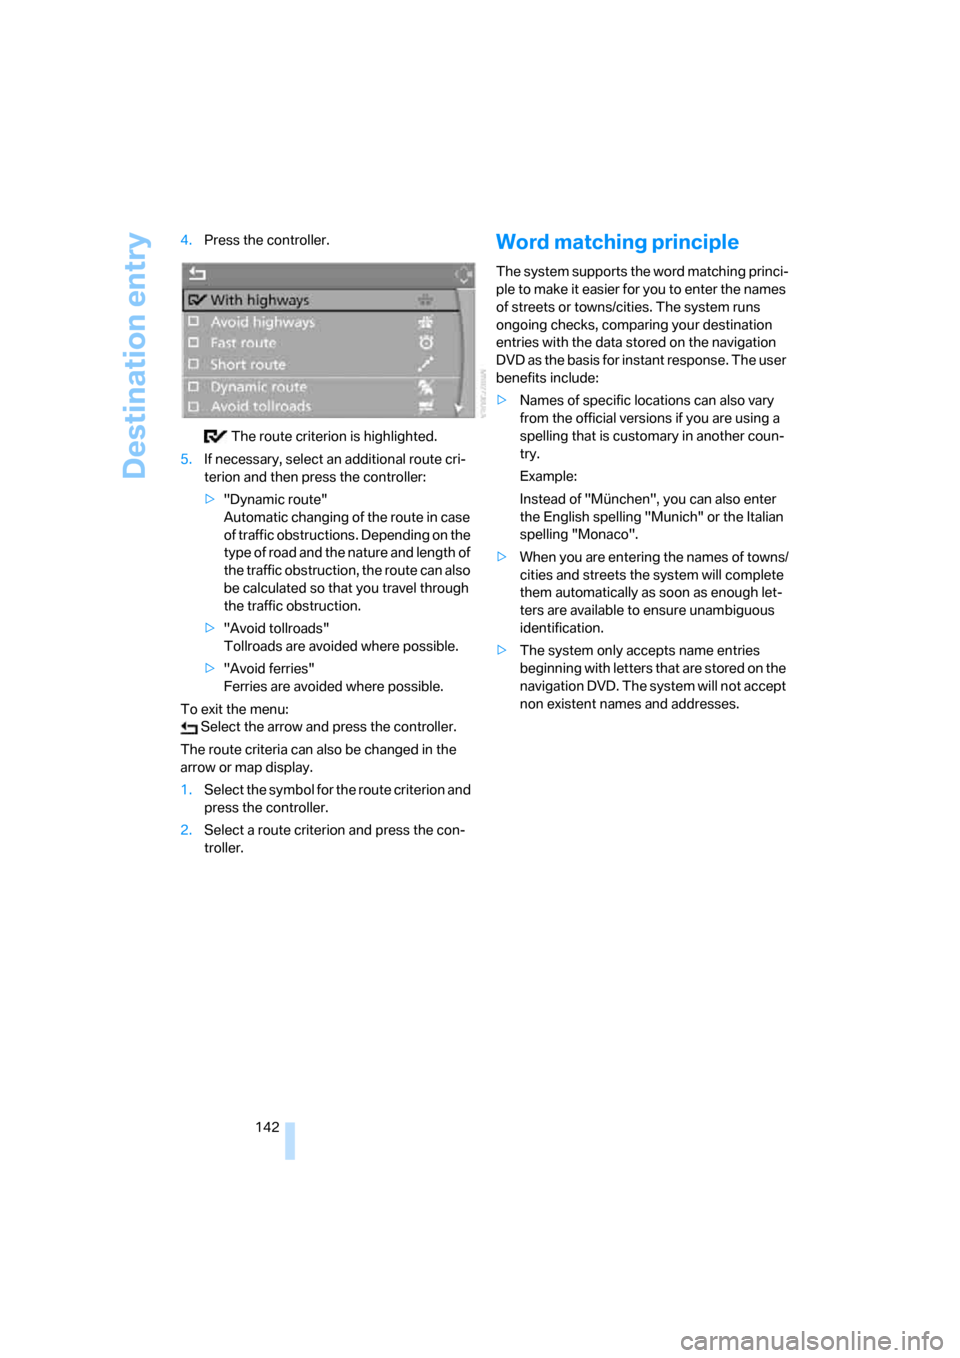
142 4.Press the controller.
The route criterion is highlighted.
5.If necessary, select an additional route cri-
terion and then press the controller:
>"Dynamic route"
Automatic changing of the route in case
of traffic obstructions. Depending on the
type of road and the nature and length of
the traffic obstruction, the route can also
be calculated so that you travel through
the traffic obstruction.
>"Avoid tollroads"
Tollroads are avoided where possible.
>"Avoid ferries"
Ferries are avoided where possible.
To exit the menu:
Select the arrow and press the controller.
The route criteria can also be changed in the
arrow or map display.
1.Select the symbol for the route criterion and
press the controller.
2.Select a route criterion and press the con-
troller.
Word matching principle
The system supports the word matching princi-
ple to make it easier for you to enter the names
of streets or towns/cities. The system runs
ongoing checks, comparing your destination
entries with the data stored on the navigation
DVD as the basis for instant response. The user
benefits include:
>Names of specific locations can also vary
from the official versions if you are using a
spelling that is customary in another coun-
try.
Example:
Instead of "München", you can also enter
the English spelling "Munich" or the Italian
spelling "Monaco".
>When you are entering the names of towns/
cities and streets the system will complete
them automatically as soon as enough let-
ters are available to ensure unambiguous
identification.
>The system only accepts name entries
beginning with letters that are stored on the
navigation DVD. The system will not accept
non existent names and addresses.
Page 147 of 272

Navigation
Driving tips
145Reference
At a glance
Controls
Communications
Entertainment
Mobility
To exit the menu:
Select the arrow and press the controller.
Displaying map view
You can have your current position displayed on
a map. After starting the destination guidance,
the planned route is shown on the map.
1.Select "Navigation" and press the control-
ler.
2.Change into the fourth field from the top.
Turn the controller until the desired map
view is selected:
>"Map facing north"
>"Map direction of travel"
>"Perspective"
3.Press the controller.
1Switching voice instructions on/off
2Starting/ending destination guidance
3Selecting destination via map
4Showing/hiding information last selected,
refer to Selecting destination using infor-
mation on page1375Changing map display
> "Map facing north"
> "Map direction of travel"
> "Perspective"
6Changing route criteria
7Manually displaying traffic information
*
8Arrow to destination from a bird's eye view
The estimated time of arrival and the distance
to the destination are shown in the bottom line
of the Control Display.
To exit from the menu:
Select the arrow and press the controller.
At scales of less than 250 miles/500 km, you
have the option of deciding whether to orient
the map to north, toward your current direction
of travel, or show the map in perspective. At
scales of 250 miles/500 km or greater, the map
always points toward north.
Changing map display
Select the corresponding symbol and press the
controller.
The next map display is displayed.
Changing scale
Turn the controller to change the scale.
Displaying streets and towns/cities of
route
You can have the roads and towns/cities along
the route displayed during destination guid-
ance.
The distances remaining to be traveled on each
individual road are also displayed.
1.Select "Navigation" and press the control-
ler.
2.Change into the third field from the top.
Turn the controller until "Route list" is
selected and press the controller.