manual transmission BMW X5 3.0I 2007 E70 Owner's Manual
[x] Cancel search | Manufacturer: BMW, Model Year: 2007, Model line: X5 3.0I, Model: BMW X5 3.0I 2007 E70Pages: 272, PDF Size: 9.03 MB
Page 60 of 272
Driving
58
Setting
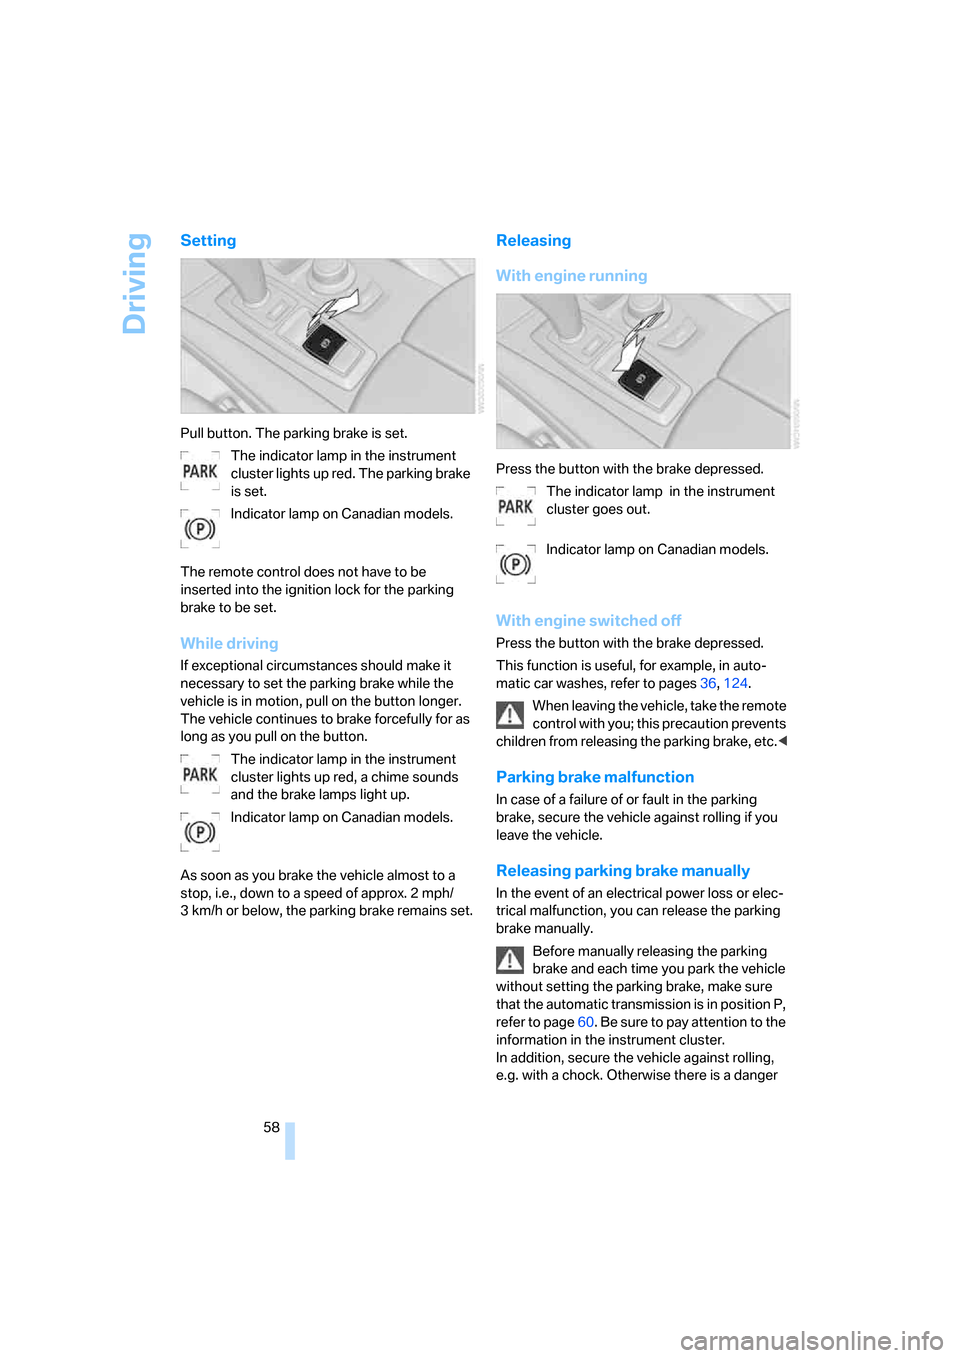
Pull button. The parking brake is set.
The indicator lamp in the instrument
cluster lights up red. The parking brake
is set.
Indicator lamp on Canadian models.
The remote control does not have to be
inserted into the ignition lock for the parking
brake to be set.
While driving
If exceptional circumstances should make it
necessary to set the parking brake while the
vehicle is in motion, pull on the button longer.
The vehicle continues to brake forcefully for as
long as you pull on the button.
The indicator lamp in the instrument
cluster lights up red, a chime sounds
and the brake lamps light up.
Indicator lamp on Canadian models.
As soon as you brake the vehicle almost to a
stop, i.e., down to a speed of approx. 2 mph/
3 km/h or below, the parking brake remains set.
Releasing
With engine running
Press the button with the brake depressed.
The indicator lamp in the instrument
cluster goes out.
Indicator lamp on Canadian models.
With engine switched off
Press the button with the brake depressed.
This function is useful, for example, in auto-
matic car washes, refer to pages36,124.
When leaving the vehicle, take the remote
control with you; this precaution prevents
children from releasing the parking brake, etc.<
Parking brake malfunction
In case of a failure of or fault in the parking
brake, secure the vehicle against rolling if you
leave the vehicle.
Releasing parking brake manually
In the event of an electrical power loss or elec-
trical malfunction, you can release the parking
brake manually.
Before manually releasing the parking
brake and each time you park the vehicle
without setting the parking brake, make sure
that the automatic transmission is in position P,
refer to page60. Be sure to pay attention to the
information in the instrument cluster.
In addition, secure the vehicle against rolling,
e.g. with a chock. Otherwise there is a danger
Page 61 of 272
Controls
59Reference
At a glance
Driving tips
Communications
Navigation
Entertainment
Mobility
that the vehicle could roll if parked on a steep
slope.<
If it becomes necessary to also release the
transmission lock of the automatic transmission
manually, follow this sequence:
1.If necessary, start by releasing the parking
brake manually.
2.Then release the automatic transmission's
transmission lock manually, refer to
page61.
Information on jump starting and towing from
page237.
Releasing
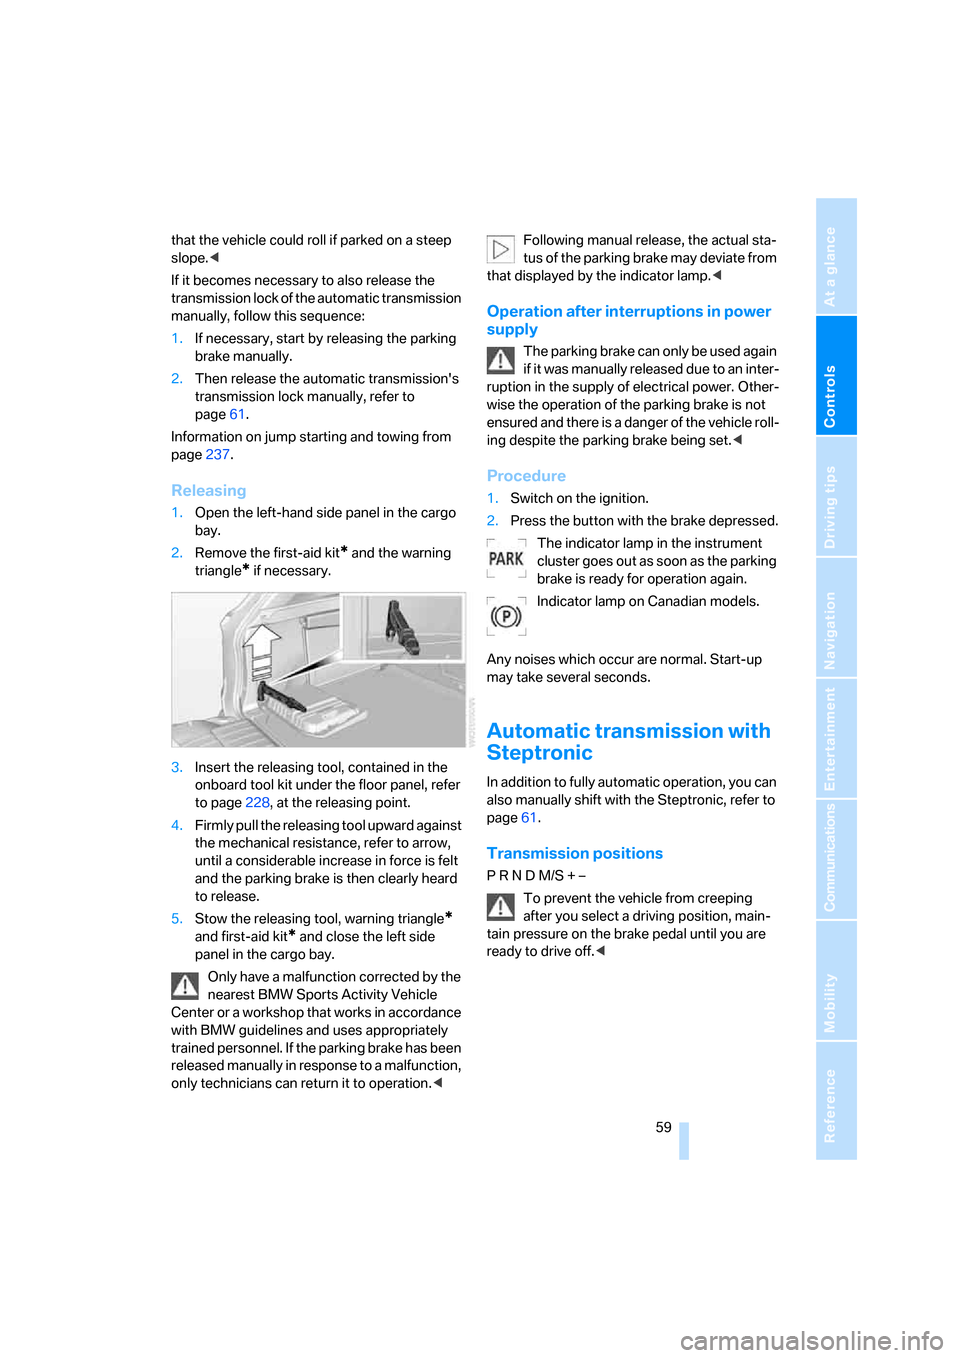
1.Open the left-hand side panel in the cargo
bay.
2.Remove the first-aid kit
* and the warning
triangle
* if necessary.
3.Insert the releasing tool, contained in the
onboard tool kit under the floor panel, refer
to page228, at the releasing point.
4.Firmly pull the releasing tool upward against
the mechanical resistance, refer to arrow,
until a considerable increase in force is felt
and the parking brake is then clearly heard
to release.
5.Stow the releasing tool, warning triangle
*
and first-aid kit* and close the left side
panel in the cargo bay.
Only have a malfunction corrected by the
nearest BMW Sports Activity Vehicle
Center or a workshop that works in accordance
with BMW guidelines and uses appropriately
trained personnel. If the parking brake has been
released manually in response to a malfunction,
only technicians can return it to operation.
that displayed by the indicator lamp.<
Operation after interruptions in power
supply
The parking brake can only be used again
if it was manually released due to an inter-
ruption in the supply of electrical power. Other-
wise the operation of the parking brake is not
ensured and there is a danger of the vehicle roll-
ing despite the parking brake being set.<
Procedure
1.Switch on the ignition.
2.Press the button with the brake depressed.
The indicator lamp in the instrument
cluster goes out as soon as the parking
brake is ready for operation again.
Indicator lamp on Canadian models.
Any noises which occur are normal. Start-up
may take several seconds.
Automatic transmission with
Steptronic
In addition to fully automatic operation, you can
also manually shift with the Steptronic, refer to
page61.
Transmission positions
P R N D M/S + –
To prevent the vehicle from creeping
after you select a driving position, main-
tain pressure on the brake pedal until you are
ready to drive off.<
Page 62 of 272
Driving
60
Displays in instrument cluster
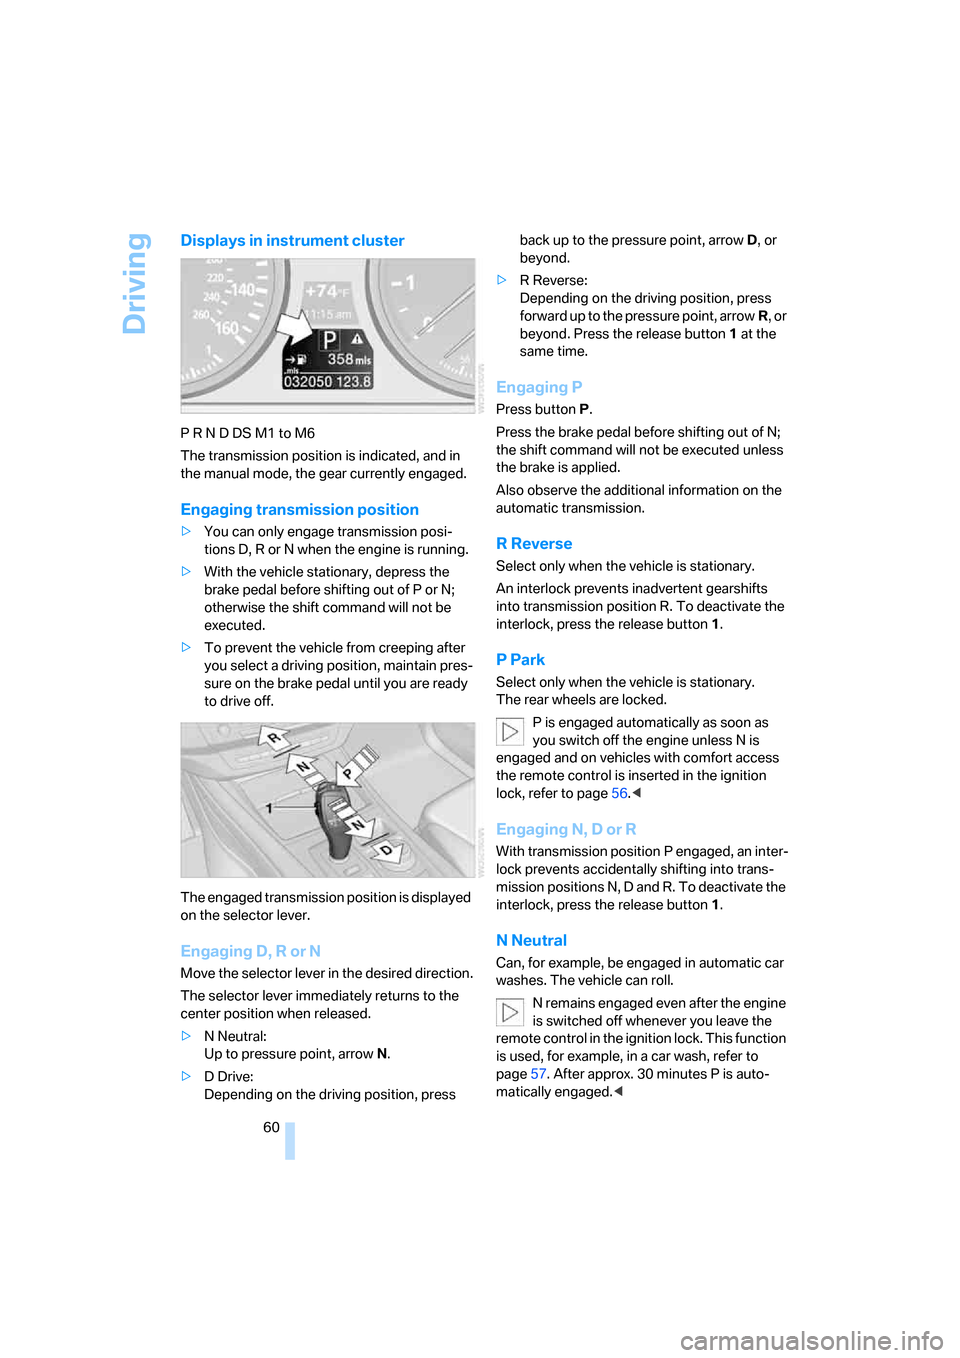
P R N D DS M1 to M6
The transmission position is indicated, and in
the manual mode, the gear currently engaged.
Engaging transmission position
>You can only engage transmission posi-
tions D, R or N when the engine is running.
>With the vehicle stationary, depress the
brake pedal before shifting out of P or N;
otherwise the shift command will not be
executed.
>To prevent the vehicle from creeping after
you select a driving position, maintain pres-
sure on the brake pedal until you are ready
to drive off.
The engaged transmission position is displayed
on the selector lever.
Engaging D, R or N
Move the selector lever in the desired direction.
The selector lever immediately returns to the
center position when released.
>N Neutral:
Up to pressure point, arrowN.
>D Drive:
Depending on the driving position, press back up to the pressure point, arrowD, or
beyond.
>R Reverse:
Depending on the driving position, press
forward up to the pressure point, arrowR, or
beyond. Press the release button1 at the
same time.
Engaging P
Press buttonP.
Press the brake pedal before shifting out of N;
the shift command will not be executed unless
the brake is applied.
Also observe the additional information on the
automatic transmission.
R Reverse
Select only when the vehicle is stationary.
An interlock prevents inadvertent gearshifts
into transmission position R. To deactivate the
interlock, press the release button1.
P Park
Select only when the vehicle is stationary.
The rear wheels are locked.
P is engaged automatically as soon as
you switch off the engine unless N is
engaged and on vehicles with comfort access
the remote control is inserted in the ignition
lock, refer to page56.<
Engaging N, D or R
With transmission position P engaged, an inter-
lock prevents accidentally shifting into trans-
mission positions N, D and R. To deactivate the
interlock, press the release button1.
N Neutral
Can, for example, be engaged in automatic car
washes. The vehicle can roll.
N remains engaged even after the engine
is switched off whenever you leave the
remote control in the ignition lock. This function
is used, for example, in a car wash, refer to
page57. After approx. 30 minutes P is auto-
matically engaged.<
Page 63 of 272
Controls
61Reference
At a glance
Driving tips
Communications
Navigation
Entertainment
Mobility
D Drive, automatic position
Position for normal vehicle operation. All for-
ward gears are available.
Under normal operating conditions, the fuel
consumption is lowest when driving in posi-
tion D.
Kick-down
The kick-down mode provides maximum accel-
eration.
Depress the accelerator pedal past the
increased resistance point at the full-throttle
position.
Sport program and manual mode M/S
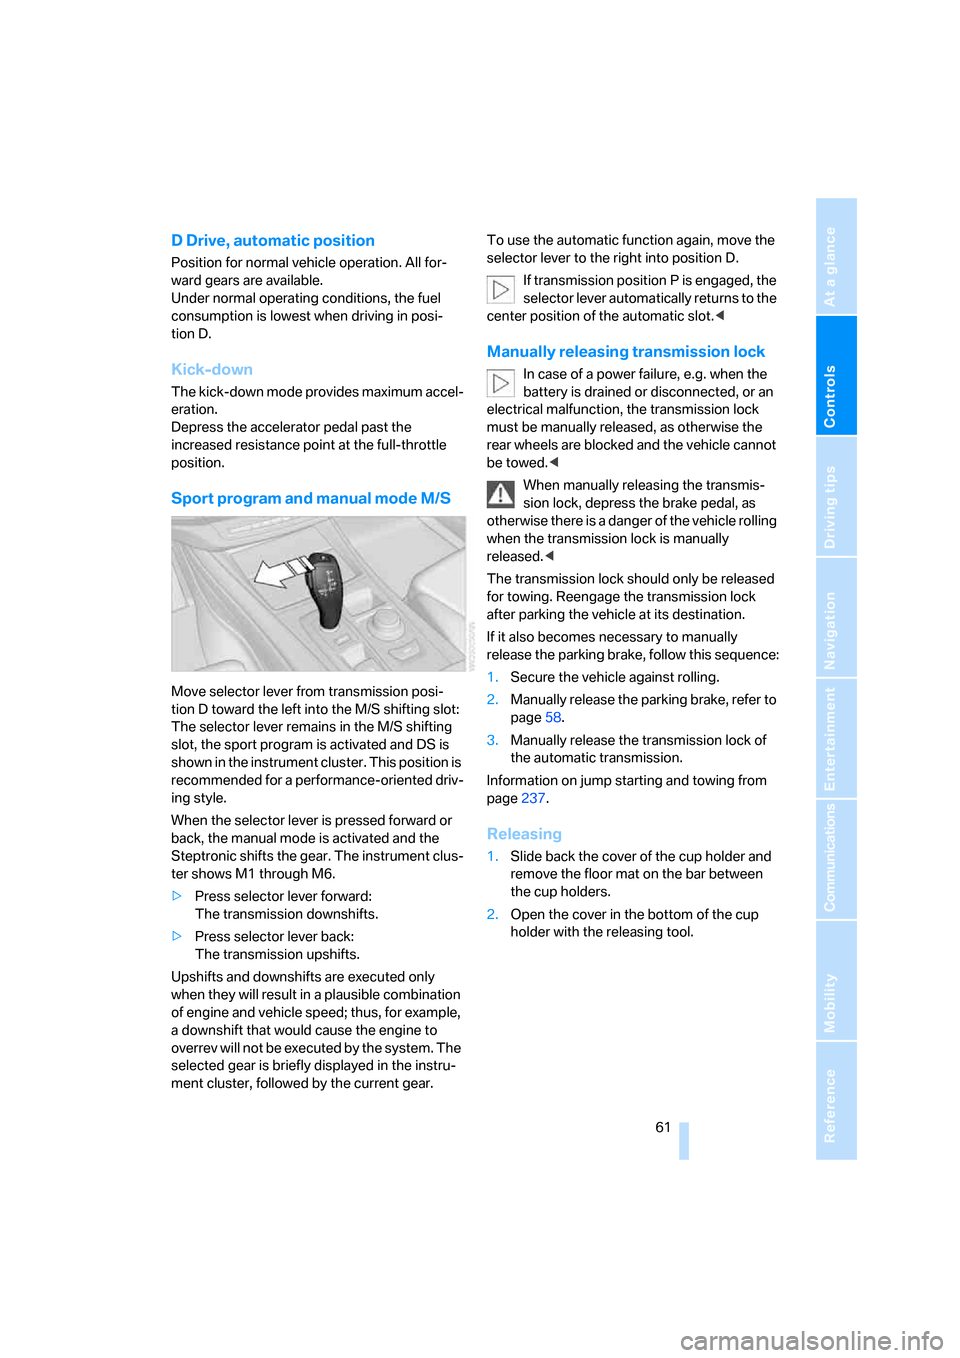
Move selector lever from transmission posi-
tion D toward the left into the M/S shifting slot:
The selector lever remains in the M/S shifting
slot, the sport program is activated and DS is
shown in the instrument cluster. This position is
recommended for a performance-oriented driv-
ing style.
When the selector lever is pressed forward or
back, the manual mode is activated and the
Steptronic shifts the gear. The instrument clus-
ter shows M1 through M6.
>Press selector lever forward:
The transmission downshifts.
>Press selector lever back:
The transmission upshifts.
Upshifts and downshifts are executed only
when they will result in a plausible combination
of engine and vehicle speed; thus, for example,
a downshift that would cause the engine to
overrev will not be executed by the system. The
selected gear is briefly displayed in the instru-
ment cluster, followed by the current gear.To use the automatic function again, move the
selector lever to the right into position D.
If transmission position P is engaged, the
selector lever automatically returns to the
center position of the automatic slot.<
Manually releasing transmission lock
In case of a power failure, e.g. when the
battery is drained or disconnected, or an
electrical malfunction, the transmission lock
must be manually released, as otherwise the
rear wheels are blocked and the vehicle cannot
be towed.<
When manually releasing the transmis-
sion lock, depress the brake pedal, as
otherwise there is a danger of the vehicle rolling
when the transmission lock is manually
released.<
The transmission lock should only be released
for towing. Reengage the transmission lock
after parking the vehicle at its destination.
If it also becomes necessary to manually
release the parking brake, follow this sequence:
1.Secure the vehicle against rolling.
2.Manually release the parking brake, refer to
page58.
3.Manually release the transmission lock of
the automatic transmission.
Information on jump starting and towing from
page237.
Releasing
1.Slide back the cover of the cup holder and
remove the floor mat on the bar between
the cup holders.
2.Open the cover in the bottom of the cup
holder with the releasing tool.
Page 64 of 272
Driving
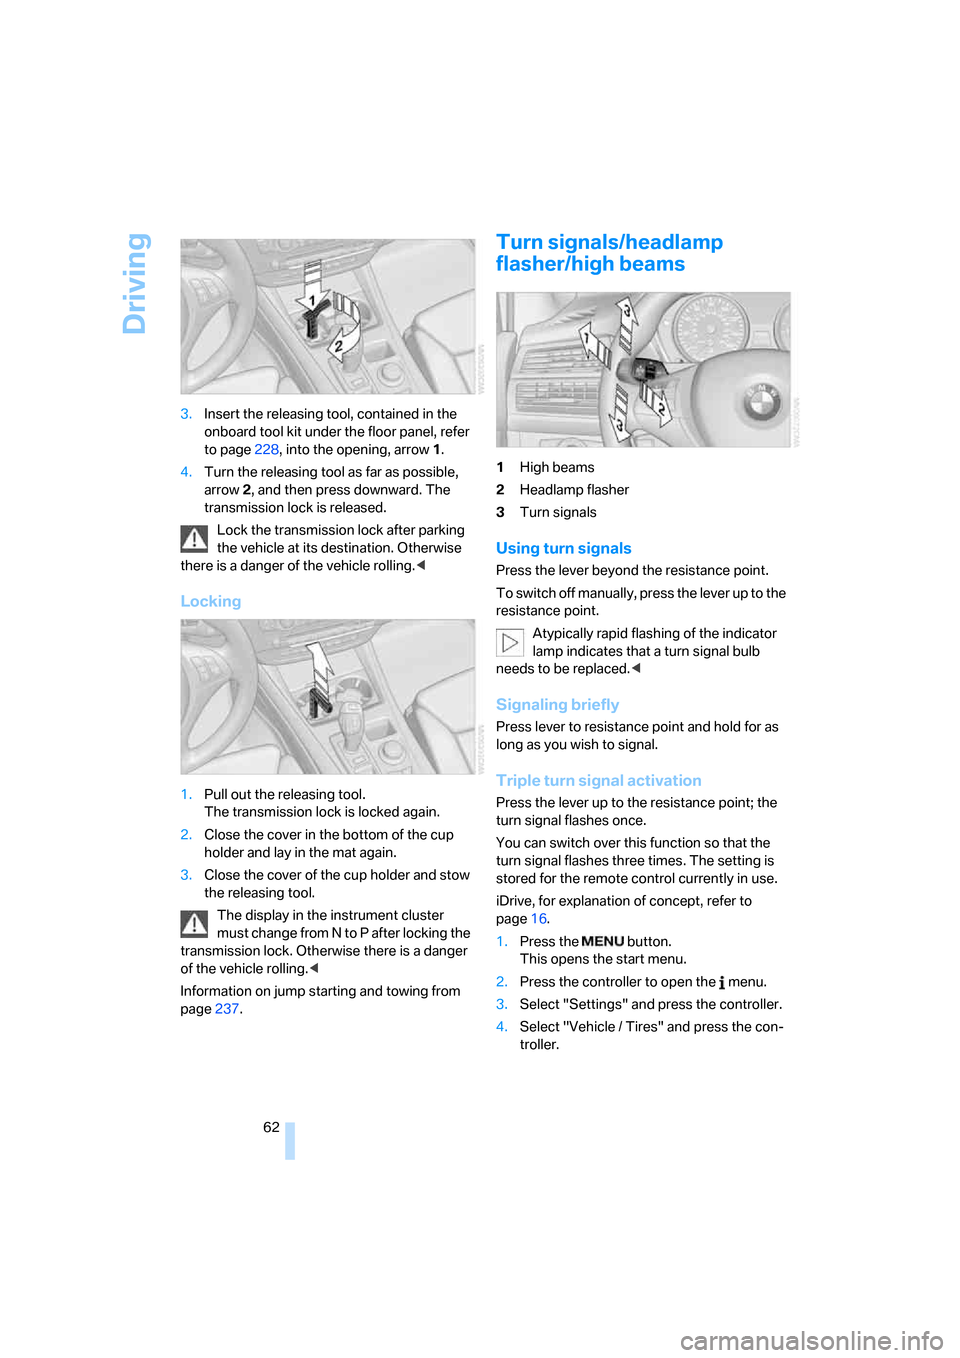
62 3.Insert the releasing tool, contained in the
onboard tool kit under the floor panel, refer
to page228, into the opening, arrow1.
4.Turn the releasing tool as far as possible,
arrow2, and then press downward. The
transmission lock is released.
Lock the transmission lock after parking
the vehicle at its destination. Otherwise
there is a danger of the vehicle rolling.<
Locking
1.Pull out the releasing tool.
The transmission lock is locked again.
2.Close the cover in the bottom of the cup
holder and lay in the mat again.
3.Close the cover of the cup holder and stow
the releasing tool.
The display in the instrument cluster
must change from N to P after locking the
transmission lock. Otherwise there is a danger
of the vehicle rolling.<
Information on jump starting and towing from
page237.
Turn signals/headlamp
flasher/high beams
1High beams
2Headlamp flasher
3Turn signals
Using turn signals
Press the lever beyond the resistance point.
To switch off manually, press the lever up to the
resistance point.
Atypically rapid flashing of the indicator
lamp indicates that a turn signal bulb
needs to be replaced.<
Signaling briefly
Press lever to resistance point and hold for as
long as you wish to signal.
Triple turn signal activation
Press the lever up to the resistance point; the
turn signal flashes once.
You can switch over this function so that the
turn signal flashes three times. The setting is
stored for the remote control currently in use.
iDrive, for explanation of concept, refer to
page16.
1.Press the button.
This opens the start menu.
2.Press the controller to open the menu.
3.Select "Settings" and press the controller.
4.Select "Vehicle / Tires" and press the con-
troller.
Page 83 of 272
Controls
81Reference
At a glance
Driving tips
Communications
Navigation
Entertainment
Mobility
PDC with visual warning*
You can also have the system show distances
to objects on the Control Display. Objects that
are farther away are already shown there before
a signal tone sounds.
The setting is stored for the remote control cur-
rently in use.
If the vehicle is equipped with a backup camera,
refer to the display of the backup camera on
page83.
iDrive, for explanation of concept, refer to
page16.
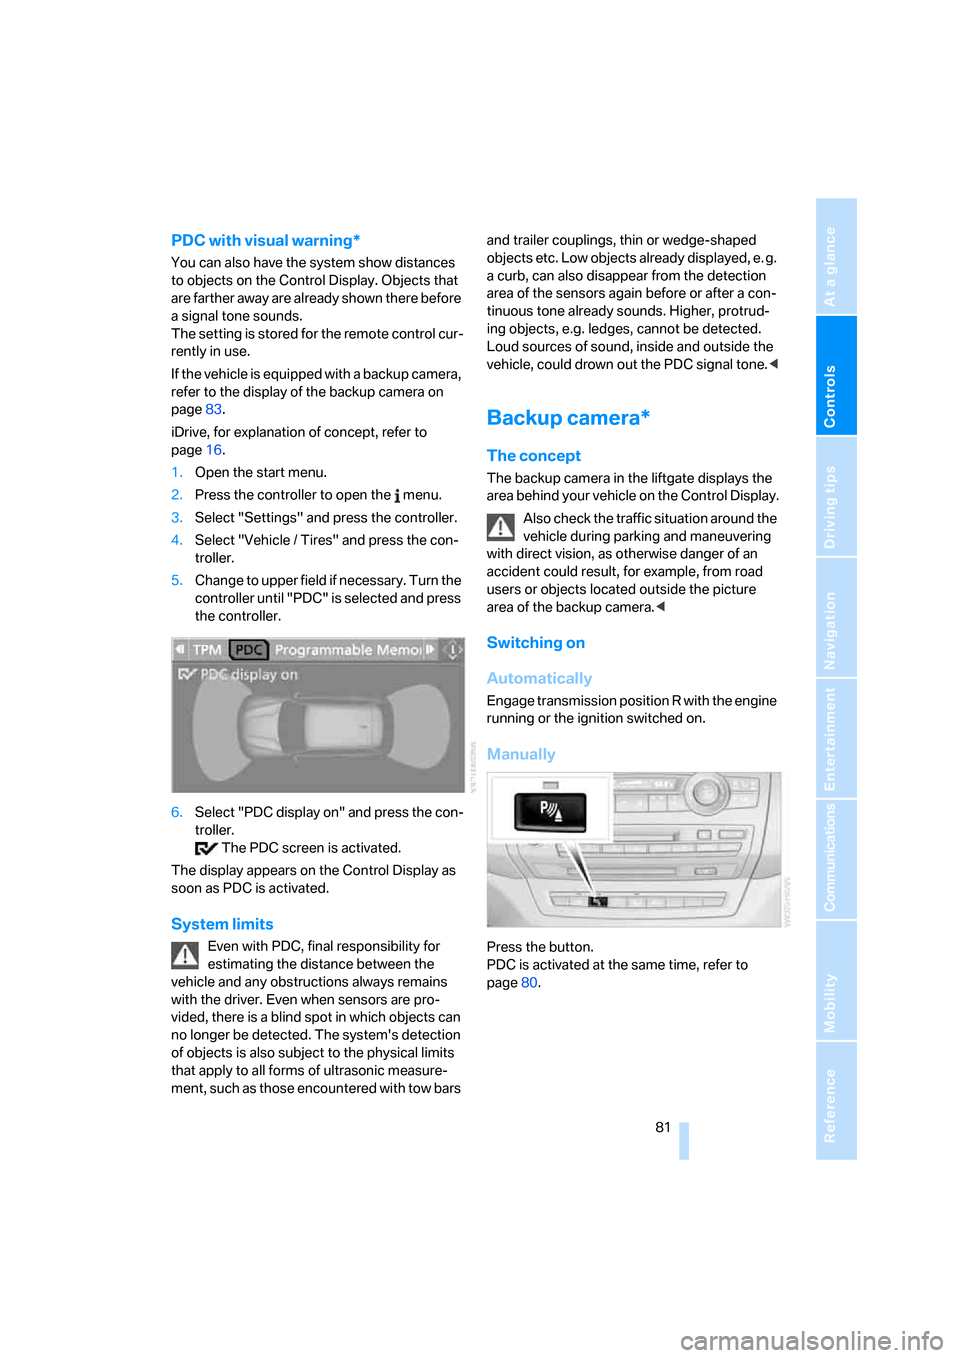
1.Open the start menu.
2.Press the controller to open the menu.
3.Select "Settings" and press the controller.
4.Select "Vehicle / Tires" and press the con-
troller.
5.Change to upper field if necessary. Turn the
controller until "PDC" is selected and press
the controller.
6.Select "PDC display on" and press the con-
troller.
The PDC screen is activated.
The display appears on the Control Display as
soon as PDC is activated.
System limits
Even with PDC, final responsibility for
estimating the distance between the
vehicle and any obstructions always remains
with the driver. Even when sensors are pro-
vided, there is a blind spot in which objects can
no longer be detected. The system's detection
of objects is also subject to the physical limits
that apply to all forms of ultrasonic measure-
ment, such as those encountered with tow bars and trailer couplings, thin or wedge-shaped
objects etc. Low objects already displayed, e. g.
a curb, can also disappear from the detection
area of the sensors again before or after a con-
tinuous tone already sounds. Higher, protrud-
ing objects, e.g. ledges, cannot be detected.
Loud sources of sound, inside and outside the
vehicle, could drown out the PDC signal tone.<
Backup camera*
The concept
The backup camera in the liftgate displays the
area behind your vehicle on the Control Display.
Also check the traffic situation around the
vehicle during parking and maneuvering
with direct vision, as otherwise danger of an
accident could result, for example, from road
users or objects located outside the picture
area of the backup camera.<
Switching on
Automatically
Engage transmission position R with the engine
running or the ignition switched on.
Manually
Press the button.
PDC is activated at the same time, refer to
page80.
Page 112 of 272
Practical interior accessories
110
Practical interior accessories
Integrated universal remote
control*
The concept
The integrated universal remote control can
replace as many as three hand-held transmit-
ters for various remote-controlled accessories,
such as door openers and house alarm sys-
tems. The integrated universal remote control
registers and stores signals from the original
hand-held transmitters.
The signal of an original hand-held transmitter
can be programmed on one of the three mem-
ory buttons1. Then with the ignition switched
on, this programmed memory button1 can be
used to operate the respective feature. The
LED2 flashes to confirm transmission of the
signal.
Should you sell your vehicle one day, be sure to
delete the stored programs beforehand for your
safety, refer to page111.
To prevent possible damage or injury,
before programming or using the inte-
grated universal remote control, always inspect
the immediate area to make certain that no peo-
ple, animals or objects are within the travel
range of the device. Also, comply with the
safety precautions of the original hand-held
transmitter.<
Checking compatibility
If you see this symbol on the packaging
or in the manual supplied with the orig-
inal hand-held transmitter, it is safe to
assume that it is compatible with the integrated
universal remote control.
Should you have additional questions,
please contact your BMW Sports Activity
Vehicle Center or call: 1-800-355-3515.
Information is also provided on the Internet at:
www.bmwusa.com or
www.homelink.com.HomeLink is a registered trademark of Johnson
Controls, Inc.<
Programming
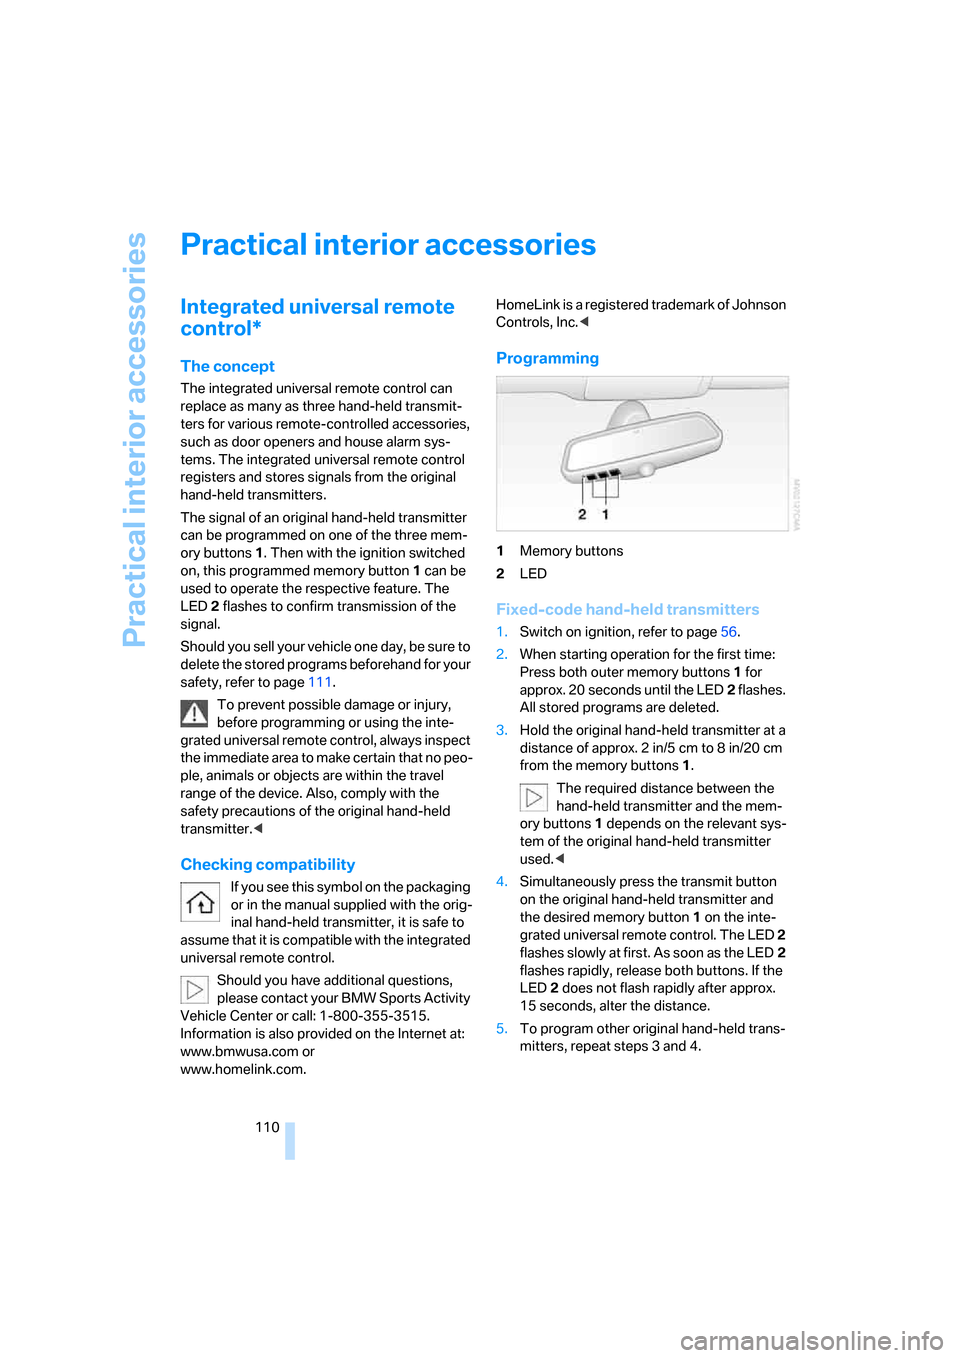
1Memory buttons
2LED
Fixed-code hand-held transmitters
1.Switch on ignition, refer to page56.
2.When starting operation for the first time:
Press both outer memory buttons1 for
approx. 20 seconds until the LED2 flashes.
All stored programs are deleted.
3.Hold the original hand-held transmitter at a
distance of approx. 2 in/5 cm to 8 in/20 cm
from the memory buttons1.
The required distance between the
hand-held transmitter and the mem-
ory buttons1 depends on the relevant sys-
tem of the original hand-held transmitter
used.<
4.Simultaneously press the transmit button
on the original hand-held transmitter and
the desired memory button 1 on the inte-
grated universal remote control. The LED 2
flashes slowly at first. As soon as the LED2
flashes rapidly, release both buttons. If the
LED2 does not flash rapidly after approx.
15 seconds, alter the distance.
5.To program other original hand-held trans-
mitters, repeat steps 3 and 4.
Page 125 of 272
Driving tips
123Reference
At a glance
Controls
Communications
Navigation
Entertainment
Mobility
Hydroplaning
When driving on wet or slushy roads,
reduce road speed. If you do not, a wedge
of water can form between tires and road sur-
face. This phenomenon is referred to as hydro-
planing, and is characterized by a partial or
complete loss of contact between the tires and
the road surface, ultimately undermining your
ability to steer and brake the vehicle.<
The risk of hydroplaning increases as the tread
depth of the tires decreases, refer also to Mini-
mum tread depth on page219.
Driving through water
Do not drive through water on the road if it
is deeper than 20 in/50 cm, and then only
at walking speed at the most. Otherwise, the
vehicle's engine, the electrical systems and the
transmission may be damaged.<
Starting assistant
The starting assistant enables you to start off
conveniently on slopes. The parking brake is
not required for this purpose.
1.Hold the vehicle with the footbrake.
2.Release the footbrake and immediately
drive off quickly.
The starting assistant holds the vehicle
for approx. 2 seconds after releasing the
footbrake. Depending on the load, the vehicle
may also roll back slightly during this time.
After releasing the footbrake, immediately start
quickly, otherwise the starting assistant no
longer holds the vehicle after approx. 2 seconds
and it begins to roll back.<
Braking safely
Your BMW is equipped with ABS as a standard
feature. In situations that require it, it is best to
brake with full force. Since the vehicle maintains
steering responsiveness, you can still avoid
possible obstacles with a minimum of steering
effort.
Pulsation of the brake pedal, combined with
sounds from the hydraulic circuits, indicate that
ABS is in its active mode.Do not drive with your foot resting on the
brake pedal. Even light but consistent
pedal pressure can lead to high temperatures,
brake wear and possibly even brake failure.<
Driving in wet conditions
When roads are wet or there is heavy rain,
briefly exert gentle pressure on the brake pedal
every few miles. Monitor traffic conditions to
ensure that this maneuver does not endanger
other road users. The heat generated in this
process helps dry the pads and rotors to ensure
that full braking efficiency will then be available
when you need it.
Hills
To prevent overheating and the resulting
reduced efficiency of the brake system,
drive long or steep downhill gradients in the
gear in which the least braking is required. Even
light but consistent pressure on the brake pedal
can lead to high temperatures, brake wear and
possibly even brake failure.<
The braking effect of the engine can be further
increased by downshifting in the manual mode
of the automatic transmission, if necessary into
first gear, refer to page61. This prevents an
excessive strain on the brakes.
Do not drive in idle or with the engine
stopped, otherwise there will be no
engine braking action or support of the braking
force and steering.
Never allow floor mats, carpets or any other
objects to protrude into the area of movement
of the pedals and impair their operation.<
Corrosion on brake rotors
When the vehicle is driven only occasionally,
during extended periods when the vehicle is not
used at all, and in operating conditions where
brake applications are less frequent, there is an
increased tendency for corrosion to form on
rotors, while contaminants accumulate on the
brake pads. This occurs because the minimum
pressure which must be exerted by the pads
during brake applications to clean the rotors is
not reached.
Page 126 of 272
Things to remember when driving
124 Should corrosion form on the brake rotors, the
brakes will tend to respond with a pulsating
effect that even extended application will fail to
cure.
When vehicle is parked
Condensation forms in the automatic climate
control system during operation, and then exits
under the vehicle. Traces of condensed water
under the vehicle are therefore normal.
Before driving into a car wash
Fold in the exterior mirrors, refer to page48,
otherwise they could be damaged due to the
width of the vehicle.
General information on the care and mainte-
nance of your BMW is contained in the Caring
for your vehicle brochure.
Rear window wiper
The rear window wiper can be damaged in car
washes. Take appropriate protective measures;
ask the car wash operator if necessary.
With comfort access*
Insert the remote control into the ignition lock.
The engine can be switched off in transmission
position N. Also refer to page36.
Loading
To avoid loading the tires beyond their
approved carrying capacity, never over-
load the vehicle. Overloading can lead to over-
heating and increases the rate at which damage
develops inside the tires. The ultimate result
can assume the form of a sudden blow-out.<
Determining loading limit
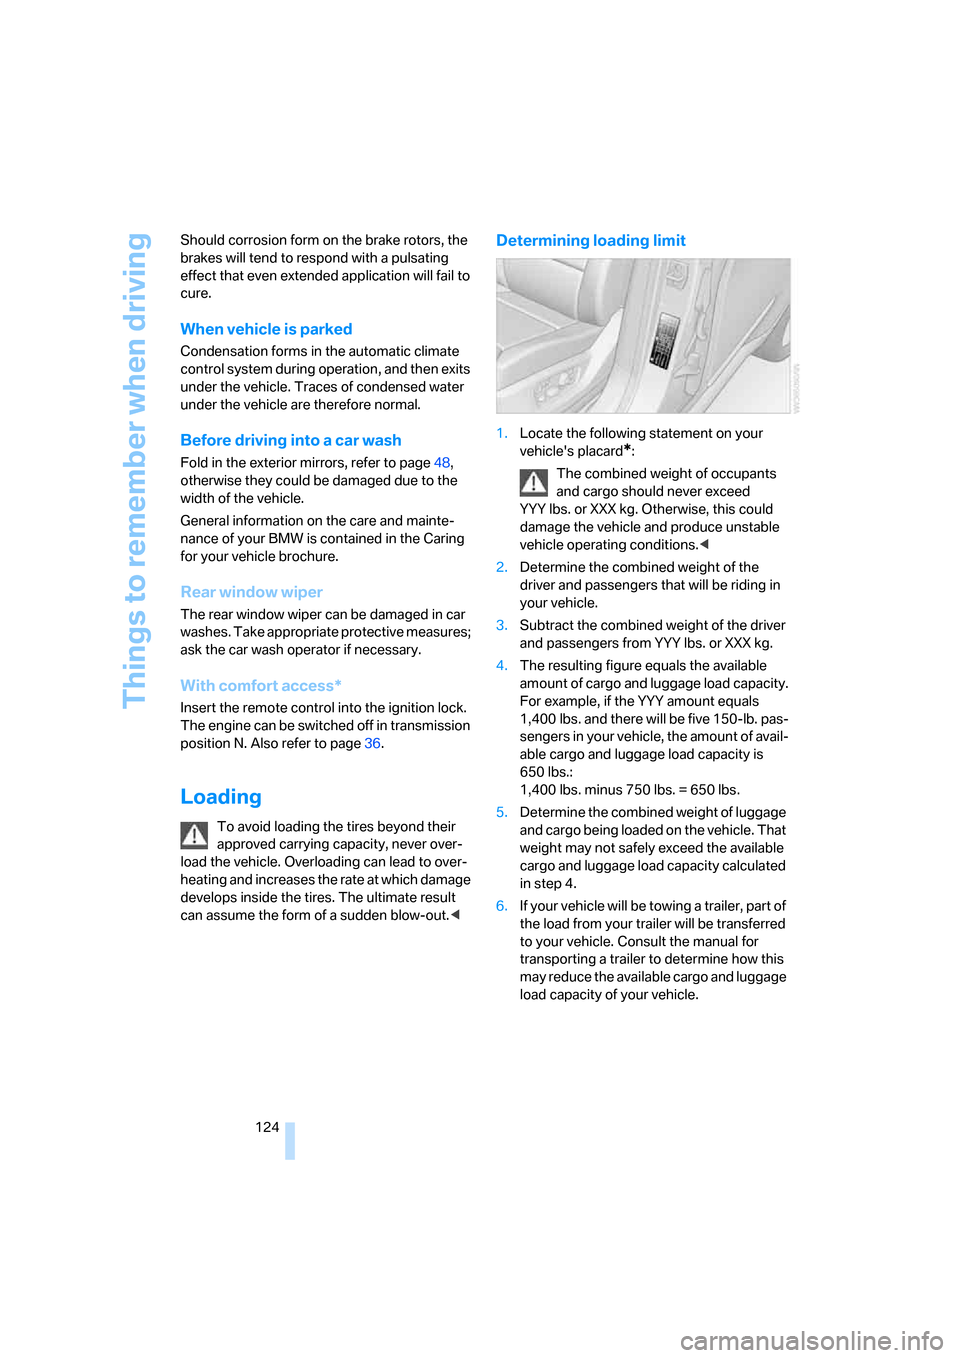
1.Locate the following statement on your
vehicle's placard
*:
The combined weight of occupants
and cargo should never exceed
YYY lbs. or XXX kg. Otherwise, this could
damage the vehicle and produce unstable
vehicle operating conditions.<
2.Determine the combined weight of the
driver and passengers that will be riding in
your vehicle.
3.Subtract the combined weight of the driver
and passengers from YYY lbs. or XXX kg.
4.The resulting figure equals the available
amount of cargo and luggage load capacity.
For example, if the YYY amount equals
1,400 lbs. and there will be five 150-lb. pas-
sengers in your vehicle, the amount of avail-
able cargo and luggage load capacity is
650 lbs.:
1,400 lbs. minus 750 lbs. = 650 lbs.
5.Determine the combined weight of luggage
and cargo being loaded on the vehicle. That
weight may not safely exceed the available
cargo and luggage load capacity calculated
in step 4.
6.If your vehicle will be towing a trailer, part of
the load from your trailer will be transferred
to your vehicle. Consult the manual for
transporting a trailer to determine how this
may reduce the available cargo and luggage
load capacity of your vehicle.
Page 161 of 272
Navigation
Entertainment
Driving tips
159Reference
At a glance
Controls
Communications
Mobility
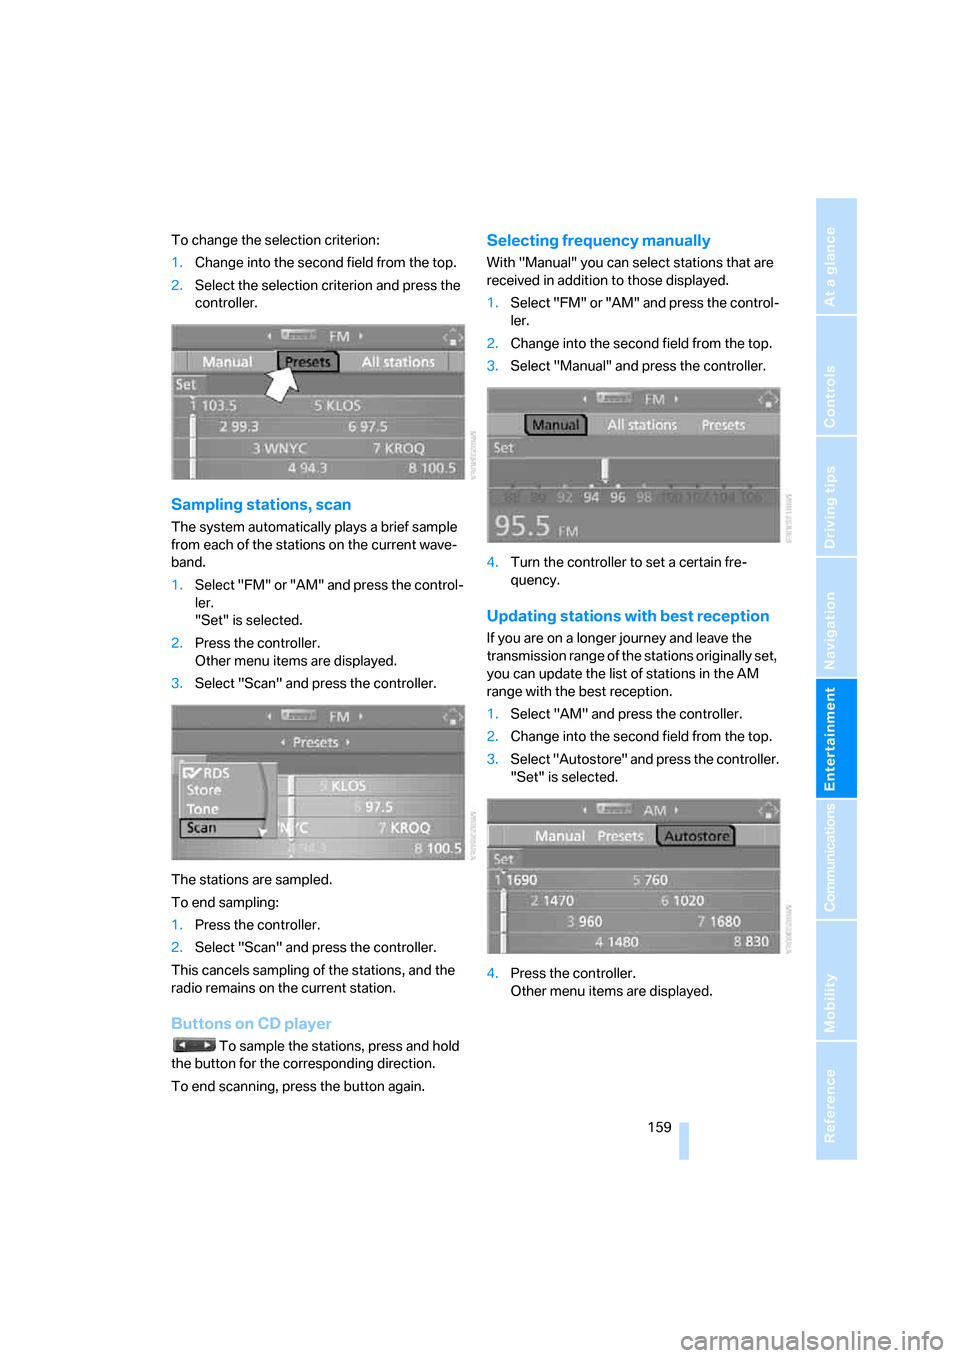
To change the selection criterion:
1.Change into the second field from the top.
2.Select the selection criterion and press the
controller.
Sampling stations, scan
The system automatically plays a brief sample
from each of the stations on the current wave-
band.
1.Select "FM" or "AM" and press the control-
ler.
"Set" is selected.
2.Press the controller.
Other menu items are displayed.
3.Select "Scan" and press the controller.
The stations are sampled.
To end sampling:
1.Press the controller.
2.Select "Scan" and press the controller.
This cancels sampling of the stations, and the
radio remains on the current station.
Buttons on CD player
To sample the stations, press and hold
the button for the corresponding direction.
To end scanning, press the button again.
Selecting frequency manually
With "Manual" you can select stations that are
received in addition to those displayed.
1.Select "FM" or "AM" and press the control-
ler.
2.Change into the second field from the top.
3.Select "Manual" and press the controller.
4.Turn the controller to set a certain fre-
quency.
Updating stations with best reception
If you are on a longer journey and leave the
transmission range of the stations originally set,
you can update the list of stations in the AM
range with the best reception.
1.Select "AM" and press the controller.
2.Change into the second field from the top.
3.Select "Autostore" and press the controller.
"Set" is selected.
4.Press the controller.
Other menu items are displayed.