Manual BMW X5 3.0Si 2008 E70 Service Manual
[x] Cancel search | Manufacturer: BMW, Model Year: 2008, Model line: X5 3.0Si, Model: BMW X5 3.0Si 2008 E70Pages: 292, PDF Size: 9.32 MB
Page 148 of 292
Destination entry
146 >Delete all entries:
Select "Delete list". The destination
guidance is switched off.
>Change entry:
Select "Edit". For operation, refer to
Entering destination via town/city name,
page139.
3.Press the controller.
Address book
Opening address book
iDrive, for operating principle refer to page16.
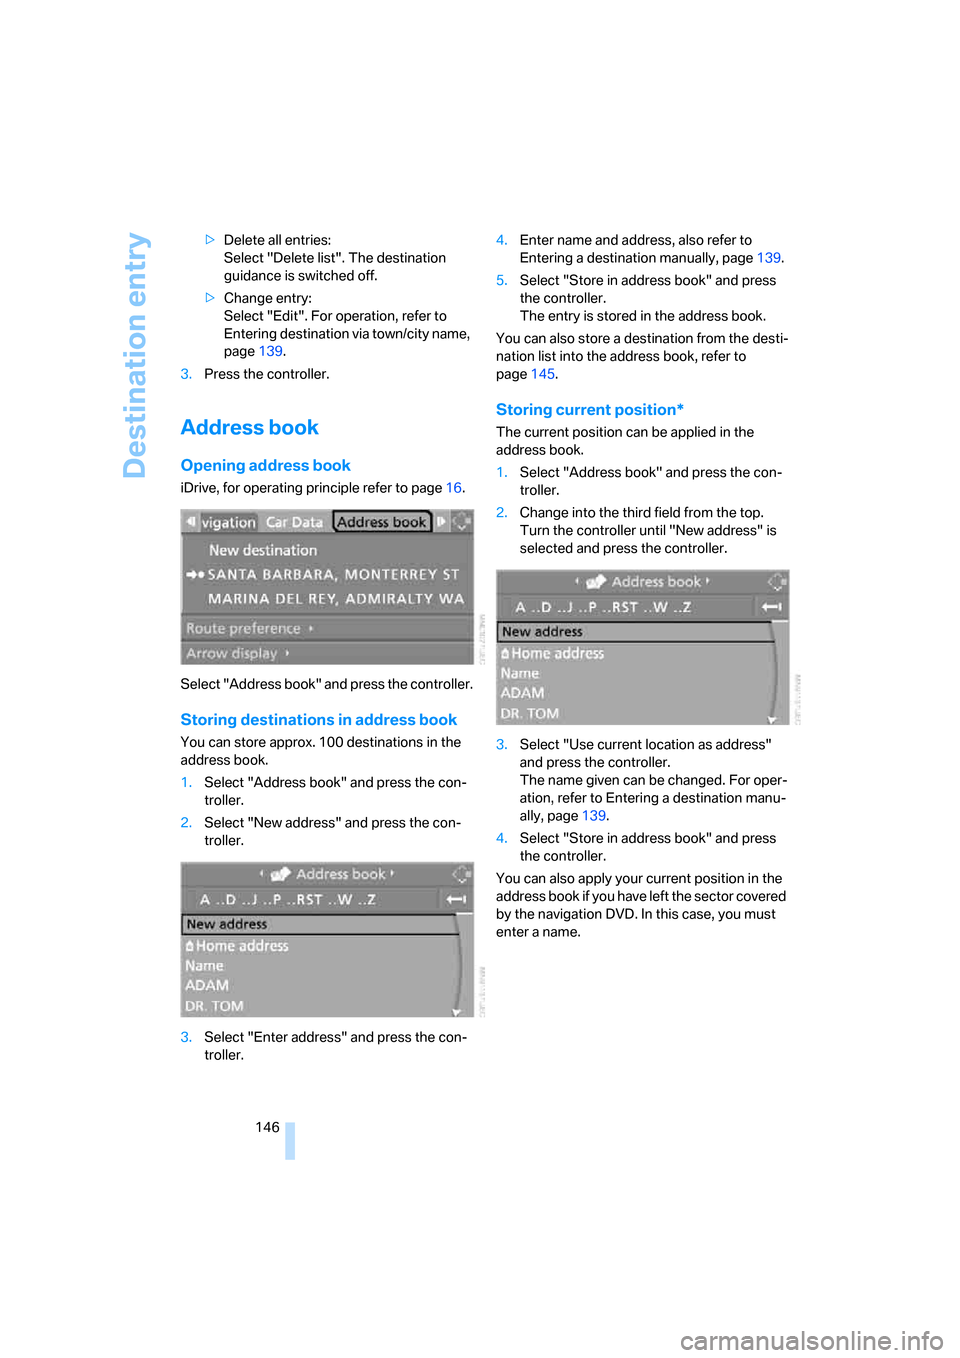
Select "Address book" and press the controller.
Storing destinations in address book
You can store approx. 100 destinations in the
address book.
1.Select "Address book" and press the con-
troller.
2.Select "New address" and press the con-
troller.
3.Select "Enter address" and press the con-
troller.4.Enter name and address, also refer to
Entering a destination manually, page139.
5.Select "Store in address book" and press
the controller.
The entry is stored in the address book.
You can also store a destination from the desti-
nation list into the address book, refer to
page145.
Storing current position*
The current position can be applied in the
address book.
1.Select "Address book" and press the con-
troller.
2.Change into the third field from the top.
Turn the controller until "New address" is
selected and press the controller.
3.Select "Use current location as address"
and press the controller.
The name given can be changed. For oper-
ation, refer to Entering a destination manu-
ally, page139.
4.Select "Store in address book" and press
the controller.
You can also apply your current position in the
address book if you have left the sector covered
by the navigation DVD. In this case, you must
enter a name.
Page 149 of 292
Navigation
Driving tips
147Reference
At a glance
Controls
Communications
Entertainment
Mobility
Selecting destinations from address
book
1.Select "Address book" and press the con-
troller.
The stored entries appear on the Control
Display.
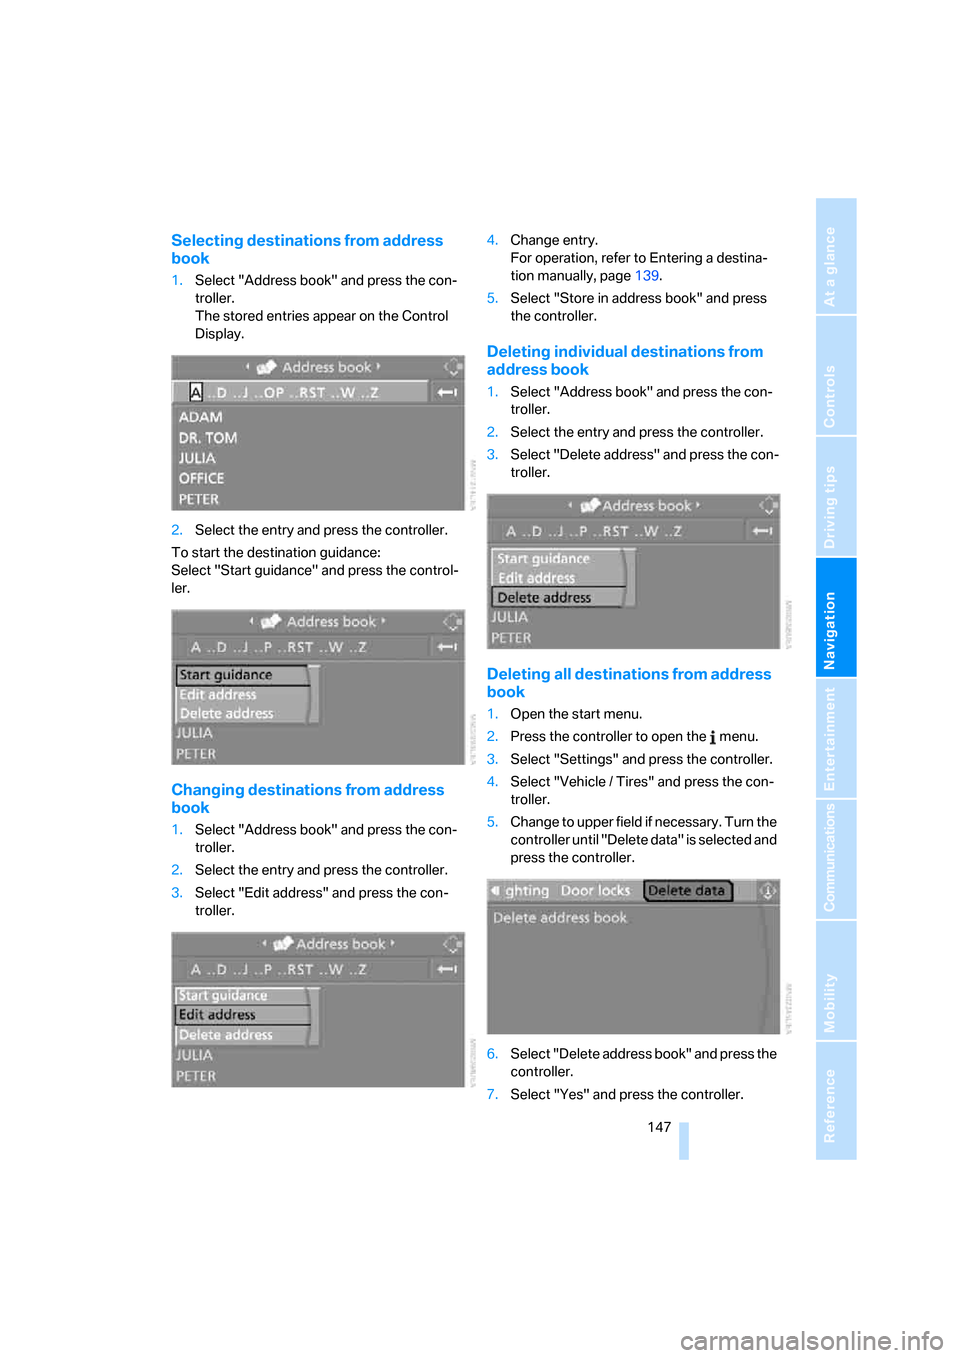
2.Select the entry and press the controller.
To start the destination guidance:
Select "Start guidance" and press the control-
ler.
Changing destinations from address
book
1.Select "Address book" and press the con-
troller.
2.Select the entry and press the controller.
3.Select "Edit address" and press the con-
troller.4.Change entry.
For operation, refer to Entering a destina-
tion manually, page139.
5.Select "Store in address book" and press
the controller.
Deleting individual destinations from
address book
1.Select "Address book" and press the con-
troller.
2.Select the entry and press the controller.
3.Select "Delete address" and press the con-
troller.
Deleting all destinations from address
book
1.Open the start menu.
2.Press the controller to open the menu.
3.Select "Settings" and press the controller.
4.Select "Vehicle / Tires" and press the con-
troller.
5.Change to upper field if necessary. Turn the
controller until "Delete data" is selected and
press the controller.
6.Select "Delete address book" and press the
controller.
7.Select "Yes" and press the controller.
Page 150 of 292
Destination entry
148
Home address
You can store your current position or the cur-
rent destination as the home address in the
address book. This entry occupies the second
position in the address book.
Storing home address
1.Select "Address book" and press the con-
troller.
2.Change into the third field from the top.
Turn the controller until "Home address" is
selected and press the controller.
3.Select "Use current location as address", or
"Save current destination" during the desti-
nation guidance, and press the controller.
4.Select "Store in address book" and press
the controller.
Applying home address as destination
1.Select "Home address" and press the con-
troller.
2.Select "Start guidance" and press the con-
troller.
Changing home address
1.Select "Home address" and press the con-
troller.
2.Select "Edit address" and press the con-
troller. For operation, refer to Entering a
destination manually, page139.
Selecting route
You can influence the calculated route by
choosing certain route criteria. You can change
the route criteria as often as you like while
entering the destination and whenever the des-
tination guidance is active.
The route is planned according to fixed rules.
The road type is taken into account, e.g.
whether it is a highway or a winding road. The
road types are stored on the navigation DVD.
As a result, the routes recommended by the
navigation system may not always be the same
ones that you would choose based on personal
experience.
Changing route criteria
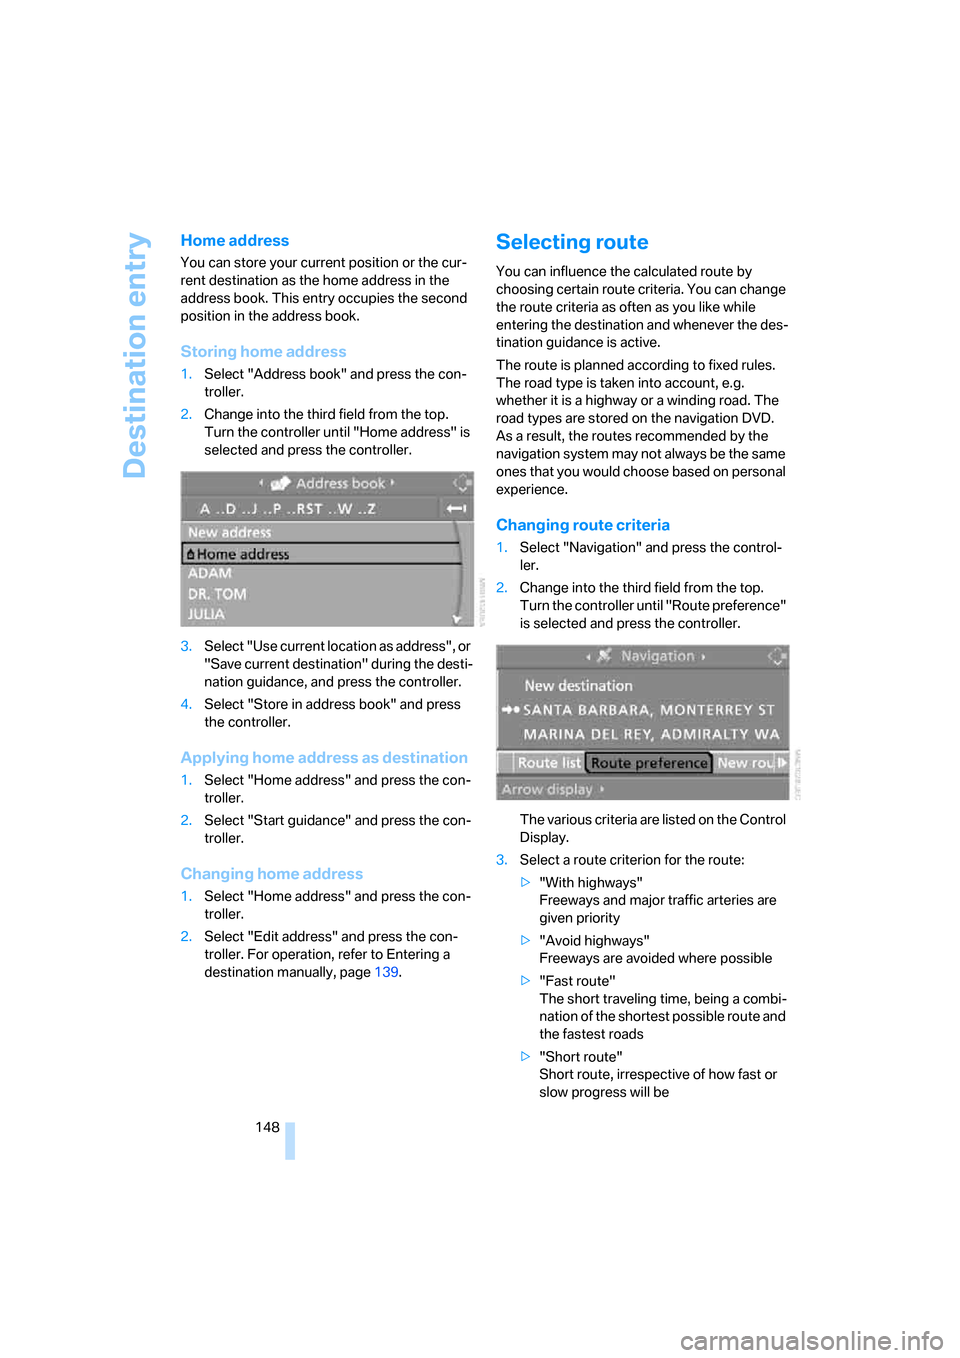
1.Select "Navigation" and press the control-
ler.
2.Change into the third field from the top.
Turn the controller until "Route preference"
is selected and press the controller.
The various criteria are listed on the Control
Display.
3.Select a route criterion for the route:
>"With highways"
Freeways and major traffic arteries are
given priority
>"Avoid highways"
Freeways are avoided where possible
>"Fast route"
The short traveling time, being a combi-
nation of the shortest possible route and
the fastest roads
>"Short route"
Short route, irrespective of how fast or
slow progress will be
Page 154 of 292
Destination guidance
152 To exit the menu:
Select the arrow and press the controller.
Displaying map view
You can have your current position displayed on
a map. After starting the destination guidance,
the planned route is shown on the map.
1.Select "Navigation" and press the control-
ler.
2.Change into the fourth field from the top.
Turn the controller until the desired map
view is selected:
>"Map facing north"
>"Map direction of travel"
>"Perspective"
3.Press the controller.
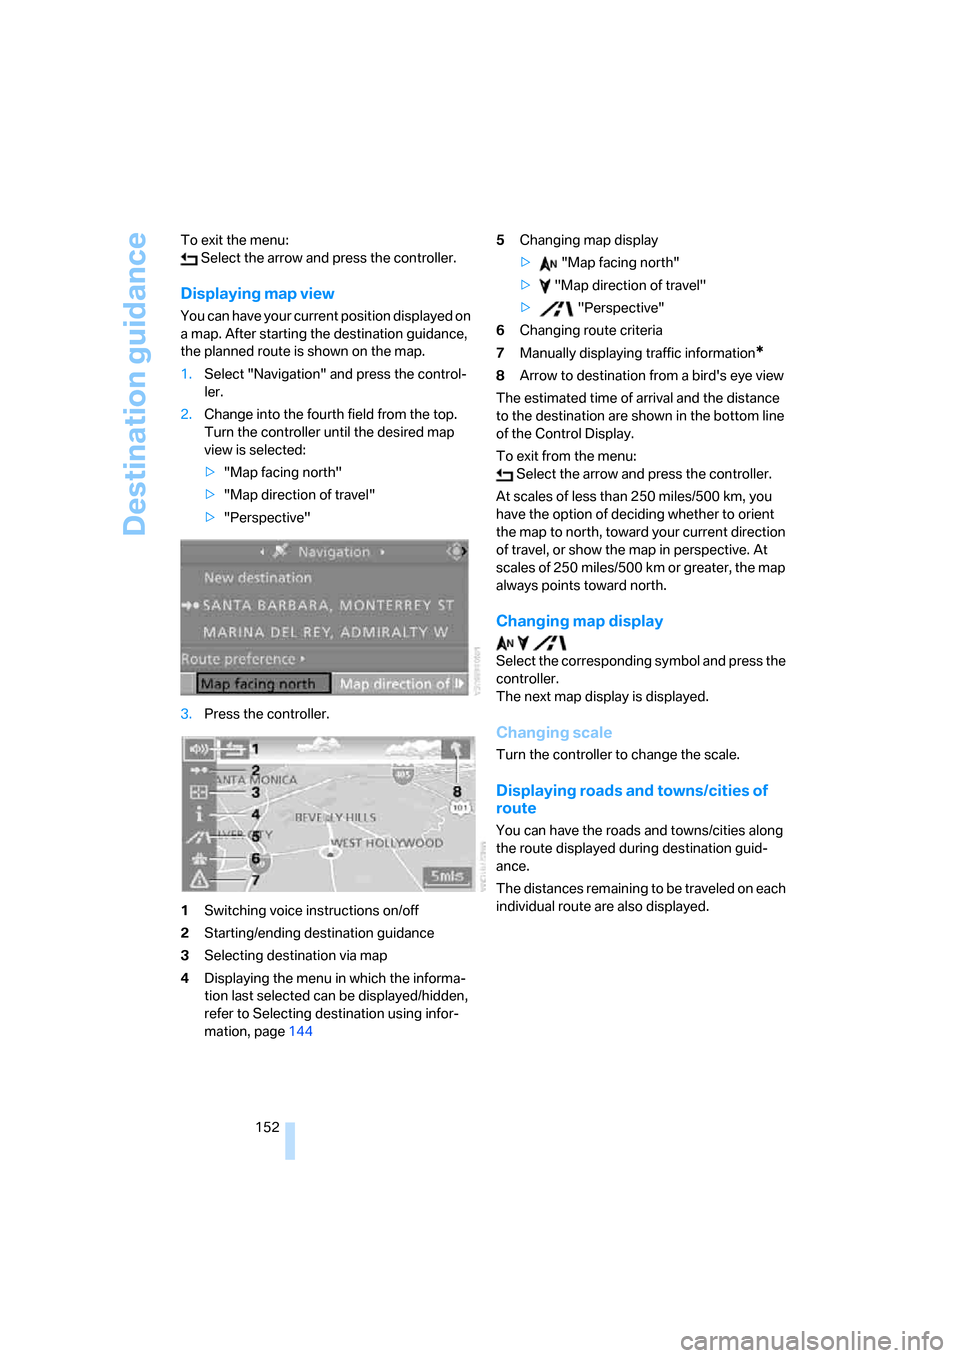
1Switching voice instructions on/off
2Starting/ending destination guidance
3Selecting destination via map
4Displaying the menu in which the informa-
tion last selected can be displayed/hidden,
refer to Selecting destination using infor-
mation, page1445Changing map display
> "Map facing north"
> "Map direction of travel"
> "Perspective"
6Changing route criteria
7Manually displaying traffic information
*
8Arrow to destination from a bird's eye view
The estimated time of arrival and the distance
to the destination are shown in the bottom line
of the Control Display.
To exit from the menu:
Select the arrow and press the controller.
At scales of less than 250 miles/500 km, you
have the option of deciding whether to orient
the map to north, toward your current direction
of travel, or show the map in perspective. At
scales of 250 miles/500 km or greater, the map
always points toward north.
Changing map display
Select the corresponding symbol and press the
controller.
The next map display is displayed.
Changing scale
Turn the controller to change the scale.
Displaying roads and towns/cities of
route
You can have the roads and towns/cities along
the route displayed during destination guid-
ance.
The distances remaining to be traveled on each
individual route are also displayed.
Page 157 of 292
Navigation
Driving tips
155Reference
At a glance
Controls
Communications
Entertainment
Mobility
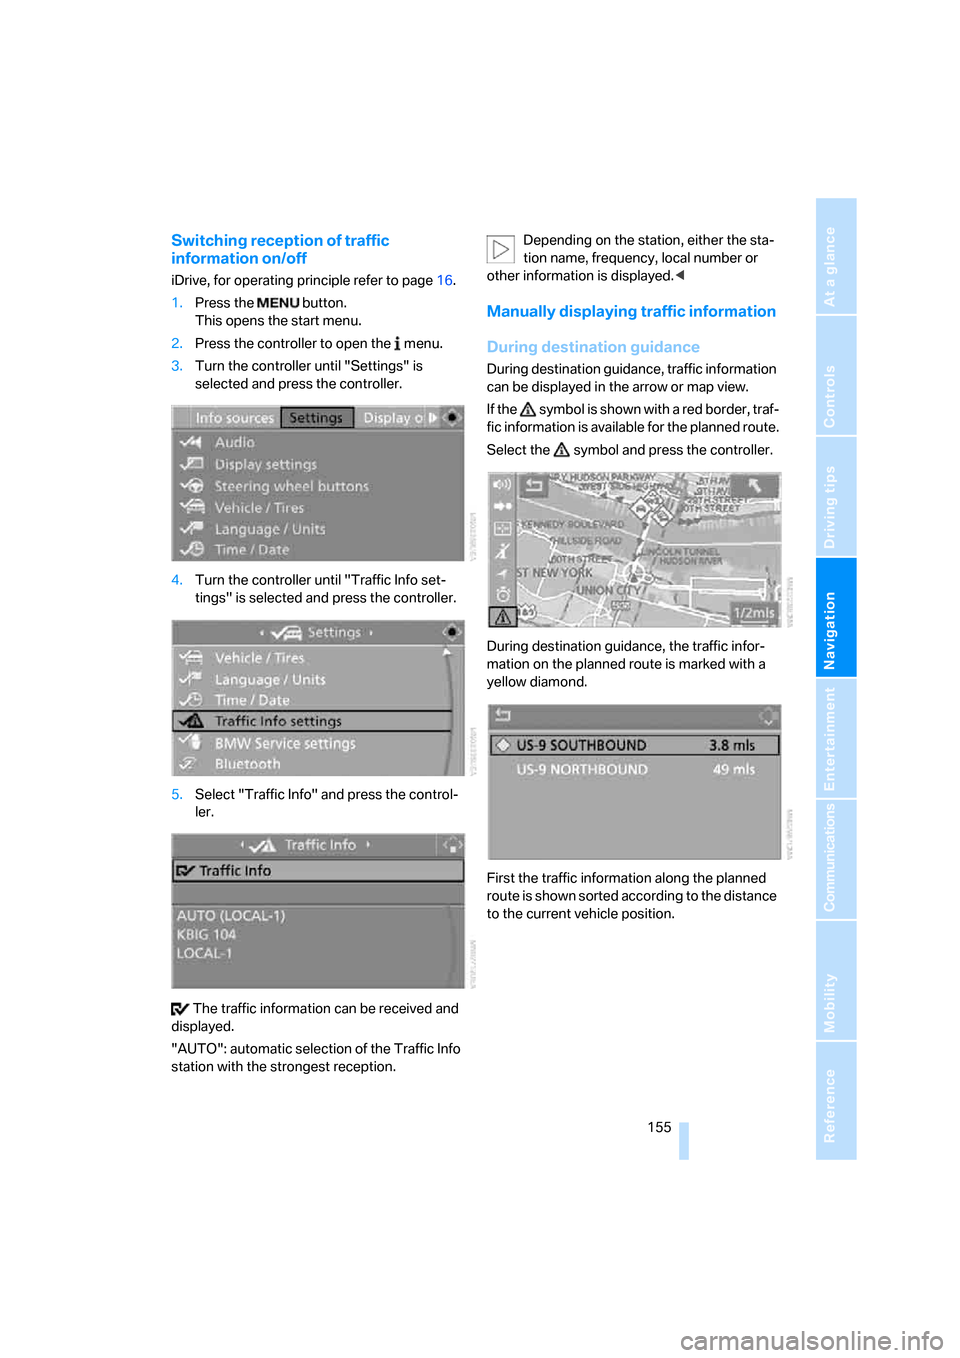
Switching reception of traffic
information on/off
iDrive, for operating principle refer to page16.
1.Press the button.
This opens the start menu.
2.Press the controller to open the menu.
3.Turn the controller until "Settings" is
selected and press the controller.
4.Turn the controller until "Traffic Info set-
tings" is selected and press the controller.
5.Select "Traffic Info" and press the control-
ler.
The traffic information can be received and
displayed.
"AUTO": automatic selection of the Traffic Info
station with the strongest reception.Depending on the station, either the sta-
tion name, frequency, local number or
other information is displayed.<
Manually displaying traffic information
During destination guidance
During destination guidance, traffic information
can be displayed in the arrow or map view.
If the symbol is shown with a red border, traf-
fic information is available for the planned route.
Select the symbol and press the controller.
During destination guidance, the traffic infor-
mation on the planned route is marked with a
yellow diamond.
First the traffic information along the planned
route is shown sorted according to the distance
to the current vehicle position.
Page 168 of 292
Radio
166
Radio
Your radio provides reception of the FM and AM
wavebands.
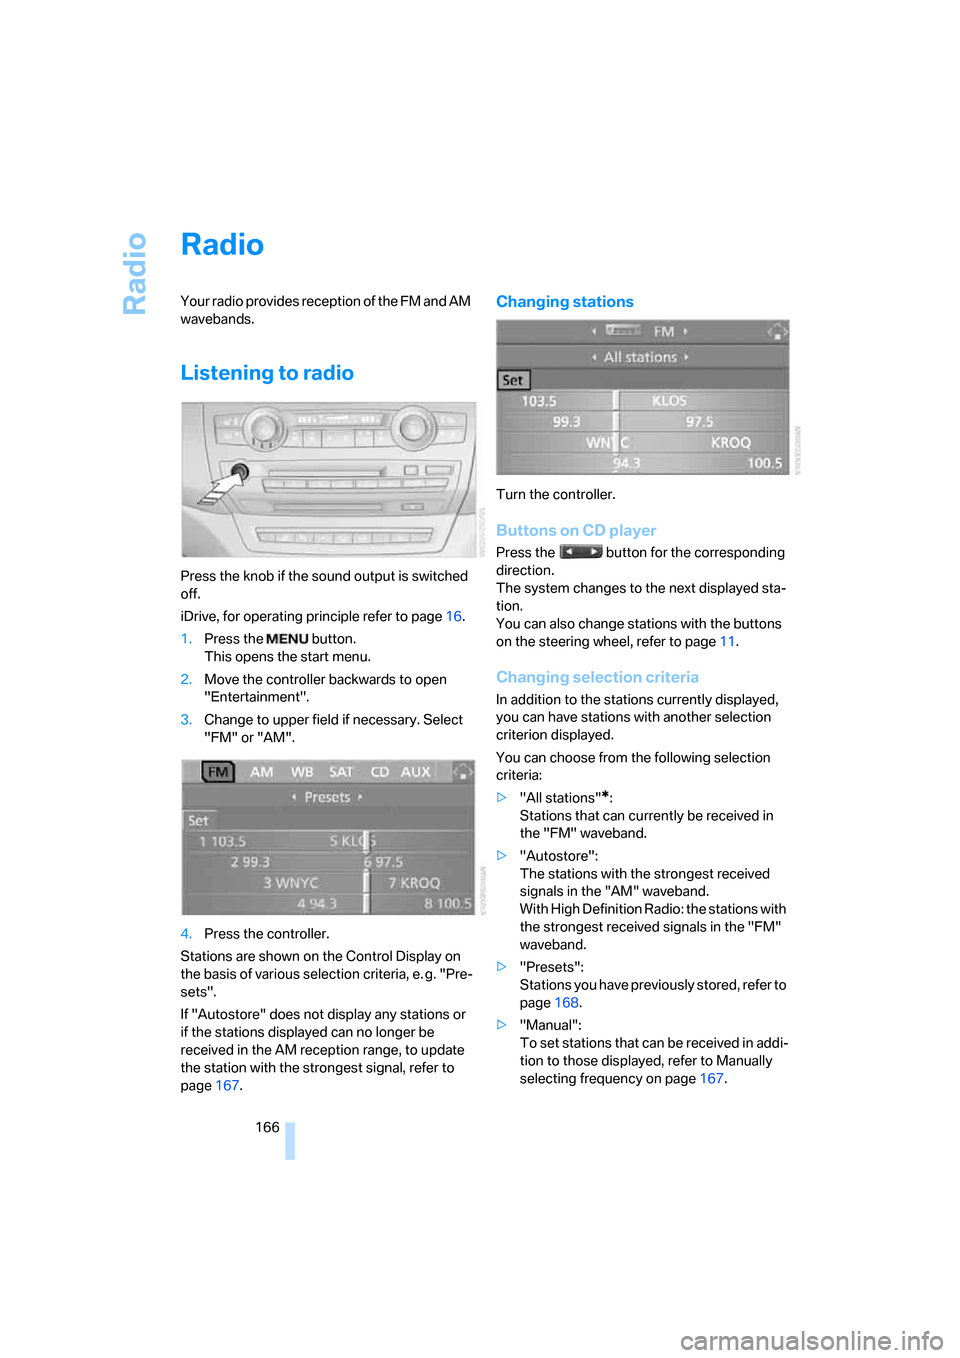
Listening to radio
Press the knob if the sound output is switched
off.
iDrive, for operating principle refer to page16.
1.Press the button.
This opens the start menu.
2.Move the controller backwards to open
"Entertainment".
3.Change to upper field if necessary. Select
"FM" or "AM".
4.Press the controller.
Stations are shown on the Control Display on
the basis of various selection criteria, e. g. "Pre-
sets".
If "Autostore" does not display any stations or
if the stations displayed can no longer be
received in the AM reception range, to update
the station with the strongest signal, refer to
page167.
Changing stations
Turn the controller.
Buttons on CD player
Press the button for the corresponding
direction.
The system changes to the next displayed sta-
tion.
You can also change stations with the buttons
on the steering wheel, refer to page11.
Changing selection criteria
In addition to the stations currently displayed,
you can have stations with another selection
criterion displayed.
You can choose from the following selection
criteria:
>"All stations"
*:
Stations that can currently be received in
the "FM" waveband.
>"Autostore":
The stations with the strongest received
signals in the "AM" waveband.
With High Definition Radio: the stations with
the strongest received signals in the "FM"
waveband.
>"Presets":
Stations you have previously stored, refer to
page168.
>"Manual":
To set stations that can be received in addi-
tion to those displayed, refer to Manually
selecting frequency on page167.
Page 169 of 292
Navigation
Entertainment
Driving tips
167Reference
At a glance
Controls
Communications
Mobility
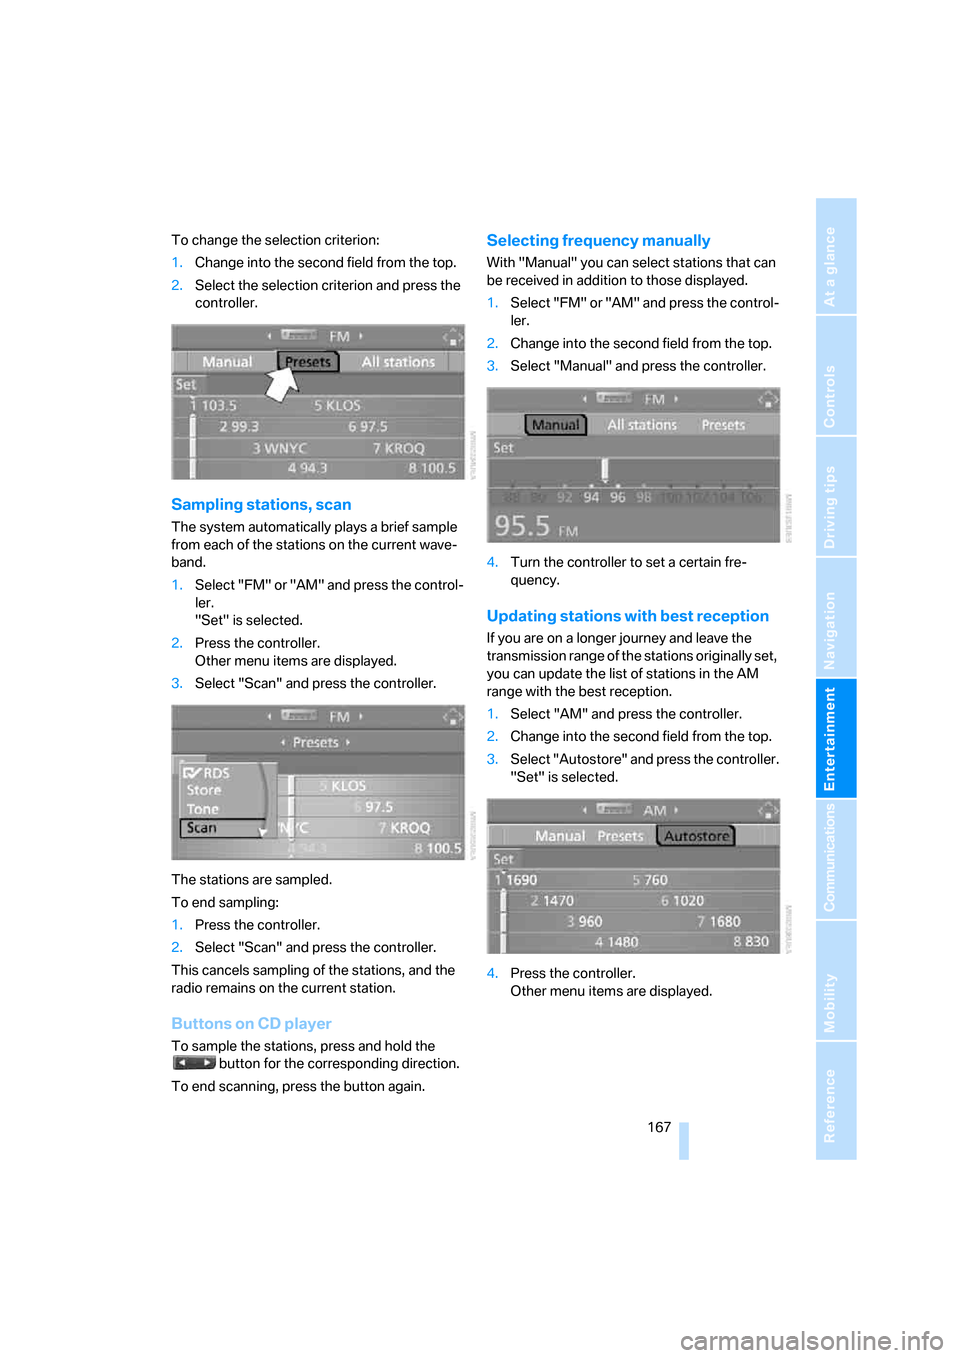
To change the selection criterion:
1.Change into the second field from the top.
2.Select the selection criterion and press the
controller.
Sampling stations, scan
The system automatically plays a brief sample
from each of the stations on the current wave-
band.
1.Select "FM" or "AM" and press the control-
ler.
"Set" is selected.
2.Press the controller.
Other menu items are displayed.
3.Select "Scan" and press the controller.
The stations are sampled.
To end sampling:
1.Press the controller.
2.Select "Scan" and press the controller.
This cancels sampling of the stations, and the
radio remains on the current station.
Buttons on CD player
To sample the stations, press and hold the
button for the corresponding direction.
To end scanning, press the button again.
Selecting frequency manually
With "Manual" you can select stations that can
be received in addition to those displayed.
1.Select "FM" or "AM" and press the control-
ler.
2.Change into the second field from the top.
3.Select "Manual" and press the controller.
4.Turn the controller to set a certain fre-
quency.
Updating stations with best reception
If you are on a longer journey and leave the
transmission range of the stations originally set,
you can update the list of stations in the AM
range with the best reception.
1.Select "AM" and press the controller.
2.Change into the second field from the top.
3.Select "Autostore" and press the controller.
"Set" is selected.
4.Press the controller.
Other menu items are displayed.
Page 172 of 292
Radio
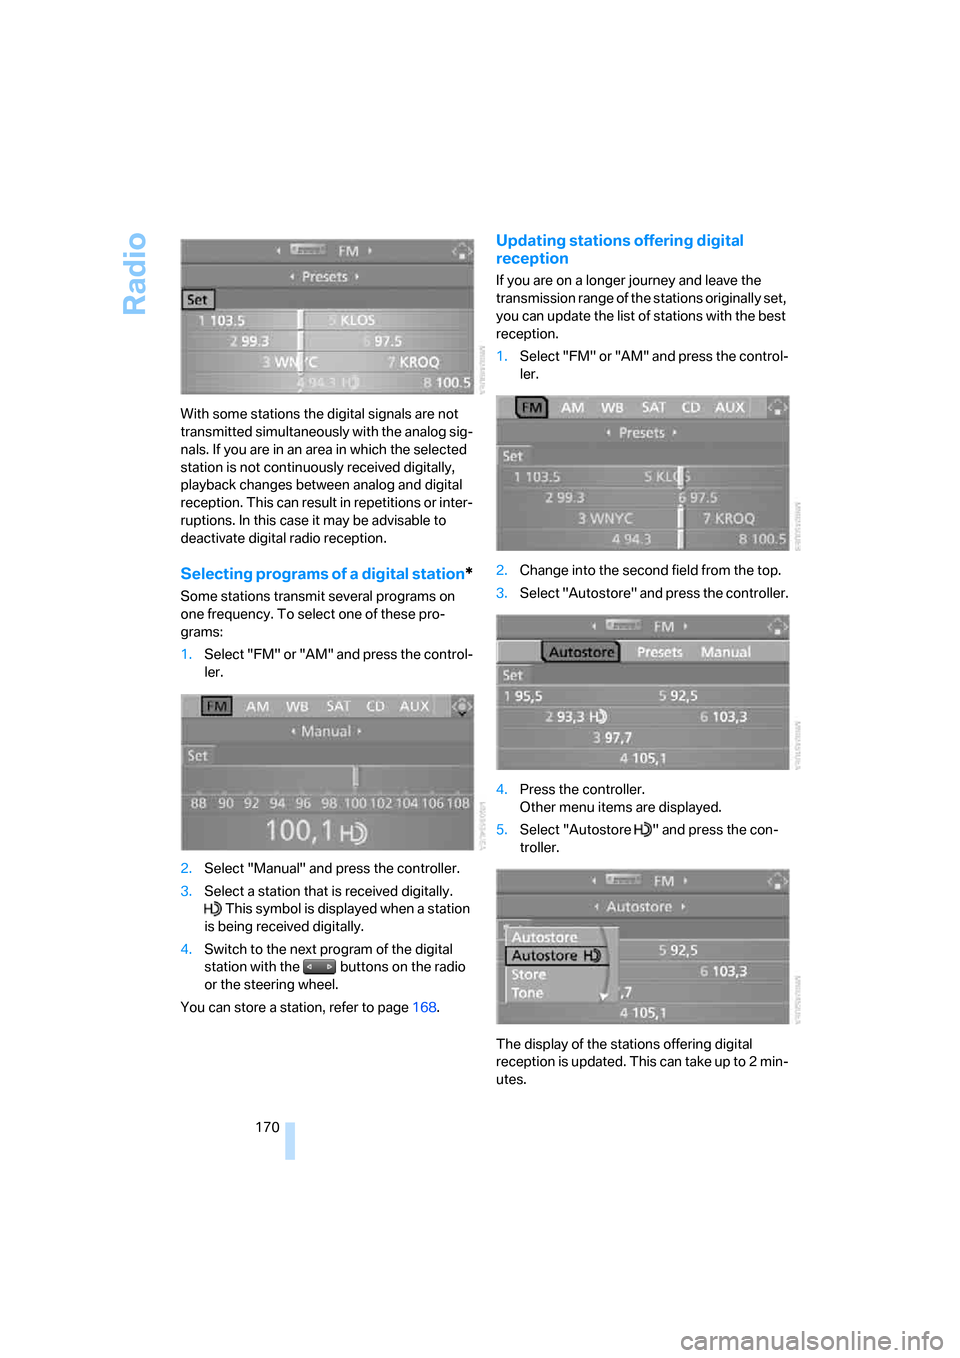
170 With some stations the digital signals are not
transmitted simultaneously with the analog sig-
nals. If you are in an area in which the selected
station is not continuously received digitally,
playback changes between analog and digital
reception. This can result in repetitions or inter-
ruptions. In this case it may be advisable to
deactivate digital radio reception.
Selecting programs of a digital station*
Some stations transmit several programs on
one frequency. To select one of these pro-
grams:
1.Select "FM" or "AM" and press the control-
ler.
2.Select "Manual" and press the controller.
3.Select a station that is received digitally.
This symbol is displayed when a station
is being received digitally.
4.Switch to the next program of the digital
station with the buttons on the radio
or the steering wheel.
You can store a station, refer to page168.
Updating stations offering digital
reception
If you are on a longer journey and leave the
transmission range of the stations originally set,
you can update the list of stations with the best
reception.
1.Select "FM" or "AM" and press the control-
ler.
2.Change into the second field from the top.
3.Select "Autostore" and press the controller.
4.Press the controller.
Other menu items are displayed.
5.Select "Autostore " and press the con-
troller.
The display of the stations offering digital
reception is updated. This can take up to 2 min-
utes.
Page 206 of 292
DVD system in rear
204
Settings for external devices
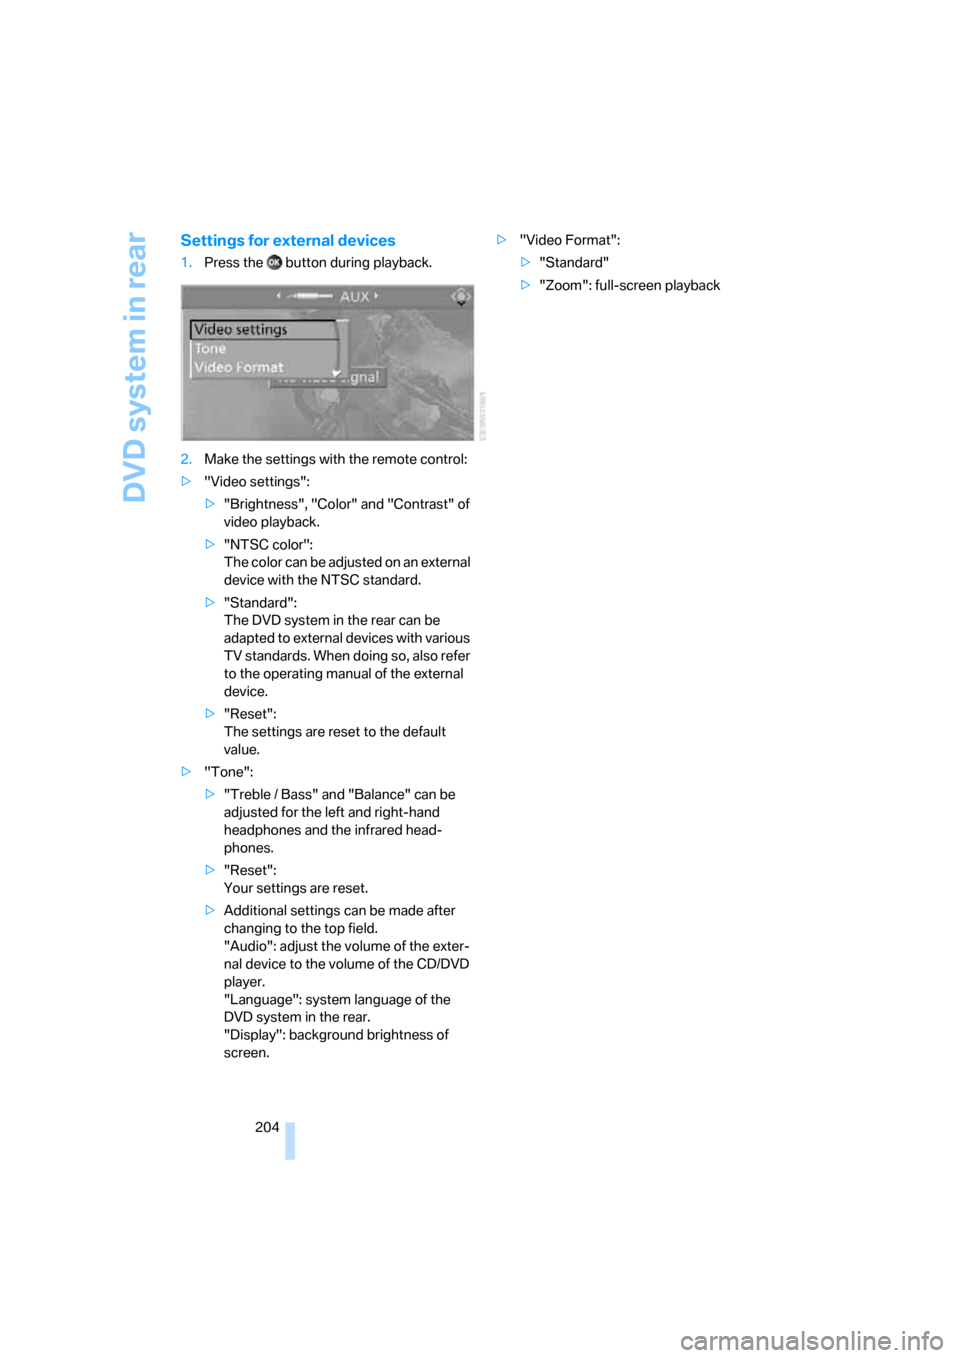
1.Press the button during playback.
2.Make the settings with the remote control:
>"Video settings":
>"Brightness", "Color" and "Contrast" of
video playback.
>"NTSC color":
The color can be adjusted on an external
device with the NTSC standard.
>"Standard":
The DVD system in the rear can be
adapted to external devices with various
TV standards. When doing so, also refer
to the operating manual of the external
device.
>"Reset":
The settings are reset to the default
value.
>"Tone":
>"Treble / Bass" and "Balance" can be
adjusted for the left and right-hand
headphones and the infrared head-
phones.
>"Reset":
Your settings are reset.
>Additional settings can be made after
changing to the top field.
"Audio": adjust the volume of the exter-
nal device to the volume of the CD/DVD
player.
"Language": system language of the
DVD system in the rear.
"Display": background brightness of
screen.>"Video Format":
>"Standard"
>"Zoom": full-screen playback
Page 210 of 292
Telephoning
208
Telephoning
The concept
Your BMW is equipped with a full mobile phone
preparation package. After pairing a suitable
mobile phone in the vehicle once, you can oper-
ate the mobile phone via iDrive, with the buttons
on the steering wheel and by voice.
A mobile phone that has been paired once is
automatically detected again with the engine
running or the ignition switched on as soon as
it is in the vehicle interior. The pairing data of up
to four mobile phones can be stored simulta-
neously. If several mobile phones are detected
simultaneously, the respective last mobile
phone paired can be operated via the vehicle.
Using a phone in your vehicle
Using snap-in adapter*
The so-called snap-in adapter, a mobile phone
cradle, enables the battery to be charged and
the mobile phone to be connected to the exter-
nal antenna of your vehicle. This ensures
improved network reception and a consistent
voice reproduction quality. Ask your BMW
Sports Activity Vehicle Center which mobile
phones snap-in adapters are offered for.
For your safety
A car phone makes life more convenient in
many ways, and can even save lives in an emer-
gency. While you should consult your mobile
phone's separate operating instructions for a
detailed description of safety precautions and
information, we request that you direct your
particular attention to the following:
Only make entries when the traffic situa-
tion allows you to do so. Do not hold the
mobile phone in your hand while you are driving;
use the hands-free system instead. If you do
not observe this precaution, your being dis-
tracted can endanger vehicle occupants and
other road users.<
Suitable mobile phones
Ask your BMW Sports Activity Vehicle Center
which mobile phones with a Bluetooth interface
are supported by the mobile phone preparation
package or which mobile phones snap-in
adapters are available for. These mobile phones
support the functions described in this Owner's
Manual with a certain software version. Mal-
functions can occur with other mobile phones.
Care instructions
You can find what you need to know about car-
ing for your mobile phone in the Caring for your
vehicle brochure and in the separate mobile
phone operating instructions.
Operating options
You can operate the mobile phone* using:
>Buttons on steering wheel, refer to page11
>iDrive, refer to page214
>Voice commands, refer to page219
>Programmable memory/direct selection
buttons, refer to page21
Avoid operating a mobile phone detected by
the vehicle with the keypad of the mobile
phone, otherwise malfunctions can occur.
Placing phone calls with BMW Assist
system*: BMW Assist calls
You can use the BMW Assist system via the
hands-free unit for BMW Assist calls.
When the status information "Communication"
or "BMW Assist" is displayed in "BMW Ser-
vice", only BMW Assist calls are possible.
It may not be possible to establish a telephone
connection using the mobile phone while a con-
nection is being established to BMW Assist
or while a call to BMW Assist is already in
*