tow BMW X5 XDRIVE 35I PREMIUM 2012 Owner's Guide
[x] Cancel search | Manufacturer: BMW, Model Year: 2012, Model line: X5 XDRIVE 35I PREMIUM, Model: BMW X5 XDRIVE 35I PREMIUM 2012Pages: 317, PDF Size: 8.83 MB
Page 260 of 317
Wheel/tire damage
Due
to low-profile tires, please note that wheels,
tires and suspension parts are more susceptible
to road hazard and consequential damages.
Inspect your tires often for damage, foreign ob‐
jects lodged in the tread, and tread wear.
Indications of tire damage or other vehicle de‐
fects:
▷ Unusual vibrations during driving.
▷ Unusual handling such as a strong tendency
to pull to the left or right.
In case of tire damage
If there are indications of tire damage, re‐
duce your speed immediately and have the
wheels
and tires checked right away; otherwise,
there is the increased risk of an accident.
Drive carefully to the next service center or tire
shop.
If necessary, have the vehicle towed.◀
Repair of tire damage
For safety reasons, the manufacturer of
your vehicle recommends that you do not have
damaged tires repaired; they should be re‐
placed. Otherwise, damage can occur as a re‐
sult.◀
Changing wheels and tires
Mounting
Information on mounting tires
Have mounting and balancing performed
only by a service center or tire specialist.
If this work is not carried out properly, there is
the danger of subsequent damage and related
safety hazards.◀
Wheel and tire combination
Information on the right wheel and tire combi‐
nation and rim version for your vehicle can be
obtained from the service center. Incorrect wheel and tire combinations impair the
function of a variety of systems such as ABS or
DSC.
To maintain good handling and vehicle re‐
sponse, use only tires with a single tread con‐
figuration from a single manufacturer.
Following tire damage, have the original wheel
and tire combination remounted on the vehicle
as soon as possible.
Approved wheels and tires
The manufacturer of your vehicle recom‐
mends that you use only wheels and tires that
have been approved for your particular vehicle
model.
For example, despite having the same official
size
ratings, variations can lead to body contact
and with it, the risk of severe accidents.
The manufacturer of your vehicle cannot evalu‐
ate non-approved wheels and tires to determine
if they are suited for use, and therefore cannot
ensure the operating safety of the vehicle if they
are mounted.◀
Wheels with electronics for TPM Tire
Pressure Monitor
When mounting new tires or changing from
summer to winter tires or vice versa, only use
wheels with TPM electronics; otherwise, the
Tire Pressure Monitor will not be able to detect
a flat tire, refer to page 90. Your service center
will be glad to advise you.
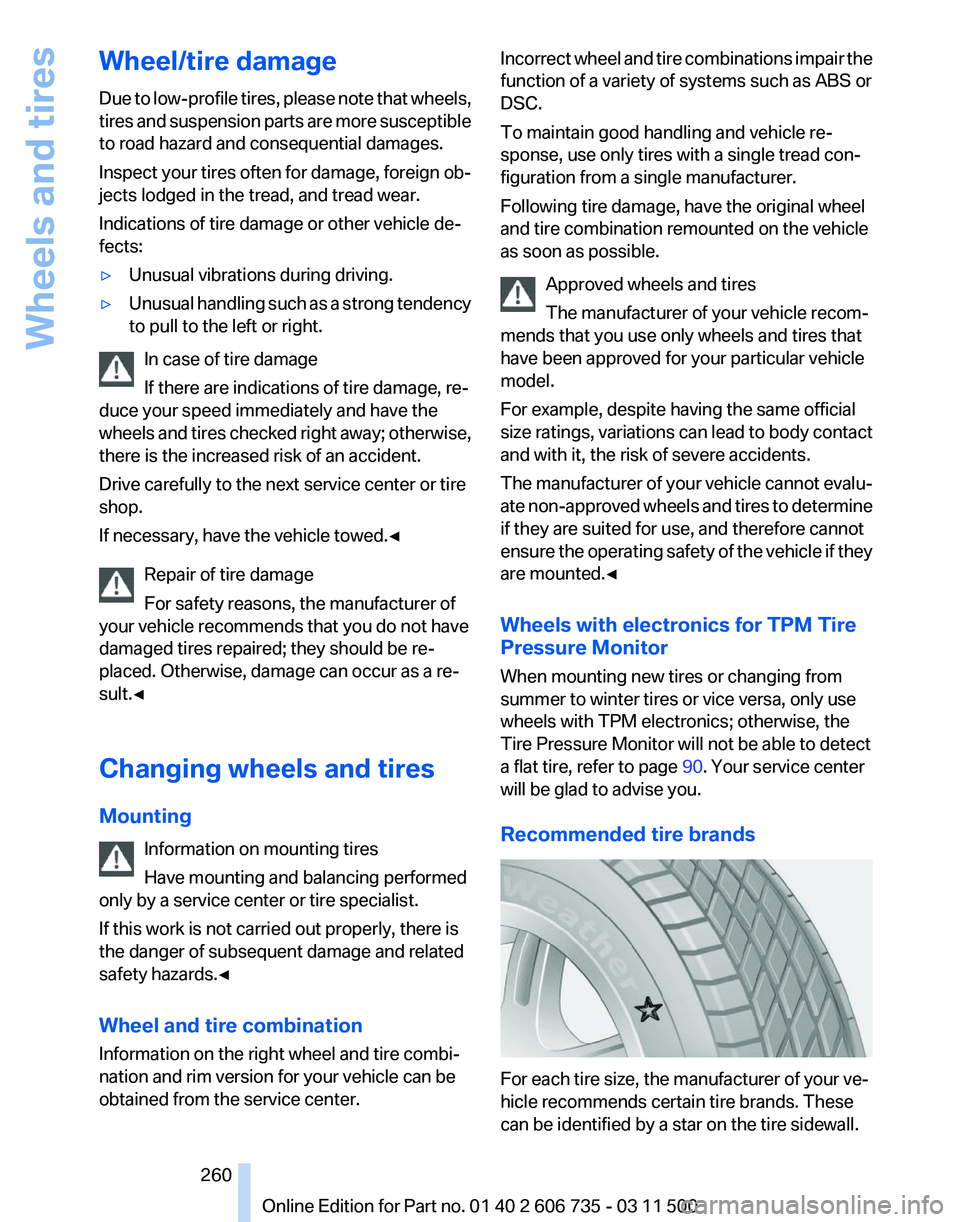
Recommended tire brands For each tire size, the manufacturer of your ve‐
hicle recommends certain tire brands. These
can be identified by a star on the tire sidewall. Seite 260
260 Online Edition for Part no. 01 40 2 606 735 - 03 11 500
Wheels and tires
Page 270 of 317
Replacing components
Tool kit
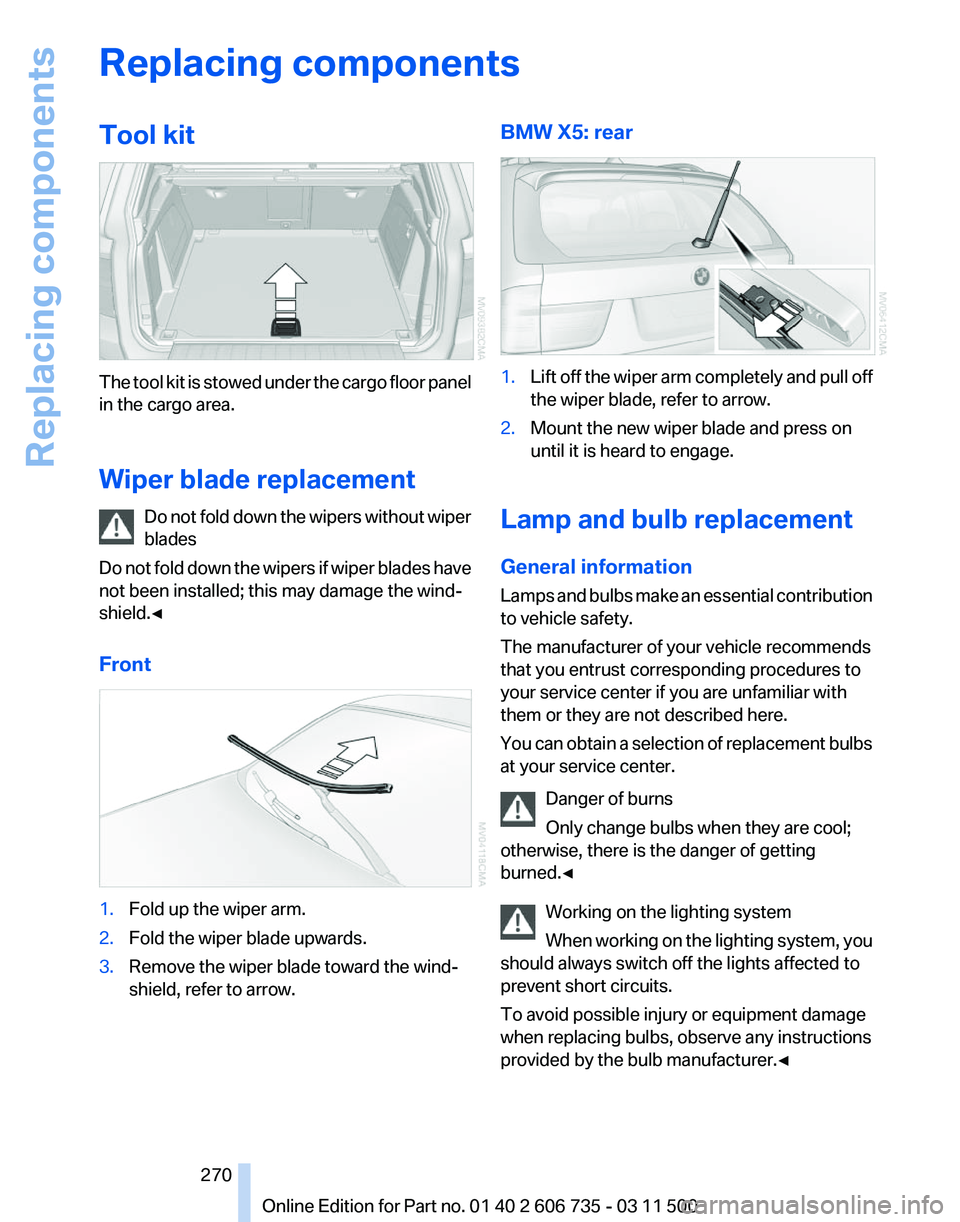
The tool kit is stowed under the cargo floor panel
in the cargo area.
Wiper blade replacement
Do
not fold down the wipers without wiper
blades
Do not fold down the wipers if wiper blades have
not been installed; this may damage the wind‐
shield.◀
Front 1.
Fold up the wiper arm.
2. Fold the wiper blade upwards.
3. Remove the wiper blade toward the wind‐
shield, refer to arrow. BMW X5: rear
1.
Lift off the wiper arm completely and pull off
the wiper blade, refer to arrow.
2. Mount the new wiper blade and press on
until it is heard to engage.
Lamp and bulb replacement
General information
Lamps
and bulbs make an essential contribution
to vehicle safety.
The manufacturer of your vehicle recommends
that you entrust corresponding procedures to
your service center if you are unfamiliar with
them or they are not described here.
You can obtain a selection of replacement bulbs
at your service center.
Danger of burns
Only change bulbs when they are cool;
otherwise, there is the danger of getting
burned.◀
Working on the lighting system
When working on the lighting system, you
should always switch off the lights affected to
prevent short circuits.
To avoid possible injury or equipment damage
when replacing bulbs, observe any instructions
provided by the bulb manufacturer.◀ Seite 270
270 Online Edition for Part no. 01 40 2 606 735 - 03 11 500
Replacing components
Page 277 of 317
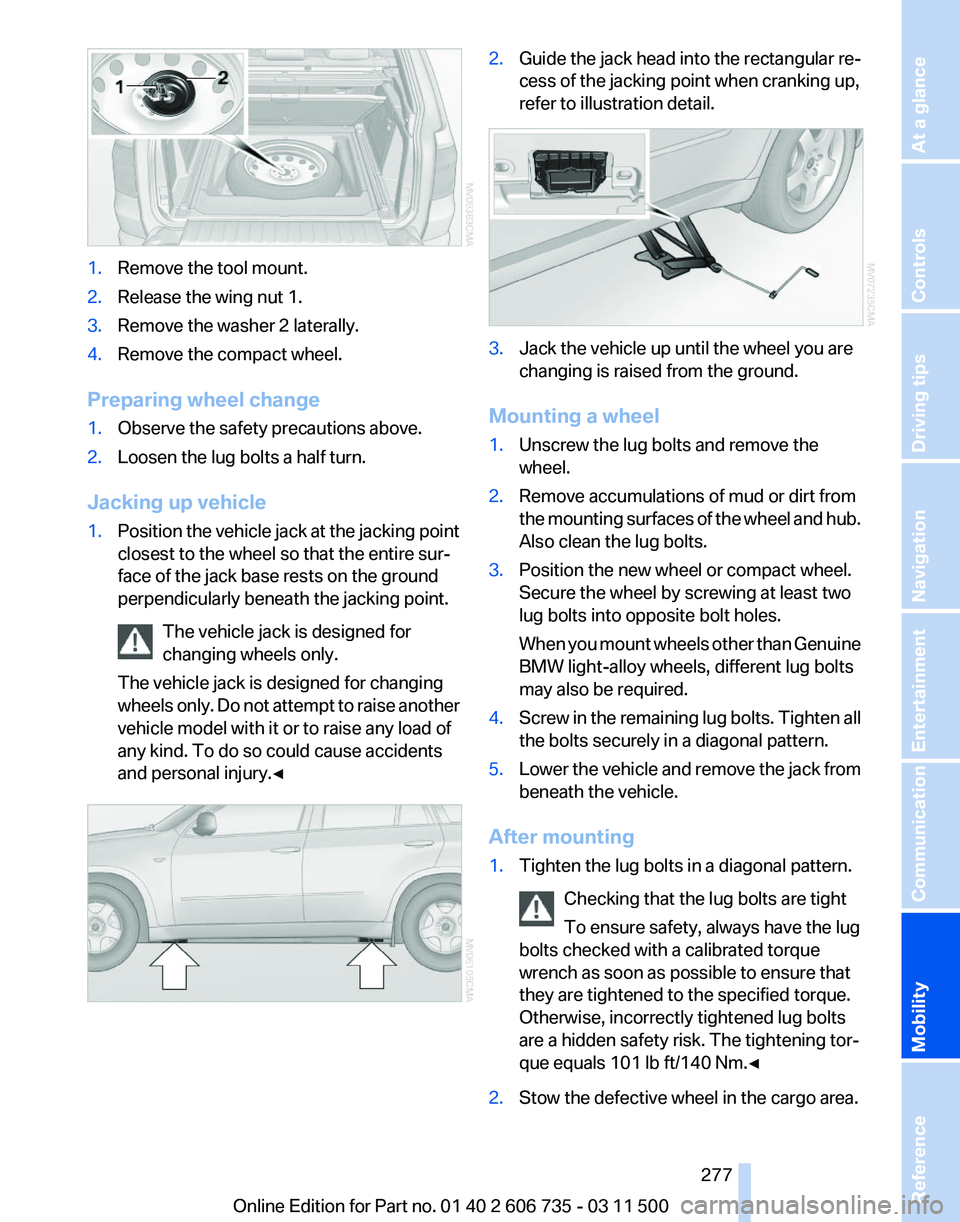
1.
Remove the tool mount.
2. Release the wing nut 1.
3. Remove the washer 2 laterally.
4. Remove the compact wheel.
Preparing wheel change
1. Observe the safety precautions above.
2. Loosen the lug bolts a half turn.
Jacking up vehicle
1. Position the vehicle jack at the jacking point
closest to the wheel so that the entire sur‐
face of the jack base rests on the ground
perpendicularly beneath the jacking point.
The vehicle jack is designed for
changing wheels only.
The vehicle jack is designed for changing
wheels
only. Do not attempt to raise another
vehicle model with it or to raise any load of
any kind. To do so could cause accidents
and personal injury.◀ 2.
Guide the jack head into the rectangular re‐
cess of the jacking point when cranking up,
refer to illustration detail. 3.
Jack the vehicle up until the wheel you are
changing is raised from the ground.
Mounting a wheel
1. Unscrew the lug bolts and remove the
wheel.
2. Remove accumulations of mud or dirt from
the
mounting surfaces of the wheel and hub.
Also clean the lug bolts.
3. Position the new wheel or compact wheel.
Secure the wheel by screwing at least two
lug bolts into opposite bolt holes.
When
you mount wheels other than Genuine
BMW light-alloy wheels, different lug bolts
may also be required.
4. Screw in the remaining lug bolts. Tighten all
the bolts securely in a diagonal pattern.
5. Lower the vehicle and remove the jack from
beneath the vehicle.
After mounting
1. Tighten the lug bolts in a diagonal pattern.
Checking that the lug bolts are tight
To ensure safety, always have the lug
bolts checked with a calibrated torque
wrench as soon as possible to ensure that
they are tightened to the specified torque.
Otherwise, incorrectly tightened lug bolts
are a hidden safety risk. The tightening tor‐
que equals 101 lb ft/140 Nm.
◀ 2.
Stow the defective wheel in the cargo area.
Seite 277
277Online Edition for Part no. 01 40 2 606 735 - 03 11 500
Reference
Mobility Communication Entertainment Navigation Driving tips Controls At a glance
Page 282 of 317
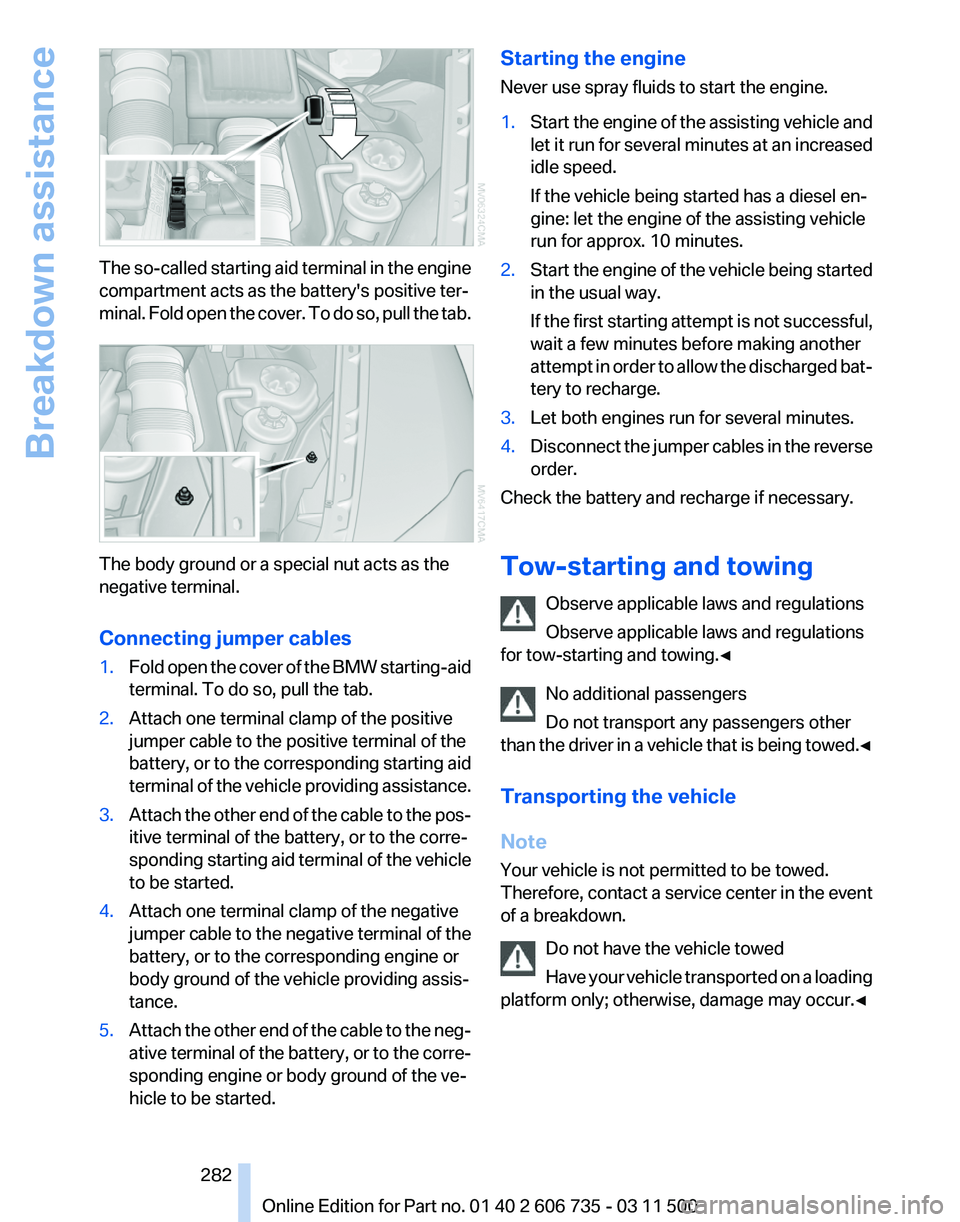
The so-called starting aid terminal in the engine
compartment acts as the battery's positive ter‐
minal.
Fold open the cover. To do so, pull the tab. The body ground or a special nut acts as the
negative terminal.
Connecting jumper cables
1.
Fold open the cover of the BMW starting-aid
terminal. To do so, pull the tab.
2. Attach one terminal clamp of the positive
jumper cable to the positive terminal of the
battery,
or to the corresponding starting aid
terminal of the vehicle providing assistance.
3. Attach the other end of the cable to the pos‐
itive terminal of the battery, or to the corre‐
sponding
starting aid terminal of the vehicle
to be started.
4. Attach one terminal clamp of the negative
jumper
cable to the negative terminal of the
battery, or to the corresponding engine or
body ground of the vehicle providing assis‐
tance.
5. Attach the other end of the cable to the neg‐
ative
terminal of the battery, or to the corre‐
sponding engine or body ground of the ve‐
hicle to be started. Starting the engine
Never use spray fluids to start the engine.
1.
Start the engine of the assisting vehicle and
let
it run for several minutes at an increased
idle speed.
If the vehicle being started has a diesel en‐
gine: let the engine of the assisting vehicle
run for approx. 10 minutes.
2. Start the engine of the vehicle being started
in the usual way.
If
the first starting attempt is not successful,
wait a few minutes before making another
attempt in order to allow the discharged bat‐
tery to recharge.
3. Let both engines run for several minutes.
4. Disconnect the jumper cables in the reverse
order.
Check the battery and recharge if necessary.
Tow-starting and towing
Observe applicable laws and regulations
Observe applicable laws and regulations
for tow-starting and towing.◀
No additional passengers
Do not transport any passengers other
than
the driver in a vehicle that is being towed.◀
Transporting the vehicle
Note
Your vehicle is not permitted to be towed.
Therefore, contact a service center in the event
of a breakdown. Do not have the vehicle towed
Have your vehicle transported on a loading
platform only; otherwise, damage may occur.◀ Seite 282
282 Online Edition for Part no. 01 40 2 606 735 - 03 11 500
Breakdown assistance
Page 283 of 317
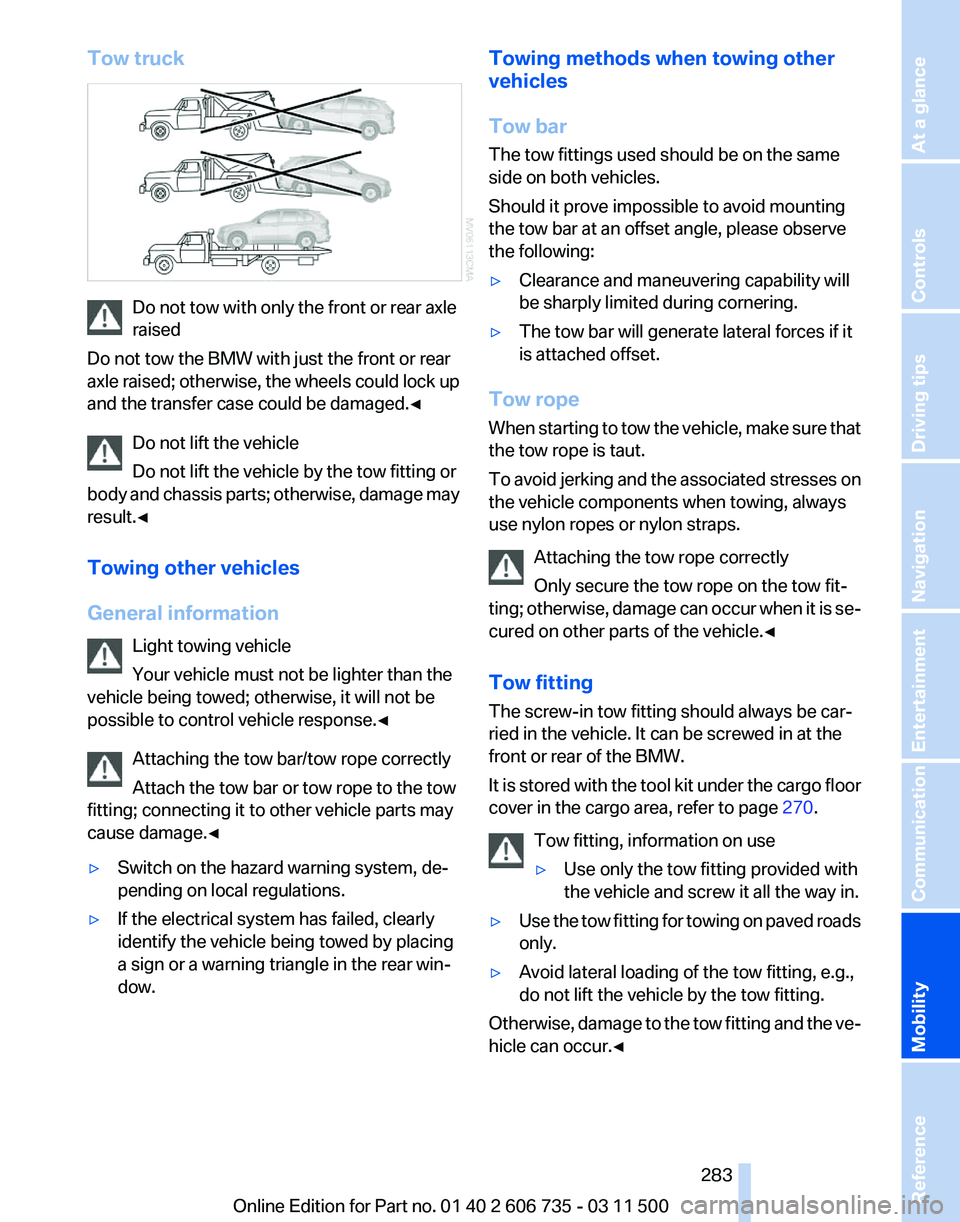
Tow truck
Do not tow with only the front or rear axle
raised
Do not tow the BMW with just the front or rear
axle
raised; otherwise, the wheels could lock up
and the transfer case could be damaged.◀
Do not lift the vehicle
Do not lift the vehicle by the tow fitting or
body and chassis parts; otherwise, damage may
result.◀
Towing other vehicles
General information
Light towing vehicle
Your vehicle must not be lighter than the
vehicle being towed; otherwise, it will not be
possible to control vehicle response.◀
Attaching the tow bar/tow rope correctly
Attach the tow bar or tow rope to the tow
fitting; connecting it to other vehicle parts may
cause damage.◀
▷ Switch on the hazard warning system, de‐
pending on local regulations.
▷ If the electrical system has failed, clearly
identify the vehicle being towed by placing
a sign or a warning triangle in the rear win‐
dow. Towing methods when towing other
vehicles
Tow bar
The tow fittings used should be on the same
side on both vehicles.
Should it prove impossible to avoid mounting
the tow bar at an offset angle, please observe
the following:
▷
Clearance and maneuvering capability will
be sharply limited during cornering.
▷ The tow bar will generate lateral forces if it
is attached offset.
Tow rope
When
starting to tow the vehicle, make sure that
the tow rope is taut.
To avoid jerking and the associated stresses on
the vehicle components when towing, always
use nylon ropes or nylon straps.
Attaching the tow rope correctly
Only secure the tow rope on the tow fit‐
ting; otherwise, damage can occur when it is se‐
cured on other parts of the vehicle.◀
Tow fitting
The screw-in tow fitting should always be car‐
ried in the vehicle. It can be screwed in at the
front or rear of the BMW.
It is stored with the tool kit under the cargo floor
cover in the cargo area, refer to page 270.
Tow fitting, information on use
▷ Use only the tow fitting provided with
the vehicle and screw it all the way in.
▷ Use the tow fitting for towing on paved roads
only.
▷ Avoid lateral loading of the tow fitting, e.g.,
do not lift the vehicle by the tow fitting.
Otherwise, damage to the tow fitting and the ve‐
hicle can occur.◀ Seite 283
283Online Edition for Part no. 01 40 2 606 735 - 03 11 500
Reference
Mobility Communication Entertainment Navigation Driving tips Controls At a glance
Page 284 of 317
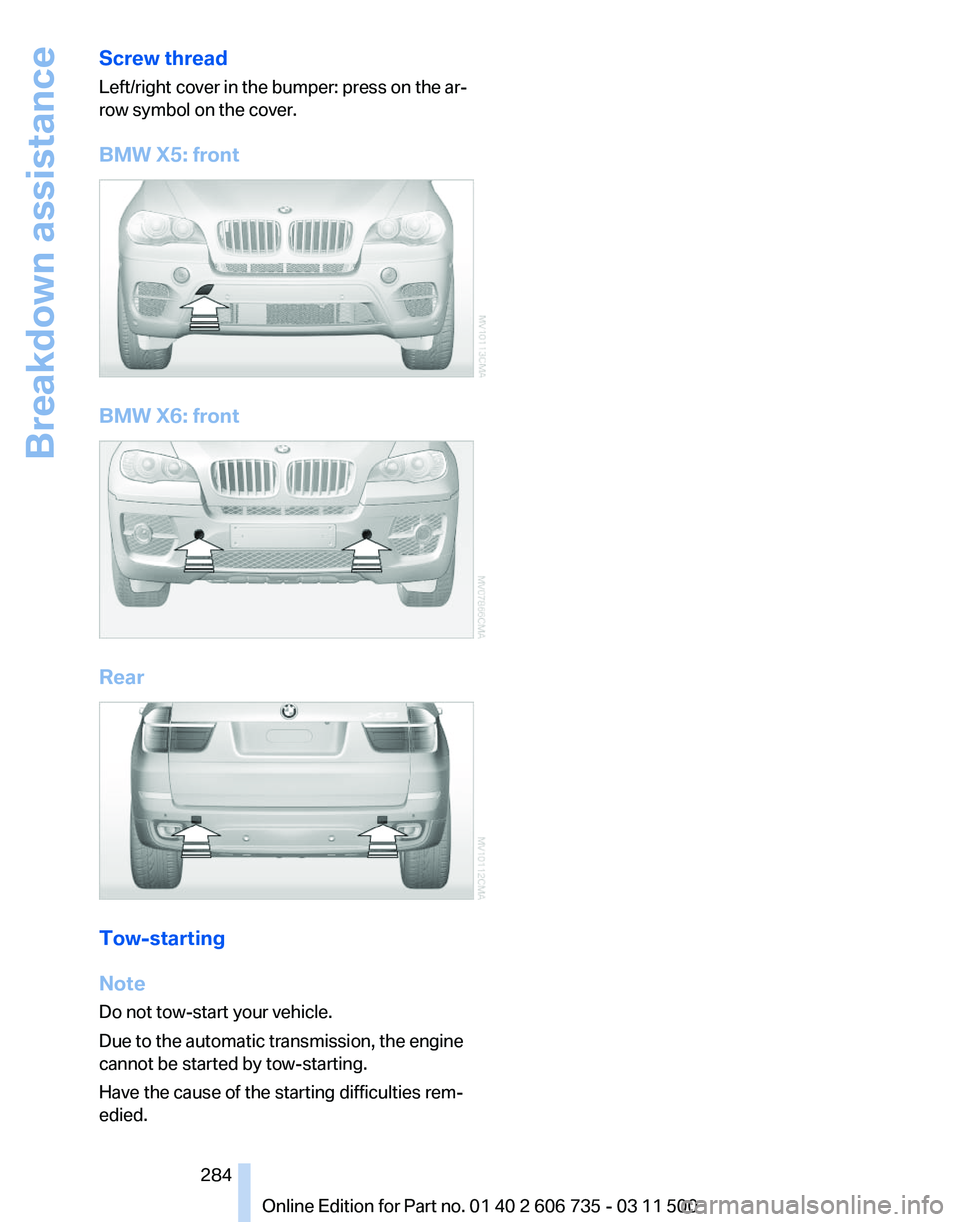
Screw thread
Left/right cover in the bumper: press on the ar‐
row symbol on the cover.
BMW X5: front
BMW X6: front
Rear
Tow-starting
Note
Do not tow-start your vehicle.
Due to the automatic transmission, the engine
cannot be started by tow-starting.
Have the cause of the starting difficulties rem‐
edied.
Seite 284
284 Online Edition for Part no. 01 40 2 606 735 - 03 11 500Breakdown assistance
Page 306 of 317
DTC Dynamic Traction Con‐
trol 97
DTMF suffix dialing 222
DVD/CD 181
DVDs, storing 188
DVD system in rear 200
DVD, video 183
Dynamic destination guid‐ ance 167
Dynamic Performance Con‐ trol 98
Dynamic Stability Control DSC 96
Dynamic Traction Control DTC 97
E
Easy entry/exit 55
EfficientDynamics, refer to Saving fuel 148
Electrical malfunction
– Door lock 32
– Driver's door 32
– Fuel filler flap 246
Electrical malfunction of upper
tailgate 34
Electrical malfunction, parking brake 65
Electric seat adjustment 46
Electric
steering wheel adjust‐
ment 55
Electronic brake-force distri‐ bution 96
Electronic engine oil level check 265
Electronic Stability Program ESP, refer to Dynamic Stabil‐
ity Control DSC 96
Emergency operation
– Door lock, refer to Manual operation 32
Emergency operation, fuel
filler flap, unlocking man‐
ually 246
Emergency Request 280
Emergency service, refer to Roadside Assistance 281 Energy-conscious driving, re‐
fer to Current fuel consump‐
tion 72
Energy,
saving, refer to Saving
fuel 148
Engine, breaking in 142
Engine compartment 263
Engine coolant, refer to Cool‐ ant 267
Engine oil, adding 266
Engine oil, additives, refer to Approved engine oils 266
Engine oil, alternative oil types 266
Engine oil, BMW maintenance system 268
Engine oil change intervals, re‐ fer to Service require‐
ments 75
Engine oil, checking the level 265
Engine oil, filling capacity 293
Engine oil temperature 72
Engine oil types, alterna‐ tive 266
Engine oil types, ap‐ proved 266
Engine, overheating, refer to Coolant temperature 72
Engine power, refer to Engine data 290
Engine, RPM 290
Engine start, assistance 281
Engine, starting 62
Engine, starting
– Comfort Access 37
Engine, starting, Start/Stop
button 61
Engine, stopping, Start/Stop button 61
Engine, switching off 62
Entry lamps, refer to Interior lamps 84
Environmentally friendly driv‐ ing,
refer to Current fuel con‐
sumption 72
Equalizer 172
Equipment, interior 127 ESP Electronic Stability Pro‐
gram, refer to Dynamic Sta‐
bility Control DSC 96
Exchanging wheels/tires 260
Exhaust system 142
Exterior mirrors 53
Exterior mirrors, adjusting 53
Exterior mirrors, automatic dimming 55
Exterior mirrors, automatic heating 54
Exterior mirrors, folding in and out 54
External audio device 134
External devices 192
External temperature dis‐ play 71
External temperature display, changing the units of meas‐
ure, changing the units of
measure on the Control Dis‐
play 80
External temperature warn‐ ing 71
Eyes for securing cargo 146
F
Fader 172
Failure messages, refer to Check Control 76
False alarm
– Avoiding unintentional alarms 40
– Ending an alarm 39
Fastening safety belts, refer to
Safety belts 50
Fault messages, refer to Check Control 76
Filling capacities 293
Filter, refer to Microfilter/acti‐ vated-charcoal filter 124
Fine wood, care 287
First aid kit 281
Fitting for towing 283
Fixing system, adaptive 137
Flashing
when locking/unlock‐
ing 31
Flat Tire Monitor FTM 88
Seite 306
306 Online Edition for Part no. 01 40 2 606 735 - 03 11 500
Everything from A to Z
Page 307 of 317
Flat Tire Monitor FTM, snow
chains 261
Flat tire, run-flat tires 261
Flat
tire, Tire Pressure Monitor
TPM 90
Flat tire, warning lamp 89, 91
Flat tire, wheel change 275
Flooding, refer to Driving through water 143
Floor carpet, care 287
Floor mats, care 287
FM/AM station 174
Fog on windows, remov‐ ing 121
Foldable rear seat back‐ rest 133
Foot brake 143
Footwell lamps, refer to Inte‐ rior lamps 84
For your own safety 6
Four-wheel drive, refer to xDrive 98
Front airbags 86
Front fog lamps 84
Front fog lamps, indicator lamp 84
FTM Flat Tire Monitor 88
Fuel 248
Fuel
– Refer to Average fuel con‐ sumption 74
Fuel, average consump‐
tion 74
Fuel cap 246
Fuel cap, closing 246
Fuel consumption display
– Average fuel consump‐ tion 74
Fuel consumption display,
current fuel consumption 72
Fuel-efficient driving, refer to Current
fuel consumption 72
Fuel filler flap, closing 246
Fuel filler flap, opening 246
Fuel filler flap, unlocking in case of an electrical malfunc‐
tion 246
Fuel gauge 73
Fuel, high-quality brands 248 Fuel, quality
248
Fuel, saving 148
Fuel, specifications 248
Fuel
tank capacity, refer to Fill‐
ing capacities 293
Fuel tank contents, refer to Filling capacities 293
Fuel tank, refer to Filling ca‐ pacities 293
Fuse 279
G
Garage door opener, refer to Integrated universal remote
control 127
Gasoline gauge, refer to Fuel gauge 73
Gasoline, refer to Required fuel 248
Gas station recommenda‐ tion 162
Gear change, automatic trans‐ mission with Steptronic 70
Gear change, via shift pad‐ dles 70
General driving notes 142
Glass sunroof, closing 43
Glass sunroof, electric
– Convenient operation 30
– Remote control 30
Glass sunroof, initializing 44
Glass sunroof, opening 43
Glass sunroof, pinch protec‐
tion 44
Glass sunroof, power fail‐ ure 44
Glass sunroof, refer to Panor‐ amic glass sunroof 42
Glass sunroof, tilting 43
Glove compartment 134
Glove compartment
– USB interface 134
Glove compartment, light‐
ing 134
GPS navigation, refer to Navi‐ gation system 152
Gross vehicle weight, refer to Weights 292 H
Handbrake, refer to Parking
brake 63
Hand-held transmitter, alter‐ nating code 128
Hands-free microphone 16
Hazard warning sys‐ tem 16, 280
HDC Hill Descent Control 98
HD Radio 175
Head airbags 86
Headlamp control, auto‐ matic 81, 82
Headlamp courtesy delay fea‐ ture 81
Headlamp flasher 66, 83
Headlamp flasher, indicator lamp 15
Headlamps 81
Headlamps, care 285
Headlamps, cleaning 67
Headlamps, cleaning, washer fluid 68
Headliner 17
Headphones,
connecting, rear
DVD system 201
Head restraints 51
Head-up Display 117
Head-up Display, care 287
Heatable rear window 121
Heating 119
Heating
– Seats 48
Heating, interior 119
Heating, mirrors 54
Heating, residual heat 122
Heating with the engine switched off, refer to Resid‐
ual heat 122
Heavy cargo, refer to Stowing cargo 145
Height, refer to Dimen‐ sions 291
High-beam Assistant 83
High beams 83
High beams/low beams, auto‐ matic, refer to High-beam
Assistant 83
Seite 307
307Online Edition for Part no. 01 40 2 606 735 - 03 11 500
Reference Mobility Communication Entertainment Navigation Driving tips Controls At a glance
Page 311 of 317
Protective function, refer to
Pinch protection
– Windows 41
Push-and-turn switch, refer to
Controls 18
R
Radiator fluid, refer to Cool‐ ant 267
Radio-operated key, refer to Remote control with
integrated key 28
Radio ready state 61
Radio ready state, switched off 61
Radio ready state, switched on 61
Radio setting, refer to Radio ready state 61
Rain sensor 67
Random 182
Random playback 182
Range 73
RDS 175
Reading lamps 85
Reading out loud 234
Rear entertainment, refer to DVD system in rear 200
Rear lamps, refer to Tail lamps 271, 274
Rear seat backrest, folda‐ ble 133
Rear seats, adjusting 47
Rear
seats, adjusting the head
restraints 52
Rear seats, heating 48
Rear socket 131
Rear ventilation 123
Rear ventilation, 3rd row seats 123
Rear ventilation, automatic cli‐ mate control in rear 124
Rearview mirror, refer to Mir‐ rors 53
Rear window defroster 121
Rear window, washing 68
Rear window wiper 68
Recirculated air mode 122 Recommended tire
brands 260
Redialing 222
Refueling 246
Remaining distance to desti‐ nation,
refer to Computer 74
Remaining range for service, refer to Service require‐
ments 75
Remaining range, refer to Range 73
Reminders 233
Remote control
– Battery replacement 39
– Comfort Access 37
– Malfunction 31, 38
– Tailgate 31
Remote control, garage door
opener 127
Remote
control, rear DVD sys‐
tem 201
Remote control, removing from the ignition lock 61
Remote control, service data 268
Remote control, universal 127
Remote inquiry 222
Replacement fuse 279
Replacement remote con‐ trol 28
Replacing wheels/tires 260
Reporting safety defects 8
Reserve warning, refer to Fuel gauge 73
Reservoir for washer fluid, re‐ fer to Washer fluid reser‐
voir 68
Resetting, Tire Pressure Mon‐ itor TPM 91
Residual heat 122
Restraining systems
– Refer to Safety belts 50
Restraint systems for chil‐
dren 56
Retaining straps, securing cargo 146
Retreaded tires 261
Road, avoiding 161
Road detour 161 Roadside Assistance 238
Roadside parking lamps
83
Roller sunblinds 41
Roof load capacity 292
Roof-mounted luggage rack 147
Rope, refer to Towing 283
Route 162
Route criteria, route 161
Route, displaying 162
Route
section, bypassing 162
RPM, refer to Engine data 290
RSC Runflat System Compo‐ nent, refer to Run-flat
tires 261
Rubber components, care 286
Run-flat tires 261
Run-flat tires, tire inflation pressure 252
Running lights, refer to Parking lamps/low beams 81
S
Safe braking 143
Safety 6
Safety belts 50
Safety belts
– Damage 50
Safety belts, care 287
Safety
belts, indicator/warning
lamp 50
Safety belts, reminder 50
Safety switch for rear win‐ dows 41
Safety systems
– Safety belts 50
Safety systems, airbags 86
Safety tires, refer to Run-flat tires 261
Satellite radio 176
Saving fuel 148
Scale, changing during navi‐ gation 164
Screen, folding open/closed, rear DVD system 200
Seite 311
311Online Edition for Part no. 01 40 2 606 735 - 03 11 500
Reference Mobility Communication Entertainment Navigation Driving tips Controls At a glance
Page 313 of 317
Storage, tires 261
Storing
the seat position, refer
to Seat and mirror mem‐
ory 53
Storing the vehicle 287
Street, entering for naviga‐ tion 154
Summer tires, refer to Wheels and tires 252
Summer tires, tread 259
Sunblinds, roller sunblinds 41
Surround View 112
Switches, refer to Cockpit 12
Switching off, engine 62
Switching off, vehicle 62
Switch-on times, parked-car ventilation 126
Symbols 6
T
Tachometer 72
Tailgate
– Comfort Access 38
– Remote control 31
Tailgate, adjusting the open‐
ing height 34, 36
Tailgate, automatic opera‐ tion 36
Tail lamps 271, 274
Tank gauge, refer to Fuel gauge 73
Tasks 232
Technical changes, refer to Safety 6
Technical data 290
Telephone 216
Telephone, adjusting the vol‐ ume 220
Telephone, installation loca‐ tion, refer to Center arm‐
rest 134
TeleService 237
Temperature, adjusting in up‐ per body region 121
Temperature, coolant, refer to Coolant temperature 72 Temperature display
– External temperature
71
– External temperature warn‐ ing 71
Temperature display, setting
the units 80
Temperature, engine oil 72
Temperature, setting with au‐ tomatic climate con‐
trol 121, 125
Temperature warning 71
Text messages 230
Theft alarm system, refer to Alarm system 39
Thigh support adjustment 45
Third
brake lamp, refer to Cen‐
ter brake lamp 273, 275
Seats, 3rd row seats 47
Tilting the passenger side mir‐ ror 54
Time, setting 79
Tire age 258
Tire identification marks 258
Tire inflation pressure 252
Tire inflation pressure, check‐ ing 252
Tire pressure monitor, refer to Flat Tire Monitor 88
Tire Pressure Monitor TPM 90
Tire Quality Grading 258
Tires
– Inflation pressure 252
Tires, breaking in 142
Tires, changing 260
Tires, condition 259
Tires, damage 260
Tire size 258
Tires, minimum tread 259
Tires, retreaded tires 261
Tires, run-flat tires 261
Tires, storage 261
Tire tread 259
Toll roads, route 161
Tone 172
Tool kit, refer to Onboard ve‐ hicle tool kit 270
Tools,
refer to Onboard vehicle
tool kit 270 Top View 114
Torque, refer to Engine
data 290
Tow bar 283
Tow fitting 283
Towing 282
Town/city, navigation 153
Tow rope 283
Tow-starting 282, 284
TPM Tire Pressure Moni‐ tor 90
Traction control 97
Traffic bulletins, naviga‐ tion 165
Transmission, automatic transmission with Step‐
tronic 69
Transmission positions, auto‐ matic transmission with
Steptronic 69
Transporting children safely 56
Treble, tone 172
Trip computer, refer to Dis‐ plays on the Control Dis‐
play 74
Trip-distance counter, refer to Trip odometer 71
Triple turn signal activa‐ tion 66
Trip odometer 71
Trips, planning 159
Trunk lid, refer to Tailgate 36
Turning circle, refer to Dimen‐ sions 291
Turning lamps, refer to Adap‐ tive light control 82
Turn signal, indicator lamp 14
Turn signals 66
Turn signals, triple turn signal activation 66
U
Uniform Tire Quality Grading/ UTQG 258
Unintentional alarms, avoid‐ ing 40
Seite 313
313Online Edition for Part no. 01 40 2 606 735 - 03 11 500
Reference Mobility Communication Entertainment Navigation Driving tips Controls At a glance