brake BMW Z4 ROADSTER 3.0I 2005 E85 User Guide
[x] Cancel search | Manufacturer: BMW, Model Year: 2005, Model line: Z4 ROADSTER 3.0I, Model: BMW Z4 ROADSTER 3.0I 2005 E85Pages: 120, PDF Size: 3.82 MB
Page 54 of 120
Technology for safety and driving convenience
52
Brake force display
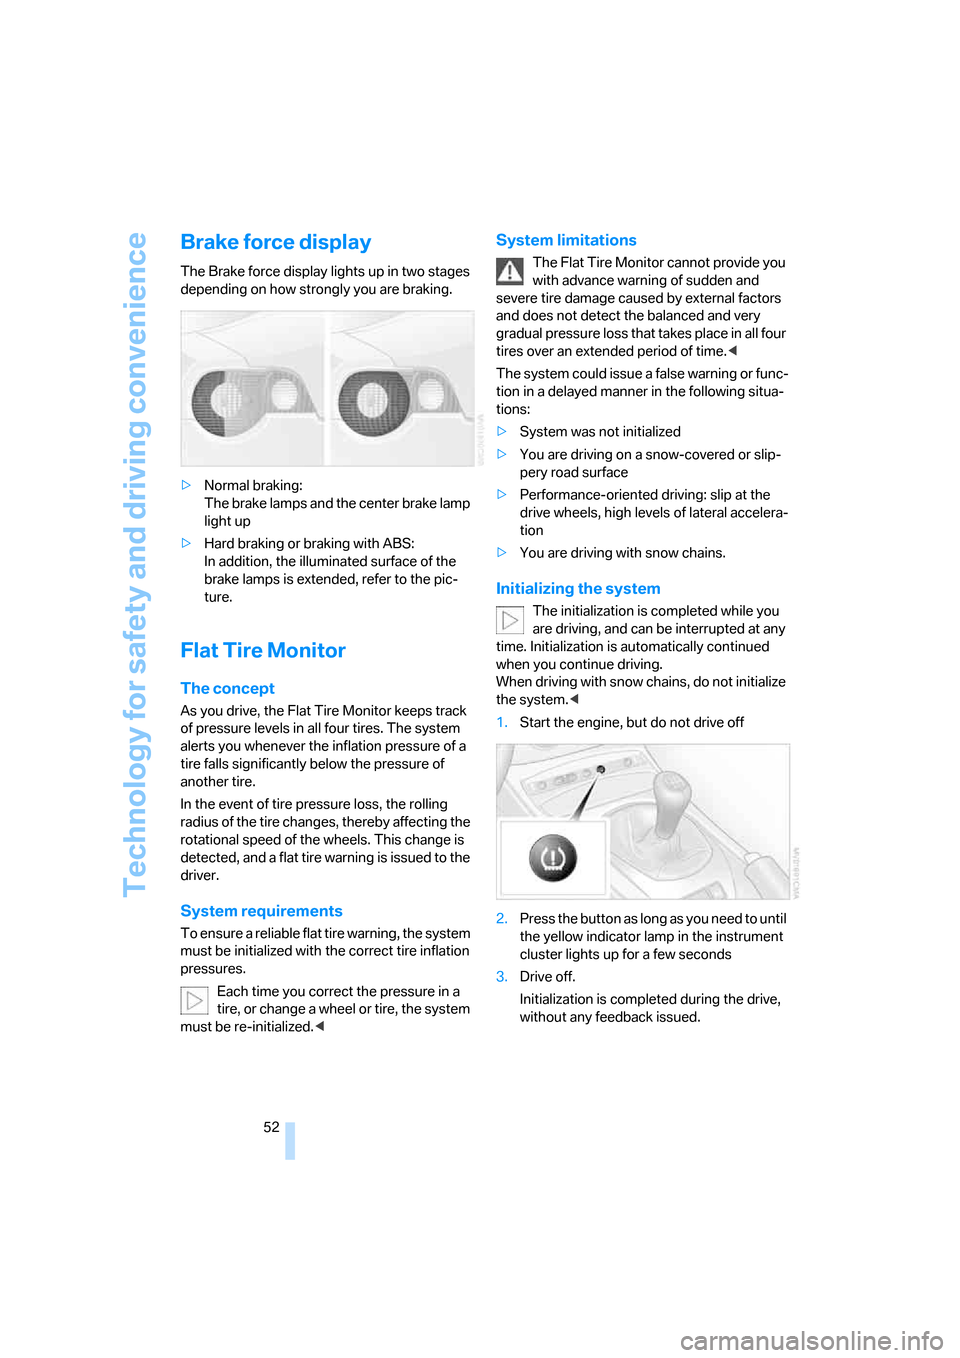
The Brake force display lights up in two stages
depending on how strongly you are braking.
>Normal braking:
The brake lamps and the center brake lamp
light up
>Hard braking or braking with ABS:
In addition, the illuminated surface of the
brake lamps is extended, refer to the pic-
ture.
Flat Tire Monitor
The concept
As you drive, the Flat Tire Monitor keeps track
of pressure levels in all four tires. The system
alerts you whenever the inflation pressure of a
tire falls significantly below the pressure of
another tire.
In the event of tire pressure loss, the rolling
radius of the tire changes, thereby affecting the
rotational speed of the wheels. This change is
detected, and a flat tire warning is issued to the
driver.
System requirements
To ensure a reliable flat tire warning, the system
must be initialized with the correct tire inflation
pressures.
Each time you correct the pressure in a
tire, or change a wheel or tire, the system
must be re-initialized.<
System limitations
The Flat Tire Monitor cannot provide you
with advance warning of sudden and
severe tire damage caused by external factors
and does not detect the balanced and very
gradual pressure loss that takes place in all four
tires over an extended period of time.<
The system could issue a false warning or func-
tion in a delayed manner in the following situa-
tions:
>System was not initialized
>You are driving on a snow-covered or slip-
pery road surface
>Performance-oriented driving: slip at the
drive wheels, high levels of lateral accelera-
tion
>You are driving with snow chains.
Initializing the system
The initialization is completed while you
are driving, and can be interrupted at any
time. Initialization is automatically continued
when you continue driving.
When driving with snow chains, do not initialize
the system.<
1.Start the engine, but do not drive off
2.Press the button as long as you need to until
the yellow indicator lamp in the instrument
cluster lights up for a few seconds
3.Drive off.
Initialization is completed during the drive,
without any feedback issued.
Page 70 of 120
Special operating instructions
68
Special operating instructions
Break-in procedures
Moving parts need to be given some time until
they can interact smoothly with one another. To
ensure that your vehicle provides maximum
economy throughout a long service life, we
request that you observe the following:
Engine and differential
Up to 1,200 miles/2,000 km:
Drive at varying engine and road speeds, but do
not exceed the following engine or road speed:
4,500 rpm / 4,500/min or 100 mph / 160 km/h.
Obey your local and state maximum speed lim-
its.
Refrain from using full throttle and avoid press-
ing the accelerator beyond the kickdown point.
After you have driven 1,200 miles/2,000 km,
you can gradually increase the engine or road
speeds.
Sequential manual gearbox SMG
Up to 1,200 miles/2,000 km:
Do not use the acceleration assistant during the
break-in period.
Tires
Due to technical factors associated with their
manufacture, tires do not achieve their full trac-
tion potential until an initial break-in period has
elapsed. You should therefore drive with extra
caution during the first 200 miles/300 km.
Obey your local and state maximum speed lim-
its.
When the vehicle is operated on wet or
slushy roads, a wedge of water may form
between the tire and the road surface. This phe-
nomenon is referred to as hydroplaning and can
lead to partial or complete loss of traction, vehi-
cle control and braking effectiveness. Reduce
your speed on wet roads.<
Brake system
Approx. 300 miles/500 km must elapse before
the brake pads and rotors achieve their optimal
surface and wear pattern.
To break in the separate parking brake drums,
apply the parking brake lightly when coasting to
a standstill – at a traffic signal, for instance; use
caution to avoid posing a danger to other road
users.
To avoid corrosion, repeat this procedure from
time to time.
The brake lamps do not come on when the
parking brake is set.
Vacuum for the brake system servo unit
on your BMW is available only when the
engine is running. When you move the car with
the engine off, e.g. by towing, substantially
higher levels of pedal force will be required to
brake the vehicle.<
Clutch
The clutch will achieve its optimal functionality
after approx. 300 miles/500 km. Shift gears
carefully during the break-in period.
After replacing components
Follow the same break-in procedure again if any
of the components mentioned above have to be
replaced in the future.
Driving notes
Close the luggage compartment lid
Operate the vehicle only when the lug-
gage compartment lid is completely
closed, otherwise exhaust fumes could pene-
trate into the interior of the vehicle.<
Should it be absolutely necessary to operate
the vehicle with the luggage compartment lid
open and with the convertible top closed:
Page 71 of 120
Reference
At a glance
Controls
Driving tips
Mobility
69
1.Close all windows
2.Increase the air supply from the air condi-
tioner or automatic climate control to a high
level. Refer to page58 or61.
Hot exhaust system
High temperatures occur with every vehi-
cle equipped with a catalytic converter.
Heat shields are installed adjacent to some sec-
tions of the exhaust system. Never remove
these shields; do not apply undercoating to
their surfaces. When driving, standing at idle
and parking the vehicle, take care to avoid con-
tact between the hot exhaust system and flam-
mable materials, e.g. hay, leaves, grass, etc.
Such contact could lead to a fire, resulting in
serious personal injury and property damage.<
Hydroplaning
When driving on wet or slushy roads,
reduce vehicle speed. If you do not, a
wedge of water may form between the tires and
the road surface. This phenomenon can lead to
partial or complete loss of traction, vehicle con-
trol and braking effectiveness.<
Driving through water
Do not drive through water on the road if it
is deeper than 1 ft/30 cm, and then only at
walking speed. Otherwise, the vehicle's engine,
the electrical systems and the transmission
may be damaged.<
Use the parking brake on inclines
On inclines, keep the vehicle from rolling
by using the parking brake rather than by
slipping the clutch, which would lead to a high
degree of clutch wear.<
Braking safely
Your BMW is equipped with ABS as a standard
feature. If you are in a situation which requires
full braking, it is best to brake using maximum
brake pressure: panic stop. Since the vehicle
maintains steering responsiveness, you can still
avoid possible obstacles with a minimum of
steering effort.Pulsation at the brake pedal combines with
sounds from the hydraulic circuits to indicate to
the driver that ABS is in its active mode.
Wet roads
If the roads are wet or if there is heavy rain, it is
advisable to gently press the brakes for a brief
moment every few miles/kilometers. Watch
traffic conditions to ensure that this maneuver
does not endanger other road users. The
resulting heat dries the brake rotors and brake
pads. Immediate braking force is then available
if necessary.
Inclines
To prevent overheating and, as a result,
diminished braking effectiveness, drive
down long or steep downhill grades in a gear
which requires the least braking. Otherwise,
even light but consistent pedal pressure can
lead to high temperatures, brake wear and pos-
sibly even brake failure.<
The braking power of the engine can be further
enhanced by downshifting the automatic trans-
mission in manual mode, if necessary, into first
gear; refer to pages39 and41. This prevents an
excessive load on the brakes.
Do not coast with the clutch depressed or
with the transmission or selector lever in
Neutral. Do not coast with the engine switched
off. Otherwise, the engine provides no braking
effect while the transmission is in idling posi-
tion, and there is no power-assist for braking or
steering when the engine is off.
Floor mats, floor carpets or other objects must
not be in the area near the brake or accelerator
pedal, as this could impair the movement of the
pedals.<
Corrosion on the brake rotors
Limited vehicle use, extended periods with the
vehicle parked or in storage, and operating con-
ditions in which braking is restricted to gentle,
low-pressure applications will all increase the
tendency for corrosion to form on the rotors and
contamination to accumulate on the brake
pads. This occurs because the minimal pres-
Page 72 of 120
Special operating instructions
70 sure which must be exerted by the pads to
clean the rotors by brake applications is not
reached.
If the brake rotors are corroded, they will tend to
respond to braking with a pulsating effect which
even extended application will fail to cure.
Interior and exterior mirrors with
automatic dimming feature*
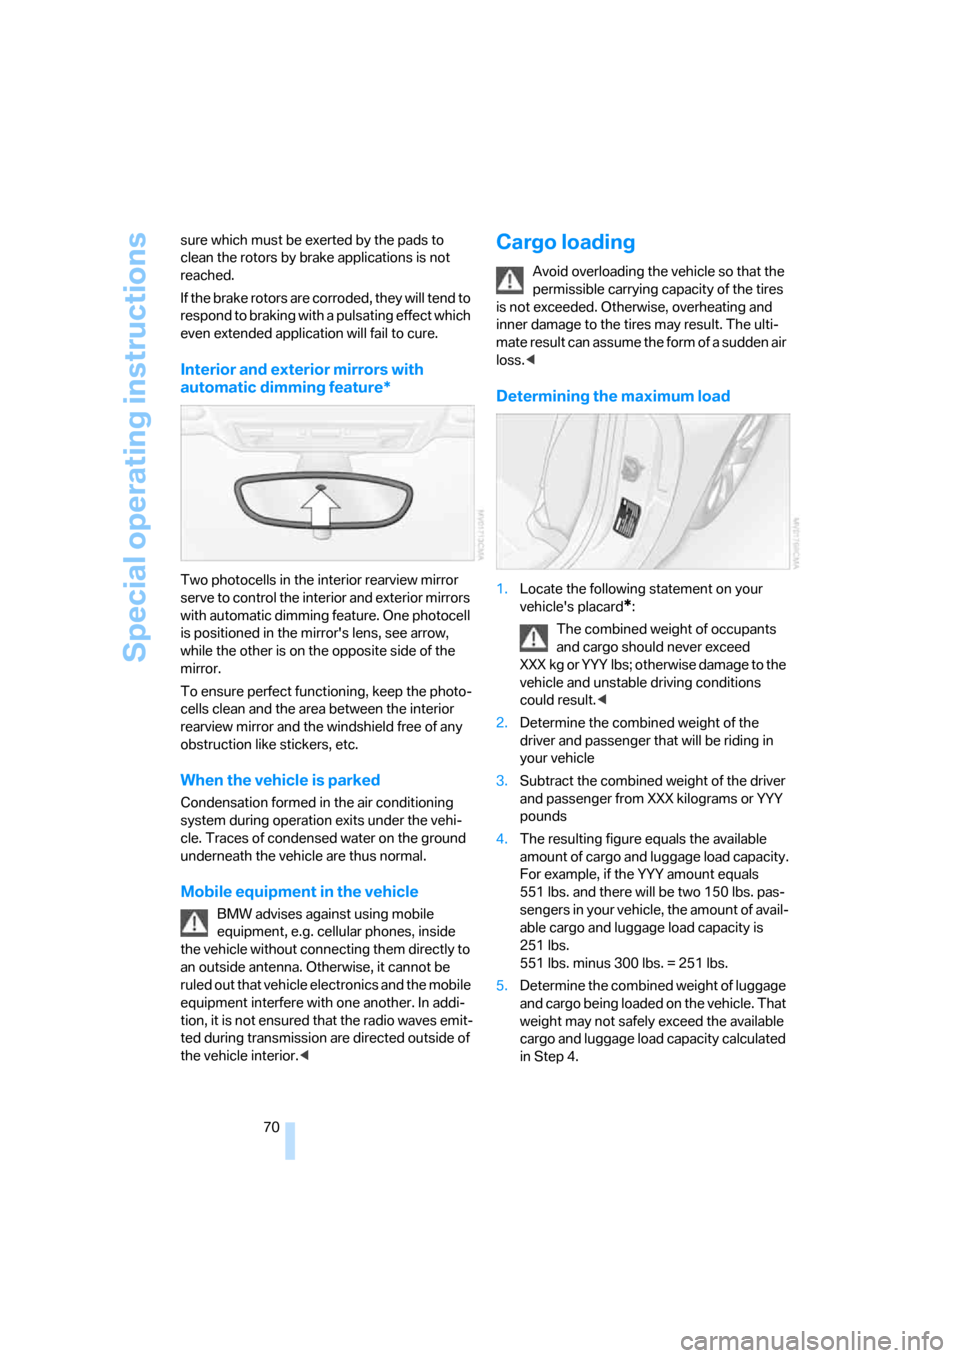
Two photocells in the interior rearview mirror
serve to control the interior and exterior mirrors
with automatic dimming feature. One photocell
is positioned in the mirror's lens, see arrow,
while the other is on the opposite side of the
mirror.
To ensure perfect functioning, keep the photo-
cells clean and the area between the interior
rearview mirror and the windshield free of any
obstruction like stickers, etc.
When the vehicle is parked
Condensation formed in the air conditioning
system during operation exits under the vehi-
cle. Traces of condensed water on the ground
underneath the vehicle are thus normal.
Mobile equipment in the vehicle
BMW advises against using mobile
equipment, e.g. cellular phones, inside
the vehicle without connecting them directly to
an outside antenna. Otherwise, it cannot be
ruled out that vehicle electronics and the mobile
equipment interfere with one another. In addi-
tion, it is not ensured that the radio waves emit-
ted during transmission are directed outside of
the vehicle interior.<
Cargo loading
Avoid overloading the vehicle so that the
permissible carrying capacity of the tires
is not exceeded. Otherwise, overheating and
inner damage to the tires may result. The ulti-
mate result can assume the form of a sudden air
loss.<
Determining the maximum load
1.Locate the following statement on your
vehicle's placard
*:
The combined weight of occupants
and cargo should never exceed
XXX kg or YYY lbs; otherwise damage to the
vehicle and unstable driving conditions
could result.<
2.Determine the combined weight of the
driver and passenger that will be riding in
your vehicle
3.Subtract the combined weight of the driver
and passenger from XXX kilograms or YYY
pounds
4.The resulting figure equals the available
amount of cargo and luggage load capacity.
For example, if the YYY amount equals
551 lbs. and there will be two 150 lbs. pas-
sengers in your vehicle, the amount of avail-
able cargo and luggage load capacity is
251 lbs.
551 lbs. minus 300 lbs. = 251 lbs.
5.Determine the combined weight of luggage
and cargo being loaded on the vehicle. That
weight may not safely exceed the available
cargo and luggage load capacity calculated
in Step 4.
Page 87 of 120
Reference
At a glance
Controls
Driving tips
Mobility
85
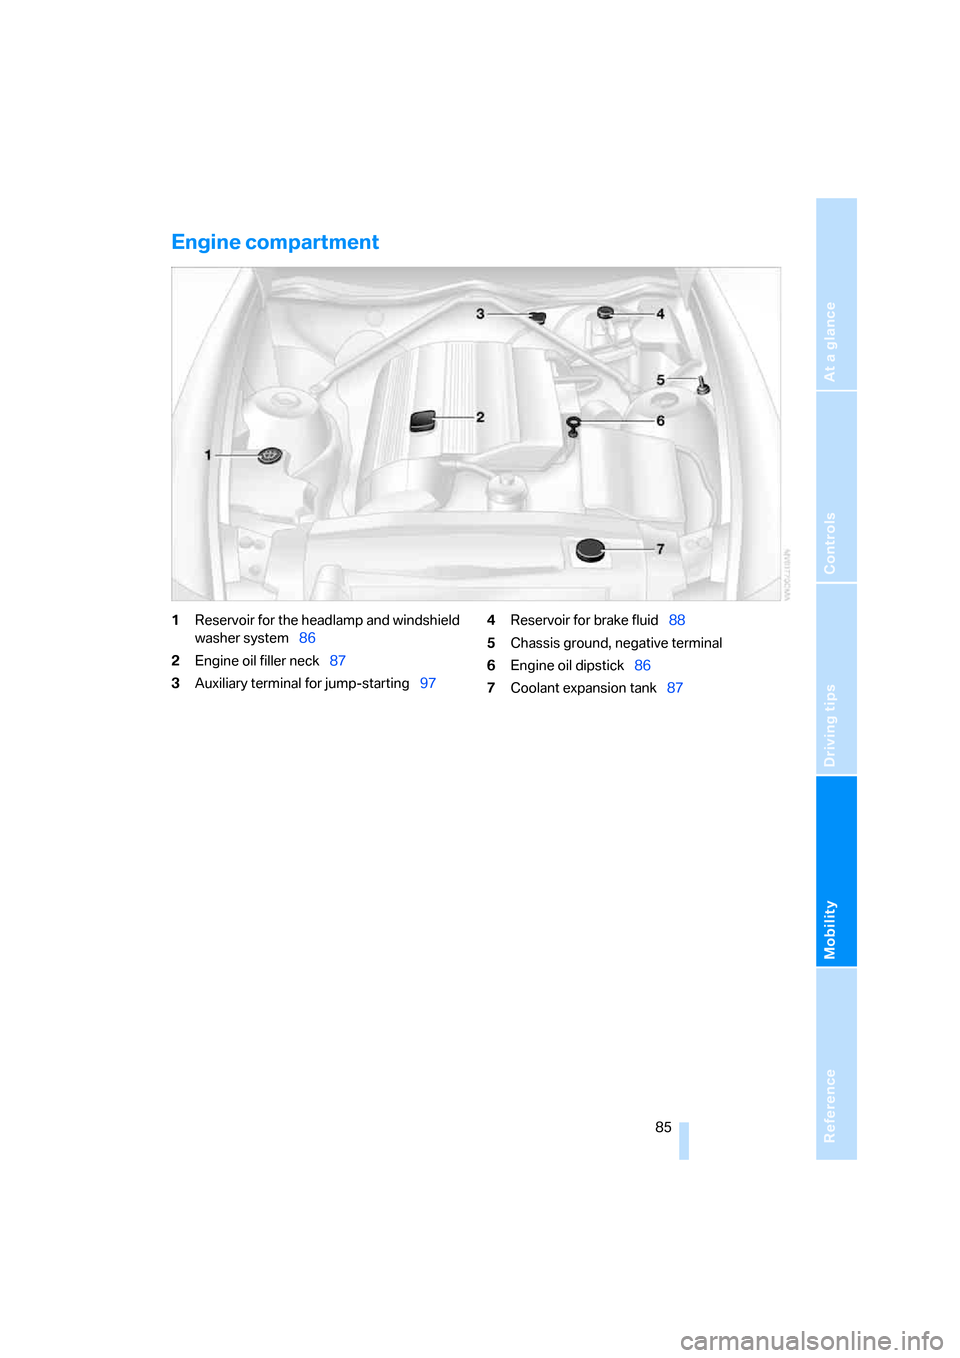
Engine compartment
1Reservoir for the headlamp and windshield
washer system86
2Engine oil filler neck87
3Auxiliary terminal for jump-starting974Reservoir for brake fluid88
5Chassis ground, negative terminal
6Engine oil dipstick86
7Coolant expansion tank87
Page 90 of 120
In the engine compartment
88
Checking the coolant level
1.The engine must be at ambient tempera-
ture
2.Open the cap of the expansion tank by turn-
ing it slightly counterclockwise to allow
accumulated pressure to escape, then
open completely
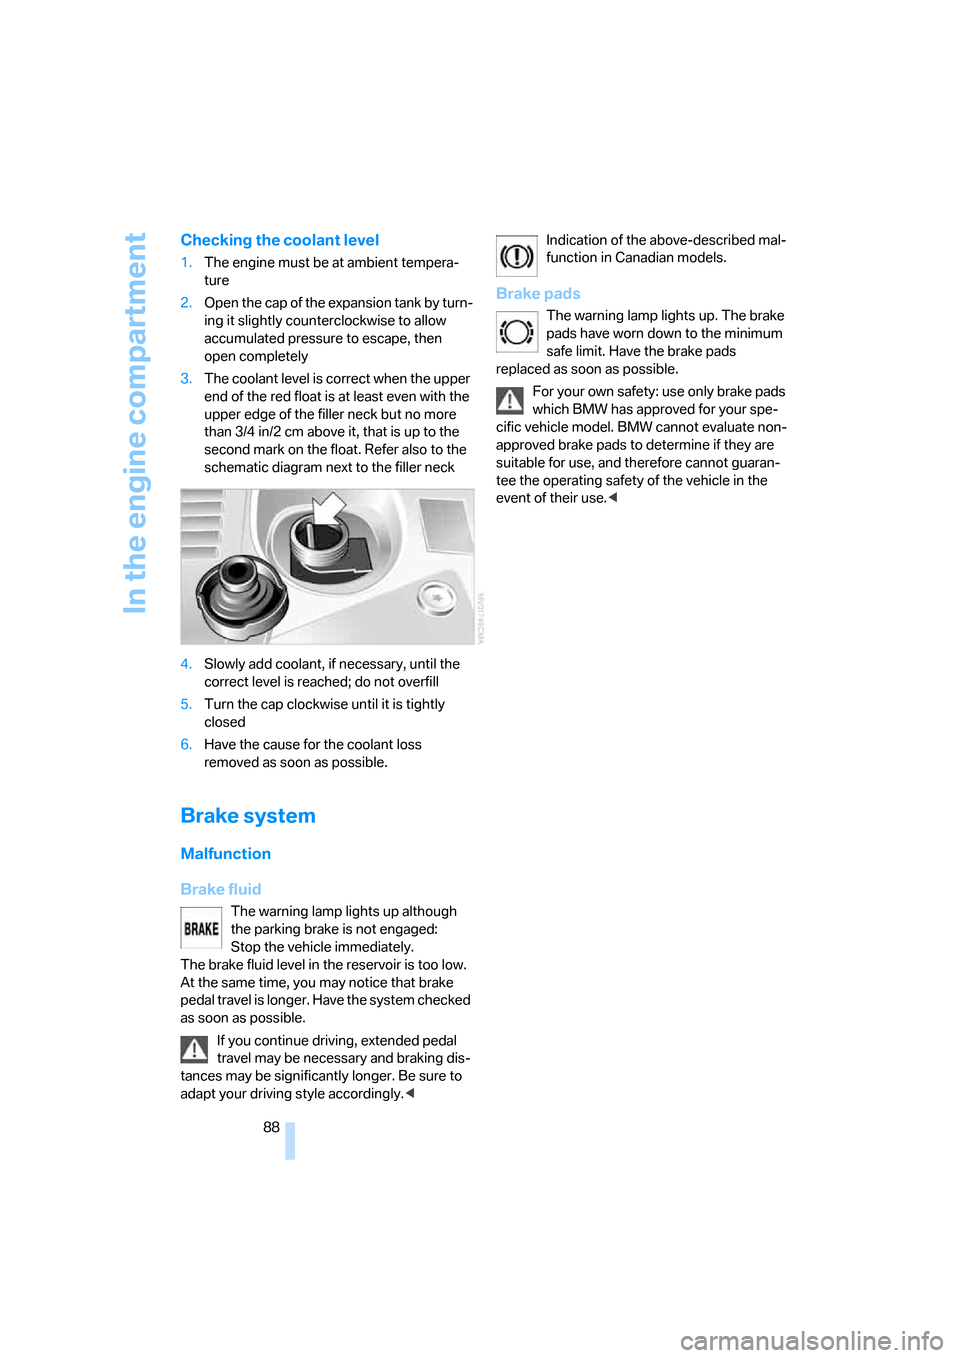
3.The coolant level is correct when the upper
end of the red float is at least even with the
upper edge of the filler neck but no more
than 3/4 in/2 cm above it, that is up to the
second mark on the float. Refer also to the
schematic diagram next to the filler neck
4.Slowly add coolant, if necessary, until the
correct level is reached; do not overfill
5.Turn the cap clockwise until it is tightly
closed
6.Have the cause for the coolant loss
removed as soon as possible.
Brake system
Malfunction
Brake fluid
The warning lamp lights up although
the parking brake is not engaged:
Stop the vehicle immediately.
The brake fluid level in the reservoir is too low.
At the same time, you may notice that brake
pedal travel is longer. Have the system checked
as soon as possible.
If you continue driving, extended pedal
travel may be necessary and braking dis-
tances may be significantly longer. Be sure to
adapt your driving style accordingly.
Brake pads
The warning lamp lights up. The brake
pads have worn down to the minimum
safe limit. Have the brake pads
replaced as soon as possible.
For your own safety: use only brake pads
which BMW has approved for your spe-
cific vehicle model. BMW cannot evaluate non-
approved brake pads to determine if they are
suitable for use, and therefore cannot guaran-
tee the operating safety of the vehicle in the
event of their use.<
Page 95 of 120
Reference
At a glance
Controls
Driving tips
Mobility
93
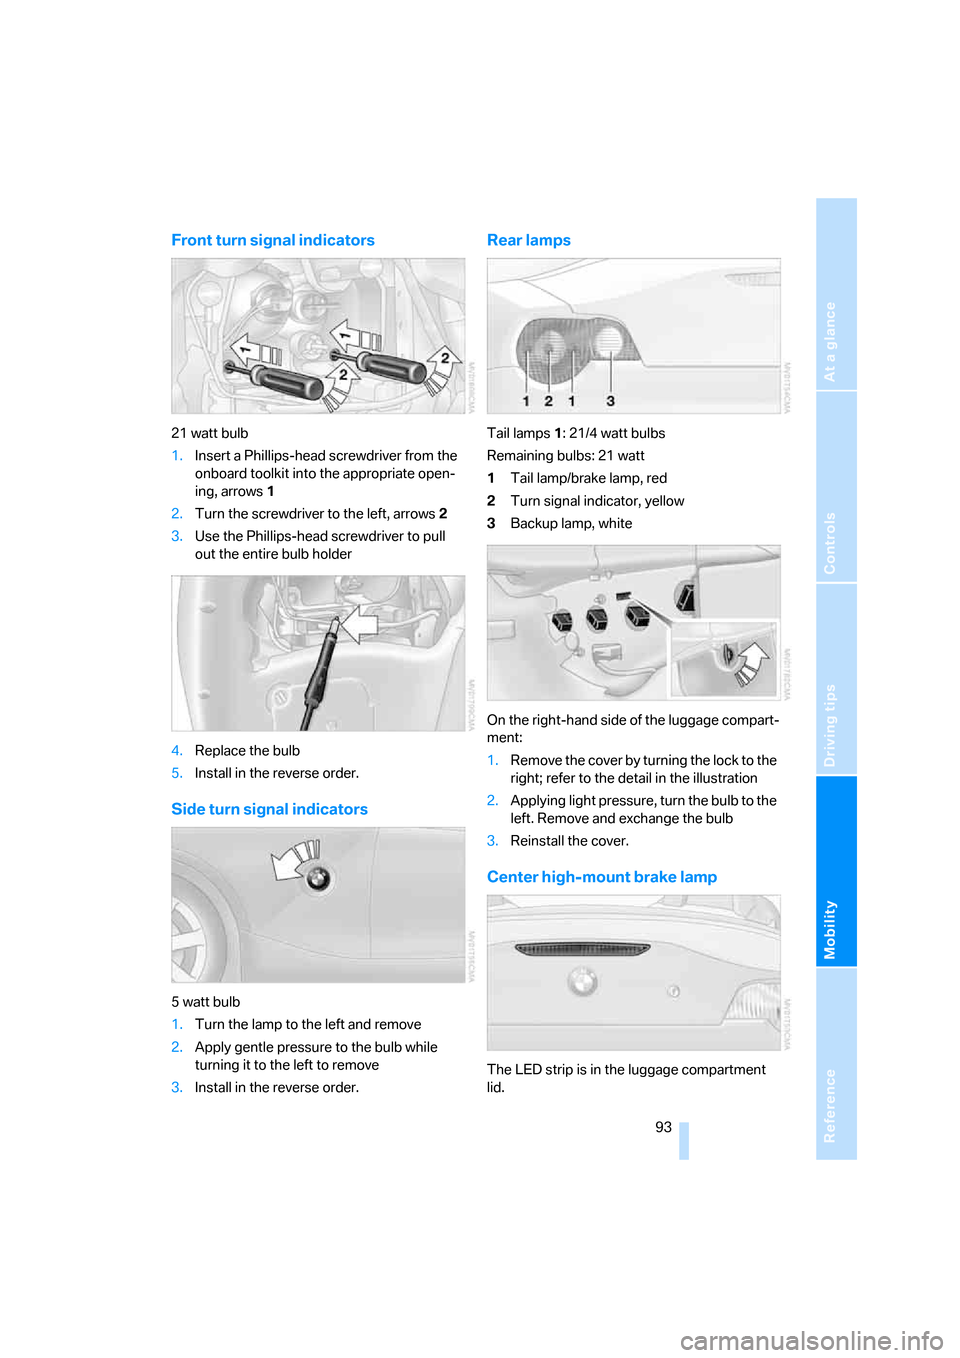
Front turn signal indicators
21 watt bulb
1.Insert a Phillips-head screwdriver from the
onboard toolkit into the appropriate open-
ing, arrows1
2.Turn the screwdriver to the left, arrows2
3.Use the Phillips-head screwdriver to pull
out the entire bulb holder
4.Replace the bulb
5.Install in the reverse order.
Side turn signal indicators
5 watt bulb
1.Turn the lamp to the left and remove
2.Apply gentle pressure to the bulb while
turning it to the left to remove
3.Install in the reverse order.
Rear lamps
Tail lamps1: 21/4 watt bulbs
Remaining bulbs: 21 watt
1Tail lamp/brake lamp, red
2Turn signal indicator, yellow
3Backup lamp, white
On the right-hand side of the luggage compart-
ment:
1.Remove the cover by turning the lock to the
right; refer to the detail in the illustration
2.Applying light pressure, turn the bulb to the
left. Remove and exchange the bulb
3.Reinstall the cover.
Center high-mount brake lamp
The LED strip is in the luggage compartment
lid.
Page 98 of 120
Giving and receiving assistance
96
Giving and receiving assistance
Receiving assistance
The BMW Group's Mobile Service offers you
24-hour assistance in the event of a breakdown,
even on weekends and holidays.
The telephone number of the Mobile Service
control center in your country is listed in the
Contact brochure.
If your vehicle has the necessary equipment,
you can contact the Mobile Service or issue an
emergency call using buttons in the center con-
sole, behind the parking brake under a cover.
When the emergency call is initiated, a tele-
phone connection is established with the BMW
Assist response center.
If your vehicle is equipped with an activated
BMW Assist and the current location of the
vehicle can be determined, this location is
transmitted to the BMW Assist response cen-
ter.
Requirements for initiating an emergency call or
contacting Mobile Service:
>Ignition key in position 1 or higher
>The car phone must be registered with a
mobile network
>The emergency call system must be opera-
tional.
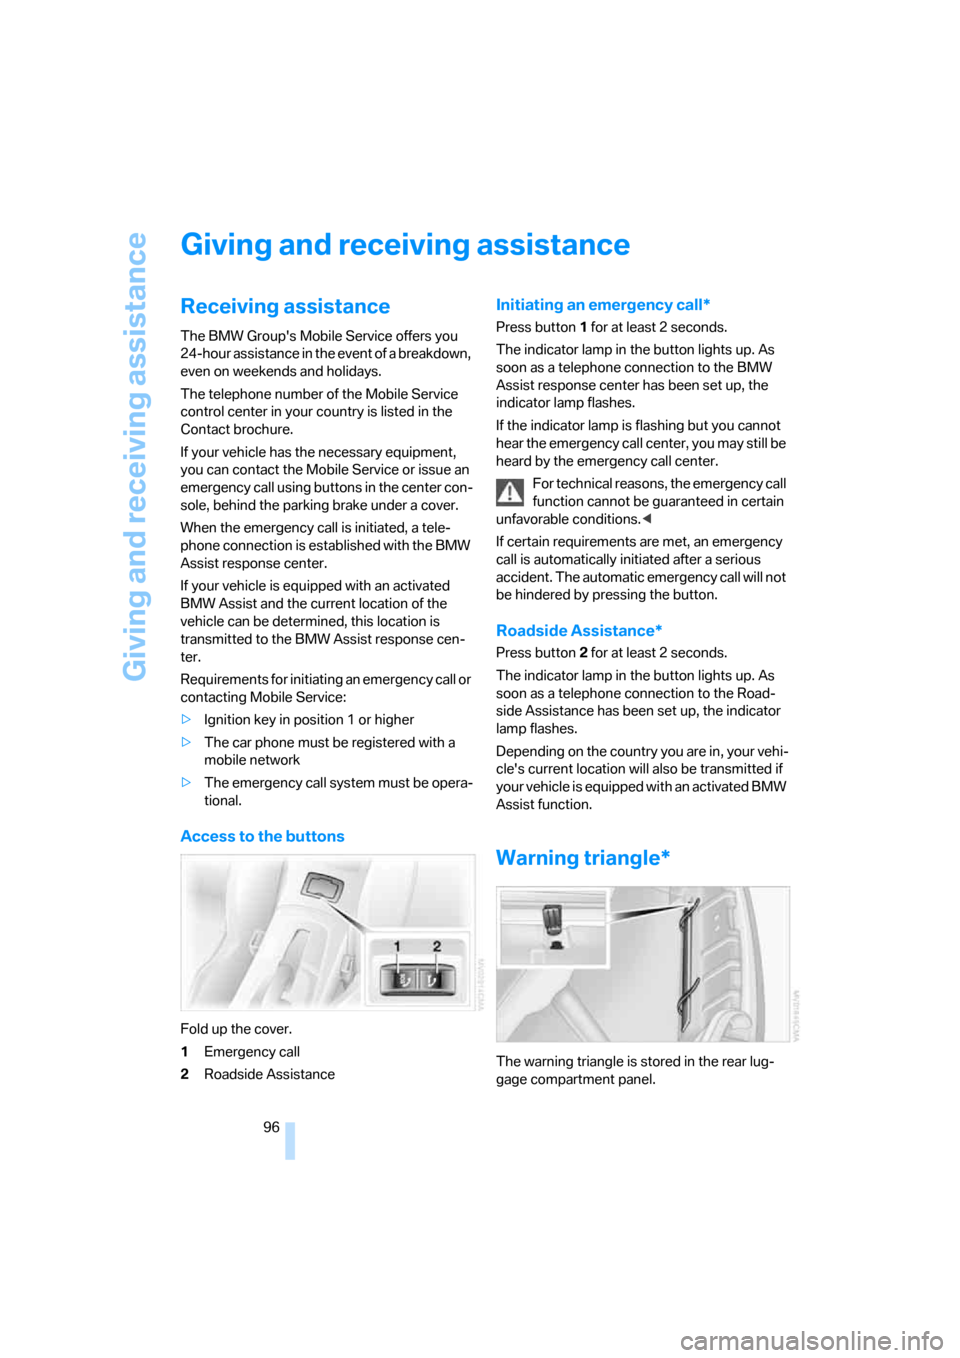
Access to the buttons
Fold up the cover.
1Emergency call
2Roadside Assistance
Initiating an emergency call*
Press button1 for at least 2 seconds.
The indicator lamp in the button lights up. As
soon as a telephone connection to the BMW
Assist response center has been set up, the
indicator lamp flashes.
If the indicator lamp is flashing but you cannot
hear the emergency call center, you may still be
heard by the emergency call center.
For technical reasons, the emergency call
function cannot be guaranteed in certain
unfavorable conditions.<
If certain requirements are met, an emergency
call is automatically initiated after a serious
accident. The automatic emergency call will not
be hindered by pressing the button.
Roadside Assistance*
Press button2 for at least 2 seconds.
The indicator lamp in the button lights up. As
soon as a telephone connection to the Road-
side Assistance has been set up, the indicator
lamp flashes.
Depending on the country you are in, your vehi-
cle's current location will also be transmitted if
your vehicle is equipped with an activated BMW
Assist function.
Warning triangle*
The warning triangle is stored in the rear lug-
gage compartment panel.
Page 100 of 120
Giving and receiving assistance
98 positive terminal of the battery or to an aux-
iliary jump-starting terminal of the vehicle to
be jump-started.
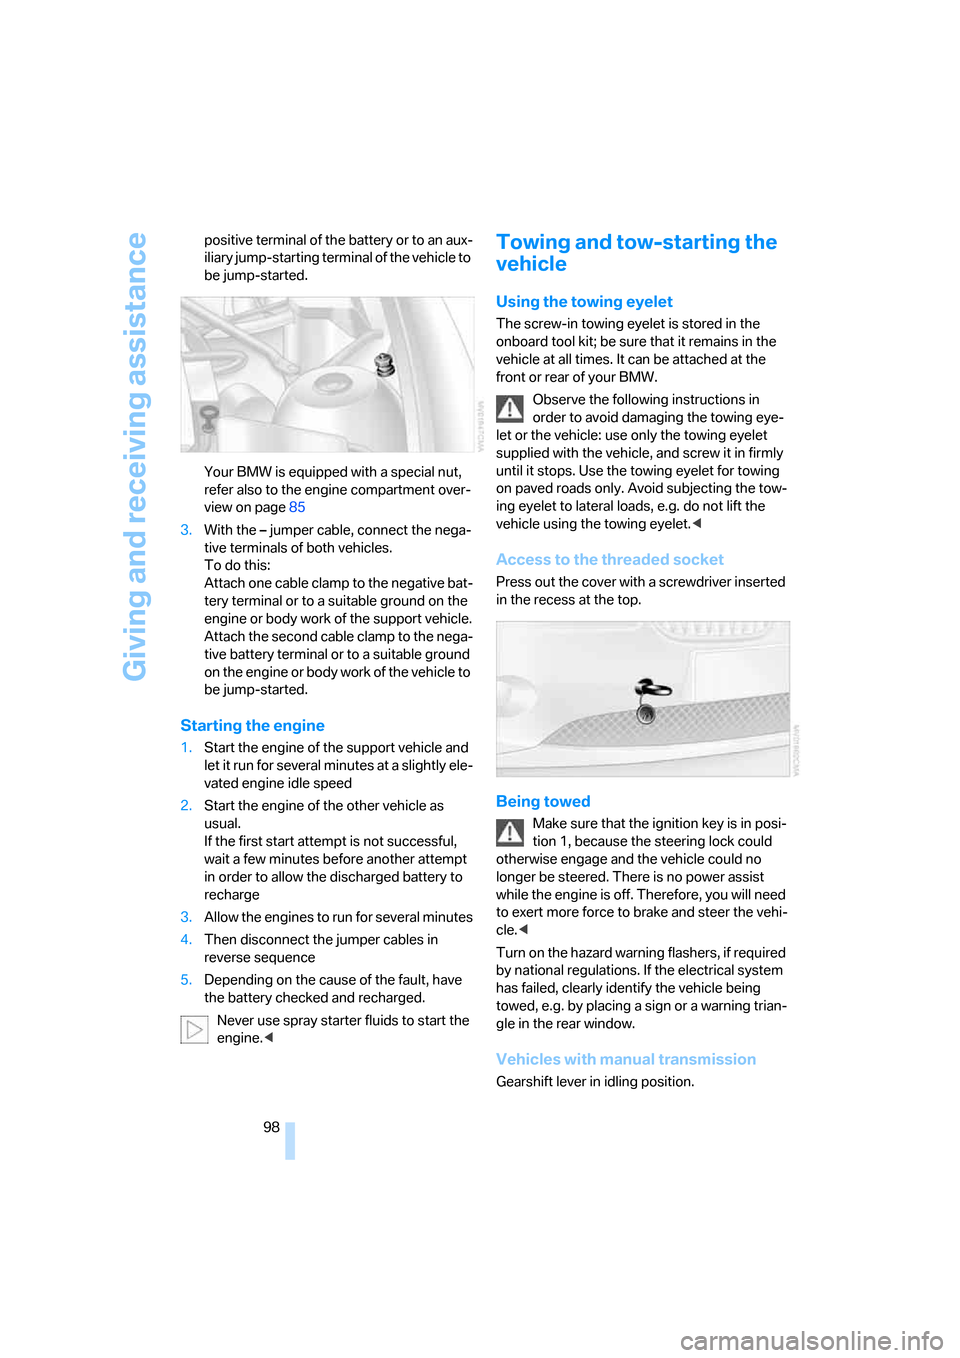
Your BMW is equipped with a special nut,
refer also to the engine compartment over-
view on page85
3.With the– jumper cable, connect the nega-
tive terminals of both vehicles.
To do this:
Attach one cable clamp to the negative bat-
tery terminal or to a suitable ground on the
engine or body work of the support vehicle.
Attach the second cable clamp to the nega-
tive battery terminal or to a suitable ground
on the engine or body work of the vehicle to
be jump-started.
Starting the engine
1.Start the engine of the support vehicle and
let it run for several minutes at a slightly ele-
vated engine idle speed
2.Start the engine of the other vehicle as
usual.
If the first start attempt is not successful,
wait a few minutes before another attempt
in order to allow the discharged battery to
recharge
3.Allow the engines to run for several minutes
4.Then disconnect the jumper cables in
reverse sequence
5.Depending on the cause of the fault, have
the battery checked and recharged.
Never use spray starter fluids to start the
engine.<
Towing and tow-starting the
vehicle
Using the towing eyelet
The screw-in towing eyelet is stored in the
onboard tool kit; be sure that it remains in the
vehicle at all times. It can be attached at the
front or rear of your BMW.
Observe the following instructions in
order to avoid damaging the towing eye-
let or the vehicle: use only the towing eyelet
supplied with the vehicle, and screw it in firmly
until it stops. Use the towing eyelet for towing
on paved roads only. Avoid subjecting the tow-
ing eyelet to lateral loads, e.g. do not lift the
vehicle using the towing eyelet.<
Access to the threaded socket
Press out the cover with a screwdriver inserted
in the recess at the top.
Being towed
Make sure that the ignition key is in posi-
tion 1, because the steering lock could
otherwise engage and the vehicle could no
longer be steered. There is no power assist
while the engine is off. Therefore, you will need
to exert more force to brake and steer the vehi-
cle.<
Turn on the hazard warning flashers, if required
by national regulations. If the electrical system
has failed, clearly identify the vehicle being
towed, e.g. by placing a sign or a warning trian-
gle in the rear window.
Vehicles with manual transmission
Gearshift lever in idling position.
Page 108 of 120
Everything from A to Z
106
A
ABS Antilock Brake
System50
– indicator lamp13
Acceleration assistant42
Accessories, refer to
– For your own safety6
– Your individual vehicle5
Accident, refer to Emergency
call96
Acknowledgment signal for
vehicle locking/unlocking16
Activated-charcoal filter63
Adjusting the thigh support29
Air, drying,
refer to Air conditioning
mode59,62
Airbags53
– deactivation33
– indicator lamp12
– passenger airbags indicator
lamp34
– reactivation33
– safe seating position27
Airbag switch33
Air conditioning58
Air conditioning mode
– air conditioning59
– automatic climate control62
Air conditioning mode
switching on/off
manually59,62
Air distribution
– air conditioning59
– automatic climate control62
Airing out, refer to
Ventilation59,63
Air outlets,
refer to Ventilation59,63
Air pressure, refer to Tire
inflation pressure78Air recirculation, refer to
Recirculated air
mode59,62
Air supply/blower
– air conditioning59
– automatic climate control62
AKI, refer to Fuel
specifications76
Alarm system25
– avoiding unintentional
alarms26
All-season tires, refer to
Winter tires81
Antenna, refer to the
Caring for your vehicle
brochure
Antifreeze86,87
– coolant87
– washing fluids86
Antilock Brake System
ABS50
– indicator lamp13
Anti-theft alarm system, refer
to Alarm system25
Anti-theft protection16,25
Approved axle load, refer to
Weights103
Approved engine oils87
Approved gross vehicle
weight, refer to Weights103
Artificial leather, refer to the
Caring for your vehicle
brochure
Ashtray65
Assistant systems,
refer to Dynamic Stability
Control DSC50
AUC Automatic recirculated
air control62Automatic
– air distribution62
– air supply/blower62
– cruise control44
– headlamp control56
– luggage compartment lid
operation19
Automatically dimming
interior rearview mirror31
Automatic car wash, refer to
the Caring for your vehicle
brochure
Automatic climate control61
Automatic recirculated air
control AUC62
Automatic transmission with
Steptronic38
– ignition36
– indicator lamp13
– interlock36
– selector lever lock38
– shiftlock38
– towing the vehicle99
– tow-starting99
AUTO program,
refer to Automatic air
distribution62
Average fuel consumption49
– setting unit of measure48
Average speed49
– setting unit of measure48
Avoiding unintentional
alarms26
Axle loads, refer to
Weights103
B
Backrest, refer to Seat
adjustment28
Backup lamps38
– bulb replacement93
Everything from A to Z
Index