jump start BMW Z4 SDRIVE35I ROADSTER 2010 Owners Manual
[x] Cancel search | Manufacturer: BMW, Model Year: 2010, Model line: Z4 SDRIVE35I ROADSTER, Model: BMW Z4 SDRIVE35I ROADSTER 2010Pages: 254, PDF Size: 8.04 MB
Page 61 of 254
Controls
59Reference
At a glance
Driving tips
Communications
Navigation
Entertainment
Mobility
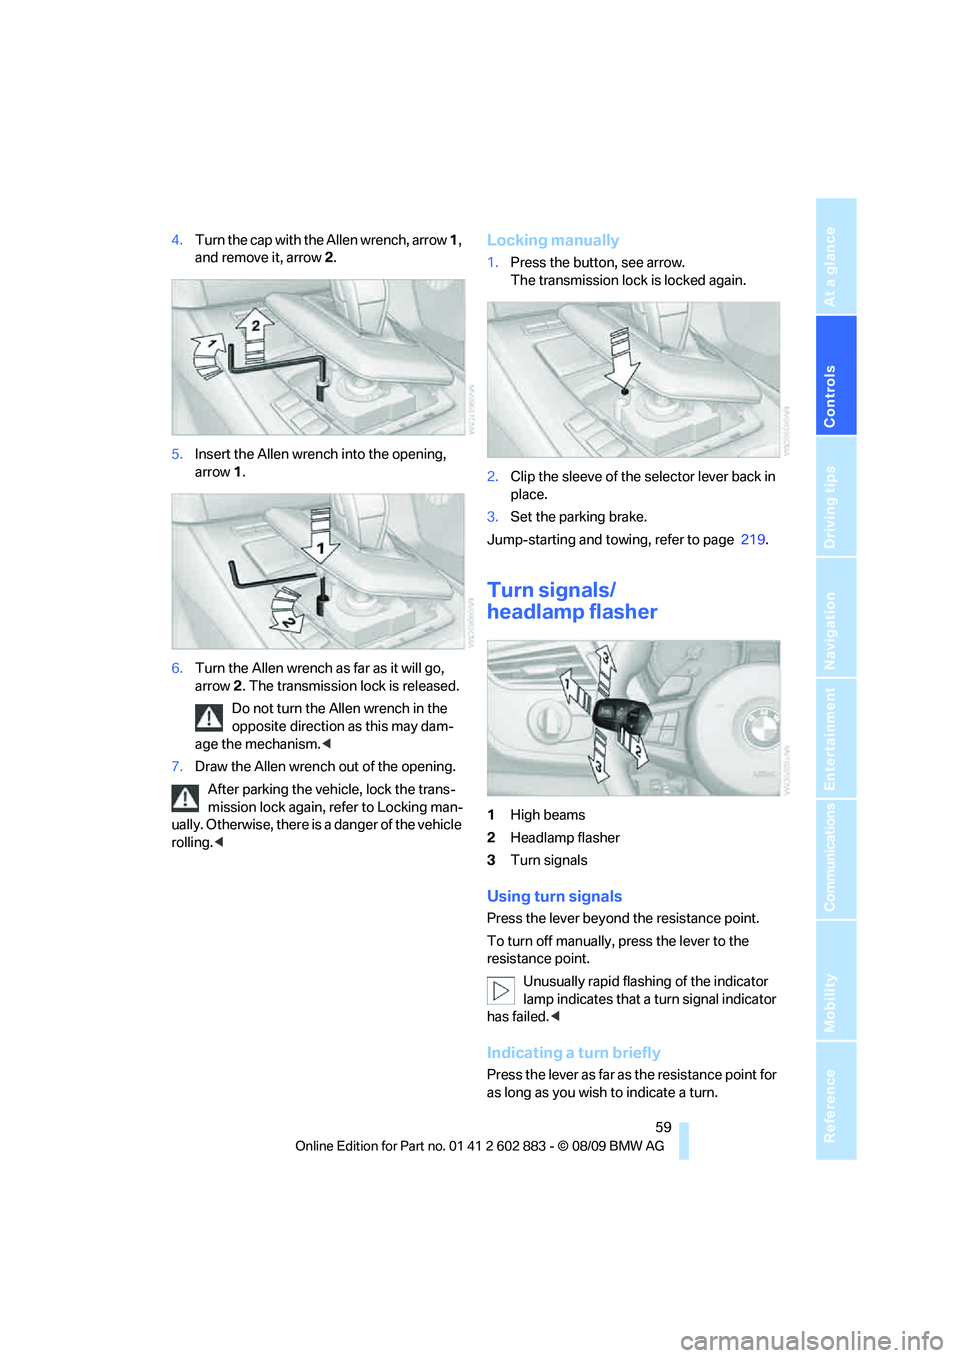
4.Turn the cap with the Allen wrench, arrow 1,
and remove it, arrow 2.
5.Insert the Allen wrench into the opening,
arrow 1.
6.Turn the Allen wrench as far as it will go,
arrow 2. The transmission lock is released.
Do not turn the Allen wrench in the
opposite direction as this may dam-
age the mechanism.<
7.Draw the Allen wrench out of the opening.
After parking the vehicle, lock the trans-
mission lock again, refer to Locking man-
ually. Otherwise, there is a danger of the vehicle
rolling.
The transmission lock is locked again.
2.Clip the sleeve of the selector lever back in
place.
3.Set the parking brake.
Jump-starting and towing, refer to page 219.
Turn signals/
headlamp flasher
1High beams
2Headlamp flasher
3Turn signals
Using turn signals
Press the lever beyond the resistance point.
To turn off manually, press the lever to the
resistance point.
Unusually rapid flashing of the indicator
lamp indicates that a turn signal indicator
has failed.<
Indicating a turn briefly
Press the lever as far as the resistance point for
as long as you wish to indicate a turn.
Page 204 of 254
Under the hood
202
Important parts of the engine compartment
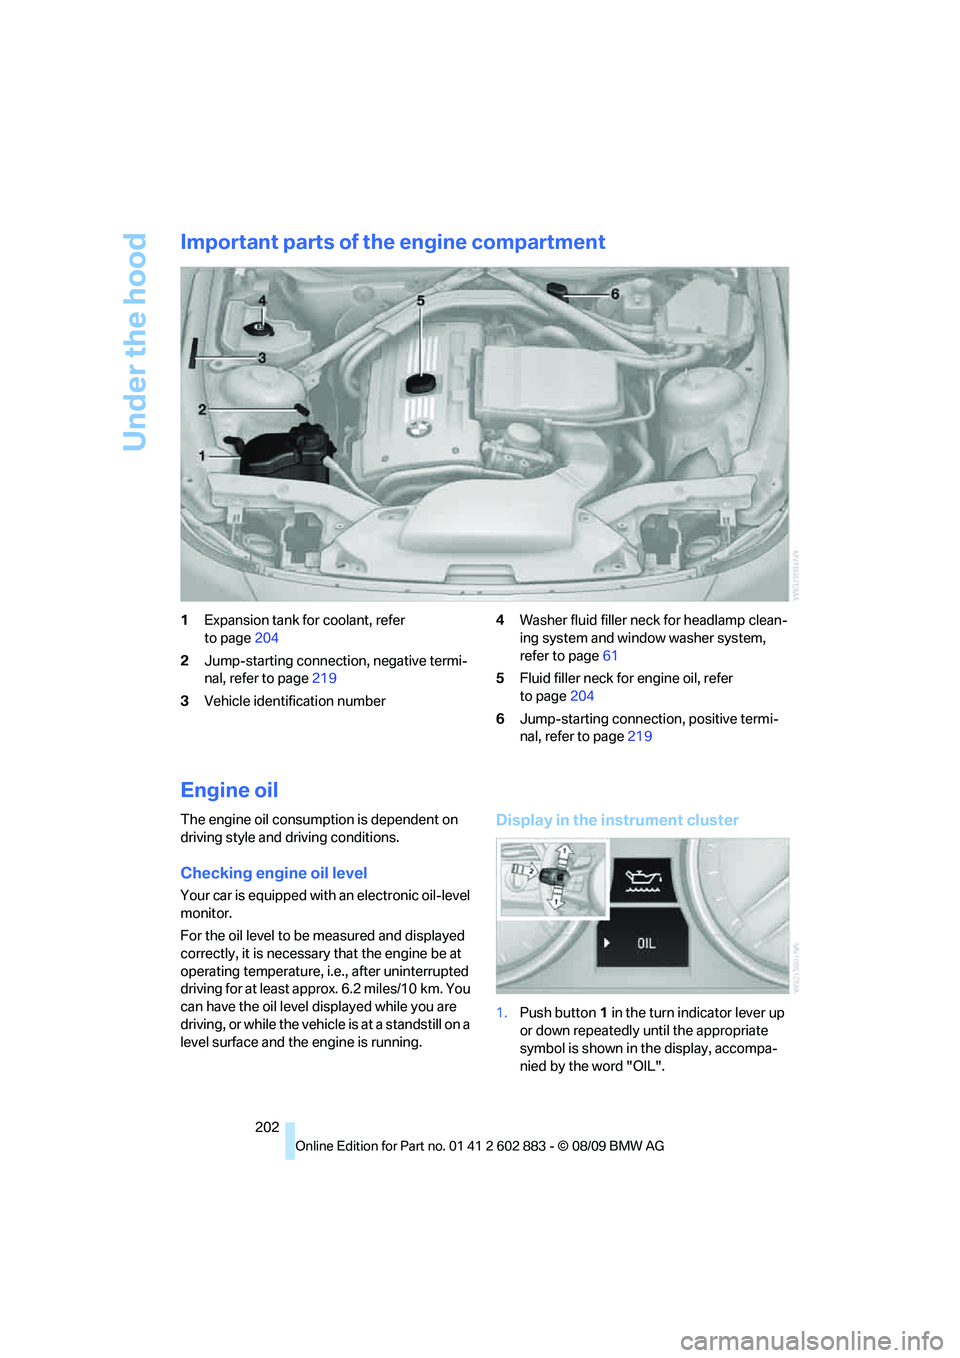
1Expansion tank for coolant, refer
to page204
2Jump-starting connection, negative termi-
nal, refer to page219
3Vehicle identification number4Washer fluid filler neck for headlamp clean-
ing system and window washer system,
refer to page61
5Fluid filler neck for engine oil, refer
to page204
6Jump-starting connection, positive termi-
nal, refer to page219
Engine oil
The engine oil consumption is dependent on
driving style and driving conditions.
Checking engine oil level
Your car is equipped with an electronic oil-level
monitor.
For the oil level to be measured and displayed
correctly, it is necessary that the engine be at
operating temperature, i.e., after uninterrupted
driving for at least approx. 6.2 miles/10 km. You
can have the oil level displayed while you are
driving, or while the vehicle is at a standstill on a
level surface and the engine is running.
Display in the instrument cluster
1.Push button 1 in the turn indicator lever up
or down repeatedly until the appropriate
symbol is shown in the display, accompa-
nied by the word "OIL".
Page 218 of 254
Replacing components
216
Vehicle battery
Battery care
The battery is 100 % maintenance-free, the
electrolyte will last for the life of the battery
when the vehicle is operated in a temperate cli-
mate. Your BMW center will be glad to advise in
all matters concerning the battery.
Battery replacement
Only used approved batteries.
Only use vehicle batteries that have been
approved for your vehicle by the manufacturer;
otherwise, the vehicle could be damaged
and systems or functions may not be fully
available.<
After a battery replacement, have the battery
registered on the vehicle by your service center
to ensure that all comfort functions are fully
available.
Charging the battery
Only charge the battery in the vehicle via the
terminals in the engine compartment with the
engine off. Connections, refer to Jump-starting
on page219.
Disposal
Have old batteries disposed of by your
BMW center or bring them to a recycling
center. Maintain the battery in an upright posi-
tion for transport and storage. Always secure
the battery against tipping over during
transport.<
Power failure
After a temporary power loss, the functioning of
some equipment may be limited and require
reinitialization. Individual settings may likewise
have been lost and will have to be programmed:
>Time and date
These values must be updated, refer
to page71.
>Radio
In some cases, stations may have to be
stored again, refer to page144.
>Navigation system
Operability must be waited for, refer
to page120.
>Seat and mirror memory
The positions must be stored again, refer
to page43.
>Inside rearview mirror with digital compass
The system must be calibrated, refer
to page103.
Fuses
Never attempt to repair a blown fuse and
do not replace a defective fuse with a sub-
stitute of another color or amperage rating; oth-
erwise, this could lead to a circuit overload, ulti-
mately resulting in a fire in the vehicle.<
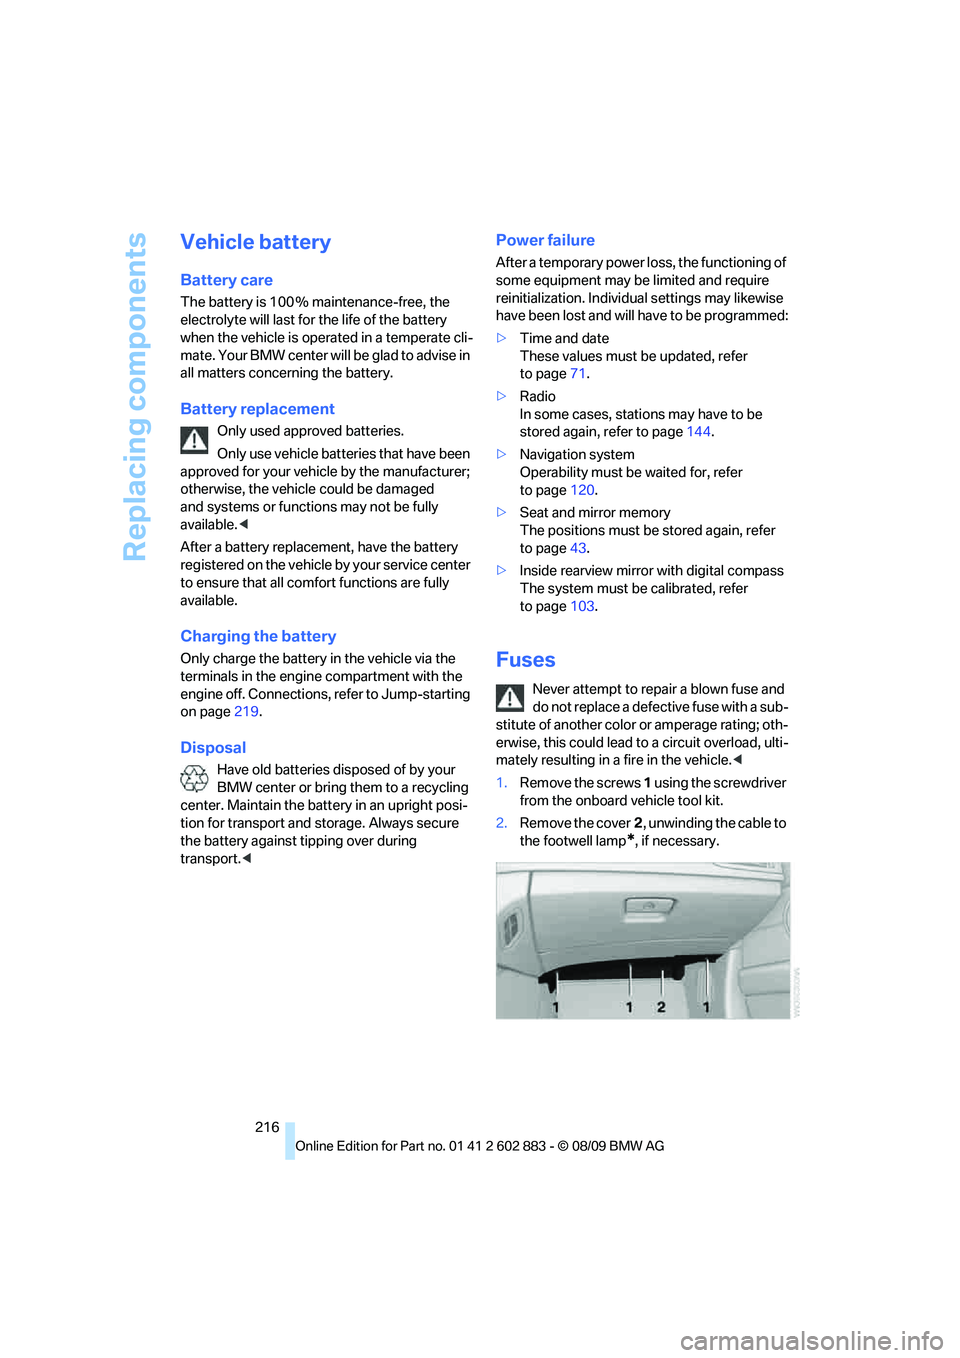
1.Remove the screws 1 using the screwdriver
from the onboard vehicle tool kit.
2.Remove the cover2, unwinding the cable to
the footwell lamp
*, if necessary.
Page 221 of 254
Mobility
219Reference
At a glance
Controls
Driving tips
Communications
Navigation
Entertainment
In vehicles equipped with BMW Assist or
TeleService, you can establish contact with
BMW Roadside Assistance for breakdown
assistance directly via iDrive, refer to page185.
First aid pouch*
Some of the articles contained in the first aid
pouch have a limited service life. Therefore,
check the expiration dates of the contents reg-
ularly and replace any items in good time, if nec-
essary.
The first aid pouch is located on the lateral stor-
age shelf behind the seats.
Warning triangle*
The warning triangle is located in a holder in the
luggage compartment lid. Press the tabs to take
it out.
Jump-starting
If the car's own battery is flat, your BMW's
engine can be started by connecting two
jumper cables to another vehicle's battery. You can also use the same method to help start
another vehicle. Only use jumper cables with
fully-insulated clamp handles.
Do not touch any electrically live parts
when the engine is running, or a fatal acci-
dent may occur. Carefully adhere to the follow-
ing sequence, both to prevent damage to one or
both vehicles, and to guard against possible
personal injuries.<
Preparation
1.Check whether the battery of the other
vehicle has a voltage of 12 volts and
approximately the same capacitance in Ah.
This information can be found on the
battery.
2.Switch off the engine of the assisting
vehicle.
3.Switch off any consumers in both vehicles.
There must not be any contact between
the bodies of the two vehicles; otherwise,
there is a danger of shorting.<
Connecting jumper cables
Connect the jumper cables in the correct
order, so that no sparks which could
cause injury occur.<
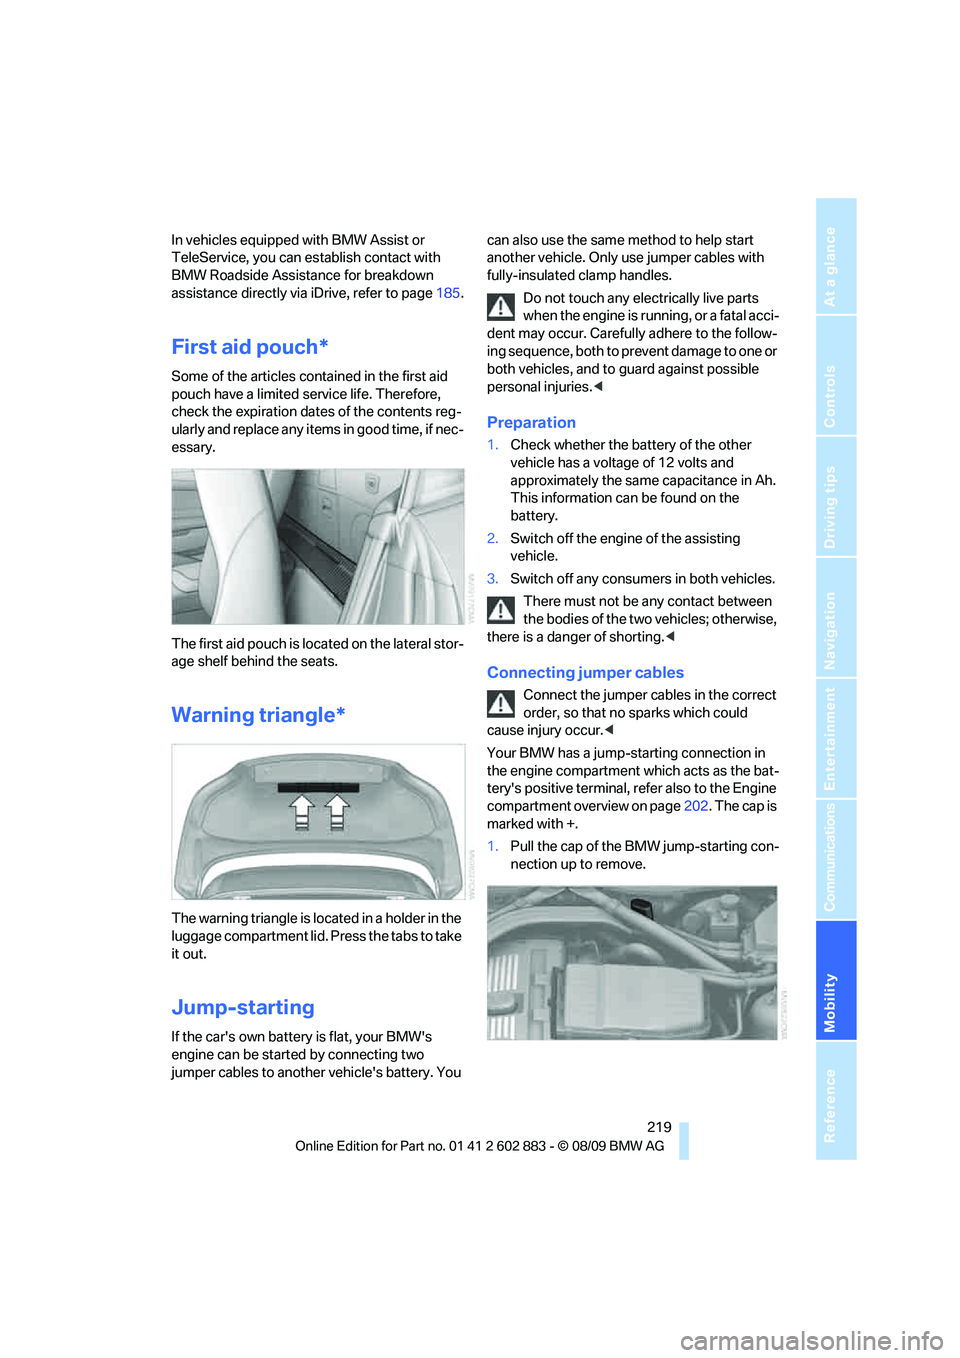
Your BMW has a jump-starting connection in
the engine compartment which acts as the bat-
tery's positive terminal, refer also to the Engine
compartment overview on page202. The cap is
marked with +.
1.Pull the cap of the BMW jump-starting con-
nection up to remove.
Page 222 of 254
Giving and receiving assistance
220 2.Attach one terminal clamp of the plus/+
jumper cable to the positive terminal of the
battery or a starting-aid terminal of the vehi-
cle providing assistance.
3.Attach the second terminal clamp of the
plus/+ jumper cable to the positive terminal
of the battery or a starting-aid terminal of
the vehicle to be started.
4.Attach one terminal clamp of the minus/–
jumper cable to the negative terminal of the
battery or to an engine or body ground of
the assisting vehicle.
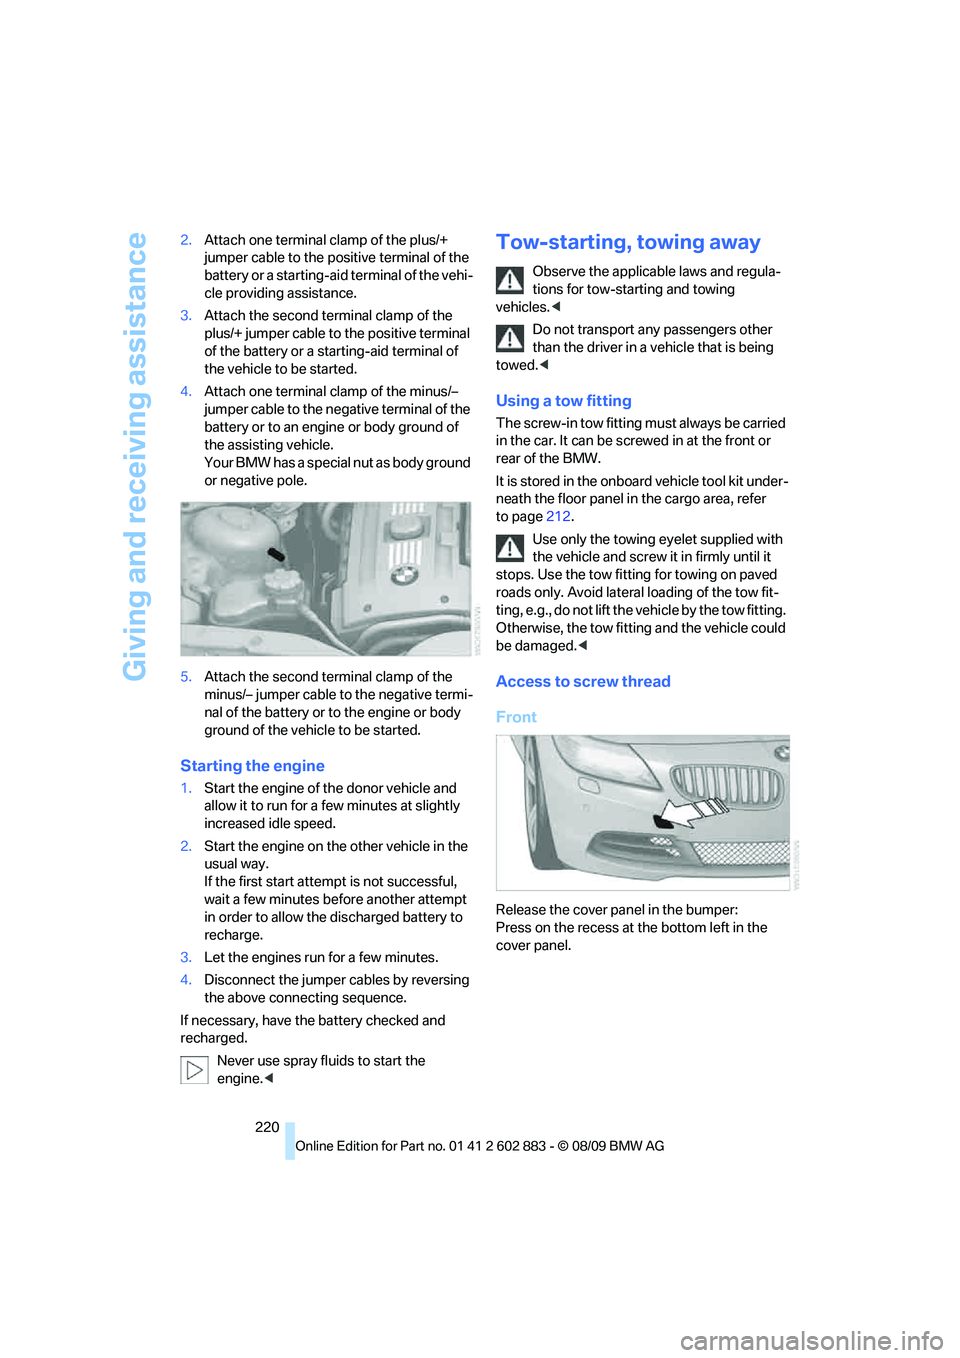
Your BMW has a special nut as body ground
or negative pole.
5.Attach the second terminal clamp of the
minus/– jumper cable to the negative termi-
nal of the battery or to the engine or body
ground of the vehicle to be started.
Starting the engine
1.Start the engine of the donor vehicle and
allow it to run for a few minutes at slightly
increased idle speed.
2.Start the engine on the other vehicle in the
usual way.
If the first start attempt is not successful,
wait a few minutes before another attempt
in order to allow the discharged battery to
recharge.
3.Let the engines run for a few minutes.
4.Disconnect the jumper cables by reversing
the above connecting sequence.
If necessary, have the battery checked and
recharged.
Never use spray fluids to start the
engine.<
Tow-starting, towing away
Observe the applicable laws and regula-
tions for tow-starting and towing
vehicles.<
Do not transport any passengers other
than the driver in a vehicle that is being
towed.<
Using a tow fitting
The screw-in tow fitting must always be carried
in the car. It can be screwed in at the front or
rear of the BMW.
It is stored in the onboard vehicle tool kit under-
neath the floor panel in the cargo area, refer
to page212.
Use only the towing eyelet supplied with
the vehicle and screw it in firmly until it
stops. Use the tow fitting for towing on paved
roads only. Avoid lateral loading of the tow fit-
ting, e.g., do not lift the vehicle by the tow fitting.
Otherwise, the tow fitting and the vehicle could
be damaged.<
Access to screw thread
Front
Release the cover panel in the bumper:
Press on the recess at the bottom left in the
cover panel.
Page 223 of 254
Mobility
221Reference
At a glance
Controls
Driving tips
Communications
Navigation
Entertainment
Rear
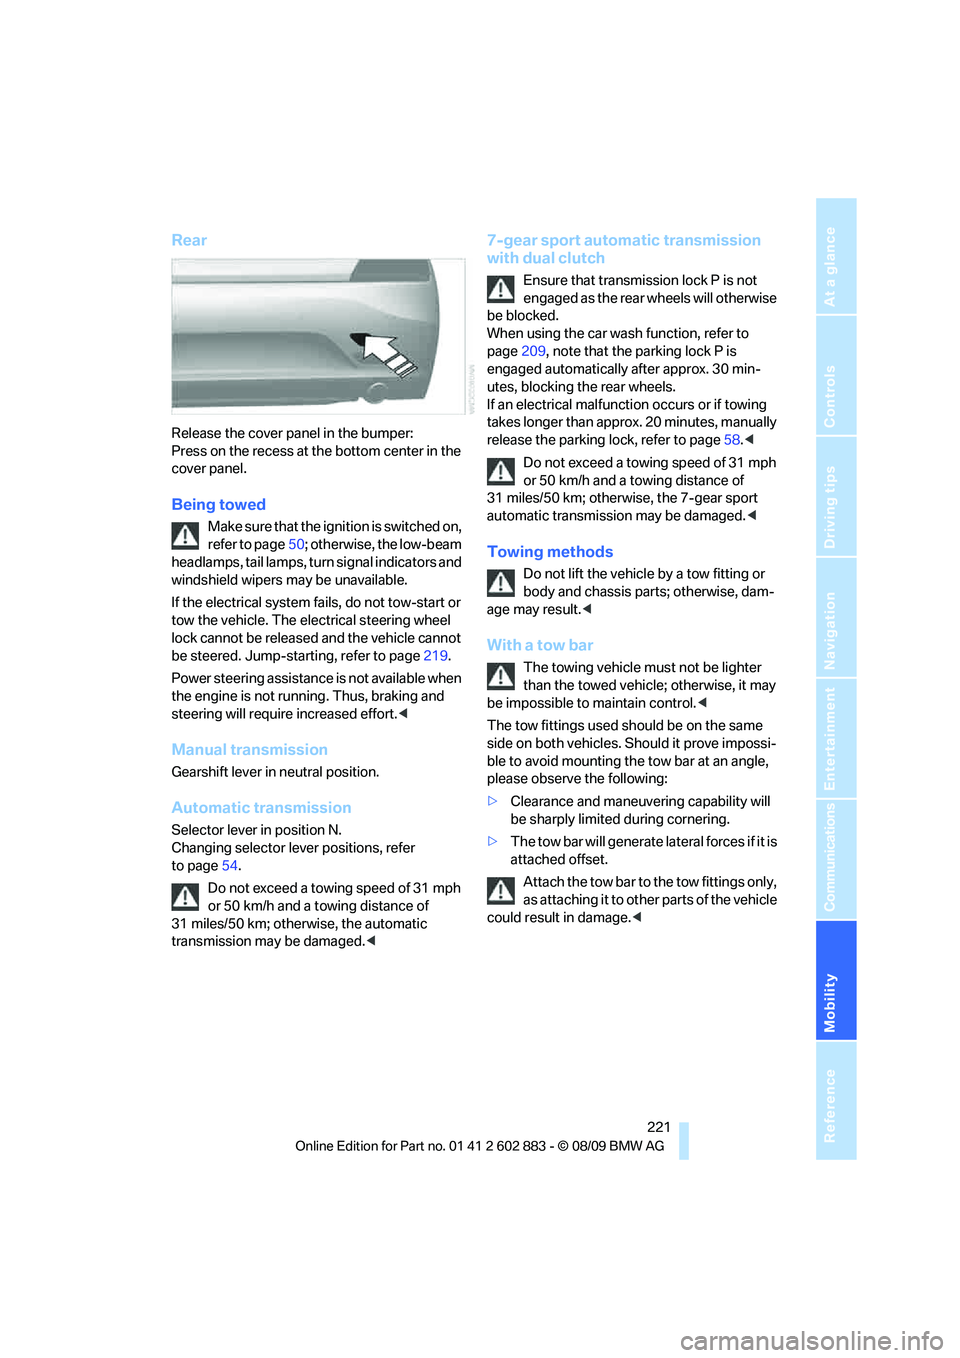
Release the cover panel in the bumper:
Press on the recess at the bottom center in the
cover panel.
Being towed
Make sure that the ignition is switched on,
refer to page50; otherwise, the low-beam
headlamps, tail lamps, turn signal indicators and
windshield wipers may be unavailable.
If the electrical system fails, do not tow-start or
tow the vehicle. The electrical steering wheel
lock cannot be released and the vehicle cannot
be steered. Jump-starting, refer to page219.
Power steering assistance is not available when
the engine is not running. Thus, braking and
steering will require increased effort.<
Manual transmission
Gearshift lever in neutral position.
Automatic transmission
Selector lever in position N.
Changing selector lever positions, refer
to page54.
Do not exceed a towing speed of 31 mph
or 50 km/h and a towing distance of
31 miles/50 km; otherwise, the automatic
transmission may be damaged.<
7-gear sport automatic transmission
with dual clutch
Ensure that transmission lock P is not
engaged as the rear wheels will otherwise
be blocked.
When using the car wash function, refer to
page209, note that the parking lock P is
engaged automatically after approx. 30 min-
utes, blocking the rear wheels.
If an electrical malfunction occurs or if towing
takes longer than approx. 20 minutes, manually
release the parking lock, refer to page58.<
Do not exceed a towing speed of 31 mph
or 50 km/h and a towing distance of
31 miles/50 km; otherwise, the 7-gear sport
automatic transmission may be damaged.<
Towing methods
Do not lift the vehicle by a tow fitting or
body and chassis parts; otherwise, dam-
age may result.<
With a tow bar
The towing vehicle must not be lighter
than the towed vehicle; otherwise, it may
be impossible to maintain control.<
The tow fittings used should be on the same
side on both vehicles. Should it prove impossi-
ble to avoid mounting the tow bar at an angle,
please observe the following:
>Clearance and maneuvering capability will
be sharply limited during cornering.
>The tow bar will generate lateral forces if it is
attached offset.
Attach the tow bar to the tow fittings only,
as attaching it to other parts of the vehicle
could result in damage.<
Page 224 of 254
Giving and receiving assistance
222
With a tow rope
When starting off in the towing vehicle, make
sure that the tow rope is taut.
To avoid jerking and the associated
stresses on vehicle components when
towing, always use nylon ropes or nylon straps.
Attach the tow rope to the tow fittings only, as
attaching it to other parts of the vehicle could
result in damage.<
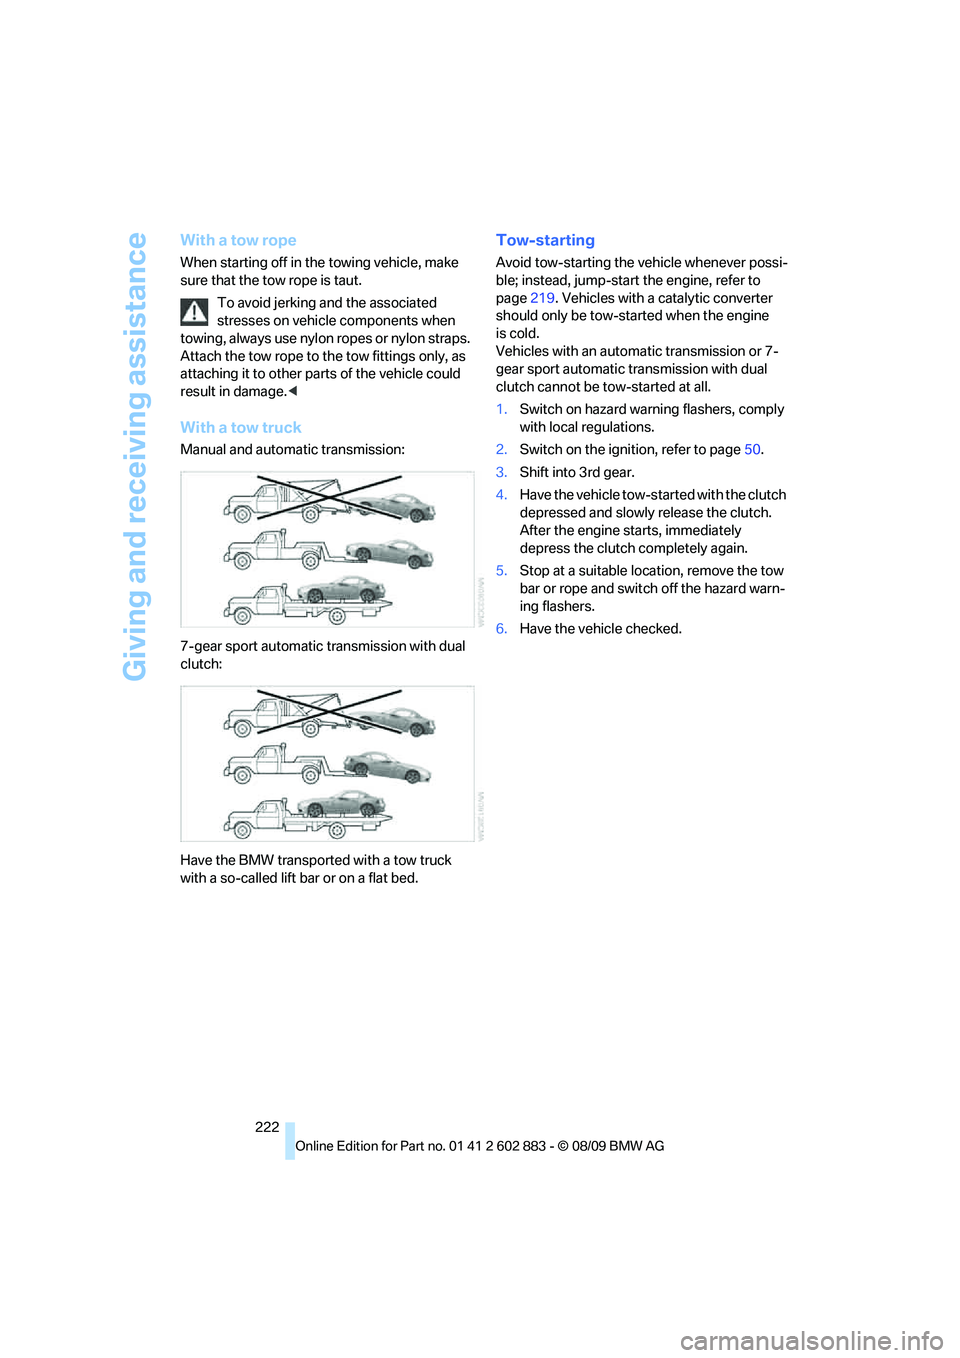
With a tow truck
Manual and automatic transmission:
7-gear sport automatic transmission with dual
clutch:
Have the BMW transported with a tow truck
with a so-called lift bar or on a flat bed.
Tow-starting
Avoid tow-starting the vehicle whenever possi-
ble; instead, jump-start the engine, refer to
page219. Vehicles with a catalytic converter
should only be tow-started when the engine
is cold.
Vehicles with an automatic transmission or 7-
gear sport automatic transmission with dual
clutch cannot be tow-started at all.
1.Switch on hazard warning flashers, comply
with local regulations.
2.Switch on the ignition, refer to page50.
3.Shift into 3rd gear.
4.Have the vehicle tow-started with the clutch
depressed and slowly release the clutch.
After the engine starts, immediately
depress the clutch completely again.
5.Stop at a suitable location, remove the tow
bar or rope and switch off the hazard warn-
ing flashers.
6.Have the vehicle checked.
Page 239 of 254
Reference 237
At a glance
Controls
Driving tips
Communications
Navigation
Entertainment
Mobility
Automatic high beams and
low beams, refer to High-
beam assistant90
Automatic recirculated-air
control AUC98
Automatic Service
Request188
Automatic transmission with
Steptronic53
– interlock53,54
– overriding selector lever
lock55
– shiftlock, refer to Changing
selector lever position54
– sport program54
– towing220
– tow-starting220
AUTO program for automatic
climate control97
AUX-IN port104,163
Available services188
Average fuel consumption66
– setting the units68
Average speed66
Avoid highways in
navigation130
Avoiding unintentional
alarms34
Axle loads, refer to
Weights228
B
Backrest contour, refer to
Lumbar support43
Backrests, refer to Seat
adjustment42
Backrest width adjustment43
Backup lamps
– replacing bulb214
Backup lamps, refer to Tail
lamps214
Band-aids, refer to First-aid
pouch219
Bar, refer to Towing
methods221Base plate for telephone or
mobile phone
– refer to Snap-in adapter180
– refer to Snap-in adapter in
the center armrest storage
compartment104
Bass, tone setting140
Battery216
– charging216
– disposal36,216
– jump-starting219
– remote control28
– temporary power failure216
Battery for mobile phone181
Battery renewal
– remote control36
– remote control for vehicle36
Being towed221
Belts, refer to Safety belts44
Belt tensioner, refer to Safety
belts44
Beverage holders, refer to
Cupholders105
Blower, refer to Air flow
rate94,97
Bluetooth, activating/
deactivating173
Bluetooth, refer to separate
Owner's Manual
BMW
– car shampoo211
BMW Assist,
activating186,188
BMW Assist184
BMW Homepage4
BMW Maintenance
System206
BMW Search186
BMW webpage4
Bottle holders, refer to
Cupholders105
Brake
– parking brake52
Brake Assist, refer to Dynamic
Brake Control DBC78Brake fluid, refer to Service
requirements69
Brake Force Display85
Brake lamps
– Brake Force Display85
– replacing bulb214
Brake pads112
– breaking in112
Brake rotors114
– brakes112
– breaking in112
Brakes
– ABS78
– BMW Maintenance
System206
– breaking in112
– service requirements69
Brakes, refer to Braking
safely114
Brake system112
– BMW Maintenance
System206
– breaking in112
– disc brakes114
Breakdown services, refer to
Roadside Assistance218
Breaking in the clutch112
Breaking in the differential,
refer to Engine and
differential112
Break-in period112
Brightness of Control
Display76
Bulb changing, refer to Lamps
and bulbs212
Button for starting the engine,
refer to Start/stop button50
Buttons on the steering
wheel11
C
California Proposition 65
warning6
Page 244 of 254
Everything from A to Z
242 Heating93
– mirrors46
– rear window95,98
– seats43
Heating and ventilation, refer
to Climate93
Heavy loads, refer to Stowing
cargo116
Height, refer to
Dimensions227
Height adjustment
– seats42
– steering wheel46
High-beam assistant90
High beams90
– headlamp flasher90
– indicator lamp13
High beams and low beams,
automatic, refer to High-
beam assistant90
High-pressure
washer208,209
High water, refer to Driving
through water114
Highways, refer to Route
criteria130
Hills114
Holders for cups105
Homepage BMW4
Hood201
Horn10,11
Hot exhaust system113
Hydraulic brake assist, refer to
Dynamic Brake Control
DBC78
Hydroplaning113
I
IBOC, refer to HD Radio144
Ice warning, refer to Outside
temperature warning64
Identification marks
– run-flat tires199
– tire coding197iDrive16
– adjusting brightness76
– changing language75
– changing settings75
– changing units of measure
and display format68
– controls16
– menu guidance17
– operating principle16
– overview16
– setting the date and
time71,72
– status information20
iDrive operating principle16
Ignition50
– switched off50
– switched on50
Ignition key, refer to Remote
control with integrated
key28
Ignition key position 1, refer to
Radio readiness50
Ignition key position 2, refer to
Ignition on50
Ignition lock50
Imprint2
Indicator and warning
lamps13
– Tire Pressure Monitor
TPM83
Individual air distribution94
Inflation pressure, refer to Tire
inflation pressure194
Inflation pressure monitoring,
refer to Tire Pressure
Monitor TPM82
Initializing
– after power failure216
– compass, refer to
Calibrating103
– Flat Tire Monitor FTM81
– radio, refer to Station,
storing144
– refer to Setting the time and
date72Installation location
– telephone104
Instructions for navigation
system, refer to Voice
instructions132
Instrument cluster12
Instrument lighting91
Instrument panel, refer to
Cockpit10
Integrated key28
Integrated universal remote
control100
Interactive map127
Interior lamps92
– remote control30
Interior motion sensor34
Interior rearview mirror46
– automatic dimming
feature46
– compass102
Interlock, refer to Disengaging
the remote control53
Intermittent mode of the
wipers60
Intersection, entering,
navigation122
iPod, connecting, refer to
AUX-IN port163
iPod, connecting, refer to USB
audio interface163
J
Jacking points215
Joystick, refer to iDrive16
Jumpering, refer to Jump-
starting219
Jump-starting219
K
Key, refer to Integrated key/
remote control28
Keyless go, refer to Comfort
Access34
Page 248 of 254
Everything from A to Z
246 Reception
– quality144
– radio station144
Recirculated-air mode94,98
Recirculation of air, refer to
Recirculated-air
mode94,98
Reclining seat, refer to
Backrest42
Refueling192
Releasing
– hood201
Remaining distance, refer to
Cruising range66
Remote control28
– battery renewal36
– Comfort Access34
– garage door opener100
– luggage compartment lid30
– malfunction31,36
– removing from the ignition
lock50
– service data206
Replacement remote
control28
Replacing bulbs, refer to
Lamps and bulbs212
Replacing tires199
Replacing tires, refer to New
wheels and tires199
Reporting safety defects6
Reserve warning, refer to Fuel
gauge65
Reset, refer to Resetting tone
settings142
Restraint systems
– for children48
– refer to Safety belts44
Retractable hardtop
– care, refer to Caring for your
vehicle brochure
– convenient operation30
– opening and closing39
– remote control30
retractable hardtop38
Reverse
– CD changer153
– CD player153Reverse gear56
– automatic transmission with
Steptronic54
– manual transmission53
Road map132
Roadside
Assistance185,218
Roadside parking lamps90
Roadworthiness test, refer to
Service requirements69
Roof load capacity228
Rope, refer to Tow-starting,
towing away222
Rotary/pushbutton, refer to
iDrive16
Route130,131
– bypassing sections131
– changing130,131
– changing criteria130
– displaying streets or towns/
cities131
– map display132
– selecting130
Route instructions, refer to
Destination guidance
through voice
instructions132
Route map, refer to Map
display132
Route section, changing131
Route selection130
RSC Runflat System
Component, refer to Run-
flat tires199
Runflat System Component
RSC, refer to Run-flat
tires199
Run-flat tires199
– continuing driving with a
damaged tire82
– flat tire81
– Flat Tire Monitor81
– new tires199
– replacing199
– tire inflation pressure194
– winter tires200
S
Safety-belt height
adjustment45
Safety belts44
– damage45
– indicator/warning lamp45
– reminder45
– sitting safely41
Safety systems
– airbags85
– Antilock Brake System
ABS78
– brake system78
– driving stability control
systems78
– Dynamic Stability Control
DSC78
– safety belts44
Safety tires, refer to Run-flat
tires199
Satellite radio146
– enabling or unsubscribing
from a channel146
– favorites148
– selecting channel147
– storing channel147
– timeshift148
– Traffic Jump149
Saving fuel112
Screen, refer to iDrive
controls16
Screw thread for tow
fitting220
SDARS, refer to Satellite
radio146
Seat adjustment
– electric42
– mechanical42
Seat and mirror memory43
Seat belt reminder, refer to
"Fasten safety belts"
reminder45
Seat heating43