engine BUICK ENCLAVE 2009 Owner's Manual
[x] Cancel search | Manufacturer: BUICK, Model Year: 2009, Model line: ENCLAVE, Model: BUICK ENCLAVE 2009Pages: 412
Page 4 of 412
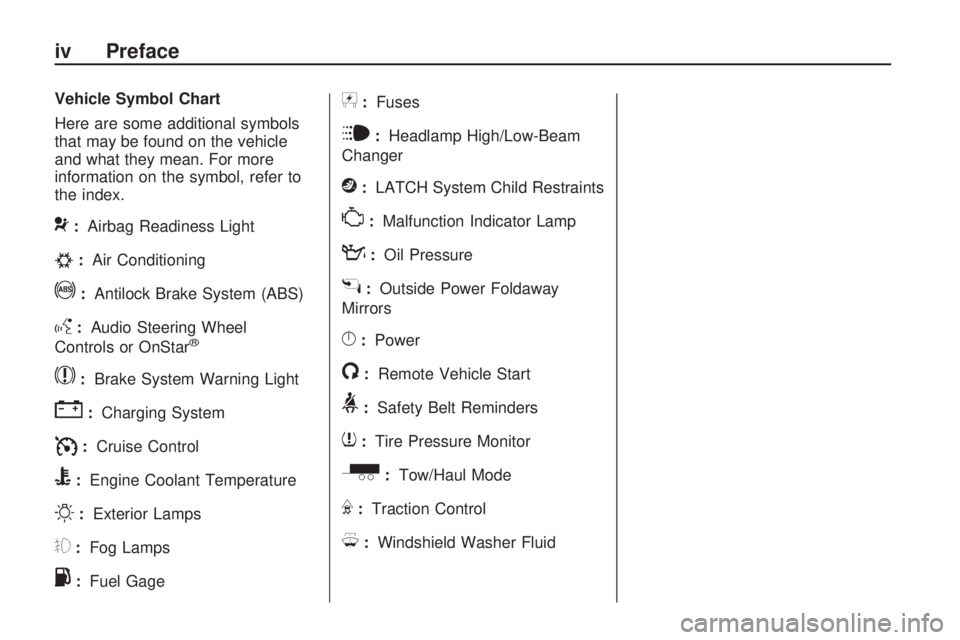
Vehicle Symbol Chart
Here are some additional symbols
that may be found on the vehicle
and what they mean. For more
information on the symbol, refer to
the index.
9:Airbag Readiness Light
#:Air Conditioning
!:Antilock Brake System (ABS)
g:Audio Steering Wheel
Controls or OnStar®
$:Brake System Warning Light
":Charging System
I:Cruise Control
B:Engine Coolant Temperature
O:Exterior Lamps
#:Fog Lamps
.:Fuel Gage
+:Fuses
i:Headlamp High/Low-Beam
Changer
j:LATCH System Child Restraints
*:Malfunction Indicator Lamp
::Oil Pressure
g:Outside Power Foldaway
Mirrors
}:Power
/:Remote Vehicle Start
>:Safety Belt Reminders
7:Tire Pressure Monitor
_:Tow/Haul Mode
F:Traction Control
M:Windshield Washer Fluid
iv Preface
Page 8 of 412
Power Lumbar
If the seats have power lumbar, the
controls used to operate this
feature are located on the outboard
side of the seats. See “Power
Lumbar” underPower Seats on
page 1-3for more information.
To increase or decrease lumbar
support, press and hold the front or
rear of the control (C).
Release the control when the
seatback reaches the desired level
of lumbar support.
The lumbar support may need to be
adjusted when changing the
seating position.
Heated Seats
On vehicles with heated front seats,
the controls are located on the center
console. To operate the heated seats
the engine must be running.
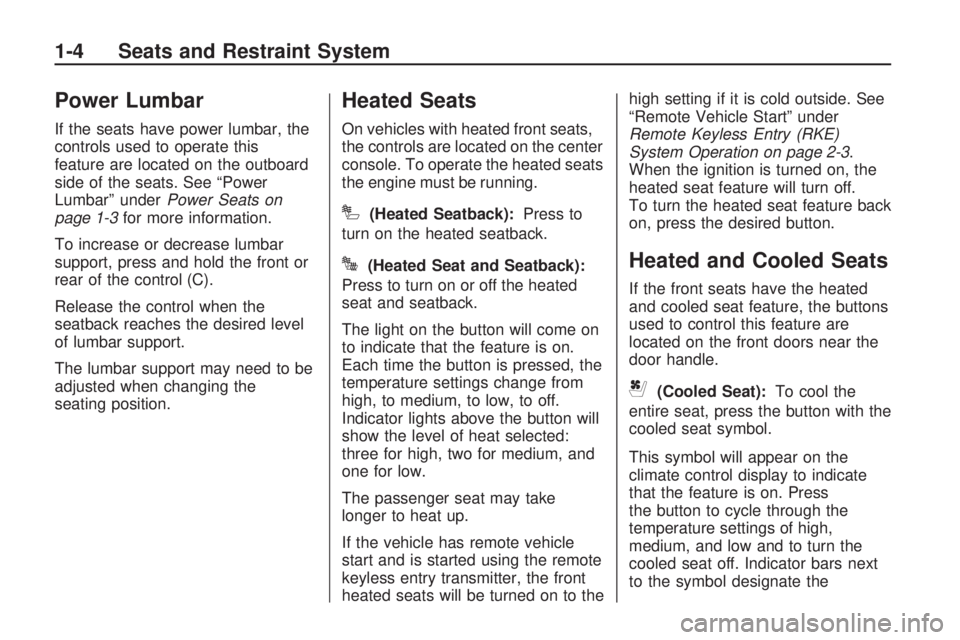
I(Heated Seatback):Press to
turn on the heated seatback.
J(Heated Seat and Seatback):
Press to turn on or off the heated
seat and seatback.
The light on the button will come on
to indicate that the feature is on.
Each time the button is pressed, the
temperature settings change from
high, to medium, to low, to off.
Indicator lights above the button will
show the level of heat selected:
three for high, two for medium, and
one for low.
The passenger seat may take
longer to heat up.
If the vehicle has remote vehicle
start and is started using the remote
keyless entry transmitter, the front
heated seats will be turned on to thehigh setting if it is cold outside. See
“Remote Vehicle Start” under
Remote Keyless Entry (RKE)
System Operation on page 2-3.
When the ignition is turned on, the
heated seat feature will turn off.
To turn the heated seat feature back
on, press the desired button.Heated and Cooled Seats
If the front seats have the heated
and cooled seat feature, the buttons
used to control this feature are
located on the front doors near the
door handle.
{(Cooled Seat):To cool the
entire seat, press the button with the
cooled seat symbol.
This symbol will appear on the
climate control display to indicate
that the feature is on. Press
the button to cycle through the
temperature settings of high,
medium, and low and to turn the
cooled seat off. Indicator bars next
to the symbol designate the
1-4 Seats and Restraint System
Page 65 of 412
Features and
Controls
Keys
Keys...................................2-2
Remote Keyless Entry
(RKE) System...................2-3
Remote Keyless Entry
(RKE) System
Operation
..........................2-3
Remote Vehicle Start..........2-5
Doors and Locks
Door Locks.........................2-8
Power Door Locks..............2-8
Delayed Locking.................2-8
Programmable Automatic
Door Locks.......................2-9
Rear Door Security Locks. . . .2-9
Lockout Protection..............2-9
Liftgate.............................2-10
Power Liftgate...................2-10
Windows
Windows...........................2-14
Power Windows................2-14
Sun Visors........................2-16
Theft-Deterrent Systems
Theft-Deterrent Systems. . . .2-16
Content Theft-Deterrent.....2-16
PASS-Key®III+ Electronic
Immobilizer......................2-18
PASS-Key®III+ Electronic
Immobilizer Operation......2-18
Starting and Operating
Your Vehicle
New Vehicle Break-In.......2-20
Ignition Positions...............2-21
Retained Accessory
Power (RAP)...................2-22
Starting the Engine...........2-22
Engine Coolant Heater......2-23
Automatic Transmission
Operation........................2-24
Tow/Haul Mode.................2-26
Parking Brake...................2-27
Shifting Into Park..............2-28
Shifting Out of Park..........2-29
Parking Over Things
That Burn........................2-30
Engine Exhaust.................2-30
Running the Vehicle
While Parked..................2-31
Mirrors
Automatic Dimming
Rearview Mirror...............2-31
Outside Power Mirrors......2-32
Outside Power Foldaway
Mirrors............................2-33
Park Tilt Mirrors....................2-34
Outside Convex Mirror......2-34
Outside Heated Mirrors.....2-34
Object Detection
Systems
Ultrasonic Rear Parking
Assist (URPA).................2-34
Rear Vision
Camera (RVC)................2-37
OnStar®System
OnStar®System................2-41
Features and Controls 2-1
Page 69 of 412
Programming Transmitters to
the Vehicle
Only RKE transmitters programmed
to this vehicle will work. If a
transmitter is lost or stolen, a
replacement can be purchased and
programmed through your dealer/
retailer. When the replacement
transmitter is programmed to this
vehicle using the DIC, all remaining
transmitters must also be
reprogrammed. Any lost or stolen
transmitters will no longer work once
the new transmitter is programmed.
Each vehicle can have up to
eight transmitters programmed to it.
See “Relearn Remote Key” under
DIC Operation and Displays on
page 3-41for instructions on how to
program transmitters to this vehicle.
Battery Replacement
Replace the battery if the REPLACE
BATTERY IN REMOTE KEY
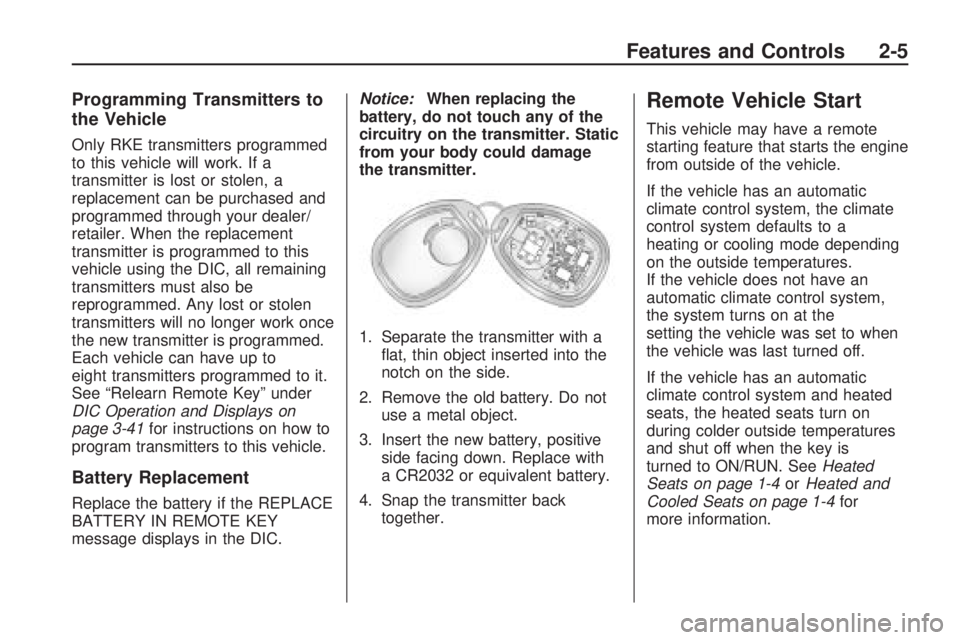
message displays in the DIC.Notice:When replacing the
battery, do not touch any of the
circuitry on the transmitter. Static
from your body could damage
the transmitter.
1. Separate the transmitter with a
�at, thin object inserted into the
notch on the side.
2. Remove the old battery. Do not
use a metal object.
3. Insert the new battery, positive
side facing down. Replace with
a CR2032 or equivalent battery.
4. Snap the transmitter back
together.
Remote Vehicle Start
This vehicle may have a remote
starting feature that starts the engine
from outside of the vehicle.
If the vehicle has an automatic
climate control system, the climate
control system defaults to a
heating or cooling mode depending
on the outside temperatures.
If the vehicle does not have an
automatic climate control system,
the system turns on at the
setting the vehicle was set to when
the vehicle was last turned off.
If the vehicle has an automatic
climate control system and heated
seats, the heated seats turn on
during colder outside temperatures
and shut off when the key is
turned to ON/RUN. SeeHeated
Seats on page 1-4orHeated and
Cooled Seats on page 1-4for
more information.
Features and Controls 2-5
Page 70 of 412

The rear window defogger and
heated mirrors, if the vehicle has
them, turn on during colder outside
temperatures and turn off when
the key is turned to ON/RUN.
Laws in some communities may
restrict the use of remote starters.
For example, some laws may
require a person using the remote
start to have the vehicle in view
when doing so. Check local
regulations for any requirements
on remote starting of vehicles.
Do not use the remote start
feature if the vehicle is low on fuel.
The vehicle could run out of fuel.
If the vehicle has the remote
start feature, the RKE transmitter
functions have an increased
range of operation. However, the
range may be less while the vehicle
is running.There are other conditions which
can affect the performance of
the transmitter, seeRemote Keyless
Entry (RKE) System on page 2-3
for additional information.
/(Remote Start):This button is
located on the RKE transmitter if the
vehicle has remote start.
To start the vehicle:
1. Aim the transmitter at the
vehicle.
2. Press and release
Q, then
immediately press and hold
/until the parking lamps �ash.
If the vehicle’s lights can not
be seen, press and hold
/for
at least four seconds. The
vehicle’s doors lock. When the
vehicle starts, the parking
lamps turn on and remain on
while the vehicle is running.
Pressing
/again, after the
vehicle has started, shuts the
vehicle off.3. If it is the �rst remote start since
the vehicle has been driven,
repeat these steps while the
engine is still running, to extend
the time by 10 minutes for the
engine to continue to run. Remote
start can be extended one time.
After entering the vehicle during a
remote start, insert and turn the key
to the ON/RUN position to drive
the vehicle.
If the vehicle is left running it
automatically shuts off after
10 minutes unless a time extension
has been done.
To manually shut off a remote start:
Aim the RKE transmitter at the
vehicle and press
/until the
parking lamps turn off.
Turn on the hazard warning
�ashers.
Turn the ignition switch on and
then off.
2-6 Features and Controls
Page 71 of 412
The vehicle can be started using the
remote start feature two separate
times between driving sequences.
The engine runs for 10 minutes after
each remote start. Or, the engine
run time can be extended another
10 minutes within the �rst 10 minute
remote start time frame, and
before the engine stops.
For example, if
Qand then/are
pressed again after the vehicle
has been running for �ve minutes,
10 minutes are added, allowing
the engine to run for 15 minutes.
The additional 10 minutes are
considered a second remote start.The vehicle must be started with the
key once two remote starts, or a
single remote start with one time
extension has been done.
The vehicle can be started using the
remote start feature again after
the key is removed from the ignition.
The vehicle cannot be started
using the remote start feature if the
key is in the ignition, the hood is
open, or if there is an emission
control system malfunction.
The engine turns off during a remote
start if the coolant temperature
gets too high or if the oil pressure
gets low.Vehicles that have the remote
vehicle start feature are shipped
from the factory with the remote
vehicle start system enabled. The
system may be enabled or disabled
through the DIC if the vehicle has
DIC buttons. See “REMOTE
START” underDIC Vehicle
Customization on page 3-57for
additional information. If the vehicle
does not have DIC buttons, see
your dealer/retailer to enable
or disable the remote start system.
Features and Controls 2-7
Page 74 of 412

Liftgate
{CAUTION
Exhaust gases may enter the
vehicle if it is driven with the
liftgate, trunk/hatch open, or with
any objects that pass through the
seal between the body and the
trunk/hatch or liftgate. Engine
exhaust contains Carbon
Monoxide (CO) which cannot be
seen or smelled. It can cause
unconsciousness and even death.
If the vehicle must be driven with
the liftgate, or trunk/hatch open:
Close all of the windows
Fully open the air outlets on
or under the instrument panel
Adjust the Climate Control
system to a setting that
brings in only outside air and
set the fan speed to the
highest setting. See Climate
Control System in the Index.
(Continued)
CAUTION (Continued)
If the vehicle is equipped with
a power liftgate, disable the
power liftgate function.
For more information about
carbon monoxide, see Engine
ExhaustEngine Exhaust on
page 2-30.
If your vehicle has a power liftgate,
seePower Liftgate on page 2-10.
To unlock the liftgate, use the power
door lock switch or press the door
unlock button on the Remote
Keyless Entry (RKE) transmitter
twice. SeeRemote Keyless Entry
(RKE) System Operation on
page 2-3.
To open the liftgate, press the
touchpad under the liftgate handle.
The vehicle must be in P (Park) to
open the liftgate. To close the
liftgate, use the pull cup or pull strap.The liftgate will not open if the
battery is disconnected or has low
voltage. Recharge or reconnect
the battery to use the liftgate.
If the liftgate still will not function,
take your vehicle to a dealer/retailer
for service.
Power Liftgate
Power Liftgate Operation
{CAUTION
Exhaust gases may enter the
vehicle if it is driven with the
liftgate, trunk/hatch open, or with
any objects that pass through the
seal between the body and the
trunk/hatch or liftgate. Engine
exhaust contains Carbon
Monoxide (CO) which cannot be
seen or smelled. It can cause
unconsciousness and even death.
(Continued)
2-10 Features and Controls
Page 75 of 412

CAUTION (Continued)
If the vehicle must be driven with
the liftgate, or trunk/hatch open:
Close all of the windows
Fully open the air outlets on
or under the instrument panel
Adjust the Climate Control
system to a setting that
brings in only outside air and
set the fan speed to the
highest setting. See Climate
Control System in the Index.
If the vehicle is equipped with
a power liftgate, disable the
power liftgate function.
For more information about
carbon monoxide, see Engine
ExhaustEngine Exhaust on
page 2-30.The vehicle may have a power
liftgate. The vehicle must be
in P (Park) to use this feature.
The taillamps will �ash and a chime
will sound when the power liftgate
is used.
{CAUTION
You or others could be injured if
caught in the path of the power
liftgate. Make sure there is no one
in the way of the liftgate as it is
opening and closing.
Notice:If you open the liftgate
without checking for overhead
obstructions such as a garage
door, you could damage the
liftgate or the liftgate glass.
Always check to make sure the
area above and behind the liftgate
is clear before opening it.To open or close the power liftgate:
Press and hold the power
liftgate button on the Remote
Keyless Entry (RKE) transmitter.
SeeRemote Keyless Entry
(RKE) System Operation on
page 2-3for more information.
Press the liftgate button on the
center console.
Press the touchpad on the
outside liftgate handle.
Pressing the buttons, or touchpad a
second time while the liftgate is
moving reverses the direction.
Features and Controls 2-11
Page 83 of 412

When the PASS-Key®III+ system
senses an incorrect key, the vehicle
does not start. Anyone using a
trial-and-error method to start the
vehicle will be discouraged because
of the high number of electrical
key codes.
If the engine does not start and the
security light on the instrument panel
comes on when trying to start the
vehicle, there may be a problem with
your theft-deterrent system. Turn the
ignition off and try again.
If the engine still does not start, and
the key appears to be undamaged,
try another ignition key and
check the fuses. SeeFuses and
Circuit Breakers on page 5-92
for additional information. If the
engine still does not start with the
other key, the vehicle needs service.
If the vehicle does start, the �rst
key may be faulty. See your
dealer/retailer who can service thePASS-Key®III+ to have a new key
made. In an emergency, contact
Roadside Assistance. SeeRoadside
Assistance Program on page 7-6.
It is possible for the PASS-Key
®III+
decoder to learn the transponder
value of a new or replacement key.
Up to 10 keys may be programmed
to the vehicle. The following
procedure is for programming
additional keys only. If all the
currently programmed keys are lost
or do not operate, you must see
your dealer/retailer or a locksmith
who can service PASS-Key
®III+ to
have keys made and programmed
to the system.
See your dealer/retailer or a
locksmith who can service
PASS-Key
®III+ to get a new key
blank that is cut exactly as the
ignition key that operates the
system.To program the new additional key:
1. Verify that the new key has a
1stamped on it.
2. Insert the already programmed
key in the ignition and start the
engine. If the engine does
not start, see your dealer/retailer
for service.
3. After the engine has started, turn
the key to LOCK/OFF, and
remove the key.
4. Insert the key to be programmed
and turn it to the ON/RUN
position within �ve seconds of
the original key being turned
to the LOCK/OFF position.
The security light turns off once
the key has been programmed.
5. Repeat Steps 1 through 4
if additional keys are to be
programmed.
Features and Controls 2-19
Page 84 of 412

If the PASS-Key®III+ key is lost or
damaged, see your dealer/retailer
or a locksmith to have a new
key made.
The SERVICE THEFT DETERRENT
SYSTEM message displays on
the Driver Information Center (DIC)
when there is a problem with the
theft-deterrent system. See
DIC Warnings and Messages on
page 3-48for additional information.
Do not leave the key or device
that disarms or deactivates the theft
deterrent system in the vehicle.Starting and
Operating Your
Vehicle
New Vehicle Break-In
Notice:The vehicle does
not need an elaborate break-in.
But it will perform better in
the long run if you follow these
guidelines:
If you have all-wheel drive,
keep your speed at 55 mph
(88 km/h) or less for the
�rst 500 miles (805 km).
Do not drive at any one
constant speed, fast or slow,
for the �rst 500 miles (805 km).
Do not make full-throttle
starts. Avoid downshifting to
brake or slow the vehicle.
Avoid making hard stops for
the �rst 200 miles (322 km)
or so. During this time the
new brake linings are not yet
broken in. Hard stops with new
linings can mean premature
wear and earlier replacement.
Follow this breaking-in
guideline every time you get
new brake linings.
Do not tow a trailer during
break-in. SeeTowing a
Trailer on page 4-24for the
trailer towing capabilities
of your vehicle and more
information.
Following break-in, engine speed
and load can be gradually
increased.
2-20 Features and Controls