key off BUICK ENCLAVE 2010 User Guide
[x] Cancel search | Manufacturer: BUICK, Model Year: 2010, Model line: ENCLAVE, Model: BUICK ENCLAVE 2010Pages: 438, PDF Size: 2.47 MB
Page 43 of 438
Keys, Doors and Windows 2-15
3. After the engine has started, turnthe key to LOCK/OFF, and
remove the key.
4. Insert the key to be programmed and turn it to the ON/RUN
position within five seconds of
the original key being turned to
the LOCK/OFF position.
The security light turns off once
the key has been programmed.
5. Repeat Steps 1 through 4 if additional keys are to be
programmed.
If the PASS-Key
®III+ key is lost or
damaged, see your dealer/retailer
or a locksmith to have a new
key made. The SERVICE THEFT
DETERRENT SYSTEM message
displays on the Driver Information
Center (DIC) when there is a
problem with the theft-deterrent
system. See
Anti-Theft Alarm
System Messages
on page 5‑36for additional information.
Do not leave the key or device that
disarms or deactivates the theft
deterrent system in the vehicle.
Exterior Mirrors
Convex Mirrors
{WARNING
A convex mirror can make things,
like other vehicles, look farther
away than they really are. If you
cut too sharply into the right lane,
you could hit a vehicle on the
right. Check the inside mirror or
glance over your shoulder before
changing lanes.
The passenger side mirror is convex
shaped. A convex mirror's surface is
curved so more can be seen from
the driver seat.
Page 45 of 438
Keys, Doors and Windows 2-17
Resetting the Power Foldaway
Mirrors
Reset the power foldaway mirrors if:
.The mirrors are accidentally
obstructed while folding.
.They are accidentally manually
folded/unfolded.
.The mirrors vibrate at normal
driving speeds.
Fold and unfold the mirrors one time
using the mirror controls to reset
them to their normal position.
A popping noise may be heard
during the resetting of the power
foldaway mirrors. This sound is
normal after a manual folding
operation.
Automatic Dimming Feature
The driver outside mirror adjusts for
the glare of the headlamps behind
you. See Automatic Dimming
Rearview Mirror
on page 2‑18for
information on how to turn this
feature on.
Turn Signal Indicator
The vehicle may have a turn signal
indicator lamp that is built into the
mirror housing. The turn signal lamp
flashes with the use of the vehicle's
turn signal and hazard flashers.
Heated Mirrors
For vehicles with heated mirrors:
<(Rear Window Defogger):
Press to heat the mirrors.
See “Rear Window Defogger” under
Dual Automatic Climate Control
System
on page 8‑1for more
information.
Park Tilt Mirrors
If the vehicle has the memory
package, the outside mirrors have a
park tilt feature. This feature tilts the
outside mirrors to a preselected
position when the vehicle is in
R (Reverse). This allows the driver
to view the curb for parallel parking.
The passenger and/or driver mirror
returns to its original position when
the vehicle is shifted out of
R (Reverse), or the ignition is turned
off or to OFF/LOCK.
This feature can be turned on or off
through the Driver Information
Center (DIC). See Vehicle
Personalization
on page 5‑40for
more information.
Page 46 of 438
2-18 Keys, Doors and Windows
Interior Mirrors
Automatic Dimming
Rearview Mirror
The vehicle has an automatic
dimming inside rearview mirror.
Automatic dimming reduces the
glare from the headlamps of the
vehicle behind you. The dimming
feature comes on and the indicator
light illuminates each time the
ignition is turned to start.
Vehicles with OnStar
®have three
additional control buttons located at
the bottom of the mirror. See your
dealer/retailer for more information
about OnStar
®and how to
subscribe to it. See the OnStar®
owner guide for more information
about the services OnStar®
provides.
O(On/Off): Press to turn the
dimming feature on or off.
The vehicle may also have a
Rear Vision Camera (RVC). See
Rear Vision Camera (RVC)
on
page 9‑34for more information.
If the vehicle has RVC,
the
Obutton for turning the
dimming feature on or off will not
be available.
Cleaning the Mirror
Do not spray glass cleaner directly
on the mirror. Use a soft towel
dampened with water.
Windows
{WARNING
Leaving children, helpless adults,
or pets in a vehicle with the
windows closed is dangerous.
They can be overcome by the
extreme heat and suffer
permanent injuries or even death
from heat stroke. Never leave a
child, a helpless adult, or a pet
alone in a vehicle, especially with
the windows closed in warm or
hot weather.
Page 48 of 438
2-20 Keys, Doors and Windows
Express-Up/Express-Down
Windows
A window with the express-up/down
feature allows it to be raised or
lowered without holding the switch.
Press or pull the window switch fully
and release it to activate the
express feature. The express mode
can be canceled by pressing or
pulling the switch.
Programming the Power
Windows
If the battery on the vehicle has
been recharged, disconnected,
or replaced, windows with the
express-up feature need to be
reprogrammed for this feature to
work. To program the window:
1. Close all doors with the ignitionin the ACC/ACCESSORY,
ON/RUN position, or when
Retained Accessory
Power (RAP) is active. See
Retained Accessory Power
(RAP) on page 9‑17. 2. Press and continue to hold the
window switch until the window
is fully open.
3. Pull up and hold the window switch to close the window.
Continue to hold it briefly after
the window is fully closed.
4. Repeat for each window that has the express-up feature.
Anti-Pinch Feature
The anti-pinch feature is on
windows with the express-up
feature. If an object is in the way of
the window as it is express-closing,
or in certain weather conditions like
severe icing, the window will stop
and open to a factory preset
position. The window functions
normally once the obstruction is
removed.
Window Lockout
o(Window Lockout): The window
lockout switch is located with the
power window switches on the driver door armrest. This feature
prevents the rear windows from
being operated, except from the
driver position. Press the switch to
turn the lockout feature on or off.
An indicator light will come on to
show the lockout feature is on.
Sun Visors
Pull the sun visor down to block
glare. Detach the sun visor from the
center mount and slide it along the
rod from side-to-side to cover the
driver or passenger side of the front
window. Swing the sun visor to the
side to cover the side window. It can
be moved along the rod from
side-to-side in this position also.
Lighted Visor Vanity Mirror
The vehicle has lighted visor vanity
mirrors on both the driver and
passenger sun visors. Pull the sun
visor down and lift the mirror cover
to turn the lamps on.
Page 57 of 438
Seats and Restraints 3-7
Heated Front Seats
{WARNING
If you cannot feel temperature
change or pain to the skin, the
seat heater may cause burns
even at low temperatures. To
reduce the risk of burns, people
with such a condition should use
care when using the seat heater,
especially for long periods of
time. Do not place anything on
the seat that insulates against
heat, such as a blanket, cushion,
cover or similar item. This may
cause the seat heater to
overheat. An overheated seat
heater may cause a burn or may
damage the seat.On vehicles with heated front seats,
the controls are located on the
center console. To operate the
heated seats the engine must be
running.
I
(Heated Seatback): Press to
turn on the heated seatback.
J (Heated Seat and Seatback):
Press to turn on or off the heated
seat and seatback.
The light on the button will come on
to indicate that the feature is on.
Each time the button is pressed, the
temperature settings change from
high, to medium, to low, to off.
Indicator lights above the button will
show the level of heat selected:
three for high, two for medium, and
one for low. The passenger seat may take
longer to heat up.
If the vehicle has remote vehicle
start and is started using the RKE
transmitter, the front heated seats
will be turned on to the high setting
if it is cold outside. See
“Remote
Vehicle Start” underRemote
Keyless Entry (RKE) System
Operation
on page 2‑3. When the
ignition is turned on, the heated seat
feature will turn off. To turn the
heated seat feature back on, press
the desired button.
Page 124 of 438
5-6 Instruments and Controls
The ignition key must be in
ACC/ACCESSORY or ON/RUN for
this to work. SeeWasher Fluid
on
page 10‑21Windshield Washer
Fluid.
{WARNING
In freezing weather, do not use
your washer until the windshield
is warmed. Otherwise the washer
fluid can form ice on the
windshield, blocking your vision.
WASHER FLUID LOW ADD FLUID
is displayed on the Driver
Information Center (DIC) when the
washer fluid is low. See Washer
Fluid Messages on page 5‑39.
Rear Window Wiper/
Washer
The rear wiper and rear wash button
is located on the instrument panel
below the climate control system.
Z (Rear Wiper): Press to turn the
rear wiper on and off. The wiper
speed cannot be changed.
Y (Wash): Press to spray washer
fluid on the rear window. The
window wiper will also come on.
Release the button when enough
fluid has been sprayed on the
window. The rear wiper will run a
few more cycles after it is released.
If the rear wiper function was
already on, prior to pressing the
wash button, it stays on until the
wiper button is pressed again.
The rear window washer uses the
same fluid that is in the windshield
washer reservoir. See Washer Fluid
on page 10‑21.
Compass
Your vehicle may have a compass
in the Driver Information Center
(DIC). SeeDriver Information
Center (DIC)
on page 5‑25for
more information about the DIC.
Compass Zone
The zone is set to zone eight upon
leaving the factory. Your dealer/
retailer will set the correct zone for
your location.
Under certain circumstances,
such as during a long distance
cross-country trip or moving to a
new state or province, it will be
necessary to compensate for
compass variance by resetting the
zone through the DIC if the zone is
not set correctly.
Page 127 of 438
Instruments and Controls 5-9
Enabling/Disabling the Digital
Radio Clock
To enable or disable the radio clock
display:
1. Press
Huntil the clock and date
setting menus appear.
2. Press the pushbutton located under the forward arrow label
until the menu for default clock
and date settings appear.
3. Press the pushbutton located under the currently displayed
status of either ON or OFF to
toggle the radio clock display on
or off. The ON display indicates
the radio clock display is
disabled and the OFF display
indicates the radio clock display
is enabled.
.If the radio clock display is
turned on, the screen
displays Radio Clock ON
for 10 seconds, then returns
to the original clock
display menu.
.If the radio clock display is
turned off, the screen
displays Radio Clock OFF
for 10 seconds. The menus
for clock and date settings
are removed, and ON
displays as a current status
indicating that the clock
display can be turned on.
If the radio clock and analog clock
are not synchronized. Use the
procedure below to synchronize
both clocks.
Setting the Digital Radio Clock
Adjusting the Time and Date
1. Turn the ignition key to ACC/ ACCESSORY or ON/RUN, then
press
O, to turn the radio on.
2. Press
Gto display HR, MIN,
MM, DD, YYYY (hour, minute,
month, day, and year). 3. Press the pushbutton located
under any one of the labels to be
changed.
4. To increase the time or date, do one of the following:
.Press the pushbutton below
the selected label.
.Press¨SEEK.
.Press\FWD.
.Turnfclockwise.
5. To decrease the time or date, do one of the following:
.Press©SEEK.
.PresssREV.
.Turnfcounter-clockwise.
Page 137 of 438
Instruments and Controls 5-19
If the check engine light comes on
and stays on, while the engine is
running, this indicates that there is
an OBD II problem and service is
required.
Malfunctions often are indicated by
the system before any problem is
apparent. Being aware of the light
can prevent more serious damage
to the vehicle. This system assists
the service technician in correctly
diagnosing any malfunction.
Notice:If the vehicle is
continually driven with this light
on, after a while, the emission
controls might not work as well,
the vehicle's fuel economy might
not be as good, and the engine
might not run as smoothly. This
could lead to costly repairs that
might not be covered by the
vehicle warranty. Notice:
Modifications made to the
engine, transmission, exhaust,
intake, or fuel system of the
vehicle or the replacement of the
original tires with other than
those of the same Tire
Performance Criteria (TPC) can
affect the vehicle's emission
controls and can cause this light
to come on. Modifications to
these systems could lead to
costly repairs not covered by the
vehicle warranty. This could also
result in a failure to pass a
required Emission Inspection/
Maintenance test. See
Accessories and Modifications
on
page 10‑3.
This light comes on during a
malfunction in one of two ways:
Light Flashing: A misfire condition
has been detected. A misfire
increases vehicle emissions and
could damage the emission control
system on the vehicle. Diagnosis
and service might be required. The following can prevent more
serious damage to the vehicle:
.Reduce vehicle speed.
.Avoid hard accelerations.
.Avoid steep uphill grades.
.If towing a trailer, reduce the
amount of cargo being hauled as
soon as it is possible.
If the light continues to flash, when
it is safe to do so, stop the vehicle.
Find a safe place to park the
vehicle. Turn the key off, wait at
least 10 seconds, and restart the
engine. If the light is still flashing,
follow the previous steps and see
your dealer/retailer for service as
soon as possible.
Page 138 of 438

5-20 Instruments and Controls
Light On Steady:An emission
control system malfunction has
been detected on the vehicle.
Diagnosis and service might be
required.
An emission system malfunction
might be corrected.
.Make sure the fuel cap is fully
installed. See Filling the Tankon
page 9‑42. The diagnostic
system can determine if the fuel
cap has been left off or
improperly installed. A loose or
missing fuel cap allows fuel to
evaporate into the atmosphere.
A few driving trips with the cap
properly installed should turn the
light off.
.If the vehicle has been driven
through a deep puddle of water,
the vehicle's electrical system
might be wet. The condition is
usually corrected when the
electrical system dries out.
A few driving trips should turn
the light off.
.Make sure to fuel the vehicle
with quality fuel. Poor fuel quality
causes the engine not to run as
efficiently as designed and may
cause: stalling after start-up,
stalling when the vehicle is
changed into gear, misfiring,
hesitation on acceleration,
or stumbling on acceleration.
These conditions might go away
once the engine is warmed up.
If one or more of these
conditions occurs, change the
fuel brand used. It will require at
least one full tank of the proper
fuel to turn the light off.
See Gasoline Specifications
on
page 9‑40.
If none of the above have made the
light turn off, your dealer/retailer
can check the vehicle. The dealer/
retailer has the proper test
equipment and diagnostic tools to
fix any mechanical or electrical
problems that might have
developed.
Emissions Inspection and
Maintenance Programs
Some state/provincial and local
governments have or might begin
programs to inspect the emission
control equipment on the vehicle.
Failure to pass this inspection could
prevent getting a vehicle
registration.
Here are some things to know to
help the vehicle pass an inspection:
.The vehicle will not pass this
inspection if the check engine
light is on with the engine
running, or if the key is in
ON/RUN and the light is not on.
.The vehicle will not pass this
inspection if the OBD II
(on-board diagnostic) system
determines that critical emission
control systems have not been
completely diagnosed by the
system. The vehicle would be
considered not ready for
inspection. This can happen if
Page 139 of 438
Instruments and Controls 5-21
the battery has recently been
replaced or if the battery has run
down. The diagnostic system is
designed to evaluate critical
emission control systems during
normal driving. This can take
several days of routine driving.
If this has been done and the
vehicle still does not pass the
inspection for lack of OBD II
system readiness, your dealer/
retailer can prepare the vehicle
for inspection.
Brake System Warning
Light
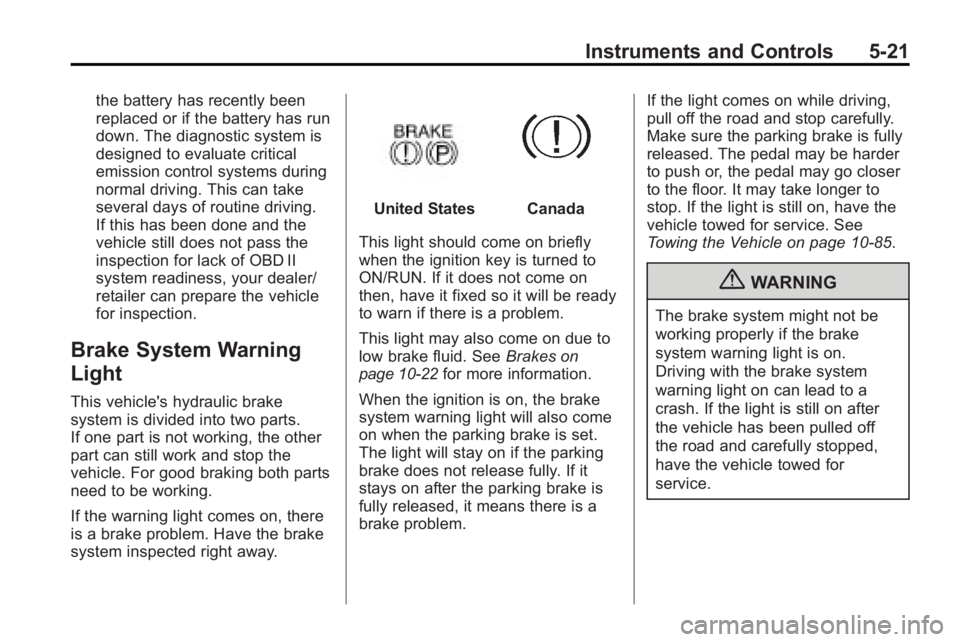
This vehicle's hydraulic brake
system is divided into two parts.
If one part is not working, the other
part can still work and stop the
vehicle. For good braking both parts
need to be working.
If the warning light comes on, there
is a brake problem. Have the brake
system inspected right away.
United StatesCanada
This light should come on briefly
when the ignition key is turned to
ON/RUN. If it does not come on
then, have it fixed so it will be ready
to warn if there is a problem.
This light may also come on due to
low brake fluid. See Brakes
on
page 10‑22for more information.
When the ignition is on, the brake
system warning light will also come
on when the parking brake is set.
The light will stay on if the parking
brake does not release fully. If it
stays on after the parking brake is
fully released, it means there is a
brake problem. If the light comes on while driving,
pull off the road and stop carefully.
Make sure the parking brake is fully
released. The pedal may be harder
to push or, the pedal may go closer
to the floor. It may take longer to
stop. If the light is still on, have the
vehicle towed for service. See
Towing the Vehicle on page 10‑85.
{WARNING
The brake system might not be
working properly if the brake
system warning light is on.
Driving with the brake system
warning light on can lead to a
crash. If the light is still on after
the vehicle has been pulled off
the road and carefully stopped,
have the vehicle towed for
service.