key off BUICK ENCLAVE 2010 Workshop Manual
[x] Cancel search | Manufacturer: BUICK, Model Year: 2010, Model line: ENCLAVE, Model: BUICK ENCLAVE 2010Pages: 438, PDF Size: 2.47 MB
Page 319 of 438

Vehicle Care 10-21
When to Check Power Steering
Fluid
It is not necessary to regularly
check power steering fluid unless
you suspect there is a leak in the
system or you hear an unusual
noise. A fluid loss in this system
could indicate a problem. Have the
system inspected and repaired.
How to Check Power Steering
Fluid
To check the power steering fluid:
1. Turn the key off and let theengine compartment cool down.
2. Remove the engine cover. See Engine Cover on page 10‑7.
3. Wipe the cap and the top of the reservoir clean. 4. Unscrew the cap and wipe the
dipstick with a clean rag.
5. Replace the cap and completely tighten it.
6. Remove the cap again and look at the fluid level on the dipstick.
The fluid level should be
somewhere between MAX and
MIN line on the dipstick in room
temperature. If the fluid is on or
below MIN line, you should add fluid
close to MAX Line.
What to Use
To determine what kind of fluid to
use, see Recommended Fluids and
Lubricants
on page 11‑7. Always
use the proper fluid. Notice:
Use of the incorrect fluid
may damage the vehicle and the
damages may not be covered by
the vehicle's warranty. Always
use the correct fluid listed in
Recommended Fluids and
Lubricants on page 11‑7.
Washer Fluid
What to Use
When adding windshield washer
fluid, be sure to read the
manufacturer's instructions before
use. If the vehicle will be operating
in an area where the temperature
may fall below freezing, use a fluid
that has sufficient protection against
freezing.
Page 324 of 438

10-26 Vehicle Care
Automatic Transmission
Shift Lock Control
System Check
{WARNING
When you are doing this
inspection, the vehicle could
move suddenly. If the vehicle
moves, you or others could be
injured.
1. Before starting this check, be sure there is enough room
around the vehicle. It should be
parked on a level surface.
2. Firmly apply the parking brake. See Parking Brake
on
page 9‑27.
Be ready to apply the regular
brake immediately if the vehicle
begins to move. 3. With the engine off, turn the
ignition to ON/RUN, but do not
start the engine. Without
applying the regular brake, try to
move the shift lever out of
P (Park) with normal effort. If the
shift lever moves out of P (Park),
contact your dealer/retailer for
service.
Ignition Transmission
Lock Check
While parked, and with the parking
brake set, try to turn the ignition to
LOCK/OFF in each shift lever
position.
.The ignition should turn to
LOCK/OFF only when the shift
lever is in P (Park).
.The ignition key should come
out only in LOCK/OFF.
Contact your dealer/retailer if
service is required.
Park Brake and P (Park)
Mechanism Check
{WARNING
When you are doing this check,
the vehicle could begin to move.
You or others could be injured
and property could be damaged.
Make sure there is room in front
of the vehicle in case it begins to
roll. Be ready to apply the regular
brake at once should the vehicle
begin to move.
Page 347 of 438

Vehicle Care 10-49
The TPMS sensors can also be
matched to each tire/wheel position
by increasing or decreasing the
tire's air pressure. If increasing the
tire's air pressure, do not exceed
the maximum inflation pressure
indicated on the tire's sidewall.
To decrease air-pressure out of a
tire you can use the pointed end of
the valve cap, a pencil-style air
pressure gage, or a key.
You have two minutes to match the
first tire/wheel position, and
five minutes overall to match all
four tire/wheel positions. If it takes
longer than two minutes, to match
the first tire and wheel, or more than
five minutes to match all four tire
and wheel positions the matching
process stops and you need to
start over.
The TPMS sensor matching process
is outlined below:
1. Set the parking brake.
2. Turn the ignition switch to ON/RUN with the engine off. 3. Press the Remote Keyless Entry
(RKE) transmitter's LOCK and
UNLOCK buttons at the same
time for approximately
five seconds. The horn sounds
twice to signal the receiver is in
relearn mode and TIRE
LEARNING ACTIVE message
displays on the DIC screen.
4. Start with the driver side front tire.
5. Remove the valve cap from the valve cap stem. Activate the
TPMS sensor by increasing or
decreasing the tire's air pressure
for five seconds, or until a horn
chirp sounds. The horn chirp,
which may take up to
30 seconds to sound, confirms
that the sensor identification
code has been matched to this
tire and wheel position.
6. Proceed to the passenger side front tire, and repeat the
procedure in Step 5. 7. Proceed to the passenger side
rear tire, and repeat the
procedure in Step 5.
8. Proceed to the driver side rear tire, and repeat the procedure in
Step 5. The horn sounds two
times to indicate the sensor
identification code has been
matched to the driver side rear
tire, and the TPMS sensor
matching process is no longer
active. The TIRE LEARNING
ACTIVE message on the DIC
display screen goes off.
9. Turn the ignition switch to LOCK/OFF.
10. Set all four tires to the recommended air pressure
level as indicated on the Tire
and Loading Information label.
11. Put the valve caps back on the valve stems.
Page 369 of 438

Vehicle Care 10-71
Removing the Flat Tire and
Installing the Spare Tire
1. Do a safety check beforeproceeding. See If a Tire Goes
Flat
on page 10‑58for more
information.
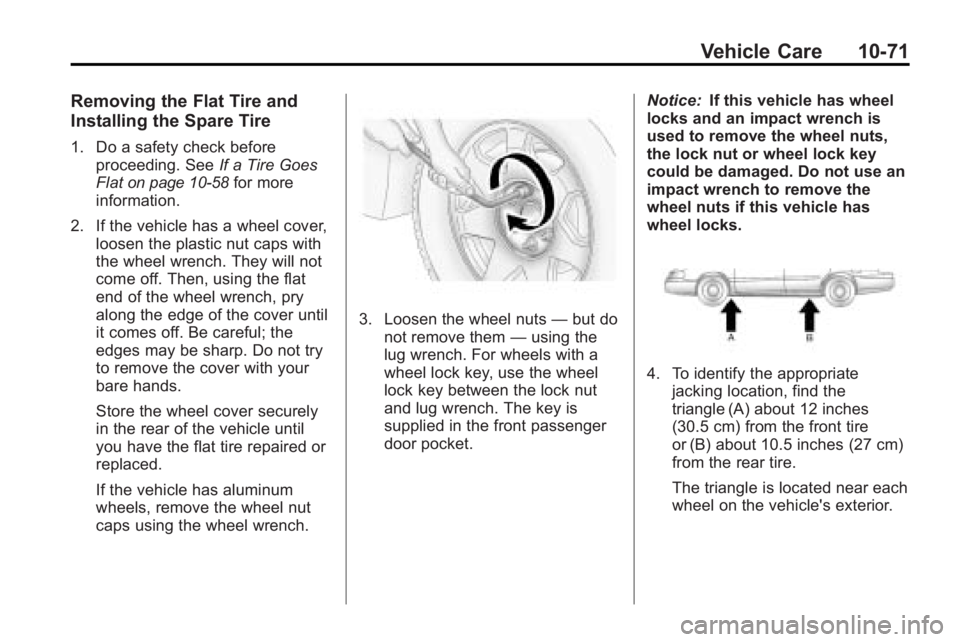
2. If the vehicle has a wheel cover, loosen the plastic nut caps with
the wheel wrench. They will not
come off. Then, using the flat
end of the wheel wrench, pry
along the edge of the cover until
it comes off. Be careful; the
edges may be sharp. Do not try
to remove the cover with your
bare hands.
Store the wheel cover securely
in the rear of the vehicle until
you have the flat tire repaired or
replaced.
If the vehicle has aluminum
wheels, remove the wheel nut
caps using the wheel wrench.
3. Loosen the wheel nuts —but do
not remove them —using the
lug wrench. For wheels with a
wheel lock key, use the wheel
lock key between the lock nut
and lug wrench. The key is
supplied in the front passenger
door pocket. Notice:
If this vehicle has wheel
locks and an impact wrench is
used to remove the wheel nuts,
the lock nut or wheel lock key
could be damaged. Do not use an
impact wrench to remove the
wheel nuts if this vehicle has
wheel locks.
4. To identify the appropriate
jacking location, find the
triangle (A) about 12 inches
(30.5 cm) from the front tire
or (B) about 10.5 inches (27 cm)
from the rear tire.
The triangle is located near each
wheel on the vehicle's exterior.
Page 385 of 438

Vehicle Care 10-87
Once the destination is reached:
1. Set the parking brake.
2. Reinstall the 50 amp BATT1 fuseto the underhood fuse block.
3. Shift the transmission to P (Park), turn the ignition to
LOCK/OFF and remove the key
from the ignition.
4. Disconnect the vehicle from the towing vehicle.
Notice: Do not tow a vehicle with
the front drive wheels on the
ground if one of the front tires is
a compact spare tire. Towing with
two different tire sizes on the
front of the vehicle can cause
severe damage to the
transmission.Dolly Towing
(All-Wheel-Drive Vehicles)
All-wheel-drive vehicles must not be
towed with two wheels on the
ground. To properly tow these
vehicles, they should be placed on
a platform trailer with all four wheels
off of the ground or dinghy towed
from the front.
Dolly Towing
(Front-Wheel-Drive
Vehicles Only)
To tow a front-wheel-drive vehicle
from the front with two wheels on
the ground:
1. Put the front wheels on a dolly.
2. Move the shift lever to P (Park).
3. Set the parking brake.
Page 426 of 438

13-16 Customer Information
GM will not access this data or
share it with others except: with the
consent of the vehicle owner or,
if the vehicle is leased, with the
consent of the lessee; in response
to an official request of police or
similar government office; as part of
GM's defense of litigation through
the discovery process; or, as
required by law. Data that GM
collects or receives may also be
used for GM research needs or may
be made available to others for
research purposes, where a need is
shown and the data is not tied to a
specific vehicle or vehicle owner.
Navigation System
If your vehicle has a navigation
system, use of the system may
result in the storage of destinations,
addresses, telephone numbers, and
other trip information. Refer to the
navigation system operating manual
for information on stored data and
for deletion instructions.
Radio Frequency
Identification (RFID)
RFID technology is used in some
vehicles for functions such as tire
pressure monitoring and ignition
system security, as well as in
connection with conveniences such
as key fobs for remote door locking/
unlocking and starting, and
in-vehicle transmitters for garage
door openers. RFID technology in
GM vehicles does not use or record
personal information or link with any
other GM system containing
personal information.
Radio Frequency
Statement
This vehicle has systems that
operate on a radio frequency that
comply with Part 15 of the Federal
Communications Commission (FCC)
Rules and with RSS-210/211 of
Industry and Science Canada.
Operation is subject to the following
two conditions:
1. The device may not causeinterference.
2. The device must accept any interference received, including
interference that may cause
undesired operation of the
device.
Changes or modifications to any of
these systems by other than an
authorized service facility could void
authorization to use this equipment.