Call BUICK ENCLAVE 2010 Owner's Guide
[x] Cancel search | Manufacturer: BUICK, Model Year: 2010, Model line: ENCLAVE, Model: BUICK ENCLAVE 2010Pages: 438, PDF Size: 2.47 MB
Page 144 of 438
5-26 Instruments and Controls
The outside air temperature and
compass, if equipped, also display
on the DIC when viewing the trip
and fuel information. The outside air
temperature automatically appears
in the top right corner of the DIC
display. If there is a problem with
the system that controls the
temperature display, the numbers
will be replaced with dashes. If this
occurs, have the vehicle serviced.
The compass will be shown in the
bottom right corner of the DIC
display. SeeCompass
on
page 5‑6for more information.
The DIC has different displays
which can be accessed by pressing
the DIC buttons located on the
instrument panel.
The DIC displays trip, fuel, and
vehicle system information, and
warning messages if a system
problem is detected.
The DIC also allows some features
to be customized. See Vehicle
Personalization
on page 5‑40for
more information. DIC Buttons
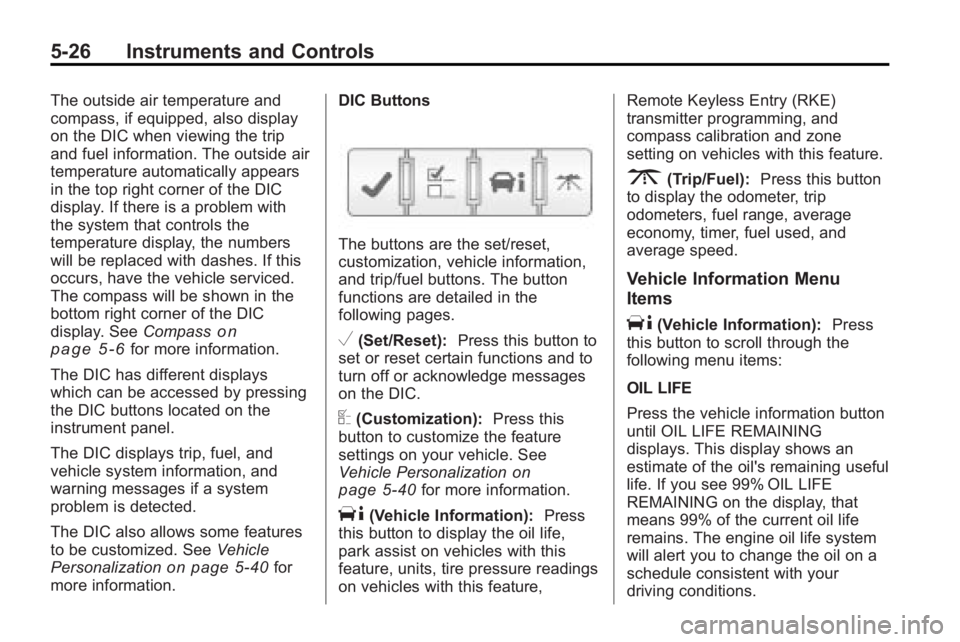
The buttons are the set/reset,
customization, vehicle information,
and trip/fuel buttons. The button
functions are detailed in the
following pages.
V(Set/Reset):
Press this button to
set or reset certain functions and to
turn off or acknowledge messages
on the DIC.
U(Customization): Press this
button to customize the feature
settings on your vehicle. See
Vehicle Personalization
on
page 5‑40for more information.
T(Vehicle Information): Press
this button to display the oil life,
park assist on vehicles with this
feature, units, tire pressure readings
on vehicles with this feature, Remote Keyless Entry (RKE)
transmitter programming, and
compass calibration and zone
setting on vehicles with this feature.
3(Trip/Fuel):
Press this button
to display the odometer, trip
odometers, fuel range, average
economy, timer, fuel used, and
average speed.
Vehicle Information Menu
Items
T(Vehicle Information): Press
this button to scroll through the
following menu items:
OIL LIFE
Press the vehicle information button
until OIL LIFE REMAINING
displays. This display shows an
estimate of the oil's remaining useful
life. If you see 99% OIL LIFE
REMAINING on the display, that
means 99% of the current oil life
remains. The engine oil life system
will alert you to change the oil on a
schedule consistent with your
driving conditions.
Page 145 of 438
Instruments and Controls 5-27
When the remaining oil life is low,
the CHANGE ENGINE OIL SOON
message will appear on the display.
See“CHANGE ENGINE OIL SOON”
under Engine Oil Messages
on
page 5‑34. You should change the
oil as soon as you can. See Engine
Oil
on page 10‑8. In addition to the
engine oil life system monitoring the
oil life, additional maintenance is
recommended in the Maintenance
Schedule in this manual. See
Scheduled Maintenance
on
page 11‑2for more information.
Remember, you must reset the OIL
LIFE display yourself after each oil
change. It will not reset itself. Also,
be careful not to reset the OIL LIFE
display accidentally at any time
other than when the oil has just
been changed. It cannot be reset
accurately until the next oil change.
To reset the engine oil life system,
see Engine Oil Life System
on
page 10‑10. PARK ASSIST
If your vehicle has the Ultrasonic
Rear Parking Assist (URPA) system,
press the vehicle information button
until PARK ASSIST displays. This
display allows the system to be
turned on or off. Once in this
display, press the set/reset button to
select between ON or OFF. If you
choose ON, the system will be
turned on. If you choose OFF, the
system will be turned off. The URPA
system automatically turns back on
after each vehicle start. When the
URPA system is turned off and the
vehicle is shifted out of P (Park), the
DIC will display the PARK ASSIST
OFF message as a reminder that
the system has been turned off. See
Object Detection System Messages
on page 5‑35and
Ultrasonic
Parking Assiston page 9‑33for
more information. UNITS
Press the vehicle information button
until UNITS displays. This display
allows you to select between
English or Metric units of
measurement. Once in this display,
press the set/reset button to select
between ENGLISH or METRIC
units. All of the vehicle information
will then be displayed in the unit of
measurement selected.
FRONT TIRES or REAR TIRES
On vehicles with the Tire Pressure
Monitor System (TPMS), the
pressure for each tire can be viewed
in the DIC. The tire pressure will be
shown in either pounds per square
inch (psi) or kilopascals (kPa).
Press the vehicle information button
until the DIC displays FRONT
TIRES PSI (kPa) LEFT ##
RIGHT ##. Press the vehicle
information button again until the
DIC displays REAR TIRES
PSI (kPa) LEFT ## RIGHT ##.
Page 146 of 438
5-28 Instruments and Controls
If a low tire pressure condition is
detected by the system while
driving, a message advising you
add air to a specific tire will appear
in the display. SeeTire Pressure
on
page 10‑44and Tire Messageson
page 5‑37for more information.
If the tire pressure display shows
dashes instead of a value, there
may be a problem with your vehicle.
If this consistently occurs, see your
dealer/retailer for service.
RELEARN REMOTE KEY
This display allows you to match
Remote Keyless Entry (RKE)
transmitters to your vehicle. This
procedure will erase all previously
learned transmitters. Therefore, they
must be relearned as additional
transmitters. To match an RKE transmitter to your
vehicle:
1. Press the vehicle information
button until PRESS
VTO
RELEARN REMOTE KEY
displays.
2. Press the set/reset button until REMOTE KEY LEARNING
ACTIVE is displayed.
3. Press and hold the lock and unlock buttons on the first
transmitter at the same time for
about 15 seconds.
On vehicles with memory recall
seats, the first transmitter
learned will match driver 1 and
the second will match driver 2.
A chime will sound indicating
that the transmitter is matched. 4. To match additional transmitters
at this time, repeat Step 3.
Each vehicle can have a
maximum of eight transmitters
matched to it.
5. To exit the programming mode, you must cycle the key to
LOCK/OFF.
COMPASS ZONE SETTING
This display will be available if the
vehicle has a compass. See
Compass
on page 5‑6for more
information.
COMPASS RECALIBRATION
This display will be available if the
vehicle has a compass. See
Compass
on page 5‑6for more
information.
Blank Display
This display shows no information.
Page 147 of 438

Instruments and Controls 5-29
Trip/Fuel Menu Items
3(Trip/Fuel):Press this button
to scroll through the following menu
items:
ODOMETER
Press the trip/fuel button until
ODOMETER displays. This display
shows the distance the vehicle has
been driven in either miles (mi) or
kilometers (km).
To switch between English and
metric measurements, see “UNITS”
earlier in this section.
TRIP A and TRIP B
Press the trip/fuel button until
TRIP A or TRIP B displays. This
display shows the current distance
traveled in either miles (mi) or
kilometers (km) since the last reset
for each trip odometer. Both trip
odometers can be used at the
same time. Each trip odometer can be reset to
zero separately by pressing the
set/reset button while the desired
trip odometer is displayed.
The trip odometer has a feature
called retroactive reset. This can be
used to set the trip odometer to the
number of miles (kilometers) driven
since the ignition was last turned on.
This can be used if the trip
odometer is not reset at the
beginning of the trip.
To use the retroactive reset feature,
press and hold the set/reset button
for at least four seconds. The trip
odometer will display the number of
miles (mi) or kilometers (km) driven
since the ignition was last turned on
and the vehicle was moving. Once
the vehicle begins moving, the trip
odometer will accumulate mileage.
For example, if the vehicle was
driven 5 miles (8 km) before it is
started again, and then the
retroactive reset feature is activated,
the display will show 5 miles (8 km).
As the vehicle begins moving, the
display will then increase to
5.1 miles (8.2 km), 5.2 miles
(8.4 km), etc.
If the retroactive reset feature is
activated after the vehicle is started,
but before it begins moving, the
display will show the number of
miles (mi) or kilometers (km) that
were driven during the last ignition
cycle.
RANGE
Press the trip/fuel button until
RANGE displays. This display
shows the approximate number
of remaining miles (mi) or
kilometers (km) the vehicle can be
driven without refueling. The display
will show LOW if the fuel level
is low.
Page 151 of 438
Instruments and Controls 5-33
RIGHT REAR DOOR OPEN
This message displays and a chime
sounds if the passenger side rear
door is not fully closed and the
vehicle is shifted out of P (Park).
Stop and turn off the vehicle, check
the door for obstructions, and close
the door again. Check to see if the
message still appears on the DIC.
Engine Cooling System
Messages
ENGINE HOT A/C
(Air Conditioning) OFF
This message displays when the
engine coolant becomes hotter than
the normal operating temperature.
SeeEngine Coolant Temperature
Gage
on page 5‑15. To avoid
added strain on a hot engine, the air
conditioning compressor
automatically turns off. When the
coolant temperature returns to
normal, the air conditioning
compressor turns back on. You can
continue to drive your vehicle. If this message continues to appear,
have the system repaired by your
dealer/retailer as soon as possible
to avoid damage to the engine.
ENGINE OVERHEATED IDLE
ENGINE
Notice:
If you drive your vehicle
while the engine is overheating,
severe engine damage may
occur. If an overheat warning
appears on the instrument panel
cluster and/or DIC, stop the
vehicle as soon as possible. Do
not increase the engine speed
above normal idling speed. See
Engine Overheating
on page 10‑18for more information.
This message displays when the
engine coolant temperature is too
hot. Stop and allow the vehicle to
idle until it cools down. See Engine
Coolant Temperature Gage
on
page 5‑15.
See Overheated Engine Protection
Operating Mode
on page 10‑20for
information on driving to a safe
place in an emergency.
ENGINE OVERHEATED STOP
ENGINE
Notice: If you drive your vehicle
while the engine is overheating,
severe engine damage may
occur. If an overheat warning
appears on the instrument panel
cluster and/or DIC, stop the
vehicle as soon as possible. Do
not increase the engine speed
above normal idling speed. See
Engine Overheating
on page 10‑18for more information.
This message displays and a
continuous chime sounds if the
engine cooling system reaches
unsafe temperatures for operation.
Stop and turn off the vehicle as
soon as it is safe to do so to avoid
severe damage. This message
clears when the engine has cooled
to a safe operating temperature.
Page 158 of 438
5-40 Instruments and Controls
Vehicle
Personalization
Your vehicle may have
customization capabilities that allow
you to program certain features to
one preferred setting. Customization
features can only be programmed to
one setting on the vehicle and
cannot be programmed to a
preferred setting for two different
drivers.
All of the customization options may
not be available on your vehicle.
Only the options available will be
displayed on the DIC.
The default settings for the
customization features were set
when your vehicle left the factory,
but may have been changed from
their default state since then.
The customization preferences are
automatically recalled.
To change customization
preferences, use the following
procedure.
Entering the Feature
Settings Menu
1. Turn the ignition on and placethe vehicle in P (Park).
To avoid excessive drain on the
battery, it is recommended that
the headlamps are turned off.
2. Press the customization button to enter the feature settings
menu. If the menu is not
available, FEATURE SETTINGS
AVAILABLE IN PARK will
display. Before entering the
menu, make sure the vehicle is
in P (Park).
Feature Settings Menu Items
The following are customization
features that allow you to program
settings to the vehicle:
DISPLAY IN ENGLISH
This feature will only display if a
language other than English has
been set. This feature allows you to
change the language in which the
DIC messages appear to English. Press the customization button until
the PRESS
VTO DISPLAY IN
ENGLISH screen appears on the
DIC display. Press the set/reset
button once to display all DIC
messages in English.
DISPLAY LANGUAGE
This feature allows you to select the
language in which the DIC
messages will appear.
Press the customization button until
the DISPLAY LANGUAGE screen
appears on the DIC display. Press
the set/reset button once to access
the settings for this feature. Then
press the customization button to
scroll through the following settings:
ENGLISH (default): All messages
will appear in English.
FRANCAIS: All messages will
appear in French.
ESPANOL: All messages will
appear in Spanish.
Page 159 of 438
Instruments and Controls 5-41
NO CHANGE:No change will be
made to this feature. The current
setting will remain.
To select a setting, press the
set/reset button while the desired
setting is displayed on the DIC.
AUTO DOOR LOCK
This feature allows you to select
when the vehicle's doors will
automatically lock. See Automatic
Door Locks
on page 2‑8for more
information.
Press the customization button until
AUTO DOOR LOCK appears on the
DIC display. Press the set/reset
button once to access the settings
for this feature. Then press the
customization button to scroll
through the following settings:
SHIFT OUT OF PARK (default):
The doors will automatically lock
when the vehicle is shifted out of
P (Park). AT VEHICLE SPEED:
The doors
will automatically lock when the
vehicle speed is above 8 mph
(13 km/h) for three seconds.
NO CHANGE: No change will be
made to this feature. The current
setting will remain.
To select a setting, press the set/
reset button while the desired
setting is displayed on the DIC.
AUTO DOOR UNLOCK
This feature allows you to select
whether or not to turn off the
automatic door unlocking feature.
It also allows you to select which
doors and when the doors will
automatically unlock. See Automatic
Door Locks
on page 2‑8for more
information.
Press the customization button until
AUTO DOOR UNLOCK appears on
the DIC display. Press the set/reset
button once to access the settings for this feature. Then press the
customization button to scroll
through the following settings:
OFF:
None of the doors will
automatically unlock.
DRIVER AT KEY OUT: Only the
driver's door will unlock when the
key is taken out of the ignition.
DRIVER IN PARK: Only the
driver's door will unlock when the
vehicle is shifted into P (Park) .
ALL AT KEY OUT: All of the doors
will unlock when the key is taken
out of the ignition.
ALL IN PARK (default): All of the
doors will unlock when the vehicle is
shifted into P (Park).
NO CHANGE: No change will be
made to this feature. The current
setting will remain.
To select a setting, press the
set/reset button while the desired
setting is displayed on the DIC.
Page 162 of 438
5-44 Instruments and Controls
APPROACH LIGHTING
This feature allows you to select
whether or not to have the exterior
lights turn on briefly during low light
periods after unlocking the vehicle
using the Remote Keyless Entry
(RKE) transmitter.
Press the customization button until
APPROACH LIGHTING appears on
the DIC display. Press the set/reset
button once to access the settings
for this feature. Then press the
customization button to scroll
through the following settings:
OFF:The exterior lights will not
turn on when you unlock the vehicle
with the RKE transmitter.
ON (default): If it is dark enough
outside, the exterior lights will turn
on briefly when you unlock the
vehicle with the RKE transmitter.
The lights will remain on for
20 seconds or until the lock button
on the RKE transmitter is pressed,
or the vehicle is no longer off. See
Remote Keyless Entry (RKE)
System Operationon page 2‑3for
more information.
NO CHANGE : No change will be
made to this feature. The current
setting will remain.
To select a setting, press the set/
reset button while the desired
setting is displayed on the DIC.
CHIME VOLUME
This feature allows you to select the
volume level of the chime.
Press the customization button until
CHIME VOLUME appears on the
DIC display. Press the set/reset
button once to access the settings
for this feature. Then press the
customization button to scroll
through the following settings:
NORMAL: The chime volume will
be set to a normal level.
LOUD: The chime volume will be
set to a loud level. NO CHANGE:
No change will be
made to this feature. The current
setting will remain.
There is no default for chime
volume. The volume will stay at the
last known setting.
To select a setting, press the set/
reset button while the desired
setting is displayed on the DIC.
PARK TILT MIRRORS
If your vehicle has this feature, it
allows you to select whether or
not the outside mirror(s) will
automatically tilt down when the
vehicle is shifted into R (Reverse).
See Park Tilt Mirrors
on page 2‑17for more information.
Page 163 of 438
Instruments and Controls 5-45
Press the customization button until
PARK TILT MIRRORS appears on
the DIC display. Press the set/reset
button once to access the settings
for this feature. Then press the
customization button to scroll
through the following settings:
OFF (default):Neither outside
mirror will be tilted down when the
vehicle is shifted into R (Reverse).
DRIVER MIRROR: The driver's
outside mirror will be tilted down
when the vehicle is shifted into
R (Reverse).
PASSENGER MIRROR: The
passenger's outside mirror will be
tilted down when the vehicle is
shifted into R (Reverse).
BOTH MIRRORS: The driver's and
passenger's outside mirrors will be
tilted down when the vehicle is
shifted into R (Reverse).
NO CHANGE: No change will be
made to this feature. The current
setting will remain. To select a setting, press the set/
reset button while the desired
setting is displayed on the DIC.
EASY EXIT SEAT
If your vehicle has this feature, it
allows you to select your preference
for the automatic easy exit seat
feature. See
Delayed Locking
on
page 2‑7for more information.
Press the customization button until
EASY EXIT SEAT appears on the
DIC display. Press the set/reset
button once to access the settings
for this feature. Then press the
customization button to scroll
through the following settings:
OFF (default): No automatic seat
exit recall will occur.
ON: The driver's seat will move
back when the key is removed from
the ignition. The steering column will
also move up and forward on
vehicles with the power tilt and
telescopic steering feature. See
Steering Wheel Adjustment
on
page 5‑2for more information. The automatic easy exit seat
movement will only occur one time
after the key is removed from the
ignition. If the automatic movement
has already occurred, and you put
the key back in the ignition and
remove it again, the seat and
steering column will stay in the
original exit position, unless a
memory recall took place prior to
removing the key again.
NO CHANGE:
No change will be
made to this feature. The current
setting will remain.
To select a setting, press the set/
reset button while the desired
setting is displayed on the DIC.
MEMORY SEAT RECALL
If your vehicle has this feature, it
allows you to select your preference
for the remote memory seat recall
feature. See Delayed Locking
on
page 2‑7for more information.
Page 164 of 438
5-46 Instruments and Controls
Press the customization button until
MEMORY SEAT RECALL appears
on the DIC display. Press the set/
reset button once to access the
settings for this feature. Then press
the customization button to scroll
through the following settings:
OFF (default):No remote memory
seat recall will occur.
ON: The driver's seat and outside
mirrors will automatically move to
the stored driving position when the
unlock button on the Remote
Keyless Entry (RKE) transmitter is
pressed. The steering column will
also move on vehicles with the
power tilt and telescopic steering
feature. See Steering Wheel
Adjustment
on page 5‑2for more
information. See “Relearn Remote
Key” under Driver Information
Center (DIC)
on page 5‑25for
more information on matching
transmitters to driver ID numbers.
NO CHANGE: No change will be
made to this feature. The current
setting will remain. To select a setting, press the set/
reset button while the desired
setting is displayed on the DIC.
REMOTE START
If your vehicle has this feature, it
allows you to turn the remote start
off or on. The remote start feature
allows you to start the engine from
outside of the vehicle using the
Remote Keyless Entry (RKE)
transmitter. See
Remote Vehicle
Start
on page 2‑5for more
information.
Press the customization button until
REMOTE START appears on the
DIC display. Press the set/reset
button once to access the settings
for this feature. Then press the
customization button to scroll
through the following settings:
OFF: The remote start feature will
be disabled.
ON (default): The remote start
feature will be enabled. NO CHANGE:
No change will be
made to this feature. The current
setting will remain.
To select a setting, press the set/
reset button while the desired
setting is displayed on the DIC.
FACTORY SETTINGS
This feature allows you to set all of
the customization features back to
their factory default settings.
Press the customization button until
FACTORY SETTINGS appears on
the DIC display. Press the set/reset
button once to access the settings
for this feature. Then press the
customization button to scroll
through the following settings:
RESTORE ALL (default): The
customization features will be set to
their factory default settings.
DO NOT RESTORE: The
customization features will not be
set to their factory default settings.