Call BUICK ENCLAVE 2010 Repair Manual
[x] Cancel search | Manufacturer: BUICK, Model Year: 2010, Model line: ENCLAVE, Model: BUICK ENCLAVE 2010Pages: 438, PDF Size: 2.47 MB
Page 230 of 438
7-52 Infotainment System
To Transfer Audio to the In-Vehicle
Bluetooth System
The cellular phone must be paired
and connected with the Bluetooth
system before a call can be
transferred. The connection process
can take up to two minutes after the
key is turned to the ON/RUN or
ACC/ACCESSORY position.
During a call with the audio on the
cell phone, press
bgfor more
than two seconds. The audio
switches from the cell phone to the
vehicle.
Voice Pass-Thru
Voice Pass-Thru allows access to
the voice recognition commands on
the cell phone. See the cell phone
manufacturers user guide to see if
the cell phone supports this feature. This feature can be used to verbally
access contacts stored in the cell
phone.
1. Press and hold
b
gfor
two seconds. The system
responds with “Ready”followed
by a tone.
2. Say “Bluetooth”. The system
responds with “Bluetooth ready”
followed by a tone.
3. Say “Voice”. The system
responds with “OK, accessing
.The cell phone's normal
prompt messages will go
through its cycle according
to the phone's operating
instructions.
Dual Tone Multi-Frequency
(DTMF) Tones
The in-vehicle Bluetooth system can
send numbers and numbers stored
as name tags during a call. This is
used when calling a menu driven
phone system. Account numbers
can be programmed into the
phonebook for retrieval during menu
driven calls.
Sending a Number During a Call
1. Press
b g. The system
responds with “Ready”followed
by a tone.
2. Say “Dial”. The system responds
with “Say a number to send
tones” followed by a tone.
3. Say the number to send.
.If the system clearly
recognizes the number it
responds with “OK, Sending
Number” and the dial tones
are sent and the call
continues.
Page 231 of 438

Infotainment System 7-53
.If the system is not sure it
recognized the number
properly, it responds“Dial
Number, Please say yes or
no?” followed by a tone.
If the number is correct, say
“Yes”. The system responds
with “OK, Sending Number”
and the dial tones are sent
and the call continues.
Sending a Stored Name Tag
During a Call
1. Press
b g. The system
responds with “Ready”followed
by a tone.
2. Say “Send name tag.” The
system responds with “Say a
name tag to send tones”
followed by a tone. 3. Say the name tag to send.
.If the system clearly
recognizes the name tag it
responds with
“OK, Sending
tones are sent and the call
continues.
.If the system is not sure it
recognized the name tag
properly, it responds “Dial
yes or no?” followed by a
tone. If the name tag is
correct, say “Yes”. The
system responds with “OK,
Sending
the dial tones are sent and
the call continues.
Clearing the System
Unless information is deleted out of
the in-vehicle Bluetooth system, it
will be retained indefinitely. This
includes all saved name tags in the
phonebook and phone pairing
information. For information on how
to delete this information, see the
above sections on Deleting a Paired
Phone and Deleting Name Tags.
Other Information
The Bluetooth®word mark and
logos are owned by the Bluetooth®
SIG, Inc. and any use of such marks
by General Motors is under license.
Other trademarks and trade names
are those of their respective owners.
See Radio Frequency Statement
on
page 13‑16for FCC information.
Page 234 of 438
8-2 Climate Controls
Display Function
Each time the temperature, mode,
or fan control buttons are pressed,
the climate control display shows
that function along with the inside
temperature setting. The outside
temperature is displayed on the
instrument panel cluster.
O(On/Off):Press to turn the
climate control system on or off.
While the system is off, outside air
still enters through the floor outlets,
but the air delivery mode can be
adjusted.
The climate control system will also
turn on if either the fan control,
defrost, AUTO, or air conditioning
buttons are pressed.
Automatic Operation
AUTO (Automatic): The system
automatically controls the inside
temperature, the air delivery, and
the fan speed. To use automatic mode:
1. Press the AUTO button.
When AUTO is selected, the
current temperature(s) selected
and AUTO is shown on the
display. The current air delivery
mode and fan speed also
appear for approximately
five seconds.
When AUTO is selected, the air
conditioning and air inlet are
automatically controlled. The air
conditioning runs when the
outside temperature is over
4°C (40°F). The system is
automatically set to outside air,
unless it is hot outside and
then the air inlet changes to
recirculation mode to help
quickly cool the vehicle. The
recirculation indicator light will
come on. 2. Set the temperature for the
driver and passenger.
To find a comfortable setting,
start with a 22°C (73°F)
temperature setting and allow
about 20 minutes for the system
to regulate. Use the driver's side
or passenger side temperature
buttons to adjust the
temperature setting as
necessary. The system will
remain at the selected setting.
Choosing the warmest or coolest
temperatures does not cause the
vehicle to heat or cool more
quickly.
To avoid blowing cold air in cold
weather, the system delays
turning on the fan until warm air
is available. Press the fan
control to override this delay and
select the fan speed.
Page 236 of 438
8-4 Climate Controls
6(Floor):Air is directed to the
floor outlets, with some of the air
directed to the windshield, side
window, and second row floor
outlets. In this mode, the system
uses outside air.
-(Defog): This mode clears the
windows of fog or moisture. Air is
directed to the windshield, floor
outlets, and side window vents.
When this mode is selected, the
system turns off recirculation and
runs the air conditioning compressor
unless the outside temperature is
less than 4°C (40°F). Do not drive
the vehicle until all the windows are
clear.
0(Defrost): Press to turn the
defrost on or off. This mode quickly
clears the windshield of fog or frost.
Air is directed to the windshield,
side window, and floor vents. In this mode, outside air is pulled
inside the vehicle. The air
conditioning system runs
automatically in this setting, unless
the outside temperature is less than
4°C (40°F).
Do not drive the vehicle until all the
windows are clear.
While in defrost mode, if the PASS
button is pressed, the PASS button
indicator flashes three times to
show that the passenger climate
control system cannot be activated.
If the passenger temperature
buttons are adjusted while in
defrost mode, the driver
temperature indicator will change.
The passenger temperature will not
be displayed.
When returning to bi-level, vent,
or floor mode, the previous
temperature settings displays in
place of any change made while in
defrost mode.
Air Conditioning
#(Air Conditioning):
Press to
turn the air conditioning (A/C) on
and off. An indicator light comes on
when A/C is on.
The A/C does not work when the
outside temperature is below
4°C (40°F). If
#is pressed the
indicator flashes three times and
turns off to show that the A/C mode
is not available. If the A/C is on and
the outside temperature drops
below a temperature which is too
cool for air conditioning to be
effective, the A/C indicator turns off
to show that the A/C mode has
been canceled.
On hot days, open the windows
briefly to let hot inside air escape.
This helps reduce the time it takes
for the interior of the vehicle to
cool down.
Page 237 of 438

Climate Controls 8-5
The air conditioning system
removes moisture from the air, so
water might drip under the vehicle
while idling or after turning off the
engine. This is normal.
@(Recirculation):Press to turn
the recirculation mode on or off. An
indicator light comes on when
recirculation is on. When the engine
is turned off, the recirculation mode
automatically turns off and must be
re-selected when the engine is
turned on again.
This mode recirculates and helps to
quickly cool the air inside the
vehicle. It can be used to prevent
outside air and odors from entering
the vehicle.
The recirculation mode cannot be
used with floor, defog, or defrosting
modes. If recirculation is selected in
these modes, the indicator flashes three times and turns off. The air
conditioning compressor also comes
on when this mode is activated.
While in recirculation mode the
windows can fog when the weather
is cold and damp. To clear the fog,
select either the defog or defrost
mode and increase the fan speed.
REAR:
Press to turn the rear
heating and air conditioning on or
off. See Rear Climate Control
System (Rear Climate Control Only)
on page 8‑7or Rear Climate
Control System (Rear Climate with
Rear Seat Audio) on page 8‑8.
Rear Window Defogger
The rear window defogger uses a
warming grid to remove fog from the
rear window.
<(Rear Window Defogger):
Press to turn the rear window
defogger on or off. The rear window
defogger stays on for about
10 minutes, before turning off.
The defogger also turns off when
the engine is turned off. Do not drive
the vehicle until all the windows are
clear.
For vehicles with heated outside
rearview mirrors, fog or frost is
cleared from the surface of the
mirror when the rear window defog
button is pressed.
Notice: Do not use a razor blade
or sharp object to clear the inside
rear window. Do not adhere
anything to the defogger grid
lines in the rear glass. These
actions may damage the rear
defogger. Repairs would not be
covered by your warranty.
Page 254 of 438

9-12 Driving and Operating
Vehicle Load Limits
It is very important to know how
much weight your vehicle can
carry. This weight is called the
vehicle capacity weight and
includes the weight of all
occupants, cargo, and all
nonfactory-installed options.
Two labels on your vehicle show
how much weight it may
properly carry, the Tire and
Loading Information label and
the Certification/Tire label.
{WARNING
Do not load the vehicle any
heavier than the Gross
Vehicle Weight Rating
(GVWR), or either the
maximum front or rear Gross
Axle Weight Rating (GAWR).
If you do, parts on the vehicle
can break, and it can change
(Continued)
WARNING (Continued)
the way your vehicle handles.
These could cause you to lose
control and crash. Also,
overloading can shorten the
life of the vehicle.
Tire and Loading Information
Label
Example Label
A vehicle specific Tire and
Loading Information label is
attached to the center pillar (B-pillar) of your vehicle. With
the driver's door open, you will
find the label attached below the
door lock post (striker). The tire
and loading information label
shows the number of occupant
seating positions (A), and the
maximum vehicle capacity
weight (B) in kilograms and
pounds.
The Tire and Loading
Information label also shows the
size of the original equipment
tires (C) and the recommended
cold tire inflation pressures (D).
For more information on tires
and inflation see
Tires
on
page 10‑37
and Tire Pressureon
page 10‑44
.
There is also important loading
information on the vehicle
Certification/Tire label. It tells
you the Gross Vehicle Weight
Rating (GVWR) and the Gross
Axle Weight Rating (GAWR) for
Page 256 of 438
9-14 Driving and Operating
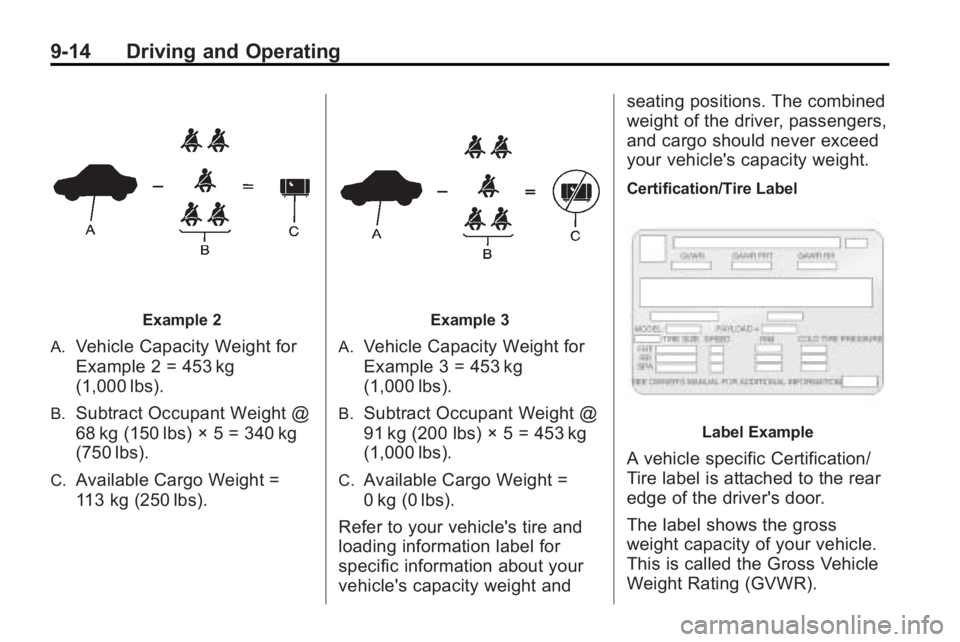
Example 2
A.
Vehicle Capacity Weight for
Example 2 = 453 kg
(1,000 lbs).
B.Subtract Occupant Weight @
68 kg (150 lbs) × 5 = 340 kg
(750 lbs).
C.Available Cargo Weight =
113 kg (250 lbs).
Example 3
A.
Vehicle Capacity Weight for
Example 3 = 453 kg
(1,000 lbs).
B.Subtract Occupant Weight @
91 kg (200 lbs) × 5 = 453 kg
(1,000 lbs).
C.Available Cargo Weight =
0 kg (0 lbs).
Refer to your vehicle's tire and
loading information label for
specific information about your
vehicle's capacity weight and seating positions. The combined
weight of the driver, passengers,
and cargo should never exceed
your vehicle's capacity weight.
Certification/Tire Label
Label Example
A vehicle specific Certification/
Tire label is attached to the rear
edge of the driver's door.
The label shows the gross
weight capacity of your vehicle.
This is called the Gross Vehicle
Weight Rating (GVWR).
Page 257 of 438
Driving and Operating 9-15
The GVWR includes the weight
of the vehicle, all occupants,
fuel, and cargo.
The Certification/Tire label also
tells you the maximum weights
for the front and rear axles,
called the Gross Axle Weight
Rating (GAWR). To find out the
actual loads on your front and
rear axles, you need to go to a
weigh station and weigh your
vehicle. Your dealer/retailer can
help you with this. Be sure to
spread out your load equally on
both sides of the centerline.
Never exceed the GVWR for
your vehicle or the GAWR for
either the front or rear axle.
{WARNING
Do not load the vehicle any
heavier than the Gross
Vehicle Weight Rating
(Continued)
WARNING (Continued)
(GVWR), or either the
maximum front or rear Gross
Axle Weight Rating (GAWR).
If you do, parts on the vehicle
can break, and it can change
the way your vehicle handles.
These could cause you to lose
control and crash. Also,
overloading can shorten the
life of the vehicle.
Notice :Overloading the
vehicle may cause damage.
Repairs would not be covered
by the vehicle warranty. Do
not overload the vehicle.
If you put things inside your
vehicle —like suitcases, tools,
packages, or anything else, they
will go as fast as the vehicle
goes. If you have to stop or turn
quickly, or if there is a crash,
they will keep going.
{WARNING
Things you put inside your
vehicle can strike and injure
people in a sudden stop or
turn, or in a crash.
.Put things in the cargo
area of your vehicle. Try to
spread the weight evenly.
.Never stack heavier
things, like suitcases,
inside the vehicle so that
some of them are above
the tops of the seats.
.Do not leave an
unsecured child restraint
in your vehicle.
.When you carry something
inside the vehicle, secure
it whenever you can.
.Do not leave a seat folded
down unless you need to.
Page 267 of 438
Driving and Operating 9-25
Manual Mode
Electronic Range Select
(ERS) Mode
ERS mode allows you to choose the
top-gear limit of the transmission
and the vehicle's speed while
driving down hill or towing a trailer.
The vehicle has an electronic shift
position indicator within the
instrument panel cluster. When
using the ERS Mode a number will
display next to the L, indicating the
current gear that has been selected.
To use this feature:
1. Move the shift lever to L (Low).
2. Press the plus/minus buttonlocated on the shift lever, to
increase or decrease the gear
range available.
When you shift from D (Drive) to
L (Low), the transmission will shift to
a pre-determined lower gear range.
The highest gear available for this
pre-determined range is displayed next to the L in the DIC. See
Driver
Information Center (DIC)
on
page 5‑25for more information.
The number displayed in the DIC is
the highest gear that the
transmission will be allowed to
operate in. This means that all
gears below that number are
available. For example, when
4 (Fourth) is shown next to the L,
1 (First) through 4 (Fourth) gears are
automatically shifted by the vehicle.
The transmission will not shift into
5 (Fifth) until the + (Plus) button is
used or you shift back into D (Drive).
While in L (Low), the transmission
will prevent shifting to a lower gear
range if the engine speed is too
high. You have a brief period of time
to slow the vehicle. If vehicle speed
is not reduced within the time
allowed, the lower gear range shift
will not be completed. You must
further slow the vehicle, then press
the −(Minus) button to the desired
lower gear range. Automatic Engine Grade braking is
not available when the ERS is
active. It is available in D (Drive) for
both normal and Tow/Haul mode.
While using the ERS, cruise control
and the tow/haul mode can be used.
See Tow/Haul Mode following.
Tow/Haul Mode
_
(Tow/Haul):
The vehicle may
have a Tow/Haul mode.
The button is located on the
instrument panel under the climate
controls.
Push the button to activate the
system. Push it again to deactivate
the system. You can use this feature
to assist when towing or hauling a
heavy load.
When Tow/Haul is activated the
Tow/Haul symbol will come on the
instrument panel cluster. See
“Tow/Haul Mode” underDriving
Characteristics and Towing Tips
on
page 9‑45for more information.
Page 268 of 438
9-26 Driving and Operating
Automatic Engine Grade
Braking
Automatic Engine Grade Braking
assists when driving on a downhill
grade. It maintains vehicle speed by
automatically implementing a shift
schedule that uses the engine and
the transmission to slow the vehicle.
The system will automatically
command downshifts to reduce
vehicle speed, until the brake pedal
is no longer being pressed.
While in the Electronic Range
Select (ERS) mode, grade braking
is deactivated, allowing the driver to
select a range and limiting the
highest gear available. Grade
braking is available for normal
driving and in Tow/Haul mode.
SeeAutomatic Transmission
on
page 9‑23.
Drive Systems
All-Wheel Drive
With this feature, engine power is
always sent to all four wheels. It is
fully automatic, and adjusts itself as
needed for road conditions.
When using a compact spare tire on
an AWD vehicle, the system
automatically detects the compact
spare and disables AWD. To restore
AWD operation and prevent
excessive wear on system, replace
the compact spare with a full-size
tire as soon as possible. See
Compact Spare Tire
on page 10‑80for more information.
Brakes
Antilock Brake
System (ABS)
This vehicle has the Antilock Brake
System (ABS), an advanced
electronic braking system that helps
prevent a braking skid.
When the engine is started and the
vehicle begins to drive away, ABS
checks itself. A momentary motor or
clicking noise might be heard while
this test is going on, and it might
even be noticed that the brake
pedal moves a little. This is normal.
If there is a problem with ABS, this
warning light stays on. See Antilock
Brake System (ABS) Warning Light
on page 5‑22.