head BUICK ENCLAVE 2010 Owner's Guide
[x] Cancel search | Manufacturer: BUICK, Model Year: 2010, Model line: ENCLAVE, Model: BUICK ENCLAVE 2010Pages: 438, PDF Size: 2.47 MB
Page 125 of 438
Instruments and Controls 5-7
Compass variance is the difference
between the earth's magnetic north
and true geographic north. If the
compass is not set to the zone
where you live, the compass may
give false readings. The compass
must be set to the variance zone in
which the vehicle is traveling.
To adjust for compass variance, use
the following procedure:
Compass Variance (Zone)
Procedure
1. Do not set the compass zonewhen the vehicle is moving.
Only set it when the vehicle is
in P (Park).
Press the vehicle information
button until PRESS
VTO
CHANGE COMPASS ZONE
displays.
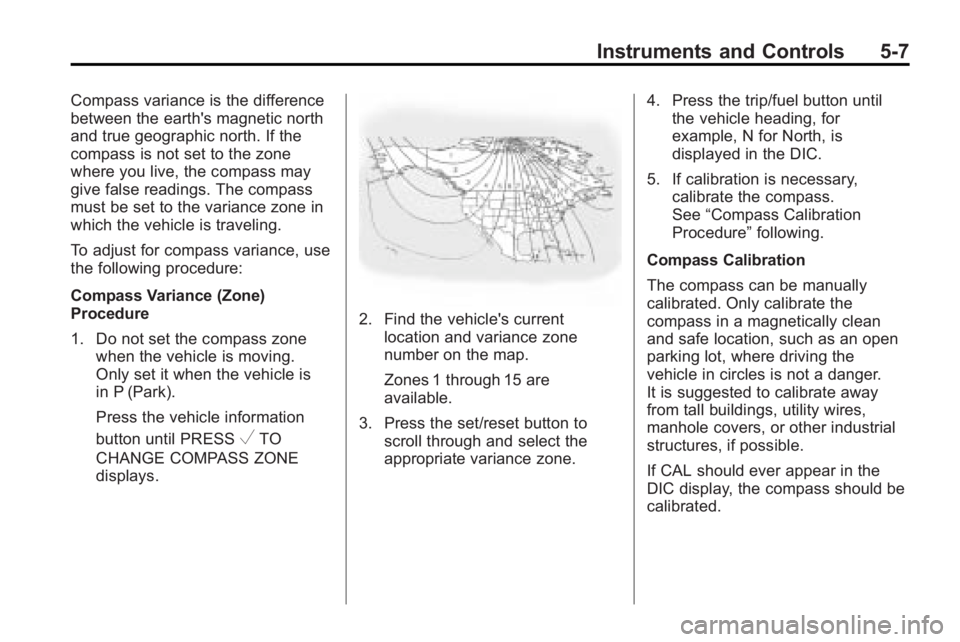
2. Find the vehicle's current location and variance zone
number on the map.
Zones 1 through 15 are
available.
3. Press the set/reset button to scroll through and select the
appropriate variance zone. 4. Press the trip/fuel button until
the vehicle heading, for
example, N for North, is
displayed in the DIC.
5. If calibration is necessary, calibrate the compass.
See “Compass Calibration
Procedure” following.
Compass Calibration
The compass can be manually
calibrated. Only calibrate the
compass in a magnetically clean
and safe location, such as an open
parking lot, where driving the
vehicle in circles is not a danger.
It is suggested to calibrate away
from tall buildings, utility wires,
manhole covers, or other industrial
structures, if possible.
If CAL should ever appear in the
DIC display, the compass should be
calibrated.
Page 126 of 438
5-8 Instruments and Controls
If the DIC display does not show a
heading, for example, N for North,
or the heading does not change
after making turns, there may be a
strong magnetic field interfering with
the compass. Such interference
may be caused by a magnetic CB or
cell phone antenna mount, a
magnetic emergency light, magnetic
note pad holder, or any other
magnetic item. Turn off the vehicle,
move the magnetic item, then turn
on the vehicle and calibrate the
compass.
To calibrate the compass, use the
following procedure:
Compass Calibration Procedure
1. Before calibrating the compass,make sure the compass zone is
set to the variance zone in which
the vehicle is located. See
“Compass Variance (Zone)
Procedure” earlier in this
section. Do not operate any switches
such as window, sunroof,
climate controls, seats, etc.
during the calibration procedure.
2. Press the vehicle information button until PRESS
VTO
CALIBRATE COMPASS
displays.
3. Press the set/reset button to start the compass calibration.
4. The DIC will display CALIBRATING: DRIVE IN
CIRCLES. Drive the vehicle in
tight circles at less than 5 mph
(8 km/h) to complete the
calibration. The DIC will display
CALIBRATION COMPLETE
for a few seconds when the
calibration is complete. The DIC
display will then return to the
previous menu.
Clock
The vehicle has an analog clock
and a digital radio clock. The digital
radio clock can be enabled or
disabled.
Setting the Analog Clock
The analog clock is located on the
instrument panel above the radio.
The clock is not connected with any
other vehicle system and runs by
itself. To adjust the time:
1. Push and hold the button
located directly above the clock
to advance the clock hands.
Holding the button down causes
the clock to advance faster.
2. Push and release the button to increase the time by one minute
increments.
Page 142 of 438

5-24 Instruments and Controls
Engine Oil Pressure Light
{WARNING
Do not keep driving if the oil
pressure is low. The engine can
become so hot that it catches fire.
Someone could be burned. Check
the oil as soon as possible and
have the vehicle serviced.
Notice: Lack of proper engine oil
maintenance can damage the
engine. The repairs would not be
covered by the vehicle warranty.
Always follow the maintenance
schedule in this manual for
changing engine oil.
The oil pressure light should come
on briefly as the engine is started.
If it does not come on have the
vehicle serviced by your dealer/
retailer.
If the light comes on and stays on, it
means that oil is not flowing through
the engine properly. The vehicle
could be low on oil and might have
some other system problem.
Security Light
This light flashes when the security
system is activated.
For more information, see Anti-Theft
Alarm System on page 2‑12.
High-Beam on Light
The high-beam on light comes on
when the high-beam headlamps are
in use.
See Headlamp High/Low-Beam
Changer
on page 6‑2for more
information.
Page 153 of 438
Instruments and Controls 5-35
TIGHTEN GAS CAP
This message may display along
with the check engine light on the
instrument panel cluster if the
vehicle's fuel cap is not tightened
properly. SeeMalfunction Indicator
Lamp
on page 5‑18. Reinstall the
fuel cap fully. See Filling the Tank
on page 9‑42. The diagnostic
system can determine if the fuel cap
has been left off or improperly
installed. A loose or missing fuel
cap allows fuel to evaporate into the
atmosphere. A few driving trips with
the cap properly installed should
turn this light and message off.
Key and Lock Messages
REMOTE KEY LEARNING
ACTIVE
This message displays while you
are matching a Remote Keyless
Entry (RKE) transmitter to your
vehicle. See “Matching
Transmitter(s) to Your Vehicle” under
Remote Keyless Entry (RKE)
System Operation
on page 2‑3and Driver Information Center (DIC)on page 5‑25for more information.
REPLACE BATTERY IN
REMOTE KEY
This message displays if a Remote
Keyless Entry (RKE) transmitter
battery is low. The battery needs to
be replaced in the transmitter. See
“Battery Replacement” under
Remote Keyless Entry (RKE)
System Operation on page 2‑3.
Lamp Messages
AUTOMATIC LIGHT
CONTROL OFF
This message displays when the
automatic headlamps are turned off.
This message clears itself after
10 seconds.
AUTOMATIC LIGHT
CONTROL ON
This message displays when the
automatic headlamps are turned on.
This message clears itself after
10 seconds.
TURN SIGNAL ON
This message displays and a chime
sounds if a turn signal is left on for
3/4 of a mile (1.2 km). Move the turn
signal/multifunction lever to the off
position.
Object Detection System
Messages
PARK ASSIST OFF
If your vehicle has the Ultrasonic
Rear Parking Assist (URPA) system,
after the vehicle has been started
and shifted out of P (Park), this
message displays to remind the
driver that the URPA system has
been turned off or to notify the driver
that the system has turned itself off.
Page 158 of 438
5-40 Instruments and Controls
Vehicle
Personalization
Your vehicle may have
customization capabilities that allow
you to program certain features to
one preferred setting. Customization
features can only be programmed to
one setting on the vehicle and
cannot be programmed to a
preferred setting for two different
drivers.
All of the customization options may
not be available on your vehicle.
Only the options available will be
displayed on the DIC.
The default settings for the
customization features were set
when your vehicle left the factory,
but may have been changed from
their default state since then.
The customization preferences are
automatically recalled.
To change customization
preferences, use the following
procedure.
Entering the Feature
Settings Menu
1. Turn the ignition on and placethe vehicle in P (Park).
To avoid excessive drain on the
battery, it is recommended that
the headlamps are turned off.
2. Press the customization button to enter the feature settings
menu. If the menu is not
available, FEATURE SETTINGS
AVAILABLE IN PARK will
display. Before entering the
menu, make sure the vehicle is
in P (Park).
Feature Settings Menu Items
The following are customization
features that allow you to program
settings to the vehicle:
DISPLAY IN ENGLISH
This feature will only display if a
language other than English has
been set. This feature allows you to
change the language in which the
DIC messages appear to English. Press the customization button until
the PRESS
VTO DISPLAY IN
ENGLISH screen appears on the
DIC display. Press the set/reset
button once to display all DIC
messages in English.
DISPLAY LANGUAGE
This feature allows you to select the
language in which the DIC
messages will appear.
Press the customization button until
the DISPLAY LANGUAGE screen
appears on the DIC display. Press
the set/reset button once to access
the settings for this feature. Then
press the customization button to
scroll through the following settings:
ENGLISH (default): All messages
will appear in English.
FRANCAIS: All messages will
appear in French.
ESPANOL: All messages will
appear in Spanish.
Page 166 of 438
5-48 Instruments and Controls
Do not use the Universal Home
Remote with any garage door
opener that does not have the stop
and reverse feature. This includes
any garage door opener model
manufactured before April 1, 1982.
Read the instructions completely
before attempting to program the
Universal Home Remote. Because
of the steps involved, it may be
helpful to have another person
available to assist you with
programming the Universal Home
Remote.
Keep the original hand-held
transmitter for use in other vehicles
as well as for future Universal Home
Remote programming. It is also
recommended that upon the sale of
the vehicle, the programmed
Universal Home Remote buttons
should be erased for security
purposes. See“Erasing Universal
Home Remote Buttons” later in this
section. When programming a garage door,
park outside of the garage. Park
directly in line with and facing the
garage door opener motor-head or
gate motor-head. Be sure that
people and objects are clear of the
garage door or gate that is being
programmed.
It is recommended that a new
battery be installed in your
hand-held transmitter for quicker
and more accurate transmission of
the radio-frequency signal.
Programming the Universal
Home Remote System
For questions or help programming
the Universal Home Remote
System, call 1-800-355-3515 or go
to www.homelink.com.
Programming a garage door opener
involves time-sensitive actions, so
read the entire procedure before
starting. Otherwise, the device will
time out and the procedure will have
to be repeated.To program up to three devices:
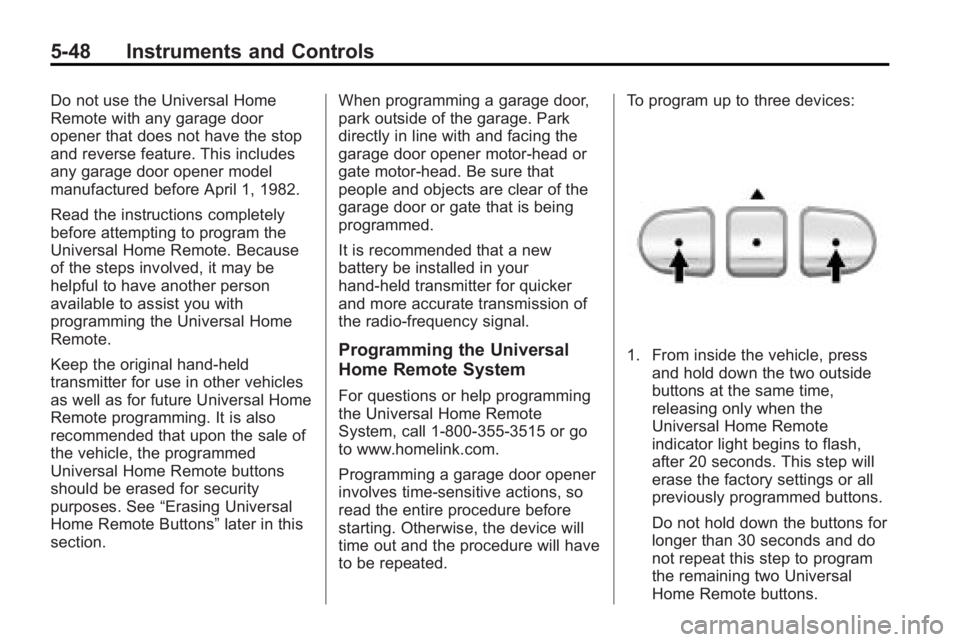
1. From inside the vehicle, press
and hold down the two outside
buttons at the same time,
releasing only when the
Universal Home Remote
indicator light begins to flash,
after 20 seconds. This step will
erase the factory settings or all
previously programmed buttons.
Do not hold down the buttons for
longer than 30 seconds and do
not repeat this step to program
the remaining two Universal
Home Remote buttons.
Page 167 of 438
Instruments and Controls 5-49
2. Hold the end of your hand-heldtransmitter about 3 to 8 cm
(1 to 3 inches) away from the
Universal Home Remote buttons
while keeping the indicator
light in view. The hand-held
transmitter was supplied by the
manufacturer of your garage
door opener receiver (motor
head unit).
3. At the same time, press and hold both the Universal Home
Remote button to be used to
control the garage door and the
hand-held transmitter button. Do
not release the Universal Home
Remote button or the hand-held
transmitter button until Step 4
has been completed.
Some entry gates and garage
door openers may require
substitution of Step 3 with the
procedure noted in “Gate
Operator and Canadian
Programming” later in this
section. 4. The indicator light on the
Universal Home Remote will
flash slowly at first and then
rapidly after Universal Home
Remote successfully receives
the frequency signal from the
hand-held transmitter. Release
both buttons.
5. Press and hold the newly-trained Universal Home Remote button
and observe the indicator light.
.If the indicator light stays
on continuously, the
programming is complete
and the garage door should
move when the Universal
Home Remote button is
pressed and released.
There is no need to
continue programming
Steps 6 through 8.
.If the Universal Home
Remote indicator light
blinks rapidly for
two seconds and then turns to a constant light, continue
with the programming
Steps 6 through 8.
It may be helpful to have
another person assist with
the remaining steps.
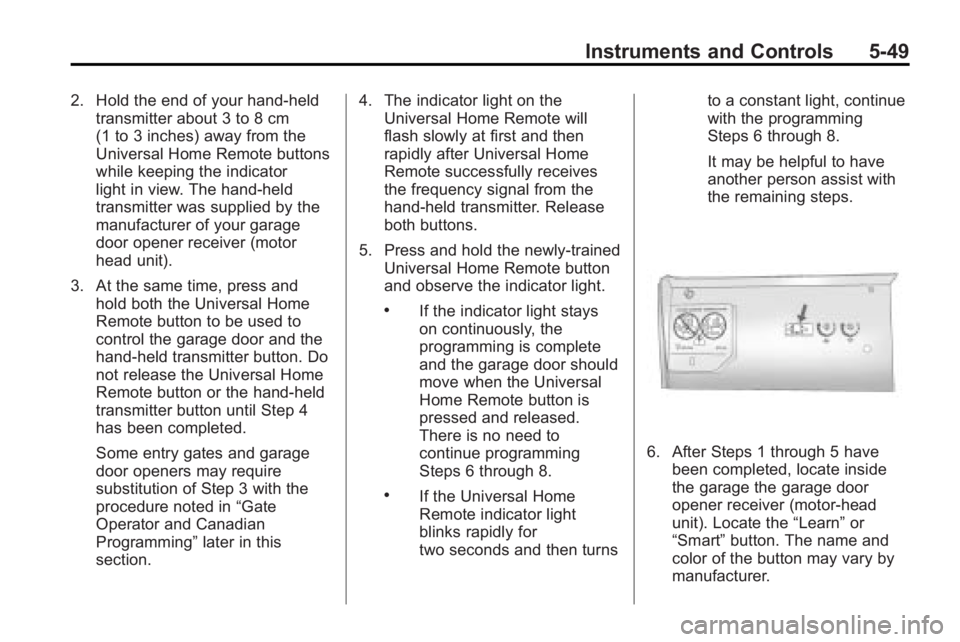
6. After Steps 1 through 5 have
been completed, locate inside
the garage the garage door
opener receiver (motor-head
unit). Locate the “Learn”or
“Smart” button. The name and
color of the button may vary by
manufacturer.
Page 171 of 438
Lighting 6-1
Lighting
Exterior Lighting
Exterior Lamp Controls . . . . . . . . 6-1
Headlamp High/Low-BeamChanger . . . . . . . . . . . . . . . . . . . . . 6-2
Flash-to-Pass . . . . . . . . . . . . . . . . . 6-3
Daytime Running Lamps (DRL)/Automatic Headlamp
System . . . . . . . . . . . . . . . . . . . . . . 6-3
Delayed Headlamps . . . . . . . . . . 6-3
Adaptive Forward Lighting (AFL) . . . . . . . . . . . . . . . 6-4
Hazard Warning Flashers . . . . . 6-4
Turn and Lane-Change Signals . . . . . . . . . . . . . . . . . . . . . . 6-4
Fog Lamps . . . . . . . . . . . . . . . . . . . . 6-5
Interior Lighting
Instrument Panel Illumination Control . . . . . . . . . . . . . . . . . . . . . . 6-5
Dome Lamps . . . . . . . . . . . . . . . . . 6-5
Reading Lamps . . . . . . . . . . . . . . . 6-5
Lighting Features
Entry Lighting . . . . . . . . . . . . . . . . . 6-6
Delayed Entry Lighting . . . . . . . . 6-6
Delayed Exit Lighting . . . . . . . . . 6-6
Parade Dimming . . . . . . . . . . . . . . 6-7
Battery Load Management . . . . 6-7
Battery Power Protection . . . . . . 6-8
Exterior Lighting
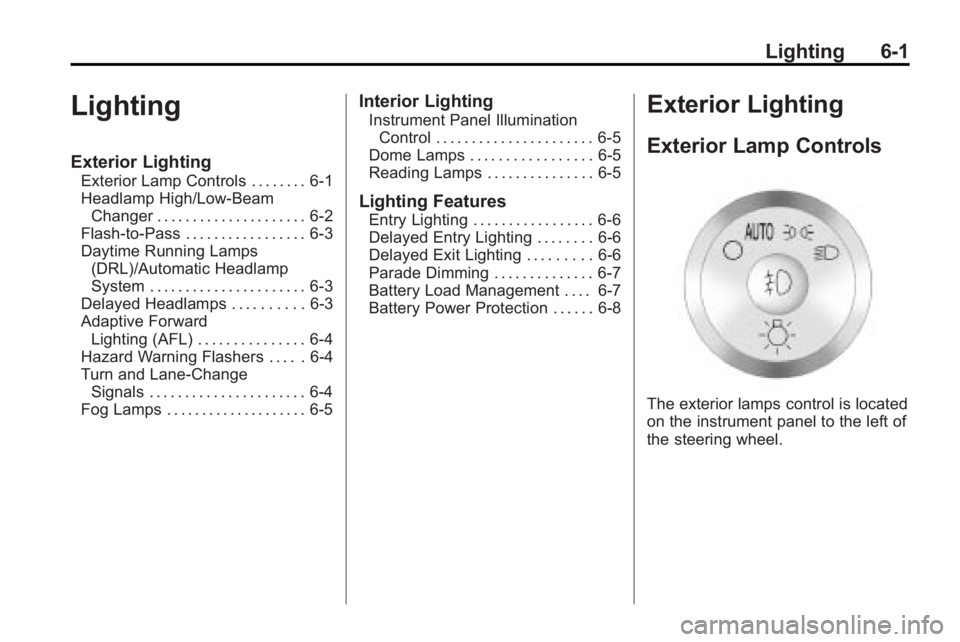
Exterior Lamp Controls
The exterior lamps control is located
on the instrument panel to the left of
the steering wheel.
Page 172 of 438

6-2 Lighting
It controls the following systems:
.Headlamps
.Taillamps
.Parking Lamps
.License Plate Lamps
.Instrument Panel Lights
.Fog Lamps
The exterior lamps control has four
positions:
9(Off): Briefly turn to this position
to turn the automatic light control off
or on again.
AUTO (Automatic): Turns the
headlamps on automatically at
normal brightness, together with the
following:
.Parking Lamps
.Taillamps
.License Plate Lamps
.Instrument Panel Lights ;
(Parking Lamps): Turns the
parking lamps on together with the
following:
.Taillamps
.License Plate Lamps
.Instrument Panel Lights
2 (Headlamps): Turns the
headlamps on together with the
following lamps listed below.
A warning chime sounds if the
driver's door is opened when the
ignition switch is off and the
headlamps are on.
.Parking Lamps
.Taillamps
.License Plate Lamps
.Instrument Panel Lights
# (Fog Lamps): Push the fog
lamps control in to turn on the fog
lamps.
See Fog Lamps on page 6‑5.
Headlamp High/
Low-Beam Changer
2 3
Headlamp High/Low Beam
Changer: Push the turn signal/lane
change lever away from you to turn
the high beams on.
Pull the lever towards you to return
to low beams.
This indicator light turns on in the
instrument panel cluster when the
high beam headlamps are on.
Page 173 of 438

Lighting 6-3
Flash-to-Pass
This feature is used to signal to the
vehicle ahead that you want
to pass.
If the headlamps are off or in the
low-beam position, pull the turn
signal lever toward you to
momentarily switch to high-beams.
Release the lever to turn the
high-beam headlamps off.
Daytime Running Lamps
(DRL)/Automatic
Headlamp System
Daytime Running Lamps (DRL) can
make it easier for others to see the
front of your vehicle during the day.
Fully functional daytime running
lamps are required on all vehicles
first sold in Canada.
A light sensor on top of the
instrument panel makes the DRL
work, so do not cover the sensor.The DRL system's automatic control
makes the DRL lights come on
when the following conditions
are met:
.The ignition is in the ON/RUN
position.
.The exterior lamps control is
in AUTO.
.The engine is running.
When the DRL are on, only the DRL
lights will be on. The headlamps,
taillamps, sidemarker, and other
lamps will not be on. The instrument
panel and cluster will also not be lit.
When it is dark enough outside, the
DRL lights will turn off and the
headlamps and parking lamps will
turn on. The other lamps that come
on with the headlamps will also
come on.
When it is bright enough outside,
the headlamps will go off and the
DRL will come on.
The regular headlamp system
should be turned on when it is
needed.
Delayed Headlamps
Delayed headlamps provide a
period of exterior lighting as you
leave the area around the vehicle.
This feature is activated when the
headlamps are on due to the
automatic headlamps control
feature, and when the ignition is
turned off. The headlamps remain
on until the exterior lamps control is
moved to the parking lamps position
or until the pre-selected delayed
headlamp lighting period has ended.
If the ignition is turned off with the
exterior lamp control in the parking
lamps or headlamps position, the
delayed headlamps cycle will not
occur.
To disable the delayed headlamps
feature or change the time of delay,
see Vehicle Personalization
on
page 5‑40.