head BUICK ENCLAVE 2010 Workshop Manual
[x] Cancel search | Manufacturer: BUICK, Model Year: 2010, Model line: ENCLAVE, Model: BUICK ENCLAVE 2010Pages: 438, PDF Size: 2.47 MB
Page 216 of 438
7-38 Infotainment System
The infrared receivers for the
wireless headphones and the
remote control are located at the
rear of the overhead console.
Notice:Avoid directly touching
the video screen, as damage may
occur. See “Cleaning the Video
Screen” later in this section for
more information.
Remote Control
To use the remote control, aim it at
the transmitter window at the rear of
the overhead console and press the
desired button. Direct sunlight or
very bright light could affect the
ability of the RSE transmitter to
receive signals from the remote
control. If the remote control does
not seem to be working, the
batteries might need to be replaced.
See “Battery Replacement” later in
this section. Objects blocking the
line of sight could also affect the
function of the remote control. If a CD or DVD is in the Radio DVD
slot, the remote control
Obutton
can be used to turn on the video
screen display and start the disc.
The radio can also turn on the video
screen display. See Operation
on
page 7‑2for more information.
Notice: Storing the remote
control in a hot area or in direct
sunlight can damage it, and the
repairs will not be covered by the
warranty. Storage in extreme cold
can weaken the batteries. Keep
the remote control stored in a
cool, dry place.
Remote Control Buttons
O(Power): Press to turn the
video screen on and off.
P(Illumination): Press to turn the
remote control backlight on. The
backlight automatically times out
after seven to ten seconds if no
other button is pressed while the
backlight is on.
v(Title): Press to return the DVD
to the main menu of the DVD. This
function could vary for each disc.
y(Main Menu): Press to access
the DVD menu. The DVD menu is
different on every DVD. Use the
navigation arrows to move the
cursor around the DVD menu. After
making a selection press the enter
button. This button only operates
when using a DVD.
n,q,p,o(Menu Navigation
Arrows): Use the arrow buttons to
navigate through a menu.
r(Enter): Press to select the
choice that is highlighted in
any menu.
z(Display Menu): Press to adjust
the brightness, screen display mode
(normal, full, or zoom), and display
the language menu.
q(Return): Press to exit the
current active menu and return to
the previous menu. This button
operates only when the display
menu or a DVD menu is active.
Page 219 of 438
Infotainment System 7-41
Tips and Troubleshooting Chart (cont'd)
ProblemRecommended Action
After stopping the player, I push
Play but sometimes the DVD starts
where I left off and sometimes at the
beginning. If the stop button was pressed one
time, the DVD player resumes
playing where the DVD was
stopped. If the stop button was
pressed two times the DVD player
begins to play from the beginning of
the DVD.
The auxiliary source is running but
there is no picture or sound. Check that the RSE video screen is
in the auxiliary source mode.
Check the auxiliary input
connections at both devices.
Sometimes the wireless headphone
audio cuts out or buzzes. Check for obstructions, low
batteries, reception range, and
interference from cellular telephone
towers or by using a cellular
telephone in the vehicle.
Check that the headphones are on
correctly using the L (left) and
R (right) on the headphones.
I lost the remote and/or the
headphones. See your dealer/retailer for
assistance.
The DVD is playing, but there is no
picture or sound. Check that the RSE video screen is
sourced to the DVD player.
DVD Display Error Messages
The DVD display error message
depends on which radio the vehicle
has. The video screen might display
one of the following:
Disc Load/Eject Error:
This
message displays when there are
disc load or eject problems.
Disc Format Error: This message
displays if the disc is inserted with
the disc label wrong side up, or if
the disc is damaged.
Disc Region Error: This message
displays if the disc is not from a
correct region.
No Disc Inserted: This message
displays if no disc is present when
the
ZEJECT button is pressed on
the radio.
Page 220 of 438
7-42 Infotainment System
DVD Distortion
Video distortion can occur when
operating cellular phones, scanners,
CB radios, Global Position Systems
(GPS)*, two-way radios, mobile fax,
or walkie talkies.
It might be necessary to turn off the
DVD player when operating one of
these devices in or near the vehicle.
*Excludes the OnStar
®System.
Cleaning the RSE Overhead
Console
When cleaning the RSE overhead
console surface, use only a clean
cloth dampened with clean water.
Cleaning the Video Screen
Use only a clean cloth dampened
with clean water. Use care when
directly touching or cleaning the
screen, as damage could result.
Rear Seat Audio (RSA)
System
For vehicles with Rear Seat Audio
(RSA), rear seat passengers can
listen to and control any of the
music sources: radio, CDs, DVDs,
or other auxiliary sources. The rear
seat passengers can only control
the music sources the front seat
passengers are not listening to
(except on some radios where dual
control is allowed). For example,
rear seat passengers can control a
CD and listen to it through the
headphones, while the driver listens
to the radio through the front
speakers. The rear seat passengers
have control of the volume for each
set of headphones.The RSA functions operate even
when the main radio is off. The front
audio system displaysXwhen the
RSA is on, and disappears from the
display when it is off.
Audio can be heard through wired
headphones (not included) plugged
into the jacks on the RSA. If the
vehicle has this feature, audio can
also be heard on Channel 2 of the
wireless headphones.
The audio system mutes the rear
speakers when the RSA audio is
active through the headphones.
To listen to an iPod or portable
audio device through the RSA,
attach the iPod or portable audio
device to the front auxiliary input (if
available), located on the front audio
system. Turn the iPod on, then
choose the front auxiliary input with
the RSA SRCE button.
Page 221 of 438
Infotainment System 7-43
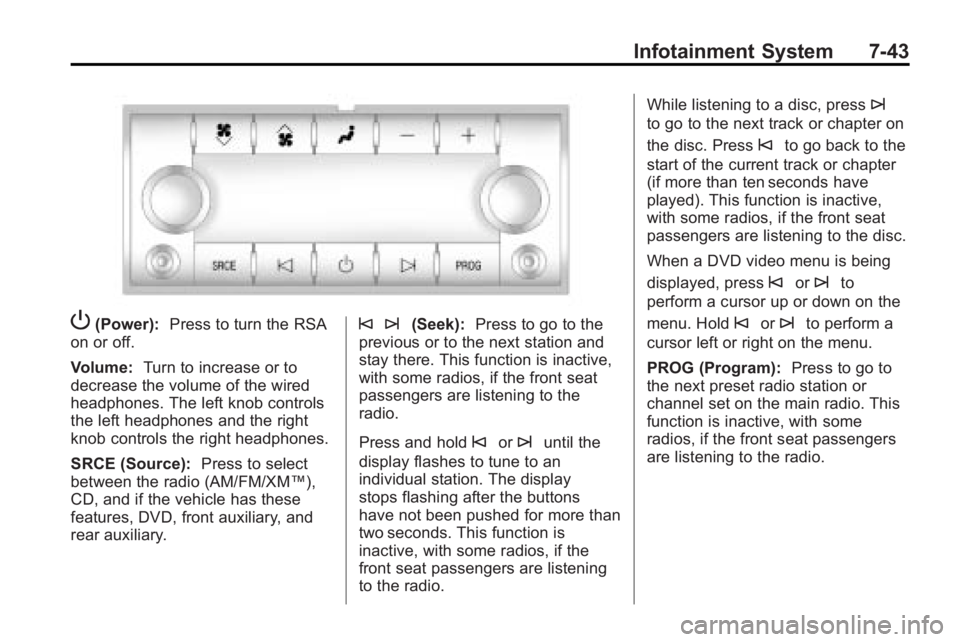
P(Power):Press to turn the RSA
on or off.
Volume: Turn to increase or to
decrease the volume of the wired
headphones. The left knob controls
the left headphones and the right
knob controls the right headphones.
SRCE (Source): Press to select
between the radio (AM/FM/XM™),
CD, and if the vehicle has these
features, DVD, front auxiliary, and
rear auxiliary.© ¨(Seek): Press to go to the
previous or to the next station and
stay there. This function is inactive,
with some radios, if the front seat
passengers are listening to the
radio.
Press and hold
©or¨until the
display flashes to tune to an
individual station. The display
stops flashing after the buttons
have not been pushed for more than
two seconds. This function is
inactive, with some radios, if the
front seat passengers are listening
to the radio. While listening to a disc, press
¨
to go to the next track or chapter on
the disc. Press
©to go back to the
start of the current track or chapter
(if more than ten seconds have
played). This function is inactive,
with some radios, if the front seat
passengers are listening to the disc.
When a DVD video menu is being
displayed, press
©or¨to
perform a cursor up or down on the
menu. Hold
©or¨to perform a
cursor left or right on the menu.
PROG (Program): Press to go to
the next preset radio station or
channel set on the main radio. This
function is inactive, with some
radios, if the front seat passengers
are listening to the radio.
Page 239 of 438
Climate Controls 8-7
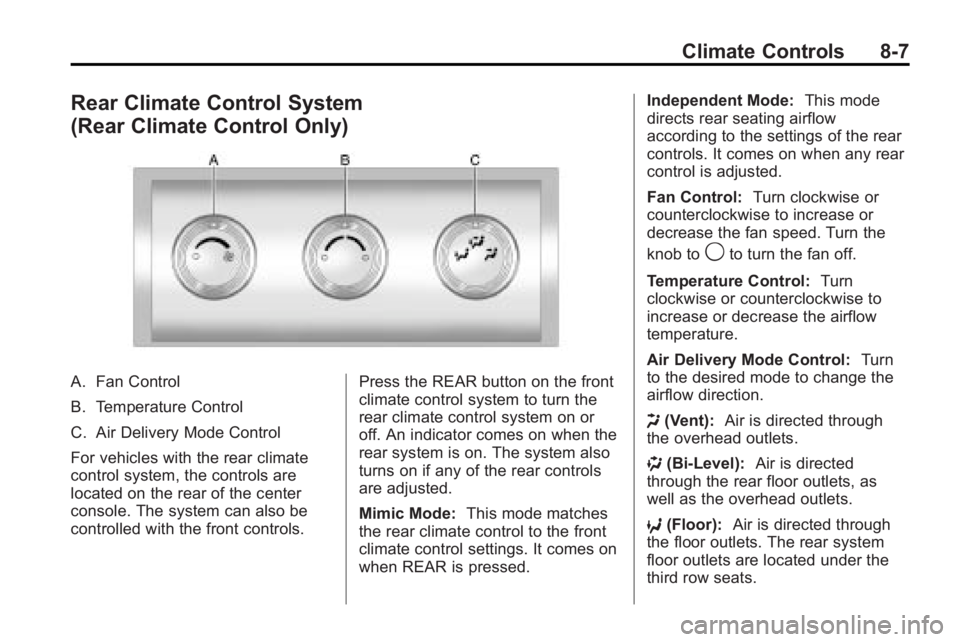
Rear Climate Control System
(Rear Climate Control Only)
A. Fan Control
B. Temperature Control
C. Air Delivery Mode Control
For vehicles with the rear climate
control system, the controls are
located on the rear of the center
console. The system can also be
controlled with the front controls.Press the REAR button on the front
climate control system to turn the
rear climate control system on or
off. An indicator comes on when the
rear system is on. The system also
turns on if any of the rear controls
are adjusted.
Mimic Mode:
This mode matches
the rear climate control to the front
climate control settings. It comes on
when REAR is pressed. Independent Mode:
This mode
directs rear seating airflow
according to the settings of the rear
controls. It comes on when any rear
control is adjusted.
Fan Control: Turn clockwise or
counterclockwise to increase or
decrease the fan speed. Turn the
knob to
9to turn the fan off.
Temperature Control: Turn
clockwise or counterclockwise to
increase or decrease the airflow
temperature.
Air Delivery Mode Control: Turn
to the desired mode to change the
airflow direction.
H (Vent): Air is directed through
the overhead outlets.
) (Bi-Level): Air is directed
through the rear floor outlets, as
well as the overhead outlets.
6 (Floor): Air is directed through
the floor outlets. The rear system
floor outlets are located under the
third row seats.
Page 241 of 438
Climate Controls 8-9
N(Air Delivery Mode Control):
Press to manually change the
direction of the airflow. Repeatedly
press the button until the desired
mode appears on the display.
H(Vent): Air is directed through
the overhead outlets.
)(Bi-Level): Air is directed
through the rear floor outlets, as
well as the overhead outlets.
6(Floor): Air is directed through
the floor outlets. The rear system
floor outlets are located under the
third row seats.
Air Vents
Use the slider switch in the center of
the outlet, to change the direction of
the air flow. Use the thumbwheel
near the outlet to control the amount
of air flow or to shut off the airflow.
Keep all outlets open whenever
possible for best system
performance.
Operation Tips
.Clear away any ice, snow,
or leaves from the air inlets at
the base of the windshield that
can block the flow of air into the
vehicle.
.Use of non-GM approved hood
deflectors can adversely affect
the performance of the system.
.Keep the path under all seats
clear of objects to help circulate
the air inside the vehicle more
effectively.
.If fogging reoccurs while in vent
or bi-level modes with mild
temperature throughout the
vehicle, turn on the air
conditioner to reduce windshield
fogging.
Page 249 of 438
Driving and Operating 9-7
WARNING (Continued)
Flowing or rushing water creates
strong forces. Driving through
flowing water could cause your
vehicle to be carried away. If this
happens, you and other vehicle
occupants could drown. Do not
ignore police warnings and be
very cautious about trying to drive
through flowing water.
Hydroplaning
Hydroplaning is dangerous. Water
can build up under your vehicle's
tires so they actually ride on the
water. This can happen if the road is
wet enough and you are going fast
enough. When your vehicle is
hydroplaning, it has little or no
contact with the road.
There is no hard and fast rule about
hydroplaning. The best advice is to
slow down when the road is wet.
Other Rainy Weather Tips
Besides slowing down, other wet
weather driving tips include:
.Allow extra following distance.
.Pass with caution.
.Keep windshield wiping
equipment in good shape.
.Keep the windshield washer fluid
reservoir filled.
.Have good tires with proper
tread depth. SeeTireson
page 10‑37.
.Turn off cruise control.
Highway Hypnosis
Always be alert and pay attention to
your surroundings while driving.
If you become tired or sleepy, find a
safe place to park your vehicle
and rest.
Other driving tips include:
.Keep the vehicle well ventilated.
.Keep interior temperature cool.
.Keep your eyes moving —scan
the road ahead and to the sides.
.Check the rearview mirror and
vehicle instruments often.
Page 253 of 438
Driving and Operating 9-11
Repeat this until help arrives but
only when you feel really
uncomfortable from the cold. Moving
about to keep warm also helps.
If it takes some time for help to
arrive, now and then when you run
the engine, push the accelerator
pedal slightly so the engine runs
faster than the idle speed. This
keeps the battery charged to restart
the vehicle and to signal for help
with the headlamps. Do this as little
as possible to save fuel.
If the Vehicle is Stuck
Slowly and cautiously spin the
wheels to free the vehicle when
stuck in sand, mud, ice, or snow.
If the vehicle has a traction system,
it can often help to free a stuck
vehicle. Refer to the vehicle's
traction system in the Index.If stuck too severely for the traction
system to free the vehicle, turn the
traction system off and use the
rocking method.
{WARNING
If the vehicle's tires spin at high
speed, they can explode, and you
or others could be injured. The
vehicle can overheat, causing an
engine compartment fire or other
damage. Spin the wheels as little
as possible and avoid going
above 55 km/h (35 mph) as
shown on the speedometer.
For information about using tire
chains on the vehicle, see Tire
Chains on page 10‑57.
Rocking the Vehicle to Get
it Out
Turn the steering wheel left and
right to clear the area around the
front wheels. Turn off any traction or
stability system. Shift back and forth
between R (Reverse) and a forward
gear, spinning the wheels as little as
possible. To prevent transmission
wear, wait until the wheels stop
spinning before shifting gears.
Release the accelerator pedal while
shifting, and press lightly on the
accelerator pedal when the
transmission is in gear. Slowly
spinning the wheels in the forward
and reverse directions causes a
rocking motion that could free the
vehicle. If that does not get the
vehicle out after a few tries, it might
need to be towed out. If the vehicle
does need to be towed out, see
Towing the Vehicle on page 10‑85.
Page 269 of 438
Driving and Operating 9-27
If driving safely on a wet road and it
becomes necessary to slam on the
brakes and continue braking to
avoid a sudden obstacle, a
computer senses that the wheels
are slowing down. If one of the
wheels is about to stop rolling, the
computer will separately work the
brakes at each wheel.
ABS can change the brake pressure
to each wheel, as required, faster
than any driver could. This can help
the driver steer around the obstacle
while braking hard.
As the brakes are applied, the
computer keeps receiving updates
on wheel speed and controls
braking pressure accordingly.Remember: ABS does not change
the time needed to get a foot up to
the brake pedal or always decrease
stopping distance. If you get too
close to the vehicle in front of you,
there will not be enough time to
apply the brakes if that vehicle
suddenly slows or stops. Always
leave enough room up ahead to
stop, even with ABS.
Using ABS
Do not pump the brakes. Just hold
the brake pedal down firmly and let
ABS work. The ABS pump or motor
might be heard operating, and the
brake pedal might be felt to pulsate,
but this is normal.
Braking in Emergencies
ABS allows the driver to steer and
brake at the same time. In many
emergencies, steering can help
more than even the very best
braking.
Parking Brake
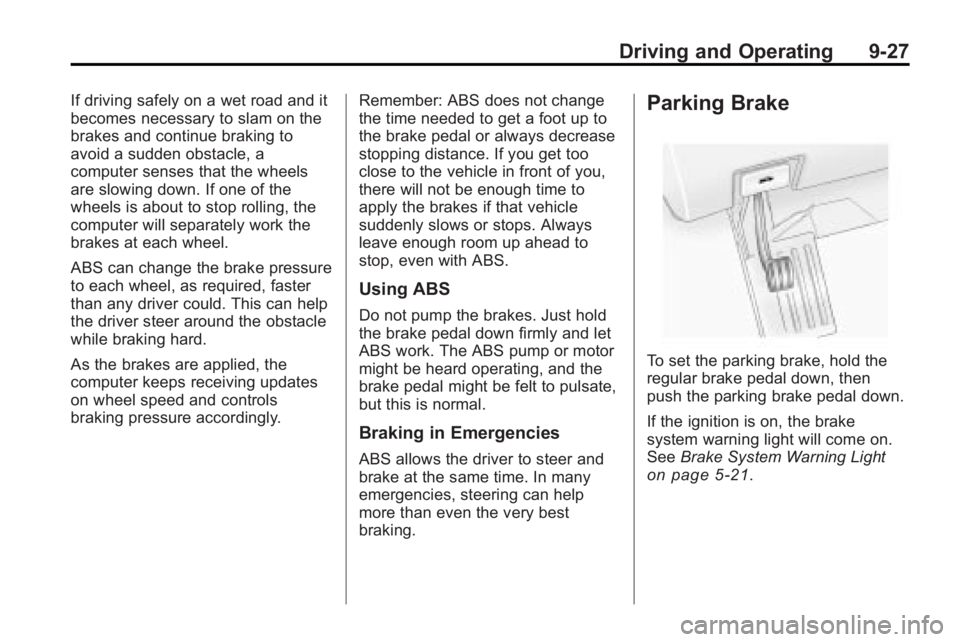
To set the parking brake, hold the
regular brake pedal down, then
push the parking brake pedal down.
If the ignition is on, the brake
system warning light will come on.
See
Brake System Warning Light
on page 5‑21.
Page 280 of 438
9-38 Driving and Operating
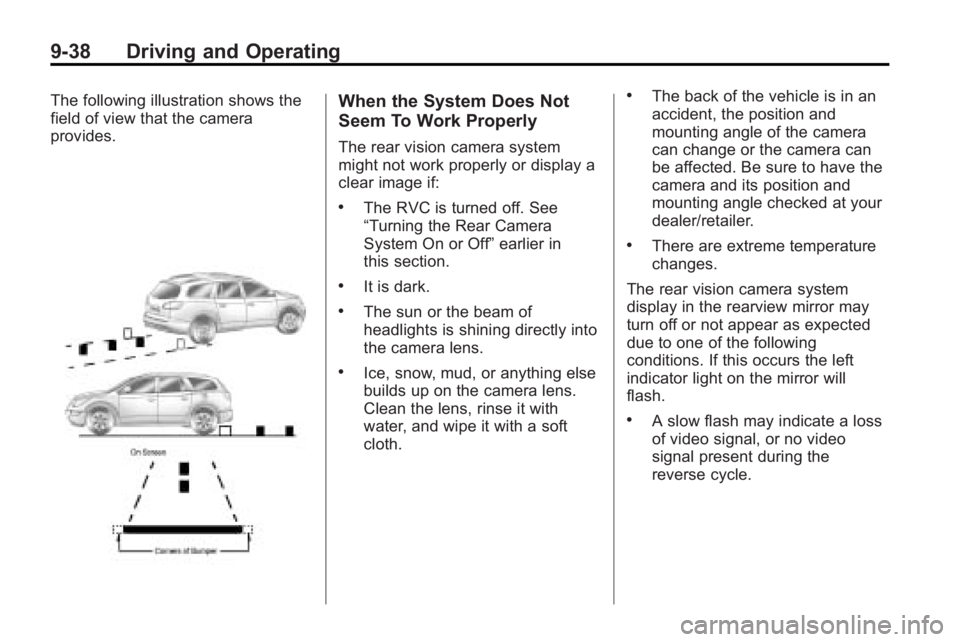
The following illustration shows the
field of view that the camera
provides.When the System Does Not
Seem To Work Properly
The rear vision camera system
might not work properly or display a
clear image if:
.The RVC is turned off. See
“Turning the Rear Camera
System On or Off”earlier in
this section.
.It is dark.
.The sun or the beam of
headlights is shining directly into
the camera lens.
.Ice, snow, mud, or anything else
builds up on the camera lens.
Clean the lens, rinse it with
water, and wipe it with a soft
cloth.
.The back of the vehicle is in an
accident, the position and
mounting angle of the camera
can change or the camera can
be affected. Be sure to have the
camera and its position and
mounting angle checked at your
dealer/retailer.
.There are extreme temperature
changes.
The rear vision camera system
display in the rearview mirror may
turn off or not appear as expected
due to one of the following
conditions. If this occurs the left
indicator light on the mirror will
flash.
.A slow flash may indicate a loss
of video signal, or no video
signal present during the
reverse cycle.