controls BUICK ENCLAVE 2010 Manual Online
[x] Cancel search | Manufacturer: BUICK, Model Year: 2010, Model line: ENCLAVE, Model: BUICK ENCLAVE 2010Pages: 438, PDF Size: 2.47 MB
Page 179 of 438
Infotainment System 7-1
Infotainment
System
Introduction
Introduction . . . . . . . . . . . . . . . . . . . 7-1
Theft-Deterrent Feature . . . . . . . 7-2
Operation . . . . . . . . . . . . . . . . . . . . . 7-2
Radio
AM-FM Radio . . . . . . . . . . . . . . . . . 7-6
Satellite Radio . . . . . . . . . . . . . . . . 7-7
Radio Reception . . . . . . . . . . . . . 7-11
Multi-Band Antenna . . . . . . . . . . 7-11
Audio Players
CD Player . . . . . . . . . . . . . . . . . . . 7-12
CD/DVD Player . . . . . . . . . . . . . . 7-14
MP3 (Radio with CD andRadio with CD/USB) . . . . . . . 7-21
MP3 (Radio with CD/DVD) . . . 7-26
Auxiliary Devices . . . . . . . . . . . . 7-32
Rear Seat Infotainment
Rear Seat Entertainment
(RSE) System . . . . . . . . . . . . . . 7-34
Rear Seat Audio (RSA) System . . . . . . . . . . . . . . . . . . . . . 7-42
Phone
Bluetooth . . . . . . . . . . . . . . . . . . . . 7-44
Introduction
Read the following pages to
become familiar with the audio
system's features.
{WARNING
Taking your eyes off the road for
extended periods could cause a
crash resulting in injury or death
to you or others. Do not give
extended attention to
entertainment tasks while driving.
This system provides access to
many audio and non audio listings.
To minimize taking your eyes off the
road while driving, do the following
while the vehicle is parked:
.Become familiar with the
operation and controls of the
audio system.
.Set up the tone, speaker
adjustments, and preset radio
stations.
Page 183 of 438
Infotainment System 7-5
Setting the Tone (Bass/
Midrange/Treble)
BASS/MID/TREB (Bass, Midrange,
or Treble):To adjust bass,
midrange, or treble:
1. Press
funtil the tone control
tabs display.
2. Continue pressing
fto highlight
the tab, or press the softkey
under the tab.
3. To adjust the highlighted setting, do one of the following until the
levels are obtained.
.Turnfclockwise or
counterclockwise.
.Press\FWD,
or
sREV.
If a station's frequency is weak or if
there is static, decrease the treble. To quickly adjust bass, midrange,
or treble to the middle position,
press the softkey under the BASS,
MID, or TREB tab for more than
two seconds. A beep sounds and
the level adjusts to the middle
position.
To quickly adjust all tone and
speaker controls to the middle
position, press
ffor more than
two seconds until a beep sounds.
EQ (Equalization): Press to
choose bass and treble equalization
settings designed for different types
of music. The choices are pop, rock,
country, talk, jazz, and classical.
Selecting MANUAL or changing
bass or treble, returns the EQ to the
manual bass and treble settings.
Unique EQ settings can be saved
for each source.
If the radio has a Bose
®audio
system, the EQ settings are either
MANUAL or TALK.
Adjusting the Speakers
(Balance/Fade)
BAL/FADE (Balance/Fade):
To adjust the balance or fade:
1. Press
funtil the speaker control
tabs display.
2. Continue pressing
fto highlight
the tab, or press the softkey
under the tab.
3. To adjust the highlighted setting, do one of the following until the
levels are obtained.
.Turnfclockwise or
counterclockwise.
.Press\FWD,
or
sREV.
To quickly adjust balance or fade to
the middle position, press the
softkey under the BAL or FADE tab
for more than two seconds. A beep
sounds and the level adjusts to the
middle position.
Page 184 of 438
7-6 Infotainment System
To quickly adjust all speaker and
tone controls to the middle position,
press
ffor more than two seconds
until a beep sounds.
Radios with CD and DVD fade
differently depending on the DVD
Media type:
.With DVD-A 5.1 Surround
media, the left front and right
front speakers fade rearward,
leaving the center front speakers
unaffected until the last fade
step, then all front
speakers mute.
.With DVD-V 5.1 Surround
media, surround sound is
maintained until Step 4 of the
Fade control is reached while
fading rearward. At that point the
audio system output changes to
Stereo to prevent the loss of
Center channel output when the
full rearward fade position is
reached.
If the Rear Seat Audio (RSA) is
turned on, the radio disables FADE
and mutes the rear speakers.
Radio Messages
Calibration Error: The audio
system has been calibrated for the
vehicle from the factory.
If Calibration Error displays, it
means that the radio has not been
configured properly for the vehicle
and it must be returned to your
dealer/retailer for service.
Locked: This message displays
when the THEFTLOCK
®system has
locked up the radio. Take the
vehicle to your dealer/retailer for
service.
If any error occurs repeatedly or if
an error cannot be corrected,
contact your dealer/retailer.
Radio
AM-FM Radio
Radio Data System (RDS)
The Radio Data System (RDS)
feature is available for use only on
FM stations that broadcast RDS
information. This system relies upon
receiving specific information from
these stations and only works when
the information is available. While
the radio is tuned to an FM-RDS
station, the station name or call
letters display. In rare cases, a radio
station could broadcast incorrect
information that causes the radio
features to work improperly. If this
happens, contact the radio station.
Finding a Station
BAND: Press to switch between
AM, FM, or XM. The selection
displays.
f(Tune): Turn to select radio
stations.
Page 185 of 438
Infotainment System 7-7
©SEEK¨:Press to go to the
previous or to the next station and
stay there.
To scan stations, press and hold
©
or¨until a beep sounds. The
radio goes to a station, plays for a
few seconds, then goes to the next
station. Press either arrow again to
stop scanning.
The radio only seeks and scans
stations with a strong signal that are
in the selected band.
Storing a Radio Station as a
Favorite
Drivers are encouraged to set up
their radio station favorites while the
vehicle is in P (Park). Tune to
favorite stations using the presets,
favorites button, and steering wheel
controls. See Steering Wheel
Controls on page 5‑3. FAV (Favorites):
A maximum of
36 stations can be programmed as
favorites using the six softkeys
below the radio station frequency
tabs and by using the radio favorites
page button (FAV button). Press to
go through up to six pages of
favorites, each having six favorite
stations available per page. Each
page of favorites can contain any
combination of AM, FM, or XM
stations.
The balance/fade and tone settings
that were previously adjusted, are
stored with the favorite stations.
To store a station as a favorite:
1. Tune to the desired radio station.
2. Press FAV to display the page to
store the station.
3. Press and hold one of the six softkeys until a beep sounds.
When that softkey is pressed
and released, the station that
was set, returns.
4. Repeat the steps for each radio station to be stored as a favorite. To setup the number of favorites
pages:
1. Press MENU to display the radio
setup menu.
2. Press the softkey below the FAV 1-6 tab.
3. Select the desired number of favorites pages by pressing the
softkey below the displayed
page numbers.
4. Press FAV, or let the menu time out, to return to the original main
radio screen showing the radio
station frequency tabs and to
begin the process of
programming favorites for the
chosen amount of numbered
pages.
Satellite Radio
XM™ Satellite Radio Service
XM is a satellite radio service that is
based in the 48 contiguous United
States and 10 Canadian provinces.
Page 187 of 438
Infotainment System 7-9
4. Press the softkey under theRemove tab until the category
name along with the word
Removed displays.
5. Repeat the steps to remove more categories.
Removed categories can be
restored by pressing the softkey
under the Add tab when a removed
category is displayed or by pressing
the softkey under the Restore
All tab.
Categories cannot be removed or
added while the vehicle is moving
faster than 8 km/h (5 mph).
Storing a Radio Station as a
Favorite
Drivers are encouraged to set up
their radio station favorites while the
vehicle is in P (Park). Tune to
favorite stations using the presets,
favorites button, and steering wheel
controls. See Steering Wheel
Controls on page 5‑3. FAV (Favorites):
A maximum of
36 stations can be programmed as
favorites using the six softkeys
below the radio station frequency
tabs and by using the radio favorites
page button (FAV button). Press to
go through up to six pages of
favorites, each having six favorite
stations available per page. Each
page of favorites can contain any
combination of AM, FM, or XM
stations.
The balance/fade and tone settings
that were previously adjusted, are
stored with the favorite stations.
To store a station as a favorite:
1. Tune to the desired radio station.
2. Press FAV to display the page to
store the station.
3. Press and hold one of the six softkeys until a beep sounds.
When that softkey is pressed
and released, the station that
was set, returns.
4. Repeat the steps for each radio station to be stored as a favorite. To setup the number of favorites
pages:
1. Press MENU to display the radio
setup menu.
2. Press the softkey below the FAV 1-6 tab.
3. Select the desired number of favorites pages by pressing the
softkey below the displayed
page numbers.
4. Press FAV, or let the menu time out, to return to the original main
radio screen showing the radio
station frequency tabs and to
begin the process of
programming favorites for the
chosen amount of numbered
pages.XM™ Radio Messages
XL (Explicit Language
Channels): These channels, or any
others, can be blocked at a
customer's request, by calling
1-800-852-XMXM (9696).
Page 196 of 438
7-18 Infotainment System
Playing a DVD
f(Tune):Turn to change tracks on
a CD or DVD, to manually tune a
radio station, or to change clock or
date settings, while in the clock or
date setting mode. See the
information given earlier in this
section specific to the radio, CD,
and the DVD. Also, see “Setting the
Clock” in the index, for setting the
clock and date.
©SEEK (Previous Track/
Chapter): Press to return to the
start of the current track or chapter.
Press
©again to go to the
previous track or chapter. This
button may not work when the DVD
is playing the copyright information
or the previews.
SEEK
¨(Next Track/Chapter):
Press to go to the next track or
chapter. This button may not work
when the DVD is playing the
copyright information or the
previews.
sREV (Fast Reverse): Press to
quickly reverse the DVD at
five times the normal speed. The
radio displays the elapsed time
while in fast reverse. To stop fast
reversing, press again. This button
may not work when the DVD is
playing the copyright information or
the previews.
\FWD (Fast Forward): Press to
fast forward the DVD. The radio
displays the elapsed time and fast
forwards five times the normal
speed. To stop fast forwarding,
press again. This button may not
work when the DVD is playing the
copyright information or the
previews.
Z(Eject): Press to eject a DVD.
If the DVD is ejected, but not
removed, the player automatically
pulls it back in after 15 seconds.
If loading and reading of a DVD
cannot be completed, because of an
unknown format, etc., and the disc fails to eject, press and hold for
more than five seconds to force the
disc to eject.
DVD-V (Video) Display Buttons
Once a DVD-V is inserted, the radio
display menu shows several icons.
Press the softkeys under any icon
during DVD playback. See the icon
list below for more information.
The rear seat passenger can
navigate the DVD-V menus and
controls through the remote control.
See
“Remote Control”, under Rear
Seat Entertainment (RSE) System
on page 7‑34for more information.
The Video Screen automatically
turns on when the DVD-V is
inserted into the DVD slot.
r/j(Play/Pause): Press either
the play or pause icon displayed on
the radio system, to toggle between
pausing or restarting playback of
a DVD.
.If the forward arrow is showing
on display, the system is in
pause mode.
Page 197 of 438
Infotainment System 7-19
.If the pause icon is showing on
display, the system is in
playback mode.
.If the DVD screen is off, press
the play button to turn the
screen on.
Some DVDs begin playing after the
previews have finished, although
there could be a delay of up to
30 seconds. If the DVD does not
begin playing the movie
automatically, press the softkey
under the play/pause icon displayed
on the radio. If the DVD still does
not play, refer to the on-screen
instructions, if available.
c(Stop): Press to stop playing,
rewinding, or fast forwarding a DVD.
r(Enter): Press to select the
choices that are highlighted in
any menu.
y(Menu): Press to access the
DVD menu. The DVD menu is
different on every DVD. Use the
softkeys under the navigation
arrows to navigate the cursor
through the DVD menu. After making a selection press this
button. This button only operates
when using a DVD.
Nav (Navigate):
Press to display
directional arrows for navigating
through the menus.
q(Return): Press to exit the
current active menu and return to
the previous menu. This button
operates only when a DVD is
playing and a menu is active.
DVD-A (Audio) Display Buttons
Once a DVD-A is inserted, the radio
display menu shows several icons.
Press the softkeys under any icon
during DVD playback. See the icon
list below for more information.
The rear seat operator can navigate
the DVD-A menus and controls
through the remote control. See
“Remote Control”, under Rear Seat
Entertainment (RSE) System
on
page 7‑34for more information.
The Video Screen does not
automatically power on when the
DVD-A is inserted into the DVD slot. It must be manually turned on by
the rear seat occupant through the
remote control power button.
r/j(Play/Pause):
Press either
the play or pause icon displayed on
the radio system, to toggle between
pausing or restarting playback of
a DVD.
.If the forward arrow is showing
on display, the system is in
pause mode.
.If the pause icon is showing on
display, the system is in
playback mode.
qGroupr: Press to cycle
through musical groupings on the
DVD-A disc.
Nav (Navigate): Press to display
directional arrows for navigating
through the menus.
e(Audio Stream): Press to cycle
through audio stream formats
located on the DVD-A disc. The
video screen shows the audio
stream changing.
Page 221 of 438
Infotainment System 7-43
P(Power):Press to turn the RSA
on or off.
Volume: Turn to increase or to
decrease the volume of the wired
headphones. The left knob controls
the left headphones and the right
knob controls the right headphones.
SRCE (Source): Press to select
between the radio (AM/FM/XM™),
CD, and if the vehicle has these
features, DVD, front auxiliary, and
rear auxiliary.© ¨(Seek): Press to go to the
previous or to the next station and
stay there. This function is inactive,
with some radios, if the front seat
passengers are listening to the
radio.
Press and hold
©or¨until the
display flashes to tune to an
individual station. The display
stops flashing after the buttons
have not been pushed for more than
two seconds. This function is
inactive, with some radios, if the
front seat passengers are listening
to the radio. While listening to a disc, press
¨
to go to the next track or chapter on
the disc. Press
©to go back to the
start of the current track or chapter
(if more than ten seconds have
played). This function is inactive,
with some radios, if the front seat
passengers are listening to the disc.
When a DVD video menu is being
displayed, press
©or¨to
perform a cursor up or down on the
menu. Hold
©or¨to perform a
cursor left or right on the menu.
PROG (Program): Press to go to
the next preset radio station or
channel set on the main radio. This
function is inactive, with some
radios, if the front seat passengers
are listening to the radio.
Page 222 of 438
7-44 Infotainment System
When a CD or DVD audio disc is
playing, press PROG to go to the
beginning of the CD or DVD audio.
This function is inactive, with some
radios, if the front seat passengers
are listening to the disc.
When a disc is playing in the CD or
DVD changer, press PROG to
select the next disc, if multiple discs
are loaded. This function is inactive,
with some radios, if the front seat
passengers are listening to the disc.
When a DVD video menu is being
displayed, press PROG to perform
the ENTER menu function.Phone
Bluetooth
Vehicles with a Bluetooth system
can use a Bluetooth capable cell
phone with a Hands Free Profile to
make and receive phone calls. The
system can be used while the key is
in ON/RUN or ACC/ACCESSORY
position. The range of the Bluetooth
system can be up to 9.1 m (30 ft.).
Not all phones support all functions,
and not all phones are guaranteed
to work with the in-vehicle Bluetooth
system. See gm.com/bluetooth for
more information on compatible
phones.
Voice Recognition
The Bluetooth system uses voice
recognition to interpret voice
commands to dial phone numbers
and name tags.
Noise:Keep interior noise levels to
a minimum. The system may not
recognize voice commands if there
is too much background noise. When to Speak:
A short tone
sounds after the system responds
indicating when it is waiting for a
voice command. Wait until the tone
and then speak.
How to Speak: Speak clearly in a
calm and natural voice.
Audio System
When using the in-vehicle Bluetooth
system, sound comes through the
vehicle's front audio system
speakers and overrides the audio
system. Use the audio system
volume knob, during a call, to
change the volume level. The
adjusted volume level remains in
memory for later calls. To prevent
missed calls, a minimum volume
level is used if the volume is turned
down too low.
Bluetooth Controls
Use the buttons located on the
steering wheel to operate the
in-vehicle Bluetooth system. See
Steering Wheel Controls
on
page 5‑3for more information.
Page 233 of 438
Climate Controls 8-1
Climate Controls
Climate Control Systems
Dual Automatic ClimateControl System . . . . . . . . . . . . . . 8-1
Rear Climate Control System (Rear Climate
Control Only) . . . . . . . . . . . . . . . . 8-7
Rear Climate Control System (Rear Climate with RearSeat Audio) . . . . . . . . . . . . . . . . . 8-8
Air Vents
Air Vents . . . . . . . . . . . . . . . . . . . . . . 8-9
Climate Control Systems
Dual Automatic Climate Control System
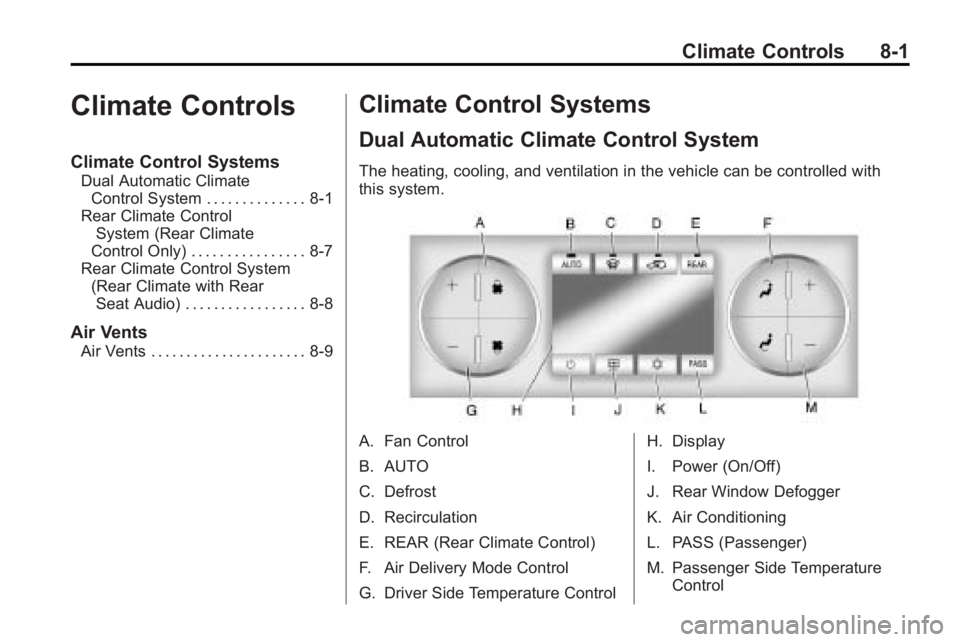
The heating, cooling, and ventilation in the vehicle can be controlled with
this system.
A. Fan Control
B. AUTO
C. Defrost
D. Recirculation
E. REAR (Rear Climate Control)
F. Air Delivery Mode Control
G. Driver Side Temperature Control H. Display
I. Power (On/Off)
J. Rear Window Defogger
K. Air Conditioning
L. PASS (Passenger)
M. Passenger Side Temperature
Control