maintenance schedule BUICK ENCLAVE 2010 Owner's Manual
[x] Cancel search | Manufacturer: BUICK, Model Year: 2010, Model line: ENCLAVE, Model: BUICK ENCLAVE 2010Pages: 438, PDF Size: 2.47 MB
Page 2 of 438
2010 Buick Enclave Owner ManualM
Wheels and Tires . . . . . . . . . . . 10-37
Jump Starting . . . . . . . . . . . . . . . 10-81
Towing . . . . . . . . . . . . . . . . . . . . . . 10-85
Appearance Care . . . . . . . . . . . 10-88
Service and Maintenance . . . 11-1
General Information . . . . . . . . . . 11-1
Scheduled Maintenance . . . . . . 11-2
Recommended Fluids, Lubricants, and Parts . . . . . . . 11-7
Maintenance Records . . . . . . . . 11-9
Technical Data . . . . . . . . . . . . . . . 12-1
Vehicle Identification . . . . . . . . . 12-1
Vehicle Data . . . . . . . . . . . . . . . . . . 12-2
Customer Information . . . . . . . 13-1
Customer Information . . . . . . . . 13-1
Reporting Safety Defects . . . . 13-13
Vehicle Data Recording and Privacy . . . . . . . . . . . . . . . . . . . . 13-15
Index . . . . . . . . . . . . . . . . . . . . . i-1
Page 26 of 438
1-20 In Brief
Driving for Better Fuel
Economy
Driving habits can affect fuel
mileage. Here are some driving tips
to get the best fuel economy
possible.
.Avoid fast starts and accelerate
smoothly.
.Brake gradually and avoid
abrupt stops.
.Avoid idling the engine for long
periods of time.
.When road and weather
conditions are appropriate, use
cruise control, if equipped.
.Always follow posted speed
limits or drive more slowly when
conditions require.
.Keep vehicle tires properly
inflated.
.Combine several trips into a
single trip.
.Replace the vehicle's tires with
the same TPC Spec number
molded into the tire's sidewall
near the size.
.Follow recommended scheduled
maintenance.
Roadside Assistance
Program
Roadside Assistance
U.S.:1-800-252-1112;
TTY Users: 1-888-889-2438;
Canada: 1-800-268-6800
As the owner of a new Buick, you
are automatically enrolled in the
Roadside Assistance program. This
program provides technically trained
advisors who are available 24 hours
a day, 365 days a year, minor repair
information or towing arrangements. Roadside Assistance and OnStar
If you have a current OnStar
subscription, press the OnStar
button and the current GPS location
will be sent to an OnStar Advisor
who will assess your problem,
contact Roadside Assistance, and
relay exact location to get you the
help you need.
Online Owner Center
The Online Owner Center is a
complimentary service that includes
online service reminders, vehicle
maintenance tips, online owner
manual, special privileges
and more.
Sign up today at:
www.gmownercenter.com/buick.
Page 93 of 438

Seats and Restraints 3-43
Airbag System Check
The airbag system does not need
regularly scheduled maintenance or
replacement. Make sure the airbag
readiness light is working. See
Airbag Readiness Light
on
page 5‑16for more information.
Notice: If an airbag covering is
damaged, opened, or broken, the
airbag may not work properly. Do
not open or break the airbag
coverings. If there are any
opened or broken airbag covers,
have the airbag covering and/or
airbag module replaced. For the
location of the airbag modules,
see What Makes an Airbag
Inflate?
on page 3‑34. See your
dealer/retailer for service.
Replacing Airbag System
Parts After a Crash
{WARNING
A crash can damage the airbag
systems in your vehicle.
A damaged airbag system may
not work properly and may
not protect you and your
passenger(s) in a crash, resulting
in serious injury or even death.
To help make sure your airbag
systems are working properly
after a crash, have them
inspected and any necessary
replacements made as soon as
possible. If an airbag inflates, you will need to
replace airbag system parts. See
your dealer/retailer for service.
If the airbag readiness light stays on
after the vehicle is started or comes
on when you are driving, the airbag
system may not work properly.
Have the vehicle serviced right
away. See
Airbag Readiness Light
on page 5‑16for more information.
Page 142 of 438

5-24 Instruments and Controls
Engine Oil Pressure Light
{WARNING
Do not keep driving if the oil
pressure is low. The engine can
become so hot that it catches fire.
Someone could be burned. Check
the oil as soon as possible and
have the vehicle serviced.
Notice: Lack of proper engine oil
maintenance can damage the
engine. The repairs would not be
covered by the vehicle warranty.
Always follow the maintenance
schedule in this manual for
changing engine oil.
The oil pressure light should come
on briefly as the engine is started.
If it does not come on have the
vehicle serviced by your dealer/
retailer.
If the light comes on and stays on, it
means that oil is not flowing through
the engine properly. The vehicle
could be low on oil and might have
some other system problem.
Security Light
This light flashes when the security
system is activated.
For more information, see Anti-Theft
Alarm System on page 2‑12.
High-Beam on Light
The high-beam on light comes on
when the high-beam headlamps are
in use.
See Headlamp High/Low-Beam
Changer
on page 6‑2for more
information.
Page 145 of 438
Instruments and Controls 5-27
When the remaining oil life is low,
the CHANGE ENGINE OIL SOON
message will appear on the display.
See“CHANGE ENGINE OIL SOON”
under Engine Oil Messages
on
page 5‑34. You should change the
oil as soon as you can. See Engine
Oil
on page 10‑8. In addition to the
engine oil life system monitoring the
oil life, additional maintenance is
recommended in the Maintenance
Schedule in this manual. See
Scheduled Maintenance
on
page 11‑2for more information.
Remember, you must reset the OIL
LIFE display yourself after each oil
change. It will not reset itself. Also,
be careful not to reset the OIL LIFE
display accidentally at any time
other than when the oil has just
been changed. It cannot be reset
accurately until the next oil change.
To reset the engine oil life system,
see Engine Oil Life System
on
page 10‑10. PARK ASSIST
If your vehicle has the Ultrasonic
Rear Parking Assist (URPA) system,
press the vehicle information button
until PARK ASSIST displays. This
display allows the system to be
turned on or off. Once in this
display, press the set/reset button to
select between ON or OFF. If you
choose ON, the system will be
turned on. If you choose OFF, the
system will be turned off. The URPA
system automatically turns back on
after each vehicle start. When the
URPA system is turned off and the
vehicle is shifted out of P (Park), the
DIC will display the PARK ASSIST
OFF message as a reminder that
the system has been turned off. See
Object Detection System Messages
on page 5‑35and
Ultrasonic
Parking Assiston page 9‑33for
more information. UNITS
Press the vehicle information button
until UNITS displays. This display
allows you to select between
English or Metric units of
measurement. Once in this display,
press the set/reset button to select
between ENGLISH or METRIC
units. All of the vehicle information
will then be displayed in the unit of
measurement selected.
FRONT TIRES or REAR TIRES
On vehicles with the Tire Pressure
Monitor System (TPMS), the
pressure for each tire can be viewed
in the DIC. The tire pressure will be
shown in either pounds per square
inch (psi) or kilopascals (kPa).
Press the vehicle information button
until the DIC displays FRONT
TIRES PSI (kPa) LEFT ##
RIGHT ##. Press the vehicle
information button again until the
DIC displays REAR TIRES
PSI (kPa) LEFT ## RIGHT ##.
Page 152 of 438
5-34 Instruments and Controls
Engine Oil Messages
CHANGE ENGINE OIL SOON
This message displays when the
engine oil needs to be changed.
When you change the engine oil, be
sure to reset the CHANGE ENGINE
OIL SOON message. SeeEngine
Oil Life System
on page 10‑10for
information on how to reset the
message. See Engine Oil
on
page 10‑8and Scheduled
Maintenanceon page 11‑2for
more information.
OIL PRESSURE LOW STOP
ENGINE
Notice: If you drive your vehicle
while the engine oil pressure is
low, severe engine damage
may occur. If a low oil pressure
warning appears on the
instrument panel cluster and/or
DIC, stop the vehicle as soon as possible. Do not drive the vehicle
until the cause of the low oil
pressure is corrected. See
Engine
Oil
on page 10‑8for more
information.
This message displays if low oil
pressure levels occur. Stop the
vehicle as soon as safely possible
and do not operate it until the cause
of the low oil pressure has been
corrected. Check the oil as soon as
possible and have your vehicle
serviced by your dealer/retailer.
See Engine Oil on page 10‑8.
Engine Power Messages
ENGINE POWER IS REDUCED
This message displays and a chime
sounds when the cooling system
temperature gets too hot and the
engine further enters the engine
coolant protection mode. See
Engine Overheating
on page 10‑18for further information. This message also displays when
the vehicle's engine power is
reduced. Reduced engine power
can affect the vehicle's ability to
accelerate. If this message is on,
but there is no reduction in
performance, proceed to your
destination. The performance may
be reduced the next time the vehicle
is driven. The vehicle may be driven
at a reduced speed while this
message is on, but acceleration and
speed may be reduced. Anytime
this message stays on, the vehicle
should be taken to your dealer/
retailer for service as soon as
possible.
Fuel System Messages
FUEL LEVEL LOW
This message displays and a chime
sounds if the fuel level is low. Refuel
as soon as possible. See
Fuel Gage
on page 5‑14andFuelon
page 9‑39for more information.
Page 292 of 438

9-50 Driving and Operating
Maintenance When Trailer
Towing
The vehicle needs service more
often when pulling a trailer. See this
manual's Maintenance Schedule or
Index for more information. Things
that are especially important in
trailer operation are automatic
transmission fluid, engine oil, axle
lubricant, belts, cooling system and
brake system. Inspect these before
and during the trip.
Check periodically to see that all
hitch nuts and bolts are tight.
Engine Cooling When Trailer
Towing
The cooling system may temporarily
overheat during severe operating
conditions. SeeEngine Overheating
on page 10‑18.
Trailer Towing
Three important considerations
have to do with weight:
.The weight of the trailer
.The weight of the trailer tongue
.The total weight on the vehicle's
tires
Weight of the Trailer
How heavy can a trailer safely be?
Speed, altitude, road grades,
outside temperature, special
equipment, and the amount of
tongue weight the vehicle can carry
must be considered. See “Weight of
the Trailer Tongue” later in this
section for more information.
Maximum trailer weight is calculated
assuming only the driver is in the
tow vehicle and it has all the
required trailering equipment.
The weight of additional optional
equipment, passengers and cargo in
the tow vehicle must be subtracted
from the maximum trailer weight.
Page 309 of 438
Vehicle Care 10-11
To reset the Engine Oil Life System:
1. Turn the ignition to ON/RUN,with the engine off.
2. Press the vehicle information button until OIL LIFE
REMAINING displays.
3. Press and hold the set/reset button until 100% is displayed.
Three chimes sound and the
CHANGE ENGINE OIL SOON
message goes off.
4. Turn the key to LOCK/OFF.
If the CHANGE ENGINE OIL SOON
message comes back on when the
vehicle is started, the engine oil life
system has not reset. Repeat the
procedure.What to Do with Used Oil
Used engine oil contains certain
elements that can be unhealthy for
your skin and could even cause
cancer. Do not let used oil stay on
your skin for very long. Clean your
skin and nails with soap and water,
or a good hand cleaner. Wash or
properly dispose of clothing or rags
containing used engine oil. See the
manufacturer's warnings about the
use and disposal of oil products.
Used oil can be a threat to the
environment. If you change your
own oil, be sure to drain all the oil
from the filter before disposal. Never
dispose of oil by putting it in the
trash, pouring it on the ground, into
sewers, or into streams or bodies of
water. Recycle it by taking it to a
place that collects used oil.
Automatic Transmission
Fluid
It is not necessary to check the
transmission fluid level.
A transmission fluid leak is the only
reason for fluid loss. If a leak
occurs, take the vehicle to the
dealer/retailer and have it repaired
as soon as possible.
Change the fluid at the intervals
listed in Scheduled Maintenance
on
page 11‑2, and be sure to use the
transmission fluid listed in
Recommended Fluids and
Lubricants on page 11‑7.
Page 310 of 438
10-12 Vehicle Care
Notice:Use of the incorrect
automatic transmission fluid may
damage the vehicle, and the
damages may not be covered by
the vehicle's warranty. Always
use the automatic transmission
fluid listed in Recommended
Fluids and Lubricants
on
page 11‑7.
The transmission fluid will not reach
the end of the dipstick unless the
transmission is at operating
temperature. If you need to check
the transmission fluid level, please
take the vehicle to your dealer/
retailer.
Engine Air Cleaner/Filter
When to Inspect the Engine Air
Cleaner/Filter
Inspect the air cleaner/filter at the
Maintenance IIintervals and replace
it at the first oil change after each
80 000 km (50,000 mile) interval.
See Scheduled Maintenance
on
page 11‑2for more information.
If you are driving in dusty/dirty
conditions, inspect the filter at each
engine oil change.
See Engine Compartment Overview
on page 10‑6for the location of the
engine air cleaner/filter.
How to Inspect the Engine Air
Cleaner/Filter
To inspect the air cleaner/filter,
remove the filter from the vehicle
and lightly shake the filter (away
from vehicle) to release loose dust
and dirt. If the filter remains caked
with dirt, a new filter is required. To inspect or replace the engine air
cleaner/filter:
1. Remove the engine cover. See
Engine Cover on page 10‑7.
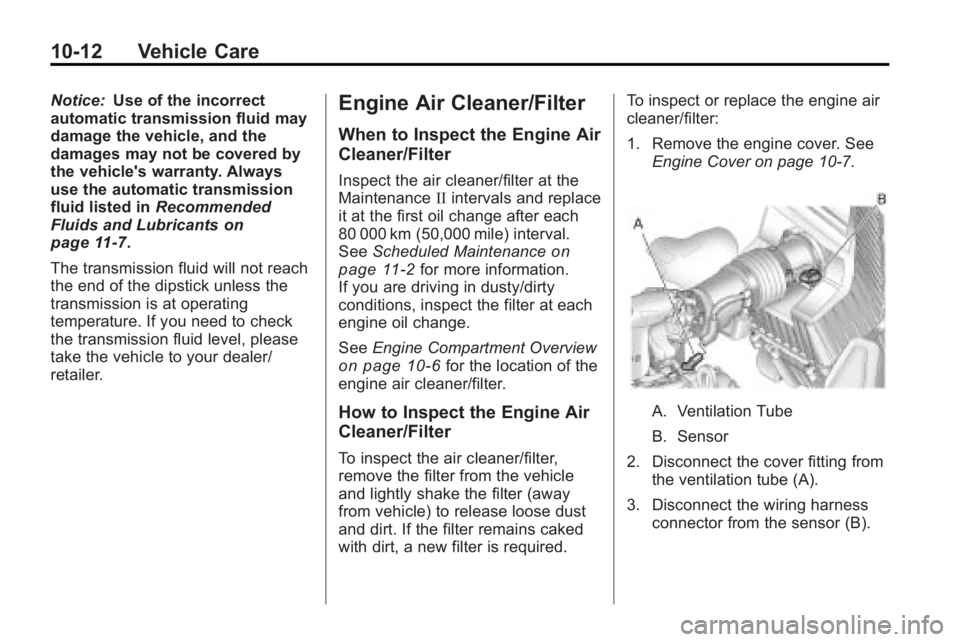
A. Ventilation Tube
B. Sensor
2. Disconnect the cover fitting from the ventilation tube (A).
3. Disconnect the wiring harness connector from the sensor (B).
Page 325 of 438

Vehicle Care 10-27
Park on a fairly steep hill, with the
vehicle facing downhill. Keeping
your foot on the regular brake, set
the parking brake.
.To check the parking brake's
holding ability: With the engine
running and the transmission in
N (Neutral), slowly remove foot
pressure from the regular brake
pedal. Do this until the vehicle is
held by the parking brake only.
.To check the P (Park)
mechanism's holding ability:
With the engine running, shift to
P (Park). Then release the
parking brake followed by the
regular brake.
Contact your dealer/retailer if
service is required.
Wiper Blade Replacement
Windshield wiper blades should be
inspected for wear or cracking. See
Scheduled Maintenance
on
page 11‑2for more information. Replacement blades come in
different types and are removed in
different ways. To replace the wiper
blade assembly:
1. Pull the windshield wiper arm
away from the windshield.
2. Press the button in the middle ofthe wiper arm connector and pull
the wiper blade away from the
arm connector.
3. Install the new wiper blade and make sure the wiper blade locks
into place. For the proper size and type see
Maintenance Replacement Parts
on
page 11‑8.
Backglass Wiper Blade
To replace the backglass wiper
blade:
1. Pull the wiper blade assembly away from the backglass.
The backglass wiper blade will
not lock in a vertical position so
care should be used when
pulling it away from the vehicle.
2. Rotate the wiper blade assembly, hold the wiper arm in
position, and push the blade
away from the wiper arm.
3. Replace the wiper blade.
4. Return the wiper arm and blade assembly to the rest position on
the glass.