lock BUICK ENCLAVE 2012 Owner's Manual
[x] Cancel search | Manufacturer: BUICK, Model Year: 2012, Model line: ENCLAVE, Model: BUICK ENCLAVE 2012Pages: 382, PDF Size: 5.43 MB
Page 299 of 382

Black plate (59,1)Buick Verano Owner Manual - 2013 - crc - 10/17/12
Vehicle Care 10-59
WARNING (Continued)
1. Set the parking brake firmly.
2. Put an automatictransmission in P (Park) or a
manual transmission in
1 (First) or R (Reverse).
3. Turn off the engine and do not restart while the vehicle
is raised.
4. Do not allow passengers to remain in the vehicle.
5. Place wheel blocks on both sides of the tire at the
opposite corner of the tire
being changed.
When the vehicle has a flat tire (2),
use the following example as a
guide to assist in the placement of
the wheel blocks (1).
1. Wheel Block
2. Flat Tire
The following information explains
how to repair or change a tire.
Tire Changing
Removing the Spare Tire and
Tools
1. Retainer Nut
2. Tool Bag Tether
3. Tool Bag
4. Spare Tire
To access the spare tire and tools:
1. Open the trunk. See Trunk on
page 2‑11.
2. Lift the load floor.
Page 300 of 382

Black plate (60,1)Buick Verano Owner Manual - 2013 - crc - 10/17/12
10-60 Vehicle Care
3. Turn the retainer nut (1)counterclockwise to remove it.
Then remove the tool bag
tether (2) from the stow rod, the
tool bag (3) containing the wheel
wrench and wheel blocks, and
the spare tire (4).
4. Remove the jack, jack handle extension, and two-piece
wrench, if equipped.
1. Hex Head Jack
2. Jack Handle Extension
3. Coin/Pierce Jack
4. Two-Piece Wrench This vehicle may have one of the
following: A coin/pierce jack (3), a
jack handle extension (2), and a
two-piece wrench (4), or a hex head
jack (1) and two-piece wrench (4).
Removing the Flat Tire and
Installing the Spare Tire
This vehicle may have aluminum
wheels with exposed wheel nuts.
Use the wheel wrench to loosen all
the wheel nuts. Do not remove
them yet.
Or, this vehicle may have steel
wheels with plastic covers.
To remove the plastic covers and
wheel nut caps, loosen the plastic
nut caps with the wheel wrench in a
counterclockwise direction.
If needed, finish loosening them
with your fingers. The plastic nut
caps will not come off.
If needed, use the flat end of the
wheel wrench and pry along the
edge of the cover until it comes off.
The edge of the wheel cover could
be sharp, so do not try to remove it
with your bare hands. Do not drop
the cover or lay it face down, as it
could become scratched or
Page 301 of 382

Black plate (61,1)Buick Verano Owner Manual - 2013 - crc - 10/17/12
Vehicle Care 10-61
damaged. Store the wheel cover in
the trunk until the flat tire is repaired
or replaced.
Once you have removed the wheel
cover, use the following procedure
to remove the flat tire and install the
spare tire.
1. Do a safety check beforeproceeding. See If a Tire Goes
Flat on page 10‑58 for more
information.2. Turn the wheel wrench counterclockwise once on each
wheel nut to loosen it. Do not
remove them yet.
3. Place the jack near the flat tire.
4. Place the wheel blocks on both sides of the tire at the opposite
corner of the tire being changed.
See If a Tire Goes Flat on
page 10‑58 for proper wheel
block placement.
5. Place the jack under the vehicle.
6. If you have a coin/pierce jack, attach the jack handle extension
to the jack by sliding the hook
through the end of the jack.
If you have a hex head jack,
place the hex tube end of the
wrench over the hex head of
the jack. Notice:
Make sure that the jack
lift head is in the correct position
or you may damage your vehicle.
The repairs would not be covered
by your warranty.
7. Position the jack lift head at the
jack location nearest the flat tire.
The location is indicated by a
notch in the flange. The jack
must not be used in any other
position.
Page 302 of 382

Black plate (62,1)Buick Verano Owner Manual - 2013 - crc - 10/17/12
10-62 Vehicle Care
{WARNING
Getting under a vehicle when it is
lifted on a jack is dangerous.
If the vehicle slips off the jack,
you could be badly injured or
killed. Never get under a vehicle
when it is supported only by
a jack.
{WARNING
Raising the vehicle with the jack
improperly positioned can
damage the vehicle and even
make the vehicle fall. To help
avoid personal injury and vehicle
damage, be sure to fit the jack lift
head into the proper location
before raising the vehicle.
{WARNING
Lifting a vehicle and getting under
it to do maintenance or repairs is
dangerous without the
appropriate safety equipment and
training. If a jack is provided with
the vehicle, it is designed only for
changing a flat tire. If it is used for
anything else, you or others could
be badly injured or killed if the
vehicle slips off the jack. If a jack
is provided with the vehicle, only
use it for changing a flat tire.
Hex Head Jack Shown, Coin/Pierce Jack Similar
8. Raise the jack by turning the handle clockwise until it comes
in contact with the notch in the
flange.
Page 304 of 382

Black plate (64,1)Buick Verano Owner Manual - 2013 - crc - 10/17/12
10-64 Vehicle Care
{WARNING
Never use oil or grease on bolts
or nuts because the nuts might
come loose. The vehicle's wheel
could fall off, causing a crash.
13. Reinstall the wheel nuts. Tighten each nut by hand until
the wheel is held against
the hub.
14. Lower the vehicle by turning the jack handle
counterclockwise.
{WARNING
Wheel nuts that are improperly or
incorrectly tightened can cause
the wheels to become loose or
come off. The wheel nuts should
be tightened with a torque wrench
to the proper torque specification
(Continued)
WARNING (Continued)
after replacing. Follow the torque
specification supplied by the
aftermarket manufacturer when
using accessory locking wheel
nuts. SeeCapacities and
Specifications on page 12‑2 for
original equipment wheel nut
torque specifications.
Notice: Improperly tightened
wheel nuts can lead to brake
pulsation and rotor damage. To
avoid expensive brake repairs,
evenly tighten the wheel nuts in
the proper sequence and to the
proper torque specification. See
Capacities and Specifications on
page 12‑2 for the wheel nut
torque specification.
15. Tighten the wheel nuts firmly in a crisscross sequence, as
shown.
16. Lower the jack all the way and remove the jack from under the
vehicle.
17. Tighten the wheel nuts firmly with the wheel wrench.
18. Remove the wheel blocks and return them to their proper
storage location.
Page 305 of 382

Black plate (65,1)Buick Verano Owner Manual - 2013 - crc - 10/17/12
Vehicle Care 10-65
When reinstalling the wheel cover or
center cap on the full-size tire,
tighten all five plastic caps hand
snug with the aid of the wheel
wrench and tighten them with the
wheel wrench an additional
one-quarter of a turn.
Notice:Wheel covers will not fit
on the vehicle's compact spare.
If you try to put a wheel cover on
the compact spare, the cover or
the spare could be damaged.
Storing a Flat or Spare Tire
and Tools
{WARNING
Storing a jack, a tire, or other
equipment in the passenger
compartment of the vehicle could
cause injury. In a sudden stop or
collision, loose equipment could
strike someone. Store all these in
the proper place. Storing the Flat Tire and Tools
1. Replace the wheel wrench and
wheel blocks in the tool bag.
2. Remove the foam container from the rear storage compartment.Coin/Pierce Jack Shown, Hex
Head Jack Similar
3. Place the flat tire in the storage compartment with the valve
stem down. 4. Place the jack and jack handle
extension, if the vehicle has one,
in the foam container.
5. Place the foam container inside the flat tire. Align the hole with
the stow rod.
6. Place the tool bag tether over the stow rod and the tool bag
rear of the flat tire.
7. Turn the retainer nut clockwise until tight.
8. Replace the load floor. The load floor may not lay flat.
The compact spare is for temporary
use only. Replace the compact
spare tire with a full-size tire as
soon as you can.
Storing the Compact Spare Tire
and Tools
Reverse the instructions for
removing the spare tire and tools to
store the compact spare tire.
Page 307 of 382

Black plate (67,1)Buick Verano Owner Manual - 2013 - crc - 10/17/12
Vehicle Care 10-67
Notice:Ignoring these steps
could result in costly damage to
the vehicle that would not be
covered by the warranty.
Trying to start the vehicle by
pushing or pulling it will not
work, and it could damage the
vehicle.
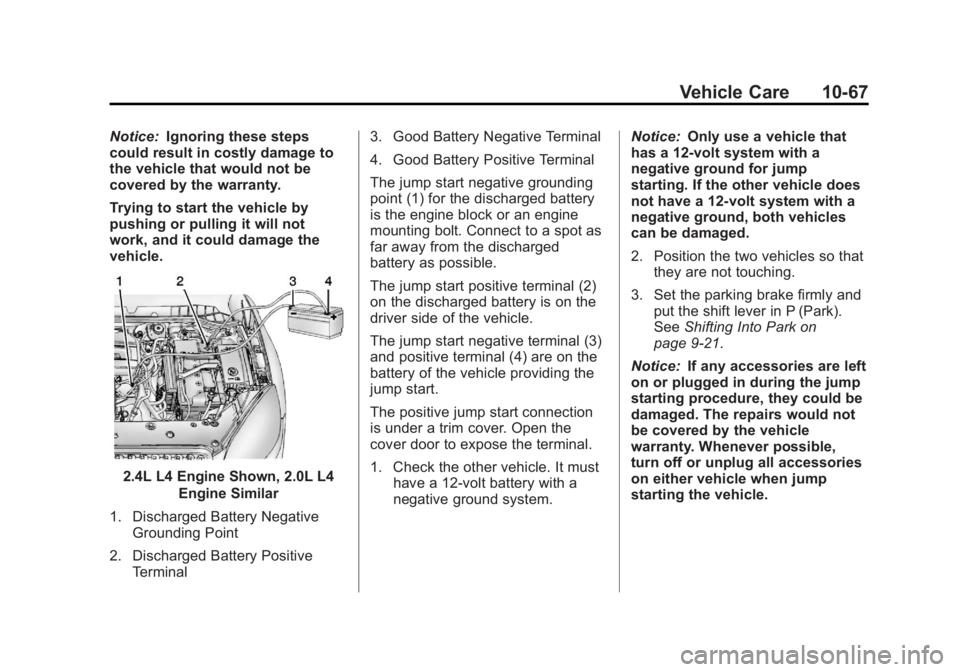
2.4L L4 Engine Shown, 2.0L L4
Engine Similar
1. Discharged Battery Negative Grounding Point
2. Discharged Battery Positive Terminal 3. Good Battery Negative Terminal
4. Good Battery Positive Terminal
The jump start negative grounding
point (1) for the discharged battery
is the engine block or an engine
mounting bolt. Connect to a spot as
far away from the discharged
battery as possible.
The jump start positive terminal (2)
on the discharged battery is on the
driver side of the vehicle.
The jump start negative terminal (3)
and positive terminal (4) are on the
battery of the vehicle providing the
jump start.
The positive jump start connection
is under a trim cover. Open the
cover door to expose the terminal.
1. Check the other vehicle. It must
have a 12-volt battery with a
negative ground system. Notice:
Only use a vehicle that
has a 12-volt system with a
negative ground for jump
starting. If the other vehicle does
not have a 12-volt system with a
negative ground, both vehicles
can be damaged.
2. Position the two vehicles so that they are not touching.
3. Set the parking brake firmly and put the shift lever in P (Park).
See Shifting Into Park on
page 9‑21.
Notice: If any accessories are left
on or plugged in during the jump
starting procedure, they could be
damaged. The repairs would not
be covered by the vehicle
warranty. Whenever possible,
turn off or unplug all accessories
on either vehicle when jump
starting the vehicle.
Page 308 of 382

Black plate (68,1)Buick Verano Owner Manual - 2013 - crc - 10/17/12
10-68 Vehicle Care
4. Turn the ignition to LOCK/OFF.Turn off all lights and
accessories in both vehicles,
except the hazard warning
flashers if needed.
{WARNING
An electric fan can start up even
when the engine is not running
and can injure you. Keep hands,
clothing and tools away from any
underhood electric fan.
{WARNING
Using a match near a battery can
cause battery gas to explode.
People have been hurt doing this,
and some have been blinded.
Use a flashlight if you need more
light.
(Continued)
WARNING (Continued)
Be sure the battery has enough
water. You do not need to add
water to the battery installed in
your new vehicle. But if a battery
has filler caps, be sure the right
amount of fluid is there. If it is low,
add water to take care of that
first. If you do not, explosive gas
could be present.
Battery fluid contains acid that
can burn you. Do not get it on
you. If you accidentally get it in
your eyes or on your skin, flush
the place with water and get
medical help immediately.
{WARNING
Fans or other moving engine
parts can injure you badly. Keep
your hands away from moving
parts once the engine is running.
5. Connect one end of the red positive (+) cable to the jump
start positive (+) post (2).
6. Connect the other end of the red positive (+) cable to the
positive (+) terminal of the good
battery (4).
7. Connect one end of the black negative (–) cable to the
negative (–) terminal of the good
battery (3).
8. Connect the other end of the black negative (–) cable to the
negative (–) grounding point (1).
Page 312 of 382

Black plate (72,1)Buick Verano Owner Manual - 2013 - crc - 10/17/12
10-72 Vehicle Care
Notice:Towing the vehicle from
the rear could damage it. Also,
repairs would not be covered by
the vehicle warranty. Never have
the vehicle towed from the rear.
Appearance Care
Exterior Care
Locks
Locks are lubricated at the factory.
Use a de-icing agent only when
absolutely necessary, and have the
locks greased after using. See
Recommended Fluids and
Lubricants.
Washing the Vehicle
To preserve the vehicle's finish,
wash it often and out of direct
sunlight.
Notice: Do not use
petroleum-based, acidic,
or abrasive cleaning agents as
they can damage the vehicle's
paint, metal, or plastic parts.
If damage occurs, it would not be
covered by the vehicle's warranty. Approved cleaning products can
be obtained from your dealer.
Follow all manufacturer
directions regarding correct
product usage, necessary safety
precautions, and appropriate
disposal of any vehicle care
product.
Notice:
Avoid using
high-pressure washes closer than
30 cm (12 in) to the surface of the
vehicle. Use of power washers
exceeding 8,274 kPa (1,200 psi)
can result in damage or removal
of paint and decals.
Rinse the vehicle well, before
washing and after, to remove all
cleaning agents completely. If they
are allowed to dry on the surface,
they could stain.
Dry the finish with a soft, clean
chamois or an all-cotton towel to
avoid surface scratches and water
spotting.
Page 314 of 382

Black plate (74,1)Buick Verano Owner Manual - 2013 - crc - 10/17/12
10-74 Vehicle Care
Weatherstrips
Apply silicone grease on
weatherstrips to make them last
longer, seal better, and not stick or
squeak. Lubricate weatherstrips
once a year. Black marks from
rubber material on painted surfaces
can be removed by rubbing with a
clean cloth. SeeRecommended
Fluids and Lubricants on
page 11‑12.
Tires
Use a stiff brush with tire cleaner to
clean the tires.
Notice: Using petroleum-based
tire dressing products on the
vehicle may damage the paint
finish and/or tires. When applying
a tire dressing, always wipe off
any overspray from all painted
surfaces on the vehicle.
Wheels and Trim —Aluminum
or Chrome
Use a soft, clean cloth with mild
soap and water to clean the wheels.
After rinsing thoroughly with clean
water, dry with a soft, clean towel.
A wax may then be applied.
Notice: Chrome wheels and other
chrome trim may be damaged if
the vehicle is not washed after
driving on roads that have been
sprayed with magnesium,
calcium, or sodium chloride.
These chlorides are used on
roads for conditions such as ice
and dust. Always wash the
chrome with soap and water after
exposure.
Notice: To avoid surface damage,
do not use strong soaps,
chemicals, abrasive polishes,
cleaners, brushes, or cleaners
that contain acid on aluminum or
chrome-plated wheels. Use only
approved cleaners. Also, never
drive a vehicle with aluminum or
chrome-plated wheels through an automatic car wash that uses
silicone carbide tire cleaning
brushes. Damage could occur
and the repairs would not be
covered by the vehicle warranty.
Steering, Suspension, and
Chassis Components
Visually inspect the front and rear
suspension and steering system for
damaged, loose, or missing parts or
signs of wear. Inspect the power
steering for proper hook-up, binding,
leaks, cracks, chafing, etc. Visually
check constant velocity joints,
rubber boots, and axle seals for
leaks.
Body Component Lubrication
Lubricate all key lock cylinders,
hood hinges, liftgate hinges, and the
steel fuel door hinge unless the
components are plastic. Applying
silicone grease on weatherstrips
with a clean cloth will make them
last longer, seal better, and not stick
or squeak.