lock BUICK ENCLAVE 2012 Owners Manual
[x] Cancel search | Manufacturer: BUICK, Model Year: 2012, Model line: ENCLAVE, Model: BUICK ENCLAVE 2012Pages: 382, PDF Size: 5.43 MB
Page 268 of 382

Black plate (28,1)Buick Verano Owner Manual - 2013 - crc - 10/17/12
10-28 Vehicle Care
License Plate Lamp
Lamp Assembly
Bulb Assembly1. Bulb Socket
2. Bulb
3. Lamp Assembly
To replace one of these bulbs:
1. Push the left end of the lamp
assembly toward the right.
2. Turn the lamp assembly down to remove it.
3. Turn the bulb socket (1) counterclockwise to remove it
from the lamp assembly (3).
4. Pull the bulb (2) straight out of the bulb socket (1).
5. Push the replacement bulb straight into the bulb socket and
turn the bulb socket clockwise to
install it into the lamp assembly.
6. Turn the lamp assembly into the lamp assembly opening
engaging the clip side first.
7. Push on the lamp side opposite the clip until the lamp assembly
snaps into place.
Replacement Bulbs
Exterior Lamp Bulb
Number
Back-Up Lamp 921K
Deck Lid Taillamp 194
Fog Lamp H11 LL
Front Parking/Turn
Signal Lamp 7444NA
High‐Beam
Headlamp H9LL
License Plate Lamp W5W LL
Low‐Beam
Headlamp H11
Rear Turn
Signal Lamp H21W
Stoplamp/Taillamp 7443
For replacement bulbs not listed
here, contact your dealer.
Page 269 of 382
Black plate (29,1)Buick Verano Owner Manual - 2013 - crc - 10/17/12
Vehicle Care 10-29
Electrical System
Electrical System
Overload
The vehicle has fuses and circuit
breakers to protect against an
electrical system overload.
When the current electrical load is
too heavy, the circuit breaker opens
and closes, protecting the circuit
until the current load returns to
normal or the problem is fixed. This
greatly reduces the chance of circuit
overload and fire caused by
electrical problems.
Fuses and circuit breakers protect
power devices in the vehicle.
Replace a bad fuse with a new one
of the identical size and rating.
If there is a problem on the road and
a fuse needs to be replaced, the
same amperage fuse can be
borrowed. Choose some feature of
the vehicle that is not needed to use
and replace it as soon as possible.
Headlamp Wiring
An electrical overload may cause
the lamps to go on and off, or in
some cases to remain off. Have the
headlamp wiring checked right away
if the lamps go on and off or
remain off.
Windshield Wipers
If the wiper motor overheats due to
heavy snow or ice, the windshield
wipers will stop until the motor
cools, and the wiper control is
turned off. After removal of the
blockage, the wiper motor will
restart when the control is moved to
the desired operating position.
Although the circuit is protected
from electrical overload, overload
due to heavy snow or ice may
cause wiper linkage damage.
Always clear ice and heavy snow
from the windshield before using the
windshield wipers.
If the overload is caused by an
electrical problem and not snow or
ice, be sure to get it fixed.
Fuses and Circuit
Breakers
The wiring circuits in the vehicle are
protected from short circuits by a
combination of fuses and circuit
breakers. This greatly reduces the
chance of damage caused by
electrical problems.
To check a fuse, look at the
silver-colored band inside the fuse.
If the band is broken or melted,
replace the fuse. Be sure to replace
a bad fuse with a new one of the
identical size and rating.
Fuses of the same amperage can
be temporarily borrowed from
another fuse location, if a fuse goes
out. Replace the fuse as soon as
possible.
To identify and check fuses, circuit
breakers, and relays, seeEngine
Compartment Fuse Block on
page 10‑30, Instrument Panel Fuse
Block on page 10‑33, and Rear
Compartment Fuse Block on
page 10‑35.
Page 270 of 382
Black plate (30,1)Buick Verano Owner Manual - 2013 - crc - 10/17/12
10-30 Vehicle Care
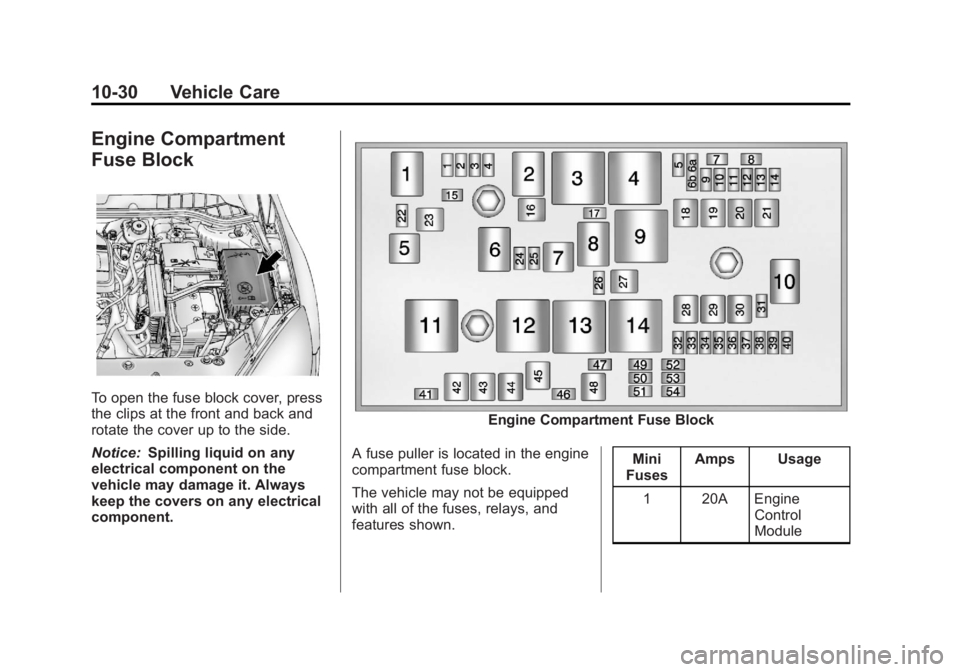
Engine Compartment
Fuse Block
To open the fuse block cover, press
the clips at the front and back and
rotate the cover up to the side.
Notice:Spilling liquid on any
electrical component on the
vehicle may damage it. Always
keep the covers on any electrical
component.
Engine Compartment Fuse Block
A fuse puller is located in the engine
compartment fuse block.
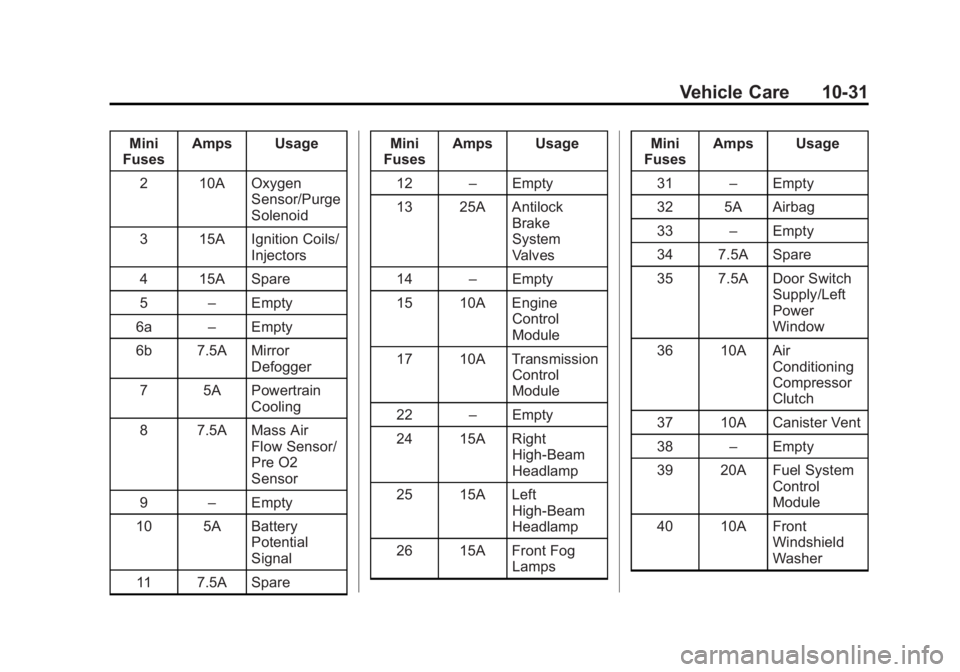
The vehicle may not be equipped
with all of the fuses, relays, and
features shown. Mini
Fuses Amps Usage
1 20A Engine Control
Module
Page 271 of 382
Black plate (31,1)Buick Verano Owner Manual - 2013 - crc - 10/17/12
Vehicle Care 10-31
Mini
Fuses Amps Usage
2 10A Oxygen Sensor/Purge
Solenoid
3 15A Ignition Coils/ Injectors
4 15A Spare
5 –Empty
6a –Empty
6b 7.5A Mirror Defogger
7 5A Powertrain Cooling
8 7.5A Mass Air Flow Sensor/
Pre O2
Sensor
9 –Empty
10 5A Battery Potential
Signal
11 7.5A Spare Mini
Fuses Amps Usage
12 –Empty
13 25A Antilock Brake
System
Valves
14 –Empty
15 10A Engine Control
Module
17 10A Transmission Control
Module
22 –Empty
24 15A Right High-Beam
Headlamp
25 15A Left High-Beam
Headlamp
26 15A Front Fog Lamps Mini
Fuses Amps Usage
31 –Empty
32 5A Airbag
33 –Empty
34 7.5A Spare
35 7.5A Door Switch Supply/Left
Power
Window
36 10A Air Conditioning
Compressor
Clutch
37 10A Canister Vent
38 –Empty
39 20A Fuel System Control
Module
40 10A Front Windshield
Washer
Page 272 of 382

Black plate (32,1)Buick Verano Owner Manual - 2013 - crc - 10/17/12
10-32 Vehicle Care
Mini
Fuses Amps Usage
41 –Empty
46 –Empty
47 15A Horn
49 20A Fuel Pump
50 –Empty
51 5A Inside Rear View Mirror
52 –Empty
53 10A Ignition Engine
Control
Module/
Transmission
Control
Module Mini
Fuses Amps Usage
54 7.5A Instrument Cluster/Fuel
System
Control
Module/
Heater,
Ventilation,
and Air
Conditioning
Run/Crank
J-Case Fuses Amps Usage
16 30A Starter Control
18 30A Rear Window Defogger
19 30A Front Power Window
20 30A Rear Power Window J-Case
Fuses Amps Usage
21 40A Rear Electrical
Center
23 –Empty
27 50A Spare
28 –Empty
29 30A Electric Parking
Brake
30 60A Antilock Brake
System
Pump
42 40A Engine Cooling Fan
(RPO LEA)
43 30A Front Wipers
44 –Empty
Page 273 of 382
Black plate (33,1)Buick Verano Owner Manual - 2013 - crc - 10/17/12
Vehicle Care 10-33
J-CaseFuses Amps Usage
45 30A Engine Cooling Fan
(RPO LEA)
48 60A Engine Cooling Fan
Relays Usage 1 Empty
2 Starter
3 Engine Control Powertrain
4 Rear Window Defogger
5 Empty
6 Empty
7 Spare
8 Empty
9 Spare
10 EGR/Coolant Pump/ AIR Solenoid Valve Relays Usage
11 Engine Cooling Fan (RPO LEA)
12 Engine Cooling Fan (RPO LEA)
13 Engine Cooling Fan (RPO LEA)
14 Run/Crank
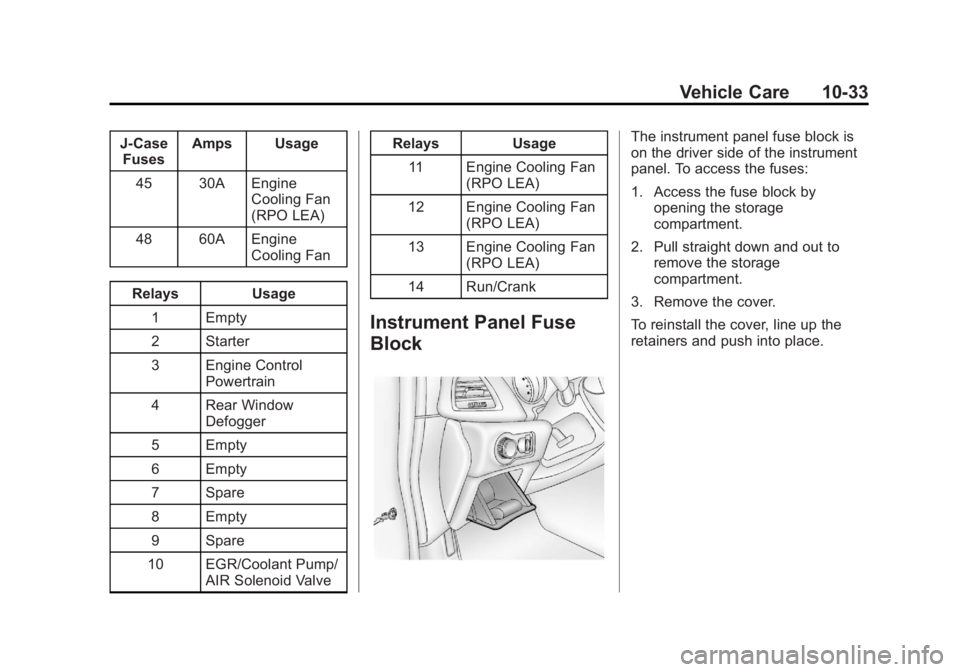
Instrument Panel Fuse
Block
The instrument panel fuse block is
on the driver side of the instrument
panel. To access the fuses:
1. Access the fuse block by opening the storage
compartment.
2. Pull straight down and out to remove the storage
compartment.
3. Remove the cover.
To reinstall the cover, line up the
retainers and push into place.
Page 274 of 382

Black plate (34,1)Buick Verano Owner Manual - 2013 - crc - 10/17/12
10-34 Vehicle Care
Instrument Panel Fuse Block
The vehicle may not be equipped
with all of the fuses, relays, and
features shown. Fuses Amps Usage
1 2A Body Control Module
2 20A Body Control Module
3 20A Body Control Module
4 20A Infotainment System
5 10A Information Display/
Parking
Assist
6 20A Ignition/ Electronic
Key System
7 20A Power Outlet
8 30A Body Control Module
9 30A Body Control Module
10 30A Body Control Module Fuses Amps Usage
11 40A Interior Fan
12 25A Driver Power Seat
13 –Not Used
14 7.5A Diagnostic Connector
15 10A Airbag
16 10A Central Locking
System/
Tailgate
17 10A Air Conditioning
System
18 30A Infotainment System
19 30A Body Control Module
20 5A Passenger Power Seat
21 7.5A Instrument Cluster
Page 275 of 382

Black plate (35,1)Buick Verano Owner Manual - 2013 - crc - 10/17/12
Vehicle Care 10-35
Fuses Amps Usage22 2A/5A Ignition/ Electronic
Key System
23 20A Body Control Module
24 20A Body Control Module
25 –Not Used
26 –Not Used
Relays Usage 1 Trunk Open
2 Door Security
3 Power OutletRear Compartment Fuse
Block
The rear compartment fuse block,
if equipped, is located on the left
side of the trunk behind a cover.
Page 290 of 382

Black plate (50,1)Buick Verano Owner Manual - 2013 - crc - 10/17/12
10-50 Vehicle Care
4. Use the thumbwheel to scroll tothe Tire Pressure Menu Item
screen.
5. Press the SET/CLR button to begin the sensor matching
process.
A message asking if the process
should begin should appear.
6. Press the SET/CLR button again to confirm the selection.
The horn sounds twice to signal
the receiver is in relearn mode
and the TIRE LEARNING
ACTIVE message displays on
the DIC screen.
7. Start with the driver side front tire.
8. Place the relearn tool against the tire sidewall, near the valve
stem. Then press the button to
activate the TPMS sensor.
A horn chirp confirms that the
sensor identification code has
been matched to this tire and
wheel position. 9. Proceed to the passenger side
front tire, and repeat the
procedure in Step 8.
10. Proceed to the passenger side rear tire, and repeat the
procedure in Step 8.
11. Proceed to the driver side rear tire, and repeat the procedure
in Step 8. The horn sounds two
times to indicate the sensor
identification code has been
matched to the driver side rear
tire, and the TPMS sensor
matching process is no longer
active. The TIRE LEARNING
ACTIVE message on the DIC
display screen goes off.
12. Turn the ignition to LOCK/OFF or press STOP to turn the
ignition off.
13. Set all four tires to the recommended air pressure
level as indicated on the Tire
and Loading Information label.Tire Inspection
We recommend that the tires,
including the spare tire, if the
vehicle has one, be inspected
for signs of wear or damage at
least once a month.
Replace the tire if:
.The indicators at three or
more places around the tire
can be seen.
.There is cord or fabric
showing through the tire's
rubber.
.The tread or sidewall is
cracked, cut, or snagged
deep enough to show cord or
fabric.
.The tire has a bump, bulge,
or split.
Page 294 of 382
Black plate (54,1)Buick Verano Owner Manual - 2013 - crc - 10/17/12
10-54 Vehicle Care
{WARNING
Mixing tires of different sizes,
brands, or types may cause
loss of control of the vehicle,
resulting in a crash or other
vehicle damage. Use the
correct size, brand, and type
of tires on all wheels.
{WARNING
Using bias-ply tires on the
vehicle may cause the wheel
rim flanges to develop cracks
after many miles of driving.
A tire and/or wheel could fail
suddenly and cause a crash.
Use only radial-ply tires with
the wheels on the vehicle.
If the vehicle tires must be
replaced with a tire that does not
have a TPC Spec number, make sure they are the same size,
load range, speed rating, and
construction (radial) as the
original tires.
Vehicles that have a tire
pressure monitoring system
could give an inaccurate
low-pressure warning if non-TPC
Spec rated tires are installed.
See
Tire Pressure Monitor
System on page 10‑46.
The Tire and Loading
Information label indicates the
original equipment tires on the
vehicle. See Vehicle Load Limits
on page 9‑10.
Different Size Tires and
Wheels
If wheels or tires are installed that
are a different size than the original
equipment wheels and tires, vehicle
performance, including its braking,
ride and handling characteristics,
stability, and resistance to rollover may be affected. If the vehicle has
electronic systems such as antilock
brakes, rollover airbags, traction
control, electronic stability control,
or All-Wheel Drive, the performance
of these systems can also be
affected.
{WARNING
If different sized wheels are used,
there may not be an acceptable
level of performance and safety if
tires not recommended for those
wheels are selected. This
increases the chance of a crash
and serious injury. Only use GM
specific wheel and tire systems
developed for the vehicle, and
have them properly installed by a
GM certified technician.
See Buying New Tires on
page 10‑53 andAccessories and
Modifications on page 10‑3.