air condition BUICK ENVISION 2021 User Guide
[x] Cancel search | Manufacturer: BUICK, Model Year: 2021, Model line: ENVISION, Model: BUICK ENVISION 2021Pages: 360, PDF Size: 10.4 MB
Page 119 of 360
Buick E2UB-N Owner Manual (GMNA-Localizing-U.S./Canada/Mexico-
14583509) - 2021 - CRC - 1/8/21
118 Lighting
To enable the IntelliBeam system, press
bon the turn signal lever when it is
dark outside and the exterior lamp control is
in AUTO or
2.
Driving with IntelliBeam
The system only activates the high beams
when driving over 40 km/h (25 mph).
The blue high-beam on light appears on the
instrument cluster when the high beams
are on.
There is a sensor near the top center of the
windshield that automatically controls the
system. Keep this area of the windshield
clear of debris to allow for best system
performance.
The high-beam headlamps remain on, under
the automatic control, until one of the
following occurs:
.The system detects an approaching
vehicle's headlamps.
.The system detects a preceding vehicle's
taillamps.
.The outside light is bright enough that
high-beam headlamps are not required.
.The vehicle's speed drops below 20 km/h
(12 mph).
.The IntelliBeam system is disabled by the
button on the turn signal lever. If this
happens, press
bon the turn signal
lever when the exterior lamp control is in
the AUTO or
2position to reactivate the
IntelliBeam system. The instrument
cluster light will come on to indicate the
IntelliBeam system is reactivated.
The high beams may not turn off
automatically if the system cannot detect
another vehicle's lamps because of any of
the following:
.The other vehicle's lamps are missing,
damaged, obstructed from view,
or otherwise undetected.
.The other vehicle's lamps are covered
with dirt, snow, and/or road spray.
.The other vehicle's lamps cannot be
detected due to dense exhaust, smoke,
fog, snow, road spray, mist, or other
airborne obstructions.
.The vehicle's windshield is dirty, cracked,
or obstructed by something that blocks
the view of the light sensor.
.The vehicle is loaded such that the front
end points upward, causing the light
sensor to aim high and not detect
headlamps and taillamps.
.Driving on winding or hilly roads.
The automatic high-beam headlamps may
need to be disabled if any of the above
conditions exist.
Adaptive Headlight System
If equipped, this Adaptive Headlight System
allows the high beam to function as the
main driving light at night. The sensor in
the windshield detects the lights of
oncoming or preceding vehicles.
The system turns on all the high-beam
headlamp LED segment when it is dark
enough and there is no other traffic present.
This light
bcomes on in the instrument
cluster when the Adaptive Headlight System
is enabled.
Page 120 of 360
Buick E2UB-N Owner Manual (GMNA-Localizing-U.S./Canada/Mexico-
14583509) - 2021 - CRC - 1/8/21
Lighting 119
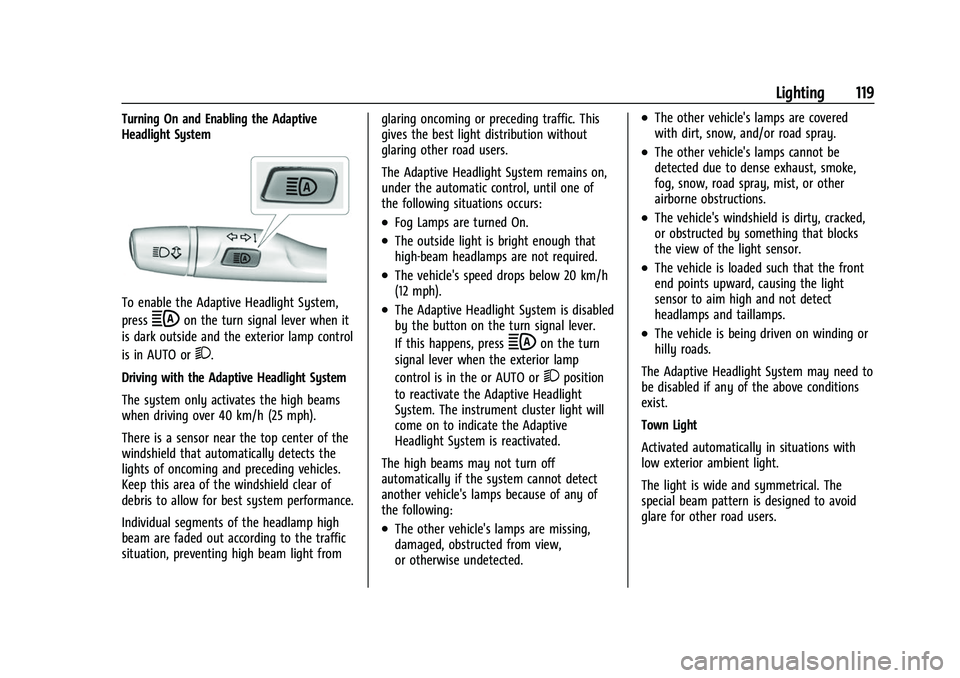
Turning On and Enabling the Adaptive
Headlight System
To enable the Adaptive Headlight System,
press
bon the turn signal lever when it
is dark outside and the exterior lamp control
is in AUTO or
2.
Driving with the Adaptive Headlight System
The system only activates the high beams
when driving over 40 km/h (25 mph).
There is a sensor near the top center of the
windshield that automatically detects the
lights of oncoming and preceding vehicles.
Keep this area of the windshield clear of
debris to allow for best system performance.
Individual segments of the headlamp high
beam are faded out according to the traffic
situation, preventing high beam light from glaring oncoming or preceding traffic. This
gives the best light distribution without
glaring other road users.
The Adaptive Headlight System remains on,
under the automatic control, until one of
the following situations occurs:
.Fog Lamps are turned On.
.The outside light is bright enough that
high-beam headlamps are not required.
.The vehicle's speed drops below 20 km/h
(12 mph).
.The Adaptive Headlight System is disabled
by the button on the turn signal lever.
If this happens, press
bon the turn
signal lever when the exterior lamp
control is in the or AUTO or
2position
to reactivate the Adaptive Headlight
System. The instrument cluster light will
come on to indicate the Adaptive
Headlight System is reactivated.
The high beams may not turn off
automatically if the system cannot detect
another vehicle's lamps because of any of
the following:
.The other vehicle's lamps are missing,
damaged, obstructed from view,
or otherwise undetected.
.The other vehicle's lamps are covered
with dirt, snow, and/or road spray.
.The other vehicle's lamps cannot be
detected due to dense exhaust, smoke,
fog, snow, road spray, mist, or other
airborne obstructions.
.The vehicle's windshield is dirty, cracked,
or obstructed by something that blocks
the view of the light sensor.
.The vehicle is loaded such that the front
end points upward, causing the light
sensor to aim high and not detect
headlamps and taillamps.
.The vehicle is being driven on winding or
hilly roads.
The Adaptive Headlight System may need to
be disabled if any of the above conditions
exist.
Town Light
Activated automatically in situations with
low exterior ambient light.
The light is wide and symmetrical. The
special beam pattern is designed to avoid
glare for other road users.
Page 121 of 360
Buick E2UB-N Owner Manual (GMNA-Localizing-U.S./Canada/Mexico-
14583509) - 2021 - CRC - 1/8/21
120 Lighting
Country Light
Activated automatically when low beams
come on. This is the normal low beam light
pattern.
The illumination of the current lane and the
side of the road is improved, reducing glare
to oncoming and preceding vehicles.
The high beams may not turn off
automatically if the system cannot detect
another vehicle's lamps because of any of
the following:
.The other vehicle's lamps are missing,
damaged, obstructed from view,
or otherwise undetected.
.The other vehicle's lamps are covered
with dirt, snow, and/or road spray.
.The other vehicle's lamps cannot be
detected due to dense exhaust, smoke,
fog, snow, road spray, mist, or other
airborne obstructions.
.The vehicle's windshield is dirty, cracked,
or obstructed by something that blocks
the view of the light sensor.
.The vehicle is loaded such that the front
end points upward, causing the light
sensor to aim high and not detect
headlamps and taillamps.
.Driving on winding or hilly roads.The automatic high-beam headlamps may
need to be disabled if any of the above
conditions exist.
Exterior Lamps Off Reminder
A warning chime sounds if the driver door is
opened while the ignition is off and the
exterior lamps are on.
Headlamp High/Low-Beam
Changer
3:
Push the turn signal lever away from
you and release, to turn the high beams on.
To return to low beams, push the lever
again or pull it toward you and release.
This indicator light turns on in the
instrument cluster when the high-beam
headlamps are on.
Flash-to-Pass
To flash the high beams, pull the turn signal
lever toward you, and release.
Daytime Running Lamps (DRL)
DRL can make it easier for others to see the
front of the vehicle during the day.
The DRL system comes on when the
following conditions are met:
.The ignition is on.
.The exterior lamp control is in AUTO.
.The transmission is not in P (Park).
.The light sensor determines it is daytime.
When the DRL system is on, only the DRL
are on. The taillamps, sidemarker lamps,
instrument panel lights, and other lamps
will not be on.
When it begins to get dark, the automatic
headlamp system switches from DRL to the
headlamps.
To turn off the DRL, turn the exterior lamp
control to the off position and then release.
For vehicles first sold in Canada, off will only
work when the vehicle is parked.
Automatic Headlamp System
When the exterior lamp control is set to
AUTO and it is dark enough outside, the
headlamps come on automatically.
Page 138 of 360
Buick E2UB-N Owner Manual (GMNA-Localizing-U.S./Canada/Mexico-
14583509) - 2021 - CRC - 1/8/21
Infotainment System 137
Music can be launched by touching
Bluetooth from the recent sources list on
the left of the display or by touching the
More option and then touching the
Bluetooth device.
To play music via Bluetooth:1. Power on the device, and pair to connect the device.
2. Once paired, touch Audio from the Home Page, then touch Bluetooth from the
recent sources list on the left of the
display.
Bluetooth Sound Menu
See “Infotainment System Sound Menu”
under AM-FM Radio 0130.
Manage Bluetooth Devices
From the Home Page: 1. Touch Audio.
2. Touch Devices to add or delete devices.
When using the Bluetooth audio source, the
radio may not be able to launch specific
applications on your device. Use the device
to start audio playback when it is safe to
do so. All devices launch audio differently. When
selecting Bluetooth audio as a source, the
radio may show as paused on the display.
Touch
rto begin playback.
Browse functionality will be provided where
supported by the Bluetooth device. This
media content will not be part of the
MyMedia source mode.
Some smartphones support sending
Bluetooth music information to display on
the radio. When the radio receives this
information, it will check to see if any is
available and display it. For more
information about supported Bluetooth
features, see your dealer.
OnStar System
4G LTE
If equipped with 4G LTE, up to seven
devices, such as smartphones, tablets, and
laptops, can be connected to high-speed
Internet through the vehicle’s built-in Wi-Fi
hotspot.
Call 1-888-4ONSTAR (1-888-466-7827) to
connect to an OnStar Advisor for assistance.
See www.onstar.com for vehicle availability,
details, and system limitations. Service and connectivity may vary by make, model,
year, carrier, availability, and conditions.
4G LTE service is available in select markets.
4G LTE performance is based on industry
averages and vehicle systems design. Some
services require a data plan.
The OnStar App
If equipped, the infotainment system has
OnStar controls in the embedded OnStar app
on the Home Page. Most OnStar functions
that can be performed with the buttons can
be done using the app. To open the app,
touch the OnStar icon on the Home Page.
App updates require a corresponding service
plan. Features vary by region and model.
Features are subject to change. For more
information, see my.buick.com/learn or
press
Q.
Services
The Services tab displays the default view
for the app. Use this page to launch the
available OnStar services. Touch a service to
open its display. Touch Wi-Fi to launch the
connections manager. Turn-by-Turn and
Advisor Call are the other tiled options.
Page 142 of 360
Buick E2UB-N Owner Manual (GMNA-Localizing-U.S./Canada/Mexico-
14583509) - 2021 - CRC - 1/8/21
Infotainment System 141
.Clear Recent Destinations–Touch\to
clear the recent destinations.
.Clear Search History –Touch\to clear
the search history.
About
Touch to display software information,
such as:
.Telenav Terms and Conditions
.Telenav Privacy Statement
.Navigation Version
Maps
The Navigation application requires a map
database to run. It is stored on an SD card
that is connected to the infotainment
system. If the map database is not available,
a missing SD card error message will be
displayed.
SD Card Error Messages
The SD card only works for one unique
vehicle. The SD card must pass
authentication verification to be used for
that specific vehicle. If the SD card has a
switch that can be set to read-only mode,
ensure that it is in the upward position and
not in read-only. Potential error scenarios and messages
include:
.The SD card has initialized for the first
time:
“Once initialized, this SD card can
only be used for navigation in this
vehicle.”
.The SD card is not working properly: “SD
card is not functioning properly.
(Error Code).”
.The SD card is not paired with the
existing system: “This SD card is not valid
in this vehicle for navigation. See Owner’s
Manual for more detail or visit your
dealer. (Error Code).”
.The SD card has been removed from the
slot: “SD card has been removed.
(Error Code).”
Touch Confirm to resume after the
initialization error message. For the other
messages, touch OK to return to the
Home Page.
Navigation Symbols
Following are the most common symbols
that appear in the Nav application.
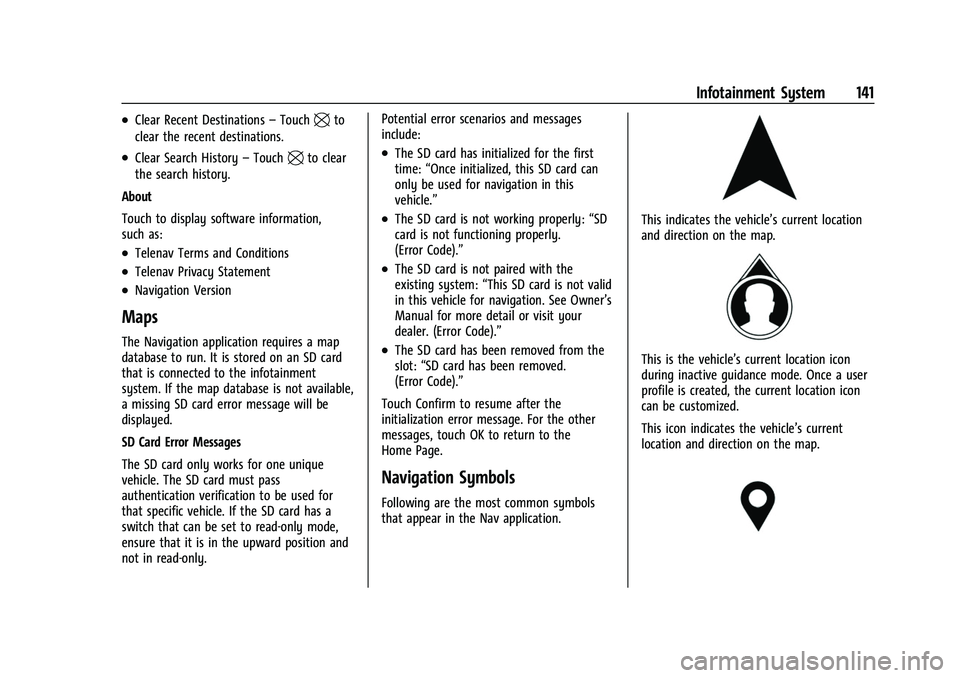
This indicates the vehicle’s current location
and direction on the map.
This is the vehicle’s current location icon
during inactive guidance mode. Once a user
profile is created, the current location icon
can be customized.
This icon indicates the vehicle’s current
location and direction on the map.
Page 148 of 360
Buick E2UB-N Owner Manual (GMNA-Localizing-U.S./Canada/Mexico-
14583509) - 2021 - CRC - 1/8/21
Infotainment System 147
search icon will display an alert message
that allows the passenger to search for a
destination as if the vehicle were stopped.
Global Positioning System (GPS)
If equipped, the position of the vehicle is
determined by using satellite signals, various
vehicle signals, and map data.
At times, other interference such as the
satellite condition, road configuration,
condition of the vehicle, and/or other
circumstances can affect the navigation
system's ability to determine the accurate
position of the vehicle.
The GPS shows the current position of the
vehicle using signals sent by GPS satellites.
When the vehicle is not receiving signals
from the satellites, a symbol appears on the
map screen.
This system might not be available or
interference can occur if any of the
following are true:
.Signals are obstructed by tall buildings,
trees, large trucks, or a tunnel.
.Satellites are being repaired or improved.For more information if the GPS is not
functioning properly, see
Problems with
Route Guidance 0147 and
If the System Needs Service 0148.
Vehicle Positioning
At times, the position of the vehicle on the
map could be inaccurate due to one or more
of the following reasons:
.The road system has changed.
.The vehicle is driving on slippery road
surfaces such as sand, gravel, or snow.
.The vehicle is traveling on winding roads
or long, straight roads.
.The vehicle is approaching a tall building
or a large vehicle.
.The surface streets run parallel to a
freeway.
.The vehicle has been transferred by a
vehicle carrier or a ferry.
.The current position calibration is set
incorrectly.
.The vehicle is traveling at high speed.
.The vehicle changes directions more than
once, or the vehicle is turning on a turn
table in a parking lot.
.The vehicle is entering and/or exiting a
parking lot, garage, or a lot with a roof.
.The GPS signal is not received.
.A roof carrier is installed on the vehicle.
.Tire chains have been installed.
.The tires are replaced or worn.
.The tire pressure for the tires is incorrect.
.This is the first navigation use after the
map data is updated.
.The 12-volt battery has been disconnected
for several days.
.The vehicle is driving in heavy traffic
where driving is at low speeds, and the
vehicle is stopped and started repeatedly.
Problems with Route Guidance
Inappropriate route guidance can occur
under one or more of the following
conditions:
.The turn was not made on the road
indicated.
.Route guidance might not be available
when using automatic rerouting for the
next right or left turn.
.The route might not be changed when
using automatic rerouting.
.There is no route guidance when turning
at an intersection.
.Plural names of places might be
announced occasionally.
Page 159 of 360
Buick E2UB-N Owner Manual (GMNA-Localizing-U.S./Canada/Mexico-
14583509) - 2021 - CRC - 1/8/21
158 Infotainment System
Apple CarPlay and Android Auto
If equipped, Android Auto and/or Apple
CarPlay capability may be available through
a compatible smartphone. If available, the
Android Auto and Apple CarPlay icons will
change from gray to color on the Home
Page of the infotainment display.
To use Android Auto and/or Apple CarPlay:
For Wired Phone Projection1. Download the Android Auto app to your smartphone from the Google Play store.
There is no app required for Apple
CarPlay.
2. Connect your Android phone or Apple iPhone by using the factory-provided
phone USB cable and plugging into a
USB data port. For best performance, it is
highly recommended to use the device’s
factory-provided USB cable, which should
be replaced after significant wear to
maintain connection quality. Aftermarket
or third-party cables may not work.
3. When the phone is first connected to activate Apple CarPlay or Android Auto,
accept the terms and conditions on both
the infotainment system and the phone.
4. Follow the instructions on the phone. The Android Auto and Apple CarPlay icons
on the Home Page will illuminate depending
on the smartphone. Android Auto and/or
Apple CarPlay may automatically launch
upon USB connection. If not, touch the
Android Auto or Apple CarPlay icon on the
Home Page to launch.
Press
{on the center stack to return to the
Home Page.
For Wireless Phone Projection
Verify your phone is wireless compatible by
visiting the Google Android Auto or Apple
CarPlay support page.
1. Download the Android Auto app to your smartphone from the Google Play store.
There is no app required for Apple
CarPlay.
2. For first time connection, there are two ways to set up wireless projection:
.Connect your Android phone or Apple
iPhone by using the factory-provided
phone USB cable and plugging into a
USB data port. For best performance,
it is highly recommended to use the
device’s factory-provided USB cable,
which should be replaced after significant wear to maintain
connection quality. Aftermarket or
third-party cables may not work.
.Connecting the phone over Bluetooth.
See
Bluetooth (Pairing and Using a
Phone) 0154 or
Bluetooth (Overview) 0153.
3. Make sure wireless is turned on the phone for wireless projection to work.
4. When the phone is first connected to activate Apple CarPlay or Android Auto,
agree to the terms and conditions on
both the infotainment system and the
phone.
5. Follow the instructions on the phone.
The Android Auto and Apple CarPlay icons
on the Home Page will illuminate depending
on the smartphone. Android Auto and/or
Apple CarPlay may automatically launch
upon wireless connection. If not, touch the
Android Auto or Apple CarPlay icon on the
Home Page to launch.
Wireless Carplay and/or Wireless Android
Auto may experience occasional service
disruption due to outside Wi-Fi interference.
To disconnect the phones wireless
projection: 1. Select Settings from the Home Page.
Page 179 of 360
Buick E2UB-N Owner Manual (GMNA-Localizing-U.S./Canada/Mexico-
14583509) - 2021 - CRC - 1/8/21
178 Climate Controls
Climate Controls
Climate Control Systems
Climate Control Systems . . . . . . . . . . . . . . . 178
Dual Automatic Climate ControlSystem . . . . . . . . . . . . . . . . . . . . . . . . . . . . . . 180
Air Vents
Air Vents . . . . . . . . . . . . . . . . . . . . . . . . . . . . . . 184
Maintenance
Passenger Compartment Air Filter . . . . . 184
Service . . . . . . . . . . . . . . . . . . . . . . . . . . . . . . . . . 185
Climate Control Systems
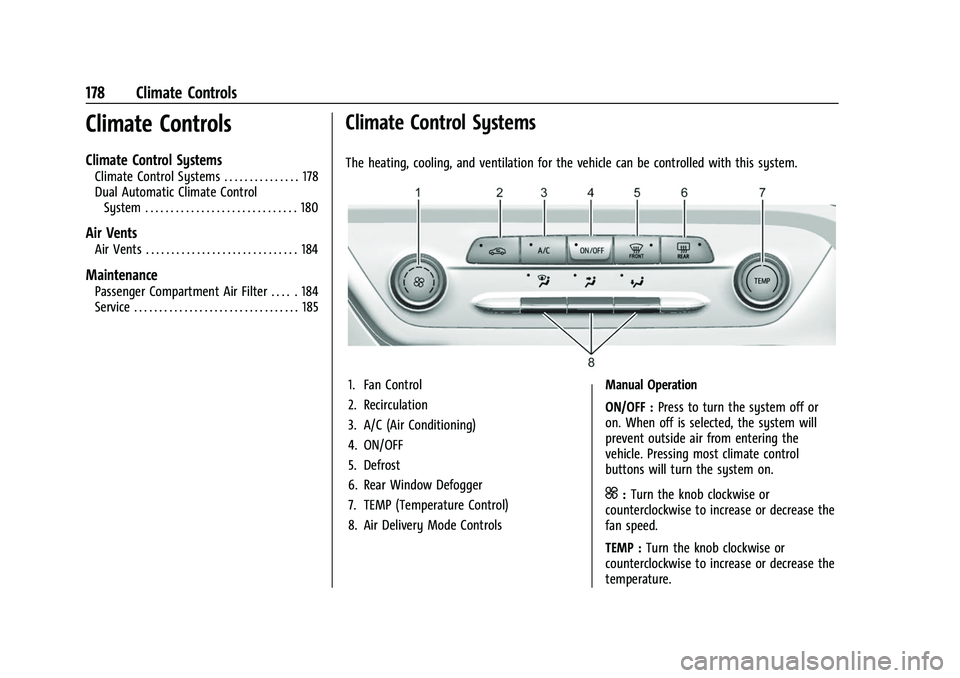
The heating, cooling, and ventilation for the vehicle can be controlled with this system.
1. Fan Control
2. Recirculation
3. A/C (Air Conditioning)
4. ON/OFF
5. Defrost
6. Rear Window Defogger
7. TEMP (Temperature Control)
8. Air Delivery Mode Controls Manual Operation
ON/OFF :
Press to turn the system off or
on. When off is selected, the system will
prevent outside air from entering the
vehicle. Pressing most climate control
buttons will turn the system on.
]: Turn the knob clockwise or
counterclockwise to increase or decrease the
fan speed.
TEMP : Turn the knob clockwise or
counterclockwise to increase or decrease the
temperature.
Page 180 of 360
Buick E2UB-N Owner Manual (GMNA-Localizing-U.S./Canada/Mexico-
14583509) - 2021 - CRC - 1/8/21
Climate Controls 179
Air Delivery Mode Controls :Pressz,Y,
or
[to change the direction of the
airflow. The indicator light in the button will
turn on. Any combination of the three
buttons can be selected. The current mode
appears in the display.
To change the current mode, select one or
more of the following:
z: Clears the windows of fog or moisture.
Air is directed to the windshield.
Y: Air is directed to the instrument panel
outlets.
[: Air is directed to the floor outlets.
0FRONT : Clears the windshield of fog or
frost more quickly. Air is directed to the
windshield.
For best results, clear all snow and ice from
the windshield before defrosting.
A/C : Press to turn the air conditioning
system on or off. If the climate control
system is turned off or the outside
temperature falls below freezing, the air
conditioner will not run.
@: Press to turn on recirculation. An
indicator light comes on. Air is recirculated
to quickly cool the inside of the vehicle or
prevent outside air and odors from entering.
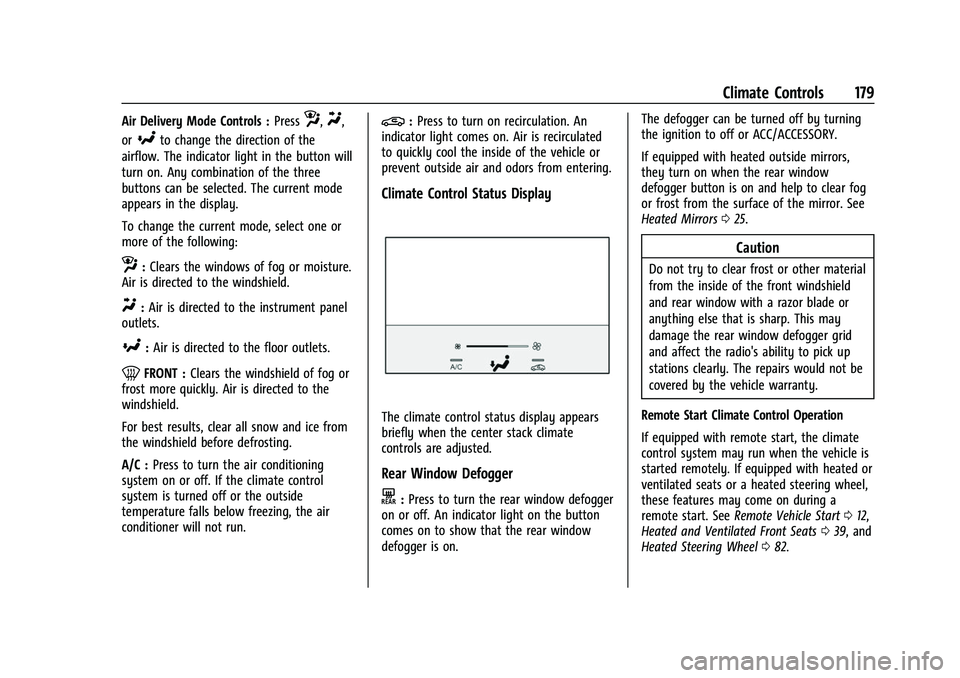
Climate Control Status Display
The climate control status display appears
briefly when the center stack climate
controls are adjusted.
Rear Window Defogger
K: Press to turn the rear window defogger
on or off. An indicator light on the button
comes on to show that the rear window
defogger is on. The defogger can be turned off by turning
the ignition to off or ACC/ACCESSORY.
If equipped with heated outside mirrors,
they turn on when the rear window
defogger button is on and help to clear fog
or frost from the surface of the mirror. See
Heated Mirrors
025.
Caution
Do not try to clear frost or other material
from the inside of the front windshield
and rear window with a razor blade or
anything else that is sharp. This may
damage the rear window defogger grid
and affect the radio's ability to pick up
stations clearly. The repairs would not be
covered by the vehicle warranty.
Remote Start Climate Control Operation
If equipped with remote start, the climate
control system may run when the vehicle is
started remotely. If equipped with heated or
ventilated seats or a heated steering wheel,
these features may come on during a
remote start. See Remote Vehicle Start 012,
Heated and Ventilated Front Seats 039, and
Heated Steering Wheel 082.
Page 181 of 360
Buick E2UB-N Owner Manual (GMNA-Localizing-U.S./Canada/Mexico-
14583509) - 2021 - CRC - 1/8/21
180 Climate Controls
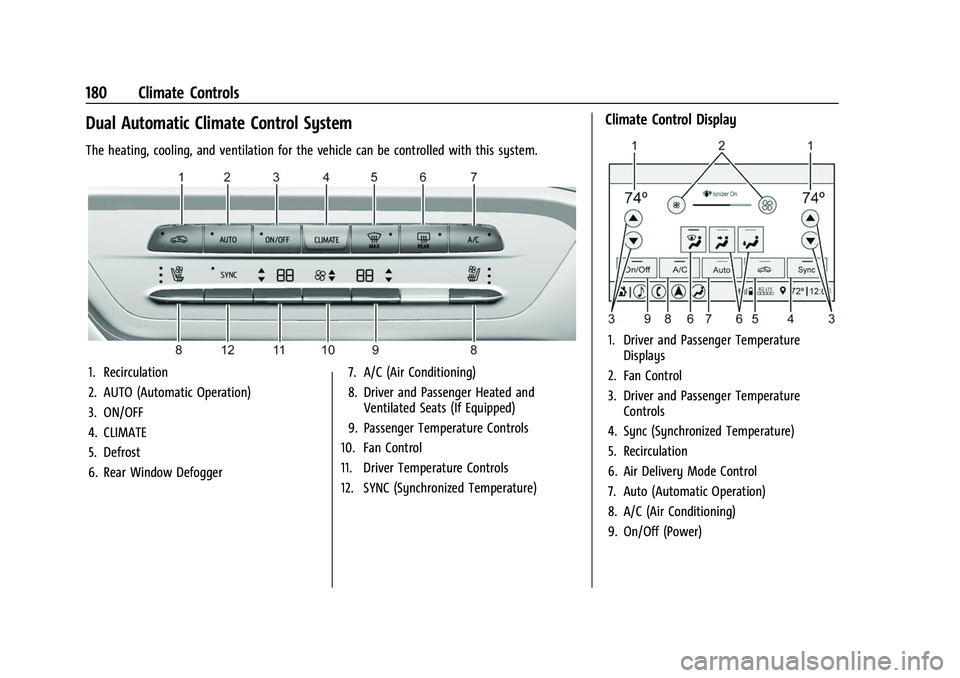
Dual Automatic Climate Control System
The heating, cooling, and ventilation for the vehicle can be controlled with this system.
1. Recirculation
2. AUTO (Automatic Operation)
3. ON/OFF
4. CLIMATE
5. Defrost
6. Rear Window Defogger7. A/C (Air Conditioning)
8. Driver and Passenger Heated and
Ventilated Seats (If Equipped)
9. Passenger Temperature Controls
10. Fan Control
11. Driver Temperature Controls
12. SYNC (Synchronized Temperature)
Climate Control Display
1. Driver and Passenger Temperature Displays
2. Fan Control
3. Driver and Passenger Temperature Controls
4. Sync (Synchronized Temperature)
5. Recirculation
6. Air Delivery Mode Control
7. Auto (Automatic Operation)
8. A/C (Air Conditioning)
9. On/Off (Power)