tow BUICK LACROSSE 2009 Get To Know Guide
[x] Cancel search | Manufacturer: BUICK, Model Year: 2009, Model line: LACROSSE, Model: BUICK LACROSSE 2009Pages: 20, PDF Size: 0.81 MB
Page 6 of 20

Getting to Know Your LaCrosse6
Unlocking the Doors with the Key
Your vehicle’s passenger doors can be
unlocked using the driver’s door key.
With the key in the lock cylinder:
• Turn the key toward the front of the
vehicle to unlock the driver’s door.
• Turn and hold the key toward the
front of the vehicle for two seconds
to unlock all doors.
• Turn and hold the key toward the rear
of the vehicle to lock all doors.
See Section 2 of your Owner Manual.
SAFETY & SECURITY
Automatic Door Locks
Auto Door Lock
The automatic door locks will lock the
vehicle’s doors when all doors are closed
and the vehicle is shifted into Drive.
Auto Door Unlock
Automatic door unlocking options
include off, unlocking the driver’s door
or unlocking all doors. Press the
(Option) button on the DIC until Auto
Door Unlock is displayed; and then
press the (Set/Reset) button to scroll
through Off, Driver and All. If Driver or
All is selected, two additional choices —
Key-Out and Park — will be displayed.
Select one of these choices to deter-
mine when the vehicle’s door(s) will
automatically unlock.
See Section 3 of your Owner Manual.
Exterior Light Delay— Sets the time
for exterior lights to remain on after the
key is removed from the ignition or the
vehicle is unlocked with the Remote
Keyless Entry transmitter. To program:
1. From the Personal Program menu,
press the (Option) button until
EXT LIGHT DELAY is displayed.
2. Press the (Set/Reset) button to
scroll through OFF or 15/30/60/90-
second delays.
3. Press the button to store a setting.
You can also use the (Option) and
(Set/Reset) buttons to personalize
each of the following:
• Return settings to factory default/
reset all keys
• Interior lights on when key is
removed from the ignition
• Content theft-deterrent system on/off
• Remote start on/off
• Personalize/replace key
• Personalize radio stations
• Auto door unlock all/driver’s door/off
• Key fob unlock driver’s door/all doors
on first press
Exiting Programming Mode:The DIC
exits programming mode when:
• The vehicle is shifted out of Park.
• The vehicle is no longer in Run.
• You reach the end of the Personal
Program menu.
See Section 3 of your Owner Manual.
Page 7 of 20

• Roadside Assistance
• Fuel Station Location
• Information & Connections services
• Virtual Advisor, GPS-based Traffic &
Weather
For Turn-by-Turn Navigation, press your
OnStar button. OnStar Advisors can
send a planned route to your vehicle
and, as you approach a turn, instructions
will play over your vehicle speakers.
For Remote Door Unlock or Stolen
Vehicle Location Assistance, call
1-888-4-ONSTAR (1-888-466-7827). For
more information, refer to your OnStar
Owner’s Guide or visit onstar.com.
See Section 2 of your Owner Manual.
7
Tilt/Telescoping Steering Wheel
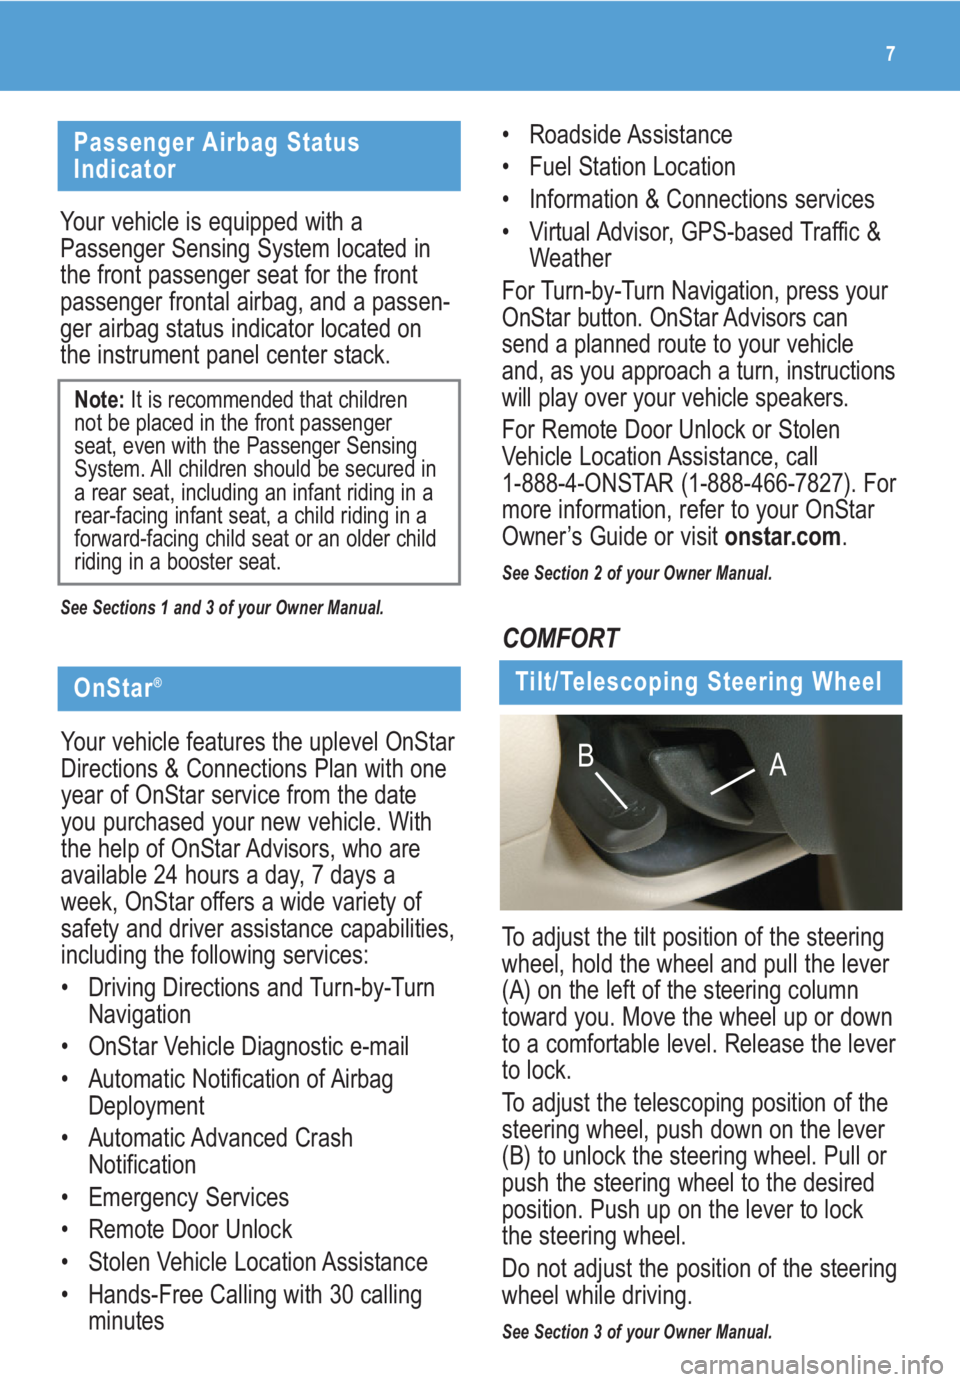
To adjust the tilt position of the steering
wheel, hold the wheel and pull the lever
(A) on the left of the steering column
toward you. Move the wheel up or down
to a comfortable level. Release the lever
to lock.
To adjust the telescoping position of the
steering wheel, push down on the lever
(B) to unlock the steering wheel. Pull or
push the steering wheel to the desired
position. Push up on the lever to lock
the steering wheel.
Do not adjust the position of the steering
wheel while driving.
See Section 3 of your Owner Manual.
A B
Passenger Airbag Status
Indicator
Your vehicle is equipped with a
Passenger Sensing System located in
the front passenger seat for the front
passenger frontal airbag, and a passen-
ger airbag status indicator located on
the instrument panel center stack.
See Sections 1 and 3 of your Owner Manual.
Note:It is recommended that children
not be placed in the front passenger
seat, even with the Passenger Sensing
System. All children should be secured in
a rear seat, including an infant riding in a
rear-facing infant seat, a child riding in a
forward-facing child seat or an older child
riding in a booster seat.
COMFORT
OnStar®
Your vehicle features the uplevel OnStar
Directions & Connections Plan with one
year of OnStar service from the date
you purchased your new vehicle. With
the help of OnStar Advisors, who are
available 24 hours a day, 7 days a
week, OnStar offers a wide variety of
safety and driver assistance capabilities,
including the following services:
• Driving Directions and Turn-by-Turn
Navigation
• OnStar Vehicle Diagnostic e-mail
• Automatic Notification of Airbag
Deployment
• Automatic Advanced Crash
Notification
• Emergency Services
• Remote Door Unlock
• Stolen Vehicle Location Assistance
• Hands-Free Calling with 30 calling
minutes
Page 9 of 20

9
ENTERTAINMENT
Audio Systems
Setting the Time
Press and hold the H button on the
sound system faceplate until the correct
hour appears on the display. Press
and hold M until the correct minute
appears. The ignition does not need to
be turned on.
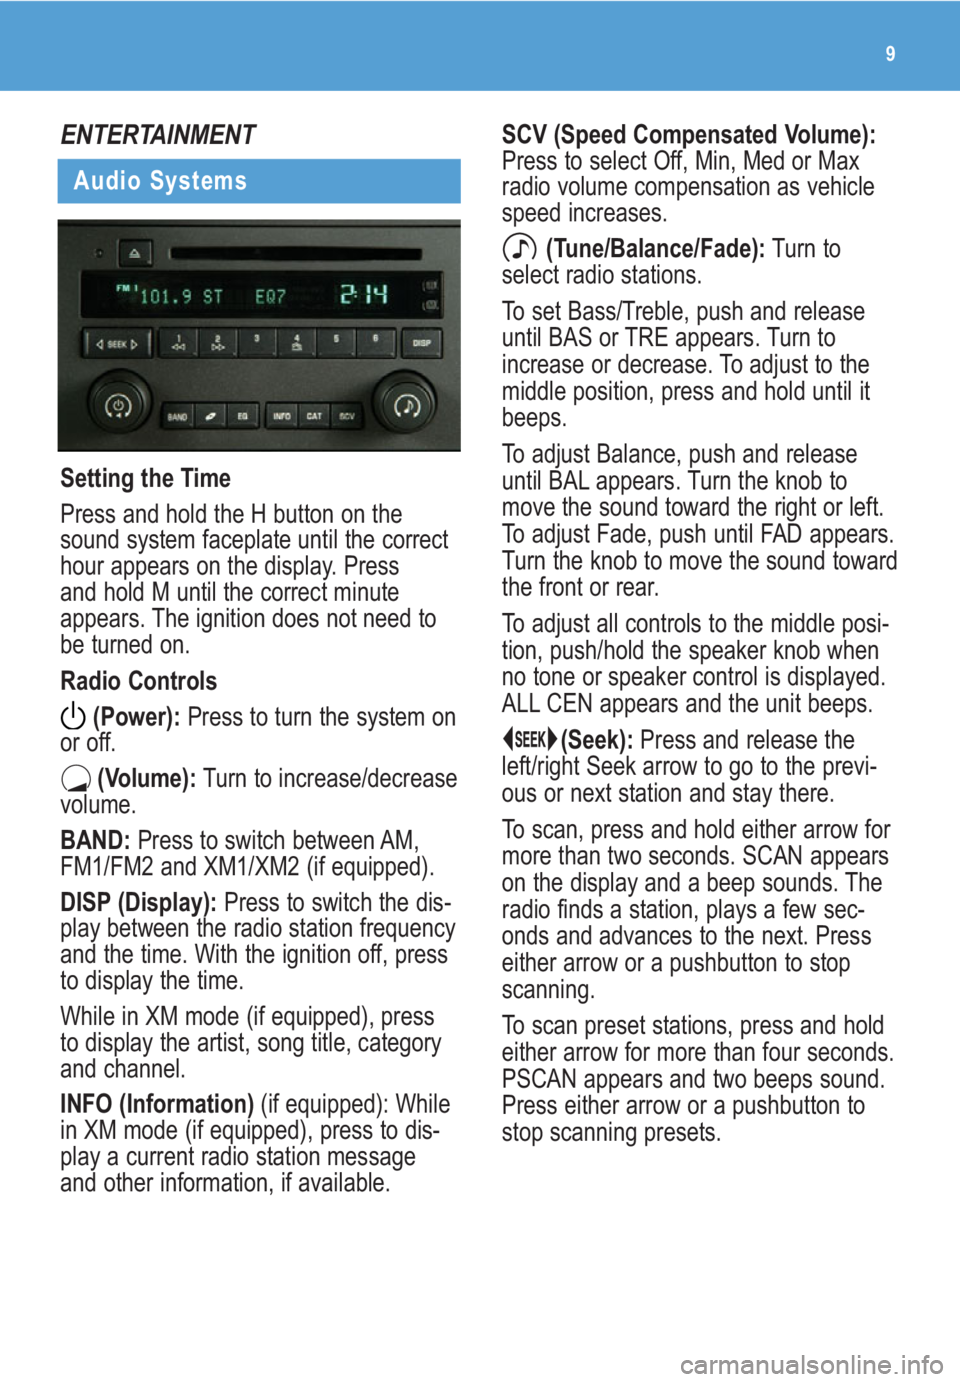
Radio Controls
(Power):Press to turn the system on
or off.
(Volume):Turn to increase/decrease
volume.
BAND:Press to switch between AM,
FM1/FM2 and XM1/XM2 (if equipped).
DISP (Display): Press to switch the dis-
play between the radio station frequency
and the time. With the ignition off, press
to display the time.
While in XM mode (if equipped), press
to display the artist, song title, category
and channel.
INFO (Information) (if equipped): While
in XM mode (if equipped), press to dis-
play a current radio station message
and other information, if available.
SCV (Speed Compensated Volume):
Press to select Off, Min, Med or Max
radio volume compensation as vehicle
speed increases.
(Tune/Balance/Fade):Turn to
select radio stations.
To set Bass/Treble, push and release
until BAS or TRE appears. Turn to
increase or decrease. To adjust to the
middle position, press and hold until it
beeps.
To adjust Balance, push and release
until BAL appears. Turn the knob to
move the sound toward the right or left.
To adjust Fade, push until FAD appears.
Turn the knob to move the sound toward
the front or rear.
To adjust all controls to the middle posi-
tion, push/hold the speaker knob when
no tone or speaker control is displayed.
ALL CEN appears and the unit beeps.
(Seek):Press and release the
left/right Seek arrow to go to the previ-
ous or next station and stay there.
To scan, press and hold either arrow for
more than two seconds. SCAN appears
on the display and a beep sounds. The
radio finds a station, plays a few sec-
onds and advances to the next. Press
either arrow or a pushbutton to stop
scanning.
To scan preset stations, press and hold
either arrow for more than four seconds.
PSCAN appears and two beeps sound.
Press either arrow or a pushbutton to
stop scanning presets.
Page 20 of 20

Getting to Know Your LaCrosse20
25783629 A
Roadside Assistance
My GMLink
1-800-252-1112
TTY Users: 1-888-889-2438
As the proud owner of a new Buick vehi-
cle, you are automatically enrolled in the
Buick Roadside Assistance program.
This value-added service is intended to
provide you with peace of mind as you
drive in the city or travel the open road.
Buick’s Roadside Assistance toll-free
number is staffed by a team of techni-
cally trained advisors who are available
24 hours a day, 365 days a year. The
advisors can provide minor repair infor-
mation or make arrangements to tow
your vehicle to the nearest Buick dealer.
Buick will provide the following services
for 5 years/100,000 miles at no expense
to you:
• Fuel delivery
• Lockout service (identification
required)
• Tow to nearest dealership for
warranty service
• Flat tire assistance
• Jump starts
In many instances, mechanical failures
are covered under Buick’s comprehen-
sive warranty. However, when other
services are utilized, our advisors will
explain any payment obligations you
might incur.
The Buick Owner Center at My GMLink
is a complimentary service for Buick
owners, a one-stop resource to enhance
your Buick ownership experience.
Exclusive member benefits include
online service reminders, vehicle
maintenance tips, online owner manual,
special privileges and more. Sign up
today at www.mygmlink.com. For prompt and efficient assistance
when calling, please provide the follow-
ing information to the advisor:
• Location of the vehicle
• Telephone number and your location
• Vehicle model, year and color
• Vehicle mileage
• Vehicle Identification Number (VIN)
• Vehicle license plate number
Buick reserves the right to limit services
or reimbursement to an owner or driver
when, in Buick’s judgment, the claims
become excessive in frequency or type
of occurrence.
Roadside Assistance and OnStar
(if equipped)
If you have a current OnStar subscription,
press the OnStar button and the vehicle
will send your current GPS location to an
OnStar Advisor who will speak to you,
assess your problem, contact Roadside
Assistance and relay your exact location
so you will get the help you need.
!25783629=A!
OWNER INFORMATION
Certain restrictions, precautions and safety procedures apply to your vehicle. Please read your Owner
Manual for complete instructions. All information contained herein is based on information available at the
time of printing and is subject to change without notice. Copyright 2008 by GM Corp. All rights reserved.