stop start BUICK LACROSSE 2010 User Guide
[x] Cancel search | Manufacturer: BUICK, Model Year: 2010, Model line: LACROSSE, Model: BUICK LACROSSE 2010Pages: 414
Page 134 of 414
4-46 Instruments and Controls
Do not use the Universal Home
Remote with any garage door
opener that does not have the stop
and reverse feature. This includes
any garage door opener model
manufactured before April 1, 1982.
Read the instructions completely
before attempting to program the
Universal Home Remote. Because
of the steps involved, it may be
helpful to have another person
available to assist you with
programming the Universal Home
Remote.
Keep the original hand-held
transmitter for use in other vehicles
as well as for future Universal Home
Remote programming. It is also
recommended that upon the sale of
the vehicle, the programmed
Universal Home Remote buttons
should be erased for security
purposes. See“Erasing Universal
Home Remote Buttons” later in this
section. When programming a garage door,
park outside of the garage. Park
directly in line with and facing the
garage door opener motor-head or
gate motor-head. Be sure that
people and objects are clear of the
garage door or gate that is being
programmed.
It is recommended that a new
battery be installed in your
hand-held transmitter for quicker
and more accurate transmission of
the radio-frequency signal.
Programming the Universal
Home Remote System
For questions or help programming
the Universal Home Remote
System, call 1-800-355-3515 or go
to www.homelink.com.
Programming a garage door opener
involves time-sensitive actions, so
read the entire procedure before
starting. Otherwise, the device will
time out and the procedure will have
to be repeated.To program up to three devices:
1. Hold the end of your hand-held
transmitter about 3 to 8 cm
(1 to 3 inches) away from the
Universal Home Remote buttons
while keeping the indicator light
in view. The hand-held
transmitter was supplied by the
manufacturer of your garage
door opener receiver
(motor-head unit).
2. At the same time, press and hold both the hand-held
transmitter button and one of the
three Universal Home Remote
buttons to be used to operate
the garage door. Do not release
the Universal Home Remote
button or the hand-held
transmitter button until the
indicator light changes from a
slow to a rapidly flashing light.
You now may release both
buttons.
Page 172 of 414
6-26 Infotainment System
starts and disappears when the
process has ended. Copy protected
CDs cannot be recorded to MEM.
Recording to MEM
Press
OREC, then select Record
Current Song or Record All Songs
on Disc. If the track has started
playing, the system will restart the
track and begin recording from the
beginning of the track. When the
song recording is completed, the
message Song Recorded to MEM
displays, and there may be a slight
pause.
Songs recorded to MEM are stored
as the current date, disc and track
number.
Re-recording a Previously
Recorded Disc
If the disc or track has already been
recorded to MEM, the message The
Song(s) is Already Recorded
displays. Stopping the Recording
Press the
OREC button while
recording from an audio CD to
display the stop recording option.
Select Stop Recording Song
to MEM.
Renaming Recorded Discs
Discs that have been recorded to
MEM can be renamed.
1. Turn the menu knob.
2. Select Rename Recorded Discs.
3. Select the disc.
4. Select Album or Artist to rename either one.
5. Use the menu knob to enter the character sequence. See
Operation
on page 6‑7for
more information.
Recording From MP3/WMA
Discs or USB Storage Devices
USB Host Support
The USB connector uses the USB
standards, 1.1 and 2.0. USB Supported Devices
.USB Flash Drives
.Portable USB Hard Drives
Recording to MEM
Press
OREC, then select Record
Current Song or Record Current
Folder.
The information stored by MEM is
titled according to the ID3 tag
associated with it.
Re-recording a Previously
Recorded Disc
If the disc or track has already been
recorded to MEM, the message The
Song(s) is Already Recorded
displays.
Stopping the Recording
Press the
OREC button while
recording from an MP3/WMA CD or
USB storage device to display the
stop recording option. Select Stop
Recording Song to MEM.
Page 184 of 414
6-38 Infotainment System
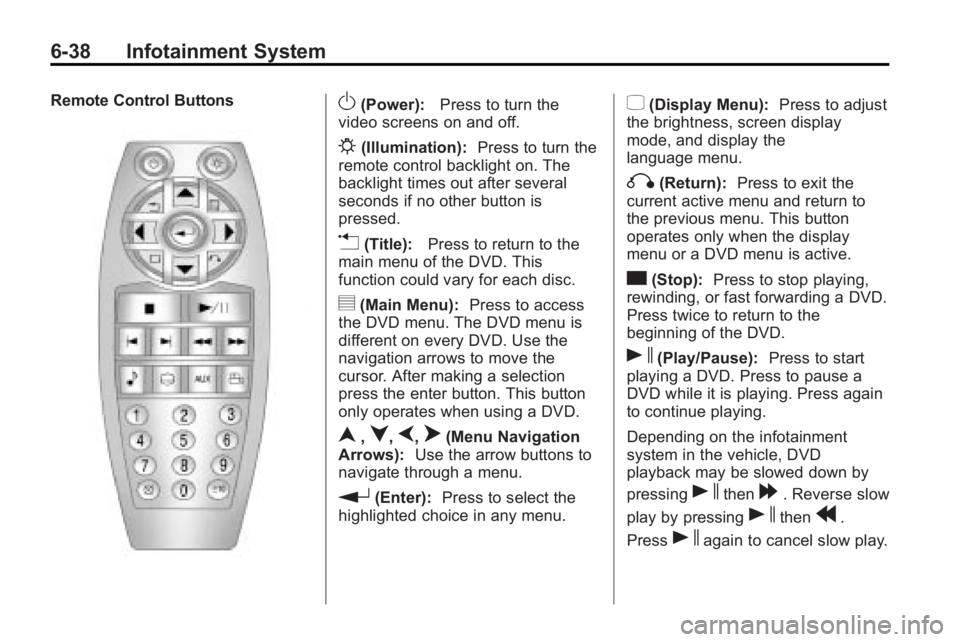
Remote Control ButtonsO(Power):Press to turn the
video screens on and off.
P(Illumination): Press to turn the
remote control backlight on. The
backlight times out after several
seconds if no other button is
pressed.
v(Title): Press to return to the
main menu of the DVD. This
function could vary for each disc.
y(Main Menu): Press to access
the DVD menu. The DVD menu is
different on every DVD. Use the
navigation arrows to move the
cursor. After making a selection
press the enter button. This button
only operates when using a DVD.
n,q,p,o(Menu Navigation
Arrows): Use the arrow buttons to
navigate through a menu.
r(Enter): Press to select the
highlighted choice in any menu.
z(Display Menu): Press to adjust
the brightness, screen display
mode, and display the
language menu.
q(Return): Press to exit the
current active menu and return to
the previous menu. This button
operates only when the display
menu or a DVD menu is active.
c(Stop): Press to stop playing,
rewinding, or fast forwarding a DVD.
Press twice to return to the
beginning of the DVD.
s(Play/Pause): Press to start
playing a DVD. Press to pause a
DVD while it is playing. Press again
to continue playing.
Depending on the infotainment
system in the vehicle, DVD
playback may be slowed down by
pressing
sthen[. Reverse slow
play by pressing
sthenr.
Press
sagain to cancel slow play.
Page 185 of 414
Infotainment System 6-39
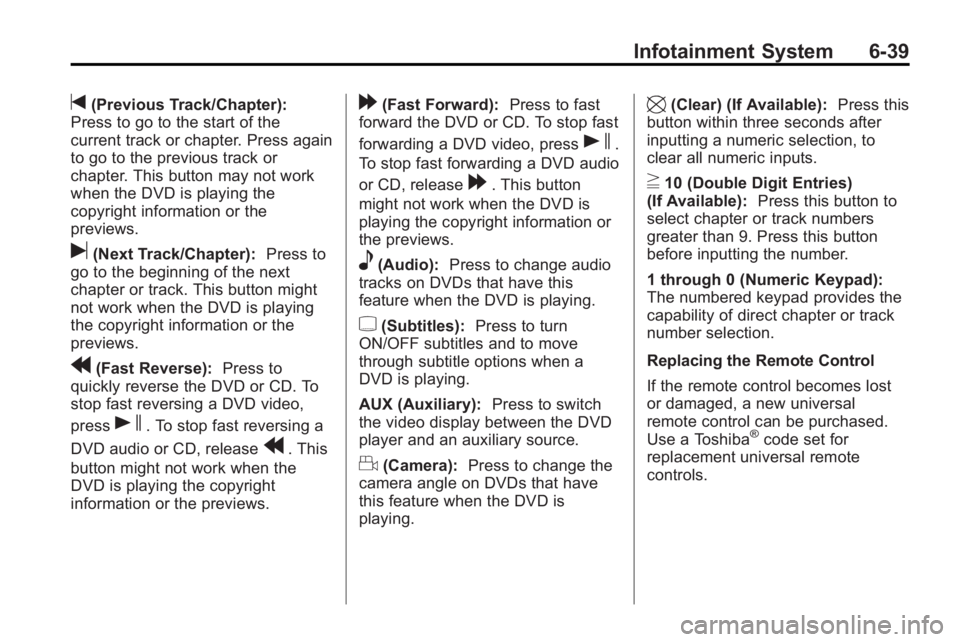
t(Previous Track/Chapter):
Press to go to the start of the
current track or chapter. Press again
to go to the previous track or
chapter. This button may not work
when the DVD is playing the
copyright information or the
previews.
u(Next Track/Chapter): Press to
go to the beginning of the next
chapter or track. This button might
not work when the DVD is playing
the copyright information or the
previews.
r(Fast Reverse): Press to
quickly reverse the DVD or CD. To
stop fast reversing a DVD video,
press
s. To stop fast reversing a
DVD audio or CD, release
r. This
button might not work when the
DVD is playing the copyright
information or the previews.
[(Fast Forward): Press to fast
forward the DVD or CD. To stop fast
forwarding a DVD video, press
s.
To stop fast forwarding a DVD audio
or CD, release
[. This button
might not work when the DVD is
playing the copyright information or
the previews.
e(Audio): Press to change audio
tracks on DVDs that have this
feature when the DVD is playing.
{(Subtitles): Press to turn
ON/OFF subtitles and to move
through subtitle options when a
DVD is playing.
AUX (Auxiliary): Press to switch
the video display between the DVD
player and an auxiliary source.
d(Camera): Press to change the
camera angle on DVDs that have
this feature when the DVD is
playing.
\(Clear) (If Available): Press this
button within three seconds after
inputting a numeric selection, to
clear all numeric inputs.
}10 (Double Digit Entries)
(If Available): Press this button to
select chapter or track numbers
greater than 9. Press this button
before inputting the number.
1 through 0 (Numeric Keypad):
The numbered keypad provides the
capability of direct chapter or track
number selection.
Replacing the Remote Control
If the remote control becomes lost
or damaged, a new universal
remote control can be purchased.
Use a Toshiba
®code set for
replacement universal remote
controls.
Page 186 of 414
6-40 Infotainment System
Battery Replacement
To change the remote control
batteries:
1. Slide back the rear cover on theremote control.
2. Replace the two batteries in the compartment.
3. Replace the battery cover.
Remove the batteries from the
remote control if unused for an
extended period of time.Tips and Troubleshooting Chart
Problem Recommended Action
No power. The ignition might not be turned to
ON/RUN or in ACC/ACCESSORY.
The picture does not fill the screen.
There are black borders on the top
and bottom or on both sides or it
looks stretched out. Check the display mode settings in
the setup menu by pressing the
display menu button on the remote
control.
In auxiliary mode, the picture moves
or scrolls. Check the auxiliary input
connections at both devices.
The remote control does not work. Check to make sure there is no obstruction between the remote
control and the transmitter window.
Check the batteries to make sure
they are not dead or installed
incorrectly.
After stopping the player, I push
Play but sometimes the DVD starts
where I left off and sometimes at the
beginning. If the stop button was pressed one
time, the DVD player resumes
playing where the DVD was
stopped. If the stop button was
pressed two times the DVD player
begins to play from the beginning of
the DVD.
Page 224 of 414
8-2 Driving and Operating
Towing
General TowingInformation . . . . . . . . . . . . . . . . . 8-54
Driving Characteristics and Towing Tips . . . . . . . . . . . . . . . . 8-54
Trailer Towing (2.4L L4
Engine) . . . . . . . . . . . . . . . . . . . . . 8-58
Trailer Towing (3.0L and 3.6L V6 Engines) . . . . . . . . . . . . . . . . 8-58
Towing Equipment . . . . . . . . . . . 8-59
Conversions and Add-Ons
Add-On Electrical Equipment . . . . . . . . . . . . . . . . . 8-60
Driving Information
Driving for Better Fuel
Economy
Driving habits can affect fuel
mileage. Here are some driving tips
to get the best fuel economy
possible.
.Avoid fast starts and accelerate
smoothly.
.Brake gradually and avoid
abrupt stops.
.Avoid idling the engine for long
periods of time.
.When road and weather
conditions are appropriate, use
cruise control, if equipped.
.Always follow posted speed
limits or drive more slowly when
conditions require.
.Keep vehicle tires properly
inflated.
.Combine several trips into a
single trip.
.Replace the vehicle's tires with
the same TPC Spec number
molded into the tire's sidewall
near the size.
.Follow recommended scheduled
maintenance.
Page 229 of 414
Driving and Operating 8-7
tire contacts the pavement edge.
Then turn the steering wheel to go
straight down the roadway.
Loss of Control
Let us review what driving experts
say about what happens when the
three control systems—brakes,
steering, and acceleration —do not
have enough friction where the tires
meet the road to do what the driver
has asked.
In any emergency, do not give up.
Keep trying to steer and constantly
seek an escape route or area of
less danger.
Skidding
In a skid, a driver can lose control of
the vehicle. Defensive drivers avoid
most skids by taking reasonable
care suited to existing conditions,
and by not overdriving those
conditions. But skids are always
possible. The three types of skids correspond
to the vehicle's three control
systems. In the braking skid, the
wheels are not rolling. In the
steering or cornering skid, too much
speed or steering in a curve causes
tires to slip and lose cornering force.
And in the acceleration skid, too
much throttle causes the driving
wheels to spin.
If the vehicle starts to slide, ease
your foot off the accelerator pedal
and quickly steer the way you want
the vehicle to go. If you start
steering quickly enough, the vehicle
may straighten out. Always be ready
for a second skid if it occurs.
Of course, traction is reduced when
water, snow, ice, gravel, or other
material is on the road. For safety,
slow down and adjust your driving to
these conditions. It is important to
slow down on slippery surfaces
because stopping distance is longer
and vehicle control more limited.
While driving on a surface with
reduced traction, try your best to
avoid sudden steering, acceleration,
or braking, including reducing
vehicle speed by shifting to a lower
gear. Any sudden changes could
cause the tires to slide. You might
not realize the surface is slippery
until the vehicle is skidding. Learn to
recognize warning clues
—such as
enough water, ice, or packed snow
on the road to make a mirrored
surface —and slow down when you
have any doubt.
Remember: Any Antilock Brake
System (ABS) helps avoid only the
braking skid.
Page 239 of 414
Driving and Operating 8-17
WARNING (Continued)
.Never stack heavier
things, like suitcases,
inside the vehicle so that
some of them are above
the tops of the seats.
.Do not leave an
unsecured child restraint
in the vehicle.
.When you carry something
inside the vehicle, secure
it whenever you can.
.Do not leave a seat folded
down unless you need to.
Starting and
Operating
New Vehicle Break-In
Notice:The vehicle does not
need an elaborate break-in. But it
will perform better in the long run
if you follow these guidelines:
.Do not drive at any one
constant speed, fast or slow,
for the first 805 km
(500 miles). Do not make
full-throttle starts. Avoid
downshifting to brake or
slow the vehicle.
.During the first 1 000 km
(600 miles), avoid using more
than moderate acceleration
in lower gears and avoid
vehicle speeds above
110 km/h (68 mph).
.Between the first 1 000 km
(600 miles) and 5 000 km
(3,000 miles), heavy
acceleration in lower gears can be used. Vehicle speeds
above 110 km/h (68 mph)
should be limited to
five minutes per use.
.Avoid making hard stops for
the first 322 km (200 miles) or
so. During this time the new
brake linings are not yet
broken in. Hard stops with
new linings can mean
premature wear and earlier
replacement. Follow this
breaking-in guideline every
time you get new brake
linings.
.Do not tow a trailer during
break-in. See
Driving
Characteristics and Towing
Tips
on page 8‑54for the
trailer towing capabilities of
your vehicle and more
information.
Following break-in, engine speed
and load can be gradually
increased.
Page 242 of 414
8-20 Driving and Operating
To place the ignition in ON/RUN/
START from OFF without starting
the engine, press the button two
times without your foot on the brake
pedal.
The battery could be drained if you
leave the ignition in the ON/RUN/
START position with the engine off.
You may not be able to start the
vehicle if the battery is allowed to
drain for an extended period of time.
Retained Accessory
Power (RAP)
These vehicle accessories can be
used for up to 10 minutes after the
engine is turned off:
.Audio System
.Power Windows
.Sunroof (if equipped)
.Auxiliary Power OutletPower to the audio system will
continue to operate for up to
10 minutes or until the driver door is
opened.
Power to the power windows and
sunroof will continue to operate for
up to 10 minutes or until any door is
opened.
All these features will work when the
key is in ON/RUN or ACC/
ACCESSORY.
Starting the Engine
Move the shift lever to P (Park) or
N (Neutral). The engine will not start
in any other position. To restart the
engine when the vehicle is already
moving, use N (Neutral) only.
Notice:
Do not try to shift to
P (Park) if the vehicle is moving.
If you do, you could damage the
transmission. Shift to P (Park)
only when the vehicle is stopped. Notice:
The engine is designed to
work with the electronics in the
vehicle. If you add electrical parts
or accessories, you could change
the way the engine operates.
Before adding electrical
equipment, check with your
dealer/retailer. If you do not, the
engine might not perform
properly. Any resulting damage
would not be covered by the
vehicle warranty.
Starting Procedure (Key Access)
1. With your foot off the accelerator
pedal, turn the ignition key to
START. When the engine starts,
let go of the ignition.
The idle speed will go down as
your engine gets warm. Do not
race the engine immediately
after starting it. Operate the
engine and transmission gently
to allow the oil to warm up and
lubricate all moving parts.
Page 243 of 414
Driving and Operating 8-21
The vehicle has a
Computer-Controlled Cranking
System. This feature assists in
starting the engine and protects
components. If the ignition key is
turned to the START position,
and then released when the
engine begins cranking, the
engine will continue cranking for
a few seconds or until the
vehicle starts. If the engine does
not start and the key is held in
START for many seconds,
cranking will be stopped after
15 seconds to prevent cranking
motor damage. To prevent gear
damage, this system also
prevents cranking if the engine
is already running. Engine
cranking can be stopped by
turning the ignition switch to
ACC/ACCESSORY or
LOCK/OFF.
Notice: Cranking the engine for
long periods of time, by returning
the key to the START position
immediately after cranking has
ended, can overheat and damage the cranking motor, and drain the
battery. Wait at least 15 seconds
between each try, to let the
cranking motor cool down.
2. If the engine does not start after
5-10 seconds, especially in very
cold weather (below −18°C or
0°F), it could be flooded with too
much gasoline. Try pushing the
accelerator pedal all the way to
the floor and holding it there as
you hold the key in START,
or press the START button, for
up to a maximum of 15 seconds.
Wait at least 15 seconds
between each try, to allow the
cranking motor to cool down.
When the engine starts, let go of
the key or button, and the
accelerator. If the vehicle starts
briefly but then stops again, do
the same thing. This clears the
extra gasoline from the engine.
Do not race the engine
immediately after starting it.
Operate the engine and transmission gently until the oil
warms up and lubricates all
moving parts.
Starting Procedure (Keyless
Access)
1. If the vehicle has the keyless access system, the transmitter
must be in the vehicle. Put your
foot on the brake pedal and
push the START button. When
the engine begins cranking, let
go of the button.
The idle speed will go down as
your engine gets warm. Do not
race the engine immediately
after starting it. Operate the
engine and transmission gently
to allow the oil to warm up and
lubricate all moving parts.
If the transmitter is not in the
vehicle or something is
interfering with the transmitter,
the Driver Information Center
(DIC) will display NO REMOTE
DETECTED. See Driver
Information Center (DIC)
on
page 4‑25for more information.